
Preparation
One of the more common means of starting a new beehive is by ordering live honey bees from a commercial vendor. Such ‘packaged’ bees typically contain about 12,000 live adult workers (approximately 3 pounds), one newly mated queen bee, and an inverted can of sugar water, all contained in a wooden box with screened sides (Figure 1).
When installing a package of bees, you should wear a veil and take appropriate precautions to prevent bees from crawling up you pant legs. You also will need a hive tool, a smoker, a spray bottle filled with sugar syrup, and one or more gallons of sugar syrup to feed the new colony. To make the syrup, mix warm water with granulated sugar in a 1:1 ratio and mix thoroughly until all of the sugar is dissolved.
NOTE: When shipping, storing, receiving, or installing a package of honey bees, it is critical to ensure temperature control. Overheating bees (> 100°F) will kill all workers and the queen. Allowing the bees to chill (< 55°F) will not kill the bees but kill the stored sperm in the queen, resulting in her premature failure. Thus always keep the bees in a warm, secured place and only install into a hive if temperatures are above 65°F. (18C)
Step 1
Pick up your bees from the local bee supply store or other place of delivery. Carefully look over the package for any cracks or tears in the screen and inspect the bees to make sure they are alive and in good health (it is normal to have about one inch of dead bees in the bottom of the box). If there is an excessive amount of dead bees, it may be an indication that they have been overheated during shipping, in which case you should contact your package provider. Spray the bees with sugar syrup; be generous, but be sure not to drown the bees!
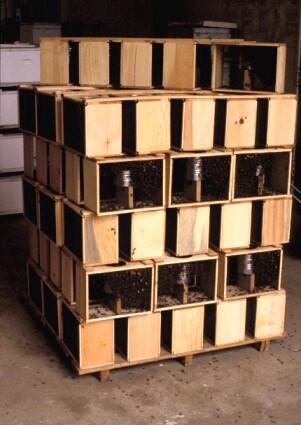
Figure 1. A pallet of packaged honey bees.
Step 2
Place the package in a cool, dark place to allow the bees to ‘rest’ for several hours before installing them into a hive. Make sure the bees are not exposed to excessive heat or cold, loud noise, or unusual vibrations. Periodically spray the bees with sugar syrup (1 part sugar, 1 part water) until you are ready to install the bees into a hive. This is a good time to make sure your hive equipment is ready.
Step 3
When your equipment is set up and you are ready to install the bees into the hive, feed the bees again with sugar syrup and carry the package (by holding the wooden sides) into the apiary. Be sure to keep your hands away from the screened sides of the package to avoid getting stung through the screen. Place the package on the ground in a shaded area.
Step 4
Remove three or four frames from the center of the brood chamber to create a space in the hive for the bees (Figure 2).

Figure 2. Prepare a space in the hive in which to shake the bees.
Step 5
Spray the bees again with sugar syrup.
Step 6
With the hive tool, remove the wooden panel from the first package of bees (Figure 3a). Gently remove the tin feeder and queen cage from the hole in the top of the box (Figure 3b). Shake bees from the outside of the queen cage and inspect the queen to ensure that she is still alive and healthy. Place the queen cage in the shade (Figure 3c). Replace the wooden panel over the hole to prevent bees from escaping (Figure 3d).
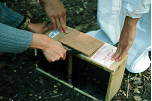
Figure 3a. Remove the package lid.
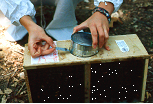
Figure 3b. Remove the feeder and queen cage.
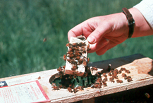
Figure 3c. Check that the queen is alive in her cage.
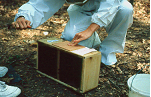
Figure 3d. Quickly replace the package lid.
Step 7
Immediately before installing the bees into the hive, firmly knock the package on the ground once to make the bees drop to the bottom of the box. Be sure to hold the wooden lid in place while doing this.
Step 8
Next, remove the wood panel and quickly invert the package over the hive body. Firmly and vigorously shake the bees into the space in the hive (Figure 4). It might be necessary to shake the package several times. Don’t worry if there are a large number of bees flying around; they are largely “confused” and therefore not defensive, and they will eventually settle down and enter the hive.
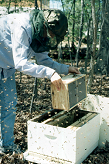
Figure 4. Shake the bees into the hive.
Step 9
Prop the package in front of the entrance of the hive so that any remaining bees in the package can crawl into the hive (Figure 5).
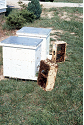
Figure 5. Let the remaining bees enter the hive.
Step 10
Gently return the frames to the hive after the workers have dispersed on the bottom board (Figure 6), being sure not to crush any bees.
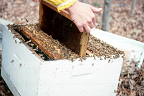
Figure 6. Replace the frames.
Installing the Queen
- Remove the cork from the end of the queen cage with the white sugar candy (Figure 7). The bees will eat the candy and eventually release the queen within one or two days. This time-release method allows the bees to become accustomed to the queen, minimizing the chance that the bees will reject the queen. Do not remove the cork on the end without the candy!
- Place the queen cage candy side up between two center frames of the hive (Figure 8). Make sure the cage is secure between the frames so that it does not fall to the bottom of the hive. The screen should be accessible by the workers.
- Feed the new colony with sugar syrup. It is critical that the bees have an ample supply of food at all times, particularly before there is a sufficient supply of honey stored in the colony. Replace the inner cover and lid.
- Inspect the colony 5 days after installing the package to ensure that the queen is alive and has been released. Inspect the colony again after another 5 days to verify that the queen has begun laying eggs. Eggs appear as small grains of rice standing up in the center of cells (Figure 9). If necessary, add sugar syrup again at this time.
Troubleshooting
Sometimes, problems may arise while starting a new hive from packaged bees. Here are some common issues, and some potential solutions.
- “My queen was not accepted by the workers!”
Occasionally, the workers will not accept the queen either before or after she is released from her cage. You will know this has occurred if the queen is dead in the cage or missing from the hive. If this is the case, you may either:- Insert a replacement queen from a commercial vendor, or
- Unite the hive to an existing colony by:
- Placing a single sheet of newspaper on the top of the established hive, making sure that it is completely covered;
- Poking numerous small holes into the newspaper with your hive tool;
- Placing the hive body of the queenless colony on top of the hive body with the newspaper;
- The bees will chew through the paper and unite with the queenlesss colony.
- “The bees are not building enough wax comb!”
Feed!!! Feed!!! Feed!!! Bees will build the wax comb in response to a need for it. Thus they require ample sugar syrup to secrete enough wax. Even when they are well fed, they may still take several weeks to furnish ten frames with wax comb. - “The queen is present, but she is only producing drone brood!”
On occasion, a queen is not properly mated, has depleted her sperm stores, or was chilled prior to installation (see Section 1). Thus, she is only able to lay unfertilized eggs, which will develop into drones. As drones do no work in a hive, a colony consisting of only drones will quickly die out. You can identify a drone-laying, or ‘failing,’ queen by the presence of a majority of drone brood throughout the colony. Drone brood is larger than normal worker brood and protrudes from the surface of the comb. If you find the queen to be a drone layer, the only solution is to replace the queen by one of the two methods described above.
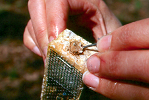
Figure 7. Gently remove the cork on the CANDY end of the queen cage.
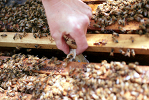
Figure 8. Secure the queen cage, candy-end up, in between the center frames.
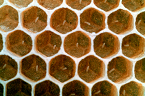
Figure 9. Newly laid eggs in the brood comb.
Contact Information
North Carolina Department of Agriculture & Consumer Services, Apiary Services
North Carolina State University Apiculture Program
For more information on beekeeping, visit the Beekeeping Notes website.
|
David R. Tarpy |
Jennifer J. Keller |
Publication date: Jan. 19, 2021
Reviewed/Revised: Nov. 14, 2024
N.C. Cooperative Extension prohibits discrimination and harassment regardless of age, color, disability, family and marital status, gender identity, national origin, political beliefs, race, religion, sex (including pregnancy), sexual orientation and veteran status.