
Introduction
During periods of dry weather, turfgrasses require supplemental water through irrigation to maintain appearance and function. When irrigating turfgrass, it is important to deliver only the amount of water needed to replace what is used by the turf. This practice promotes efficient use of water resources as well as an ideal environment for turfgrass growth. To ensure efficient irrigation, one must know the amount of water an irrigation system is applying during each cycle. Completing an audit of an irrigation system provides the information needed to set irrigation controllers to deliver the proper amount of water.
Site Inspection
Before any irrigation audit, inspect the irrigation system to ensure that everything is operating properly. Parts will begin to degrade and, if not regularly inspected, can lead to over-watering or under-watering, thus compromising application efficiency and uniformity. Oftentimes, faulty equipment associated with an irrigation system will be noticed very easily. Besides checking for broken or nonfunctioning components, it is very important to check the alignment of the irrigation heads. Heads that are out of alignment produce spray patterns that fall short of their design and misdirect water to nontargeted areas, again resulting in decreased water efficiency. The following are some common problems that affect sprinkler head performance:
- failure of head to extend above the turfgrass canopy
- worn or clogged nozzle
- incorrectly sized nozzle
- leaks within the system
- incorrect spray or rotor arc
- incorrect pressure
- mismatched sprinkler heads or types
Once you identify problems, make the necessary repairs to regain correct operation. If you lack training in irrigation maintenance, make sure that you contact someone who is a licensed irrigation contractor, certified irrigation technician, or has the proper experience in maintaining irrigation systems. The North Carolina Irrigation Contractors licensing board maintains a list of licensed irrigation contractors. Taking the time to inspect your irrigation system will result in improved efficiency, which will produce both cost savings and environmental benefits.
Catch-Can Field Method
The use of catch containers or cans has long been the standard method to determine the two primary irrigation system performance measures: precipitation rate and distribution uniformity. Catch cans are used to collect water in an area of interest (that is, individual irrigation zones) over a set time. In the absence of an automatic buried irrigation system, catch cans may also be used for movable sprinklers. When using movable sprinklers, be sure to place the sprinkler in the area that you intend to water to ensure accuracy. Catch containers are placed in a grid-like pattern across the area of interest (Figure 1). Commercially available catch cans are designed to be used for irrigation audits. So long as catch containers are uniform in shape and size, any container will work. Larger catch cans are typically considered to be better than smaller ones when measuring collected volume as large containers provide more reliable results. Much of the following guidance and form content have been adapted from the “Irrigation Audit Guidelines” developed by the Irrigation Association (2010).
Supplies Needed
- Catch cans
- Stopwatch
- Ruler (if measuring depth versus volume)
- Graduated cylinder (at least a 50 milliliter plastic cylinder is suggested)
- Tape measure
- Paper to record results (see attached worksheets)
Before performing an audit, consider wind speed. Do not perform an audit on a windy day. Wind speed should be 5 miles per hour or less during the irrigation audit.
Step 1. Position Catch Containers
Catch containers should be set up at a height that will not interfere with the arc of the irrigation water. For turf along a boundary such as a sidewalk, street, driveway or shrub area, catch cans should be placed 12 to 24 inches in from the boundary edge. Catch cans should be placed no closer than within 2 to 3 feet of sprinkler heads, ensuring that the main spray from the sprinkler does not hit the side of the container. The placement of remaining containers depends on the type of sprinkler and spacing between sprinkler heads:
- Fixed spray sprinklers: Place cans halfway between heads. (Figure 3)
- Rotor sprinklers with less than 40-foot centers: Place cans every one-third of the distance between heads. (Figure 2)
- Rotor sprinklers with greater than 40-foot centers: Place cans every one-fourth of the distance between heads.
- For irregularly shaped areas, place cans in a uniform grid pattern:
- Fixed spray sprinklers: Space cans every 5 to 8 feet on center.
- Rotor sprinklers: Space cans every 10 to 20 feet on center. (Figure 4)
Step 2. Run Irrigation for a Set Time
Each irrigation zone should be run for the minimum length of time suggested in Table 1. These run times will usually catch the amount of water generally recommended for auditing purposes. When auditing adjacent zones of similar sprinklers in which sprinklers from one zone contribute to another, be sure that the audit run times are equal and that water collected in catch containers is not measured until all contributing zones have been run. If needed, audit run times can be adjusted to accommodate sprinkler type, ability of the landscape to infiltrate the applied water, as well as catch container capacity. Be sure to monitor sprinklers during test times to verify that all adjustments made during pre-audit were successful and equipment is functioning properly.
| Type of Sprinkler | Half Circle or Full Circle (minutes) |
|---|---|
| Fixed spray | 5 |
| Rotor (less than 30-foot center) | 15 |
| Rotor (greater than 30-foot center) | 15 |
It is important to record the following information during irrigation run time:
- Date and time of testing
- Wind speed (verify that speed is less than 5 miles per hour)
- Location of sprinklers and catch cans (sketch)
- Irrigation run time
- Calculate area of catch container opening:
- Catchment Device Throat Area (ACD) = π r2
where r = radius (one-half of diameter)
- Catchment Device Throat Area (ACD) = π r2
Step 3. Determine Distribution Uniformity and Precipitation Rate
If possible, it is best to measure the volume of irrigation water collected in milliliters (mL), which are equivalent to cubic centimeters. The best and easiest way to accomplish this is to transfer the water from the catch containers to a graduated cylinder. If the volume of water in the catch container exceeds the capacity of the graduated cylinder, simply add the volumes measured in the cylinder. If unable to measure volume in milliliters, measure depth of irrigation collected in inches. If measuring depth, you can either directly measure the depth in the catch container or a transfer container of the same size. In either case, the walls of the catch container or transfer measuring container must be vertical (that is, have the same diameter or dimensions at top and bottom). Distribution uniformity (DU) is commonly calculated by the “lower half” method. This method uses the average of the lowest half of catchment volumes divided by the average of all catchment volumes. An irrigation system that has a high DU (100 percent is perfect, but generally unattainable) indicates a high performing system. Typically, a DU of 70 percent is considered excellent. Values lower than 50 percent will result in uneven distributions that may require system adjustments. Besides application uniformity, the other information gained in a catch container field test is precipitation rate (PR). See the following worksheets for instructions on how to calculate PR measured in both milliliters and inches, respectively. The catch container worksheets are designed to accommodate measurements for catch containers across multiple zones or single-zone audits. To avoid confusion, use only one sheet per zone. For use on single-zone audits, print as many worksheets as needed to audit all zones of interest.
Once a precipitation rate has been calculated, an irrigation schedule can be made. For more information on how to schedule irrigation, see Water Requirements of North Carolina Turfgrasses (AG-661).

Figure 1. Catch cans positioned for an irrigation audit.
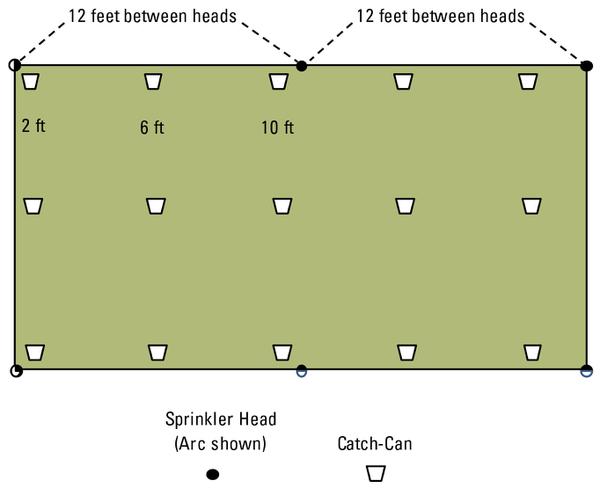
Figure 2. Example of catch-can placement for fixed sprinklers.
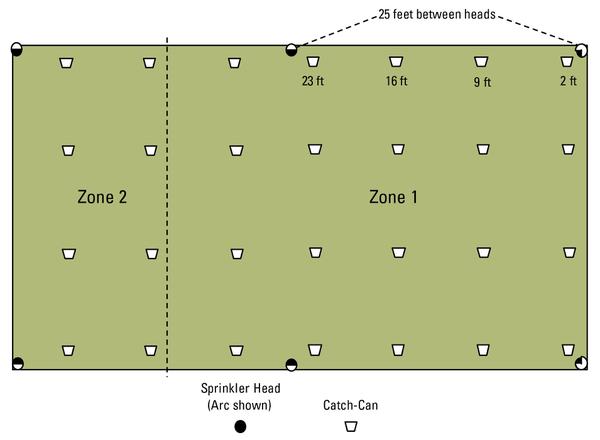
Figure 3. Example of catch-can placement for rotor sprinklers (less than 40-foot sprinkler spacing).
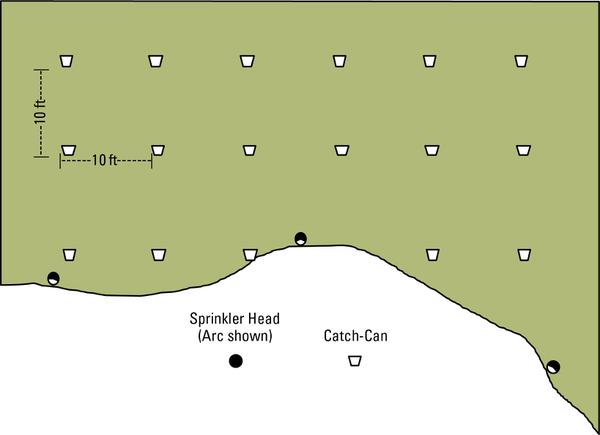
Figure 4. Example of catch-can placement for rotor sprinklers on irregularly shaped turf.
Resources
Irrigation Association. 2010. Irrigation Audit Guidelines. Falls Church, VA: Irrigation Association.
Irrigation Audit Worksheets
Irrigation System Inspection
Catch Container Worksheet (mL) (manual calculation)
Catch Container Worksheet (mL) (automated calculation)
Catch Container Worksheet (in) (manual calculation)
Catch Container Worksheet (in) (automated calculation)
Publication date: Feb. 7, 2018
Reviewed/Revised: Nov. 23, 2022
AG-838
N.C. Cooperative Extension prohibits discrimination and harassment regardless of age, color, disability, family and marital status, gender identity, national origin, political beliefs, race, religion, sex (including pregnancy), sexual orientation and veteran status.