

Quonset Design
Basic Structure
3' high × 6' wide × 20' long
¾" schedule 40 PVC pipe bows slipped into ¾" electrical conduit hangers
6 mil white copolymer cover
2" × 8" treated lumber kickboards along sides and ends
2 3⁄4" wide batten tape to hold plastic to kickboard
List of Structural Materials and Approximate Costs (2023)
| Description | Quantity | Unit Cost | Extended Cost |
|---|---|---|---|
| ¾" PVC SCH 40 pipe, 20' lengths | 4 | 8.00 | 32.00 |
| 12' × 30' white copolymer film, 6 mil | 1 | 32.64 | 32.64 |
| ¾" electrical conduit hangers | 32 | 0.19 | 6.08 |
| 2" × 8" × 12' treated lumber | 1 | 14.38 | 14.38 |
| 2" × 8" × 10' treated lumber | 4 | 12.08 | 48.32 |
| 16 penny common nails | 1 lb | 6.27 | 6.27 |
| 16 gauge steel wire, 200 ft. roll | 1 | 7.93 | 7.93 |
| Roofing nails | 1 lb | 4.98 | 4.98 |
| 4" × 5" metal mending plates | 4 | 1.64 | 6.56 |
| 2 3⁄4" batten tape, 100 yds. | 1 | 26.99 | 26.99 |
Total: $186.15
Tools Required for Construction
- Chop saw or hand saw
- Hammer
- Tape measure
- Round-pointed shovel
- Pencil
- Garden rake
- Side-cutting pliers
- Knife
- Builder's square
- Stapler with staples
Site Selection
Choose a site for your structure that is fairly level and preferably has some shade. If the structure is to be used exclusively for propagation, it should be oriented east-west. If it’s primary use will be in providing winter protection for nursery crops, it should be oriented north-south. There should be a water source nearby because water is needed for both propagation and winter protection. Drainage from the area should be sufficient so that pots do not sit in water in winter or summer, especially after light rains. For frost protection, the site should not be located in a low-lying area that collects cold air draining to it at night. An evergreen windbreak would reduce wind buffeting in winter, which both reduces heat lost from the structure and increases plastic life.
Construction
- Level an area (properly oriented depending upon whether your structure will be used for propagation or winter protection) 6' wide × 20' long.
- Square ends of lumber.
- Cut the 2" × 8" × 12' in half so that you have two (2) pieces that are 2" × 8" × 6'. These 6' sections will be used for the ends of the bed.
- Butt the ends of two (2) of the 2" × 8" × 10's together and nail securely using mending plates on both sides of the splice, so that you have a 2" × 8" × 20' piece.
- Repeat step 4 using the remaining two (2) 2" × 8" × 10' pieces. The two (2) bed sides (kickboards) are now assembled.
- Lay kickboard sides on edge 6' apart on the leveled area, and place a 2" × 8" × 6' section outside each end. Be certain that corners are square and then nail together securely. You now have a rectangular box with an open top and bottom that has inside dimensions of 5' 8¾" × 20'.
- At each of the four (4) corners along the length of the structure (on the inside edge of the kickboard), nail in a conduit connector so that the top of the connector is flush with the top edge of the 2" × 8" × 20' piece. Any nails that come through should be bent over so that they will not tear the copolymer cover.
- Repeat step 7 but with the bottom of the connector flush with the bottom of the 2" × 8" × 20' kickboard.
- Starting from the center of either of the top conduit hangers, mark off the kickboards along the length of the structure at 33 13/16" intervals. Including the two end conduit hangers, there will be eight (8) total on the top of each kickboard.
- At each of the marked intervals nail in two (2) conduit hangers as in steps 7 and 8.
- Cut the four (4) 20' lengths of PVC pipe in half so that you have eight (8) 10' pieces.
- For each section of PVC pipe, slip one end down through a set of conduit hangers, bend the pipe in a bow across the width of the structure, and slip the other end of the pipe down through the opposite set of conduit hangers.
- Install remaining ¾" PVC bows as in step 12.
- If the structure is going to be used for winter protection of containerized plants, follow steps 16 and 17 and then steps 20 through 23.
- If the structure is going to be used for propagation of stem cuttings, follow steps 18 and 19 and then steps 20 through 23.
- Place containerized materials inside the structure. More cold-tolerant plants, such as creeping junipers, should be placed around the perimeter to act as an insulator. If the area is prone to winter flooding, try spreading 2" to 3" of gravel as a base before placing plants into the structure.
- Water all containers thoroughly, then follow steps 20 through 23. Preemergence herbicides should have been applied one month earlier. Apply fungicides after irrigation. Rodent bait should be applied just before covering.
- Fill the structure to a depth of 6" or 7" with clean, moist propagating medium. Be certain that the medium is level. An alternative to filling the frame is the use of cellular trays filled with media.
- Insert cuttings and water in thoroughly; then follow steps 20 through 23.
- Use flexible wire or heavy cord to tie the bows together so that they cannot flex to either side. Another alternative is to use a single 20' PVC pipe centered at the top and attached to each bow to add greater rigidity to the frame.
- Center the 12' × 30' sheet of white copolymer film over the hoop frame.
- The cover can be secured by covering the 1' of surplus film along one of the long sides with soil, gravel or batten tape. To allow easy access to the plants or cuttings, the other three sides of the film can be held down with boards, rocks, pieces of wood or gallon jugs filled three-fourths full. Winter protection structures should have kickboards braced with soil or gravel during snow season to provide extra support.
- On warm days the structure may require venting. This can be done by opening the ends and then closing them down again later in the day.
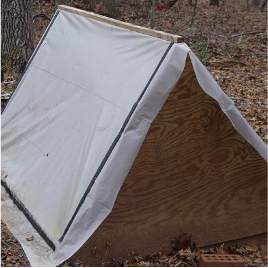
Figure 3 This overwintering structure was built based on the principles outlined here but using less material. For example, the PVC pipe bows are attached directly to the kickboard by screws rather than by electrical conduit hangers. The end walls are made of wood to allow more rigidity. Additionally, a portion of the floor was excavated to lower plants below ground level. This takes advantage of the earth’s natural insulating properties but can cause flooding if drainage underneath is poor.
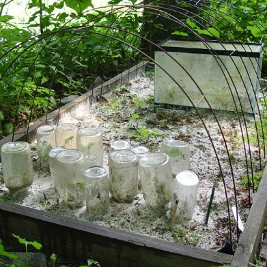
Figure 4. This overwintering structure has a dual purpose: It is overwintering plants in various container sizes, and it is being used as a propagation structure. The grower has set dormant (hardwood) stem cuttings in containers filled with propagation medium. By watering them at least once a week, he can root the cuttings by spring. He wrote the names of the plants on tags in each pot. Correct nomenclature and plants being true to name are very important to keep organized in production. To increase the burden, a 2" × 4" “purlin” or center line, has been added to hold the PVC bows straight and the end walls upright. This was done by using wood end walls as noted in Figure 3. Use of a purlin will not work if the end walls are kept open. In that case, use cord or wire instead to attach the bows together as mentioned above.
If properly constructed, the framework of your quonset should last for years. With a minimum amount of care, the white copolymer cover should last for two or more years if it is UV stabilized. Precautions should be taken to ensure that nails and wire used in the construction of the framework are properly bent and do not tear the cover. Also, if the structure is not going to be used for prolonged periods, it is best to remove the white copolymer cover, carefully roll it up, and store it out of direct sunlight. Do not fold the cover, as the creases will cause weak areas that will tear easily when the cover is replaced on the quonset. Storing the cover when it is not in use will extend its life.
Please see Preparing Nursery Crops for Winter in the Southeast (North Carolina Cooperative Extension Service publication AG-454, for more information about overwintering methods and extra tips to improve success.

Figure 1.
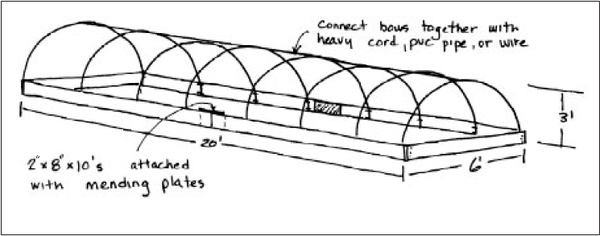
Figure 2.
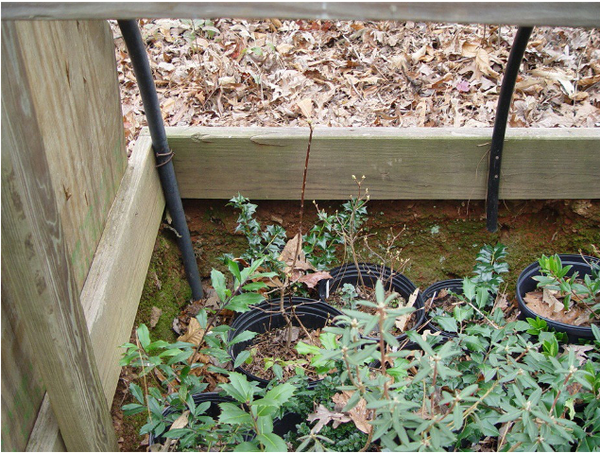
Figure 3. Figure 3. This overwintering structure was built based on the principles outlined here but using less material. For example, the PVC pipe bows are attached directly to the kickboard by screws rather than by electrical conduit hangers. The endwalls are made of wood to allow more rigidity.
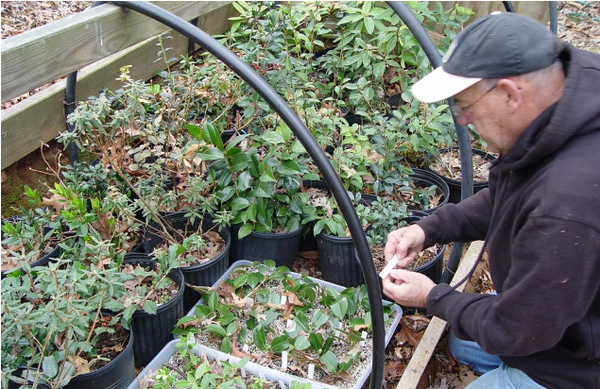
Figure 4. This overwintering structure has a dual purpose: It is overwin tering plants in various container sizes, and it is being used as a propagation structure.
Woodland Nursery Bed Design
Basic Structure
8" high × 4' wide × 12' long untreated lumber nursery box
Hardware cloth ground barrier
2" x 4" corner reinforcements
Leaf mulch frost protection
Hardware cloth cover
List of Structural Materials and Approximate Costs (2023)
| Description | Quantity | Unit Cost | Extended Cost |
|---|---|---|---|
| 1/4" x 4' x 25' length of hardware cloth | 1 | $63.45 | $63.45 |
| Landscape staples | 12 | $0.10 | $1.20 |
| 2" x 4" x 3' untreated lumber | 1 | $2.25 | $2.25 |
| 2" x 8" x 12' untreated lumber | 2 | $10.97 | $21.94 |
| 2" x 8" x 8' untreated lumber | 1 | $6.98 | $6.98 |
| 16D penny common nails | 1 lb | $6.27 | $6.27 |
| 1/2" x 4' rebar | 10 | $4.96 | $49.60 |
| Planting mix | 1 yd | $71.96 | $71.96 |
Total $223.05
Tools Required for Construction
- Chop saw or hand saw
- Hammer
- Tape measure
- Round-pointed shovel
- Pencil
- Garden rake
- Side-cutting pliers
- Knife
- Builder’s square
- Wheelbarrow
Site Selection
Choose a fairly level forested area to build a nursery propagation bed. Light, dappled sunlight is okay, though too much sun may burn sensitive plants. A deciduous hardwood forest is best, as it will provide adequate shade and winter protection in the form of insulating leaf litter. The area may be scouted for indicator plants (including, but not limited to, A. racemosa, S. canadensis, and A. canadense) that suggest the area may have the proper soil biome to sustain woodland botanicals. For frost protection, the site should not be located in a low-lying area that collects cold air drainage. The site should also be selected to ensure proper water drainage so soil does not become waterlogged, as this could increase chances of disease and anaerobic soil.
Construction
- Level an area 4' wide x 12' long. Save the soil that is removed during this process. It will be put back into the bed during step 13.
- Cut a 12' length from the hardware cloth. Lay this 4' x 12' section of hardware cloth in the leveled area. The hardware cloth will allow for proper drainage while deterring any burrowing pests.
- Secure the hardware cloth to the ground using six (6) landscape staples, placing one in each of the four (4) corners and one (1) in the middle of each 12' side, at 6'.
- Cut the 2" x 8" x 8' board in half so there are two (2) pieces measuring 2" x 8" x 4'. These 4' sections will be used to make the ends of the beds (bed ends).
- Lay the two (2) 2" x 8" x 12' pieces of lumber along the long edges of the landscape fabric, 4' apart on their 2" sides. These are the kickboards.
- Place a 2" x 8" x 4' section outside each end to make a rectangle.
- Ensure the corners are square, then nail together securely. You now have a rectangular box with an open top and bottom that has inside dimensions of 3' 9" x 12' sitting on top of a 4' x 12' section of hardware cloth.
- Cut the 2" x 4" x 3' lumber into four (4) 8" segments. These are corner supports. There will be spare wood left over after these cuts.
- Place one corner support in each corner, oriented so a 2" x 4" side faces the hardware cloth (flush with the bottom of the bed), the 4" wide side is flush against the bed end, and the 2" side is flush against the kickboard (Figure 6).
- Secure corner supports with nails.
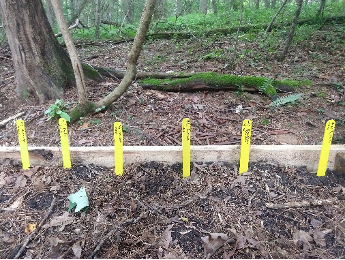
- Starting from the outside edge of one kickboard, measure and mark 3', 6', and 9'. At each of these points, use a hammer to install a 4' rebar flush against the board so there is 1' emerging from the ground. This will keep the bed from bowing under the weight of the soil that will be added. Repeat on the other kickboard.
- Starting from the outside edge of one bed end, measure and mark 1' and 3'. Install rebar using the same technique as step 11. Repeat on the other bed end.
- Fill the bed with planting mix. This may include compost, organic matter, or soil conditioner and may have a suggested use as raised bed mix.
- Incorporate the soil that was removed in step 1. This will introduce the native mycorrhizae into the planting mix.
- Plant seeds in rows, separating any different populations with clear labeling. Cover the seeds with a light layer of soil.
- Collect leaf litter from the surrounding area and spread it in a thin layer on top of the soil. This will act as an insulation layer in winter and will help with moisture control.
- Place the remaining 4' x 13' segment of hardware cloth on top of the box. The rebar may be pushed through spaces in the hardware cloth to hold it in place. Alternatively, six (6) landscape staples can be used to secure the hardware cloth to the soil in the bed.
- Additional leaf litter may be added on top of the hardware cloth in the case of extremely cold weather.
- In spring, when seedlings break dormancy, remove the hardware cloth and any leaf litter that may have collected on top of the bed. Seedlings may be left for multiple years to mature until appropriate to transplant.
Photos in Woodland Nursery Bed Design courtesy of Dr. Jeanine Davis program 2020-2022
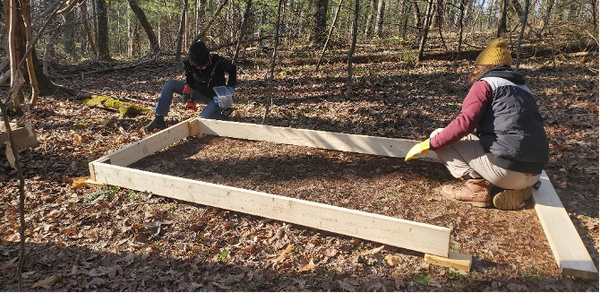
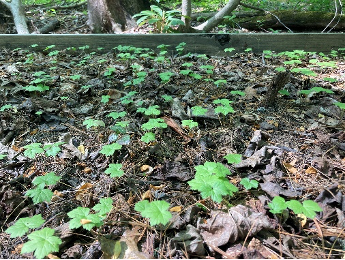
Figure 5. This woodland nursery propagation bed is being built in a predominately deciduous forest containing oak, tulip poplar, and ironwood in Western NC. Temporary supports are placed under corners during construction to provide a stable, level surface. This bed will be used to grow goldenseal (Hydrastis canadensis) seedlings.
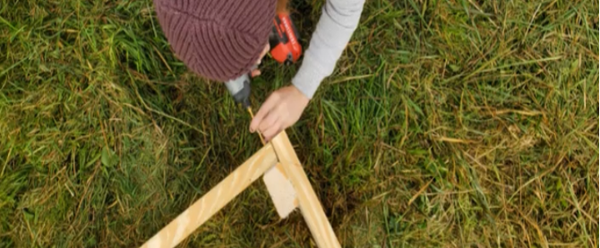
Figure 6. These corner supports are being installed with a drill instead of 16D nails. Screws are drilled through the kickboard and bed end into the corner support to provide increased stability.
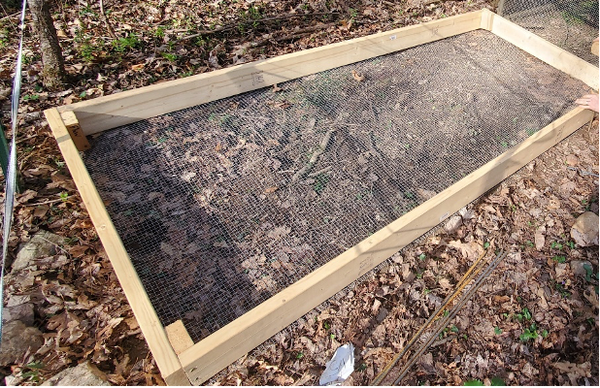
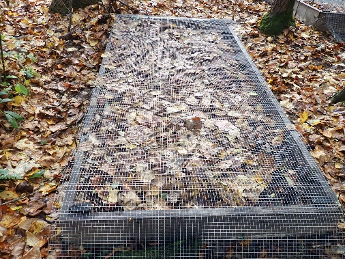
Figure 7. This woodland nursery bed in made of untreated pine. It is sitting on top of the hardware cloth, has been nailed together, and has its corner supports installed. The next step is installing the 4’ rebar to ensure the boards do not bow as they age and will support the soil that will be added.
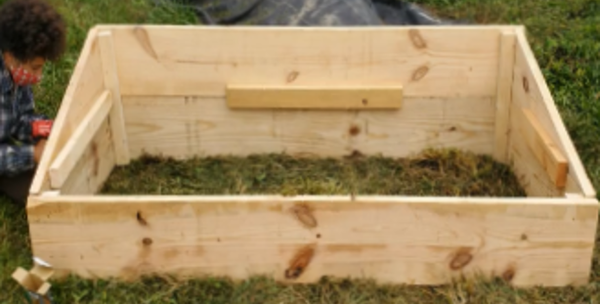
Figure 8. This woodland nursery bed was built using the same principals as outlined here, with a few differences. Boards measure 12” wide and the dimension of the bed is 5’ x 3’. The grower has also added diagonally cut sides and a back to this bed so they can attach shade cloth to protect fragile seedlings.
Publication date: July 1, 2012
N.C. Cooperative Extension prohibits discrimination and harassment regardless of age, color, disability, family and marital status, gender identity, national origin, political beliefs, race, religion, sex (including pregnancy), sexual orientation and veteran status.