
Introduction
A good showman is a person that has a sense or knack for an effective presentation of an animal. Showmanship is the one area of livestock showing over which the exhibitor has the most control. In showmanship you are judged on your abilities to control and present your goat to bring out its best characteristics. Advanced planning, practice and hard work are the key to becoming a good showperson. Meat goat showmanship not only generates enthusiasm in the show ring, but also teaches many valuable lessons that can be used in day to day life. These lessons include responsibility, learning about work and determination to reach a goal, winning graciously and losing with dignity. This will take practice at home with your goat and having someone act as a judge as if at a show.
Appropriate Dress
Dress neatly. Leather boots should be worn for safety and appearance. If the goat steps on your foot, the goat's foot will slip off a leather boot much easier than a tennis shoe. Wear clean jeans or slacks. Faded bluejeans look less professional and should not be worn.
Wear a neat button-down or polo shirt. No camouflage shirts or T-shirts should be worn. The shirt should be tucked in. Wear a belt for neatness. Leave hats and grooming equipment back at the grooming area. Hats, may distract the judge's concentration. Your planning and neat appearance will help make a positive impression on the judge.
Showtime
Before the show, walk over the show ring to find the high and low spots of the show ring surface. This will help make sure the goat is set up going uphill and not in a hole.
Be sure to enter the show ring promptly and that the goat is led from the left hand side. Small exhibitors may use a collar, chain or halter. However, more advanced exhibitors should lead the goat with their left hand under the goat's chin and the right hand behind the ears and or/ with a chain or collar.
Quickly yet smoothly, set the goat up so that all four feet are at the corners of it's body and the goat's weight is distributed evenly over its legs (Figure 1). When setting up the goat, do not get down on your knees because you will have less control of your goat. One way to move the back feet is to press back on the opposite shoulder of the foot you want to move. Small showpersons may stand and use the halter and their feet to set the goat's legs. Use the halter to indicate the direction you want the feet to go while using your foot to move the goat's leg. Larger exhibitors may use their hands to set up the goat. Set the rear legs first. Then set the front legs.
Once the goat is set up, be sure the head is held up. Then locate the judge. Remain standing in front of your goat when the judge is viewing the goats from the rear. Never place your hand on the goat's back or the base of the neck; this will obstruct the judge's view of the goat's top. As the judge moves around to the right side and around in front of the goat, move to the left side of the goat, so it is between you and the judge. When the judge is in front of the goat, remain on the goat's left side, so the judge can see the front view. Be sure to keep the head high and in line with the goat's body. You may hold the head up with the collar, halter or with your left hand under the goat's jaw. As the judge moves to the left of the goat, move back to the front of the goat to give the judge a full view of the entire animal. Do not move to the right side of the goat. When in front of the goat, you have more control and this position will provide the side view that the judge seeks.
.gif)
Figure 1. Figure A shows the feet squarely placed beneath the goat. Figures B and C are incorrect.
Handling the Goat
Be ready for the judge to handle your meat goat. Train the goat to stand to be handled by the judge. Ideally, you should hold the goat by the head, collar, chain, or halter while standing away form the goat. If the goat does not stand still be prepared to restrain it.
To restrain the goat, hold it by one or a combination of ways as described above. Use one of two methods. One method is to stand in from and place your knees in front of the goat's shoulder (Figure 3). Another method to restrain your goat is to grab a front leg below the knee and raise the leg up toward you while leaving the other three legs on the ground (Figure 3). While restraining your goat, never pick the goat up so that both front feet are off the ground. This does not give you an advantage. It is an example of poor showmanship. After the judge finishes handling the goat, set it up in line with the other exhibitors.
The preferred way to show meat goats is NOT to brace the animal. However, some judges will allow you to brace. Observe the first class and listen to the judge to determine if bracing will be allowed. You should be prepared to brace your goat if bracing is allowed by the judge and you want to be at the same advantage as the other exhibitors.
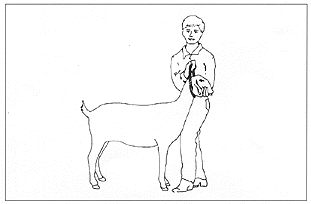
Figure 3. Restrain your goat by placing your knee in front of the shoulders or by picking up a front leg.
Moving the Goat
After handling the goats, the judge will indicate what is to be done next. Most likely the judge will want you to walk the goat. Be sure that the goat is under control and is between you and the judge. If your goat does not lead, gently reach back and lift up on the goat's tail. If an exhibitor ahead is having problems, help that person. Never whip the goat with the halter rope or grab the goat by the skin. This will result in a bruise and a soft area will remain for sometime.
Once the judge requests that you stop for the side view, set your goat up as discussed earlier. Small exhibitors should stand in front or on the goat's left side to keep control. Older, larger exhibitors may squat or stand on the goat's left side. Standing is preferred. Do not put your knees on the ground; squat so you may get up quickly and maintain control of your goat. Stay alert; the judge may handle the goat again or motion to move to another line. Once you are pulled to the placing line, remember the class is not over. Be sure the goat is set up and looks its best.
The judge may decide to place the goats differently after one last look while all goats are lined up side by side. If you are asked to move in the line, Figure 4 shows what should be done for different situations. Be sure to line your goat up in a straight line from the first goat set up, as illustrated in Figure 4.
Once the judge starts giving reasons, the class is over, but exhibitors should continue to work hard and display good sportsmanship. Congratulate the class winners and those who stood ahead of you. Ask if you can handle the goats that placed above you. This will allow you to learn what to look for in your next goat project.
Finally, remember this is a learning experience. Leave the ring with your head held high, knowing that you have given this project your best effort. Learn from your mistakes, watch other showpersons, and improve your skills for the next show.
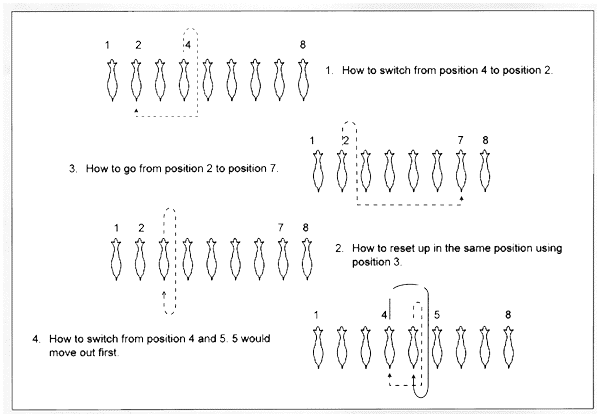
Figure 4. Proper procedures for changing positions.
Goat Showing Equipment
Showbox
- feed pan
- water bucket
- collar, neck chain, or halter
- clippers
- wash brushes
- hose (short)
- soap
- blanket
- stand
- small show brush
- health papers
- show catalog
- pen signs
- hammer and nails
- wire and pliers
- goat feed
- bedding (sawdust, chips, or straw)
Personal
- camera
- towels, washcloth, soap
- lawn chairs
- rubber boots & work clothes
- show clothes
- safety pins (for exhibitor numbers)
- first aid kit
- flashlight and batteries
North Carolina 4-H Livestock Program Overall Objectives
- To develop leadership abilities, build character, and assume citizenship responsibilities.
- To experience the pride of owning livestock and to be responsible for its management.
- To be better prepared for citizenship responsibilities through working in groups and supporting community livestock educational projects and activities
- To learn skills in livestock production and gain an understanding of the business of breeding, raising, and promoting livestock and their end products.
- To increase knowledge of safety precautions needed to prevent injury to yourself and others while working with livestock.
- To promote greater love for animals and a humane attitude toward them.
- To teach good sportsmanship through a friendly, competitive atmosphere.
- To increase knowledge of animal agricultural by-products and how animal by-product usage touches our lives each and every day.
The North Carolina 4-H and Junior Livestock Program provides many project areas that address the various segments of the livestock industry. Emphasis for all of the projects is on the development of the young person. The youth are the focus of the projects, while the animals and projects are utilized as the vehicle for the progress in the development of the youth. Available educational programs cover subject matter material from production practices to the meat product supplied for the consumer's plate. For further information about programs and services provided by North Carolina Cooperative Extension, contact your local N.C. Cooperative Extension center.
Publication date: April 1, 2003
Reviewed/Revised: May 3, 2022
N.C. Cooperative Extension prohibits discrimination and harassment regardless of age, color, disability, family and marital status, gender identity, national origin, political beliefs, race, religion, sex (including pregnancy), sexual orientation and veteran status.