
Freezing seafood at home is a popular and effective way to extend the shelf life of fresh fish and shellfish. However, freezing does not automatically ensure quality. The preservation of taste, texture, and safety depends on proper handling, cleaning, packaging, and thawing practices1. This guide offers instructions for consumers to select, freeze, and thaw seafood effectively while maintaining safety and quality.
Preparing Freshly Caught Fish for Freezing
The quality of frozen fish starts at the moment of catch. Fish should not be allowed to bounce around in the boat or on the ground as it can lead to bruising and result in a lower-quality frozen product. Fish should be dispatched quickly, bled immediately in a container of water, and rapidly chilled on ice or in an ice/saltwater slurry to prevent spoilage. If a cooler isn’t available, wrap the fish loosely in a damp cloth or paper and keep it in the shade. Use a cooler with a drain to remove excess water from melting ice (if slurry not used), as this helps prevent a soft texture and degradation of the flesh. Poor bleeding or delayed gutting can result in blood clots in the flesh. A condition called “belly burn,” where the ribs separate from the flesh, can be caused by enzymes in the gut of the fish. These fish are not good for freezing1.
Steps for Dressing Fish:
- Rinse the fish to remove slime and dirt.
- Scale the fish using a fish scaler or spoon.
- Cut along the belly from the vent to the gill collar, avoiding puncturing internal organs.
- Remove the head by cutting at the base where it connects to the spine.
- Cut around the vent and remove the entrails.
- Scrape the kidney area along the backbone to remove any blood.
Steps for Filleting Fish:
- Lay the fish on its side on a flat surface.
- Make a cut behind its gills and pectoral fin, cutting only to the rib cage.
- Turn the blade toward the tail and cut along the top of the ribs, using the fish's backbone to guide you.
- Turn the fish over and repeat these steps on the other side.
- Insert the knife blade close to the rib bones and slice the entire rib section away from each fillet.
Steps for Skinning a Fillet:
- Place the fillet skin side down.
- Hold the tail of the fillet.
- Slide the knife between the skin and the flesh, keeping the blade almost horizontal.
- Pull the skin taut as you draw the blade toward the larger end of the fillet.
- Use a little pressure and a sawing motion, cutting against (not through) the skin, to remove the fillet from the skin.
The fish can now be frozen dressed, filleted, or skinned depending on your preference. If freezing is delayed, store cleaned fish on ice. Refrigerate raw fish at 40 °F (4.4 °C) or colder and use within 3 days. Use raw shrimp and crawfish within 5 days storage at 40 °F (4.4 °C). Live or shucked shellfish like clams and oysters can be kept at 40 °F (4.4 °C) or colder for up to 10 days2, and cooked seafood should be eaten within 4 days when stored at the same temperature3.
Safe Handling of Seafood
Basic hygiene is essential:
- Wash hands thoroughly for 20 seconds with soap and warm water after handling raw seafood.
- Clean all utensils, cutting boards, and countertops with hot, soapy water.
- Sanitize surfaces using a bleach solution (1 tablespoon unscented liquid bleach per gallon of water).
- Run dishwasher-safe tools through the dishwasher after use4.
Selecting Seafood for Freezing
Whether you’re buying fish or shellfish from a market or harvesting it yourself, assessing freshness is crucial.
Whole Fish:
- Eyes should be clear and convex.
- Skin should be moist and intact, free of cuts or bruises.
- Gills should be bright red or pink.
- The body cavity, if exposed, should be clean with no discolored flesh or blood clots.
- Odor should be mild or ocean-like, never sour, fishy, or ammonia-like.
Processed Fish (fillets or steaks):
- Should appear moist and firm.
- No signs of darkening or drying at edges.
- Color should be even, and tissue should spring back when pressed.
- May show red bloodlines or red-tinted flesh if tuna.
Shellfish:
- Shells must be intact; discard any cracked or broken ones.
- Live clams, mussels, and oysters should close their shells when tapped.
- Crabs and lobsters should show movement and not be limp.
- Look for certification tags or labels confirming safe handling.
Pretreatment for Better Quality
For Fatty Fish:
To prevent off-flavors and rancidity, dip in a solution of 2 tablespoons of crystalline ascorbic acid in 1 quart of cold water for 20 seconds5.
For Lean Fish:
Dip in a salt brine of ¼ cup salt per quart of cold water for 20 seconds. This firms the flesh and helps reduce moisture loss during thawing5.
Lemon-Gelatin Glaze Option:
- Combine ¼ cup lemon juice with 1 ¾ cups water.
- Dissolve one packet of unflavored gelatin in ½ cup of the mix.
- Boil the remaining liquid and stir in the dissolved gelatin.
- Cool to room temperature and dip the fish to coat and drain5.
Packaging Options for Freezing
Vacuum Sealing:
The most effective way to prevent freezer burn and oxidation is vacuum sealing (Figure 1) using oxygen-barrier bags. This removes air and keeps the seafood protected during storage1.
Plastic Wrap with Overwrap:
Wrap fish tightly with plastic wrap, then overwrap with freezer paper (Figure 2) or aluminum foil (Figure 3) to prevent tearing and protect from air exposure. This is useful for larger species like salmon.
Freezer Bags:
Place fish inside heavy-duty freezer bags, squeeze out air, and overwrap for extra protection. Label the packaging before freezing.
Ice Glazing:
Ice glazing involves dipping frozen fish into ice water, freezing again, and repeating until a uniform layer forms. This protective glaze should be wrapped to prevent chipping and dehydration5.

Figure 1. Vacuum sealed fish.
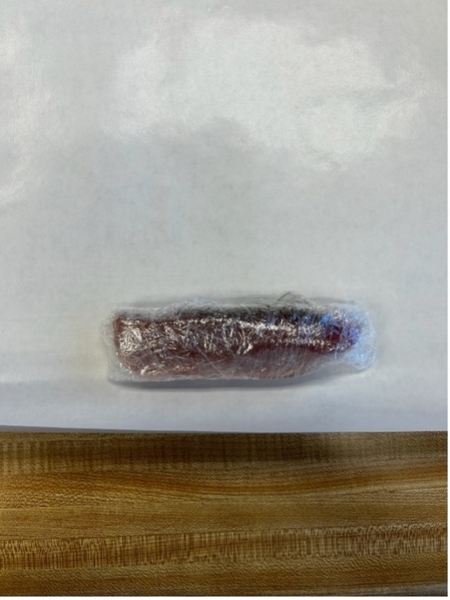
Figure 2. Plastic wrapped fish on freezer paper.

Figure 3. Fish in freezer bag, overwrapped with aluminum foil and labeled.
Labeling and Freezing Guidelines
Clearly label each package with species/cut (e.g., cod fillets, salmon steaks), total weight or portion size, and date frozen. Ensure the freezer maintains a temperature at or below 0 °F (−18 °C). Don’t overcrowd the freezer, as this slows freezing. Packages 1 inch thick should freeze within 16 hours6.
Frozen Storage Duration by Seafood Type
- Fatty fish (e.g., bluefish, salmon): 2-3 months.
- Lean fish (e.g., flounder, sea trout): 4-8 months.
- Shellfish: 2-18 months depending on type2.
Freezing Shellfish and Roe
Clams and Oysters:
- Can be frozen in-shell after cleaning.
- Alternatively, shuck, rinse to remove sand, and freeze in their liquor or ice water with headspace.
Crabs:
- Only freeze live or freshly cooked crabs.
- Remove the back, entrails, and gills either before or after cooking the crab, then wrap securely in freezer paper.
Lobster:
- Parboil or cook prior to freezing.
- Freeze whole or in cleaned sections; always leave in shell to protect the meat.
Scallops:
- Must be alive when shucked.
- Freeze in sealed containers with ½-inch headspace.
Shrimp:
- Can be frozen cooked or raw, peeled or unpeeled.
- Remove heads if keeping shells.
- Chill before freezing and use thick vacuum or freezer bags to prevent puncture.
Roe:
- Wash thoroughly, package in moisture-resistant containers with ¼-inch headspace, and freeze promptly.
Proper Thawing Techniques
Cold Running Water:
- Place seafood in a sealed, air-tight bag.
- Submerge in cold water (not hot).
- Thin items (~1 lb) thaw in about 1 hour or less; thicker cuts (3-4 lb) may need 2-3 hours7.
Refrigerator Thawing:
- Safest method.
- For smaller portions overnight thawing is sufficient, while larger portions may take about 24 hours/5 lb8.
Microwave Thawing (Figure 4):
- Use the defrost setting and heat until fish is icy but pliable.
- Monitor closely and cook immediately4.
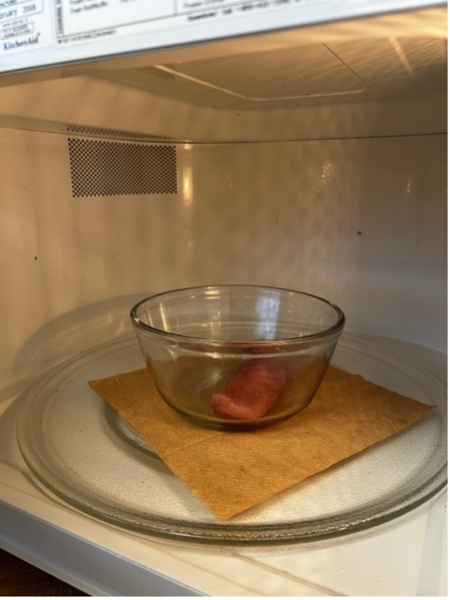
Figure 4. Microwave thawing of fish.
Cooking from Frozen:
- Seafood can be cooked without thawing.
- Add extra cooking time as needed.
Important Note on Vacuum Packaging:
Never thaw vacuum-packed seafood in the fridge without opening the package first. Lack of oxygen creates ideal conditions for Clostridium botulinum toxin formation. Always puncture or remove from packaging before refrigerator thawing9.
What to Avoid:
- Never thaw seafood at room temperature.
- Never use hot water, which can partially cook and alter texture.
References
1. University of Alaska Fairbanks. (2022). Home Freezing of Fish. ↲
2. FoodSafety.gov. (2023). Cold Food Storage Chart. ↲
3. USDA FSIS. (2024). Cold Storage Chart. ↲
4. FDA. (2024). Selecting and Serving Fresh and Frozen Seafood Safely. ↲
5. National Center for Home Food Preservation. (2014). Freezing Fish. ↲
6. Oregon State University. (1990). Freezing Seafood at Home. ↲
7. USDA FSIS. (2013). The Big Thaw – Safe Defrosting Methods. ↲
8. USDA FSIS. (2024). Freezing and Food Safety. ↲
9. Michigan State University. (2024). Thawing vacuum-packed fish correctly. ↲
Publication date: July 10, 2025
N.C. Cooperative Extension prohibits discrimination and harassment regardless of age, color, disability, family and marital status, gender identity, national origin, political beliefs, race, religion, sex (including pregnancy), sexual orientation and veteran status.