
Prepared by:
Gregory D. Jennings
Extension Agricultural Engineering
Publication Number: AG 473-15
Last Electronic Revision: March 1996 (JWM)
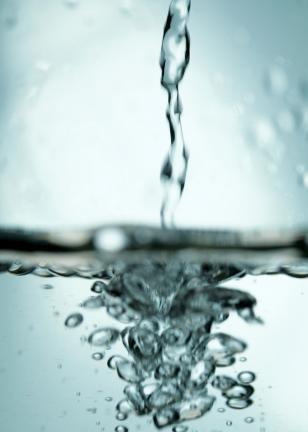
A spring is a place on the earth's surface where groundwater emerges naturally. The water source of most springs is rainfall that seeps into the ground uphill from the spring outlet. While springs may seem like an ideal water supply, they need to be selected with care, developed properly, and tested periodically for contamination.
Spring water moves downhill through soil or cracks in rock until it is forced out of the ground by natural pressure. The amount, or yield, of available water form springs may vary with the time of year and rainfall. Groundwater obtained from springs is similar to water pumped from shallow wells. Like shallow wells, springs may be contaminated by surface water or other sources on or below the ground surface.
Springs are susceptible to contamination because the water feeding them typically flows through the ground for only a short distance, limiting the amount of natural filtering that can occur. Springs may not be a good choice for a water supply if the area uphill where the water collects is used for industry, agriculture, or other potential sources of pollution.
Spring Development
Proper spring development helps protect the water supply form contamination. The objective of spring development is to collect the flowing water underground to protect it from surface contamination and store it in a sanitary spring box. Proper development depends on whether the spring is a concentrated spring or a seepage spring.
Concentrated springs occur along hillsides in mountain and piedmont areas at points where groundwater emerges naturally from openings in rock (Figure 1a). These are the easiest springs to develop and protect from contamination. Proper development for concentrated springs consists of intercepting water underground in its natural flowpath before it reaches the land surface. One type of concentrated spring found in valleys or other low areas is termed a low-area spring (Figure 1b). Low-area springs are not as easily protected as those located in higher areas where other surface water naturally drains away from the spring.
Seepage springs occur where groundwater "seeps" from the soil over large areas (Figure 2a). The development process for seepage springs consists of intercepting flowing groundwater over a wide area underground and channeling it to a collection point. Because seepage springs collect water over large areas, they are more difficult to protect from surface water contamination than concentrated springs.
To develop a concentrated spring you should take the following steps (Figures 1a and 1b):
- Dig upslope from the spring outlet to a point where flowing water is at least 3 feet underground or where rock is encountered.
- Install a rock bed to form an interception reservoir. On the downslope side, install a cutoff wall of concrete or plastic. The cutoff wall may not be necessary for a low-area spring, where the spring box may serve as the collector.
- Insert a collector pipe low in the cutoff wall to guide water into the spring box. As much as possible, prevent water from backing up behind the wall.
Follow these steps to develop a seepage spring (Figures 2a and 2b):
- Dig test holes uphill from the seep to find a point where the impervious layer below the water-bearing layer is about 3 feet underground. Water flows on top of this layer in sand or gravel toward the surface seep.
- Dig a 2-foot-wide trench across the slope to a depth of 6 inches below the water-bearing layer and extending 4 to 6 feet beyond the seep area on each side. Install a 4-inch collector tile and completely surround the tile with gravel.
- Connect the collector tile to a 4-inch line leading to the spring box. The box inlet must be below the elevation of the collector tile.
The spring box should be watertight (most are made of reinforced concrete) and have a tight-fitting "shoebox" cover. It should be at least 4 feet tall and should extend at least 1 foot above ground level when buried. The size of the spring box depends on the amount of storage needed. Typically, it should be at least 3 feet square, which would provide storage of 135 gallons with water standing 2 feet deep. If the size were increased to 4 feet square, the amount of storage would increase to 240 gallons with water standing 2 feet deep.
The spring box should have an outlet pipe and an overflow pipe. The overflow pipe should be screened and located below the collector pipe or tile so that water will not back up behind the spring. The overflow may be a floating device connected to the outlet pipe. Install a drain for cleaning the box.
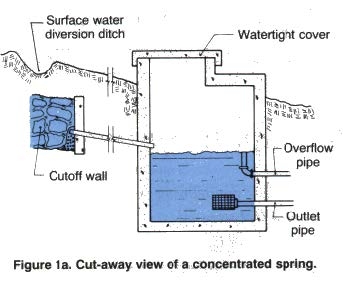
Figure 1a. Cut-away view of a concentrated spring.
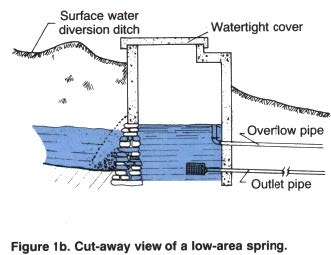
Figure 1b. Cut-away view of a low-area spring.
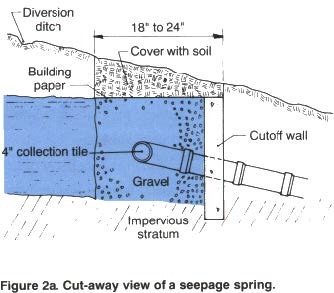
Figure 2a. Cut-away view of a seepage spring.
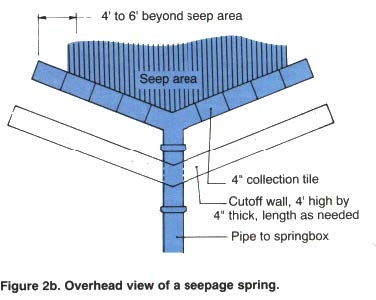
Figure 2b. Overhead view of a seepage spring.
Spring Protection
Springs are susceptible to contamination by surface water, especially during rainstorms. Contamination sources include livestock, wildlife, crop fields, forestry activities, septic systems, and fuel tanks located upslope from the spring outlet. Changes in color, taste, odor, or flow rate indicate possible contamination by surface water. To protect springs you can take the following measures.
- Divert all surface water away from the spring as far as possible. Do not allow flooding near the spring.
- Construct a U-shaped surface drainage diversion ditch or an earth berm at least 50 feet uphill from the spring to divert any surface runoff away from the spring. Be careful not to dig deep enough to uncover flowing groundwater. Prevent pounding in the diversion ditch.
- Construct an earth berm adjacent to the spring or a second U-shaped diversion ditch lined with concrete tile for added protection.
- Fence an area at least 100 feet in all directions around the spring box to prevent contamination by animals and people who are unaware of the spring's location.
- Avoid heavy vehicle traffic over the uphill water bearing layer to prevent compaction that may reduce water flow.
Water Testing
Most spring contamination result from poor spring development construction of from direct flow of surface water into the shallow groundwater feeding the spring. Spring water should be tested before and after heavy rains each year for bacteria, pH, turbidity, and conductivity to determine if surface-water contamination is a problem. If water levels change frequently when it rains, the spring is very susceptible to contamination. If bacteria are found at any time in the water, properly disinfect the system and retest the water before using it again.
Springs are susceptible to contamination by giardia, cryptosporidium, and other microorganisms that are not detected by standard bacterial tests. Test for these microorganisms if spring water is suspected as a source of illness.
Spring Disinfection
Springs are often contaminated with bacteria during construction or maintenance. All new and repaired water systems should be disinfected using shock chlorination. If bacterial contamination occurs on a regular basis because of surface sources above the spring, continuous chlorination may be necessary.
Shock chlorination requires concentration of at least 200 parts per million (ppm) chlorine. (As a point or reference, 200 ppm is the same proportion as 1 pound of salt in about 600 gallons of water.) To obtain this concentration, add 3 pints of liquid d chlorine laundry bleach (such as "Clorox," which is about 5 percent chlorine) for each 100 gallons of water to be disinfected. Other sources of chlorine are 1 pint of swimming pool disinfectant or concentrated bleach (at 12 to 17 percent chlorine) per 100 gallons of water or 4 ounces of high-test calcium hypochlorite tablets or powder (at 65 to 75 percent chlorine) per 100 gallons of water.
Follow these steps to disinfect spring-fed water systems with chlorine:
1. Remove debris and sediment from the spring box and distribution system. Scrub all interior surfaces with a strong chlorine solution (1 gallon of liquid chlorine laundry bleach per 10 gallons of water). Be sure to wear gloves and other appropriate protective clothing
2. Disinfect the spring box by first allowing it to fill with fresh spring water. If the spring flow is small enough, plug the outlet pipe and add chlorine to the spring box to obtain the 200-part-per-million chlorine concentration as described above. Hold the chlorinated water in the spring box for at least 12 hours. Keep the overflow pipe open. If the flow rate is too high to retain water in the spring box, feed the chlorine solution into the spring box continuously for at least 12 hours.
3. Disinfect the water distribution system including pressure tanks, storage tanks, pipelines, valves, and faucets by pumping chlorinated water through the system. Open all faucets
until a strong chlorine odor is detected at each one. Close the faucets to allow the chlorine solution to remain in the system for at least 12 hours.
4. Open all valves and faucets to allow fresh spring water to flow through the system until no chlorine odor or taste can be detected.
5. Test the spring water for bacterial contamination 24 hours after chlorine has been removed from the spring and household system.
Continuous chlorination is necessary if bacterial contamination continues after repeated shock chlorinations. In this system, equipment is used to feed chorine continuously in sufficient amounts to kill bacteria. Chlorine must be in contact with water at least 1 to 5 minutes to kill all bacteria. At the end of this time, a chlorine residual of about 3 to 5 ppm should remain to indicate that the disinfection is complete. Typical chlorine feed rates are about 1 cup of 5 percent laundry bleach per 300 gallons of water. This rate depends on water temperature, pH, and pumping rate. Use an inexpensive chlorine residual kit to determine if the feed rate should be increase of decreased to obtain the proper chlorine residual.
AG-473-15
Publication date: Jan. 1, 1996
AG-473-15
N.C. Cooperative Extension prohibits discrimination and harassment regardless of age, color, disability, family and marital status, gender identity, national origin, political beliefs, race, religion, sex (including pregnancy), sexual orientation and veteran status.