Measuring soil-water is important to effective irrigation scheduling. Most soil-water measuring devices do not measure soil-water content directly; instead, they measure a property that can be related to soil-water content by using a calibration curve.
Manufacturers of most soil-water measuring devices provide a calibration curvefor their equipment. However, manufacturer's calibration curves are developedfor general conditions and are not adequate for site-specific soil conditions.
For best results, soil-water measuring devices should be calibrated for the major soil types in each field being irrigated. This publication provides a step-by-step description of how to use the gravimetric method to calibrate soil-water measuring equipment.
The purpose of calibration is to establish the specific relationship between the plant available water (PAW) on a soil site with the readings of the soil-water measuring device. It is important to calibrate each different type of equipment for each major soil where it will be used. Usually, it is not necessary to calibrate all of the devices of a similar type if the equipment comes from the same manufacturer, is used in the same field, and seems to be functioning properly.
Once a specific type of device is calibrated, all devices of the same type can be checked for uniformity of readings. For example, all tensiometers can be installed in one location in the field at the same depth. Any units that behave differently from the majority of units would then need to be examined carefully.
As seen in Table 1, the gravimetric method is the only method that measures soil-water content directly. Therefore, on-farm calibration requires matching water contents determined by the gravimetric method over a range of soil-water contents with the readings of the desired soil-water measuring device(s). Several weeks may be needed to develop a reliable calibration curve. This is especially true for obtaining the relationship at low soil-water contents (dry range), because the soil may be wetted several times by rainfall during the calibration process. The best time to calibrate the devices is in the fall, preferably during October. In North Carolina, October is typically the driest month (least rainfall), and potential evapotranspiration (PET) is still fairly high. Performing the calibration during this period increases the probability of obtaining readings in the dry range, and the calibration data are then available at the start of the next irrigation season. The calibration can also be performed during the irrigation season, but it may not be completed in time to utilize the data during that season's irrigation.
The procedure for measuring soil-water by the gravimetric method is outlined below followed by an example tensiometer calibration using this procedure. This calibration procedure is similar for the other types of soil-water measuring devices.
Determining Soil-Water by the Gravimetric Method
Soil-water content is determined by the gravimetric method by taking a soil sample, weighing it, drying it in an oven for 24 hours at 220 degrees F, and then weighing the dry sample to determine the mass of water removed. The difference between the moist weight and oven-dry weight is the mass of water contained by the soil at the time the sample was collected. For the purpose of irrigation scheduling, the soil-water content is then expressed on a volume basis (equivalent depth of water per unit depth of soil).
To determine water content on a volume basis, the bulk density of the soi1 is required. An undisturbed sample must be used to calculate bulk density because the exact volume of the sample must be known.
Bulk density, BD, of the soil is defined as the weight of oven-dry soil (Wds) divided by the volume of soil (Vs) before drying.
BD= Wds/Vs
The following is a step-by-step procedure for determining volumetric water content using the gravimetric method. The weighing device should be accurate to +/- 0.5 ounces.
Step 1
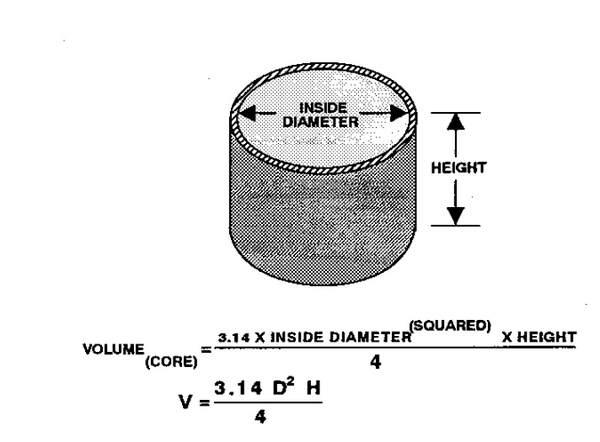
- Use a cylindrical tube about 2 to 3 inches in diameter by 2 to 3 inches long (see Figure 1).
- Measure the inside diameter and total length to the nearest 1/32 inch.
- Calculate the volume of the cylinder with the following equation:
Volume of Core = 3.14(D)(D)(H)/4
\(Volume\ (core)\ =\ \frac{3.14\ {Inside\ Diameter}^2\ \times\ Height}{4}\)
\(V=\ \frac{3.14\ D^2\ H}{4}\)
Step 2
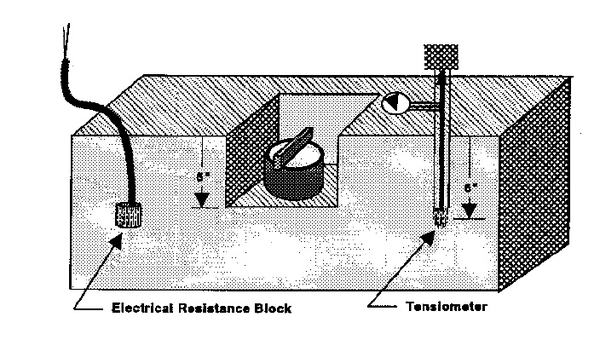
- Remove the soil above the zone to be sampled (see Figure 2).
- Take the soil sample from the center of the effective root zone. For example, if the effective root depth is 12 inches, the sample should be taken in the 5- to 8-inch depth range.
Step 3
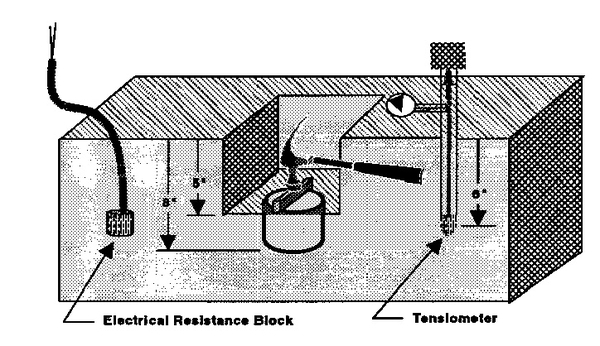
- Use a hammer to tap the cylindrical tube into the soil (Figure 3) so that the top of the tube is flush with the excavated soil.
- Cut the soil 1/2 inch below the base of the tube with a knife or trowel.
- Remove the tube and soil without spilling any of the soil from inside the tube. (The soil should completely fill the tube).
Step 4
-
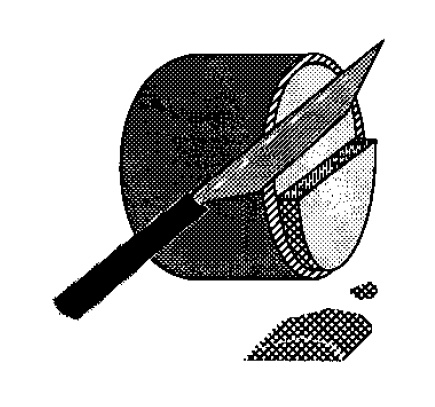
Trim the soil at each end of the tube to the tube length (Figure 4) so that the soil occupies the exact tube volume.
Step 5
- Immediately empty the soil from the tube into a plastic container (plastic bag) so the soil can be transported to the weighing location without drying. Be sure all of the soil is transferred from the tube to the plastic container.
Step 6
- Empty all of the soil from the plastic container to an oven-safe container and weigh it immediately. This is the wet weight of the soil plus the container
Step 7
- Place the sample now held in the oven-safe container into an oven and dry it for 24 hours at 220 degrees F.
Step 8
- Weigh the dried sample and oven container. This is the dry weight of the soil plus the container (Wds+c).
Step 9
- Discard the soil and weigh the empty oven container (Wc).
Step 10
- Use the following equation to determine the volumetric water content (Vw) of the sample:
Vw = [(weight wet soil & container−weight dry soil & container)/ (weight dry soil & container − weight
container)]×[bulk density soil/density water]
Vw =[(Wws+c-Wds+c)/(Wds+c-Wc)]×[BD/DW]
The standard English unit for the density of water (DW) is 62.4 pounds per cubic foot. However, for working with small samples, a more convenient unit for DW is 0.578 ounces per cubic inch. An example calculation is given in the calibration example.
Example: Field Calibration of a Tensiometer
Step 1
- Prepare two tensiometers for field installation. (Preparation and installation procedures are discussed in Extension Publication AG 452-2, Measuring Soil-Water for Irrigation Scheduling: Monitoring Methods and Devices.)
Step 2
- Install each tensiometer at locations in the field that represent average field conditions. (Tensiometers should be placed in the row if the field is bedded or a crop is growing).
- Each tensiometer should be installed with the porous tip centered at one-half the effective root zone depth (typically 5 to 8 inches deep).
Step 3
- Check tensiometer readings immediately following a soaking rain (1 to 2 inches within 24 hours). They should read near zero (less than 3 centibars (cb) if their length is 12 inches).
Step 4
- Begin measurements for sandy to sandy loam soils approximately 24 hours after the rain ends. The soil should be near field capacity by this time.
- Record the tensiometer reading. The tensiometer will read around 5 to 10cb.
Step 5
- Collect a soil sample near each tensiometer at the depth of the porous tip. Each sample should be collected, weighed, and dried according to the procedure outlined in the previous section ("Determining Soil-Water by the Gravimetric Method").
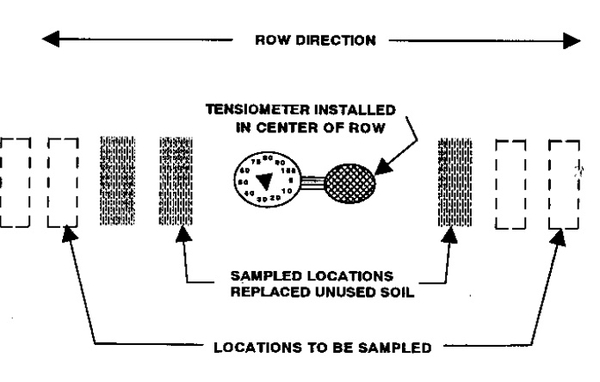
- Take the gravimetric soil sample about 12 inches from the tensiometer so that the soil around the tensiometer is not disturbed. Replace unused soil.
Step 6
- Repeat steps four and five at least twice per day (around midday and late afternoon) until the tensiometer readings exceed 70 cb. (This sampling frequency is for calibration during periods of high evapotranspiration, May to October. Otherwise, measurements can be made once every 24 hours at any time of day).
- Take samples from an undisturbed area on either side of the row near the tensiometers (Figure 5). Replace unused soil after collecting each gravimetric soil sample. At least two samples near each tensiometer should be undisturbed so that bulk density can be computed. Tensions above 20 cb are not easily obtained in the field unless plants are growing or no rainfall occurs for several weeks.
Step 7
- The above measurements will establish the moist range of the calibration curve. The permanent wilting point (POOP) water content is difficult to measure in the field. A gravimetric soil sample can be collected when a growing crop begins to remain continuously wilted for 24 hours. Otherwise, a soil sample should be sent to a laboratory so that the PWP water content can be determined by a laboratory procedure. If the PWP cannot be determined by one of the laboratory procedures, it may be estimated as one-half the water content at field capacity for most soil textures except soils with a clay content greater than about 35 percent.
Sample Calculations for the Calibration Procedure
Assume that the data in Table 2 were collected to calibrate a tensiometer as outlined above. Bulk density was determined on two undisturbed cylindrical core samples (3 inches in diameter by 3 inches in length). The bulk density can be computed from the volume of the core and the average weight of the undisturbed oven-dry samples.
Volume of core = 3.14(3in.)(3in.)(3in.)/4 = 21.2 in3
Average dry weight of two undisturbed samples:
(19.8 oz + 20.1 oz)/2 = 19.95 oz
Bulk density of the soil = 19.95 oz/21.2 in3 = 0.94 oz/in3.
The water content of each sample can be computed by the equation in step 10 of the gravimetric method.
For example, the volumetric water content for sample 2 in Table 2 would be:
Vw of sample 1
= [(23.3 oz - 19.8 oz)/19.8 oz] × [(0.94 oz/in3)/(0.578 oz/in3)] = 0.270 in3 water/in3 soil
= 0.270 in water/in soil
Note: Water content for remaining samples is shown in Table 3.
Several laboratory methods have been developed to determine soil-water versus tension from both disturbed and undisturbed core samples. With the exception of POOP, however, field-determined calibration curves are more reliable than laboratory calibrations.
Laboratory methods are about the only alternative for determining POOP. The cost of laboratory analysis is about $5 per tension measurement per core sample. Thus the total cost of laboratory analysis may approach $50 per core sample to define the full range of PAW.
Summary
Although most manufacturers provide calibration curves for soil-water measuring devices, it is important to perform field calibrations for this equipment for each major soil type that requires irrigation scheduling. After becoming familiar with the procedures discussed in this publication, be sure to:
- Check your soil-water measuring devices for storage damage or deterioration before installing them in the field.
- Place the devices in representative areas of the field.
- Be sure to calibrate all new devices.
- Take all measurements with care and accuracy.
- Use the formulas provided in this publication to perform the calculations necessary to calibrate your devices.
- Check the performance of your soil-water measuring equipment, especially tensiometers, weekly.
For further information on calibrating soil-water measuring devices, contact your local N.C. Cooperative Extension center.
Publication date: June 1, 1996
Reviewed/Revised: Sept. 23, 2024
AG-452-03
N.C. Cooperative Extension prohibits discrimination and harassment regardless of age, color, disability, family and marital status, gender identity, national origin, political beliefs, race, religion, sex (including pregnancy), sexual orientation and veteran status.

