
Introduction
Sludge accumulates in anaerobic lagoons during use. It consists of organic and nonorganic material produced when anaerobic organisms digest animal manure and other substances. Lagoon design standards include consideration for sludge accumulation, and lagoon management should include periodic measurement of the sludge layer’s depth. When its accumulation becomes excessive, sludge must be removed. The Natural Resources Conservation Service (NRCS) has a Conservation Practice Standard (Code 359) for lagoon management in North Carolina that requires an annual sludge survey after five years of lagoon operation (NRCS 2019), and the North Carolina Division of Environmental Quality (DEQ) requires annual sludge surveys for permitted lagoons.
This publication is intended for lagoon managers and operators. It describes how to conduct a sludge survey and discusses sludge depth measurement and volume determination. (For information on how to sample sludge for nutrient determination, see Sludge Sampling in Anaerobic Treatment Swine Lagoons.
Requirements for Sludge Surveys
Code 359 requires proper operation and maintenance of waste treatment lagoons. If sludge accumulation in the treatment volume exceeds 50%, the sludge should be either removed or the lagoon managed in accordance with a Sludge Management/Operation Plan approved by DEQ.
Permits for animal facilities issued by DEQ require a survey of sludge accumulation in lagoons every year unless exempted. The survey frequency may be reduced if it can be demonstrated to the satisfaction of DEQ that the rate of sludge accumulation does not warrant an annual survey. The survey shall include, but not be limited to, a sketch showing the depth of sludge in various locations within each lagoon. If the sludge accumulation is such that it reduces the lagoon’s minimum treatment volume to less than 50 percent of the treatment volume for which the lagoon was designed, a Plan of Action (POA) for Lagoon Sludge Reduction must be submitted to the DEQ central office within 90 days of the determination. The plan must describe the removal and waste utilization procedures that will be used. Compliance regarding sludge levels must be achieved within two years of the excessive sludge determination.
Sludge Characteristics
Two distinct zones occur in the anaerobic lagoon. First is the sludge accumulation zone at the bottom of the lagoon (Figure 1). The sludge is composed of settled manure solids, nonorganic constituents of manure, active and dead microbial cells, and other materials (such as debris and sand) that entered the manure collection system and settled to the bottom. Sludge is black, moderately viscous, typically about 14% solids and 86% liquid, and high in nutrients, bacteria, and organic matter. Biological activity occurs in the sludge, as evidenced by the biogas that periodically causes sludge to float to the lagoon’s surface. Sludge can be removed by pumps designed for 10% to 15% solid content.
The second distinct zone in the lagoon is the liquid layer above the sludge (Figure 1). This liquid, typically called lagoon supernatant or effluent, is low in solids (generally 0.3% to 0.6% solids), moderately rich in nutrients, and easily pumped with irrigation pumps. If the liquid and sludge are mixed, the solids content probably will be between 2% and 8% solids, depending on the proportion of sludge.
Between the two zones is a transitional zone with 5% to 10% solids, where most of the biological activity in the lagoon takes place. The sludge removal process can disturb this zone, resulting in reduced treatment activity until the lagoon returns to normal operation.
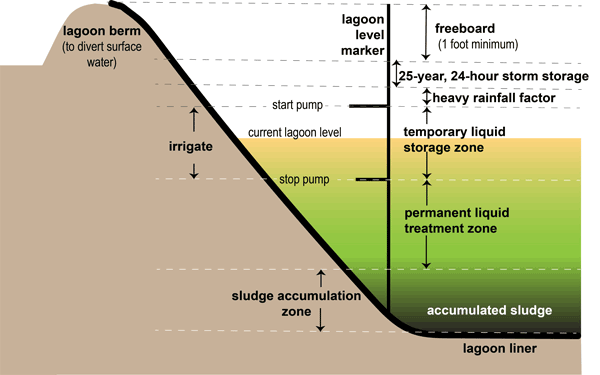
Figure 1. An anaerobic waste treatment lagoon.
Conducting a Sludge Survey—An Overview
A sludge survey involves two steps: (1) locating the top of the sludge layer, and (2) measuring its thickness at several locations in a lagoon. Both steps are discussed in detail in the sections “Steps in the Sludge Survey” and “Measuring Sludge Layer Thickness.” Using the measurements and the Lagoon Sludge Survey Form in Appendix 1, determine the thickness of the sludge layer and the thickness of the Permanent Liquid Treatment Zone, the distance from the Minimum Liquid Level (Figure 1) to the top of the sludge layer. Record measurements at each point of the survey grid on the Sludge Survey Data Sheet (Appendix 2). Estimate the volume of sludge and the fraction of the original liquid treatment zone that is filled with sludge using the worksheet in Appendix 3. Appendix 4 provides a conversion table that converts inches to tenths of a foot. If you anticipate that sludge removal might soon be required, take samples of the sludge or “cores” of the liquid column and sludge at the same time as the survey and send them for nutrient analyses. For more information on collecting sludge samples, see Sludge Sampling in Anaerobic Treatment Swine Lagoons.
Using a boat in a manure lagoon is a risky activity. The following safety guidelines are recommended:
- Flotation vests must be worn by any person within the lagoon berm (whether in the boat or at the lagoon bank).
- At least one person on the lagoon bank must be present with (a) a throwable flotation device connected to a line, and [b] a charged cell phone with signal reception to request emergency assistance if needed.
- Boots and gloves must be worn to minimize contact with manure during sampling.
- Flat-bottom or jon boats are preferred over canoes or V-bottom boats, as they are more stable.
- It is more efficient if one person in the boat uses the measuring instruments and the other records the data.
- Avoid working in inversion weather conditions because hazardous lagoon gases (ammonia, methane, and hydrogen sulfide) can reach dangerous concentrations, particularly in first-stage lagoons or lagoons with high solids accumulation.
The sludge layer is generally a “mobile” fluid, but it may form peaks and valleys within the lagoon. Small (usually older) lagoons seem to have more variation in sludge layer thickness. Liquid flow pattern in the lagoon, orientation of flush pipes and pump intake, and prevailing wind direction all contribute to the variability in sludge layer thickness across the lagoon.
Avoid measuring sludge depth in sloped areas of the lagoon embankments. For example, if a lagoon is 12 feet deep and the side slope is 3:1 (horizontal to vertical), then the slope extends for 36 feet (12 × 3 ÷ 1 = 36 ) into the lagoon. In this case, you should take the measurements more than 36 feet from the inside top of the lagoon embankment. Measurements from all locations on the grid should be averaged to produce an average sludge layer thickness and to calculate the volume of sludge.
Steps in the Sludge Survey
- Gather necessary personnel and equipment.
Personnel—There should be two people in the boat and one on the bank.
Boat—A 12-foot jon boat with a trolling motor is recommended.
Flotation vests—Every person within the lagoon berm should wear a flotation vest.
Anchors—Two to three anchors are recommended to steady the boat during measurements.
Sludge detection device—An infrared sensor or a disk-on-rope with interval markings can be used to determine the top of the sludge layer (see Measuring Sludge Layer Thickness section).
Solid, long rod or pole with measurement markings at intervals—Use these devices to determine the depth to the lagoon bottom. - Determine the number of points at which to take measurements. Measure sludge at a minimum of six points per acre on a uniform grid, using 24 points maximum; if the lagoon is smaller than 1.33 acres, measure a minimum of eight points.
- If you are unsure of the lagoon area, multiply the length times the width at the inside top of the bank and divide by 43,560 to calculate acres (1 acre = 43,560 square feet). Multiply the number of acres by 6, and round to the nearest number that gives a uniform grid, or multiply the area in acres by 8 for lagoons smaller than 1.33 acres.
- Once you have determined the number of measurement points, set up a uniform grid on the lagoon sketch to show the location of those points. For a 1-acre lagoon twice as long as it is wide, eight locations of about 60 feet by 50 feet would be marked on the grid (Figure 2). Attach this sketch to the Sludge Survey Data Sheet.
- Use survey flags or landmarks on the lagoon bank (such as the inlet pipe, power pole, and confinement house) to mark lines corresponding to the grid developed in Step 2. You can also rely on portable GPS tools to create the grid and navigate to designated grid points for sampling.
- Have the Lagoon Sludge Survey Form (Appendix 1) and Sludge Survey Data Sheet (Appendix 2) ready for recording information.
- Launch the boat and move to the first sampling point. Measure the depth from the surface of the liquid to the top of the sludge. Record this depth. Insert a pole vertically at the same location until it touches the lagoon bottom (soil). Record this depth. The sludge thickness will be the difference between the two readings. If measurements are taken in feet and inches, convert to feet and tenths of a foot using the conversion table in Appendix 4.
- Proceed to all other sampling points and record measurements as in Step 5.
- To determine the average sludge layer thickness in the lagoon, add all sludge layer thickness values and divide by the number of readings. This average sludge layer thickness will be used in the Sludge Volume and Treatment Volume Worksheet (Appendix 3) to determine how much sludge is in the lagoon. If the lagoon has an irregular shape, estimate the sludge volume by first estimating the total surface area in square feet and calculating the square root to obtain the dimensions for a square lagoon. Then use the procedures described in Appendix 3. If you need help determining the total surface area for an irregular shape, contact your local NRCS office or N.C. Cooperative Extension center.
- For each survey, the Present Liquid Level should be referenced to a permanent elevation or benchmark marker, and the Maximum Liquid Level should be noted from the lagoon marker. By measuring the difference in elevation between the Maximum Liquid Level and the Minimum Liquid Level on the lagoon gauges, you can calculate the difference between the Minimum Liquid Level and the top of the sludge layer, which is considered the existing Permanent Liquid Treatment Zone. Record this calculation on the Lagoon Sludge Survey Form. If the existing Permanent Liquid Treatment Zone is less than the existing sludge layer thickness, you must calculate the volumes of the treatment zone and the sludge layer in Appendix 3.

Figure 2. Layout for a lagoon 150 feet × 350 feet (1.21 acres), showing eight points for sludge measurements (4 × 2 grid).
Measuring Sludge Layer Thickness
Using the following procedures, measure the depth from the liquid surface to the top of the sludge layer, and then measure the depth from the liquid surface to the lagoon bottom (soil); calculate the difference to obtain the thickness of the sludge layer (Figure 3).
Depth to Top of the Sludge
Various methods can be used to measure the depth from the liquid surface to the top of the sludge layer. Although some publications recommend detecting the sludge layer by “feel” (based on resistance from the sludge) using a capped pipe or a pipe with a disk or a tee attached to the bottom, these methods are likely to yield variable and inaccurate results. Although sludge is more viscous than the lagoon liquid, it is difficult to feel when the sludge is first encountered. Therefore, we do not recommend “feel” methods. For the most accurate sludge surveys, we recommend commercially available infrared sensors, a disk-on-rope device, a clear plastic pipe (such as the Sludge Judge) for obtaining a liquid column, or an electronic sonar depth finder. Following is an overview of these tools.
- Infrared Sensors
Depth from the liquid surface to the top of the sludge layer can be measured reliably in most lagoons with infrared detectors such as the Sludge Gun or the Sludge Interface Detector. The infrared detectors indicate when the sludge layer is reached by emitting an audible sound. The sensitivity of the detectors can be adjusted, but in lagoons that have a high solids content, the detectors might sound as soon as the sensor is put into the liquid. If this occurs, you may need to use an alternative method to detect the top of the sludge layer. Infrared detectors cost between $750 and $1,000.
Sources:
- Sludge Gun (Sludge Blanket Level Detector) Model 10 from Markland Specialty Engineering Ltd. of Toronto, Canada, includes a 10-meter cable marked in feet. Markland recommends Model 10 HP for lagoons.
- Raven Sludge Interface Detector, made by Raven Environmental Products, lights up and also makes an audible sound when the sludge layer is detected. Price with a 20-foot line is about $982 (item SID-10200).
- Disk-on-Rope
This method to detect the top of the sludge layer is much less expensive but somewhat more time-consuming. It relies on a disk or plate that sinks through the liquid and settles on the sludge. Careful use of a PVC disk that is ¼-inch thick and about 8 to 12 inches in diameter or of square shape (specific gravity = 1.4) has shown results consistent with the infrared detectors (within 1-inch accuracy). Disks made of Lexan (specific gravity = 1.2) give similar results. The wire, rope, or string by which the disks are lowered into the lagoon should be marked in inches or tenths of feet for easy reading. This line should not be elastic because stretching will cause variations in readings. Lower the disk slowly to ensure it maintains horizontal orientation. Drilling holes in the disk will allow liquid to pass through and may reduce swaying. To keep the disk more stable, you can attach the rope or string to the disk at the center or at two to four symmetrical points. You should measure the depth to the sludge layer with the disk before using a pole to measure depth to the lagoon bottom because the pole may disturb the sludge layer. - Sludge Judge or Clear Plastic Pipe
These methods are considered slightly less accurate for determining the top of the sludge layer. A Sludge Judge or similar clear plastic pipe with a valve at the bottom, if used carefully, is accurate to within 1 to 3 inches of infrared or disk readings. Typically, the sludge does not flow freely into the pipe, so the reading indicates slightly less depth to the sludge than is actually present. Observe the liquid level inside the pipe as you slowly lower the Sludge Judge into the lagoon. When the sludge layer is reached, the liquid level inside the pipe will drop slightly below the liquid level outside the pipe. Then, the Sludge Judge can be removed and the depth from the liquid surface to the sludge can be recorded. (There should be 1 to 2 inches of sludge at the bottom end of the pipe to ensure that the sludge layer has been reached). As an alternative to a Sludge Judge, you can make an apparatus by attaching a ball valve with handle (operated by a rope) at the bottom of a clear plastic pipe. You can construct the pipe in sections so that it can be disassembled for transport. The pipe can be as large as 2 inches in diameter, but it will be heavier to handle when collecting liquid and sludge; the minimum recommended diameter is 1¼ inches. (Penetrating the sludge layer with an open pipe does not yield accurate thickness estimates of the sludge layer, probably because of sludge compression or clogging of the pipe.) Either the Sludge Judge or a pipe you modify can also be used to obtain a sludge sample for nutrient analysis.
The Sludge Judge costs between $50 and $150 and can be ordered in either a ¾-inch or 1¼-inch outside diameter. Sludge Judge information is available from Pollardwater. Pollardwater offers three models with prices of about $140 for a 15-foot length in three 5-foot sections (1¼-inch diameter). Wildco also offers three types with prices of about $90 to $140 for a 15-foot length. - Electronic Sonar Depth/Fish Finder
The depth finders used by boaters and fishermen can also be used to determine the distance from a lagoon’s liquid surface to its sludge layer. Fish finders and depth finders transmit a high frequency signal from an antenna (called a transducer) and measure the time that it takes the signal to be reflected back to the transducer. The receiver then calculates the distance based on the time delay between the transmitted and reflected signals and the speed at which the signal travels in water (about 4,800 feet per second).
Lagoon managers have built and used different versions of remote controlled boats in conjunction with a fish finder. By using GPS technology with a fish finder, both the location and depth to the top of the sludge layer can be recorded electronically. The recorded data can then be used to develop contour maps of the sludge or simply to calculate the average depth to the sludge. An experienced operator can obtain good results with a properly selected sonar unit. The results obtained from a sonar unit should be compared to results from another recommended method until you are confident of the results. A suitable unit will cost between $120 and $200. If additional features, such as GPS and a memory card, are desired, the cost may be considerably more. Following are some important considerations for selecting a sonar unit:
- Transmitter power—Higher power increases the likelihood that a signal will be reflected back to the transducer in lagoons with high solids content.
- Transducer—Narrow cone angles concentrate the signal into a smaller area and are preferable.
- Receiver—Manually adjustable controls, such as sensitivity, are important to reduce false readings, especially in lagoons with high solids content.
- Display—A graphic (picture) display with high resolution and good contrast is less likely than a digital display to produce false readings.
When measuring with a sonar unit, follow these procedures:
- Record the distance from sonar transducer to the surface of lagoon liquid and reference the liquid level in the lagoon to a fixed elevation (such as the start/stop pumping marker).
- For the initial survey, establish a permanent grid by measuring the lagoon bottom elevation with a pole or other method and recording the elevation for each point on the grid.
- If the sonar unit is to be used on a large boat with an operator rather than a remote controlled boat, it is best to mount the transducer on a float independent of the boat so that it will remain at a constant location relative to the liquid surface (in other words, it won’t move up and down with a rocking boat). Record the distance from the transducer to the liquid surface and add to the depth measurement if necessary.
- Adjust the sensitivity to the lowest possible setting and turn off the fish identification feature, if the unit is so equipped, to reduce the interference from suspended solids.
- Record the depth to the top of the sludge at each reference point.
In addition to sonar units attachable to remote controlled or manned boats, a new class of compact fish finder modules (4- to 5-inch diameter spheres) can be cast from the lagoon bank using a fishing line. These modules require a vendor-provided smartphone application to communicate measurements via Wi-Fi signal. Some vendors provide cloud-based services that can create contour maps. These modules can be used in continuous reading mode or single reading mode (the latter option is preferred). Large lagoons can be difficult to survey using castable fish finders because of the casting distance and precision required. These units cost between $100 and $300 depending on their range and additional features, such as cloud services access. Examples of these fish finders include the Lowrance FishHunter 3D castable sonar model ($99), available from Lowrance, and Deeper Smart Sonar Fish finder Pro+ (Model 1TGAM0301) ($190), available from Deeper.
Depth to the Bottom of the Lagoon
After measuring the depth to the sludge layer, determine the depth from the liquid surface to the lagoon bottom at the same location. Use a ½-inch to 1-inch diameter pole marked in inches or tenths of feet. It can be made of wood, aluminum, or PVC with end cap. Push the pole through the sludge until the bottom is reached. Hold the pole vertically and do not push it into the soil; it should only make contact. The marked readings at the end inserted into the lagoon should begin at zero so that you can directly read the distance from the lagoon bottom to the liquid surface. If you construct a pole with multiple sections, such as 4-foot lengths of PVC with joints, be sure that the depth indicators will be accurate when the pole is assembled.
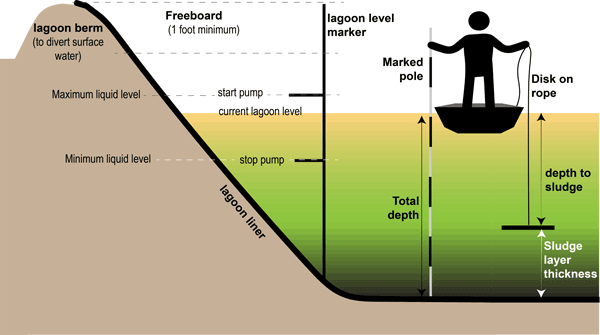
Figure 3. Sludge survey steps (sketch is not to scale and for illustration only).
Reference
Natural Resources Conservation Service (NRCS). 2019. Conservation Practice Standard: Waste Treatment Lagoon (Code 359).
Additional Resources
Sharara, M.A. and M.Y. Owusu-Twum. 2020. Sludge Sampling in Anaerobic Treatment Swine Lagoons. AG-881. Raleigh, NC: NC State Extension.
NC State Extension. 2017. “Chapter 4. Tools for the Plan.” In Certification Training for Operators of Animal Waste Management Systems: Type A. AG-538-A. Raleigh, NC: NC State Extension.
Acknowledgments
The author would like to thank Philip W. Westerman, Karl A. Shaffer, and J. Mark Rice, who developed an earlier version of this publication.
Appendices
Appendix 1. Lagoon Sludge Survey Form
Appendix 2. Sludge Survey Data Sheet
Appendix 3. Sludge Volume and Treatment Volume Worksheet
Appendix 4. Conversion Table from Inches to Tenths of a Foot
| Inches | Tenth of foot |
|---|---|
| 1 | 0.1 |
| 2 | 0.2 |
| 3 | 0.2 |
| 4 | 0.3 |
| 5 | 0.4 |
| 6 | 0.5 |
| 7 | 0.6 |
| 8 | 0.7 |
| 9 | 0.7 |
| 10 | 0.8 |
| 11 | 0.9 |
| 12 | 1 |
Publication date: Nov. 23, 2020
AG-639
The use of brand names in this publication does not imply endorsement by NC State University or N.C. A&T State University of the products or services named nor discrimination against similar products or services not mentioned.
N.C. Cooperative Extension prohibits discrimination and harassment regardless of age, color, disability, family and marital status, gender identity, national origin, political beliefs, race, religion, sex (including pregnancy), sexual orientation and veteran status.