
Introduction
To be more competitive in today's markets, vegetable growers are looking for new ways to achieve higher-quality produce, superior yields, and early spring markets. The plasticulture system–which combines raised beds, plastic mulch, drip irrigation, and fumigation–has helped an increasing number of producers reach these goals. Growers using the plasticulture system have doubled and tripled yields and harvested their crops two to three weeks earlier than is possible with traditional growing practices.
Throughout this publication we will emphasize that plasticulture is a system that cannot function optimally without all of its components. The benefits of these components are described below.
Raised beds help provide more uniform soil moisture and warmer growing conditions in the spring.
Plastic mulch, which gained wide acceptance in the early 1980s, helps warm the soil and reduces water loss. The mulch also protects fruits and leaves from disease by preventing direct contact with the soil. Black plastic mulch even helps control weeds.
Drip irrigation provides a uniform supply of water, which keeps the soil moist under the plastic. Soils in the Southeast, in particular, have limited water-holding capacity and do not re-wet easily once they have dried out. Drip irrigation helps eliminate this problem by frequently supplying small amounts of water to maintain a more constant moisture level.
Fumigation controls weeds, insects, and diseases. This control is an important element of plasticulture, because the high temperatures induced by plastic mulch stimulate pest activity.
The success you can achieve with plasticulture depends on the specifics of your operation. This publication provides information to help you decide if plasticulture is right for you, and if you decide it is, how to prepare your site and manage the system.
Plasticulture's Advantages and Disadvantages
Plasticulture is a management-intensive system that requires careful planning and close attention. Its benefits, however, can be many. Before you invest in plasticulture, you should carefully weigh the advantages and disadvantages of plasticulture versus traditional practices.
ADVANTAGES
EARLIER PRODUCTION. Probably the greatest benefit of growing crops on plastic is earlier production. Plastic mulch raises the soil temperature, which helps plants grow more quickly and mature earlier. Spring vegetables grown on black plastic can be harvested 7 to 21 days earlier than they can be on nonplastic mulch. Harvesting one to two weeks earlier often significantly increases market advantage and the prices growers receive.
REDUCED LEACHING OF FERTILIZER. Because many fertilizer nutrients are not held tightly in the soil, rainfall and excessive irrigation may leach them below the roots of plants grown on bare ground. Nitrogen, potassium, magnesium, and some formulations of micronutrients are subject to leaching, especially in light, sandy soils. A plastic mulch covering the bed (or portion of it) prevents rainfall from percolating through the soil and moving nutrients beyond the reach of plant roots. Preventing leaching improves the efficiency of production by eliminating the need to make several trips through the field to resupply leached nutrients, thereby saving time, fuel, and fertilizer. In addition, it helps prevent reduced quality and lower yields resulting from (1) hidden hunger - early stages of nutrient deficiency that may harm plants even before they begin to show symptoms and (2) lag time - the time from when plants first show symptoms of a deficiency until nutrients are replenished in the plant tissues. Finally, minimizing the amount of leaching into the soil helps protect groundwater from fertilizer contamination.
FEWER WEEDS. Black plastic mulch prevents the growth of most weeds except nutsedge. Clear plastic, however, does not prevent weed growth because light can penetrate it. So if you are going to use clear plastic, you will also need to use a herbicide or soil fumigant. Herbicides also control weeds on bare ground between the plastic-covered beds.
INCREASED PLANT GROWTH. Plants grow more with plastic mulch for two reasons. First, soil temperature at the 2-inch depth is increased by up to 10°F under black mulch and up to 15°F under clear mulch. Second, during growth, plant roots take in oxygen and give off carbon dioxide (CO2). Plant leaves require CO2, which they get from the atmosphere. When plants are grown on plastic, the CO2 released from roots accumulates under the plastic and eventually escapes through the holes in which the plants are growing. This “chimney effect” increases the concentration of CO2 to the leaves and enhances plant growth.
REDUCED EVAPORATION. Because growth rate on mulch may be twice that on unmulched soil, plants may require more water even though evaporation is reduced. Mulching cannot substitute for a sound irrigation program. However, less water evaporates from soil under plastic mulch, and soil moisture is maintained more uniformly. Therefore, you actually need less water per unit of production.
IMPROVED QUALITY. Vegetables grown on plastic mulch are cleaner and less subject to rots because soil has not been splashed on the plants or fruit.
REDUCED SOIL COMPACTION. Soil under plastic mulch remains loose, friable, and well aerated. Roots have access to adequate oxygen, and microbial activity is enhanced.
BETTER SURFACE WATER DRAINAGE. Excess water runs off the plastic-covered rows and out of the field, reducing drowning and other stresses related to waterlogged soil.
CULTIVATION ELIMINATED. There is no need for cultivation, except in the area between the mulched strips. Weed growth in these areas can be controlled with a labeled herbicide.
BETTER FUMIGATION. Plastic mulches increase the effectiveness of soil fumigation by retaining fumigants in the soil and providing better pest control.
DISADVANTAGES
REMOVAL AND DISPOSAL. A major problem with the plasticulture system is having to remove mulch and drip tubing from the field after cropping. Conventional black plastic mulch does not break down and should not be disked into the soil. It can, however, be recycled. Clear plastic does eventually break down, but small pieces may remain in the field for several years. In addition, there are photodegradable and biodegradable mulches, which break apart into the soil and do not have to be removed.
GREATER INITIAL COSTS. Because plasticulture requires an investment in specialized equipment - including bed press, mulch layer, and mulch transplanter (or plug-mix seeder) - initial production costs are significantly higher than for traditional practices. Yearly costs of plastic and drip tubing further increase production expenses. These costs, however, should be offset by increased returns from earlier harvests, better quality, and higher yields.
INCREASED MANAGEMENT. Plastic mulch and drip irrigation must be monitored daily to be successful. Although plasticulture technology offers several important advantages over conventional production practices, it is not necessarily for everyone. Whether plasticulture is right for your operation depends on several factors: (1) are the vegetables you intend to grow suited to production on plastic, (2) will the vegetables be intensely managed, (3) are sufficient financial resources available or obtainable, (4) do you have a good market, or prospects for one, and (5) have you established a successful track record growing vegetables on bare ground?
If you answered “no” to one or more of these questions, then plasticulture might not be a good alternative for you now. However, if you answered “yes” to each of these questions, plasticulture may be profitable for you.
WHERE DO I GO FROM HERE?
Learn as much as you can about producing vegetables on plastic. Closely analyze your operation to see if and how plastic would help increase profits. After you read this publication, talk with your county Extension agents, and visit farms where you can see a plasticulture operation firsthand.
Preparing the Site
Site preparation is an important component of a successful plasticulture system. The field should be plowed early, with special attention given to incorporating organic matter. If cover crop residue is not plowed under well and early enough to allow it to decompose, it will disrupt fumigation and require more fumigant to treat the soil.
SOIL PREPARATION
The first step in preparing soil is to take two soil samples in the early fall. Have one sample assayed for mineral content and one for nematodes. If there is a nematode problem, fumigate the soil at the time the plastic mulch is laid. By using a multipurpose fumigant (such as Methyl bromide [check label for crops], Terr-0-Gas 67, Busan, or Vapam) you can control weeds, nematodes, soil-borne insects, and diseases. It is important to have the proper soil pH for adequate crop growth, so apply enough lime in the fall to reach pH 6.0 to 6.5. Use dolomitic lime if magnesium is low. Fertilizer and lime should be applied according to results of the soil test. Usually 15 to 25 percent of the nitrogen and potassium and all of the phosphorus is applied at the time plastic is laid. The remaining nitrogen and potassium should be applied through the drip tube using soluble fertilizers such as calcium nitrate, sodium nitrate, 20-20-20, 15-0-14, and/or potassium nitrate. Although not recommended, overhead irrigation with fertigation can be used if the plastic is perforated. If fertigation is not used, all of the fertilizer can be applied preplant. For specific crop fertilizer recommendations consult Horticultural Information Leaflets available from your county Extension Center. Caution: Using fertilizers with ammoniacal nitrogen in fumigated soils can result in ammonium toxicity to the crop. Normally, at least 50 percent of the nitrogen should be in the nitrate (NO3) form.
TILLAGE METHODS
The tillage method you use should result in a soil of good tilth that can be easily formed into a bed. Normally, the soil is bottom plowed, disked one or two times, and then in-row subsoiled.
BED FORMING
Bed forming, or bed shaping, is an important practice in the plasticulture system. Most problems associated with plastic mulch are due to poor soil and bed preparation. The soil must be loose and friable and free of stones, clods, sticks, and undecomposed plant residue. Sharp stones and sticks will puncture the mulch film and allow soil fumigants to escape. Clods, stones, and undecomposed plant residue make laying the plastic difficult and prevent the desired contact between the soil surface and the plastic mulch. For the plastic mulch to lay properly the bed must be tight, firm, and well-formed. If the bed is too soft, fruit such as muskmelons will cause a depression where water accumulates, and the melon may rot. Also, the bed should be crowned (1.5 inches higher in the center) so water will run off and not rest on the plastic.
Bedding machines are available (Kennco Manufacturing Incorporated and Riddick Equipment Company) in single- and multiple-row models. With some bedding machines, such as Superbedders, the soil is lifted up and then bedded in one operation. If the bed shaper is lined with Teflon, the bed surface will be much smoother. With other bed shapers, the soil is first lifted with hilling discs or double disc hillers and then compressed to a uniform height and density by a bed press pan. Be sure that enough soil is pulled up so that the bed has good, sharp corners. Bedded rows should be spaced on 5- or 6-foot centers depending on your equipment.
Laying Plastic and Fumigating
WHEN TO APPLY PLASTIC AND FUMIGATE
Laying the plastic mulch and fumigating in the fall has several advantages: (1) spring’s typically wet weather can result in delays in laying the plastic and transplanting; (2) better fumigation of the soil is possible in the fall because the soil is not apt to be too wet or too cold; (3) nematode populations are generally highest in the fall so fumigating then is most effective; and (4) fall-applied mulch often makes it possible to transplant 10 to 14 days earlier in the spring.
HOW MUCH PLASTIC?
For 5-foot row centers there are 8,712 linear feet of row per net acre, so you would need about 3.5 rolls (2,400 feet per roll) of plastic mulch per acre. For 6-foot centers, three rolls of plastic mulch will be required per acre.
PLASTIC-LAYING MACHINES
A number of manufacturers make machines that lay plastic mulch. While machines may vary in design, they all lay plastic satisfactorily if properly adjusted. Most machines have some fine points that set them apart, making it worth your time to investigate these differences. Some plastic-laying machines, for instance, have the ability to change rolls of plastic without stopping, and all have some method of holding an extra roll of film. Most also can control the tension of the film as it is being laid. Some machines form the bed, fumigate, and lay plastic and drip tube all in one operation. In general, the smaller, lighter machines are designed for small acreage, and the larger, heavier machines for larger acreage. It is important that the plastic fit tightly on the bed and that the edge of the plastic, or the tuck, be held firmly in the soil. These measures reduce the chance of wind getting under the plastic and causing it to blow off or float up and down, which injures plants. Cutting a deep trench on the edge of the bed with a small furrow-opener attachment will aid in getting a tight tuck. Fumigation equipment may also be attached to the front of the mulch layer. The soil can be fumigated as the plastic mulch is being laid, or it can be done in a separate operation immediately before mulch laying. Drip irrigation tube applicators are normally attached to the front of the mulch layer.
FUMIGATION
The amount of fumigant to be applied per acre depends on row width and is a percentage of the broadcast rate. (Consult your state’s agricultural chemicals manual.) Air temperature should be at least 50°F, and the soil should be well-prepared. If both the air and soil are warm, most fumigants will escape through the plastic mulch within 12 to 14 days.
Drip Irrigation
WHAT IS DRIP IRRIGATION?
Drip irrigation was first developed in the 1940s in England, but it was not until the advent of polyethylene plastics in the 1960s that the principle of frequent low-volume irrigation was put to field use. This system of irrigation was first popular in Israel and soon spread to many parts of the world. Yields and quality of fruits and vegetables were increased severalfold. The main reason this system is so successful is that drip irrigation puts water near the roots of the crop. Because only the water needed by the crop is used, waste due to runoff and evaporation is reduced. In fact, roots of plants that are drip irrigated tend to be most plentiful near the dripper tubing and seem to grow around the tube and “lock on” to get their water.
Drip irrigation management is very different from other types of irrigation. Because most drip systems apply only 0.05 to 0.10 inches per hour, it takes a long time to supply enough water. Frequency of irrigation depends on soil type and stage of crop growth. Tensiometers or electrical resistance blocks at 6 and 12 inches below the surface of the soil in mulched beds are recommended to help determine irrigation needs. Frequent probing with a soil tube near the plant row will also help to check soil moisture. Normally the area around the drip tube is very soft to the touch; the side of the row away from the tube should be only slightly soft. Generally, drip irrigation is applied daily or even more frequently. Once the ideal soil moisture is established, only slight variations from this set point should occur. With other types of irrigation, soil moisture level varies greatly because of the practical considerations of operating the irrigation system. Because the drip system is in the field at all times and is easy to operate, it can be turned on whenever the plants need water.
MAJOR COMPONENTS OF A DRIP IRRlGATlON SYSTEM
A drip irrigation system has five major components:
- Delivery system - drip tape or retrievable drip tubing.
- Filters - sand, screen, or disc.
- Pressure regulators - spring or valve.
- Valves - hand-operated, hydraulic, or electrical.
- Controllers - simple electric clock or computer.
How you put these components together, and which options you choose, will depend on the size of the system, the water source, the crop, and how sophisticated a system you need. Table 1 describes two sample systems.
| Components | Pond or River | Well or City Water |
|---|---|---|
| Pump | 7-10 hp electric 12-20 hp gas |
7-10 hp electric Line pressure |
| Chemigation | 40-80 gph Dosatron | 40-80 gph Dosatron |
| Primary filter | Sand filters, 2-24 inch | Sand filters or disc filters or screen filter (200 micron) |
| Secondary filter | Disc or screen filter (200 micron) | Not needed, but recommended |
| Main line | 3-6" Layflat | 3-6" Layflat |
| At Field | ||
| Secondary filter | Disc or screen filters (may not be needed) | Disc or screen filters (may not be needed) |
| Solenoid or control valve and pressure regulator | Hydraulic or electrical solenoid Gate valve Reduce pressure to 8-15 psi |
Hydraulic or electrical solenoid Gate valve Reduce pressure to 8-15 psi |
| Submainliners | 1.5-3" Layflat | 1.5-3" Layflat |
| Drip tube Line Source or In-line emitter |
Roberts Ro Drip Hardie Bi Wall, Chapin 4 chamber Netafim (Typhoon or Ram [pressure compensating]) |
Roberts Ro Drip Hardie Bi Wall Chapin 4 chamber Netafim (Typhoon or Ram [pressure compensating]) |
DELIVERY SYSTEM
Most vegetable growers use a drip tape supply system as shown in Figure 4. Water passes through holes or emitters in the tube’s inner chamber to a smaller outer chamber, where it is forced through tiny passageways that serve to reduce the water’s pressure. When the water reaches the exit holes to the soil, it has little or no pressure and simply drips out. Depending on the type of drip tape, the inside holes are spaced from 8 inches to 6 feet apart, and the outside holes from 8 to 24 inches apart. You can specify the spacing between exit holes. In general, the sandier the soil, the closer together the holes must be.
This type of drip tape is usually used for only one year and then discarded because attempts to retrieve and store it have often resulted in clogging or extensive rodent damage and troublesome repair the second year. Most drip tapes have an application rate of 0.05 to 0.10 inches per hour per acre when used on a 5-foot row center.
Some vegetable growers use retrievable drip tubing, which has a heavier construction than the drip tapes (usually 20- to 30-mil thick polyethylene). These systems use in-line emitters which apply 1 to 4 quarts per emitter per hour; irrigation in inches per hour per acre will depend on spacing. These emitters can be manufactured into the line, inserted into the line or inserted onto the line. The first two types are most common in vegetable crops. Emitter systems are initially more expensive than drip tape but are reused for several years and may be less expensive over time than drip tape systems. Emitters used with vegetables are usually diaphragm or turbulent-flow type. The diaphragm types have internal pressure compensation and can be used in rolling areas where change in elevation affects water pressure.
For single-row-per-bed crops such as tomatoes, cucumbers, muskmelons, honeydews, watermelons, and pumpkins, the drip tube should be placed 4 to 5 inches from the center of the bed and 1 to 2 inches deep with the emitters facing upward. For crops like summer squash, okra, eggplant, peppers, beans, peas, lettuce, and sweet corn that are planted two rows per bed, the drip tube should be placed directly on the center of the bed and buried 2 to 3 inches deep.
FILTERS
The type and size of filter you choose will depend on the quality of your water source. Your equipment dealer will be able to assist you in making this choice. The most commonly used types of filters are sand, disc, and screen.
Sand filters are an absolute necessity for any surface water source. Most surface waters such as ponds, streams, and rivers have enough contaminants at some time in the cropping season that sand filters are the only practical way to remove them. These filters contain 12 to 18 inches of sand which traps any contaminants as the water is pumped through it. The advantage of sand filters is that they can be flushed for cleaning. Flushing is a very quick process and can even be automated. Also, for their cost, sand filters have a large filter area. At least two sand filters are needed during the back flushing operation; clean water from one filter is used to remove contaminants from the other filter. Sand filters come in varying diameters, from 14 inches (enough for 2 acres) to 48 inches. If your water source is flowing water, such as from streams or rivers, you will probably need to use a sand separator to remove sand from the water before it enters the filter.
Screen filters are used as secondary filters with surface water systems or as primary filters with well or municipal water sources. Screen filters consist of a cylindrical outer housing and an internal cylinder of a fine screen. Water enters the outer chamber and is forced through the inner chamber to an exit port. Screen filters range in diameter from 3⁄4 inch (used only for 1⁄2 acre) to 10 inches (used with several acres). Some screen filters have automatic backflush capabilities, but most must be flushed manually.
Disc filters are used as secondary filters with surface water systems or as primary filters with well or municipal water sources. These filters contain a series of grooved plastic discs that remove contaminants as small as 200 microns (about 1⁄1,000 inch). An advantage of using disc filters is that they have more surface area than screen filters and are easier to clean.
If the water is very dirty, or if it contains a lot of iron or large amounts of algae, use small screen or disc filters even on submain lines.
PRESSURE REGULATORS
Usually, pressures in a main line range from 30 to 50 pounds per square inch (psi). However, most drip irrigation systems operate at line pressures between 8 and 15 psi, so water pressure must be reduced before it reaches the drip tape. This is accomplished by spring-type or diaphragm-type pressure regulators. Spring-type regulators are used on systems of up to 5 acres; systems larger than 5 acres require diaphragm-type regulators.
VALVES
All systems need an on-off valve, and if your water source is a well or municipal water you must use an antisiphon backflow preventer. The simplest valve for a drip system is a gate valve, and on very small systems where the pressure is constant, the gate valve can also serve as a pressure regulator. Solenoid valves, either electric or hydraulic, are essential if you plan to automate your operation or separate the field into zones. Solenoid valves allow you to switch from one zone to another zone and to turn the system on and off. Solenoids can be manually switched, but usually some sort of electric controller is used.
CONTROLLERS
There is a wide variety of controllers available ranging from a simple time clock to a complex computer-controlled unit that can run many zones. The computer controllers can also sense flow rate and pressure and will shut the system down in case of a malfunction. With some clocks you can run one zone for one period and another zone for shorter or longer time periods.
Water Management for Drip Systems
IRRIGATION SCHEDULING
Irrigation scheduling means determining when to irrigate and how much water to apply. Both decisions depend on the desired soil moisture level, the crop's water requirements, the water supply in the root zone, the water-holding characteristics of the soil, and the efficiency of the irrigation zone.
It is important to schedule irrigation carefully, because frequency of irrigation and quantity of water applied affect the cost of production as well as plant growth and development. Irrigation scheduling becomes even more critical when drip irrigation is used in combination with plastic mulch and fertigation.
Remember that drip irrigation is different from other types of irrigation because it maintains a constant optimal moisture level in the root zone by frequent applications of relatively small amounts of water. These small but frequent applications help to minimize loss due to water percolating deep into the soil. Although drip irrigation uses water efficiently, the soil water content must still be monitored frequently'to make sure crops are receiving the ideal amount. This amount usually ranges from 0.03 inches to 0.25 inches per acre per day, depending on type of crop, growth stage, soil type, temperature, and evaporation rate.
SOIL MOISTURE MANAGEMENT
Soil moisture can be measured with a tensiometer or with electrical resistance blocks. Following are some general guidelines for using moisture meters to schedule drip irrigation; for more detailed information contact your county Extension Center.
- Tensiometers and moisture blocks are usually set up in pairs. Each pair is called a station, and there should normally be one station per irrigation zone.
- At each station one of the sensors should be placed near the middle and the other near the bottom of the root zone. The mid-zone sensor detects moisture loss in the upper portion of the soil and indicates when irrigation should begin. The deep sensor detects penetration of water to the lower roots and indicates when to stop irrigating.
- Placement of sensors in relation to the row and the drip tube is critical. Drip tubes wet only a portion of the soil. The soil wetting pattern may extend only 6 to 8 inches from the emitter in sandy soil to several times that distance in heavier clay soils.
Where one drip tube is used per row (for example, tomatoes on 6-foot centers), the sensor should be placed on the opposite side of the row from the drip tube halfway between two plants and about four inches off row center.
For crops having one drip line located between two rows (for example, double rows of peppers spaced 12 inches apart), the sensor should be placed on the outside of one of the rows halfway between two plants and about four inches off plant row center.
- For sands and sandy loam soils, irrigation should begin when the shallow sensor indicates 20 to 30 centibars (35 to 50 for clays) and should be stopped when the deep sensor indicates 10 centibars (15 for clays).
- The irrigation system should be turned on when the tensiometer indicates that available soil moisture (ASM) is at 70 to 80 percent and turned off at 90 percent ASM. Another way to determine when to turn the system off is to take several soil cores on both the side of the row that has the drip tube and the side away from the drip tube, then feel the soil. The soil on the drip tube side should be too wet to plow; the soil on the other side should be about ready to plow. An additional quick field check is to feel the softness of the soil with your foot on the drip tube side and on the opposite side; the drip tube side should be soft and the opposite side should be more firm. The texture of the soil varies with the soil type. With some crops, like tomatoes, you can tell by faint color changes in the vegetable when the crop needs water, but in others, this is very difficult to do. You should not see wilting at any time.
It is good management to both irrigate and fertilize with the drip irrigation system as long as supplying the crop water requirements is closely coordinated with providing the crop nutrient requirements. Drip irrigation is a management-intensive system; to be successful, crops must be watered daily or even hourly.
An example of how to operate a drip system might be to run the system for 1 to 2 hours every other day, early in the season, when the crop is young and the weather cool. As the crop grows you might need to increase irrigation to 2 to 3 hours per day. During the period when fruit is expanding or when the weather is hot it may be necessary to run the system 3 to 5 hours each day. Even with relatively long run times crops may still suffer from heat stress.
An example layout for a drip irrigation system.
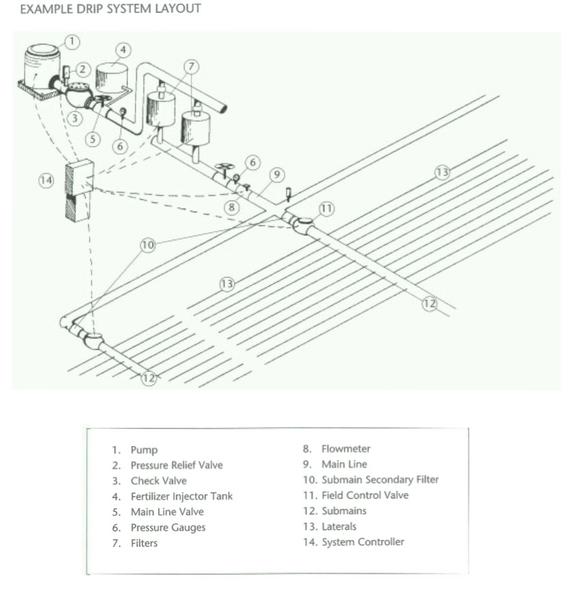
Example of drip irrigation system.
Fertigation Systems
WHAT IS FERTIGATION?
Fertigation is the process of feeding crops by adding soluble fertilizers into an irrigation system. A drip system produces uniform water distribution and, therefore, can also regulate crop feeding. Once a drip system and all its hardware is installed in the field, it makes sense to use the drip system to distribute fertilizer to the crop. Fertilizer can be applied with several types of devices, all of which are called injectors.
TYPES OF INJECTORS
VACUUM INJECTORS (VENTURI-TYPE). Vacuum injectors use the venturi principle for injecting solutions into the irrigation line. The simplest of these is the “hozon,” which is a sucking device that is recommended only for a 1⁄2 acre or less. Other venturi units are available in various sizes, up to 2 inches in diameter. A venturi applicator draws fertilizer solution out of a tank by differential pressure created within the venturi. Because pressure in an irrigation system is variable, there will be surges at times; therefore, application rates are not as uniform as with other methods.
PUMPS. Various types of pumps are available for injecting fertilizer into the irrigation stream, including small electrical pumps which must be calibrated and require electric power running to the location, and pumps that are powered by irrigation water.
The TMB pump is constructed of stainless steel and has rubber diaphragms. This pump is driven by the irrigation water and does not require electric power. It is durable, reliable, and accurate. Water drives the piston which draws a known volume from a tank and forces it into the irrigation line. If chlorine is injected and left overnight in the pump, the stainless steel can be stressed, shortening the life of the pump. TMB pumps come in four sizes, pumping from 13 to 300 gallons per hour (gph).
The Amiad pump is made entirely of plastic and also uses water to drive the piston. It, too, is accurate and durable. Amiad injection pumps come in a single-piston model (150 gph) and double-piston model (150 gph). Because of the plastic construction, chlorine does not harm this pump.
The Dosatron is the newest kind of fertilizer injector. It uses hydraulics to suck fertilizer from a tank, and then it can pump it into the system while attached in-line without requiring a bypass.
DRIP FERTIGATION SCHEDULES
Drip fertigation schedules vary depending on the crop. Most schedules are designed to supply the plant nutrients as needed. It is helpful to analyze plant samples weekly in order to adjust fertigation techniques for a particular crop. In general, preplant fertilizer should supply 15 to 25 percent of a crop’s total nitrogen needs, 20 to 30 percent of the potassium, and all of the phosphorus, calcium, magnesium, and minor nutrients. The remainder of the crop’s nutrients should be applied as needed through the life of the crop. Adding nutrients with a drip system or by foliar application can make up for any shortages you discover after the preplant fertilizer has been applied. Tables 2 through 5 provide suggested schedules for daily fertigation for Sunny and Mountain Pride tomatoes and for pepper and cantaloupe. These are starting point schedules and should be adjusted to account for your crop’s growth. Nutrient sufficiency ranges for several crops are listed in Table 6. Some researchers have suggested that fertigation can be done weekly or even every other week. This may be true for some crops in certain situations, but more frequent applications can better fulfill the plants’ nutritional needs.
Fertigation can seem complicated to new users and should be managed with care by even the most experienced fertigator. Listed here are a few important fertigation principles:
- The fertilizer type and amount must be soluble so it can dissolve in the nurse tank water.
- The irrigation system should be at full pressure (charged) at the farthest point from the pump before injecting fertilizer.
- The amount of time it takes to inject fertilizer should be at least as long as the time it takes to charge the system.
- Undissolved materials should be filtered.
- The system must be equipped with proper backflow prevention.
| Days after planting | Daily nitrogen | Daily potash | Seasonal nitrogen | Seasonal potash |
|---|---|---|---|---|
| (lb/A) | ||||
| (preplant) | 50.0 | 100.0 | ||
| 0-7 | 0.5 | 0.5 | 53.5 | 103.5 |
| 8-14 | 0.5 | 0.5 | 57.0 | 107.0 |
| 15-21 | 0.7 | 0.7 | 61.9 | 111.9 |
| 22-28 | 0.7 | 0.7 | 66.8 | 116.8 |
| 29-35 | 1.0 | 1.0 | 71.7 | 123.8 |
| 36-42 | 1.0 | 2.0 | 78.7 | 137.8 |
| 43-49 | 1.2 | 2.4 | 87.1 | 154.6 |
| 50-56 | 1.5 | 3.0 | 97.6 | 175.6 |
| 57-63 | 2.0 | 4.0 | 111.6 | 203.6 |
| 64-70 | 2.5 | 5.0 | 129.1 | 238.6 |
| 71-77 | 2.5 | 5.0 | 146.6 | 273.6 |
| 78-84 | 2.5 | 5.0 | 164.1 | 308.6 |
| 85-91 | 2.5 | 5.0 | 181.6 | 343.6 |
| 92-98 | 2.5 | 5.0 | 199.1 | 378.6 |
| Days after planting | Daily nitrogen | Daily potash | Seasonal nitrogen | Seasonal potash |
|---|---|---|---|---|
| (lb/A) | ||||
| (preplant) | 50.0 | 50.0 | ||
| 0-7 | 0.5 | 0.5 | 53.5 | 53.5 |
| 8-14 | 0.5 | 0.5 | 57.0 | 57.0 |
| 15-21 | 0.5 | 0.5 | 60.5 | 60.5 |
| 22-28 | 0.7 | 1.4 | 65.4 | 65.4 |
| 29-35 | 0.7 | 1.4 | 70.3 | 70.3 |
| 36-42 | 0.7 | 1.4 | 75.2 | 80.1 |
| 43-49 | 0.7 | 1.4 | 80.1 | 89.9 |
| 50-56 | 1.0 | 2.0 | 87.1 | 103.9 |
| 57-63 | 1.0 | 2.0 | 94.1 | 117.9 |
| 64-70 | 1.0 | 2.0 | 101.1 | 131.9 |
| 71-77 | 1.1 | 2.2 | 108.8 | 147.3 |
| 78-84 | 1.1 | 2.2 | 116.5 | 162.7 |
| 85-91 | 1.1 | 2.2 | 124.2 | 178.1 |
| 92-98 | 1.0 | 2.0 | 131.2 | 192.1 |
| 99-105 | 1.0 | 2.0 | 138.2 | 206.1 |
| 106-112 | 1.0 | 2.0 | 138.2 | 220.1 |
| Days after planting | Daily nitrogen | Daily potash | Seasonal nitrogen | Seasonal potash |
|---|---|---|---|---|
| (lb/A) | ||||
| (preplant) | 50.0 | 50.0 | ||
| 0-7 | 0.5 | 0.5 | 53.5 | 53.5 |
| 8-14 | 0.5 | 0.5 | 57.0 | 57.0 |
| 15-21 | 0.7 | 0.7 | 61.9 | 61.9 |
| 22-28 | 0.7 | 0.7 | 66.8 | 66.8 |
| 29-35 | 1.0 | 1.0 | 73.8 | 73.8 |
| 36-42 | 1.0 | 2.0 | 80.8 | 87.8 |
| 43-49 | 1.5 | 3.0 | 91.3 | 108.8 |
| 50-56 | 1.5 | 3.0 | 101.8 | 129.8 |
| 57-63 | 1.8 | 3.6 | 114.4 | 155.8 |
| 64-70 | 1.8 | 3.6 | 127.0 | 180.2 |
| 71-77 | 2.0 | 4.0 | 141.0 | 208.2 |
| 78-84 | 2.0 | 4.0 | 155.0 | 236.2 |
| 85-91 | 2.0 | 4.0 | 169.4 | 264.2 |
| 92-98 | 2.0 | 4.0 | 183.0 | 292.2 |
| Days after planting | Daily nitrogen | Daily potash | Seasonal nitrogen | Seasonal potash |
|---|---|---|---|---|
| (lb/A) | ||||
| (preplant) | 25.0 | 25.0 | ||
| 0-7 | 0.9 | 1.8 | 31.3 | 31.3 |
| 8-14 | 0.9 | 1.8 | 37.6 | 37.6 |
| 15-21 | 0.9 | 1.8 | 43.9 | 43.9 |
| 22-28 | 0.9 | 1.8 | 50.2 | 50.2 |
| 29-35 | 1.3 | 2.6 | 59.3 | 59.3 |
| 36-42 | 1.3 | 2.6 | 68.4 | 68.4 |
| 43-49 | 1.3 | 2.6 | 77.5 | 77.5 |
| 50-56 | 1.5 | 3.0 | 88.0 | 88.0 |
| 57-63 | 1.5 | 3.0 | 98.5 | 98.5 |
| 64-70 | 1.5 | 3.0 | 109.0 | 109.0 |
| 71-77 | 1.5 | 3.0 | 112.5 | 112.5 |
| 78-84 | 0.7 | 1.4 | 117.4 | 117.4 |
| 85-91 | 0.7 | 1.4 | 122.3 | 122.3 |
| Nutrient | Muskmelon | Cucumber | Eggplant | Pepper | Squash | Tomato | Watermelon |
|---|---|---|---|---|---|---|---|
| (%) | |||||||
| N | 2.00-4.00 | 5.0-6.0 | 4.0-6.0 | 5.00-5.50 | 4.00-6.00 | 3.50-5.00 | 2.50-4.50 |
| P | 0.25-0.40 | 0.3-1.0 | 0.3-1.0 | 0.35-0.45 | 0.25-1.00 | 0.35-0.45 | 0.25-0.75 |
| K | 1.80-4.00 | 4.0-5.0 | 3.5-5.0 | 4.50-6.00 | 3.00-5.00 | 3.50-5.00 | 2.25-3.50 |
| Ca | 1.80-7.00 | 1.2-3.5 | 1.0-2.5 | 1.00-1.50 | 1.00-2.50 | 1.00-1.50 | 1.10-1.50 |
| Mg | 0.50-1.50 | 0.3-1.0 | 0.3-1.0 | 0.30-0.80 | 0.30-1.00 | 0.30-0.80 | 0.25-0.80 |
| S | 0.20-0.60 | 0.2-0.8 | 0.2-0.8 | 0.15-0.40 | 0.20-0.75 | 0.20-0.40 | 0.20-.075 |
| (ppm) | |||||||
| B | 20-60 | 25-75 | 25-75 | 25-90 | 25-75 | 30-100 | 30-75 |
| Fe | 40-200 | 50-200 | 50-200 | 40-200 | 40-200 | 45-200 | 40-200 |
| Mn | 20-200 | 25-200 | 25-200 | 20-200 | 25-200 | 20-200 | 25-200 |
| Zn | 20-60 | 20-75 | 20-75 | 20-60 | 20-75 | 20-60 | 20-75 |
| Cu | 4-25 | 5-35 | 5-35 | 5-35 | 5-35 | 5-35 | 4-15 |
| Source: Dr. Ray Campbell, North Carolina Department of Agriculture & Consumer Services, Agronomic Division. | |||||||
SOLUBILITY
Solubility of materials varies in both the rate with which they dissolve and in the amount that can be dissolved in water. Most materials dissolve best in water with a pH of 5.8 to 7.8. Some common fertigation materials and their solubility are listed in Table 7.
If you attempt to dissolve more fertilizer than is soluble in a given volume of water, “salting out” can occur, meaning that a mass of fertilizer settles to the bottom of the tank. Agitation by a mechanical screw or recirculation with a pump can help dissolve fertilizer. Heating the water increases solubility of fertilizers and allows them to dissolve more rapidly. It is important that the material be dissolved because uniformity of application depends on each gallon of irrigation water containing the same amount of fertilizer. Undissolved materials lead to uneven application rates and nonuniform crop responses. When only a few applications are made, proper mixing becomes even more important.
When dissolving a fertilizer, it is best to half fill the tank with water and slowly begin adding dry fertilizer materials with constant agitation. Be careful not to add fertilizer so fast that material begins to settle to the bottom. Continue adding fertilizer and filling the tank with water until the proper fertilizer amount is in the tank. Some materials like potassium nitrate dissolve in an endothermic reaction (the solution cools as the fertilizer dissolves), which reduces the amount of material that is soluble. This type of reaction requires heat to help dissolve the materials. Some growers avoid these problems by purchasing solution fertilizer like 4-0-8 or 7-0-7. These solutions are available with micronutrients from local suppliers. See below for example calculations for dry and solution fertilizers.
| Material | Solubility in lb/100 gal. |
|---|---|
| Calcium nitrate (15.5-0-0) | 851 |
| Potassium nitrate (13-0-44 or 46) | 108 |
| Ammonium nitrate (34-0-0) | 984 |
| Sodium nitrate (16-0-0) | 608 |
| Urea (29.9-0-0) | 651 |
| Diammonium phosphate (6-17-14) | 358 |
| Nitrate of soda potash (15-0-14) | 980 |
| EDTA micronutrients fertilizer solutions | Variable solubility |
MICRONUTRIENT NEEDS
Whether micronutrients should be added to the fertilizer solution on a regular basis depends on soil type and conditions. If soils have a low nutrient-holding capacity, micronutrients should be injected. The area around the drip tube becomes the major source of all nutrients and, even though the general soil test may show good levels of micronutrients, there can be deficiencies further away from the drip tube. It is often necessary to use a mixture of micronutrients by supplying all those that are deficient. Check compatibility and solubility charts to avoid problems with micronutrients. Boron is one of the most commonly needed micronutrients and has been shown to enhance potassium uptake.
CHARGING THE SYSTEM
The irrigation system should be fully charged before any fertilizer is introduced. When the system is not fully charged, air surges occur and cause erratic application rates of fertilizers. If the system is at full pressure with no entrapped air, the flow of fertilizer solution is uniform and equal amounts will pass through each dispensing hole (dripper). Application time should be at least as long as the time it takes to bring the system to full pressure (usually 10 to 15 minutes).This will allow each dripper to have similar contact time with fertilizer solution as it passes through the system.
FILTERING FERTILIZER
Some growers believe the misconception that undissolved fertilizer and impurities will dissolve as they pass through the filter or pipelines. Such an approach results in uneven fertilizer distribution and causes the dripper lines to clog because most fertilizer materials do not totally dissolve in the 15 to 20 minutes it takes them to get through the system.
Because undissolved fertilizer is a particular problem in drip irrigation systems, the point at which fertilizer should be injected into the system is before the filters. Also, it is very helpful to allow the fertilizer solution to settle before pumping it into the system. Usually settling overnight allows adequate clearing time for most fertilizer solutions. With fertilizers such as calcium and sodium nitrate, which have a coating that floats, the water should be skimmed or drawn off through a hole near the top of the tank to remove the impurities. Other impurities sink, so there should also be a hole near the bottom of the tank through which undissolved material can be washed out. Finally, there should be an opening through which to remove the clear, usable fertilizer solution; this hole should be located about 12 to 18 inches above the bottom of the tank, which allows enough room for impurities to settle.
If a fertilizer has nondissolving material (as with some potassium nitrate sources) or nondissolving coatings (like calcium nitrate), your fertilizer supplier may suggest flocculating agents which help these impurities drop out of the fertilizer solution.
EXAMPLE CALCULATIONS FOR FERTILIZER MIXTURES
Following are two examples of fertilizer calculations, one for 4-0-8, a solution fertilizer, and one for dry fertilizers that need to be dissolved. As an example, we’ll suppose that you wanted to apply 1 pound of nitrogen and 2 pounds of potash per acre per day.
4-0-8 SOLUTION: Using a 4-0-8 solution which weighs about 10 pounds per gallon, ten gallons weighs 100 pounds, which yields 4 pounds of nitrogen and 8 pounds of potassium. So one-fourth of the 10 gallons, or 2.5 gallons, would yield 1 pound of nitrogen and 2 pounds potash, which is the desired amount in this case.
DRY FERTILIZERS: Let us suppose, in this example, that you decided to use potassium nitrate 13-0-44 and calcium nitrate or sodium nitrate, again assuming a desired application rate of 1 pound of nitrogen and 2 pounds of potash.
STEP 1
In 13-0-44, percent potassium is 44.
To calculate the amount of 13-0-44 you need to get 2 Ib of potash: 2 + 0.44 = 4.54 = pounds of 13-0-44 for 2 Ib potash
STEP 2
In 13-0-44, percent nitrogen is 13.
To calculate the amount of nitrate in 4.54 Ib of 13-0-44: 4.54 Ib 13-0-44 x 0.13 = 0.59 Ib nitrate
This is 0.41 Ib short of the 1 Ib desired.
STEP 3
For additional 0.41 Ib nitrogen, the grower could consider adding calcium nitrate (15.5-0-0).
0.41 ÷ 0.155 = 2.65 Ib calcium nitrate needed for 0.41 Ib nitrogen
STEP 4
Use the data in Table 7 to calculate how much water is needed to dissolve 4.54 Ib 13-0-44 and 2.65 lb 15.5-0-0.
4.54 lb 13-0-44 ÷ 1.08 lb/gallon of water = 4.20 gallons of water needed to dissolve 4.54 lb 13-0-44.
2.65 lb 15.5-0-0 ÷ 8.51 lb/gallon of water = 0.31 gallons of water needed to dissolve 2.65 lb 15.5-0-0.
4.20 + 0.31 = 4.51 total gallons of water needed to dissolve this formulation of dry fertilizer.
Several examples of fertilizer solutions are presented in Table 8.
| Desired ratio | Materials | lb/gal | Resulting analysis | N-K20 lb/gal |
|---|---|---|---|---|
| 1-0-2 | potassium nitratea + calcium nitrate |
.91 .50 |
2-0-4 | .12 - .40 .08 - 0 .20 - .40 |
| 1-0-2 | potassium nitrate + sodium nitrate |
.91 .50 |
2-0-4 | .12 - .40 .08 - 0 .20 - .40 |
| 1-0-1 | potassium nitrate + calcium nitrate |
.91 1.81 |
4-0-4 | .12 - .40 .28 - 0 .40 - .40 |
| 1-0-1 | nitrate of soda potash (15-0-14) |
2.67 | 4-0-4 | .40 -.37 |
| 1-0-1 | nitrate of soda potash (15-0-14) |
5.34 | 8-0-8 | .80 - .72 .80 - .72 |
| 1-0-2 | potassium nitrate + calcium nitrate |
2.27 1.24 |
5-0-10 | .30 - 1.0 .20 - 0 .50 - 1.0 |
| 1-0-2 | potassium nitrate + sodium nitrate |
2.27 1.25 |
5-0-10 | .30 - 1.0 .20 - 0 .50 - 1.0 |
| 1-0-2 | potassium nitrate + ammonium nitrate |
2.27 .61 |
5-0-10 | .30 - 1.0 .20 - 0 |
| 1-0-1 | potassium nitrate + calcium nitrate |
2.27 4.52 |
10-0-10 | .30 - 1.0 .70 - 0 1.0 - 1.0 |
| 1-0-1 | potassium nitrate + sodium nitrate |
2.27 4.38 |
10-0-10 | .30 - 1.0 .70 - 0 1.0 - 1.0 |
| 1-0-1 | potassium nitrate + ammonium nitrateb |
2.27 2.12 |
10-0-10 | .30 - 1.0 .70 1.0 - 1.0 |
| a Hot water increases the solubility of potassium nitrate and speeds solution making. b Ammonium nitrate is not recommended for tomato or pepper because of interruption of potassium uptake. |
||||
BACKFLOW
Fertilizer that remains in the system when it is shut down will siphon back through the pump into the water source. This is called backflow, a process that may contaminate the water source, stimulate the growth of algae in surface water, and pollute ground water. In some instances, backflow can also result in dangerous nitrate levels in drinking water.
OPTIONAL COMPONENTS OF FERTIGATION SYSTEMS
Drip tube can be attached to the submain line by using feeder tube or special connectors. The feeder tube system works well for most small systems, but these tubes do tend to loosen and blow out of the drip tube and should be checked frequently. Larger systems usually use connectors that lock onto the drip line. Some systems also use flush valves on the end of each drip line. These valves drain the line when the system is shut down and the pressure drops below 2 psi, and they do not close until the pressure is greater than 2 psi. Flush valves are not necessary if you open the lines once every couple of weeks to flush out sediment and other contaminants.
Types of Plastic Mulch
There are many kinds of plastic mulch, some of which are designed for very specific weather and soil conditions. Following are descriptions of some of the most widely used types of plastic.
BLACK EMBOSSED POLYETHYLENE. 1.25-mil mulch film, 3 to 6 feet wide in rolls of 2,000 to 3,000 feet.
SLICK POLYETHYLENE. 1.25-mil mulch film, 3 to 6 feet wide in rolls of 2,000 to 3,000 feet.
CLEAR POLYETHYLENE. 1-to 2-mil mulch film, or row covers, 3 to 6 feet wide in rolls of 2,000 to 3,000 feet.
WHITE POLYETHYLENE. 1.25-mil mulch film used in summer to help cool the soil, 3 to 6 feet wide in rolls of 2,000 to 3,000 feet.
WHITE ON BLACK POLYETHYLENE. 1.50-mil mulch film used in summer to help cool the soil, 4 to 6 feet wide in rolls of 2,000 to 6,000 feet.
LINEAR LOW-DENSITY POLYETHYLENE. 0.75- to 1.25-mil mulch film used to reduce weight and cost, may or may not be embossed, 4 to 6 feet wide in rolls of 2,000 to 4,000 feet.
LINEAR HIGH-DENSITY POLYETHYLENE. 0.50- to 1.0-mil mulch film used to reduce weight and cost, stronger than same thickness of low density polyethylene, may or may not be embossed, 3 to 6 feet wide in rolls of 2,000 to 4,800 feet.
LINEAR LOW-DENSITY PHOTODEGRADABLE POLYETHYLENE. Degradable mulches are designed so that they start to break down after exposure to the sun. The break down times given for degradable mulches should be used only as indicators. Under high light intensity and warm weather they will start to break down faster than they will under cool, cloudy conditions. The presence or absence of plant cover will also influence break down rate. Degradable films are not recommended for double cropping. Biolan has two rates of degradation, 30 to 60 and 60 to 90 days; it breaks down to very small pieces. Agplast, a brown mulch, was the first photodegradable film; it is a 1.25-mil mulch 3 to 6 feet wide in rolls of 2,400 to 4,000 feet. It breaks down in large pieces.
IRT FILM POLYETHYLENE. This is a green mulch which allows only infrared rays to pass through and not visible light, thus weeds do not grow under it; the level of warmth it provides is between that of clear mulch and black plastic.
POLYONE FILM. This is a brown to tan film which allows nonvisible light to pass through and stops weeds from growing.
The color and type of mulch film you should choose depends on the time of year it will be used, the crop to be grown, and whether you will plant two crops. Clear films capture the most heat, followed by black and other dark colors. The lighter the opaque color the less heat buildup in the bed. Specialty films (such as red or yellow) are becoming more available, but most of the mulch film used in the Southeast is either black or white. Clear films can increase soil temperature too much, and weed control under the plastic can be a problem.
Black film is used for most spring-planted crops. Weed control under the plastic is not a problem, and soil temperatures are raised enough to promote rapid plant growth. The heat can become excessive, however, so use white film or white over black film if daytime temperatures will average 85°F or higher at planting. Black film used for a spring crop can be painted white before planting a second crop in the summer.
Costs and Other Considerations
COSTS AND RETURNS
The costs and returns of a plasticulture system depend on your unique conditions. Average costs of plasticulture equipment are presented in Table 9.
The effect of early harvest is extremely variable, changing both with location and season. Thus we will not discuss the added value of earlier production. Easier to quantify is the yield increase plasticulture can effect if managed properly (Table 10).
| Item | Cost per acre |
|---|---|
| Equipment | One-time cost ($) |
| Pump | 150 |
| Chemigation | 50 |
| Primary Filter | 75 |
| Secondary Filter | 60 |
| Main Line | 120 |
| Subtotal | 455 |
| Materials | Annual cost |
| Laterals | 85 |
| Drip Tube | 125-185 |
| Plastic Mulch | 165 |
| Fumigant | 200 |
| Application Machine | 20 |
| Subtotal | 595-655 |
| First Year Total | $1,050-1,110 |
| Crop | Average yield per acre with plastic and drip | Increase over NC average | Increased $ per acre |
|---|---|---|---|
| Eastern cantaloupe | 6,000 fruits | 4X | 1,500 |
| Western cantaloupe | 15,000 fruits | 5X | 2,400 |
| Cucumbers | 1,200 bu | 5X | 4,000 |
| Pepper | 1,200 bu | 4X | 4,000 |
| Squash | 800 bu | 4X | 2,400 |
| Tomato | 2,500 boxes (25 lb) | 3X | 6,000 |
| Watermelon | 3,000 fruits | 4X | 1,200 |
OTHER CONSIDERATIONS
There are other challenges particular to plasticulture that may affect your decision about whether it is right for your operation.
PLANTING EQUIPMENT. Most crops grown on plastic are started with transplants, but with some (like cucumbers, for instance) it is easier and more cost effective to direct seed. Until recently, most seeding was done by hand. Holes were punched through the plastic with a sharp instrument and the seed was dropped into the hole and covered by hand. Obtaining uniform stands is difficult with this method since the seed are often planted at varying depths. Using a spiked wheel to punch the holes solves the depth problem, but labor costs for seeding are still high.
Mechanical seeders are now available that will plant directly through the plastic. The polyplanter from Ferris Farms, for example, is available in single or multirow models. This planter can be adjusted to plant from one to three seeds per hole. In-row spacing can be varied by adding or removing planting points.
Transplants can be set by hand or machine (such as Kennco plantsetter, waterwheel, or pot transplanters). When setting by hand, several tools can be used to make holes in the plastic, such as a long-handled bulb setter or a sturdy can or cylinder welded onto the end of a handle. The hole should be 2 to 4 inches wide and deep enough for the plants to be set. A hand tobacco plant setter works well once the holes are made in the plastic mulch. For extra earliness in peppers and tomatoes, large containers (3 to 4 inches in diameter) should be used. For the other vegetable crops use 1-to 2-inch cell sizes. Consult North Carolina Cooperative Extension publication AG-377, Production of Commercial Vegetable Transplants for details on transplant production. With both hand setting and machine setting, starter solutions (a soluble fertilizer high in phosphorus) can help ensure growth. Examples of starters are 10-48-0, 10-20-10, or 12-48-8, applied at 200 parts per million of raw material.
WINDBREAKS. Establish strips of rye to protect vegetable seedlings from wind. Each rye strip should be the width of a typical grain drill. They should spaced far enough apart to allow you to plant five or six vegetable rows (spaced 5 or 6 feet apart from row center to center) between the rows of rye. Well-grown rye strips planted in the fall will promote early harvest and provide protection for the young transplants. Spring topdressing will help ensure a good, thick rye stand.
Before you lay plastic in the spring, you can plant the entire field with rye, but be sure to kill off the rye early enough in the spring so that rye crop debris does not interfere with fumigating and plastic laying. Once wind protection is no longer required, mow the rye and use this area as a drive row for spraying and harvesting.
INSECT AND DISEASE CONTROL. Good insect and disease control is essential. Consult your state’s agricultural chemicals manual or your county Cooperative Extension Center for recommendations. Reflective plastic mulches, like aluminum-faced plastic, have been shown to interfere with the movement of aphids which spread the watermelon mosaic virus II. This virus causes green streaks in yellow squash. This mulch should help you harvest marketable squash for a longer period of time in the fall. Also, painting the regular plastic with aluminum paint or white paint increases its reflectivity and cools late-planted crops, resulting in better fruit quality.
WEED CONTROL. For information on weed control under clear plastic mulch and in the row middles between black plastic mulch, consult your state’s agricultural chemicals manual, or your county Cooperative Extension Center. Only herbicides approved for a particular crop can be used between rows of plastic because this is not a fallow area.
DOUBLE CROPPING. Once the first crop has been harvested it is recommended that a second crop be grown on the mulch. Never, however, plant a field with the same crop twice in one year. But the practice of rotating different crops results in two acres of production from each acre of land, plastic, drip tube, and starter fertilizer. The second crop can be fertilized (1) through the drip line using soluble fertilizers and a fertilizer injector (2) through overhead fertigation or (3) by placing fertilizer in holes in the plastic between plants. Glyphosate (Roundup) or paraquat (Gramoxone Super) can be used to terminate the first crop. Take care not to damage the trickle/drip tube when planting the second crop. Suggested spring-fall sequences are listed in Table 11.
| Spring | Fall |
|---|---|
| Peppers | Summer squash, cucumbers, or cole crops |
| Tomatoes | Cucumbers, summer squash, or cole crops |
| Summer squash | Tomatoes, pumpkins, or cole crops |
| Eggplant | Summer squash |
| Cucumbers | Tomatoes, pumpkins, or summer squash |
| Muskmelons | Tomatoes or cole crops |
| Watermelons | Tomatoes or cole crops |
| Honeydews | Tomatoes or cole crops |
| Cole crops | Summer squash, pumpkins, muskmelons, or tomatoes |
| Cauliflower | Summer squash, pumpkins, muskmelons, or tomatoes |
| Snap beans | Summer squash, pumpkins, cucumbers, muskmelons, or tomatoes |
| Southern peas | Summer squash, pumpkins, cucumbers, muskmelons, or tomatoes |
| Lettuce | Summer squash, pumpkins, muskmelons, tomatoes |
| Sweet corn | Summer squash, tomatoes, or cucumbers |
| Strawberries | Tomatoes, summer squash, cucumbers, pumpkins |
Summary
As we have discussed here, the plasticulture system relies on careful control of its major components: raised beds, plastic mulch, drip irrigation, and fumigation. Although management-intensive, plasticulture can improve crop yields and earliness, thereby increasing your profits. We encourage you to further investigate plasticulture’s benefits, as well as the work involved in maintaining the system, to decide whether plasticulture is right for you.
Publication date: Jan. 1, 1996
AG-489
The use of brand names in this publication does not imply endorsement by NC State University or N.C. A&T State University of the products or services named nor discrimination against similar products or services not mentioned.
N.C. Cooperative Extension prohibits discrimination and harassment regardless of age, color, disability, family and marital status, gender identity, national origin, political beliefs, race, religion, sex (including pregnancy), sexual orientation and veteran status.