Site Preparation
After selecting a site for caneberry production, it is important to prepare the site thoroughly to ensure the longevity of your planting. Ideally, site preparation would occur one year before the caneberry crop will be established. Destroy perennial weeds and all established sod before planting. Kill wild caneberries with an herbicide and remove the dead plant material and residue from the field. Perform several tillage passes before planting to destroy weeds and loosen the soil. Pre-plant land preparation should be completed by February to March in the coastal plain and more southern regions or in the preceding fall in the mountains for an early spring plant date.
If possible, avoid planting caneberry plants on a site previously planted with fruit crops, such as peaches, apples, grapes, raspberries, or blackberries. Some pathogens can live for several years in the soil, and a previous orchard or vineyard site is more likely to harbor pathogens that can also infect caneberries.
Since many blackberry and raspberry varieties are susceptible to viruses, insect pests, double blossom disease, and orange rust, cultivated plants should not be planted near wild blackberries.
If possible, at least one year before planting caneberries, grow a summer cover crop (such as Sudangrass) or a winter cover crop of rye, oats, or wheat. A cover crop will suppress weeds and increase organic matter in the soil. Test soils for fertility and nematodes. Apply lime and nutrients according to soil test recommendations.
Fumigation and the use of raised beds will give newly set blackberry and raspberry plants an advantage by killing most weed seeds and soil pathogens. Fumigation is highly recommended if high populations of nematodes are present in the soil. Dagger (Xiphinema americanum) nematodes are of concern because they are associated with transmission of several caneberry viruses.
Soil Tests
Soil testing is essential to change soil pH and essential plant nutrient levels prior to planting. Soils should be sampled in late fall (October to December) before early spring planting or sampled in early spring, if fall planting, to provide sufficient time to review soil test results and apply the recommended amendments. Soil tests include pH, phosphorus, potassium, and other parameters essential for establishing optimum lime and nutrient rates. Because soil testing for nitrogen is not reliable in the southeastern United States, nitrogen rates focus on maintaining plant tissue (leaf/petiole) nitrogen concentrations at or above the established critical ranges.
Since most blackberry and raspberry roots occur in the surface 12 to 18 in. of soil, soil samples should be pulled from a sampling depth of 0 to 8 in. When sampling a new planting, multiple soil cores should be collected across a field for a single composite sample. In established fields, soil samples should be collected based on the application of fertilizer. If fertilizer is applied by fertigation, soil samples can be pulled within the planted row, but if fertilizer is banded or broadcast in the field, the samples should be collected 1 to 2 ft from either side of the row. Each composite should include 20 to 40 soil cores collected from a relatively uniform area of the field (soil type, slope, past management).
The soil test report will include nutrient levels and amendment recommendations. In the Southeast, it is very common for soil tests to recommend lime to raise the soil pH. When adding lime, consider the soil test levels of calcium and magnesium in order to determine whether to apply calcitic or dolomitic (higher magnesium content) limestone. Before planting, lime, phosphorus, and potassium amendments should be broadcast evenly across the field and then incorporated with a rototill or disk. Lime, phosphorus, and potassium products have limited mobility in the soil, and subsequently, changes to soil pH, soil phosphorus, and soil potassium content are commonly observed only to the depth at which these products are incorporated into the soil. Surface applied materials will move very slowly down into the soil profile. Estimates suggest lime moves downward in the soil at a rate of approximately ½ in. per year. The limited soil mobility of these products is the reason that proper soil preparation before planting is key to the health and vigor of the planting over the long-term.
If a high rate of lime (greater than 2 tons/acre) is recommended prior to planting, the response of soil pH to applied lime is enhanced if 50% to 70% of the rate is applied, and then followed by an application of the remaining amount with a second pass for final incorporation. In established fields where incorporation of lime or other materials is not possible, the ability to impact soil pH and phosphorous content is limited. More frequent application of surface applied materials with partial rates at each application may be required to modify fertility levels in the rooting zone.
After planting, plant analysis is used to assess if applied nitrogen, phosphorus, and potassium are sufficient to meet plant demand. Soil testing should be done every two years to monitor soil pH levels and amend as needed.
Nematode Tests
Plant-parasitic nematodes cause direct damage to roots and can transmit viruses that may significantly suppress yield and fruit quality in caneberries. The only reliable way to determine if nematodes are present in a site is by collecting a soil sample and submitting the sample to a nematology laboratory for assay. It is best to thoroughly sample fields during the summer or early fall to identify the types of nematodes present in the soil and their population density. Guidelines for proper sampling and sample handling procedures are available through local Cooperative Extension centers.
Planting
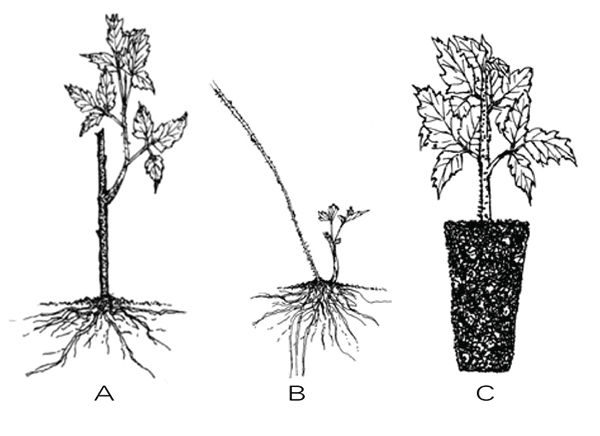
Order plants a year before you intend to establish your new planting. Several types of nursery stock plants are available (Figure 4-1). Bare root dormant nursery stock and tissue culture plug plants are usually available from November to March. A limited number of nurseries are able to ship plants for fall planting. Be sure to contact nurseries ahead of time to determine availability and shipping dates.
Purchase plants only from reputable nurseries to increase the chances of receiving healthy plants of the desired cultivars. Healthy planting stock is key to the cost-effective production of caneberries. Healthy plants will produce higher crop yields and sustained crop quality over the long term. Nurseries that produce healthy plants have programs in place to screen plants for viruses and other diseases that can be spread through contaminated material. Quarantine services provided by clean stock programs also reduce the chance of introduction of exotic pests that can be difficult and costly to control. The use of clean, healthy plants must be emphasized. Growers throughout the region have observed superior vigor of tissue culture plug plants in the first year after planting. This is likely to be due to the virus screening process that most tissue culture plants use. New bare rootstock should be purchased from nurseries that grow plants in a greenhouse or on fumigated land that is isolated from other caneberries. The plants should have regular monitoring and spray schedules for insect and disease control and be inspected by state officials.
The importance of clean plants is not always apparent. However, in the early 2000s, the newly emerging blackberry industry in the southeastern US was affected by blackberry yellow vein disease. Fields with the virus became unproductive in just a few years. Fortunately, since 2010, there has been a national initiative to provide clean plants to berry nurseries, improve awareness of the need for clean plants, and educate nurseries and growers on the detrimental effects of viruses and other pathogens on plant performance. This initiative is called the National Clean Plant Network (NCPN). The NCPN produces clean planting stock for many nurseries that increase the planting stock under strict practices that maintain clean plants and then sell those plants to growers. The NCPN is funded by the US Department of Agriculture and Plant Health Inspection Service (USDA-APHIS).
Early spring planting of dormant stock is acceptable in most regions. Plug plants have green tissue and should not be planted until after the last frost date. Plants that are set late in the spring may be adversely affected by drought or drying winds. In warmer areas, early fall planting is possible, if the soil is still warm and not excessively wet. Fall planting enables a good root system to develop. Avoid planting on wet or flooded soil. When planting both bare rootstock and tissue-culture plugs, be sure to give plants a thorough drenching with water, especially if the soil is dry and the weather is hot. After planting, cut off the stem of bare root plants to at least 3 to 4 in. from the ground.
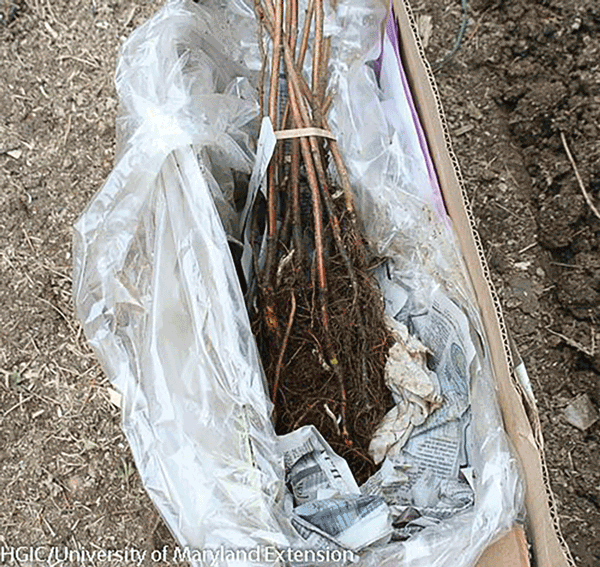
Bare root nursery stock (Figure 4-2). Plants should arrive just a day or two before planting. Do not keep plants in a cooler for an extended period or allow the roots dry out. If the bare root plants are dry upon arrival, soak the roots in water for several hours before planting. If they cannot be planted immediately, you can “heel in the plants” by digging a soil trench deep enough to contain the roots. Spread the plants along the trench, roots down, and cover the roots with moist soil. Plants can be held in this manner until buds begin to swell, which usually occurs in a few weeks. To plant, dig a hole large enough for the root system to be spread in the hole. Cover the roots of bare-root plants with soil to a depth of 2 to 3 in., and firm the soil around the roots.
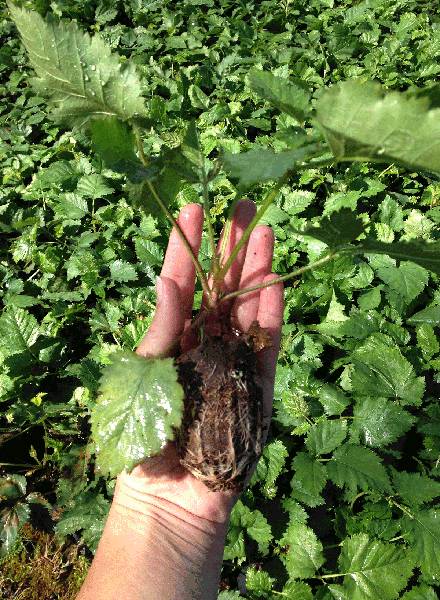
Tissue-culture plug plants (Figure 4-3). Tissue-culture plants should be allowed to harden in a protected, shaded location outdoors for several days prior to planting. When planting, take only the number of plants that can be transplanted in half a day to the field. Be sure to water the plants well prior to planting. Set tissue-culture plants in holes so that the top of the root ball is even with the soil surface. Move a thin layer of soil around the top of the plug’s root system. Growers have found that tissue-culture plants perform well in the southern United States.
Tip-layered canes. These types of plants are produced when growing tips come in contact with the ground and form roots. After root systems are well established, the newly formed plants are cut from the mother plant and stored for shipping later. This type of propagation method is most often used with black raspberry. These plants should be hardened just like the tissue-culture plants.
Root section. A root section (root cutting) should be about 3 to 4 in. in length and 1⁄4 to 3⁄8 in. in diameter. Plant the root section about 2 to 3 in. in depth. New canes will originate from adventitious buds on the root section. A new planting can be established as quickly and successfully with root cuttings as it can with rooted suckers. There is a high risk of introducing disease and nematodes into a planting when root cuttings are used as the source of plant stock.
Establishment
Spacing—Blackberry
Optimal spacing between plants and rows varies by the plant type, training method (trellis type), terrain, and size of farm equipment. Allow at least 10 to 12 ft between rows to facilitate tractor operations. On sloping ground, wider spacing is recommended. Space erect blackberries 2 to 4 ft apart in the row. Both semi-erect and trailing types require 4 to 8 ft between plants. In southern Georgia, since many cultivars have fewer canes, a spacing of 2 to 3 ft between plants is recommended. In general, the maximum row length should not exceed 600 ft. When planting before trellises are erected, align plants carefully in the rows to accommodate the trellises. To calculate how many blackberry or raspberry plants you will need per acre, multiply the distance between plants in a row by the distance between rows and divide 43,560 sq ft per acre by this number, or simply refer to Table 4-1.
Spacing—Raspberry
Primocane-fruiting raspberries can be set 2 to 3 ft apart in the row, while floricane-fruiting types should be set 3 to 4 ft apart within a row. The row-width range is from 8 to 15 ft, depending on the equipment. However, rows should be spaced as closely as possible to ensure the highest possible planting yields. To calculate how many plants you will need for each acre, see Table 4-1.
Alleys
Maintain the alleys, the space between the rows, with a ground cover. In areas where there is no soil erosion and cool temperatures, cultivation can be used. Perennial grass species are preferable in most areas because they hold soil in place year round and are not host to botrytis and verticillium. A good ground cover will serve as a deceleration/diffusion strip for run-off water and as support for equipment used in caring for the crop. Sod that is allowed to develop in between rows should be kept mowed. Tall fescue is well adapted to non-coastal plain regions of the Southeast and has proven to be an effective ground cover in the piedmont and mountains of North Carolina.
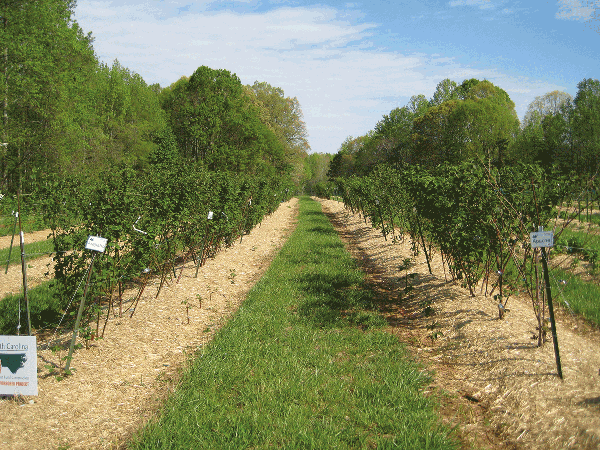
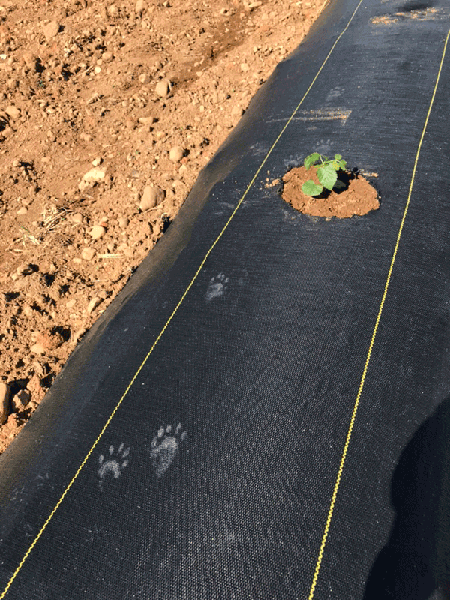
In the plant row, a 4-ft-wide, weed-free strip must be maintained, either by physical or chemical means, to prevent weed competition with the caneberry plant (Figure 4-4). The use of landscape fabric has been very successful to control weeds and the fabric usually lasts the lifetime of the planting (Figure 4-5). Chemical weed control, when used correctly, can also be very effective but requires timely application of herbicides. The choice of herbicide depends on soil type, weed species present, season of the year, herbicide application timing, and bearing status of the planting. The correct herbicide must be used at the proper time, or serious injury to the caneberry plants may result. Pesticides, including herbicides, should always be applied by a licensed applicator wearing the appropriate personal protective equipment. For detailed information on managing weeds and using herbicides, see the Southeast Regional Caneberries Integrated Management Guide, located on the Southern Region Small Fruit Consortium’s IPM/Production Guides web page.
Publication date: Feb. 23, 2023
AG-697
Other Publications in Southeast Regional Caneberry Production Guide
- Introduction
- Cultivars
- Site Selection
- Site Preparation, Planting, and Establishment
- Plant Growth
- Pruning and Training
- Trellis Systems
- Tunnel Production
- Water Management
- Integrated Pest Management and Pollination
- Fertility Management
- Fruit Development
- Harvesting and Postharvest Management
- Food Safety Considerations for Caneberry Production
N.C. Cooperative Extension prohibits discrimination and harassment regardless of age, color, disability, family and marital status, gender identity, national origin, political beliefs, race, religion, sex (including pregnancy), sexual orientation and veteran status.

