
Materials
- lumber—see specifications below
- chop saw or other saw capable of making mitered and beveled cross-cuts
- screws—23 total, GRK trim head screws, size #8 × 1-1/4″
- T-10 star bit, to drive trim screws (usually included when you purchase a box of screws)
- wood glue
- power drill
- ruler or tape measure
- bar clamps or masking tape, to hold pieces in place while fastening
- wood filler, to hide screw holes
- sandpaper, 120 grit, for smoothing screw holes, board ends, and wood filler
- exterior finish of your choice (marine varnish, spar urethane, or primer and paint)
- paintbrush, to apply finish
- nesting materials in approximately 6″ lengths
- attachment hardware of choice, such as
- two #9 deck screws with corresponding drill bit and manual screwdriver
- birdhouse mounting bracket with keyhole openings
Lumber Specifications
- Clear yellow pine is a mid-priced option that has minimal knots and blemishes and is unlikely to split while fastening with the recommended trim screws, but it does require an exterior finish for durability.
- Cedar is more durable without finish, but more likely to split during fastening. If you use cedar, pre-drill before fastening with screws to avoid splitting the wood. Stainless steel screws are recommended, since cedar can corrode other fasteners.
- Quantities
| Nominal dimensions | Actual dimensions | Length needed |
|---|---|---|
| 1″ × 10″ | 3/4″ × 9-1/4″ | 14″ |
| 1″ × 8″ | 3/4″ × 7-1/4″ | 14″ |
| 1″ × 6″ | 3/4″ × 5-1/2″ | 24″ |
Cuts
From the 1″ × 10″ board, cut two pieces (Figure A4-1):
- One piece 6-1/4″ long (A)
- One piece 7″ long (B)
From the 1″ × 8″ board, cut two pieces (Figure A4-2):
- Both 6-3/4″ long, beveled to 45° at one end (C)
From the 1″ × 6″ board, cut three pieces (Figure A4-3):
- Two pieces 6-1/2″ long (D)
- One piece 9-1/2″ long, mitered to create the 45° roof pitch (E)
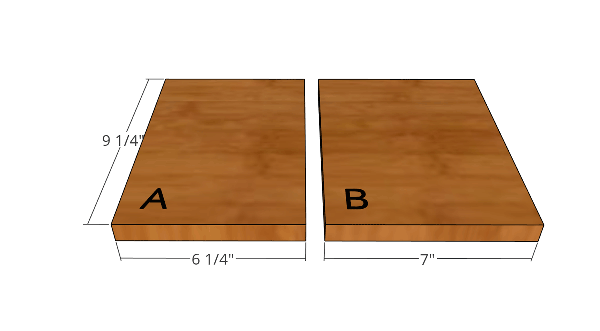
Figure A4-1. Pieces A and B will be the roof of your bee hotel.
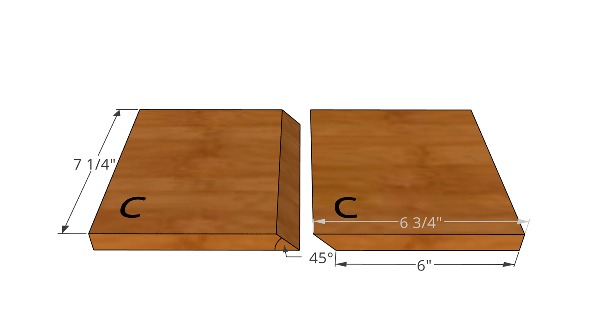
Figure A4-2. Two pieces marked C will be the side walls of your bee hotel.
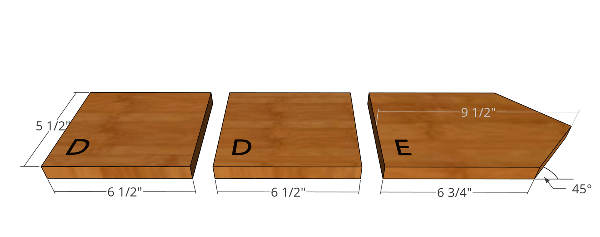
Figure A4-3. Two pieces marked D will be the ground and second floors of your bee hotel, and piece E will be the rear wall.
Assembly Overview
Figures A4-4, A4-5, and A4-6 provide an overview of the assembled hotel.
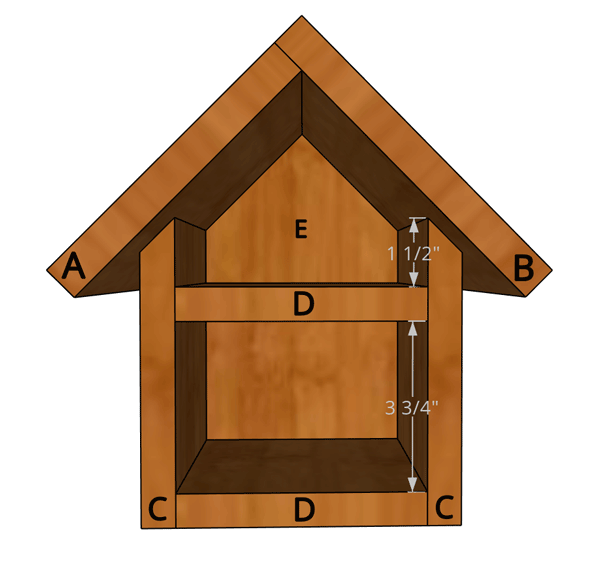
Figure A4-4. The fully assembled bee hotel (front view)
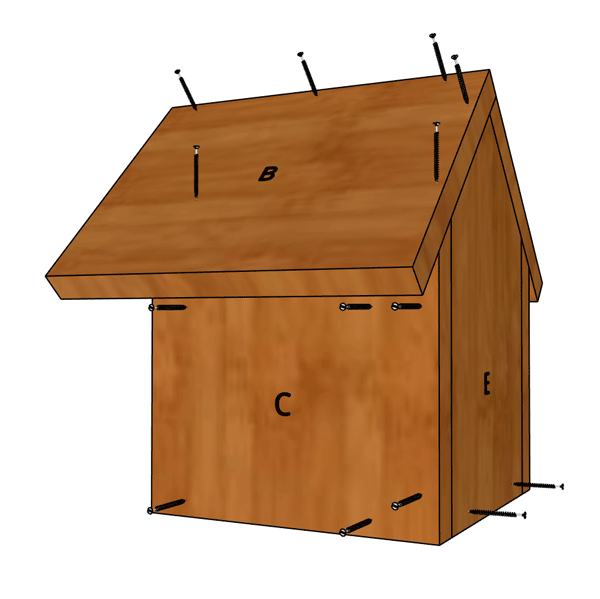
Figure A4-5. Right and rear view of the assembled bee hotel with screw placements indicated.
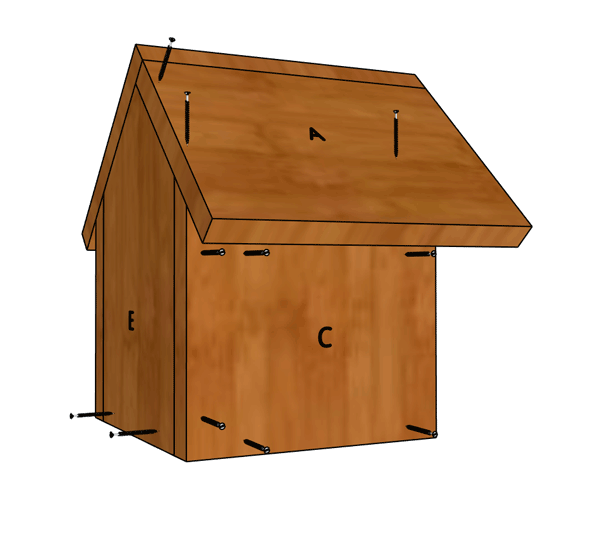
Figure A4-6. Left and rear view of the assembled bee hotel with screw placements indicated.
Assembly Steps
- Attach left side (C) and back (E) as shown in Figure A4-7
- Line the vertical edge of E with wood glue where it will touch C
- Bring E into contact with C and use a piece of masking tape or clamp to temporarily stabilize the joint while handling
- Attach E and C with screws
- Attach bottom and shelf (D, two parts) to left side (C) and back (E) as shown in Figure A4-8 and A4-9
- Use a ruler or tape measure to establish the 3-3/4″ spacing between bottom and shelf
- Line each joint with glue, stabilize with tape or clamp if needed, and fasten with screws
- Repeat steps 1 and 2 to attach the right side (C) to the back (E), bottom (D), and shelf (D) (Figure A4-10)
- Line each joint with glue, stabilize with tape or clamp as needed, and fasten with screws
- Attach the short side of the roof (A) to the back (E) and side (C) (Figure A4-11)
- Line each joint with glue and fasten, as above
- Note that screws entering E are driven perpendicular to the roof, while those entering C are driven parallel to C
- Attach the long side of the roof (B) to A, C, and E (Figure A4-12)
- Line each joint with glue and fasten, as above
- Fill screw holes with wood filler
- Let the wood filler cure, then sand wood filler and any other rough areas with sandpaper
- Use a paintbrush to coat all surfaces with exterior finish of choice
- Mount to side of 4″ × 4″ wooden post, outbuilding, or other vertical surface using hardware of choice
- If using deck screws:
- Pre-drill two holes centered on E, one above the shelf and one below the shelf
- Lay a strip of masking tape flat along the back of E over the two holes, and mark their location on the tape with pencil or by poking holes in the tape
- Transfer the masking tape to the mounting surface and pre-drill holes at the marked locations
- Attach the hotel to the mounting surface with a deck screw in each hole; these will be driven from the front by reaching into the bee hotel and will likely need to be driven by hand with a screwdriver or using a long extension on a power drill or driver.
- If using birdhouse mounting brackets, follow the mounting instructions included with the brackets
- If using deck screws:
- Fill with nesting materials
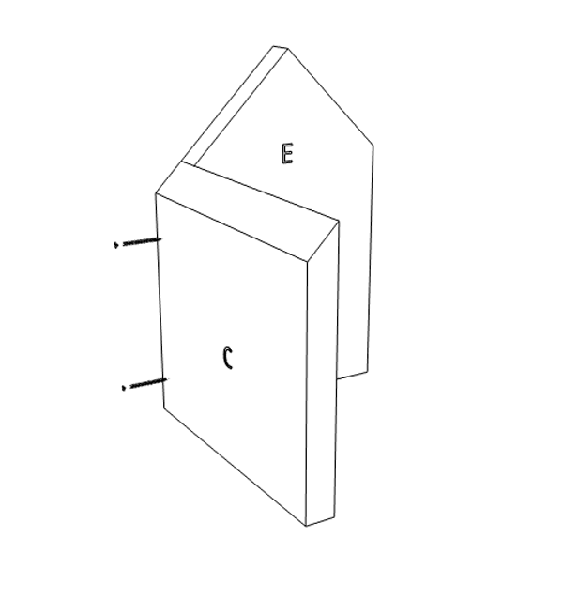
Figure A4-7. Step 1: Attach pieces C (left panel) and E.
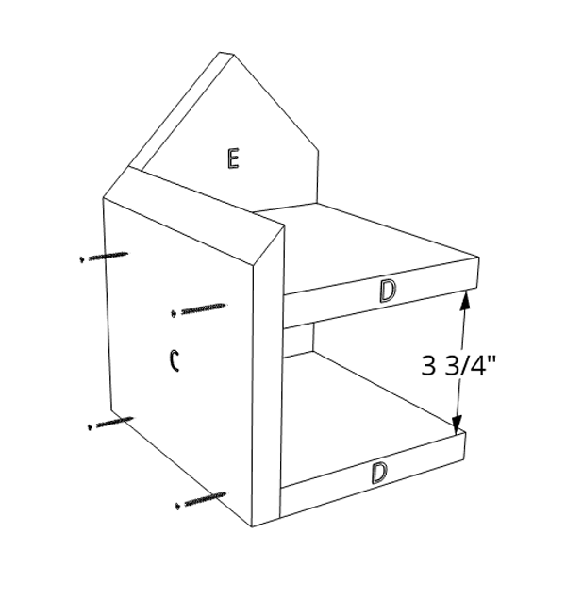
Figure A4-8. Step 2, front view: Attach both D pieces to the C-E piece.
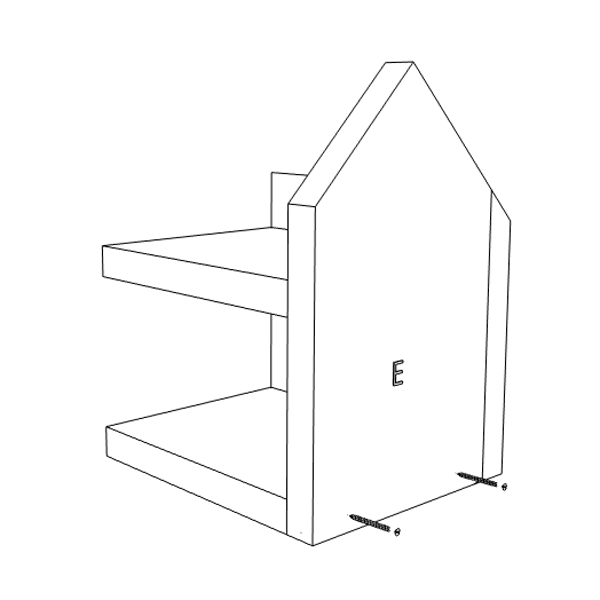
Figure A4-9. Step 2, rear view: Attach both D pieces to the C-E piece.
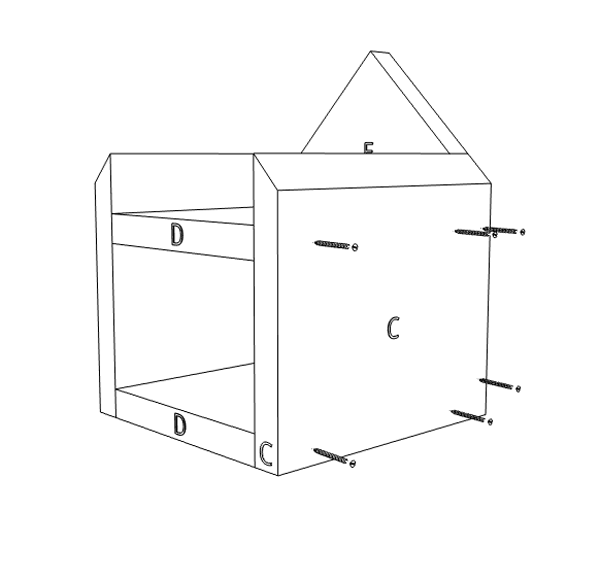
Figure A4-10. Step 3: Attach the remaining piece C (right panel) to pieces D and E.
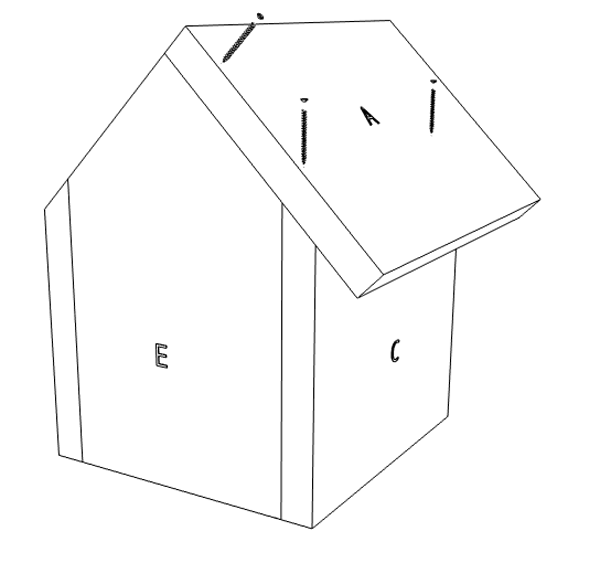
Figure A4-11. Step 4: Attach roof piece A to pieces C (left panel) and E.
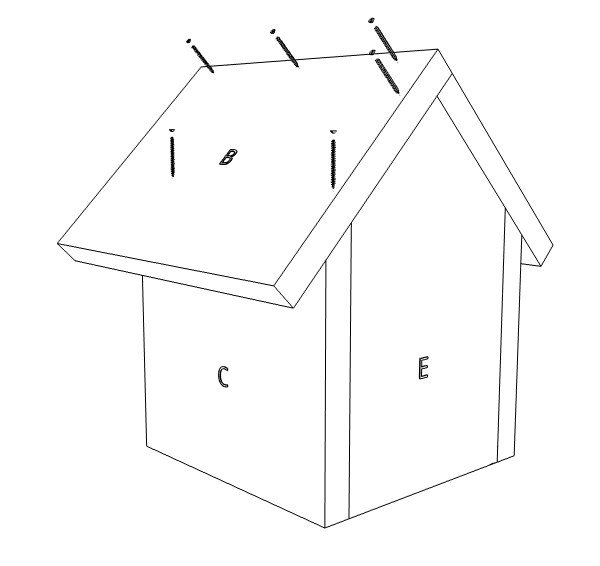
Figure A4-12. Step 5: Attach roof piece B to pieces C (right panel) and E.
Publication date: July 6, 2022
AG-915
Other Publications in How to Manage a Successful Bee Hotel
- What is a Bee Hotel?
- Meet the Residents
- Bee Hotel Design and Placement
- What If Bee Hotels Aren’t Actually Good for Bees?
- Appendix 1. Bee Hotel Checklist
- Appendix 2. Plants with Leaves and Fibers Used as Construction Materials in the Nest Interior
- Appendix 3. Plants that Produce Hollow or Pithy Twigs and Stems Used by Nesting Bees in Eastern North America
- Appendix 4. Building Plans for a Simple Bee Hotel Shelter
- Appendix 5. Additional Resources
N.C. Cooperative Extension prohibits discrimination and harassment regardless of age, color, disability, family and marital status, gender identity, national origin, political beliefs, race, religion, sex (including pregnancy), sexual orientation and veteran status.