Edibles can be grown in containers in a variety of outdoor spaces. A small apartment balcony, a large deck, or even a front stoop can provide suitable space to grow fruits, vegetables, and herbs to eat and share. Selecting the right containers, planting media, and plant combinations are essential to success.
Selecting a Container
Grow edibles in purchased, homemade, or recycled containers (Figure 1). Almost any container that is made of nontoxic materials and has drainage holes will do—a repurposed watering can, discarded wooden drawer, or brightly glazed pot whose color contrasts with the plants’ foliage, flowers, or fruit. Wood and unglazed ceramic lose moisture more quickly, so plantings in these types of containers will require more frequent watering than those in plastic, metal, fiberglass, or glazed pots. Small or dark-colored containers also dry out faster. The temperature of the planting media in a metal pot can fluctuate by as much as 30°F between day and night; if using a metal container, protect roots from extremes of heat and cold by placing the plants in a pot within the exterior pot and lining the space between the two pots with bubble wrap or 1-inch-thick foam. Plastic and wood containers can remain outside year-round, but ceramic pots may crack when moisture in the porous clay expands and contracts with freezing and thawing. Cedar and redwood containers may last 10 years, even without staining or painting.
Select a container that will provide adequate space for the mature plants’ roots, as compacted roots may result in decreased plant growth.
The larger the pot, the less frequently it will need to be watered. A 20-inch-diameter container filled with mature plants and their roots, growing media, and moisture can weigh up to 100 pounds. Consider placing larger pots on a rolling platform if they will need to be moved indoors for overwintering.
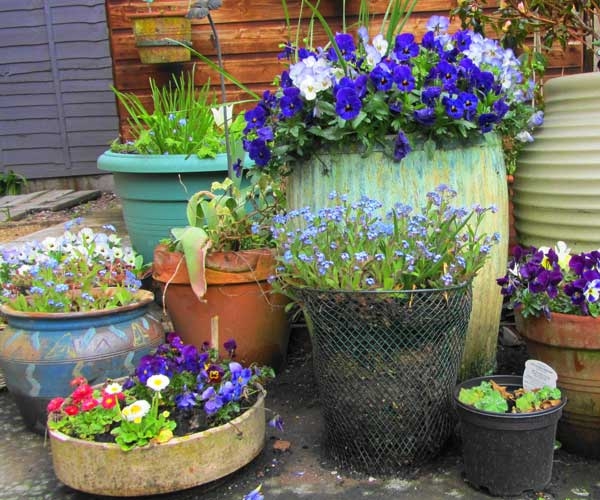
Figure 1. Different sizes and shapes of pots in a cluster create a design “family.”
Photo by Scrappy Annie, flickr. CC BY-NC 2.0
Selecting Planting Material
Planting media can be purchased or homemade (Figure 2). Give careful consideration to its composition—if the media is too dense, it will become compacted and difficult to water, and air will not penetrate to the roots; if it is too light, water will flow right through. Do not use garden soil, as it may contain weed seeds, insects, or diseases and may not drain well (for example, red clay). Many soilless mixes are commercially available. These lightweight, pH-adjusted products are free of pests and often contain fertilizer. Look for planting media certified by the Mulch & Soil Council, the nonprofit trade association for producers of horticultural mulches, consumer potting soils, and commercial growing media. Certification indicates that the product is free of contaminants and that the label accurately identifies what is in the bag.
You can make your own soil mix from one part compost; one part perlite, vermiculite, or coarse builder’s sand; and one part potting soil. Purchasing a commercial soilless mix is faster, easier, and more precise. However, a custom-made soil mix may be preferable to meet specific needs, such as:
-
To prevent the container from blowing over in windy conditions. Increase sand (more than one-third of the mixture should be soil and sand) and limit perlite.
-
To grow plants with high water needs, such as tomatoes (in the absence of automatic irrigation). Include vermiculite and compost to increase water-holding capacity.
-
To prevent root rot in plants that prefer dry conditions, such as lavender, rosemary, oregano, and thyme. Limit soil and sand to no more than one-third of the total mixture, and include perlite to increase air space.
Selecting Plants
Plants placed in the same container should have similar requirements for light, water, and nutrients. Most warm-season vegetables and fruits do best with six to eight hours of sunlight a day (Figure 3). Some fruits and a few vegetables prefer full sun but will tolerate partial shade during the hottest part of the day. Most herbs and cool-season vegetables (such as beets, carrots, kale, lettuce, radish, and spinach) tolerate partial shade, needing only three to five hours of direct sun a day. In the North Carolina piedmont, cool-season plants can be grown from late winter to early spring and again through the fall and early winter (Figure 4). Warm-season plants are generally grown from May through September. Extension publication AG-748, Container Garden Planting Calendar for Edibles in the North Carolina Piedmont, provides information on planting dates. When choosing multiple plants to group in one container, use the information in Table 1 (vegetables), Table 2 (fruits), and Table 3 (herbs) to select plants that thrive in similar light, water, and nutrient conditions.
Most vegetables require consistent watering. Apply water directly to the soil and avoid splashing soil and water onto the leaves, which can spread diseases. Most vegetables require a moderate amount of fertilization, but a few, including cucumbers, squash, and tomatoes, require extra nutrients to produce healthy fruit.
Most fruit-producing plants prefer full sun, with filtered light during the hottest part of the day, and moderate to heavy fertilization. Many fruits require supplemental phosphorus or potassium. The North Carolina Extension Gardener Handbook provides recommendations for nutrient management.
Most herbs tolerate partial shade and prefer low nutrient levels. Some, like mint, thrive in moist soil, but many herbs taste best when grown in well-drained media that is allowed to dry slightly between waterings.
| Light | Water | Nutrients* | |||||||
|---|---|---|---|---|---|---|---|---|---|
| Vegetable | Full Sun | Tolerates Partial Shade | Partial Shade | Moist | Slightly Dry | Dry | Light | Medium | Heavy |
| Bean |
X |
X |
X |
||||||
| Beet |
X |
X |
X |
||||||
| Carrot |
X |
X |
X |
||||||
| Cucumber |
X |
X |
X |
||||||
| Eggplant |
X |
X |
X |
||||||
| Garlic |
X |
X |
X |
||||||
| Kale |
X |
X |
X |
||||||
| Leek |
X |
X |
X |
||||||
| Lettuce |
X |
X |
X |
||||||
| Pea |
X |
X |
X |
||||||
| Pepper |
X |
X |
X |
||||||
| Potato |
X |
X |
X |
||||||
| Radish |
X |
X |
X |
||||||
| Scallion |
X |
X |
X |
||||||
| Spinach |
X |
X |
X |
||||||
| Squash, summer |
X |
X |
X |
||||||
| Squash, winter |
X |
X |
X |
||||||
| Swiss chard |
X |
X |
X |
||||||
| Tomato |
X |
X |
X |
||||||
*Light: Fertilize at planting or, for established plants, once early in the growing season. Medium: Fertilize monthly with liquid fertilizer or every 12 weeks with a slow-release fertilizer. Heavy: Fertilize every 2 weeks with liquid fertilizer or every 8 to 10 weeks with a slow-release fertilizer. ↲
| Light | Water | Nutrients* | |||||||
|---|---|---|---|---|---|---|---|---|---|
| Fruit | Full Sun | Tolerates Partial Shade | Partial Shade | Moist | Slightly Dry | Dry | Light | Medium | Heavy |
| Apple | X | X | X | ||||||
| Blueberry | X | X | X | ||||||
| Citrus | X | X | X | ||||||
| Fig | X | X | X | ||||||
| Grape | X | X | X | ||||||
| Peach | X | X | X | ||||||
| Strawberry | X | X | X | ||||||
*Fertilize fruiting plants only when they are actively growing. Provide just enough nutrients to keep the leaves a medium- to dark-green color and support annual growth. Fertilization needs are crop-specific. Refer to the North Carolina Extension Gardener Handbook for fertilization recommendations for small fruiting plants and trees.
| Light | Water | Nutrients* | |||||||
|---|---|---|---|---|---|---|---|---|---|
| Herb | Full Sun | Tolerates Partial Shade | Partial Shade | Moist | Slightly Dry | Dry | Light | Medium | Heavy |
| Basil | X | X | X | ||||||
| Bay | X | X | X | ||||||
| Borage | X | X | X | ||||||
| Chamomile | X | X | X | ||||||
| Chervil | X | X | X | ||||||
| Chives | X | X | X | ||||||
| Cilantro | X | X | X | ||||||
| Dill | X | X | X | ||||||
| Fennel | X | X | X | ||||||
| Feverfew | X | X | X | ||||||
| Lavender | X | X | X | ||||||
| Lemongrass | X | X | X | ||||||
| Lemon verbena | X | X | X | ||||||
| Marjoram | X | X | X | ||||||
| Mint | X | X | X | X | X | ||||
| Monarda | X | X | X | ||||||
| Oregano | X | X | X | ||||||
| Parsley | X | X | X | ||||||
| Rosemary | X | X | X | ||||||
| Sage | X | X | X | ||||||
| Salad burnet | X | X | X | ||||||
| Scented geranium | X | X | X | ||||||
| Stevia | X | X | X | ||||||
| Tarragon | X | X | X | ||||||
| Thyme | X | X | X | ||||||
*Light: Fertilize at planting or, for established plants, once early in the growing season. Medium: Fertilize monthly with liquid fertilizer or every 12 weeks with a slow-release fertilizer. Heavy: Fertilize every 2 weeks with liquid fertilizer or every 8 to 10 weeks with a slow-release fertilizer. ↲
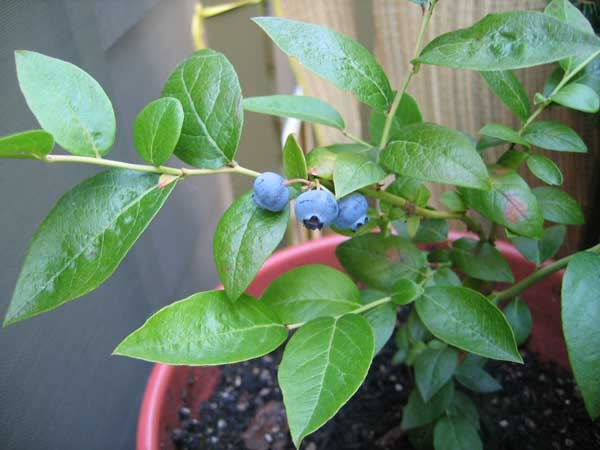
Figure 3. Blueberries thrive in full sun. Dwarf varieties are suitable for containers.
Photo by Megan, flickr. CC BY-NC 2.0
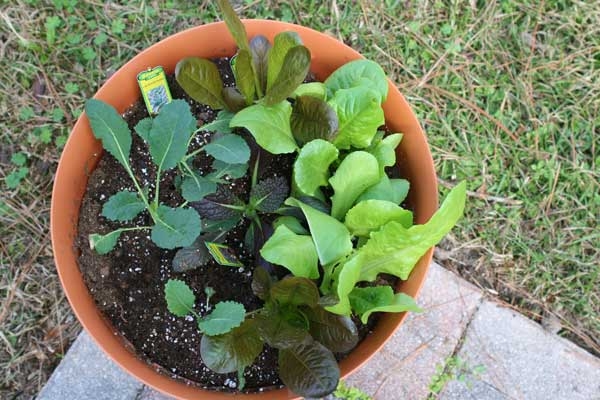
Figure 4. Looseleaf lettuce and other cool-season greens have similar growing requirements and can be grouped in the same container.
Photo by Gardening Solutions, flickr. CC BY-NC 2.0
Selecting Pots and Plants With Design in Mind
While the priority is grouping plants with similar growing requirements, there are many other variables to consider when mixing vegetables, fruits, and herbs in pots. Plants can be grouped in containers based on:
-
Harvesting time—simultaneous or sequential
-
Form—round, horizontal, oval, upright, or trailing
-
Size—small plants in front and underneath; large plants above and behind
-
Texture—coarse (stout stems, large leaves, big fruit), medium, or fine (dainty leaves, wispy stems, tiny flowers)
-
Color—stems, leaves, flowers, and fruit
-
Culinary preferences—ingredients for favorite recipes
You may also want to consider how your design choices can set a “mood” for you and your guests. A garden can be an area for relaxation at the end of a long day or a place that energizes and excites. Consider the impact of color combinations. Blue, green, and pastel-colored pots can provide a peaceful, tranquil environment, whereas bright red, yellow, and orange containers can be invigorating. The finish on a container can also create atmosphere (Figure 5). A shiny surface reflects more sunlight, whereas a muted finish is more subdued. Choose pots of different sizes and proportions to create a “family.” Group them in odd numbers of three or five unless you want to create symmetry in a formal setting with pots set out in pairs (Figure 6) or a focal point with a single plant.
Many edible plants have brightly colored stalks, showy flowers, and fruit. A container color contrasting with the plant color is energizing, while echoing the plant color in the container is soothing. Also incorporate texture and fragrance. The feel of soft-leaved sage or wispy dill, along with the scent of rosemary, mint, or ripe strawberries, can inspire people to linger.
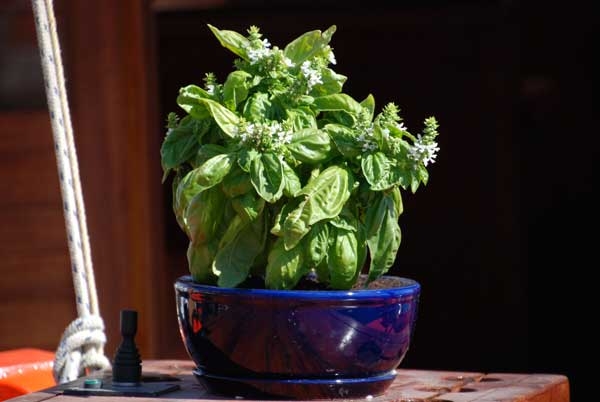
Figure 5. This shiny, electric-blue pot sets off the traditional green-leafed basil with its delicate lavender flowers and works well with the red brick.
Photo by Anders Gustavson, flickr. CC BY-NC 2.0
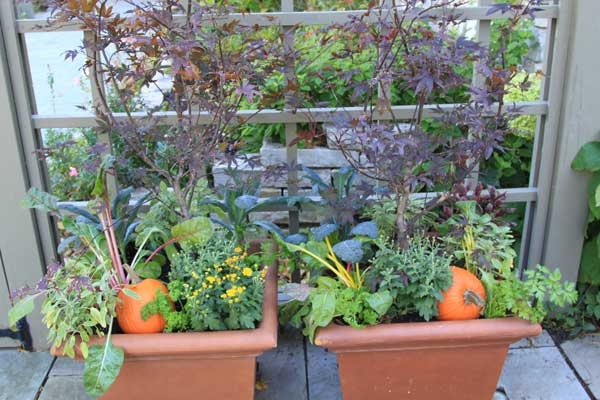
Figure 6. Two symmetrical square pots that echo the shape of the square trellis, tiles, and blocks create a formal look.
Photo by Rhonda Fleming Hayes, flickr. CC BY-ND 2.0
Example Container Designs
Example: Single Container
Situation: Limited space
Setting: Apartment balcony or entrance area
Light Exposure: Afternoon sun
Container: Minimum depth of 8 inches for cilantro’s large taproot
Crops: Succession—cilantro, basil, and chervil
Plan to grow successive crops, harvesting and planting one after the other. Place the container in an area that receives full sun or light shade. After the last frost, plant seeds or transplants of a cilantro variety that is slow to bolt. Cilantro grows best under cool conditions and will be ready to harvest about six weeks after seeding. You may eat the leaves and also the seeds, which are known as coriander.
In mid- to late spring, once nighttime temperatures are above 50°F, replace the cilantro with basil transplants. Include several varieties of basil that vary in taste, form, and color, for example, large, green leaves for pesto and ruffled, purple leaves for vinaigrette. The combination of foliage textures and colors will provide an attractive display, which can be highlighted by a brightly colored container. Basil loves hot weather so will fare well in the summer heat. Fertilize basil with a high-nitrogen plant food when first planted and once again in midsummer. Fertilizer products are labeled with three numbers that represent the percentages of nitrogen, phosphorus, and potassium they contain, in that order. For instance, a 10-5-5 fertilizer contains 10 percent nitrogen, 5 percent phosphorus, and 5 percent potassium. For basil, use a fertilizer whose first number (nitrogen) is higher than the second and third numbers.
Harvest the remaining basil in late summer and sow chervil seeds. Chervil tolerates cool weather and low light and will continue to grow into the fall. It will be ready to harvest in six to eight weeks. Both cilantro and chervil should be kept moist, but basil develops the best flavor when the soil is allowed to dry slightly between waterings.
Example: Small Grouping
Situation: Medium-size open space
Setting: Patio or walkway—long and narrow or corner grouping
Light Exposure: Partial shade in the spring but full sun in the summer
Container 1: About 15 to 18 inches in diameter and 13 to 18 inches deep
Crops: Succession—looseleaf lettuce and tomato
Container 2: About 24 to 28 inches long, 7 inches wide, and 7 inches deep
Crops: thyme, rosemary, and oregano
Container 3: About 15 inches in diameter and 12 to 16 inches deep
Crops: bell pepper, marjoram, parsley, and basil
Plant looseleaf lettuce seeds in Container 1 during late winter and place it where it will receive about three to five hours of sunlight a day. Apply a high-nitrogen fertilizer (the first number should be higher than the last two). Lettuce will be ready to harvest by early April. Most varieties of looseleaf lettuce regrow if cut at the surface, rather than pulled from the roots, providing a continuous harvest. Lettuce will taste bitter if the soil dries out or the weather becomes hot.
In late March to mid-April, plant thyme, rosemary, and oregano transplants in Container 2 and place in full sun. This size container will prevent fungal disease by allowing ample air circulation. A much wider variety of thyme is available as seeds. You can grow your own transplants of unusual varieties by planting seeds indoors in early March. After several weeks, they will be a few inches tall, well-rooted, and ready to transplant. Thyme, rosemary, and oregano all prefer well-drained soil; do not overwater.
In May, once nighttime temperatures are above 55°F and daytime temperatures are above 70°F, harvest the remaining lettuce and plant a tomato transplant in Container 1. Remove all but the top two or three sets of leaves, and lay the tomato transplant in a trench with the top placed in the middle of the pot. Cover the stem up to 1 inch below the first set of remaining leaves. Add a trellis or stake for support and move the pot into full sun. Add a bell pepper transplant in the center of Container 3 and marjoram, parsley, and basil transplants around the edges. Put the marjoram on the sunniest side of the pot and the parsley on the shadiest side. Both tomato and bell pepper thrive in full sun and moist soil. Do not use high-nitrogen fertilizer, which would result in lots of green foliage but fewer peppers and tomatoes. Use a fertilizer whose first number is equal to or less than each of the last two numbers.
Example: Large Grouping
Situation: Large, open space
Setting: Rooftop or deck
Light Exposure: Smaller area in partial shade, extending into a larger area in full sun
Container 1: 2 feet by 2 feet by 2 feet
Crop: dwarf blueberry
Container 2: 22 to 28 inches long, 16 inches wide, and 8 inches deep
Crops: Succession—spinach/peas and bush beans
Container 3: At least 12 inches long, 8 inches wide, and 8 inches deep
Crops: Succession—lettuce and hot pepper
Container 4: At least 15 inches in diameter and 8 inches deep
Crops: Swiss chard, scallions, and chives
Container 5: 15 to 18 inches in diameter and 13 to 18 inches deep
Crop: Succession—cilantro/parsley and tomato
Plant a dwarf blueberry in Container 1 any time from October through the end of February and place it where it will receive mostly full sun, with light shade midday. Planting in the cooler months allows the root system to establish before it gets hot. Initially, the blueberry can be planted in a smaller container and repotted each spring, but the root system will eventually require a container that measures 2 feet by 2 feet by 2 feet. Use a planting media with a pH between 4.5 and 5.3. Check the pH each spring by sending a soil sample to the North Carolina Department of Agriculture & Consumer Services Agronomic Services Division for analysis. Blueberries require several years to bear a full crop. Keep the soil moist but well-drained. Apply a slow-release fertilizer one month after planting and again each spring. Follow the directions on the label to avoid overfertilizing, as blueberry roots are sensitive. After the first year, apply an acidic liquid fertilizer every two to three weeks while the plants are actively growing, from spring to midsummer.
In February, mix a nitrogen-fixing inoculant (available from most nurseries) in the media in Container 2 to ensure the peas have the bacteria they need to thrive, and then sow garden peas, snap peas, or snow peas in the center of the pot and spinach seeds around the edges. Add a trellis for the peas. Place in full sun to light shade and keep the soil moist. Use a high-phosphorus fertilizer (the ratio of the three numbers should be approximately 1:2:1).
Harvest the spinach and peas mid-April through mid-July, then plant seeds of bush bean (these plants will benefit from the support of the trellis also). Beans prefer full sun and consistent moisture. Once the first bean pods begin to form, fertilize with a liquid or controlled-release fertilizer with similar levels of all three nutrients, such as 14-14-14. The first beans will be ready to harvest 50 to 55 days after planting.
Plant lettuce transplants in Container 3 between late February and March. Place in full sun to partial shade and keep the soil moist. Fertilize with a high-nitrogen fertilizer (the first number will be higher than the last two numbers). During May, when the weather is above 80°F, the lettuce will begin to bolt and become bitter. Replace it with one or more compact hot pepper transplants and place in full sun. Keep the soil moist, and supplement with a fertilizer high in phosphorus (the middle number will be higher than the first and last numbers).
Start Swiss chard seeds indoors in mid-February and transplant to the middle of Container 4 in mid-March. Plant scallion, onion, and chive sets around the chard and place the container where it will be shaded from hot afternoon sun. Keep soil moist and apply a fertilizer high in nitrogen. The chives can be harvested by snipping off green foliage. The Swiss chard and scallions will be ready to harvest in 60 to 70 days.
Start cilantro seeds in Container 5 between late February and March. Because parsley seeds germinate slowly and erratically, plant parsley as transplants between April and mid-May. Place the container in partial shade. Replace with a tomato plant once the weather gets hot and the herbs start to bolt. Apply low-nitrogen fertilizer every two weeks (the first number will not be as high as the last two numbers), and do not let the soil dry out completely.
Keys to Creating a Successful Container Garden
-
Use only containers with drainage holes.
-
Avoid small or dark-colored containers.
-
Use planting media, not garden soil.
-
Group plants that have similar light, water, and nutrient requirements.
-
Use a variety of colors, textures, and sizes to create a striking display.
Resources
Cabrera, R. I., and J. R. Johnson. Fundamentals of Container Media Management, Part 1: Physical Properties. New Brunswick, NJ: New Jersey Agricultural Experiment Station, Rutgers, The State University of New Jersey, 2014.
Creasy, R. Edible Landscaping. San Francisco, CA: Sierra Club Books, 2010.
Demboski, K., A. Swanberg, and J. C. Martin. Container Vegetable Gardening. Columbus, OH: The Ohio State University Extension, 2000.
Durham, R., R. Rudolph, M. Williams, S. Wright, R. Bessin, and B. Lee. Home Vegetable Gardening in Kentucky. Lexington, KY: University of Kentucky Cooperative Extension Service, 2024.
McGee, R. M. N., and M. Stuckey. McGee & Stuckey’s The Bountiful Container. New York: Workman Publishing Company, 2002.
Mugnai, S., P. Vernieri, and F. Tognoni. “Container Volume Effects on Morphology and Physiology of Tomato Seedlings.” Acta Horticulturae 516 (April 2000): 49–56.
Traunfeld, J. Container Vegetable Gardening: Healthy Harvests from Small Spaces. Ellicott City, MD: University of Maryland Extension, 2006.
Acknowledgments
This is a revision of an earlier publication. The authors thank Kim Richter and Mark Kistler for their original contributions.
Publication date: April 4, 2019
Revised: July 26, 2024
AG-753
N.C. Cooperative Extension prohibits discrimination and harassment regardless of age, color, disability, family and marital status, gender identity, national origin, political beliefs, race, religion, sex (including pregnancy), sexual orientation and veteran status.

