A community garden may appear to transform a neglected vacant lot overnight, like magic. But the trick isn’t really magic; it’s the months of planning, thought, and hard work that preceded the garden’s creation. In this publication we suggest a step-by-step process for setting up a new garden on a site. The garden team can adapt it to fit their garden’s needs and circumstances.
Be flexible with the proposed timeline, particularly when working with public agencies to schedule equipment use and transport of mulch, compost, or topsoil. Wet and stormy weather has the potential to slow things down.
Line up materials and people.
Locate materials needed for the project and schedule delivery and pick up. Schedule services provided by public agencies or contractors, such as preparing the soil, installing water lines, and putting up a fence.
Prepare the plan.
Prepare a large copy of the garden design plan for working on site. Attach it to a large, sturdy clipboard. On site, orient the plan so north on the drawing matches north on the site.
Check the boundaries.
Check, double-check, then clearly mark the corners of the garden property with sturdy stakes. Indicate the boundaries using irrigation flags or another simple, low-cost method.
Put up a sign.
Install a simple but attractive sign with contact information for the garden as early as possible. Later, the garden can add a larger bulletin board to share educational information, meeting notices, and tasks.
Clean the site.
Remove existing rubbish and weeds. This task is a classic job for a big volunteer group. Consider renting a dumpster if the site has a lot of trash. Be sure to wear gloves and exercise caution—there may be thorns, poison ivy, discarded syringes, broken glass, or other hazards. Clean beyond the future fence line or garden edge to improve the view and allow for pedestrian traffic and parking.
If there is a severe problem with bermudagrass, johnsongrass, honeysuckle, or other aggressive weeds, seriously discuss all control options. A concerted effort to proactively control weeds and prevent them from going to seed will make them much easier to manage in the future. For more information on weed management, see the Weeds section of the NC State gardening portal, the Extension Gardener Handbook, or check with your local Cooperative Extension center.
Locate Utility Lines
Call Before You Dig! (nc811.org) is a free service in North Carolina. Dial 811 at least three days before you plan to dig to have the underground utilities located and marked.
Mark the garden.
Check the site’s boundaries one more time. Then use durable stakes, such as metal conduit cut to length, to mark the actual location of the fence or garden border. Take special care when marking the location of gates.
Prepare the soil, adding compost and lime.
See chapter 8, Soil, Plots, and Planters for more details. Wait until later in the process, after the fence is up and the water is connected, to build raised beds.
Install the water lines.
Install water lines and taps, digging trenches and laying pipe as needed. Install spigots securely and brace them well because they get a lot of use. Seek help with this process from professionals or other highly qualified individuals. (Be sure contractors understand that standpipes are located inside the garden fence line).
Put up the fence.
Adding a fence can occur any time after marking the boundaries; however, soil preparation with a tractor and digging water lines into the garden are easier to accomplish before the fence is in place. In some situations, such as in floodplains, fences and other structures are not allowed. Be sure to check.
Lay out paths and plots (or planters).
It is possible to begin laying out the garden plots, paths, and other elements as soon as the garden boundary/fence line is marked, but waiting until the fence is in place makes placement more reliable. Be prepared to make many minor adjustments in the garden plan, but try to avoid major improvisations.
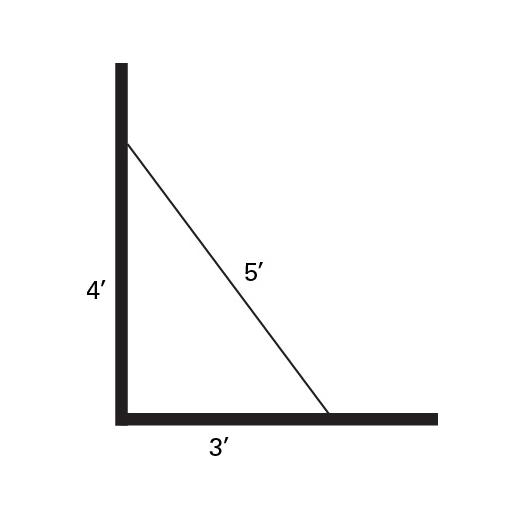
String, stakes, and a directional compass are good tools for marking marking main paths and plot locations. Use the 3-4-5 triangle method for making sure corners are right angles.
|
The 3-4-5 Method of Creating a 90° Angle To create a square corner, create a triangle with one point that is the point of the corner. The second point should be 3 feet down one sideline and the third point should be 4 feet down the other. When the line that connects the second point to the third point is five feet long, the angle at point one will be 90° (Figure 1). If a larger triangle is needed, use a multiple of 2, 3, or 4. |
A line cart used for marking athletic fields is very useful for marking the locations of paths, beds, and common areas. Marking in this manner creates an actual size version of the garden plan and allows for double-checking locations of different elements as well as ease of movement within the garden before making any final decisions.
After any final adjustments, mark plots carefully with permanent stakes in the corners. As soon as paths and common gathering areas are marked, cover them with deep mulch or sow them with a durable grass mix.
Construct and fill raised-bed planters.
See discussion in chapter 8, Soil, Plots, and Planters.
Mark each plot.
Mark each plot or planter with a clearly visible number attached to a corner post. Gardener assignment may now begin!
Add final elements.
When the basics are in place, look for ways to make beneficial additions, such as a picnic table, hay bales for seating in the common area, or a small shed for tools. Build the first compost pile. Are there places to collect recycling and trash?
Celebrate!
You can now host a big celebration to mark the opening of the garden. Congratulations!

Donna Teasley CC BY-SA 4.0
Publication date: Aug. 10, 2017
AG-806
Other Publications in Collard Greens and Common Ground: A North Carolina Community Food Gardening Handbook
N.C. Cooperative Extension prohibits discrimination and harassment regardless of age, color, disability, family and marital status, gender identity, national origin, political beliefs, race, religion, sex (including pregnancy), sexual orientation and veteran status.

