
Trails are manmade pathways designed primarily for foot travel. Planned trails provide users with access to areas to learn, recreate, exercise, and to observe and interpret nature. Successful forest trails are planned to match the tract’s resources with the intended users’ needs.
Early trails were the travel routes to food, water, and shelter. Largely fashioned by animals during migration and daily travels, trails typically followed the contour of the land, snaked along watercourses, and climbed low mountain passes. Many of our oldest roads began as trails and were improved as transportation progressed from foot to horse to rail to automobile.
Trails offer relatively low-cost access to natural surroundings and require only minor maintenance when properly constructed. This note explores proven ways to plan, construct, and interpret various types of recreational forest trails.
Which Type of Trail?
Design trails based on the needs and interests of your intended users. Their needs will vary with age, physical ability, and interests.
These needs will affect trail characteristics like length, difficulty, slope, and layout. For young and elderly visitors, ease of walking and frequent resting spots would be paramount. Conversely, active youth and adult audiences may prefer a more challenging trail with steeper slopes and access to high bluffs or cliffs.
With audience needs clearly defined, select a theme for the trail. A theme gives purpose to your trail by exploiting the natural richness of the area. Trails designed around a theme will maintain interest and provide continuity. There are many options for trail themes.
General nature or education trails focus attention on the following:
- scenery
- history
- geology
- forest management and ecology
- wildlife
- wildflowers and flowering shrubs
- landscape features such as bottomlands, uplands, swamps, bays, pocosins, or wetlands
Conservation trails highlight conservation and good management of soil, water, and vegetation through the stewardship of existing natural resources on farm and forestland. Points of interest could include the following:
- seeded forest roads
- conservation tillage
- grassed waterways
- contour farming
- forest management sites
- wildlife plantings
- successional mowing and disking
- prescribed burning
Soil or geology trails identify unique or subtle changes in the landscape by taking hikers past the following features:
- soil pits or profiles
- rock outcrops
- vegetation changes
- eroded areas
- slope changes
- land uses that are affected by soil properties such as stoniness, drainage, slope, soil depth, and productivity
Water or wetland trails explore the force and impact of water by following streams, brooks, creeks, and rivers. Do not overlook other options around bays, pocosins, swamps, beaver ponds, and farm ponds. The water theme can be linked to the following:
- soil erosion
- water quality
- watershed protection
- wildlife habitat
- fisheries
- vegetation and productivity changes
- sedimentation control
- Best Management Practices
Forest stewardship or ecology trails exhibit the following information about the land:
- history of forest management and succession
- the differences between natural and planted stands
- differences in site productivity
- impact of fire control and fire use
- past cutting history
- species diversity
- tree or plant identification
- stand maturity
- seedling development
- differences between hardwood and softwood stands
- wildlife use of various forest types
- lightning strikes
- fire scares
Historical trails highlight points of interest that can include evidence of the following uses and built elements:
- old homesteads
- Native American settlements
- tenant homes
- ornamental and exotic plantings within the forest such as daffodils, fruit trees, and shrubs
- drainage ditches that are hand or mechanically dug
- turpentine pits and old “catfaces”
- gold prospecting pits
- borrow pits
- sites that evidence farm erosion and row-crop production
- liquor still sites
- fish weirs
- old mill sites
- sawmill sites
- bark and sawdust piles
- old dams
- roads
- railroad spurs
- cemeteries
- mines
- wells
- springs
- fencerows
- rock piles
- chimneys
Wildlife management or wildlife observation trails explore animal uses. Simple observation decks and blinds can be erected to increase the enjoyment of the trail, especially around concentrated feeding areas. Wildlife trails may highlight the following:
- animal tracts
- dens, nests, artificial nest boxes, and nesting structures
- signs of use
- beaver dams and lodges
- deer scrapes
- den trees
- red-cockaded woodpecker colonies
- bird nests
- brush and cover piles
- forest and field edges
- owl or eagle nests
- wildlife plantings
- prescribed burning areas
- unique and critical habitat areas
- wildlife trails and travel ways
Studying the Land
Reconnaissance and Preconstruction
Begin planning a trail by obtaining a legal survey description or plat of the property. Good choices are either a survey map of the property or a tax map (aerial photo) from your county tax office. Begin to identify major landmarks, including access roads, buildings, and power lines, on a photocopy of the map.
Transfer the boundary lines to a contour or topographic map (Figure 1). Topographic maps illustrate the physical features of the property and are useful in locating cliffs, watercourses, swamps, and other unique or problem areas. A topographic map of the property allows you to identify steep and difficult areas to be avoided when constructing the trail. You also can map major vegetation types, water bodies, clearings, existing roads, and rough topography.
Topographic maps are available from your Soil Conservation Service office, outdoor outfitting stores, surveyor engineering supply houses, or directly from the U.S. Geological Survey. From the North Carolina Index you can locate your property and order the map or maps necessary to cover all of your property. The preferred map scale is 1 inch equals 24,000 feet.
If the proposed trail location will not follow a major watercourse or other land feature, you will need to survey the property systematically. By walking over the property, you can record the location of key features and unique areas. The only true way to locate all the important and unique interpretive items and objects is to use the grid method of surveying (Figure 2). The grid method, used frequently by foresters, requires sampling of the whole tract, ensuring that no key features are overlooked. The grid method allows for the systematic sampling of a property. Transect lines are established on a compass bearing that runs into the longest path across a property. Parallel lines are then followed so that a total “survey” of the property is made at a chosen distance—for example, 100 or 200 feet.
As you traverse the property, record roads, water bodies, timber changes, or other major interest points on your map (Figure 3). Flag important areas that are likely to be included in the final trail. Record all pertinent information in your field notes, as it will become the basis of your final layout (see Field Notes).
Field Notes
Line 1 (Plot)
- Pine-scattered beetle kill—ditch—N–S
- Gum-poplar—scattered pine
- Pine—35 years avg. 12” DBH—two logs BA 120
- Pine—35 years avg. 12” DBH—two logs BA 120
- Pine—35 years avg. 12” DBH—two logs BA 120
- Larger pine but not as high BA—good log road
- Ridge with mix pine and hardwood
- Ridge with mix pine and hardwood—wetland along creek
Line 2 (Plot)
- Large pine and hardwoods (deer stand)
- Edge of bottomland hardwood with pine—good log road
- Total beetle kill with good repro.—pine and poplar
- Same
- Edge of kill area (scatter pine)
- Pine—35 years avg. 12” DBH—two logs BA 120—fence and log road
- Pine, poplar, gum—ditch N–S
- Young pine field
Once all of your property’s features have been identified and flagged, begin a rough layout of possible routes on the field map. In laying out the trail, avoid straight lines by winding the trail to conform to the land’s contour. Maneuver from one interpretive point to the next, flagging as you go, until all points have been connected (Figure 4).
With practice and thorough knowledge of the property, most people can design a successful trail. Remember that no amount of office preparation can substitute for actually inspecting the property. The following tips will help you create successful forest trails on your property.
Favor trail placement in areas with the following characteristics:
- well-drained soils
- natural openings
- scenic vistas
- open timber
- light brush and vegetation conducive to easy travel
- special historical, ecological, and natural features
- access to and view of water bodies or streams
- natural drainage, such as side slopes and gently rolling terrain
- natural contours, such as those along terraces
- seasonal differences and experiences
- safe crossings of roads, railroads, and power lines
- good access from parking areas
- minimal conflict with existing land-use or management activities
For safety, environmental, and economic reasons try to avoid locating trails in the following areas:
- wet and flat areas with poor drainage
- frequently flooded bottomlands
- areas of unstable, fragile, or erosive soils prone to mud or rock slides
- areas where there are steep slopes and abrupt elevation changes
- areas that include bluffs, cliffs, and ledges, except where included for their scenic beauty
- locations requiring bridges or culverts
- areas of heavy vegetation requiring excessive clearing and periodic pruning and maintenance
- areas with fragile vegetation or rare and sensitive habitats
- cultural and archeological sites, except where featured as part of the trail
- places where visitors could have adverse effects on wildlife or other resources
- timbered areas subject to blowdown, falling limbs, or lightning strikes
- road and rail crossings where sight distances are limited
- old mine areas and other natural or manmade hazards
- areas requiring multiple switchbacks or retaining structures
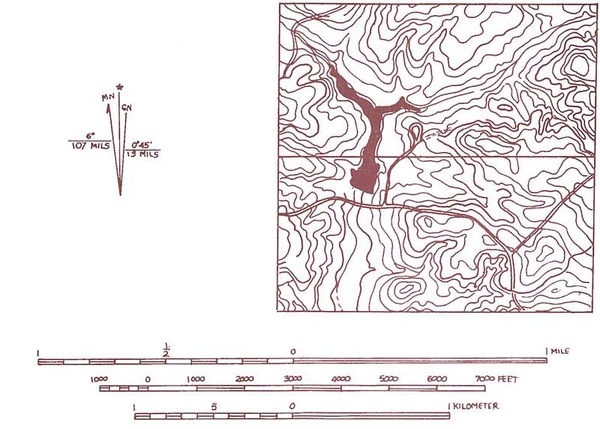
Figure 1. Topographic map showing property location and boundaries.
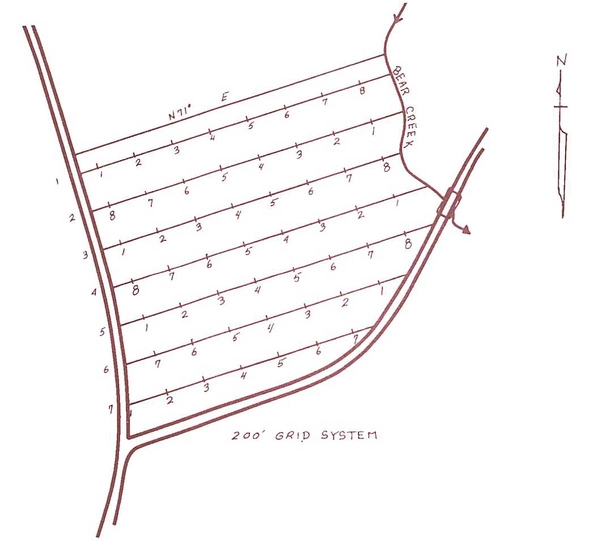
Figure 2. Establishing a grid is the first step in evaluating a property for trail layout. Partial transection lines are oriented to offer reference points.
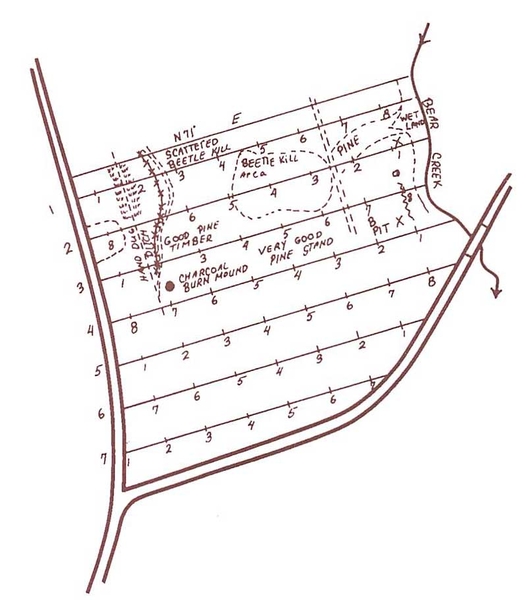
Figure 3. Take field notes and locate transition areas and points of interest that can be connected by the final trail.
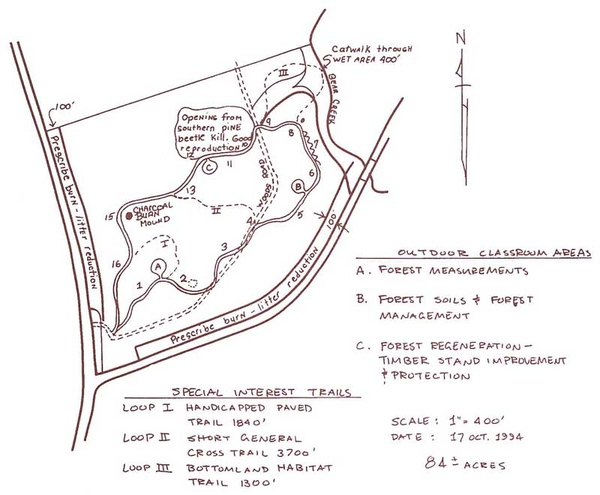
Figure 4. Your final layout map should include interpretation points of interest and trail location.
Designing, Laying Out, and Constructing a Trail
Trail Layout
The final layout of a trail can be flagged or painted so that subsequent clearing and construction can proceed with minimal supervision. The key to success in trail design is to define and follow clear objectives. Most important, keep it interesting! Keep these points in mind when laying out the trail:
- Vary trail alignment and direction.
- Avoid sameness by varying vegetative cover.
- Take advantage of natural features and diversity.
- Feature beautiful overlooks and vistas, seasonal landscapes, and clearings.
- Change the grade periodically, but strive to maintain the trail on mid-slope positions to promote good drainage and minimize erosion.
- Keep trails inconspicuous, natural, and suitable to the land. The purpose is to heighten the “natural experience,” not to construct another four-lane highway.
- Design a trail that tantalizes the senses: sight, smell, touch, and hearing.
- Avoid monotony by adding curves and zigzags that add to the natural experience. Often the shortest distance between two points is the least interesting.
- Trail length can vary, but 1/2 to 1 mile is usually best.
- Create a loop or rough figure-eight trail that will return the user to the starting point. A connecting trail at the midpoint will allow visitors to choose a shorter or longer walk.
Trail Construction
After the trail route has been marked, construction can begin. Construction activities include tree removal, brush clearing, pruning, minor excavation, and occasional foot-bridge construction. Careful preconstruction planning can minimize the need for these activities.
Construction activities should be prioritized to accomplish the greatest amount of work within the available time and other resources. Brush clearing often yields the greatest return in defining the trail and opening it to early use. Later, intensive projects such as removing trees, installing interpretive signs, or constructing bridges can be completed to refine the trail.
Trail clearing and brush removal can be accomplished with chain saws, mechanical brush cutters, hand saws, brush axes, regular axes, hatchets, loppers, and pruning saws. Hand clearing can be expensive and time consuming. However, labor availability may be the greatest obstacle to completing trail work. Greatest results are usually achieved when landowners can complete the work themselves.
Mechanized construction and clearing are often less expensive than hand labor; however, their use should be tempered by concerns for aesthetics and site disturbance. For instance, a tractor-mounted rotary mower may make short work of brush control yet leave unsightly stumps behind. Clearly, some combination of mechanical and hand work is needed to complete trail construction in a timely and cost-effective manner. Let the individual landowner’s interest and ability, as well as local conditions, be your guide.
Trail Width, Clearing Heights, and Grade Specifications
Trail width varies with intensity and type of use. Short recreational or interpretive trails to be used for small groups should be wider than lightly used, longer trails. Trails should be at least 2 to 4 feet wide with widths of 6 to 8 feet needed for pleasure walking and in areas with steep drop-offs. Educational or interpretive trails must be wide enough to accommodate small groups, especially at points of interest.
Clearing width should be at least 4 feet along the trail or 2 feet wider than the trail on either side of the actual walkway (Figure 5). Wind the trail around large, existing trees within the trail’s path rather than opting for total removal, and prune those trees’ lower branches back to the trunk. Clearing should be kept to a minimum. In cleared areas, cut all brushy vegetation flush with the ground. Clear all hazards adjacent to and above the trail. Strategically located fallen logs and large rocks can be left in place to discourage vehicular use and add to the natural variety of the trail. On trails that will be used by school groups, make small clearings (turnouts) adjacent to points of interest that will allow group instruction.
Clearing heights should be at least 7 feet for foot trails, 8 feet for biking trails, and 10 feet for equestrian trails. Periodic maintenance and monitoring at different seasons of the year will be needed to prune drooping and ice- or fruit-laden branches.
The grade, or slope, of the trail is the single most important factor in design and layout. The trail grade influences the length of the trail, level of difficulty, and drainage and maintenance requirements. Avoid creating long, sustained grades that can be tiring and monotonous to users. Try to maintain gentle slopes of 10 percent or less (less than 1 foot of drop over a 10-foot stretch). Gently undulate the grade to provide natural drainage and variation. Where steep grades are unavoidable, construct waterbars to slow runoff flow and to avoid erosion (Figure 6).
Periodic Maintenance. Natural processes are constantly shaping and altering the forests, and trails are no exception. Periodic upkeep and repair of trails must be scheduled at least annually. Some degree of mechanical or chemical control of resprouting brush will be required. Likewise, wooden and rock structures may need repair or replacement. Always build with weather- and rot-resistant materials to extend the life of structures.
To reduce the need to maintain and replace signs, consider using numbered signs keyed to an accompanying interpretive brochure that can be updated inexpensively as forest conditions change (Figure 7).
Periodic maintenance helps you avoid major construction. Schedule your maintenance in relation to the amount and extent of use. You also should consider the safety or liability constraints of your users. Maintenance on disability-accessible trails should include controlling weeds, preventing excessive cracking, and protecting the surface against erosion.
Surfacing Materials. Materials used to cover high-traffic and sensitive areas may need to be replaced or replenished periodically. When choosing these materials, seek out local supplies of natural bark, mulch, wood chips, sand, and gravel, preferably those that can be found on the tract. In wet areas with seasonal or standing water, surfacing is generally not feasible. In these areas use boardwalks, catwalks, decks, or log bridges (Figure 8) to provide access and minimize disturbance. Always provide handrails in deep-water areas and where boardwalk height is greater than 2 to 3 feet.
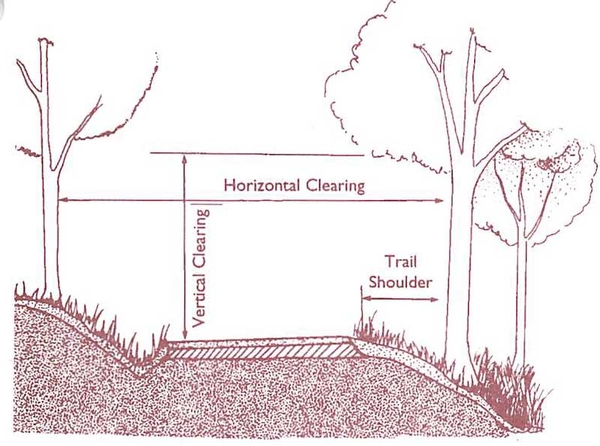
Figure 5. Trail clearing guidelines: Prune trees and shrubs 1 to 2 feet back from trail edge. Prune tree branches 8 to 12 feet above trail surface.
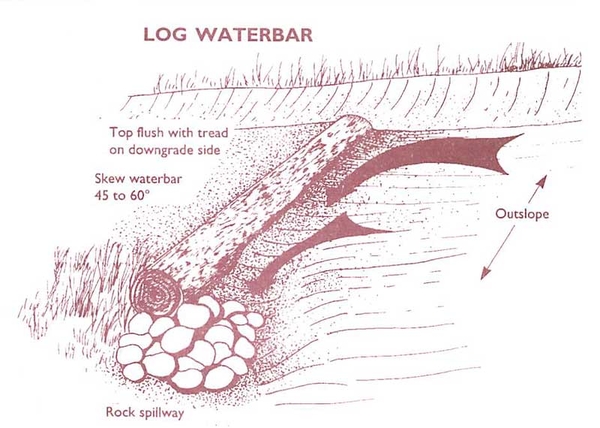
Figure 6. Waterbars are effective in controlling water flow on trails. Place them on long or steep grades to minimize erosion and the need for trail maintenance. A line of rocks can be used instead of the log to slow water flow. Bury two-thirds of each rock in the soil.
Figure 7. An interpretive brochure is an inexpensive user's guide and can be altered as audiences and conditions change.
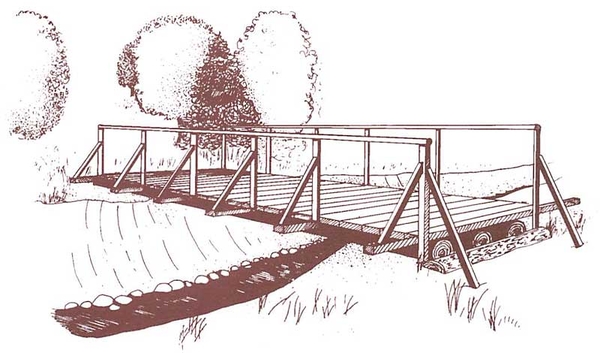
Figure 8. A simple bridge design.
Constructing the Trail for Universal Access
Design of the trail is based on the needs and interest of the intended user. It may require modifying the design of trails to make them universally accessible to persons with limited mobility.
Table 1 provides guidance based on US Forest Service Trail Accessibility Guidelines and incorporates standards and guidelines developed by the Architectural and Transportation Barriers Compliance Board.
| Feature | Technical Requirements |
|---|---|
| Width [1] | 36 inches |
| Maximum grade | 12% (1:8 slope) |
| Trail running slope | 5% maximum |
| Distance allowed at maximum grade | 10 feet maximum |
| Cross slope | 5% maximum |
| Surface | Firm and stable |
| Tread obstacles | 2 inches maximum |
| Tread openings | Less than ½ inch |
| Small level changes | ½ inch maximum |
| Rest areas [2] | 200-foot maximum interval |
| Passing space | 1000-foot maximum interval |
Source: Based on Forest Service Trail Accessibility Guidelines (FSTAG), USDA Forest Service, 2013.
[1] If the terrain, significant natural, historic or cultural feature, functionality of the trail, or prevailing construction practices prevent achieving the required width, the width may reduce to 32 inches. ↲
[2] Rest areas or landings are required at the top and bottom of each maximum grade segment and where trails change direction on maximum grade sections. (Landings must be a minimum of 60 inches long and the width of the trail.) ↲
Sources of Additional Information
Baughman, M. and Serres, T. 2019. "Recreational Trail Design" Woodland Stewardship: A Practical Guide for Midwestern Landowners, 3rd Edition, U of Minnesota Extension.
Oregon State University Extension Service. “Top 5 Things to Consider When Building a Nature Trail on Your Property”
Snodgrass, K. 2015. Forest Service Trails Accessibility Guidelines (FSTAG) Pocket Version. (1523-2812). Missoula, MT: U.S. Department of Agriculture Forest Service, Missoula Technology and Development Center. 18 p.
Top Ten Trail Construction Tips
- Decide the purpose of the trail before beginning the planning process. Educational, recreational, and scenic trails differ in layout, design, and interpretation.
- Know your users’ needs and provide ample resting areas, benches, and pamphlets or brochures for their enjoyment. Plan carefully to save resources and avoid problems.
- Hit points of interest. Maximize users’ exposure to natural features, water bodies, and vegetation changes.
- Keep the trail natural in appearance by blending it with its surroundings and by using natural and native materials in construction.
- Minimize the impact on wildlife and plants by identify known habitat areas for sensitive species. Establish trails outside these areas.
- Vary the direction of the trail to add variety.
- Keep trail length between 1/2 and 2 miles; whenever possible, create a loop so that users can return to the starting point.
- Design the trail with water in mind. Follow the contour to minimize water running down the middle of the trail. Install water drainage features such as water bars and rolling grade dips to shed water off the trail.
- In concentrated or heavy-use areas, trail surfacing may be required. Use low-cost native or natural materials such as wood chips, bark, or mulch.
- Consider trail markers, informational signs, and brochures, especially on self-guided nature and interpretive trails.
Acknowledgment
This publication is a revision of an earlier version. The authors would like to thank Leon Harkins and Mark A. Megalos for the earlier contributions.
Illustrations by Nickola Dudley.
Author
Robert E. Bardon
Extension Forestry Specialist
Publication date: May 14, 2024
WON-29
N.C. Cooperative Extension prohibits discrimination and harassment regardless of age, color, disability, family and marital status, gender identity, national origin, political beliefs, race, religion, sex (including pregnancy), sexual orientation and veteran status.