
2nd Edition
2024
Editor in chief:
Mark Hoffmann, Associate Professor, Small Fruits Extension Specialist, NC State University
Editors:
Amanda McWhirt, Extension Specialist Horticulture Crops, University of Arkansas
Rebecca Melanson, Associate Extension Professor, Mississippi State University
Edgar Vinson, Assistant Extension Professor, Auburn University
Guest editor:
Barclay Poling, Professor Emeritus, NC State University; CEO of Flavor First, Inc.
Additional Guest Editors, Fumigation Chapter:
Philip Brennan, Professor and Plant Pathologist, University of Georgia
Johan Desaeger, Associate Professor Entomology and Nematology, University of Florida
Authors:
Mark Hoffmann (NC State University), Amanda McWhirt (University of Arkansas), Jayesh Samtani (Virginia Tech), Christle Moore (Virginia Tech), Guido Schnabel (Clemson University), Daniel Tregeagle (NC State University), Hannah Dankbar (N.C. Cooperative Extension), Gina Fernandez (NC State University), Chip Simmons (NC State University), Penelope Perkins-Veazie (NC State University), Barclay Poling (NC State University), David Lockwood (University of Tennessee), Roy Flanagan (Virginia Tech), Erin Eure (N.C. Cooperative Extension), Kathryn Holmes (N.C. Cooperative Extension), Rebecca Melanson (Mississippi State University), Kristin Hicks (NCDA&CS), Aaron Cato (University of Arkansas) & Sanjun Gu (NC A&T State University)
Photo Credits:
Amanda McWhirt (University of Arkansas); Gina Fernandez (NC State University); Mark Hoffmann (NC State University); Christina Ippoliti (University of Maryland); Sam Humphrey (NC State University); Xiaonan Shi (NC State University); Guillermo Chacón (NC State University); Barclay Poling (NC State University); Sanjun Gu (NC A&T State University); Lesley Smith (University of Arkansas); Justin Moore (NC A&T State University); Cal Lewis (Lewis Farms, Rocky Point, North Carolina) & Austin Wrenn (Wrenn Farms, Zebulon, North Carolina)
Illustrations:
Mataya Duncan (University of Arkansas)
Contents
Preface
This guide has been a collaborative effort, including text bodies from 20 authors, photo illustrations from 16 contributors, and countless hours of work by three co-editors. It took more than two years from the conceptualization of this guide to the finished product. Special thanks to the Southern Regional Small Fruit Consortium, whose financial contributions helped tremendously to finalize this guide.
We decided to structure this guide into four chapters. The first chapter serves as an introduction to strawberry production in the Southeast and includes a “Quick List” for those who are new to strawberry production. Chapter 2, “Cultivars, Marketing, and Economics,” focuses on currently available strawberry cultivars (varieties) as well as sections on general marketing and the economics of strawberry production in annual hill plasticulture in the Southeastern United States. Chapter 3, “Annual Hill Strawberry Production and Management,” will then take a deep dive into the nuts and bolts of what it takes to produce strawberries here in the Southeast. The final chapter, “Additional Considerations,” covers cropping, high tunnel production, and food safety. More information, including a complete enterprise budget for a u-pick operation, can be found in the Appendix at the end of this guide.
It is my sincere hope this guide will serve as a comprehensive source of information for growers and agents alike, and at the same time will be an enjoyable read.
Sincerely,
Dr. Mark Hoffmann (editor in chief)
Associate Professor, North Carolina State University.
1. Introduction
Introduction to Annual Hill Strawberry Plasticulture
Annual hill strawberry plasticulture was developed in conjunction with Methyl Bromide soil fumigation for the California strawberry industry in the 1950s. Adaptation of strawberry plasticulture in the Southeast was first reported in the early 1960s (Figure 1-1).
Plasticulture became more widely adopted in the Southeast from the 1970s through the 1990s (Poling 1987). Strawberry plasticulture is an annual hill cultural system that provides significant production and market benefits over the bare-ground matted-row system. Today it is the predominant strawberry production system for the $50+ million strawberry industry in the southeastern US. Annual hill plasticulture has the advantage of providing higher strawberry yields and better disease control compared to matted-row strawberry cultivation (Figure 1-2). In annual hill plasticulture, a grower plants new strawberry transplants (plug plants, bare roots, or cut-offs) into a raised bed on an annual basis.
In an annual hill strawberry plasticulture production system, a grower can plan to harvest a crop within seven to eight months of planting compared with 12 months in a matted-row system (Figure 1-2). The picking season for a strawberry plasticulture system is generally two weeks earlier than matted row and will last four to eight weeks (depending on the region), using short-day cultivars. Plasticulture allows for uniform plant stands every year (unaffected by summer disease, drought, or weed competition), larger berries, and easier picking with less labor. Disease (for example, gray mold, Botrytis cinerea) can be more easily controlled compared to a matted-row system. All these factors contribute to much higher marketable yields in annual hill strawberry plasticulture systems compared to matted-row systems. The plasticulture beds also allow growers to take advantage of drip irrigation for more efficient water usage, and the same drip irrigation system can also be used to feed the crop (called fertigation).
The annual cycle of strawberry plasticulture production can be summarized in seven steps, from pre-plant preparations (Step 1) to crop termination (Step 7) (Table 1-1).
Strawberry biology
Taxonomy and Genetics
The genus Fragaria (strawberry) belongs to the family of Rosaceae. Currently, 24 distinct wild strawberry species can be found worldwide (DiMeglio et al. 2014). The cultivated strawberry plant (garden strawberry) Fragaria x ananassa is a result of hybridization between F. chiloensis and F. virginiana, originating in Europe during the 18th century. Commercial strawberry cultivars are octoploids, which have eight haploid sets of chromosomes in each cell, each carrying a set of similar genes. However, there is a wide diversity of strawberry types in wild strawberry species that are not used for cultivation, ranging from diploid strawberry species (F. vesca) to decaploid species (10 haploid sets of chromosomes: F. cascadensis). Fragaria chiloensis and Fragaria virginiana, the parents of the modern commercial strawberry plant, are both octoploids and native to South and North America, respectively (DiMeglio et al. 2014).
Morphology
A strawberry plant can be classified into several distinct morphological structures: the crown, stolon (runner), leaves and petioles, root system, inflorescences, and fruit (Galletta and Himelrick 1990; Figure 1-3). The strawberry crown is a compressed stem-rosette, between 1 and 2 inches long. It is usually covered with overlapping leaf bases. The crown is comprised of auxiliary buds, responsible for the development of runners (stolons), branch crowns and inflorescences. Runners are elongated stems are comprised of several internodes and daughter plants. Daughter plants are new leaf rosettes, genetically identical to the mother plant and with the ability to develop into a complete strawberry plant (Galletta and Himelrick 1990; Hancock 1999).
The process of ”runnering” is used in strawberry nurseries to produce planting stock for strawberry growers and to fill in perennial matted-row strawberry production in home gardens. Strawberry plants have trifoliate leaves with three leaflets, attached to the main stem (petiole) (Figure 1-4). The strawberry root system usually consists of primary soil-penetrating roots, and secondary feeder and explorer roots. Between 50% and 90% of the root system of a mature strawberry plant can be found in the upper 6 to 8 inches of soil (Galletta and Himelrick 1990). In the Southeast, the root system usually composes between 40% and 80% of the overall strawberry plant between November and March. However, root systems only compose 10% to 20% of the overall dry weight of a strawberry plant between April and June (Fernandez et al. 2001).
The main stem of an inflorescence (flower stalk) is called a “peduncle.” Flowers (and later fruit) are held by a single stem, the “pedicel.” Biologically, the strawberry inflorescence is a “compound dichasial cyme.” It is a cluster of flowers from a common peduncle, developed by branching beneath the terminal flower (dichasium). This process continuous for two to four cycles of branching (compound), with some of the secondary branches missing and with pedicels of different length (cyme) (Galletta and Himelrick 1990).
Botanically, strawberry fruit are not berries. Berries develop from a single fertilized ovary and are characterized by fleshy walls. In a strawberry, however, the flesh of the fruit is produced by a swollen receptacle. The hard seed (“achenes”) on the surface are the true fruit of the strawberry plant. A strawberry is therefore a pseudocarp (or “false fruit”) since the actual fruit are the achenes on the surface of a swollen receptacle. The receptacle is the point at which the parts of the flower are attached. Several hundred pistils and a doubling ring of stamens are part of the self-fertile cultivated strawberry flower (Figure 1-5). Being self-fertile, strawberry flowers do not require cross pollination for fruit formation. It usually takes 20 to 30 days from pollen fertilization of a flower to form a ripe strawberry. Strawberry flowers are wind- and insect-pollinated and need several pollinator visits to be fully fertilized. Cool temperatures or the use of floating row-covers can reduce the amount of pollen transfer and pollinator activity, resulting in more misshapen fruit. This phenomenon varies widely by cultivars. Frost damage to the receptacle or parts of the receptacle can also lead to misshapen fruit.
Strawberry Cultivar Classification
In strawberries, flowering and runnering are controlled by different environmental signals, especially temperature, photoperiod, and nutrition. It is in the manipulation of environmental factors that a grower can improve yields and reduce runnering. How strawberry cultivars act in certain environmental conditions depends on their genetic make-up. Typically, strawberry cultivars are classified based on their flowering behavior. (1) Short-day (SD) or “June-bearing” cultivars develop flowers under shorter day-lengths (winter and spring) and bear fruit in early summer. They are a seasonal flowering type. Typical cultivars used in the Southeast are Chandler, Camarosa, Liz, Rocco, Ruby June, Sweet Charlie, Camino Real, and Fronteras. Long-day (LD) strawberry cultivars are less sensitive to day length and develop flowers over a longer season. Because of these features, the terms “day-neutral” or “ever-bearing” are often used interchangeably when referring to LD strawberry cultivars.
SD strawberry cultivars have the feature of one flush of flowering and fruiting in spring and early summer (Heide et al. 2013; Stewart and Folta 2010). Flowers in SD cultivars are initiated during colder temperatures and shorter photoperiods (day lengths), and runnering is induced during warm temperatures and longer photoperiods. LD cultivars are specifically bred for long-season production, especially in central and southern California (Bish et al. 2001; Neri et al. 2012; Castro et al. 2015; Arnade and Kuchler 2015). Flowering in LD cultivars can be initiated by longer day lengths and higher temperatures compared to SD cultivars. In the Southeast, the majority of strawberry production utilizes SD cultivars; however, the use of LD cultivars such as Albion or Monterey has become more popular in recent years but can be very challenging in the Southeastern climate.
Quick List: Important Considerations for Strawberry Plasticulture
- Pre-Plant Fertilization and Soil Preparation
-
Chose a site that is well drained.
-
Take representative soil samples at least three months prior to planting.
-
Adjust soil pH to between 6.0 and 6.5 by incorporating lime at 8 to 12 inches of depth.
-
Lay down up to 60 pounds of nitrogen per acre and follow soil test recommendations for potassium and phosphate.
-
-
Bed Formation and Fumigation
-
Bed formation, fumigation, drip, and laying of plastic mulch is typically performed in one pass, using a tractor pulled-bed layer (Figure 1-6).
-
Pre-bedding and subsequent bed formation is often required.
-
Make a fumigation plan.
-
Test fumigation rig and repair, if needed.
-
Read the fumigant label. Most fumigants need to be applied at a minimum of 21 days before planting. We recommend allowing a few more days for Pic-Clor products.
-
-
Planting Space
-
Typically two plant rows with one drip line in the middle.
-
Plants are spaced between 12 and 16 inches apart, in a staggered zig-zag pattern (Figure 1-7).
-
The planting space directly correlates with the number of plants per acre (Table 1-2).
-
- Planting Dates
- Fresh strawberry plants are often not available before September.
- Recommended strawberry planting dates for the Southeast range from late September to mid-end of October.
- It is common to order plants for the next season during late May or early June at the latest! More recently, nursery suppliers of cut-off plants have been requiring plant orders (with a deposit) as early as mid-March.
- Given the possibility of delays in nursery plant delivery or problems due to weather it may be advisable to schedule plant delivery dates that are five to seven days ahead of your anticipated planting date.
- Transplanting
- Plug plants (rooted transplants), bare-root plants (freshly-dug plants with foliage), and cut-offs (freshly dug plants without foliage) are common transplant materials used in the Southeast (Figure 1-8).
- A well-established plug plant should have three leaves with petioles, and one crown at an approximate size of 0.8 mm. The crown should not be buried under substrate, and the root ball of the plug plant needs to be fully developed (Figure 1-9).
- Bare-roots and cut-offs are more difficult to plant and require sprinkler irrigation to supply extra overhead water during the first two weeks after planting. High-quality plants have a large set of fibrous roots, one crown of approximately 0.5-1 inch in diameter, and two to three leaves or green stems.
- All plants need to be planted with the crown above surface and roots below surface.
- Post Transplanting
- Do not walk away after planting.
- We highly recommend overhead sprinkler irrigation for plug plants at least in the first two to three days after transplanting in addition to drip irrigation.
- Transplants are also frequent carrier of diseases. We recommend preventatively managing these diseases in the fall. The Southeast Regional Strawberry Integrated Pest Management Guide provides in-depth knowledge on how to manage these diseases.
- Frequent inspection after planting help to stay ahead of diseases and other problems.
- Mefenoxam (Ridomil Gold) should be applied through drip tape to control Phytophthora crown rot (P. cactorum). Cultivars that are especially susceptible to this disease are Camarosa, Chandler, and Sweet Charlie.
- The use of multi-site chemicals (Thiram to control Neopestalotsiopsis; Captan to prevent anthracnose and Botrytis) is recommended.
- Plants that are infected with angular leaf spot need to be identified as early as possible and should be removed immediately.
- A comprehensive collection of pictures and symptoms can be found in North Carolina State’s Strawberry Diagnostic Key. Another very valuable and often-used source is the myIPM phone App, which can be downloaded from the Apple App Store and Google Play.
- Wildlife
- Deer graze on fresh plants and often destroy crown and buds.
- Transplants grazed by deer will be delayed in crown development, have reduced yields in the spring and, in severe cases, will not recover.
- Deer feeding on young plants is often more pronounced in dry periods and during harsh cold periods.
- Two wire electric fences that are spaced 1.5 feet apart and offset in height can keep deer out of a strawberry field.
- In areas with heavy deer activity, 8-to-10-foot-tall electric or non-electric fences can serve as better protection against deer damage.
- Equipment
- A plastic mulch bedder, fumigant injector, and layer is a multi-function tractor implement that will form a raised, single-row, or multiple-row bed, lay drip tape, and apply the plastic mulch in a single pass (Figure 1-10).
- It is common to “pre-bed” before laying plastic (Figure 1-10).
- Overhead sprinkler irrigation is essential in the first weeks of plant establishment, helping with evaporative cooling on young transplants and root establishment. Sprinkler irrigation systems require a large water supply, particularly if also used for freeze and frost protection in spring.
- Tractor boom sprayer for pesticide applications. Modified hoops to reach under the canopy and into the crowns, and the capacity of applying 250 to 300 pounds of pressure, using 75 to 100 gallons of water per acre when plants reach full canopy in the spring.
- Weather station. A variety of relatively inexpensive weather stations are available, often with the ability to communicate via smartphone app. Those weather stations will give better detail and an overview of the temperature, humidity, or rainfall at the specific field.
- Floating row covers are an absolutely essential tool for any strawberry grower in the Southeast. They are used for winter freeze protection, spring frost protection, and to accumulate heat units after a late planting.
Weather Threats and Climate Change in the Southeast
Food production is a matter of national security in the US. The rapidly changing weather conditions present major challenges to current strawberry production systems nationwide. Changing climate already affects strawberry production in the Southeast. In 2023, heat domes affected not only growers who scrambled to protect their blossoms from heat stress. Wildfires in Canada widely affected strawberry nurseries that in return fell behind in delivering strawberry daughter plants to plug producers later in the season.
In the Southeast, spring frost events are more frequently followed by rain and early heat waves, and it has become more common for growers to frost-protect one night, only to either scramble to harvest before the rain or protect blossoms from heat damage. Recent winter deep freezes saw often temperatures drops from the mid-50s into the low teens or even single digits within less than 24 hours. Today, a strawberry grower in the Southeast places a lot of demand on a strawberry plant and cannot get around watching and interpreting weather forecasts very closely. North Carolina State University therefore provides timely weather alerts for the Southeast and Mid-Atlantic regions every winter and spring (from November through May). Growers are strongly encouraged to subscribe to the NC State Extension Strawberry Growers Information page to gain access to this free service.
By the end of the 21st century, a shift into warmer plant hardiness zones is projected for almost the entire Southeast (Carter et al. 2018). Under this scenario, strawberry cultivars with high chilling requirements or with the tendency to break bud at low growing degree days might become even more difficult to grow (Sweet Charlie is one example). It is possible that planting dates for cultivars such as Chandler will have to be pushed back to later dates to accommodate for increasing heat units in the fall. An increasing number of warmer days in late winter (January, February) may also shift the beginning of harvest weeks earlier than traditionally known. In 2023, for example, the first North Carolina field-grown strawberries were harvested as early as the first week of March, more than three weeks earlier than usual. This was due to a very warm late-winter season. Berries have had to be protected from frost and freeze events from February through late April of 2023. Such weather patterns will potentially be more common in the future, leading to an increased risk of spring frost damage and consequently to an increased labor demand for frost and freeze protection in the Southeast.
Tropical storms present additional real and direct threats to crops. The intensity of such weather events is expected to increase in the coming 30 years in the Southeast. Flooding in particular has been problematic for strawberry production in the past, as well as damage caused by heavy winds; both will continue to be problematic in the coming years. Detailed guidance on hurricane and tropical storm preparedness for strawberry growers can be found in Hoffmann et al. (2021). Even moderate rainfall in the spring frequently leads to fruit damage, and fall tropical storms have resulted in delayed planting and compromised planting material. Protected growing systems (Figure 1-11) can protect from weather issues but come with their own set of challenges and costs.
The selection and management of appropriate cultivars for different growing systems, as well as the availability of appropriate planting materials, are becoming more important in the Southeast as reactions to issues in supply chain and climate (Figure 1-12).
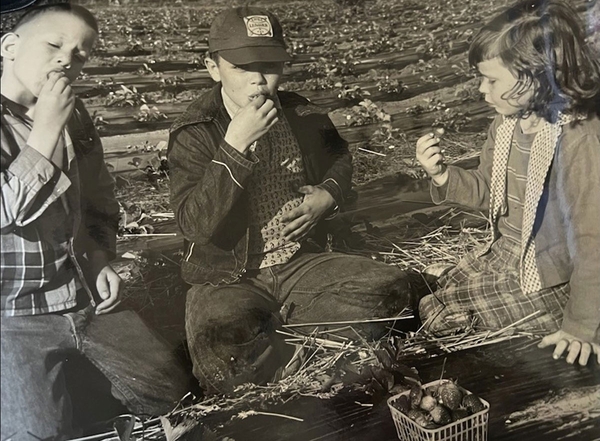
Figure 1-1. Picture of youngsters in a plasticulture strawberry field in Rocky Point, North Carolina, taken in 1962 (with permission of Cal Lewis, Lewis Nursery and Farms, Inc., Rocky Point, North Carolina).
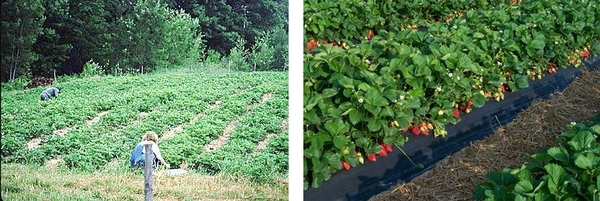
Figure 1-2. Strawberry production systems. Left: A matted-row system in western North Carolina. Right: Chandler strawberries growing in a plasticulture system.
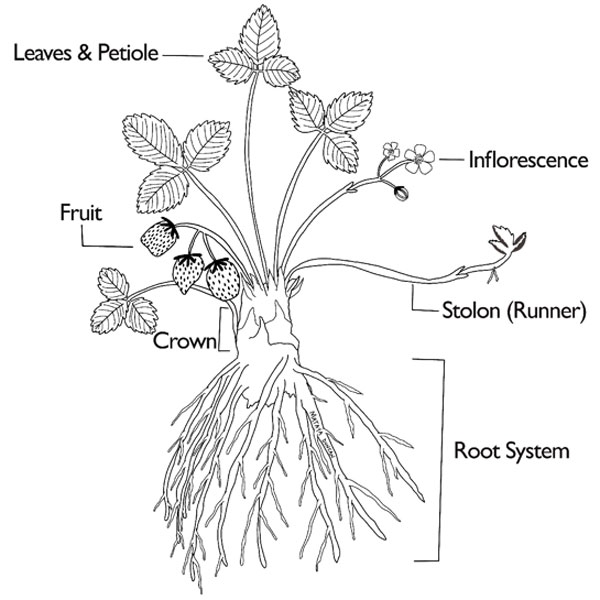
Figure 1-3. Strawberry plant morphology. The picture shows the typical tri-foliate leave and the long petioles, the compressed crown. A strawberry plant can fruit, flower, and produce stolons at the same time.
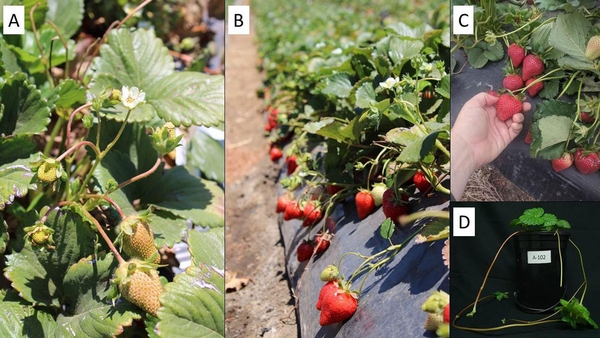
Figure 1-4. A: A flower truss with different stages of flower and fruit development (‘Monterey’). B: A strawberry field with flowers and ripe fruit (‘Monterey’). C: Several stages of ripe fruit in a commercial fruiting field in North Carolina (‘Ruby June’). D: Runner and stolon development on a potted strawberry plant (‘Albion’).
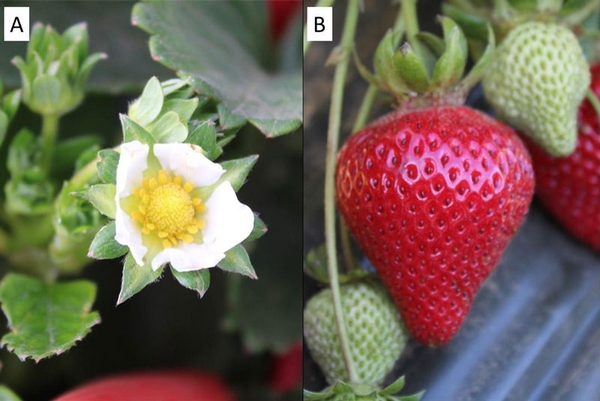
Figure 1-5. A: Open strawberry flower (blossom). B: A ripe strawberry fruit.
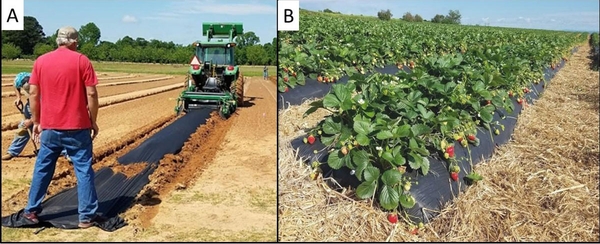
Figure 1-6. A: Plastic-mulch laid with a bed shaper in Arkansas in September. B: A fruiting strawberry field on a 14-inch in-row planting space (‘Chandler’).
Figure 1-7. Strawberries planted in a zig-zag pattern.
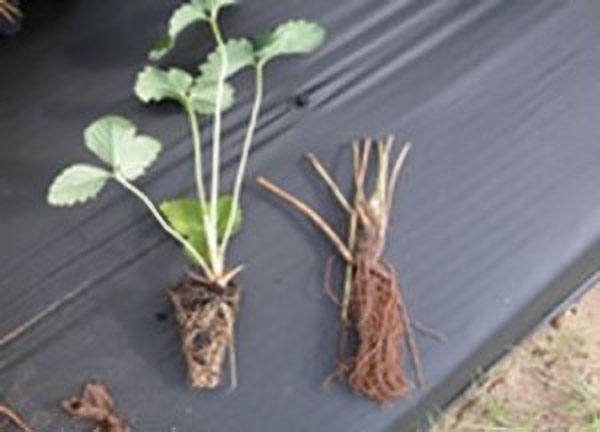
Figure 1-8. A well-developed plug plant and a cut-off plant. Both plants need a very well-developed root system.
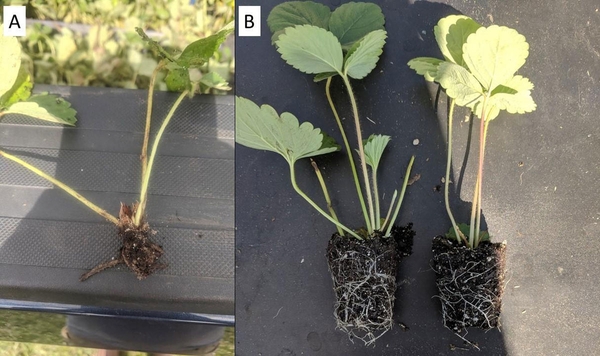
Figure 1-9. Examples of plug plants that should not be transplanted. A: A very poorly developed root system of a plug plant. This plant will not perform in the field. B: Plug plants with poor root ball and crowns set too deep in the substrate. These plants will also perform poorly in the field if planted.
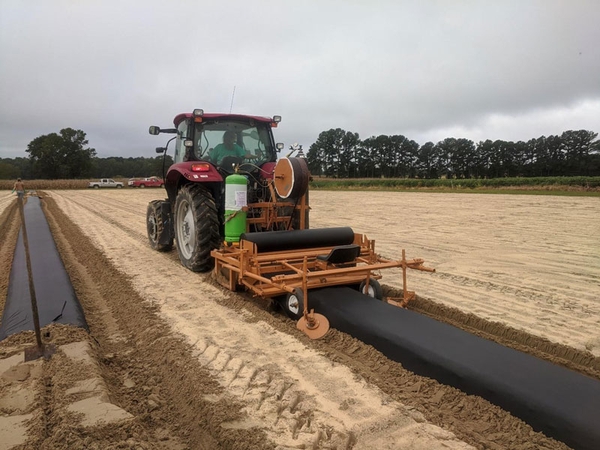
Figure 1-10. A single-row tractor towing a plastic mulch bed shaper with fumigation rig. Beds are pre-bedded through a single pass without plastic and fumigant application, and then followed up by a second pass, during which fumigants are applied and plastic is laid.

Figure 1-11. Strawberries can be grown in low- and high tunnel structures as well as in tabletop greenhouses (not shown) to protect from weather impacts.
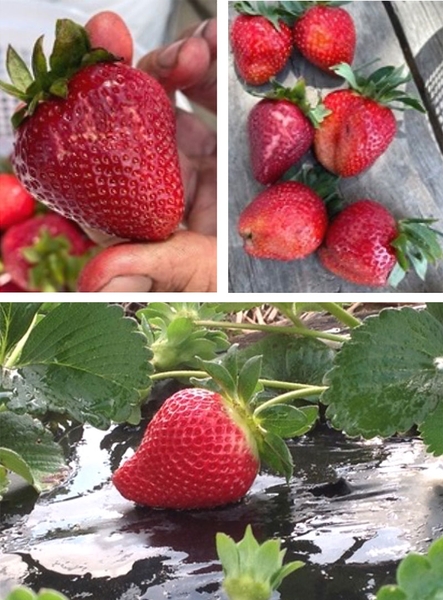
Figure 1-12. Rain damage in spring has become more prevalent throughout the Southeast. Cultivars that are more rain tolerant than others can make a big difference in today’s strawberry production systems.
2. Cultivars, Marketing, and Economics
Strawberry Cultivars (Varieties)
Strawberry growers in the Southeast have the fortune to select from a wide range of strawberry cultivars (often referred to as “varieties,” “varietals,” and “types”). However, such fortune can also become very overwhelming; growers in the Southeast need to consider many factors, often uniquely geared towards their farm and customer base, before making a decision on cultivar choice.
A successful strawberry operation in the Southeast serves a niche market in which the sales price is higher than the average US market price. Most, if not all, operations in the Southeast serve a direct-to-consumer customer base. Wholesale operations typically sell to grocery chains as “local produce” to achieve higher-than-usual shelf prices. This means growers have to select cultivars that appeal to their specific customer base. Flavor, yield, peak season, berry size, and appearance are some of the main characteristics that become more or less important, depending on the specific customer base. With increasing weather threats, a constant evaluation of a range of cultivars is highly recommended for any grower who wants to achieve a long-standing successful operation. For example, just because Chandler was the cultivar that appealed to your customers 10 year ago doesn’t mean it is still the best cultivar to grow today. A willingness to try and fail (on a small scale) and educating yourself about new and emerging cultivars is key to a long-standing success of a strawberry operation.
While there are currently more than 10 strawberry cultivars commercially used in the Southeast, the majority of those are SD (June-bearing) strawberry cultivars. LD (day-neutral, ever-bearing) cultivars are less common and mostly used in protected culture systems (such as a tunnel). The most dominant SD cultivars planted throughout the Southeast are Camarosa, Chandler, Ruby June and Fronteras. LD cultivars used in tunnel systems or greenhouse production are mostly Albion or Monterey. Other cultivars used in protected systems are Brilliance and Sensation, both strawberry cultivars from the University of Florida breeding program. The same is true for Sweet Charlie. University of Florida genetics are bred to flower early and under warmer conditions and are very difficult to grow in open-field plasticulture systems here in the Southeast. Newer cultivars on the horizon (as of 2023) are Rocco and Liz (from NC State’s breeding program), and Ashely Jay and Miss Joe (both from the Good Farms Breeding Program).
In the following section, we discuss cultivars that are generally found to be well adapted to environmental conditions across the Southeast. The breeding program that developed the cultivar is noted within parentheses after each cultivar name.
NCSU = North Carolina State University
LC = Lassen Canyon
UCD = University of California-Davis
UFL = University of Florida
The year the cultivar was released follows the breeding program institution. The states where each cultivar has been trialed or recommended are noted (AL = Alabama, AR = Arkansas, GA = Georgia, LA = Louisiana, MS = Mississippi, NC = North Carolina, SC = South Carolina, TN = Tennessee, VA = Virginia).
SD (June-bearing) Cultivars in Alphabetical Order
Camarosa (UCD, 1992)
Mid-to-late season. Medium-size fruit, moderate steady yield through season (Figure 2-1). Good flavor, especially at the end of season. Best for pick-your-own and direct-to-consumer sales. A standard cultivar in the Southeast for many years. Smaller berry size at the end of the season, but better flavor. Berry deformation in the early season is common. Fairly rain tolerant.
Recommended for: AL, AR, GA, NC, SC, and VA. Standard in NC. Adapted to AR but not widely planted.
Camino Real (UCD, 2001)
Mid-to-late season. Medium dark red fruit, with good size fruit and high yield (Figure 2-2a and Figure 2-2b). Fair flavor, firm berry. Good for wholesale or pick-your-own. Disease and rain tolerant.
Recommended for: AL, AR, NC, VA
Chandler (UCD, 1983)
Mid-season. Medium-to-small-size fruit, moderate-to-high yield that has steady production through the season (Figure 2-3). Good flavor. Fruit can be very soft. Fruit size can be inconsistent. Not rain tolerant. Best for pick-your-own and other direct-to-consumer sales. Chandler is adaptable to many regions. Widely planted in the Southeast.
Fronteras (UCD, 2014)
Mid-season. Large uniform berry and high yield (Figure 2-4a and Figure 2-4b). Very firm fruit with fair flavor. Best for mostly wholesale markets. Flavor noted to be good in Arkansas but variable in North Carolina. Color has also been noted to be variable in NC. Not rain tolerant. Spring fertigation most likely different to Chandler or Camarosa.
Recommended for: Areas in NC, SC, and GA. Has performed well in trials in AR.
Liz (NCSU, 2018)
Mid-to-late season. Medium-size fruit and high yields (Figure 2-5). Moderately firm, with improving flavor in late season. Best for pick-your-own and other direct-to-consumer sales. Can develop large canopy in some locations. Fairly tolerant to rain.
Recommended for: NC. Has performed well in trials in AR.
Rocco (NCSU, 2018)
Early season. Small-to-medium-size fruit, steady yield through season (Figure 2-6). Soft. Very unique and good flavor. Seeds sometimes at or on the surface of fruit. Best for pick-your-own and other direct-to-consumer sales. Consider as a Sweet Charlie alternative. It will start at same time or before Sweet Charlie and will continue to fruit through the season. Berry size will be reduced with a heavy crop. Not tolerant to rain.
Recommended for: NC. Has performed well in trials in AR.
Ruby June (LC, 2014)
Early-to-mid-season. Outstanding flavor, moderately firm, steady and high yield through the season (Figure 2-7). Uniform fruit size over the season. Good for pick-your-own, direct-to-consumer and wholesale markets. Has become a standard in NC. Consider as a Chandler alternative. Planting date comparable to Camarosa, important to achieve good yields. Needs higher N input. Fair-to-good tolerance to rain.
Recommended for: AR, NC, SC, GA, and VA.
Sweet Charlie (UFL, 1992)
Early season. Medium-size fruit, low yield (Figure 2-8). Good flavor, sweet and aromatic, with soft fruit. Early pick-your-own and other direct to consumer sales. Some growers plant a small acreage of Sweet Charlie to have early fruit to start the season. Very early frost protection necessary. Cultivar may ripen seven to 14 days before Chandler. Not tolerant to rain. Very difficult to manage in many areas.
Recommended with caution for: AR, NC, and VA.
Long-Day (Ever-bearing) Cultivars in Alphabetical Order
Albion (UCD, 2004)
Mid-season. Medium-to-large size, moderate yield in spring (Figure 2-9a and Figure 2-9b). Good to very good flavor. Good for low tunnel, high tunnel, and greenhouse operations. Good for direct-to-consumer sales and wholesale markets. Plants need more nitrogen than standard recommendations. Attracts two-spotted spider mites. Not tolerant to rain.
Recommended for: By far the most commonly grown LD-type cultivar in the Southeast. Recommended for tunnel and greenhouse for AR, NC, SC, and NC.
Monterey (UCD, 2008)
Medium-large berry, and higher yield than Albion. Fair flavor and firm. Good for low tunnel and high tunnel production. Good for direct-to-consumer sales and wholesale. Plants need more nitrogen during spring than is the standard recommendation. Not tolerant to rain.
Recommended for: NC, especially for tunnel production
Other Cultivars:
Many cultivars have been trialed at locations across the Southeast. Below is a list of cultivars from UC Davis, the University of Florida, and Lassen Canyon that have performed reasonably well in research trials. Miss Joe and Ashley Jay are new cultivars, released in 2021, that seem to be promising but will have to be trialed further. However, annually updated trial data can be found on the NC State Extension Strawberry Growers Information page and the University of Arkansas’ UAEX Arkansas Fruit, Vegetable, and Nut Update blog.
University of California-Davis
Merced, Cabrillo, Portola, San Andreas
University of Florida
Florida Sensation
Good Farms
Miss Joe, Ashley Jay
Strawberry Markets in the Southeast
Strawberry growers in the Southeast have to develop and find niche markets in which they can sell produce for higher price points. Virtually all strawberry farmers have a direct-to-consumer component to their operation, most of whom rely 100% on those sales. Larger farms also sell wholesale and for processing. What works for each farm will depend on a number of factors including location, time, availability of labor, marketing skills, and storage and transportation capabilities. A thorough market analysis is an important first step in deciding the best markets an operation should target.
Direct-to-Consumer Markets
- Pick your own (PYO). In this system, the grower opens the field to the public at set times to allow consumers to harvest their own berries for a set price. The major advantage to this system is reduced expenses for labor. The major disadvantage is that the public is not going to harvest berries as thoroughly as a harvest crew. This leads not only to lost revenue from missed berries, but also to increased pest and disease problems.
- On-farm sales. Pre-picked berries are offered in ready-to-go flats or containers for customers. The quantity of pre-picked berries a farm offers is determined by access to labor, weather, and ripening conditions. Pre-orders may be called in or placed online through the farm website or social media account. Pre-ordered berries may be paid for at pick-up or in advance through the website.
- Off-farm sales. Pre-picked berries may also be sold off-farm at other farm stands or farmers markets. This is a good option if the farm is located in a low-traffic or low-population area.
Wholesale Markets
Wholesale markets may include other farm stands or farmer’s markets where the grower can off-load berries in bulk. Other options in this category include sales to grocery or other local specialty stores, restaurants, or produce distributors for large-scale farms.
Processing Markets
Examples of value-added items are ice cream or frozen yogurt, smoothies, baked goods, wines, ciders, jams, and jellies. Berries destined for processing could be marketed using off-farm options, where a grower sells in bulk to a processor, or on-farm options, where the grower is set up to process certain value-added products on-site.
Pick-Your-Own (PYO) Operations in the Southeast
PYO (or “u-pick”) operations are by far the most common strawberry marketing model in the Southeast (Figure 2-10). In many areas, the customer base has slowly shifted towards the purchase of smaller quantities of berries, picked mostly for direct consumption. Many operations are using online pre-booking services for PYO as well as pre-ordering and pre-pick services. PYO operations are becoming a recreational activity for customers, especially if located close to population centers. This model has been extremely successful, allowing operations to be more efficient while additionally offering value-added products or recreational activities. We have assembled a list of important considerations for the successful establishment of a strawberry PYO operation.
- Market analysis. First, before starting a PYO operation, it is important to conduct a market analysis to understand who the customer base is and how to market the business.
- Charge by the container or by the pound? While charging by the pound is the fairest to all parties involved, pricing by container size is a recommended Good Agricultural Practices (GAP) for PYO operations. Container pricing customer friendly, faster, and can serve more customers at a time. It is not uncommon to charge a fee per customer that includes the container price.
- Opening hours? This seems like a simple question, but just like any decision it is important and merits thoughtful consideration. A key aspect of opening hours will be answered by the market analysis: Who is the competition? Who are the potential customers? How can the business differentiate itself from competitors? Labor availability (often family members) is key to a successful season.
- Where in the field are customers allowed? It is becoming increasingly uncommon to open up large portions of fields for customers. Instead, some growers allow only a small portion of the field to be harvested at the time.
- Visibility. It is also important that a PYO farm has good visibility from main roads or through large signs to attract attention. There should be plenty of parking and non-muddy paths from parking spots to the field for customers. A clearly labelled pay-station should be visible from the field.
- Markets for non-marketable berries? There might be cost-effective opportunities for non-picked berries to develop value-added products.
- County and local restrictions. Some localities have different restrictions on a variety of items: where a farm stand can be put, what can be sold at the farm stand, what are the allowed hours of operation, and so forth.
- Farm liability coverage. Farm liability coverage needs to be able to cover public traffic on the farm and must be obtained prior to the first day of opening. A blanket liability coverage is not adequate.
Budget of a Strawberry PYO Operation in North Carolina
This section provides an overview of a sample cost-and-return budget for a strawberry growing PYO operation in North Carolina. This budget serves two main purposes: to provide a new grower an overview of the processes necessary to grow strawberries in North Carolina, and a broad projection of potential net returns; and to provide a template budget for a new or established grower to adapt for their operation and calculate their own net returns.
The detailed enterprise budget breakdown can be found in the Appendix of this production guide. The budgeting program used in this chapter was modified from a program originally developed in 2015 by Olya Sydorovych, Barclay Poling, and Frank Louws at North Carolina State University (Sydorovych et al. 2015).
The budget was developed for a five-acre PYO and pre-pick operation, although costs and returns are discussed on a per-acre basis. The activities and quantities in the production system were developed in conjunction with NC State Extension specialists and agents to align with current recommended growing practices. Prices were obtained from suppliers operating in North Carolina and from online sources. A draft of the budget was checked by a convenience sampling of Extension agents and North Carolina growers for accuracy and relevance. The specific products listed in the budget are used as examples, and their inclusion should not be considered an endorsement of these products over others.
Assumptions
The costs and returns are highly dependent on the assumptions fed into the budget. It is assumed that the grower plants 15,000 plug plants per acre on plastic-covered rows. If good management practices are followed, and the weather is favorable, this system is assumed to return 1.1 pounds of marketable strawberries per plant, or 16,500 pounds per acre. It is assumed that 40% of the crop is sold as PYO, and the remaining 60% sold on-farm as pre-pick. Pre-pick prices are generally higher than PYO prices, due to the additional labor necessary for pre-pick harvest. It is assumed that both PYO and pre-pick strawberries are sold in 4-quart baskets. PYO baskets are sold at $12 per basket ($2.18 per pound), and pre-pick baskets are sold at $18 per basket ($3.27 per pound). It is assumed that pre-pick strawberries will be sold in the 4-quart buckets in which they were picked. If they were sold in small containers, such as single-quart pulp cups, the cost of the pulp cups would need to be added. Selling the 9,900 pounds of pre-pick in pulp cups would add approximately $1,500 in costs, at a cost of $0.15 per pulp cup. The labor expense was assumed to be $15 per hour, which includes the base wage rate plus taxes, benefits, and other overhead. This labor is assumed to be hired from the local community. The owner’s time is assumed to be valued at the Bureau of Labor Statistics’ average rate for agricultural managers, $32.73 per hour. Harvest laborers are assumed to be paid on a piecework basis at a rate of $1.50 per 4-quart basket. Assuming a harvester can pick 50 pounds per hour and 5.5 pounds per bucket, this equates to $13.65 per hour. The returns in this budget will be under- or overstated if the grower has faster or slower pickers. Some growers use H-2A labor for cultural management and harvest. This can be represented in the budget spreadsheet by updating the employee expense cost, which should reflect the prevailing H-2A labor rate along with H-2A overhead costs, including housing and transportation to and from the picker’s home country (if appropriate). The harvest window was assumed to occur over a six-week period in the second two weeks of April and throughout May. The quantity available for harvest varies from week to week, with an associated change in harvest labor and other input costs. Here it is assumed that harvest quantity increases until the third week before tapering off.
Machinery and equipment costs are calculated as if the entire cost is attributed to the strawberry operation. For many pieces of equipment, such as tractors, this will overstate the cost to the strawberry operation. These costs are calculated on a per-hour basis, assuming a certain purchase price, salvage value, and lifespan of each piece of equipment. Machinery costs also include the variable costs of operating the equipment, including fuel, lubricant, and repairs. The costs of fumigation, bed-shaping, and laying mulch are included as a custom operation at a rate of $2,250 per acre. However, the costs of a fumigation rig are included in the machinery calculation spreadsheet for the grower who wants to calculate the cost of doing their own fumigation.
The cost of purchasing an overhead irrigation system and a drip irrigation system can be quite substantial. The cost will vary on the system chosen and the geography of the field, but the cost for installing a system may range between $15,000 and $30,000. This one-time set-up cost is not included in the strawberry budget, although the per-hour cost of using the systems, including depreciation of the purchase price, is included. Land rental rates vary substantially across North Carolina. This budget assumes a $150-per-acre net land rental rate, but the reader is encouraged to use their own land rental rate. The budget also assumes that growers rent one beehive per acre for pollination services at a rate of $50 per hive, and a toilet and hand-washing facility for the two months during harvest season at a rate of $150 per month.
Costs and Returns
With the assumptions discussed above, the expected gross revenue for an acre of strawberries is $46,800. The expected production costs are $25,413.91 per acre, for a net return of $21,386.09 per acre. These numbers, however, give a misleading sense of certainty to the profitability of a North Carolina strawberry operation. Any changes in market price, yield, production system, or input prices will change the expected return of the enterprise (Table 2-1). Holding yields constant, a 20% reduction in price would decrease net returns to around $13,200, and a 20% increase in price would increase net returns to around $29,400. Holding price constant, a 20% decrease in yields pounds per acre would decrease net returns to $13,200, and a 20% increase in yields would increase net returns to $29,400. If both price and yield fell by 20%, net returns would fall to $5,700 per acre, and if both price and yield increase by 20%, net returns would increase to $40,600 per acre.
Table 2-2 shows the expected costs by stage of production. Costs are broken down into equipment, material, and labor costs. The percentages of total costs from each stage of production are also presented. The most costly stage of production is harvest (35.1%), when large material and labor costs are incurred. The largest equipment costs are incurred during the pre-harvest stage, and the largest material costs are during the transplant stage when plug plants are purchased.
Conclusion
The sample budget published in the Appendix provides an estimate of the potential returns to a PYO and pre-pick strawberry operation in North Carolina and can be a starting point for an existing or potential grower to estimate their own costs and returns. Growing strawberries, like any high-value specialty crop, is a risky business, requiring suitable management skills, access to labor, appropriate machinery and equipment, a stable marketing channel, and favorable weather conditions. It is recommended that a grower considering embarking on strawberry production prepare a cost-and-return study for their specific circumstances, and consult in advance with knowledgeable experts, including Extension agents, sales representatives, and experienced growers. A good overview of existing strawberry budgets in other regions can be found on NC State’s Agricultural and Resource Economics website.
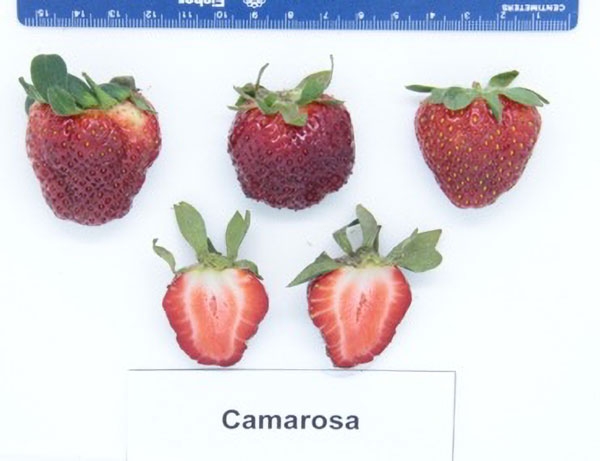
Figure 2-1. Camarosa fruit size, shape, and interior fruit color.
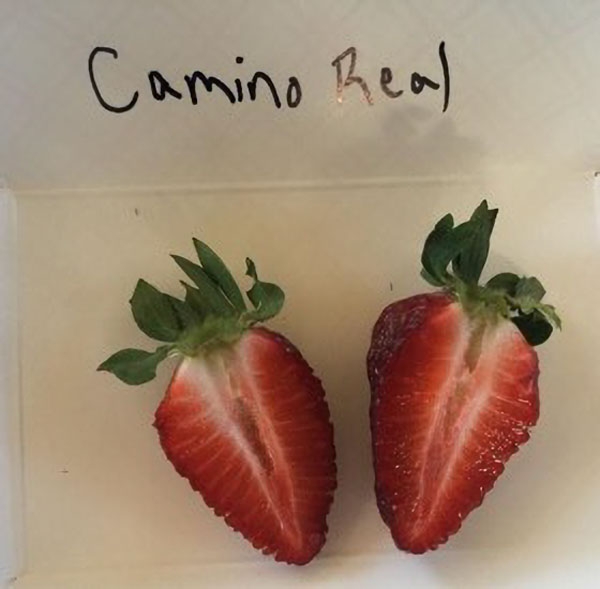
Figure 2-2a. Camino Real fruit interior.
Figure 2-2b Camino Real and at harvest.
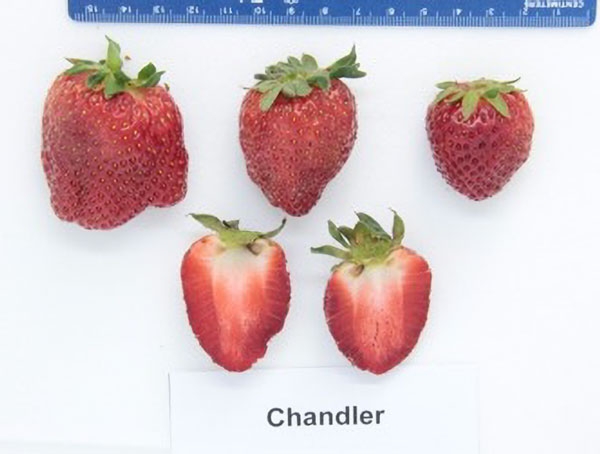
Figure 2-3. Chandler fruit size, shape, and interior fruit color.
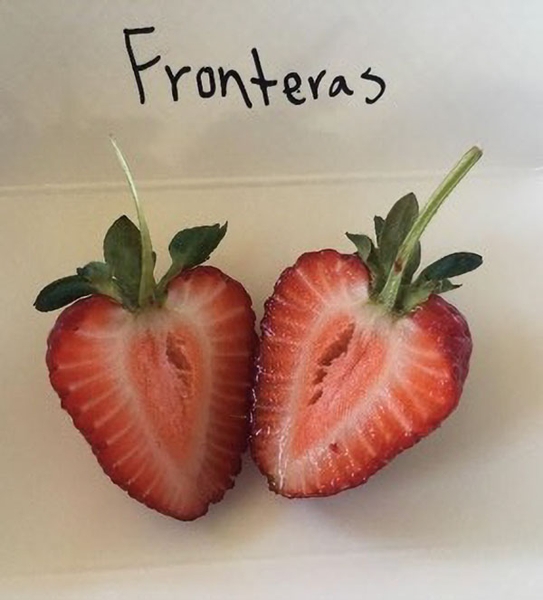
Figure 2-4a. Fronteras interior fruit.
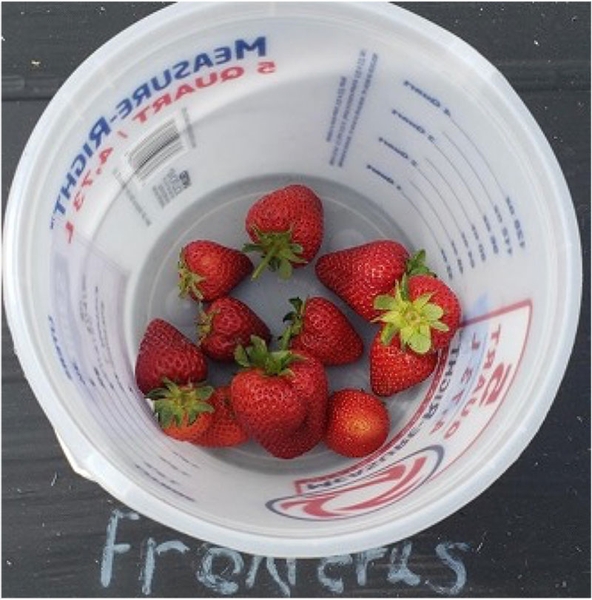
Figure 2-4b. Fronteras fruit at harvest.
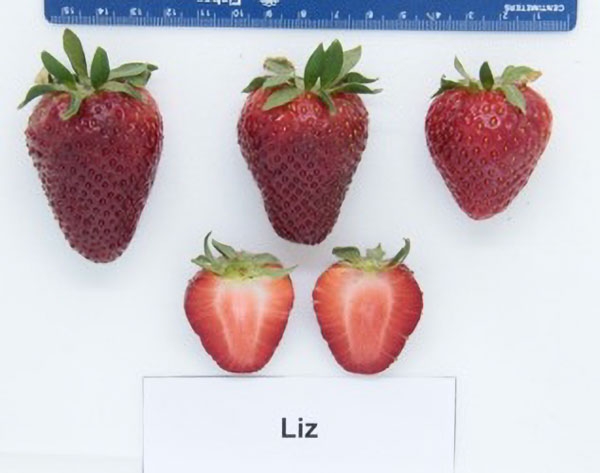
Figure 2-5. Liz fruit size, shape and interior fruit color.
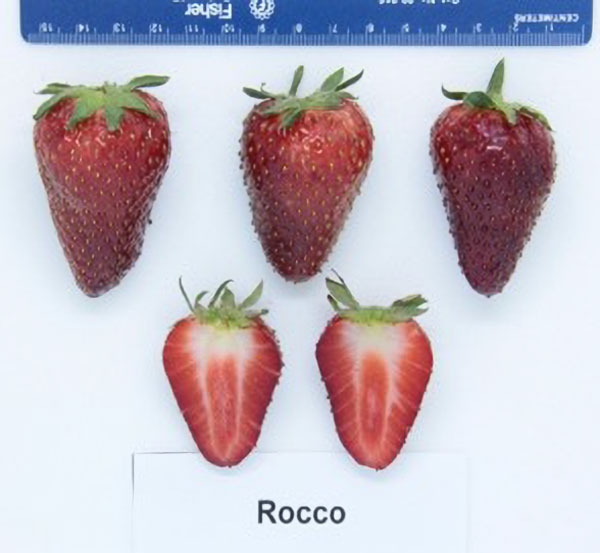
Figure 2-6. Rocco fruit size, shape and interior fruit color.
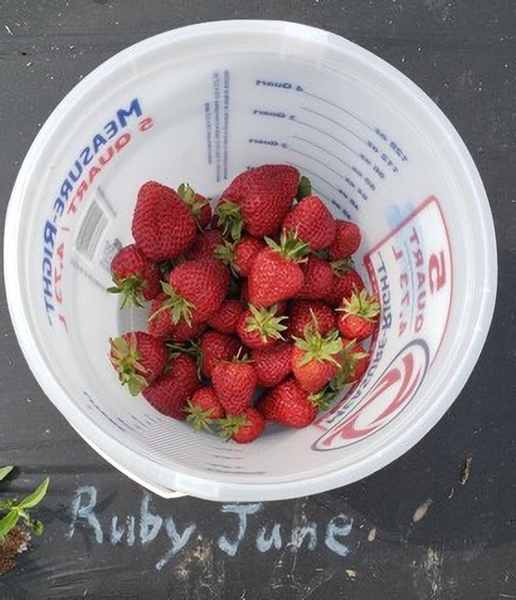
Figure 2-7. Ruby June fruit at harvest.
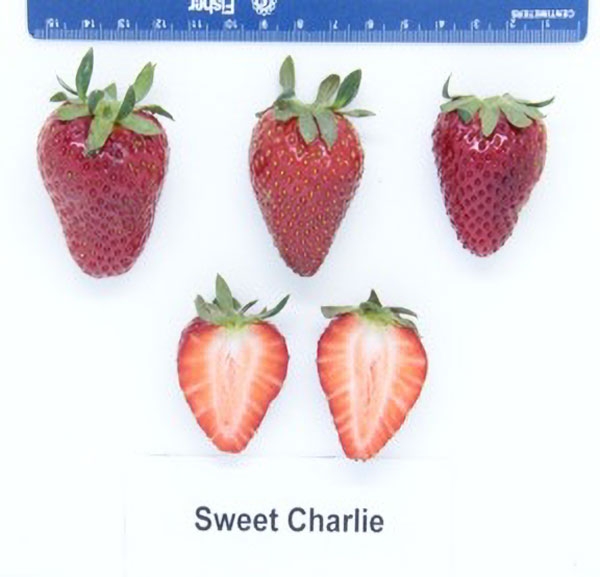
Figure 2-8. Sweet Charlie fruit size, shape and interior fruit color.
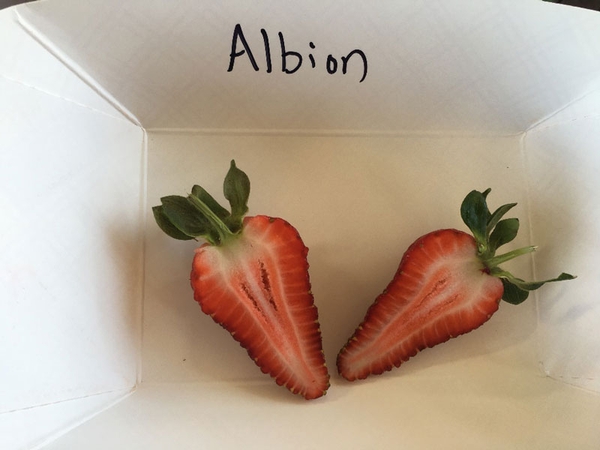
Figure 2-9a. Albion interior fruit.
Figure 2-9b. Albion fruit at harvest.
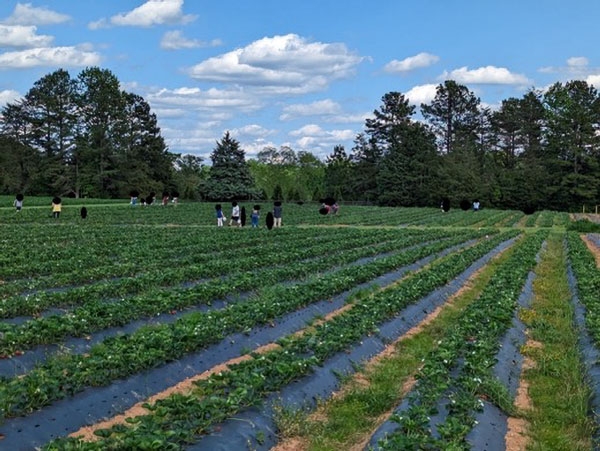
Figure 2-10. A PYO operation in Hillsborough, North Carolina, on a weekday in early May 2023.
3. Annual Hill Strawberry Production and Management
Site Selection and Bed Preparation
Soils. Strawberry plants thrive best in sandy loam or sandy clay-loam soils. Soils higher in sand content allow for easier water penetration and aeration. A grower may need to supply fertilizer more often on a sandy soil during the harvest season compared to soils with high clay and organic matter content. However, soils with high clod, clay, or stone percentage will not form well-shaped beds and can become waterlogged easily.
Water drainage in field. Standing water in a field, even in row middles, can reduce yield and access. A well-drained field will be more productive and can handle the common heavy rainfalls in the Southeast better.
Air drainage. A strawberry field should be planted in an area that provides sufficient air drainage. Ditches with standing air can become a challenge when frost- or freeze-protecting in early spring. On the other hand, too much wind exposure can damage young plants and can blow off floating row-covers. Sites in proximity to tree lines, but not in the shade, can be optimal strawberry production sites.
Soil pH. Strawberries need a soil pH from 6.0 to 6.5 to reach optimal production. A main activity for growers in the Southeast is adjusting pH before bed-laying. We recommend taking soil samples to evaluate lime and fertilizer needs three to four months before bed-laying. Soil samples need to be taken from a depth of 6to 8 inches in a zig-zag scheme across the field (Figure 3-1).
If the soil pH is acidic, dolomitic limestone needs to be added to increase the pH of the soil.
Row orientation. For optimal strawberry growth, rows should be orientated in a north-south direction to ensure uniform plant development and ripening.
Windbreaks. Having windbreaks on the north and northwest sides of the field is advantageous as it helps reduce losses from windborne freeze events that occur in late winter and early spring (Poling 1993). Too much protection from wind can increase disease pressure, while frequent exposure to high winds could harm new growth (Poling 1993).
Pre-plant fertilizer. The amount of pre-plant fertilizer should be determined by a soil test two to three months before bed-shaping. Fertilizers are often evenly broadcasted before bed formation. Phosphate, sulfate, and potash concentrations should be determined based on the soil report. We recommend applying a maximum of 60 pounds per acre of nitrogen for Chandler and Camarosa as pre-plant. Research suggests that for those cultivars, even lower amounts of nitrogen as pre-plant fertilizer might be sufficient, depending on the soil type (Lay et al. 2023; Miner et al. 1997). However, other cultivars might require more pre-plant nitrogen. Guidelines for pre-plant fertilization can be found in the Appendix. The North Carolina Department of Agriculture Agronomic Service has additional strawberry fertility recommendations.
Pre-plant fertilizers are commonly sourced from sulfur-coated urea (46-0-0), diammonium (18-46-0) or triple superphosphate (0-46-0), potassium nitrate (13-0-44), potassium sulfate (0-0-50), potassium chloride (0-0-60), or ammonium sulfate (21-0- 0). The recommended fertilizer source for potassium is potassium sulfate. Ammonium nitrate is the usual pre-plant nitrogen fertilizer (Poling 1993). Many growers also apply granular, full-spectrum pre-plant fertilizers such as 6-6-18 or 10-10-10. If organic fertilizer (such as manure) is used in combination with chemical granular fertilizer and an additional sulfur source, it is important to have the organic fertilizer analyzed for nutrient content before application.
Soil preparation and bed formation. Avoid larger stones, clumps, sticks, and undecomposed plant material. In heavy clay soil, disking will help to break down the large clods before bed shaping. Soil beds are made with a tractor-towed bed shaper, are usually 6 to 10 inches high, and have a 30-to-36-inch top width and a 5-to-6-foot row width (Figure 3-2). In many cases, pre-bedding is recommended before plastic mulch is laid. A tight fit of the film is important on the beds along with good tucking on the edges to prevent wind from blowing the plastic up and damaging the plants.
Furrow area. After the beds are made, it is desirable to seed the furrows with annual ryegrass at 50 pounds per acre. Once established, ryegrass will help reduce the washing of the topsoil after periods of heavy rainfall or after growers have employed overhead sprinkler irrigation. This will aid with crop plant establishment and for frost protection in early spring, particularly in fields with a slope greater than 2% (Poling 1993).
Fumigation and Plastic Mulch
This chapter describes fumigation and briefly discusses factors that should be considered when deciding whether to include fumigation as part of a pest management program in strawberry plasticulture production. Additional details for fumigation in strawberry plasticulture production are available on the Southern Region Small Fruit Consortium website.
Fumigants currently available for use in strawberry production include the active ingredients chloropicrin; 1,3-dichloropropene (1,3-D); metam potassium; metam sodium; and allyl isothiocyanate. These active ingredients are available under various trade names alone or in various combinations. These fumigants are not approved for use in organic production; therefore, fumigation would not be an option for organic strawberry production for an organic market.
Fumigation is a process that involves injecting a chemical fumigant into the soil. Fumigants are most often liquids under pressure that form a gas once injected, and they have pesticidal activity against various pests, depending on the fumigant. As the fumigant is injected into the soil, the soil and fumigant are immediately covered and sealed with plastic. The gas then spreads through the soil treatment area—the higher the vapor pressure of the chemical, the more uniformly the fumigant will spread.
Fumigation requires the use of specialized equipment (Figure 3-3) and the appropriate training and use of personal protection equipment (PPE; Figure 3-4) for applicators and handlers. Typical fumigation equipment used in the Southeast includes a single-row bed-shaper and plastic layer with a fumigation shank. Fumigation must also be performed prior to planting with 14 to 21 days (depending on label directions) between application and planting. Fumigation provides improved management for weeds, soilborne insects, and pathogens, particularly nematodes and black root rot, which can reduce strawberry yields.
There are various types of fumigant equipment that may be required, depending on the fumigants utilized. The most common fumigant equipment uses a nitrogen tank to push the fumigant through a line to a shank where the fumigant is injected. These rigs generally include a single-row bed-shaper, drip tape roll, and plastic layer directly behind the fumigation shank to form a sealed bed that is ready for irrigation once needed (Figure 3-3). This equipment has been commonly utilized for application of 1,3-D products, as well as combinations of 1,3-D and chloropicrin. Some 1,3-D and chloropicrin combination products have also been registered for injection through drip tape as well. Unless a specialized rig is utilized, the injection of metam sodium and similar products requires two additional passes for injection and rotovating prior to laying the drip tape and plastic.
A table outlining the efficacy of each fumigant against these pests is available in the University of Georgia Extension’s Southeast Regional Strawberry Integrated Pest Management Guide Focused on Plasticulture Production. Additional details on equipment calibration and fumigant calculations are available on the Southern Region Small Fruit Consortium website.
Soil structure, temperature, and moisture influence the effectiveness of soil fumigation. Soil should be free of plant residue and clods. Soil should be cultivated two to three weeks before fumigant application. Fields should be subsoiled in two directions to break up hardpans. After hardpans are broken, chisel plowing will break up large clods. During fumigation, soil temperatures should be between 45°F and 80°F, and soil moisture should be between 60% and 70% of field capacity. During periods of dry weather, irrigating a day or two before a planned fumigation can optimize conditions for fumigation.
When fumigating, personal safety is a priority. The most common routes of fumigant exposure are through inhalation or direct contact with eyes or skin. Fumigants can also dissipate into the air very quickly, and exposure can occur without warning. Therefore, PPE is required any time fumigants are applied or handled, including when hooking up gas cylinders, calibrating the fumigation rig, applying the fumigant, cleaning the fumigation rig, and storing the fumigants. The appropriate minimum PPE that must be worn for each fumigant is described on the fumigant label. Minimum PPE often includes a full-face, fit-tested, air-purifying respirator with the appropriate cartridge; appropriate chemical-resistant rubber gloves and boots; clothing with long sleeves and pants; and a full-body Tyvek suit (Figure 3-4).
Plastic Mulch
Various types of plastic mulch, including polyethylene plastic (PE), metallized film, virtually impermeable film (VIF), and totally impermeable film (TIF), may be suitable for use in fumigation. These mulches vary in cost, ease of application, and fumigant permeability, and may have other advantages or disadvantages in terms of pest management and durability. No biodegradable plastic mulch is allowed with soil fumigation. Additional details on the advantages and disadvantages of each of these types of mulch are available on the Southern Region Small Fruit Consortium website. Consult fumigant labels to determine the appropriate type of mulch and the required plant-back period for that specific fumigant.
As with any pesticide application, successful application requires the use of well-maintained, appropriate equipment as well as appropriate equipment calibration and fumigant calculation to ensure application of the appropriate fumigant rate. All equipment should be regularly maintained and inspected prior to use for cracked hoses, rusty fittings, or other broken parts prior to hooking up a fumigant or gas cylinder. Custom fumigant applicators must have access to all training, equipment, and fully understand all EPA regulations required for fumigant application.
Plant Type, Planting and After-Planting Care
Transplant Type and Planting Window
Commonly used plant materials in the Southeast are bare-root plants, plug plants, and “cut-off” plants (Figure 3-5). Other plant materials that may be available but are rarely used include Frigo plants and tray plants.
Bare-root plants, cut-off plants, and fresh dugs. These are plants that were grown in an open field nursery (usually in Canada or California), removed from the field, and shipped to the grower within a few days. Those plants can be stored in refrigerated environments for about a week after the initial dug date before losing quality. A high-quality bare-root plant consists of a single crown of about one half to one inch in diameter with a fibrous and dense root system. Cut-off plants have no leaves attached. Those plants are typically cheaper than plug plants and are easier to ship but more difficult to establish. Overhead irrigation for seven to 10 days after planting will have to be applied to initiate plant establishment. It is recommended that those plants are planted one week before the recommended plug plant planting date. A large problem with planting bare-root plants of any type is “J-rooting.” This happens when plants are inserted into planting holes that are too small. Cut-off plants are especially more sensitive to planting conditions, including planting depth and temperature. It is not recommended for beginners to use a large acreage of cut-off plants. Freshly dug bare-roots and cut-offs are usually delivered in crates of approximately 1,000 plants, which should be kept cold (between 35°F and 40°F) prior to planting. Plants should only be held for a few days before planting.
Plug plants consist of strawberry daughter plants (runner tips) which have been rooted into 50- or 38-cell trays. Plug plants are widely available in the Southeast, easier to plant, and can typically be planted later than bare-root plants. Plug plants are usually rooted by local companies that purchased runner tips from nurseries in Canada and elsewhere. Plug plants are more expensive than bare-root plants. Plant availability starts in early September and continues through the end of October for much of the Southeast. Plug plants are by far the most common method to plant strawberries in the Southeast. Plug plants are easily planted by hand. Mechanical-assisted planting, such as with a water wheel transplanter, is possible. However, it is important to ensure the crown of the plug plant not be buried or sticking out above the soil line for optimum plant establishment. Plug plants should be planted into a moist bed, and once planted should receive frequent and short irrigation to maintain the soil moisture around the plug. In hot weather, overhead irrigation is advised during the first two weeks of establishment.
Other plant types. Frigo plants are similar to cut-offs but stored at below-freezing temperatures for later planting dates. Frigo plants are often used in other parts of the world for early summer plantings. Tray plants (or “60-to-70-day plants”) are typically rooted for 60 to 70 days in 250-cc or 125-cc trays and have more established crowns compared to plug plants. Tray plants are the standard plant for strawberry greenhouse production along the east coast. For a selection of strawberry nurseries, please consult the Appendix.
Plant spacing. Plants are generally staggered or offset in a double row with a space of 12 to 16 inches between plants and between the rows. Holes for planting both plugs and bare-root plants can be punched by hand, using homemade tools or a water wheel transplanter. Planting holes for plug plants should be conical and about 2 inches deep. Planting holes for bare-root and cut-off plants need to be deeper, usually around 4 to 6 inches, to avoid J-rooting of plating material.
Planting date. Timing of strawberry planting in the fall has a large impact on the potential yield of the strawberry crop the following spring. Generally, any bare-root or cut-off material needs to be planted about three to five days earlier than plug plants (Figure 3-6; Table 3-1).
Fall Row-cover Use on Late-Planted Crops. Generally, floating row covers (between 0.5 and 1.5 ounces) can be used in the fall to increase the amount of heat units given to a strawberry plant. This is especially important when cultivars such as Camarosa, Fronteras or Ruby June are planted too late (Table 3-1). These cultivars require a certain amount of heat units (Growing Degree Days, or GDD) before winter to improve floral development in branch crowns (Figure 3-6). The application of floating row covers helps to offset the detrimental effect that a late planting date can have on yield in certain cultivars.
Typically, floating row covers to increase heat units should be used before the end of November, if daily high temperatures are predicted to be lower than 70°F. Prolonged row-cover use can result in disease spread and reduced pollination. Botrytis gray mold and spider mites in particular can become a concern under row covers. Disease and pest management before row-cover application and after removal is recommended. Please consult the Southeast Regional Strawberry Integrated Pest Management Guide Focused on Plasticulture Production for more guidance.
Row-middle management. Planting a grass in the row middles limits soil erosion, suppresses weed growth, and improves accessibility of row middles. Typically, annual ryegrass is broadcast-seeded just after laying beds, shortly after transplanting. Seeding rate for annual ryegrass is 25 pounds per acre (only in row-middles). Ryegrass should establish well with rainfall but will need to be mowed to maintain a short height. Tall ryegrass can interfere with row-cover applications and can eventually shade the plants and limit air movement. An alternative to annual ryegrass is black seeded oats (cosaque oat), which are generally slightly cheaper than annual ryegrass. Black seeded oats have been used in Arkansas for row-middle plantings. The plants retain a short habit throughout much of the fall and winter seasons similar to annual ryegrass, but will also require mowing to reduce plant height during picking in the spring.
Plug plant irrigation and establishment. After planting plug plants, overhead irrigation and drip irrigation are needed for plant establishment. In North Carolina, apply overhead irrigation at a rate of 0.10 inches per hour for 5 hours the first day, 3 hours on the second day, and up to 2 hours on the third day, depending on weather conditions. Drip irrigation should be continued on a regular basis, depending on weather conditions. If conditions are dry, daily drip irrigation for 1 to 2 hours is warranted.
Bare-root irrigation at establishment. Overhead irrigation should begin immediately (delayed by no more than one hour) after the plants are set. Irrigation for 7 to 14 days after transplanting may be required depending on weather conditions. Overhead irrigation should cover the entire field evenly, including field edges with a small amount of water, typically 0.10 inches per hour. At the end of the establishment period, each plant should have two or three vigorously growing, fully green leaves.
General irrigation advice for fall. Continue irrigation based on weather and plant development throughout the fall is critical. Young transplants can quickly wilt when temperatures are above 80°F or if conditions are dry. Active root growth occurs throughout the fall as long as temperatures remain above 45°F.
Runner removal. Runners should be removed by pinching or trimming before dormancy, usually in November or early December. While labor intensive, runner removal refocuses the plants’ energy toward root and crown development. In some regions, runners will have to removed twice between transplanting and dormancy, usually four weeks after transplanting and then again in November and December.
Strawberry plant propagation. Most strawberry cultivars are patented and licenses are required for propagation. Furthermore, open-field strawberry nurseries are very complicated multi-field and multi-year operations by themselves. They rely heavily on methyl bromide fumigation, a rigid spray schedule, and specific climate conditions. Both indoor and open-field strawberry nurseries require a high level of knowledge, high upfront costs, and a substantial investment in annual operational costs. It is highly recommended to consult with Cooperative Extension as well as with other growers before investing in a strawberry nursery.
Cold Protection
NC State Extension provides timely regional frost and freeze advisories for strawberry growers every season. These forecasts cover a region from Maryland to South Georgia and are available on the NC State Extension Strawberry Growers Information page. Once subscribed via email, timely frost and freeze advisories will be distributed at a minimum of 24 hours before the event.
Freeze and frost events frequently threaten strawberry production in the Southeast, resulting result in yearly losses across the region. The level of vulnerability of a strawberry plant to cold temperatures depends on its physiological stage and its acclimatization (Table 3-2). A fully dormant strawberry plant is generally less vulnerable to cold temperatures than a plant that is active.
Most vulnerable to cold injury are open blossoms (Figure 3-7). Blossoms can be damaged at temperatures around 30°F. This risk is increased during radiation weather events (such as an early spring frost), in which wet bulb temperatures fall below 30°F, even if ambient air temperatures are higher. Such weather events are very common in the South, dangerous to strawberries (as to a variety of other crops), and require preparation and constant monitoring. A range of tools are available to strawberry growers to mitigate the potential damage than can occur from cold weather. In this section, we explain what characterizes different cold events, how to read and understand weather forecasts (especially during spring frost events) and how to protect strawberries from freeze and frost events.
| Dormancy | Transition-New Leaf | Bloom | ||
|---|---|---|---|---|
| Nov–Feb | Feb-March, April–May | April–June | ||
| Buds inside the crown (Figure 3-8a) | Buds inside the crown | Emerged buds (Figure 3-8b) | Popcorn-Stage | Open Blossoms (Figure 3-8c) |
| Hardy to 10°F | Mid-teens | 20°F–25°F | 27°F–28°F | 28°F–30°F |
Cold Events
Generally, cold events can be classified into three different categories (Table 3-3): frost events, frost-freeze events, and freeze events. It is crucial to understand the differences between cold events that can occur over the season. Most frosts are radiation events, usually occurring in the spring during an inversion weather situation. Frost generally occurs when the temperature of a surface is equal to or lower than the dew point of 32°F. This is often the case on cloudless, cool nights that generate heat loss due to radiation. Radiation occurs when warmer temperatures during daylight hours heat plants and the soil. Cloud-free skies and cooler temperatures at night cause heat to re-radiate away from those surfaces. Clear nights with air temperatures of 40°F or lower, and dew points of 32°F or lower, are at high risk for frost. While the National Weather Service might issue a frost warning at temperatures above 32°F, it does not mean that a radiation frost will necessarily occur at a specific field. It is therefore important for strawberry growers in the Southeast to understand the dynamics and weather patterns at their particular location.
Radiation frost nights are a common threat to strawberry growers in spring, when strawberry blossoms are out and the plants are most vulnerable. Hoar frost events are by far the most common cold events during spring in the South, characterized by clear nights and wind speeds less than 5 mph. Hoar frosts are accountable for over 90% of all frost events, often indicated by water crystals forming on surfaces in the field (such as pipes and grass). A less-common frost type is black frost, occurring on radiation days characterized by minimum air temperatures close to freezing combined with low humidity. These frosts are less visible and therefore more dangerous. Typically visible ice crystals are absent in a black frost, and thus paying attention to weather forecasts, especially dew point predictions, cloud cover, and predicted minimum temperatures for a specific location, is even more critical.
Table 3-3. Classification of cold events and the associated wind and air temperatures.
| Cold Event | Wind Speed | Air Temp (°F) | Cause |
|---|---|---|---|
| Hoar Frost | Below 5 mph | 40°F and below | Typical frost event with dew points of 28°F or higher (high relative humidity). Usually accompanied by ice crystals. Caused by radiation heat loss. |
| Black Frost | Below 5 mph | Close to 32°F or lower | Rare frost event at low humidity. Dew point usually below 28°F. No ice crystals. Caused by radiation heat loss. |
| Frost-Freeze | Below 10 mph | 32°F and below | Rapid radiation heat loss combined with persistent winds below 10 mph. |
| Freeze | Above 10 mph | Below 32°F | Also called wind-borne or advective freeze with winds above 10 mph. |
Frost-freeze events are typically longer in duration (more than 10 hours), caused by a mix of radiation and persistent winds. Unfortunately, frost-freeze events become more common in early spring. Compared to radiation frost, protecting open blossoms from frost-freeze events in spring are among the most difficult tasks a strawberry grower faces in the South, due to generally lower temperatures and higher wind speeds.
Windborne (advective) freeze events are caused by moving air masses, bringing cold air from northern weather systems into the Southeast. While this happens frequently in winter, spring freeze events are rare. However, spring freezes can be very dangerous, last for several days, and bring significantly colder temperatures at a time when strawberries are most vulnerable. One of the most memorable spring freeze events was in April of 2007, when five days of freezing weather had a significant impact on farming all across the East Coast, including Florida (Poling 2008). Windborne freezes are common in winter. During dormancy, protection with floating row covers is recommended when predicted air temperatures drop below 15°F.
Cold Event Management Methods
Different cold weather events will require different responses and approaches to protect strawberry plants from cold injury (Figure 3-9). To select an appropriate management plan for a predicted cold weather event, it is important to have a reliable weather forecast and to formulate an idea about what the forecast means for your region and your specific site. In spring, air temperature predictions alone are insufficient to make good decisions about strawberry cold protection strategies. Temperatures at the plant level can differ vastly from the predicted air temperatures, and wind speeds and dew-point readings are important to consider when determining which weather event to expect (Figure 3-9).
Floating Row Covers
A floating row cover under low wind speeds can be used to protect from frost, frost-freeze, and windborne freeze events (Table 3-4, Figure 3-10a). However, there are several limitations to row cover use. Floating row covers in the field are often very labor intensive to deploy (it takes two or three people for a 200-by-60-foot row cover). Row cover use can promote disease and pest development, and additional disease and pest management (such as for mites or grey mold) is often needed. Most importantly, floating row covers can cause damage if not used correctly. For example, row covers deployed during wind gusts of 15 mph or more can cause physical damage to blossoms and strawberry plant tissue. Wet row covers (due to previous rain) have no insulation value and can even freeze directly to the plants, which risks additional damage to strawberry blossoms and plants. However, floating row covers are the main management tool for frost and freeze protection, and if deployed under the correct conditions, can provide important crop protection. A 1.5-ounce row cover can potentially protect open blooms down to a temperature of 24°F at the canopy level.
Table 3-4. Different functions of floating row covers over the season.
| Function | Promote Plant Development | Protect Plant Crowns from Damaging Temperatures | Protect of Blooms from Frost and Freezes |
|---|---|---|---|
| When? | Oct | Dec–Feb | Mar–May |
| Which Cover? | 0.5–1 oz | 1–2 oz (usually 1.5 oz) | 1–2oz (usually 1.5 oz) |
| Duration? | 2–3 weeks max | Depending on temp. | Depending on dew point and cloud cover |
| Required Knowledge | GDD, weather forecast | Minimum temperature and weather forecast | Dew point, weather forecast |
Overhead Irrigation
Frost protection with overhead sprinklers requires maintaining a continuous water-ice interface and an undisturbed tissue-ice connection (Figure 3-10b, Figure 3-10c). Under those conditions, continuous freezing layer releases 80 calories of heat per 0.03 ounce of water. To achieve this, water needs to be supplied constantly starting at dusk until temperatures are high enough for the ice to thaw (Figure 3-10d). This will build up a layer of ice over the tissue. Constant application of water will keep the ice temperature around 31°F or 32°F, slightly above critical damage levels. Consistent droplet size and water coverage is important to provide protection from frost injury. The water-ice layer should be clear at all times, and water droplets should be running off (“running nose”) at all times. Ice layers that become cloudy or that do not show consistent water run-off will damage plant and blossom tissue.
Overhead sprinkler systems require large water sources, high-capacity pumps, a reliable operation in cold temperatures, fast sprinkler head rotation times, and high uniformity in droplet size and distribution patterns. The choice of sprinkler equipment to be used for overhead irrigation is therefore highly important for frost protection. Sprinklers with a minimum rotation time of 30 seconds are recommended. Conventional or hybrid impact sprinklers with a mechanical braking system are needed to handle differences in water pressure. If sprinkler systems use silicone, they might slow down in colder temperatures. Water needs to be distributed uniformly, and droplet size should be consistent over the area that is covered. Differences in droplet size can lead to areas in which plants are not covered sufficiently, leading to subsequent cold injury. Hybrid impact sprinklers with an integrated nozzle and deflector design are recommended to achieve higher uniformity. Systems with nozzles that are easy to assemble and replace are highly recommended.
The frost protection success of a sprinkler system relies on the frequent and uniform distribution of water throughout the night. To successfully protect from frost and frost-freezes using overhead irrigation, water application must start before plant surface temperatures reach a critical dew-point. The lower the predicted dew point, the higher the air temperatures will be when watering should begin. Watering must continue until ambient temperatures at plant level rise above critical dew points.
To be prepared for frost and frost-freeze events in the Southeast, we recommend deploying an integrated approach of protection methods in a strawberry field. Table 3-5 gives an overview of recommended cold protection methods, based on the predicted cold event.
Table 3-5. Protection methods recommended for specific cold events.
| Method | Hoar Frost | Black Frost | Frost-Freeze | Freeze |
|---|---|---|---|---|
| Floating row cover | +++ | ++ | ++ | + |
| Row cover & overhead sprinkler | Not recommended | +++ | ++ | Not recommended |
| Overhead sprinkler | +++ | +++ | + | Not recommended |
+ = low protection
++ = moderate protection
+++ = high protection ↲
Pre-Bloom to Bloom
In most of the South, late winter and early spring are characterized by very turbulent weather. Cold events in January and February, when night temperatures can reach less than 20°F, can happen quite frequently. However, it is not uncommon that cold weather is followed by warm weather systems and rain, or vice versa. In some years, this can lead to longer warm periods in January and February, and growers will often observe unwanted flushes of early bloom. This is especially true for cultivars that don’t require a lot of heat units to break bud, such as Chandler or Sweet Charlie. If there are blossoms as early as January or February, it typically is not recommended to frost-protect. Once in late February or March, disease and pest management is as important as frost protection. Please consult the Southeast Regional Strawberry Integrated Pest Management Guide Focused on Plasticulture Production. Leaf tissue should be sampled by mid-March at the latest to determine fertility needs.
Harvest
Harvest practices. To maintain good fruit quality strawberries should be picked at a minimum of twice per week at the beginning of the season, every two to three days during peak season. Frequent harvest ensures that fruit is picked at the peak of ripeness, which improves its holding ability, and that diseased fruit is removed promptly to limit disease spread. Morning harvests are preferred due to cooler fruit temperatures during that part of the day. More frequent harvests during rainy periods are not uncommon to remove ripe fruit from the field prior to a rain event, during which it might be damaged.
Workers and customers should be trained to distinguish ripe fruit from unripe fruit as well as from non-marketable fruit that are too small, deformed, diseased, or have color or softness issues. Sometimes, soft, discolored spots are on the bottom side of the fruit, especially when fruit are touching the plastic. White shoulders on strawberry fruit usually form when provided temperatures are not consistent enough for a uniform color formation. That can be especially the case in early spring. Fruit safety concerns during harvest are discussed extensively in the “Food Safety” section of this guide.
Frequent sanitation of the strawberry field. During normal harvest operations, fruit that is soft, diseased, too small, deformed, soil-covered, or overripe should be removed from the plant and placed in a separate container for removal from the field. It has been a common practice among some growers to leave those fruit (“culls”) in the row middles. However, we strongly advise minimizing this practice as it is associated with disease outbreaks. Weeds or grass in the row middles should be managed to maintain good air-flow and access to the plant. Some growers use herbicides to maintain the row middles without vegetation. If herbicides are used, they have to be applied with protected sprayers to avoid herbicide drift on strawberry plants. For more information, please refer to the Southeast Regional Strawberry Integrated Pest Management Guide Focused on Plasticulture Production. If mowing is used to maintain grass between the rows, a mulching-type mower is preferred due to its ability to drop clippings directly on the ground.
Labor and regulatory compliance. Labor needs are difficult to predict during harvest and vary widely by operation type and the availability of skilled labor. It is important to train labor on fruit ripeness identification and other operational procedures. Small farms often rely on local labor, while large operations often participate in the H2-A program. Two or three trained workers might be able to harvest an acre of strawberries per day during peak season. Food safety compliance is discussed in the “Food Safety” section and in the Appendix. It is also important to use pesticides with adequate pre-harvest intervals. For more information, please refer to the Southeast Regional Strawberry Integrated Pest Management Guide Focused on Plasticulture Production.
Post-harvest handling. Food safety compliance of post-harvest processes is discussed in “Food Safety” and in the Appendix. Generally, shelf life of strawberry fruit will double or triple when stored in a cold environment. Fruit should be stored in a clean and dry environment as soon as possible after harvest, with temperatures maintained close to 32°F.
Water and Fertility Management
Irrigation. In annual hill plasticulture systems, irrigation is provided through drip lines under the plastic mulch. In most regions in the Southeast, one drip line (with emitter spacing of 10 to 12 inches) is installed in the bed middle during bed formation. In general, strawberry plants have a shallow and fibrous root system and require varying water amounts depending on plant growth stage, soil type, and weather conditions. Typically, water demands during plant establishment in fall are fewer compared to irrigation demands in the spring. It is important to monitor the stage of the plant and increase watering in spring once you see blossoms on the plants. Depending on crop load and weather conditions, strawberry plants might need as much as 2 inches of water per day. This is often delivered through watering a field three to seven times per week. However, research suggests that irrigation of two to three times during the day ensures that moisture level does not fall below the recommended 50% of field capacity (Klodd et al. 2021). To monitor moisture levels, a tensiometer can be used to indicate when irrigation is needed for a plant (Kirkham 2005).
Generally, sandy and sandy loam soils require more frequent watering compared to clay or clay loam soils due to their reduced water-holding capacity. For additional details on the major components of drip irrigation, pressure regulators, and types of filters to use, refer to NC State Extension Publication AG-489, Plasticulture for Commercial Vegetables.
Spring fertigation. Fertility needs in spring can range from 5 to 10 pounds of N per acre per week (most SD cultivars), and 8 to 12 pounds of N per acre per week, as is the case with most LD cultivars and Ruby June. While nitrogen is by far the most important nutrient during spring fertilization, other nutrients such as sulfur, potassium, and boron are often supplied through fertigation as well. Nitrogen can be supplied through calcium nitrate, potassium nitrate, or ammonium sulfate. If sulfur levels are low in tissue samples, sulfur should be supplied using Epson salt or potassium sulfate. Potassium is supplied through potassium-rich sources such as potassium sulfate and potassium nitrate. If boron was not applied during pre-plant fertigation, 0.125 pound of boron per acre should be applied early in the spring, using Borax or Solubor as source. For more detailed information, please see the Appendix or guidelines from the North Carolina Department of Agriculture & Consumer Services.
Plant tissue sampling. Over-fertilization can cause as much damage as under-fertilization. It is especially important to understand the nitrogen demands of the cultivar you grow. Observe the growth and appearance of your plants in combination with frequent tissue sample analysis over the entire flowering and fruiting season. Plant tissue samples should be taken and be tested every two weeks, starting in early March or April (depending on region). A representative sample of petioles and leaf blades are taken from the newest fully mature leaves. Tissue from different cultivars will need to be kept and analyzed separately. More guidelines on tissue sampling can be found in the Appendix or in guidelines from the North Carolina Department of Agriculture & Consumer Services.
Pesticide Resistance Management
Over time, weeds, mites, insects, and pathogens may develop resistance against pesticides. Furthermore, the continuous application of a single chemical or chemical class aids in the selection of resistant individuals within a pest population. When a pest develops resistance to a particular chemical or chemical class, that chemical or chemical class is no longer an effective management tool for that pest. As such, because pesticides are used heavily in several agricultural systems in the Southeast (including strawberry), pesticide resistance management needs to be practiced every year.
There are several key strategies for pesticide resistance management. The first strategy is rotation, the practice of alternating pesticides so that at each application, a pesticide with a different mode of action is used than the one that was applied in the previous application. The second strategy is to apply pesticide mixtures, either as product premixes or as tank-mixes. Another strategy is to adhere to the seasonal or annual use limitations indicated on product labels for the product itself and, more broadly, for the specific classification group (see below).
In order to effectively use these strategies in a pesticide resistance management program, you must first have some knowledge of pesticides and how they are classified. Numerous pesticides (fungicides, herbicides, insecticides) are available for pest (fungi, weeds, insects) management in strawberries. Each product is composed of one or more active ingredients, as specified in the ingredients section of the label. Different trade or brand name products can have the same active ingredient or related active ingredients. Each pesticide (active ingredient) is known to affect a target pest or group of pests in a specific way, such as the mode of action and target site of the biochemical pathway of the pest.
Pesticides are classified into groups based on their mode of action and target site. These groups are assigned codes, which consist of a number or letter-number combination. The committees responsible for these classifications of fungicides, herbicides, and insecticides are the Fungicide Resistance Action Committee (FRAC), the Insecticide Resistance Action Committee (IRAC) and the Herbicide Resistance Action Committee (HRAC). The codes or groups for the respective pesticides designated by these committees are often referred to as FRAC codes, HRAC codes, and IRAC codes, and are typically printed on the first page of the pesticide label. More information on the committees, including a list of all relevant codes, can be found on their websites.
To effectively practice the strategies for pesticide resistance management, the FRAC, HRAC, or IRAC groups should be considered rather than the product name or active ingredient, depending on which type of pesticide being used (fungicide, herbicide, or insecticide). Additional factors, relevant to fungicides, herbicides, and insecticides, as well as examples, are included in each section below.
Fungicide Resistance Management
Commercial production of high-quality strawberries typically requires an IPM program that includes the use of fungicides. When and how often fungicides need to be applied depends on the fungicide, location, weather, cultivar, and target organism. For example, in some locations and for some cultivars, season-long applications in regular intervals may be necessary to reduce inoculum (pathogen spores) build-up that could otherwise lead to devastating losses when weather conditions favor infection.
The choice of fungicide is important. Some fungicides, namely those with multi-site modes of action, have efficacy against a wide variety of pathogens (broad-spectrum activity, FRAC Mx; Table 3-6) and are not prone to resistance development but often provide insufficient efficacy. Others, namely those with single-site modes of action (FRACx; Table 3-6) have greater specificity and efficacy against certain pathogens, but also have a greater risk for resistance development and must be used in a resistance management program.
Table 3-6. Resistance management suggestions and characteristics of fungicides important for strawberry disease management.
| Fungicide Type | Group | Example Active Ingredient(s) | FRAC Code | Resistance Risk | Max. # Applications Per Season* |
|---|---|---|---|---|---|
| Single-site Mode of Action | Dicarboxamides (DCs) | iprodione | 2 | medium to high | 1 |
| Demethylation inhibitor fungicides (DMIs) | difenoconazole, propiconazole, flutriafol, myclobutanil, tetraconazole, triflumizole | 3 | medium | 2–4 | |
| PhenylAmides (PAs) | mefenoxam | 4 | high | 2 | |
| Succinate dehydrogenase inhibitors (SDHIs) | boscalid, fluopyram, fluxapyroxad, isofetamid, penthiopyrad, pydiflumetofen | 7 | medium | 4 | |
| AnilinoPyrimidines (APs) | pyrimethanil, cyprodinil | 9 | medium | 4 | |
| Quinone outside Inhibitors (QoIs) | azoxystrobin, pyraclostrobin, trifloxystobin, fluoxastrobin | 11 | high | 3 | |
| PhenylPyrroles (PPs) | fludioxonil | 12 | low to medium | 4 | |
| Keto Reductase Inhibitors (KRIs) | fenhexamid | 17 | low to medium | 4 | |
| Polyoxins | polyoxin D zinc–salt | 19 | medium | 3–6 | |
| 2,6 dinitro-anilines | fluazinam | 29 | low | 6 | |
| Multi-site Mode of Action | sulfur (calcium polysulfides) | M02 | low | 4 | |
| thiram | M03 | low | 5 | ||
| captan | M04 | low | 14 | ||
| chlorothalonil | M05 | low | 3 | ||
| Host Plant Defense Inducers | phosphonates | phosphorous acid and salts, fosetyl-Al | P07 | low | N/A |
*Maximum number of applications per season, assuming product is used at highest label rate. ↲
Older fungicides, such as sulfur, thiram, captan, and chlorothalonil, have efficacy against a wide variety of plant pathogens. They possess a “multi-site” mode of action, inhibiting multiple biochemical pathways (Table 3-6) in both the pathogen and the plant. As such, these fungicides can be toxic to the pathogen and the plant, and can lead to chemical-induced plant damage (phytotoxicity). To avoid phytotoxicity, these fungicides are designed to stay on the plant surface. It is important to note that if these fungicides are mixed with a product that is designed to penetrate the plant cuticle (such as phosphonates; FRAC P07), multi-site fungicides can become phytotoxic.
Fungicides with single-site modes of action (Table 3-6) only inhibit a single biochemical pathway that often is specific to fungi themselves. That makes them less toxic to the environment, applicator, and consumer, but it also makes them vulnerable to resistance development. For example, a single alteration at the right position of the target gene can make the resulting protein ‘untouchable’ for the fungicide. Table 3-6 shows fungicide types (single-site vs multi-site fungicides), fungicide groups (often indicating their mode of action), and active ingredients of each fungicide group. Multi-site and single-site fungicides are most effective if applied protectively before the fungus has a chance to inhabit the plant. However, single-site fungicides generally do have some systemic activity; they penetrate the plant and halt the fungus after it has already invaded the plant tissue. This curative action has its limitations, however. Most single-site fungicides will only provide effective management within 48 to 72 hours of infection. In areas with heavy clay soil, it may not be possible to move equipment into fields within this timeframe after prolonged rainstorms; preventative applications, therefore, are critical for successful disease management.
Let’s revisit the explanation provided about fungicides at the beginning of the chapter. A grower purchasing a fungicide will receive a product that contains an active ingredient and other inert materials, such as emulsifiers, solvents, carriers, aerosol propellants, fragrances, or dyes. These products possess a brand or trade name. It is important to understand that different trade name products may contain the same fungicide or essentially the same fungicide (different active ingredients with identical mode of action). For example, Merivon and Luna Sensation are different products, but each contains two fungicides with identical modes of action (a mixture of a FRAC 7 and a FRAC 11 fungicide). Resistance management dictates that growers mix or alternate different groups of fungicides. For example, the demethylation inhibitor (DMI) fungicides fenbuconazole and propiconazole are both FRAC 3 fungicides, and the succinate dehydrogenase inhibitors (SDHI) fungicides boscalid and fluopyram are both FRAC 7 fungicides (Table 3-6). Mixing or alternating FRAC 3 and FRAC 7 fungicides is a proper resistance management strategy. Most labels permit two consecutive applications of a product of the same FRAC code before rotating to another.
The most important fungicide resistance management strategy for site-specific fungicides is observing fungicide use limitations. Product manufacturers indicate the maximum number of applications (Table 3-6) or the maximum amount of product permitted per season on the product label. It is critical to understand that the restrictions are meant not for the product itself but for the entire FRAC code. For example, a grower is permitted to use Merivon (a.i. fluxapyroxad + pyraclostrobin) three times per season and Luna Sensation (a.i. fluopyram + trifloxystrobin) four times per season. Both are FRAC 7 + 11 fungicides. In this example, a grower may therefore use EITHER three applications of Merivon and one application of Luna Sensation OR four applications of Luna Sensation per season.
The resistance risk of a fungicide—the likelihood that a fungus will develop resistance to that particular fungicide—is another factor to consider when developing a resistance management program. Mixing a ”high-risk” site-specific fungicide (Table 3-6) with a ”low risk” multi-site fungicide is commonly recommended as a resistance management approach. In such a combination, selection for resistance is minimized if the multi-site fungicide is used at the highest-permitted label rate and the site-specific fungicide is used at the lowest-permitted label rate. As outlined above (in the Merivon and Luna Sensation example), some products contain two fungicides with different modes of action (different FRAC groups); these are premixtures with ”built-in” resistance management. Another example of this is Switch 62.5WG (a.i. cyprodinial + fludioxonil), which contains a FRAC 9 (cyprodinil) and FRAC 12 (fludioxonil) fungicide. The use of premixtures is recommended only if both fungicides are effective against the target organism with no resistance issues.
The choice of which fungicide(s) to incorporate into a resistance management program will also depend on the resistance profile of the pathogens within the area. Fungicide resistance in Colletotrichum spp. and Botrytis cinerea, the pathogens that cause anthracnose fruit rot (AFR) and botrytis fruit rot (BFR), respectively, is widespread, and pathogen resistance to multiple FRAC groups has been reported in some fields. For more information about determining the resistance profile of Anthracnose fruit rot and botrytis fruit rot in your field, see the latest edition of the Southeast Regional Strawberry Integrated Pest Management Guide Focused on Plasticulture Production. Your local Extension agent may also be able to provide information on the specific resistance issues present in your state or geographic area.
Herbicide Resistance Management
Once strawberries are planted, most herbicides can’t be used over the top to manage broad-leaf weeds. Therefore, weed management in beds occurs mainly through the application of fumigants and herbicides prior to planting. Weed management in row middles, however, is possible after planting; we will address herbicide resistance management for weed management in rows middles in this section.
There are two main strategies for herbicide resistance management in row middles. The first strategy is to limit herbicide use throughout the season by following the recommended seasonal use limits as indicated on the label (the maximum number of applications or the maximum amount of product permitted per season). These limits are not for the product itself but for the entire HRAC group. It is also recommended to use the full label rate to manage weeds present in the field. The second key strategy for herbicide resistance management is to practice herbicide rotation, alternating between HRAC codes that control similar weeds. Most labels permit two consecutive applications of a product of the same HRAC code before rotating to another herbicide from a different HRAC code. Scouting your field after any herbicide application is also important to assess if the herbicide was effective.
Insecticide and Miticide Resistance Management
The most important insecticide and miticide resistance management strategy is to identify your pest. To determine which insects or mites are present in fields, and at what levels, fields must actively be scouted for insect or mite presence or damage. Scouting is essential when determining if an insecticide or miticide application is needed. If insect or mite population thresholds have not been reached, pesticide applications are not recommended and could contribute to an increased risk of resistance development. As previously mentioned, use limitations and insecticide rotation are also important. Additionally, the IRAC has developed resources for each insect and mite that is known to show high resistance. It is critical to review these resources before purchasing and applying insecticides!
The principles above are true for all insecticides and miticides, no matter the target organism. However, scouting, dosage, and rotation are imperative for two-spotted spider mite management, and deviation from those principles is not recommended.
Let’s revisit the explanation of insecticides provided at the beginning of the chapter, using the two-spotted spider mite (Tetranychus urticae) as an example. The two-spotted spider mite is one of the most economically important pests in strawberries. Infestations are common each year and populations may reach high numbers or increase rapidly after extensive row-cover use, in certain cultivars (such as Albion), or after extensive N fertilization in spring. Because two-spotted spider mites have a very short lifespan, populations can increase very rapidly and may develop resistance quickly. In fact, the two-spotted spider mite is considered to be one of the most resistant arthropod species against miticides. For the two-spotted spider mite, the threshold is an average of five mites per strawberry leaflet prior to harvest.
If this threshold is surpassed, miticides should be applied. It is imperative to rotate effective miticides between IRAC groups, as each IRAC group has a different mode of action (MoA). In the best-case scenario, miticides that target nerves and muscles in the mite (IRAC group 6) could be rotated with respiratory systems (IRAC groups 20 or 21) or growth and development targets (IRAC group 10). To develop an effective pesticide resistance program for two-spotted spider mites, it is imperative to choose effective miticides to use and to rotate between the MoAs of the products. We highly discourage the use miticides from the same IRAC group for consecutive applications. More information on miticides and IRAC groups can be found in the Southeast Regional Strawberry Integrated Pest Management Guide Focused on Plasticulture Production.
Crop Termination and Follow-up Crops
As the strawberry harvest season comes to an end, crops can be destroyed by spraying a systemic herbicide (such as Roundup) or a contact herbicide, such as diquat or paraquat. (Growers should always refer to specific herbicide labels for application rates and safety precautions to be taken.) When a herbicide is applied properly, crop plant death will occur within two weeks of application. Strawberry plants can be pulled out or mowed down once killed (O’Dell and Williams 1999). This will facilitate the removal of plastic mulch; kill any weeds that may be present on-site; reduce the weed seed production; and ensure survival of biotrophic plant pathogens, nematodes, and insects—all especially beneficial if the grower does not plan on double-cropping.
Many growers in the southeastern region of the US reuse the plasticulture set-up to double-crop and grow either pumpkin (seeded in the field) or transplanted watermelon. The strawberry plants are often removed from the field after harvest in June; shortly afterward, these crops can be planted in the field with new holes in a single row close to the drip line. For cultural recommendations on how to grow these vegetable crops and pest management practices, refer to the current edition of the Southeast US Vegetable Crop Handbook.
When crop season ends, dispose of all plastic and irrigation tape needs to be disposed. Recycling used field plastic can be challenging as some field soil will always remain on the plastic when removed from the site.
Figure 3-1. Combined soils samples should be taken three to four months before planting and analyzed for nutrient content and pH. Take samples in a zig-zag scheme across the field. Soil samples should be taken from 6 to 8 inches’ depth. If different soil types are present in the same field, take one combined soil sample per soil type.

Figure 3-2. Freshly laid plastic in a pre-bedded clay soil in Arkansas.
Figure 3-3. A: The fumigant tank, nitrogen gas tank, drip tape roll, and plastic mulch roll are visible on the fumigation rigs above. B and C: Beds should be pre-formed (first tractor pass) prior to application of the plastic, drip tape, and fumigant (second tractor pass). Multiple-row bed rigs are also available for larger farms.
Figure 3-4. Common personal protection equipment (PPE) for handling or applying fumigants includes a full-face, air-purifying respirator, chemical-resistant rubber gloves and boots, and a Tyvek suit over clothing with long-sleeves and pants.
Figure 3-5. A: Cut-off plant (Camarosa) before planting. B: Plug-plant (Camarosa) before planting.
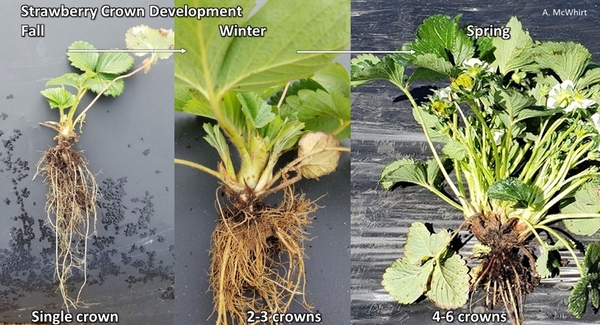
Figure 3-6. Typical strawberry branch crown development for a SD cultivar through the season in the Southeast (Chandler)

Figure 3-7. A: Open blossom with frost damage in receptacle (lower flower); B: Deformed fruit due to poor pollination
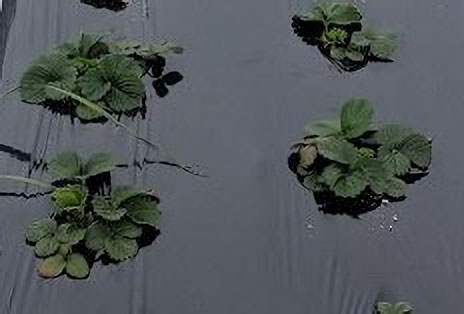
Figure 3-8a. Buds inside the crown
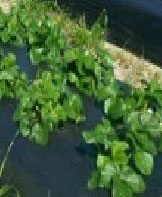
Figure 3-8b. Emerged buds
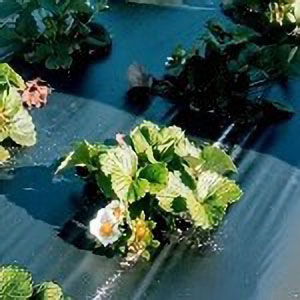
Figure 3-8c. Open blossoms
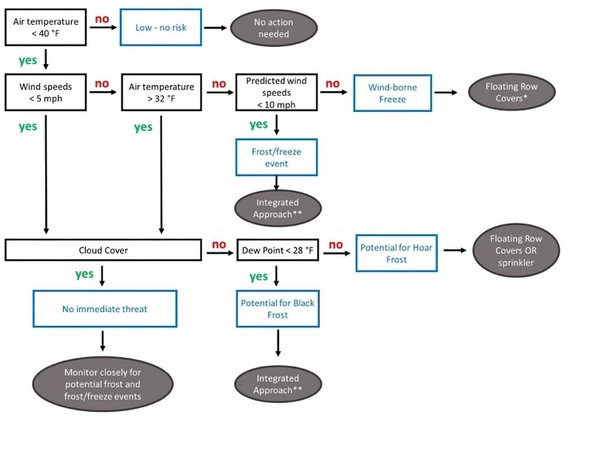
Figure 3-9. A flowchart of options for the grower based on various weather forecast scenarios. * During windborne freezes, ”double covering” plants will enhance protection from freezing. ** An integrated approach utilizes floating row covers and can include overhead irrigation.
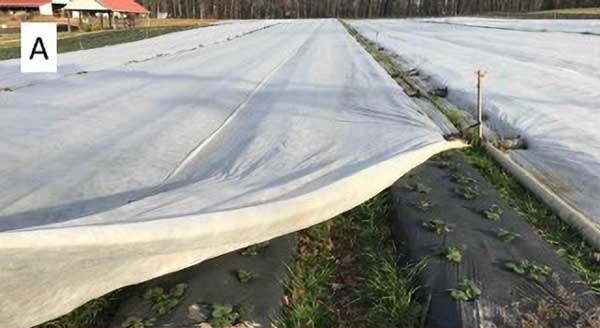
Figure 3-10a. Floating row covers deployed over a strawberry field in North Carolina with a sprinkler system (integrated cold protection).
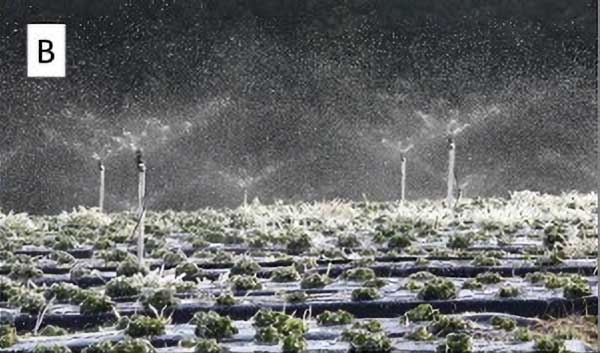
Figure 3-10b. A sprinkler system in use over strawberries during spring frost.
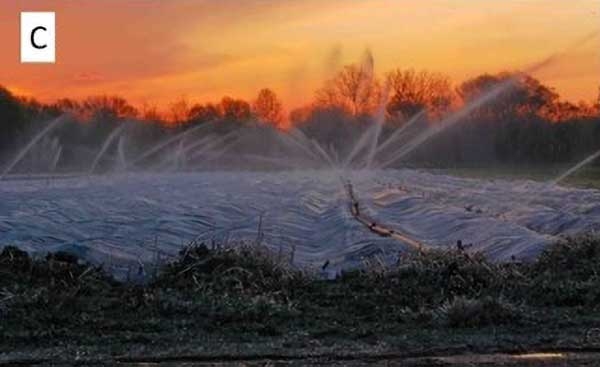
Figure 3-10c. Integrated use of sprinklers over row covers.
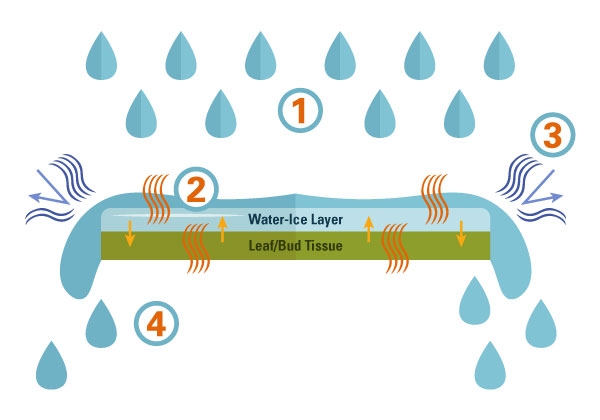
Figure 3-10d. The effect of water coverage and droplet size on plant tissue. (1) Water needs to be distributed uniformly. (2) A water-ice layer helps to insulate the plant tissue. (3) Heat is exchanged through a layer of water above the ice layer. (4) It is important to keep water dripping from the plant and keep ice clear and not cloudy.
4. Additional Considerations
Food Safety
Strawberries are particularly susceptible to foodborne contamination because they are consumed raw. Food safety on the farm begins with farm management and extends throughout the operation to all farm employees who are responsible for growing, harvesting, packing, and holding fresh produce. In order to promote food safety principles on the farm, growers should consider using Good Agricultural Practices, or GAPs. These concepts take into account worker health, hygiene, and training, potential impacts from biological soil amendments, particularly those of animal origin, impacts associated with wildlife or domesticated animals; the role that water might play in transferring microbial contaminants to produce; and the cleaning and sanitation of tools and equipment that may be used for farming activities. In order to best identify the risks for microbial contamination on a farm, the grower should consider any surface that may come into contact with the produce and the timing of that contact as it relates to the final distribution and consumption by the end-consumer. Any surface, whether a worker’s hands, a harvest bucket, or shipping container, water used for irrigation or for post-harvest processes, equipment used for packing, or any other surface that may contact strawberry fruit, should be clean and sanitary to reduce the potential of transferring microbial contaminants.
Planting and Pre-Harvest Food Safety Risks
Strawberries are at risk for microbial contamination based on how they are grown, harvested, and handled. Because strawberries grow close to the ground, they are at risk of contamination from naturally occurring microbial pathogens in soils, such as Listeria monocytogenes, as well as those that may be present from the feces of domesticated animals or wildlife. In annual hill plasticulture, the risk of such contamination is minimal but not completely eradicated. Additionally, water has been shown to be a major conduit leading to produce contamination with microbial pathogens. Pre-harvest water usage would include irrigation as well as water used for frost protection in strawberries. Surface waters are considered to be the greatest risk for produce because they are open to the environment and susceptible to multiple contamination risks. This is especially true when applied through an overhead sprinkler system. Groundwater is considered less risky than surface waters; treated municipal water supplies are considered the least risky source. Water applied to the crop using a method where there is a high probability of water directly touching the strawberry fruit (such as overhead sprinkler irrigation) is considered of highest risk. Drip irrigation is considered the least risky application method for potential microbial contamination. Many growers in the Southeast use surface water (such as a pond) for drip irrigation, but municipal or well water for overhead irrigation for frost protection in spring can also be used, if available.
Food Safety Risks During Harvest
Strawberries are hand-harvested, and therefore are susceptible to contamination that may be present on worker’s hands. Workers should be diligent about hand washing and should undergo routine training at least annually. Workers should not come to work when they are noticeably sick or showing signs of an illness, such as fever, vomiting, diarrhea, coughing, sneezing, or other symptoms that may jeopardize produce. If a worker must work with a mild illness, they should be re-assigned to a duty that would eliminate their contact with the fruit.
Prior to harvest, an employee trained in food safety practices should conduct a pre-harvest field assessment. This assessment should specifically assess wildlife activity and areas of the field with significant impacts. For example, the presence of animal feces should be flagged and employees should not harvest strawberries in those areas. Additionally, workers should not retrieve any produce that has been dropped to the ground during harvest activities.
During harvest, employees should only eat or use tobacco products in specified area designated for those purposes. Employees’ hands should be washed after breaks, eating, smoking, going to the bathroom, or any other time that their hands may become contaminated. If employees use gloves, their hands should be washed prior to putting gloves back on their hands. Additionally, break areas should be situated away from fields where produce is grown to avoid possible contamination while employees are not working. Likewise, areas with portable toilets should be planned when considering the field layout in order to minimize risks (such as a toilet tipping over and spilling). It is important that portable toilets and associated hand-washing stations be located downgrade to protect produce in the event of a leak or spill.
Particular attention should be paid to proper cleaning and, when necessary, sanitation of any equipment, tools, or harvest containers during harvest. Often, fruit is harvested directly into clamshells and other containers in which it is sold. Precautions should be taken that the containers are not contaminated prior to harvest activities. Proper storage of the containers in areas with pest management programs in place, and avoiding setting containers directly on the ground during harvest, are recommended. Many growers install portable hand washing stations supplied with soap, hand sanitizer, and fresh paper towels. We further recommend frequently testing water irrigation.
Food Safety Risks During Post-Harvest Handling
Shortly after harvest, fruit containers are often held in shaded areas prior to moving them to the packing facilities. Bird droppings can be an additional food safety risk at this stage; covering will prevent contamination. If possible, the fruit should be moved from the field in a portable refrigeration unit. However, condensation in refrigeration units used for cooling fresh produce can pose a hazard as these moist areas are hotspots for bacterial pathogens. Control and prevention of condensation is paramount for promoting food safety while storing strawberries. Commercial vehicles transporting strawberries should be clean, odor-free, and sanitized so that food safety risks are not introduced at this stage of the food supply chain. Finally, farms should have some system in place for product traceability, such as lot numbers.
Food Safety Risks Specific to PYO Operations
PYO operations should invest heavily in signage that clearly lay out instructions that visitors should follow while on the farm. These include clear statements about hand washing prior to entering the field and any time that hands may become contaminated. Appropriate toilet facilities should be provided for both workers and for farm visitors with adequate hand-washing stations. In addition, visitors should not eat, particularly the harvested fruit, while they are in the field. Farm owners should keep logs of visitors in case there is a food safety incident that would require contacting all visitors to the farm on a certain day or time. Pets should not be allowed to enter the strawberry growing or handling areas. As a best practice, farms should provide and have customers use single-use containers. If there are reusable containers that are retained on the farm, there should be a program in place for routine cleaning and sanitization of those buckets to avoid cross-contamination. Finally, areas for PYO should not be located such that farm visitors have to walk around or through fields that will only be harvested by farm workers for retail sales. More information, especially on third-party audit requirements, can be found in the Appendix of this production guide.
Cover Crops and Crop Rotation
Planting the same crop repeatedly in the same area over time can result in a buildup of pest pressure and can deplete the soil of nutrients. Cover crops and crop rotation are two practices growers should consider incorporating into their production system as these cultural practices can potentially protect soil quality and reduce pest pressure.
Cover Crops
A cover crop is a crop that is planted in the off-season from the cash crop and is planted because of the benefits it provides to the soil or to the subsequent cash crop. For strawberry production in the Southeast, a summer cover crop can easily be planted in May or June to protect the soil from erosion, smother summer weeds, suppress nematodes, and potentially add nitrogen to the soil.
Cover crop selection. Much research has been conducted in the Southeast regarding cover crop selection and the potential impacts of cover crops on strawberry production. Growers should first consider their goals for planting a cover crop before determining which cover crop species to plant. For instance, if the goal is to increase soil nitrogen, a legume cover crop should be planted. If suppressing nematodes is the goal, selecting a cover crop that is a non- or poor host to the specific nematode will be important to achieving the intended result. Growers who want to learn more about cover crop selection should consult the publication Managing Cover Crops Profitably.
Based on research in NC, a mixture of 10 pounds of pearl millet (Pennisetum glaucum) per acre and 100 pounds of cowpea Iron Clay (Vigna unguiculata) per acre is a suitable summer cover crop mix to precede fall-planted strawberry. This cover crop mix is drought-tolerant and poor hosts to several problematic nematode species, including root-knot nematodes, and has been shown to promote or maintain strawberry yields in the year after planting. This mixture, when planted to allow 8 to 10 weeks of growth, can reliably produce 3,000 pounds of biomass and supply 45 pounds of available nitrogen to the strawberry crop. If the stand is poor or weedy, less nitrogen will be supplied. To ensure optimum nitrogen fixation, the cowpea seed should be mixed with an appropriate legume inoculant to coat the seed prior to planting. More information on calculating nitrogen additions from cover crops can be found in NC State Extension publication AG-796, Sustainable Practices for Plasticulture Strawberry Production in the South.
Mustard cover crop. Mustard cover crops can be planted in the spring or late summer for a short cover crop, maturing in 45 to 60 days. Biofumigant mustard types have high glucosinolate content in their leaves, which when mowed and tilled into the soil can act as a biological fumigant to suppress nematodes and disease. The biofumigant effect from mustards can be variable and is highly dependent on several factors, including selecting a cultivar that is intended for use as a biofumigant; maximizing the plant stand and biomass produced; timing mowing to occur at flowering; and immediately tilling the material into the soil after mowing, followed by irrigation or rainfall to prevent chemical compounds from volatilizing in the air. Some examples of mustard types used for biofumigation include Kodiak (Brassica juncea), Pacific Gold (Brassica juncea), Caliente 119 (S.alba and B. juncea blend), and Caliente 199 (S.alba and B. juncea blend). It is important to consider that the fumigation effect of mustard species is not as effective as the use of a chemical soil fumigant. Some mustard species also can harbor fungal pathogens (Verticillium species) that are harmful to strawberries. The use of mustards should only be considered in consultation your local Cooperative Extension service.
Cover crop management. Maximizing the benefits from planting a cover crop requires careful management of the soil preparation, cover crop planting date, planting method, and ultimately the termination (killing) of the cover crop. Growers should promptly remove the plastic and strawberry plants at the end of the season to allow the cover crop to grow for a longer period. For growers who double-crop their plastic cover crops may be incorporated in other ways into their system.
Planting considerations. Spending time calibrating seeding equipment and checking for seed depth placement will go a long way to maximizing seed emergence and ultimately the cover crop stand. Cover crops with poor germination due to improper seed placement are generally weedy, have lower nitrogen content per acre, and result in reduced benefits of planting the cover crop. Cover crops can be successfully seeded with both seed drills and by broadcasting. Slightly higher seeding rates may be required when broadcasting to ensure an even stand. In both cases, proper cover crop seed depth placement is important to maximizing germination.
When planting cover crop mixtures like pearl millet and cowpea, differences in recommended seeding depths should be considered. Cowpea seeds are large and should be placed at a depth of around an inch to an inch and a half, whereas pearl millet seeds are much smaller and can be broadcast and scratched into the soil surface. If the cowpea seed is broadcast on the soil surface, germination will be reduced. For growers who plan to broadcast-seed the cover crop, one approach is to first broadcast the cowpea seed and lightly rake it into the soil using a cultivator. Afterwards, the pearl millet can be broadcast on the soil surface and gently pressed into the soil. Remember to inoculate legume cover crop seed prior to planting.
Mustard seed is very small and can be broadcast across a tilled area and pressed into the soil. If the soil is excessively loose, the small seed may be buried with heavy rainfall. Lightly rolling the soil to firm up the seed bed is advisable.
Cover crop termination. Planting in June allows around 60 days for the cover crop to grow before it is terminated in early August. This timeline works well for the pearl millet and cowpea mixture as it is likely to just reach flowering in 60 days. Most cover crops should be terminated around the time of flowering and before seed set, which corresponds to the beginning of flowering with no more than 20% of the field setting flowers.
To terminate the cover crop, it should be mowed and tilled into the soil in early to mid-August to allow at least 14 to 21 days for the material to decompose before laying plastic (Figure 4-1). For growers who fumigate, the plant-back period should be considered in determining the last date for cover crop termination to allow for the 14-to-21-day period of cover crop decomposition before laying down plastic. Legume and mustard cover crops will be very quick to decompose, and the soil maybe be ready for bedding in as little as 10 days. On the other hand, thick grass stems will be slower to break down, and if not allowed to decompose sufficiently prior to bedding, this material can get caught in the bedding machinery and will tear the plastic and result in uneven beds. Flail-mowing to chop the material into smaller pieces can help speed decomposition. Even very large biomass grass cover crops generally break down well after two weeks in the heat of the late summer if the material is well incorporated into the soil and there is sufficient soil moisture. In periods of extreme drought, additional time may be required for the material to decompose. If large stems of grass cover crops are still visible after two weeks the area should be re-tilled and allowed to sit for another week before proceeding with bed-laying operations.
For more information on selecting and managing cover crops refer to NC State Extension publication AG-796, Sustainable Practices for Plasticulture Strawberry Production in the South.
Crop Rotation
Crop rotation involves planting in-succession crops that are not closely related and are from different plant families. Crop rotation provides a break in pest cycles; diversifies the depths at which plants are rooting in the soil, which can break-up hardpans and make use of nutrients stored in different parts of the soil profile; and provides an opportunity to rebuild soil nutrients and organic matter after an intensive crop cycle such as strawberries. For strawberries grown in an annual plasticulture system, crop rotation should take place annually if sufficient land is available. Growers should avoid planting strawberries on the same ground year after year. The greatest benefit from crop rotation is seen in rotations in which the cash crop (strawberries) is planted on the same piece of land only once every three to five years.
Cover crops that are not in the same family as strawberries (Rosaceae) make good alternative crops for rotation and should be a part of a long-term crop rotation plan. Other rotation cash crops like sweet corn, melons, pumpkins, tomatoes, or peppers have also been shown to be potential options for rotation with strawberries.
In a strawberry-pumpkin system for example, a minimum of a two-year crop rotation is required as the pumpkin crop finishes in late fall after when the strawberry crop should be planted. Two-year crop rotations using two adjacent fields without the use of fumigation have been successful for many pick-your-own strawberry growers in North Carolina and Arkansas who have limited land available for crop rotation close to their store fronts. Growers in this system may benefit from the addition of summer cover crops prior to planting the strawberry crop to provide an additional break in the cropping cycle (Table 4-1).
Table 4-1. Sample crop rotation plan for Southeastern plasticulture strawberry production utilizing a succession pumpkin crop, cover crops, and two fields.
|
Field |
Year 1 |
Year 2 |
||||||
|---|---|---|---|---|---|---|---|---|
|
Winter |
Spring |
Summer |
Fall |
Winter |
Spring |
Summer |
Fall |
|
|
Field 1 |
Strawberry |
Strawberry |
Pumpkin |
Pumpkin |
Winter Cover Crop |
Winter Cover Crop |
Summer Cover Crop |
Strawberry |
|
Field 2 |
Winter Cover Crop |
Winter Cover Crop |
Summer Cover Crop |
Strawberry |
Strawberry |
Strawberry |
Pumpkin |
Pumpkin |
The ability of crop rotation to reduce pest build-up and positively impact crop production should not be underestimated but does require long-term planning and knowing which crop pests the grower may be trying to suppress. For instance, growers struggling with charcoal rot on strawberries should avoid planting peppers and pumpkins, which can be alternate hosts to the disease. Growers should nematode-test their soils to determine the specific nematode pressure present in their fields. This information can be used to select crop rotation and cover-cropping plans that include plants that are poor or non-hosts to the nematodes in question. The same is true for fields with a history of soilborne diseases such as charcoal rot and black root rot, for which other cash crops may be alternate hosts.
Use of Tunnel Systems
Tunnel Systems
High tunnels are unheated, plastic-covered structures that provide an intermediate level of environmental protection compared to open field conditions. A high tunnel receives energy from sunlight passing through the plastic cover and ventilates passively through the sidewalls, doors, and windows on the end walls. The term “high tunnel” is interchangeable with “hoophouse” or “cold-frame.” However, a high tunnel usually has two straight sidewalls (4 to 8 feet in height), which enables people to walk upright inside, work comfortably, and use small machines, as well as increasing the light incident angle and preventing rain from contacting the crop. A hoophouse or cold frame need not have straight sidewalls.
The main reason why a strawberry grower would want to use a high tunnel is because it enables producing fresh strawberries during fall and winter (depending on cultivar). This opens up a high value market. In summary, a high tunnel can provide growers with the following benefits:
-
Strawberry production during fall and winter.
-
Less chance of anthracnose, botrytis, and other rain-mitigated diseases.
-
Less wind-stress and ultraviolet light that can damage plants.
-
Faster growth and earlier maturity.
-
Easier adoption of sustainable practices such as biological control of insect pests.
However, high tunnels also have their own set of challenges:
-
Higher upfront cost. High tunnels are long-term investments.
-
Risk of structural damage during tropical storms.
-
Increased labor demands.
-
May necessitate new equipment (a bed layer, tractor, or sprayer).
-
Insect pest and mite challenges.
-
Different set of cultivars than typically used in annual hill plasticulture.
There are different types and styles of high tunnels, although they all share a basic structure (Figure 4-2). Based on the number of bays (the hoop structure), high tunnels can be single-bay or multi-bay (Figure 4-3). High tunnels can be homemade; however, only commercial kits qualify for the high tunnel cost-share program from the Natural Resources Conservation Service (NRCS). The width of a high tunnel bay is typically 24-to-30-feet wide, 72-to-96-feet long, 12-to-14-feet high at the center, and 4-to-8-feet high at the side wall.
The lowest temperature inside a high tunnel can be 10ºF to 20ºF warmer than the lowest temperatures outside, which raises plant hardiness by one or two zones, providing a subtropical or tropical climate in some cases. The first freezing temperatures of the fall (32ºF or below) in high tunnels are delayed by about a month and the last freeze could come almost two months earlier in the spring. High temperatures in high tunnels, if not ventilated correctly, can be warm enough to cause heat damage to strawberry fruit on sunny days in winter. Soil temperatures in high tunnels rarely fall below 40ºF. A single-layer plastic cover (6-mil greenhouse-grade plastic) can block up to 30% of light. A double-layer plastic cover (air-inflated between the two layers) could block up to 50%. Single-layer plastic high tunnels are recommended in the South. The high tunnel plastic lasts about three to four years under typical conditions in North Carolina. The relative humidity inside a high tunnel is often high after irrigation, but ventilation can reduce the humidity. The hours of leaf wetness in high tunnels are rarely long enough to support disease development.
Low tunnels have similar benefits and setbacks as high tunnels. One big difference is that the plastic of tunnels has to be opened for harvest, management, and maintenance. Low tunnels are therefore more work-intensive compared to high tunnels. However, low tunnels are much more affordable. They are short, framed structures (usually less than 3 feet in height) covered with thin transparent plastic film (1.5 mil). A standard low tunnel has (metal) hoops, a plastic cover, tie-down materials, and anchors. Low tunnels can also quickly reach higher temperatures than the open field (Figure 4-4). Low tunnels can be homemade or purchased as a commercial kit, such as the TunnelFlex Retractable Low Tunnel System from Dubois Agrinovation. The plastic film on the side of low tunnels is usually perforated or slit.
Strawberry Production in Tunnel Systems
Cultivar selection. In tunnel systems, cultivars with lower chilling requirements or longer flowering periods are preferred over the standard SD cultivars used in annual hill plasticulture. LD plants (such as Albion, Monterey, Cabrillo, San Andreas, Sweet Ann, and Portola) will have the ability to continuously produce flowers. However, this ability is widely improved when day lengths are artificially increased in winter (as with additional LED lights in high tunnel systems). Florida cultivars (Florida Brilliance, Florida Radiance, Florida Sensation) can produce reasonably well in tunnel systems but often lack the typical sweet flavor.
Marketing. Tunnel-grown strawberries—like all strawberries in the South—need to be marketed at high niche prices, typically targeting a production window between November and April. Publications such as High Tunnel Farming from N.C. A&T State University Extension, and the High Tunnel Production Handbook from Alabama Cooperative Extension, cover more in-depth information on high tunnel production basics.
Recommended production scenarios. There are two scenarios we recommend for high tunnel strawberry production: Scenario 1 produces berries in fall, winter, and spring; Scenario 2 produces berries only in the spring. Requirements for crop rotation, cultivar selection, plant management, and high tunnel management are different between the two potential scenarios (Figure 4-5). Planting dates later than October will prohibit fall production and pushes production into winter and spring, depending on the system and the cultivars used.
Strawberries in High Tunnels.
Soil fertility recommendations for high tunnel strawberry are yet to be worked out for maximized returns, but using the fertilizer and fumigation recommendations for field plasticulture strawberry is a good start. Between one half and one ton of compost can be added to a 30-by-96-foot-high tunnel (5 to 10 tons per acre). Disc the soil well before making raised beds. A 30-foot-wide tunnel fits eight 24-inch (bed top) raised beds or six 30-inch beds (Figure 4-6).
Transplanting. Use relatively narrow spacing of 10 to 4 inches between plants in high tunnels as the plants grow slow and will produce fruit at a small canopy size. A theoretical number of plants in this setting is 1,536 plants per tunnel using 12-by-12-inch in-row and between-row spacing. One bed accommodates two rows of plants with staggered planting (Figure 4-6).
Plant management. Remove runners as soon as they appear. High tunnel strawberries will not go dormant in winter; they grow, flower, and fruit instead. Therefore, promoting growth is encouraged after transplanting, which includes fertigating weekly after the first harvest until the end of February, and fertigating at least one pound of nitrogen per acre per day starting in March as would be done in field strawberry production. The plastic cover on a high tunnel shields the plants from rain, so irrigation is necessary. Evapotranspiration is low in late fall and winter; irrigate less frequently but make sure soil is moist. Apply at least one inch of water each week through drip lines after March; another 1.5 to 2.0 inches of water each week might be needed in April and May, depending on the weather.
High tunnel management. The high tunnel temperature is managed by ventilation through sidewalls and windows on end walls. The base temperature for strawberry growth is 40°F and the optimal temperature range is 70°F to 75°F. Therefore, close the tunnel when outside night temperatures outside are below 55°F. Ventilate when temperatures inside the tunnel have reached over 75°F. To mitigate frost damage, use 1.5-ounce (or heavier) floating row covers when outdoor night temperatures are below 45°F. Row covers need to be removed in the morning.
Ventilation also exchanges warm and damp inside air with cool and fresh outside air and is therefore necessary after irrigation. Keep in mind that temperatures in a tunnel can reach over 100°F quickly, even in deep winter during a sunny day if not properly ventilated. Try to ventilate for at least 30 minutes a day, even if it is a cloudy and cold winter day. Air circulation will also mitigate disease development and aid pollination.
Challenges. High tunnel strawberries grow and produce fruit in the coldest months of the year. Even with the protection from both plastic film and row covers, the unheated high tunnel could experience frost or freeze damage to flowers and fruit. In hardiness zones below 8, heavy snow could be a threat to the high tunnel structure. Growers should evaluate both risks and decide if high tunnel strawberries are a suitable crop for their operation. Additionally, low temperatures and poor ventilation inside a high tunnel can cause problems that impact fruit quality. Another challenge in an enclosed environment is the two-spotted spider mite, as well as the spotted wing drosophila later in spring. Please consult the Southeast Regional Strawberry Integrated Pest Management Guide Focused on Plasticulture Production for more guidance on management.
Strawberries in Low Tunnels
Low tunnels have been studied and used for strawberry production in North Carolina and other states, especially in the northern US. A two-year study with LD and SD cultivars in North Carolina showed reduced disease incidence (especially in wet years); increased fruit yield, fruit size, fruit quality and ratio of the marketable fruit; and reduced runner emergence in low tunnels. Low tunnels increased the fall and spring yield of LD cultivars Albion and San Andreas and increased early but not the total yield of SD cultivars Benicia, Camino Real, Florida Radiance, and Winterstar.
Low tunnel management. Install low tunnels after transplanting, either manually or with machines (Figure 4-7). Keep the low tunnel covers on until December when heavy frosts occur, after which, lift the cover and apply row covers for frost protection. For small-scale production, row covers can be placed inside the hoop structure; for large-scale production, apply row covers over the structure. Covers need to be secured with sandbags or other means that will resist wind blowing the row covers off (Figure 4-8). Most metal hoop structures can endure light snowfall (Figure 4-9). In February of the following year, remove row covers and close the low tunnels with plastic film. Only lift tunnel plastic when harvesting or managing plants.
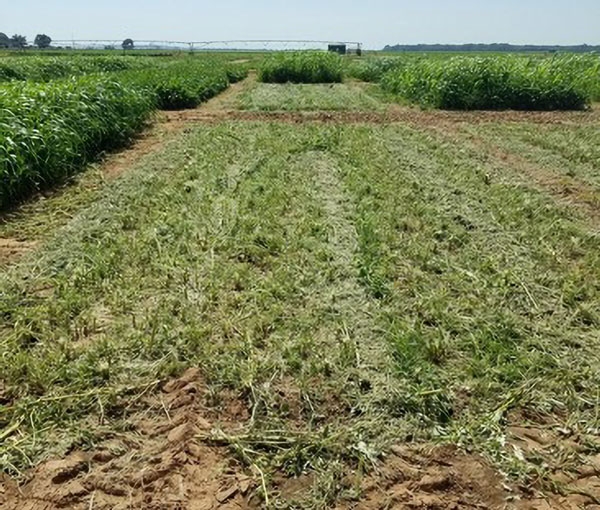
Figure 4-1. Cover crop after mowing and prior to being tilled into the soil. Adjacent plots of un-mowed cover crop can be seen adjacent to the mowed plot.
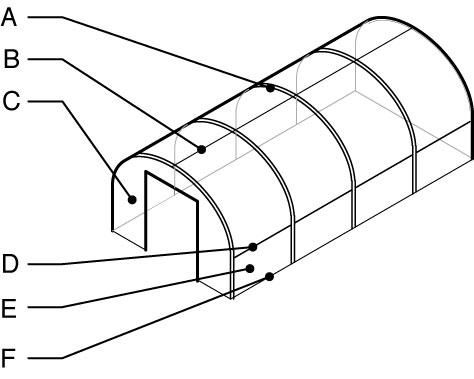
Figure 4-2. The basic structure of a single-bay high tunnel: A: Bow or hoop; B: Purlin or ridgepole; C: End wall; D: Hip board; E: Side wall or curtain; F: Baseboard.
(Source: http://hightunnels.org/materials-construction/)
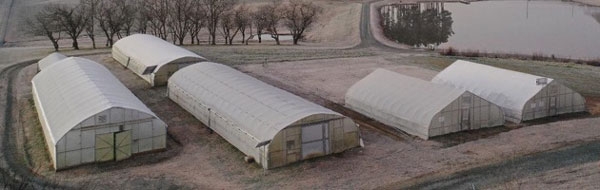
Figure 4-3. Single-bay high tunnels at the N.C. A&T State University Research Farm. From left to right: A Quonset and gothic hybrid fixed high tunnel (left), two Quonset fixed high tunnels (tandem) (center), and two gothic moveable high tunnels (side by side) (right).
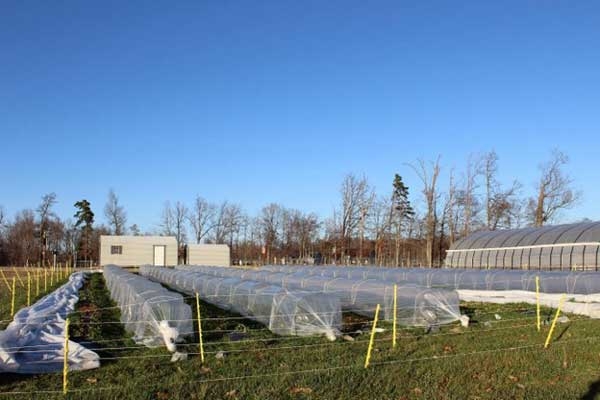
Figure 4-4. The tunnel or flex-retractable perforated low tunnels (28 inches wide, 39.5 inches tall) on the N.C. A&T State University Extension Research Farm in Greensboro, North Carolina (zone 7).
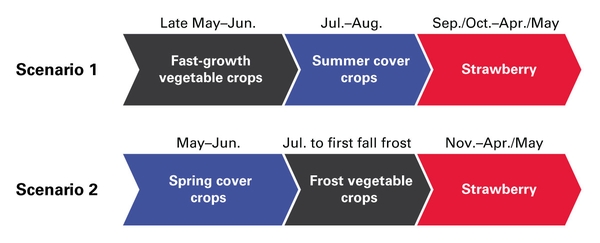
Figure 4-5. Tunnel strawberry production scenarios for North Carolina. Scenario 1: Early planting will promote fall and winter harvests and a large spring harvest. Scenario 2: Late planting will allow a summer vegetable crop but will reduce yields in winter and produce most yields in early spring.
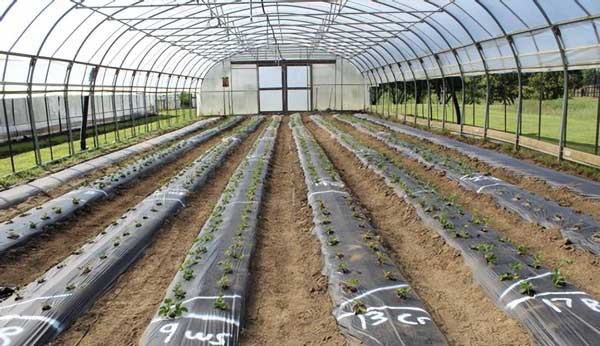
Figure 4-6. A 30-foot-wide high tunnel with eight 24-inch-wide raised beds on the N.C. A&T State University Extension Research Farm.

Figure 4-7. Installing low tunnels with a layer.
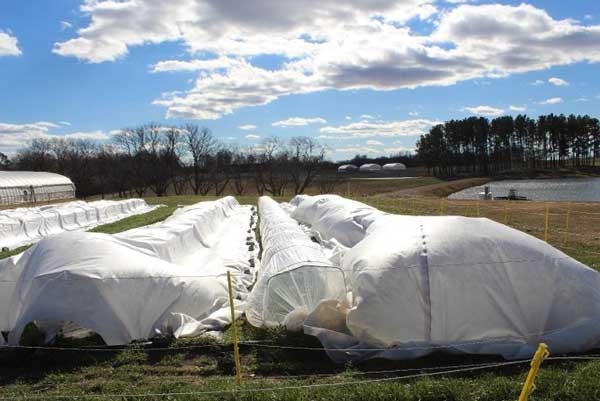
Figure 4-8. Row covers applied over the low tunnel structures can be blown off by gust of winds if not secured.
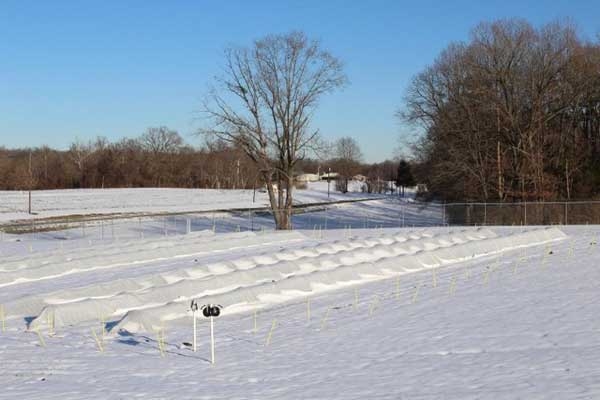
Figure 4-9. Metal hoop structure of low tunnels can usually endure light snowfalls.
Literature
Anderson, H.C., M.A. Rogers, and E.E. Hoover. 2019. Low Tunnel Covering and Microclimate, Fruit Yield, and Quality in an Organic Strawberry Production System. Horttechnology 29 (5), 590–598. HORTTECH04319-19. ↲
Ballard, A. and S. Gu. 2021. Performance of Organic June-bearing Strawberries Grown in High Tunnels with Low Tunnels in the Southeast. Unpublished manuscript.
Bruce, A.B., J.R. Farmer, E.T. Maynard, and J.C.D. Valliant. 2017. Assessing the Impact of the EQIP High Tunnel Initiative. Journal of Agriculture, Food Systems, and Community Development 7 (3), 159–180.
Fernandez, G.E., and J.R. Ballington. 2002. Double Cropping of Strawberries in an Annual System Using Conditioned Plug Plants and High Tunnels. Proceedings of the VI International Symposium of Protected Cultivation Mild Winter Climate. Production and Process Innovation 614: 547–552.
Fernandez, G., J. Pattison, P. Perkins-Veazie, J. Ballington, E. Clevinger, R. Schiavone, S. Gu, J. Samtani, E. Vinson, A. McWhirt, and J.G. Chacon. 2020. 'Liz' and ‘Rocco’ Strawberries. HortScience. 55 (4) 597–600.
Gu, S. 2021. High Tunnel Farming. ANR-21-1. N.C. A&T State University Extension. Greensboro, NC.
Gu, S. and A. Ballard. 2021. Low Tunnels Increased Early-Season Yield of Organic June-Bearing Strawberries in Southeastern United States. Acta Hortic. 1309, 457–462.
Gu, S. and T.S. Rana. 2021. Growth, Yield and Fruit Quality of Organic LD Strawberry in Field and Low Tunnel Settings in the Southeastern United States. Acta Hortic. 1309, 447–456. 1309.64.
Gu, S. and T.S. Rana. 2021. Resource Allocations of Day-neutral Strawberries with and without Low Tunnels and at Two Planting Dates in Organic High Tunnels. Manuscript submitted to the 2022 ARD Research Symposium.
Gu, S., J.E. Beck, and J.A. Moore. 2016. Characterizing High Tunnel Microclimate in Hardiness Zone Seven and Eight of North Carolina. Proceedings of the 7th National Small Farm Conference, 29–34.
Gu, S., W. Guan, and J.E. Beck. 2017. Strawberry Cultivar Evaluation under High Tunnel and Organic Management in North Carolina. HortTechnology 27 (1),78–83.
Guan, W. 2019. Spring Planted Day-neutral Strawberry Update. Facts for Fancy Fruit, A Newsletter for Commercial and Advanced Amateur Fruit Growers, 19-05. West Lafayette, IN: Purdue University.
Guan, W. and L. Sutterer. 2017. Strawberry Variety Evaluation for High Tunnel Production in Southwest Indiana. West Lafayette, IN: Purdue University. Purdue e-Pub.
Hancock, J.F. Strawberries, 2nd ed. Boston, MA: CABI, 2020.
Lamont, W.J. 2009. Overview of the Use of High Tunnels Worldwide. HortTechnology 19:25–29.
Lewers, K.S., D.H. Fleisher, and C.S.T. Daughtry. 2017. Low Tunnels as a Strawberry Breeding Tool and Season-Extending Production System. International Journal of Fruit Science 17 (3), 233–258.
Mays, J. and S. Gu. 2018. Nitrogen Affects the Growth and Yield of Day-neutral Strawberry ‘Albion’ in Low Tunnels. HortScience 53 (9), S141.
Orde, K.M. and R.G. Sideman. 2019. Low Tunnel and Cultivar Effects on Day-Neutral Strawberry Yield and Characteristics in New Hampshire. HortTechnology 29 (6), 795–810.
Poling, E.B. 2008. Spring Cold Injury in Winegrapes and Protection Strategies and Methods. HortScience 43 (6), 1652–1662.
Poling, E.B. 1987. Strawberry Varieties Adapted to Plastic Hill Culture. Proceedings of the Missouri Small Fruit Conference 7, 35–36. ↲
Rana, S.T. and S. Gu. 2020. Effect of Low Tunnels and Planting Dates on the Fruit Quality of Organic Day-Neutral Strawberries in High Tunnels in North Carolina. International Journal of Fruit Science.
Rana, S.T. and S. Gu. 2020. Growth and Yield of Organic Day-neutral Strawberries in Low Tunnels inside High Tunnel in North Carolina. HortScience 55 (3), 336–343.
Resources
Southern Regional Small Fruit Consortium
Southeast Regional Strawberry Integrated Pest Management Guide Focused on Plasticulture Production
NC State Extension Publication AG-796, Sustainable Practices for Plasticulture Strawberry Production in the South
Arkansas Sustainable Production Resources (website)
NC State Extension Publication AG-1, North Carolina Agricultural Chemicals Manual
NC State Extension Strawberry Growers Information
Strawberry Fruit Infection Risk Prediction for North Carolina
NC State Extension Diagnostic Key
NC State Extension Plant Disease and Insect Clinic
North American Strawberry Growers Association
Appendix
Grower’s Checklist
JANUARY–FEBRUARY
Attend grower meetings and conferences to hear updates on recommended practices and to visit trade shows. Stay in the know about new developments in the industry.
Post-Planting Maintenance
- Maintain fence perimeter to eliminate deer entry into the field. A double row of electrified fence (tape or wire type) has been effective when installed early in the season. Consider attaching foil, paper plates or grocery store plastic bags at regular intervals to increase the visibility of the fence.
- Check for dead plants and send suspicious-looking plants to the Disease & Insect Clinic for positive identification. However, plant growth during the winter months is very limited and disease development is also severely reduced, which makes scouting difficult. Weekly scouting in uncovered fields (no row covers) is still advisable to hedge off any environmental or mechanical issues during planting.
- If strawberry plants form runners in the fall after planting, cut these runners off—scissors or hand pruners do an excellent job. Runner removal may be combined with hand-weeding operations.
- Check for vetch in holes and set traps to remove them; winter temperatures will not kill them.
Preparation for Frost Protection
- Purchase a digital thermometer before you need it! Calibrate all thermometers to read a true 32ºF in an ice bath.
- Check your headlamps and other lighting sources for functionality and battery life.
- Monitor weather forecasts closely—consider a subscription to a custom weather report or service. Even with custom services, your local conditions can be quite different. When frost is likely, plan on tracking hourly temperatures in the field so you can respond to your actual conditions.
- Subscribe to the NC State Extension Strawberry Growers Information website for frequent weather updates.
- Check your irrigation system and consider doing a “wet run” prior to an actual frost protection event to ensure proper pump and nozzle operation and coverage.
- Check your row covers for functionality and fix possible holes. Make sure you have them ready to go in the rows and secured with enough weights.
- You may consider installing a weather alarm app on your cell phone and leave your phone charged and connected to service overnight.
Preparation for Spring Fertility
- Check the drip irrigation system (pumps, filters, lay flat and drip tape connectors) by performing a “wet run” to check for adequate flow and pressure. Repair any leaks and clean filters as needed.
- Order fertilizers. Typical sources of nitrogen range from urea ammonium nitrate, calcium nitrate, potassium nitrate, and various complete fertilizer blends.
- Tissue sampling is the best way to determine the appropriate rates for macro- (N, P, and K) and micronutrients (boron and possibly others, depending on soil type and chemistry). Prepare for leaf tissue analysis in late February or early March.
Preparing for Pest and Pathogen Management
- Check your chemical inventories and order any necessary fungicides or insecticides.
- De-winterize your sprayer, inspect the entire system for leaks, clean primary filters and screens, check nozzles for proper flow rates (replace when old tips exceed the specified flow rate by 10%), and calibrate the sprayer for the appropriate rate of water per acre.
- Continue to scout for pest and pathogen pressure as the season continues; examine plants for spider mite populations and damage, which can be mistaken for winter damage.
Preparation for Harvest and Marketing
- Order harvest containers and boxes (if not already ordered).
- Organize labor and workforce for picking season.
- Prepare signs for stands and roadside directions.
- Think about marketing and what you can do to improve sales.
- If you plan to wholesale your fruit, line up buyers now.
MARCH
Irrigation, Fertigation, and Frost Protection
- Monitor weather forecasts closely and consider a subscription to a custom weather report or service.
- Even with custom services, your local conditions can be quite different. Check hourly temperatures in the field so you can respond to your actual conditions.
- Inspect drip irrigation set-up, including pumps, filters, lateral lines, and drip connectors. Perform a “wet run” to address leaks prior to injecting fertilizer. Time the first N injection within one week after new growth has started.
- To ensure your fertility program is providing adequate nutrition throughout the season, send in leaf samples every seven to 14 days and adjust fertility accordingly. Drip-irrigate as needed to maintain proper bed moisture.
- Rates of spring N applications will vary based on developmental stage, soil type, and growing conditions. Typical rates range from one half to one pound of N per acre per day. Spring fertility recommendations were developed at NC State with plantings that were established on 5-foot-row centers (8,712 feet of row per acre) and plants spaced 12 by 12 inches apart (17,400 plants per acre). Some growers use wider row spacing, however, 8,712 feet of row per acre should be used as your acre equivalent. Regardless of your row spacing, calculate your acreage using linear feet of plastic to “keep all things equal.” For example, if your field has 70 rows that are 250 feet long on 6-foot row centers, for the purposes of fertility management = (70 × 250) / 8,712 = 17,500 / 8,712 = 2 acres.
The wider the row spacing, the less linear feet of plastic is present per acre. Therefore, you may be over-fertilizing if you calculate your acre factor using the square footage of the field (2.4 acres vs 2 acres) because the recommendations were developed from an acre equaling 8,712 feet of row.
Other Considerations
- Even when things appear to be looking good, try to get the local Extension agent in your county or regional agronomist to visit. You can find your local agent in North Carolina. Extension personnel can be a useful pair of second eyes who can confirm that “all is good” or identify something that could be a developing problem. You are all a team and strengthening the internal network is always a good thing!
- If your field consists of soils that are heavy (clay) or light (sand), consider applying straw mulch in the row middles to reduce soil and sand splash on fruit. This practice has been utilized mostly by growers with heavier soils that can limit field access when wet and increase mud splashing on fruit during rain events and from equipment passage. Growers who plant annual ryegrass in the row middles generally do not need to use additional straw for mulching.
- Pull out side crowns and leaves caught under the plastic when new leaf growth begins, and during scouting.
- Place two hives of honeybees per acre near your field.
- Apply straw mulch in the aisles.
- Renew your NCSA membership or memberships to other grower associations.
Pest Management
- Control for ryegrass in aisles with herbicide if you have not already done so.
- Complete leaf sanitation before the onset of new growth from the crown—this can help to reduce grey mold and angular leafspot (ALS) pressure in a cool or wet spring season. This type of season in particular has resulted in moderate amounts of desiccated foliage that would be beneficial to remove. Weeds that have emerged out of the planting hole should be removed at this time also.
- Frequently scout for mites, insects, and diseases. Botrytis, anthracnose, powdery mildew, aphids, thrips, mites, and clippers will be your primary pest problems at this time. Inform your county Extension agent of abnormalities and send suspicious-looking plants to the clinic for diagnosis as soon as possible. If you grow Albion, check for mites as early as possible using a microscope.
- Try to get pest and disease problems under control with dormant, pre-bloom, and pre-harvest sprays. Customers don’t like to see sprayers in the field when they are picking, and a few early sprays can be more effective than a lot of late sprays. Some fungicides can only be used in the pre-bloom period.
Getting Ready for Harvest Time
- Order signs, Strawberry Time booklets, and other promotional materials from NCSA now—materials are printed based on preorders from growers and late orders may not be fulfilled.
- Schedule picking and sales labor.
- Develop, write, and implement food safety and crisis management plans.
APRIL
- There is still potential for damaging frosts in April, so watch weather forecasts closely.
- Scout fields for mites, insects, and diseases, especially botrytis, anthracnose, powdery mildew, mites, aphids, thrips, and clippers.
- Send suspicious-looking plants to the NC State Extension Plant Disease and Insect Clinic.
- Try to keep pest problems under control with pre-harvest sprays. Customers don’t like to see sprayers in the field when they are picking.
- Be sure to read and follow ALL pesticide labels carefully. Rinse out spray tank thoroughly after each chemical use.
- Bloom sprays are the most important for managing botrytis as 90% of the infection occurs through the blossom. Recent research suggests bloom sprays are also critical for anthracnose ripe-fruit-rot control. Sprays should continue through the season to protect fruit until the end of harvest.
- Primarily use multi-site fungicides such as Thiram and Captan to control botrytis and anthracnose.
- Use single-site FRAC Codes when infection pressure increases (prior to major rain events (more than 24 hours of rain at mild temperatures)). Please use the NC State Weather Based Forecasting Tool to predict spray needs.
- Do not use the same FRAC code twice in a row and not more than twice in a season.
- Do not use FRAC1 and FRAC11 for botrytis control as it has too many resistance issues.
- Switch and Miravis Prime contain fludioxonil (FRAC 12), which is currently the heavy hitter of anthracnose and botrytis. These products should not be overused. Do not apply any product containing fludioxonil more than two or three times per season.
- Try to avoid QoIs (Abound, Pristine) as much as possible.
- Please use rates according to the Southeast Regional Strawberry Integrated Pest Management Guide for Plasticulture Production.
- Submit leaf and petiole nutrient samples every 14 days and adjust fertility accordingly.
- For growers who do not have sprinkler irrigation, it is critical to drip-irrigate for a few hours in the early morning on hot days to minimize blossom and fruit damage from high temperatures.
- Never allow strawberry plants to wilt. Provide drip irrigation on a daily basis in warm or hot weather; in milder conditions, every other day is fine. Strawberries need an average of one inch of water per week in order to grow vigorously; in warmer conditions, 1.5 inches of water per week per acre is needed. One inch of water equals 27,154 gallons per acre per week, or 3,879 gallons per acre per day. Don’t let the shoulders of the beds become dry.
- If you experience hail damage in April or May, be sure to use a fungicide afterwards to reduce the growth of fungi that will take advantage of the wounded tissue to colonize the berry (so-called opportunistic and secondary pathogens). One example is Switch, a broad-spectrum fungicide with 12-hour Re-Entry Interval (REI) and 0-day Pre-Harvest Interval (PHI). If Switch cannot be used, a broad-spectrum product like Captan would also work well. Warm, dry weather also helps the wounds on green berries to heal.
- In the event of an April “heatwave” during bloom, it is critical to drip-irrigate for a few hours in the early morning on hot days to minimize blossom damage from high temperatures.
- Estimate when the crop will ripen so you can anticipate yields. Schedule and train labor for sales, promotions, and picking accordingly.
- If weather conditions are cooler than normal in March, expect up to 35 days from open blossom to a fully red-ripe fruit for the first 10 to 14 days of blooms. Once the weather warms up, however, it usually takes about 28 to 30 days from the open blossom stage to ripen.
- Check with buyers to make sure they are ready for your berries.
- Have portable toilets delivered and emphasize proper sanitation for farm laborers and customers. Provide handwashing facilities and single-use paper towels for both workers and customers. Place signs reminding visitors to wash their hands after using the restroom.
- Fire up refrigeration systems (such as a walk-in cooler). For pre-pick berries, rapidly cool late season fruit by forced air in properly ventilated containers. High humidity condensation on pre-chilled fruit must be ventilated uniformly or it will cause a quality disaster.
- Put out signs on roadsides to direct customers to your fields when berries are ready.
- Determine a system to collect customer data (names, addresses, and emails) for your mailing list.
- Keep fields picked every two to three days. Keep records, even when you get busy!
- Keep social media and your website updated during the strawberry season. Facebook can be a powerful advertising tool, especially when you need to move berries quickly!
MAY
- Focus on customer service and marketing strategies. Run ads as needed to increase customer traffic. Visit local media with gifts of berries!
- Collect customer data for future contact.
- Pick those strawberries! During heavy picking weeks, it can take five or six pickers to keep up with one acre. Keep records, even when busy.
- Continue to send in leaf and petiole nutrient samples every 14 days and adjust fertility accordingly. For info, visit the North Carolina Department of Agriculture & Consumer Services: Agronomic Services website or call 919-733-2655. Samples from outside of North Carolina are also accepted.
- Monitor weather forecasts closely.
- It is usually a good idea to drip-irrigate in the early morning prior to a warm or hot day, but overhead sprinkling for evaporative cooling is not generally done during picking season (just during bloom stage).
- In warm or hot weather, drip-irrigate on a daily basis: 1.5 inches of water per week per acre is needed. One inch of water equals 27,154 gallons per acre per week, or 3,879 gallons per acre per day. For a fine sandy soil, it would still likely be fine to run each day for one cycle of about 1.5 hours using a drip system with a 4-gallon-per-minute flow rate per 1,000 feet.
- Don’t let the shoulders of the beds get dry.
- If you experience rain damage during harvest, be sure to pick any rain-damaged fruit, or risk an early season shut-down of the plants. Leaving fruit on the plants increases the risk of diseases. Remove fruit from the field, and do not leave any in the row middles.
- Doing everything you can to minimize stress on virus-infected plants can significantly improve their performance. In May, make sure these plants have good irrigation and fertility and avoid heat stress.
- Scout fields for mites, insects, and diseases, especially botrytis, anthracnose, powdery mildew, mites, aphids, thrips, and clippers. For information on misshapen berries, see this article on the NC Small Fruit & Specialty Crop IPM website.
- Maintain your spray program for anthracnose fruit rot.
- Collect and mail gray mold samples for fungicide resistance testing to the University of Georgia; laboratories that offer testing can be found on the Southern Region Small Fruit Consortium website.
- Send suspicious-looking plants to the NC State Extension Plant Disease and Insect Clinic.
- Monitor for spotted wing drosophila in your strawberry patch.
- Manage pesticides carefully. Rinse out spray tank thoroughly after each chemical use. Read and follow all pesticide labels carefully.
- Start vegetable transplants now for double-cropping.
- Order seed for summer cover crops.
JUNE
- Check field late in the season for disease (especially anthracnose) and insects.
- Critique your season:
- How did week-by-week sales compare with last year?
- Are your prices competitive?
- What can you do to improve the next season?
- Do you want to switch to a fall-to-spring production system?
- Do you need to reduce your plant order to better manage production peaks?
- Prepare and submit your plant order for the upcoming fall:
- Carefully assess the performance of your main strawberry cultivars in the previous season. Decide by no later than June which cultivars you will plant this upcoming fall, and how much acreage of each cultivar will you need?
- Be careful not to overload your order with a single cultivar or plant type that had an exceptionally good season in the previous year, as ”weather rules” and other factors could play out very differently next year!
- Before placing the same plant order as last year, critically evaluate the relative profitability of your different markets (PYO, ready-pick, or off-farm). For example, if you experienced further decline in PYO sales, this may the time to scale back Chandler production (which is primarily a PYO cultivar).
- If your crop was late this year, have you considered growing an early-ripening cultivar like Sweet Charlie? You will have to place this plant order quickly as Sweet Charlie supplies may be limited.
- Avoid extra early Chandler planting dates. If Chandler is producing in excess of 100 flowers per plant, your planting date is probably too early.
- Diversify. A combination of cultivars can give you more weeks of fruiting and will enable you to address a broader market.
- Consider diversifying plant type.
- Consider the potential water situation for the season ahead. Plugs are far more efficient utilizing water than fresh dugs.
- Don’t wait until the last minute to order plants or tips—tips need to arrive one month prior to planting.
- What other changes do you need to make for next year? Are you satisfied with the productivity of your current fields? A possible rotation to another site may be beneficial if your overall yields were lower than expected in the current season.
- Submit your plant order as soon as possible. Calculate about 10% more plants than you would need.
- If you are planning on raising your own plugs, organize your plug production setup in late June or early July, and set up a mist system if growing your own tips. Also order soil, trays, and fertilizer.
Final Tasks for June:
- Destroy plants when harvest ends (crop termination). Use herbicide to terminate plants and disk plant material under the soil, unless the beds will be relay- or double-cropped.
- Clean stand and coolers.
- Remove and recycle plastic if not double-cropping.
- Plant cover crop in early June.
- Test soil pH in June and schedule liming for late June or early July for the fall crop.
- Raise pH to between 6.0 and 6.2. Incorporate lime when existing beds are broken down.
- Use overhead irrigation to soften soil as needed and subsoil completely.
- Make a fumigation plan, set a schedule, and talk to custom fumigators; or, if you fumigate yourself, acquire necessary materials. Be sure to allow appropriate plant-back intervals (usually up to 21 days) and an additional buffer in case of bad weather.
JULY
- Make a fumigation plan, set a schedule, talk to a custom fumigator and acquire necessary materials. If you fumigate your own, check all PPE (respirator, Tyvek, chemical-resistant gloves, rubber boots) for functionality. Be sure to allow appropriate plant-back intervals and an additional buffer in case of bad weather.
- If you fumigate your own, check your fumigation rig and make any adjustments or repairs well in advance of fumigation.
- Renew respirator fit testing (must be current within one year of fumigation).
- Make sure you have new respirator cartridges.
AUGUST
Preparing for Next Season
- Stick tips by mid-to-late August, depending on location.
- Make key decisions about cultivars and plant types for next season. Don’t wait until the last minute to order your plants! Remember, tips need to arrive one month prior to planting.
- If raising your own plugs, be sure to order soil, trays, and fertilizer if growing tips.
- Stay in close contact with your plant supplier this summer and do not be afraid to ask for periodic updates on plant health.
- Get mist system set up by early August if growing your own tips.
- Stick tips by mid-to-late August, depending on location.
- For planting in mid-September (Western North Carolina), apply pre-plant fertilizer in mid-August.
SEPTEMBER
Fumigation and Bed-Making
- Prepare your Fumigant Management Plan as required by the regulations. Don’t wait until the last minute. We recommend hiring specialized fumigation services to custom fumigate.
- If you fumigate yourself, please read the following suggestions carefully. All currently used fumigants and fumigant alternatives have a high potential to impact your health if you don’t protect yourself!
- Make sure you have the required PPE (respirators, Tyvek, rubber boots, chemical resistant gloves) and that it all functions properly. Wear PPE at ALL times when you handle or inject fumigants, or if you are near the fumigated area with the first five days.
- READ the label of the fumigant and follow the instructions!
- Make sure your respirator has been fit-tested.
- Have required signage in the field as well as at the corners of the field. You protect potential customers by doing so.
- If applying compost before bed-making in late summer, do your homework first: Nutrient content? Heavy metals? Nitrogen release pattern? Get advice from your Extension agent on issues related to usage of any animal manures in strawberries.
- Install a “blow-out tube” on your fumigation rig—this is an important safety measure in case excessive pressure builds up in the nitrogen tank.
- Before fumigation, pressure-test your fumigation system using only nitrogen (a special connector can be obtained to do this).
- Make sure that the knives on the fumigation rig are open and filters are clean.
- Consult your supplier to determine fumigation equipment specifications (orifice size, pressure, flow meter percentage) to achieve proper application rates of the selected fumigant.
- Calibrate your fumigation rig annually and each time you change the bottle or gas tank!
- Set up overhead irrigation system. Check pump, pipes, and nozzles.
- If soil conditions are dry, overhead-irrigate 1/4-inch per cycle until soil conditions are optimum for both bed making (firm but not clumpy) and fumigation (optimal retention time of product for maximum efficacy).
- Supplemental irrigation amounts will vary by soil type. Be careful not to over-wet soil.
- Plant ryegrass soon after fumigating and before punching holes for planting. The recommended seeding rate for annual ryegrass is 25 pounds (you are only covering half of the area with seed, so this rate is equivalent to 50 pounds per acre). Heavier seeding rates will result in a thick, luxuriant stand that often has to be sprayed twice to get it to lay down.
- Allow for a minimum three-week plant-back period for most fumigants. Be sure to consult the fumigant label and to clarify with your supplier if you have any questions about the required plant-back period. It is very risky to attempt transplanting before the minimum plant-back requirement for the fumigant you are using has been met.
Tip and Plug Management
- Maintain adequate mist to facilitate quick rooting of tips. If tips flag or wilt excessively, increase misting frequency until plants remain turgid during irrigation intervals. Typical schedules irrigate for 20 to 30 seconds every 2 minutes for the first 3 to 5 days, then increase the interval by a few minutes each day as the plants will tolerate (20 to 30 seconds every 10 to 15 minutes by week 2). Misting schedules will vary depending on propagation environment, and factors such as (indoor vs outdoor production, temperature, relative humidity, and wind.
- Tips should have fully functional root systems after 21 days. To finish the plugs, transition to a watering schedule using either the misting system at lower frequency and longer duration (10 to 20 minutes twice a day) or hand watering.
- Do not fertilize just-planted tips. The fertilizer charge in most potting media will be sufficient until the plants are well rooted.
- Fertilizer applications can be made to plugs in the third or fourth week of the program. Fertilizer formulations with low phosphorus are desirable to keep plants from stretching (15-5-15, 13-2-13). Apply at a rate of 50 ppm of nitrogen once a day for the last week prior to field planting and delivery. A tray drench with 150 to 200 ppm of nitrogen the day prior to planting is a common practice.
- Fertigating plug trays is best accomplished using a proportioner such as a brass venturi siphon type (for example, Hozon) that easily attaches to a standard ¾-inch hose bib. These operate on a 16:1 ratio (for every 16 gallons of output, 1 gallon of stock fertilizer is injected). To achieve a 100-ppm nitrogen solution using a 15% N-water soluble fertilizer (15-5-15) add 1.35 ounces (38g) of fertile proportioning, which requires a minimum pressure of 35 psi. Siphoning rates vary with pressure (higher pressure will result in more fertilizer and a higher finished ppm). Including a 35-psi pressure regulator on the supply line in front of the siphon is recommended to keep constant pressure and a consistent rate of fertilizer delivery. Other proportioners such as Dosatron, DosMatic, and Chemilizer maintain a constant nutrient output if bulk flow varies due to pressure changes. These are more expensive but deliver greater precision. Consult your supplier to discuss flow rates and pressure specifications of your system to select the best option.
OCTOBER
Planting
- Check plants for possible biological (insects and diseases) and physiological (nutrient) disorders prior to planting and treat appropriately. Consult your Extension agent if plants appear unhealthy. Get a diagnosis if disease is suspected. Notify plant seller of any problems. If you have planted Albion for a fall-to-spring production system, check for mites very early!
- In fall-to-spring production systems, have a picking crew ready.
- Set plants carefully—planting depth is extremely important to a good start. Set plug plants deep enough to have approximately 3/8 of an inch of soil covering the top of the media plug. Set fresh dugs at the depth at which they were growing in the nursery or midway on the crown.
- If you establish plugs with drip irrigation only, be sure to hook up the system before planting. Drip-irrigate often enough after transplanting to keep beds near field capacity during the first four weeks. Prevent standing water. Using a water wheel transplanter is recommended if overhead irrigation is not available or possible.
- Irrigate fresh dug plants between 9:00 a.m. to 5:00 p.m. for seven to 12 days (longer periods may be needed if weather is hot and sunny). Growers typically reduce irrigation times on the “tails” of the day during the latter part of fresh dug establishment (later morning start times and earlier evening stop times). Let the plants tell you when they are becoming established and adjust irrigation schedules based on plant response.
__________________________________________________
Post-Planting Maintenance
- If deer predation has historically been a site problem, install fencing NOW. A double row of electrified fence (tape or wire type) is effective when installed early in the season. Consider attaching foil, paper plates, or grocery store plastic bags at regular intervals to increase the visibility of the fence.
- Drip-irrigate in the fall, as needed, to keep soil from drying out.
- Scout for pest injury, including deer.
- Check for dead plants and reset as soon as possible. Send suspicious-looking plants to the Disease & Insect Clinic for positive identification. Notify plant seller of any problems.
- Place order for row covers NOW; they will help greatly to conserve irrigation water during frost protection next spring.
- If planting is delayed a week or more, fall row covers can help enhance plant growth and partially compensate for late planting for both Chandler and Camarosa.
- A row cover applied in the first two weeks of November may enhance flower bud development in the crowns and improve spring yields—this may be especially helpful for later Chandler plantings. Row cover research in the mountains, piedmont and coastal plains regions has shown that Camarosa yields are optimized with 800 Growing Degree Day units in the fall (October through December), and Chandler needs about 650 GDD units.
- Growers should consult seasonal climate data and predicted long-range forecasts before installing row covers. The National Weather Service’s Climate Prediction Center provides outlooks for periods of 6-to-10 and 8-to-14 days with an interactive tool.
- If unseasonably warm temperatures during row cover treatment are followed by unseasonably cold temperatures, plants may not acclimate and tissues could have reduced tolerance to cold. One way to improve winter cold-hardiness of Albion is to de-blossom in the fall. This may be needed on plug plants of Albion, but not cutoffs. Do not pull off the blooms as you could damage the root system; use small scissors instead. Also, be mindful that Albion is very susceptible to cold injury in the fall, and row covers must be applied in October if there is the threat of temperatures below the mid-20s.
- Consider removing dead leaves from plants during November and December to minimize gray mold. Don't hand prune if anthracnose is known to be present.
NOVEMBER—DECEMBER
- Inspect plants during late fall and winter for crown development. You should see two to three crowns.
- Plants should cold-hardy—adaptable to cold temperatures in November and early December.
- Protect plants and plastic from deer.
- Order chemicals for spring.
- Hand-weed winter weeds. Check for vetch in holes and weed out; winter temperatures will not kill them.
- Examine plants for spider mite damage carefully; they can easily be mistaken for winter damage. Control as needed.
- In North Carolina’s mountain region, place row covers in December and leave on until spring.
- Remove row covers this month if used for fall flower enhancement or late planting in North Carolina’s piedmont and coastal plain regions.
- Remove dead leaves from strawberry plants. They can harbor gray mold and removal should lessen the disease in the fruiting season.
Strawberry Nurseries
Aarons Creek Farms
(Gregg Gordon, Greg Williamson)
380 Greenhouse Dr.
Buffalo Junction, VA 24529
Phone: 800-487-8502; 434-374-2174
Fax: 434-374-2055
Email: plants@acfgreenhouses.com
Balamore Farm Ltd.
(Joe Cooper)
9036 Hwy #2
Great Village
Nova Scotia B0M 1L0
Canada
Office: 902-668-2005
Cell: 902-893-0744
Fax: 902-668-2025
Email: sales@balamore.com
Cottle Strawberry Nursery
(Whit Jones)
192 Ned Cottle Lane
Faison, NC 28341
Phone: 910-276-4531; 910-271-9990 (Jones cell)
Fax: 910-267-0156
Email: whitjones@embarqmail.com
E-Z Grow Farms Ltd. Strawberry Nursery
(Darrly Zamecnik),
1771 Norfolk County Rd 23
Langton, Ontario
Canada.
Phone: 519-875-4751
Email: darryl@ezgrow.ca
Fresh-Pik Produce
(Jim Warenda, James Sharp)
7802 Sadie Rd.
Kenly, NC 27542
Phone: 252-237-1260; 252-205-2783 (Warenda cell)
Fax: 252-237-6133
Email: jwarenda@freshpik.com; jsharp@freshpik.com
Goodson Farm & Nursery
(Jim & Donna Goodson)
228 Scratch Gravel Rd.
Damascus, AR 72039
Phone: 501-993-8604 (D. Goodson); 501-951-6830 (J. Goodson)
Email: goodson01@windstream.net
Hunter Farms
(Eric & Kristi Hunter)
607 Jameson Rd.
Easley, SC 29640
Phone: 864-859-2978; 864-238-0684
Email: hunterfarms@bellsouth.net
Kube Pak
(Brian Morris)
194 Route 526
Allentown, NJ 08501
Phone: 609-259-3114
Fax: 609-259-0487
Email: sales@kubepak.com
Lassen Canyon Nursery
(Kenny Elwood)
PO Box 992400
Redding, CA 96099
Phone: 530-227-7415
Email: nancy@lassencanyonnursery.com
Lewis Nursery & Farms
(Cal Lewis, Butler Anderson)
3500 NC Hwy 133
Rocky Point, NC 28457
Phone: 910-675-2394
Fax: 910-602-3106
Production Lareault, Inc.
(Frédérick Laforge)
90 Rue Lareault, C.P. 96
Lavaltrie, QC (Quebec) J5T 4A9
CANADA
Phone: 450-586-1850 (office); 450-944-1850 (Laforge cell)
Fax.: 450-586-1051
Email: flaforge@lareault.com
Maplewood Produce & Greenhouse
(Reuben Martin)
8564 Old Scotland Rd.
Shippensburg, PA 17257
Phone: 717-532-3278
McNeill Farms
(Steve McNeill)
1621 Kentyrewood Farm Rd.
Sanford, NC 27332
Phone/Fax: 919-499-9706; 919-775-9482 (cell)
McNitt Growers
(Andy McNitt)
78 Oak Ridge Lane
Carbondale, IL 62903
Phone: 618-687-3563; 618-201-2135 (cell)
Email: bill@mcnittgrowers.com; andy@mcnittgrowers.com
Mt. Olympus Berry Farm
(Ken West)
23298 Jefferson Davis Hwy.
Ruther Glenn, VA 22546
Phone: 804-448-0395
Email: mary@mtolympusfarm.com
Nourse Farms
(Anne Kowaleck)
41 River Rd.
South Deerfield, MA 01373
Phone: 413-665-2658
Fax: 413-665-7888
Email: info@noursefarms.com
Strawberry Tyme Farms
(John Cooper)
RR2, Simcoe
Ontario N3Y 4K1
Canada
Phone: 519-426-3099
Fax: 519-426-2573
Email: styme@kwic.com
Westech Agriculture Ltd.
(Nora Dorgan)
600 Church St.
Alberton, PE C0B 1B0
Canada
Phone: 902-853-4184
Food Safety: Third-Party Audit Requirements by Buyers
Produce buyers will often require farms to document the practices that they are implementing to promote food safety as a condition for buying their produce. Over the last 25 years, several programs have been developed to regulate farm practices in order to promote on-farm food safety. These general practices are known as Good Agricultural Practices (GAPs) and include practices that will help protect produce from microbial, chemical, and physical hazards that are common across many commodities grown, harvested, packed, and held on fresh produce farms in the United States. A common program that buyers might require of farms is the USDA Harmonized GAP Audit Program. Other third-party audits are available from PrimusLabs and GLOBALG.A.P.
To participate in these programs, the farm needs to develop a farm food safety plan. A farm safety plan should include information about the farm including name and location, maps, listing of commodities grown, the name of the food safety manager, a documented risk assessment identifying food safety hazards to crops grown on the farm, practices the farm implements to reduce these hazards, and documentation that the practices are actually implemented. Once the food safety plan is written, the farm would contact a third-party auditor to visit the farm and review all elements of the food safety plan: does it adequately address potential, do the practices as outlined and implemented adequately control these risks, and is there appropriate documentation demonstrate implementation of appropriate responses, and so forth. In the case of a USDA Harmonized GAP audit, all of this paperwork is then sent to the USDA for review. If there are questions about the observations, USDA personnel will contact the third-party auditors with questions about their assessments. Once this review is completed and application approved, the USDA sends the farm official certification, a copy of which the farm forwards to the buyer with whom to establish a line of business.
Multiple crops that are grown under similar conditions, at similar times of the year, and that are harvested in similar manners can all be certified at the same time. Often, growers who are producing a variety of commodities will need to undergo multiple audits each year to meet the requirements for each of their buyers. The audits have associated costs, generally in the range of $1,000 to $3,000 per audit, and are required annually by buyers. There are also federally funded Specialty Crops grants available to state departments of agriculture, which in turn make available to new growers (these grants often offset the costs for initial GAP certification).
Food Safety: Federal Food Safety Requirements
In the early 2000s, the Centers for Disease Control and Prevention (CDC) estimated that one in six Americans contracted a foodborne illness each year. This led to the Food Safety Modernization Act (FSMA) in early 2011. The goal of the FSMA is to reduce the overall foodborne disease burden in the US by moving from a reactive approach to a proactive one that integrates food safety at all levels of government.
The US Food and Drug Association (FDA) has composed seven specific rules to achieve the goals set forth under the FSMA. The FSMA’s Final Rule on Produce Safety addresses food safety on all domestic produce farms that meet a certain sales threshold. Activities covered include growing, harvesting, packing, or holding types of fresh produce that are rarely cooked prior to consumption. Strawberries are considered “covered” produce because they are regularly consumed raw.
The PSR outlines several exclusions and exemptions for eligible farms. Farms with three-year sales averages totaling less than $25,000 of annual gross produce sales are exempt and thus not subject to the PSR. Any produce grown on an otherwise covered farm that is designated for personal consumption, such as produce grown in a personal garden on a farm) is exempt and not covered under the PSR. In addition to exemptions exist for sales to food processors, certain farms may be eligible for a “Qualified Exemption” from the PSR. Eligibility for this exemption requires a three-year average of gross covered-produce sales above $25,000 but less than $500,000 of total food sales, the majority of which are to “Qualified End Users.” Qualified End Users are defined by the PSR as consumers of a restaurant or retail food establishment located in the same state or Indian reservation as the farm but not more than 275 miles away. Farms eligible for the Qualified Exemption will be inspected to meet certain modified requirements, including labeling all produce that is sold with the name and complete business address of the farm where the produce was grown. In addition, Qualified Exempt farms must document sales of all produce (and other food) as well as fulfillment of labeling requirements.
To date, there is only one produce safety training program that meets the FDA criteria, the Produce Safety Alliance (PSA) grower training at Cornell University. Participants who complete the one-day training will receive certification from the Association of Food and Drug Officials (AFDO) for completing the course. At the time of this writing, it is not clear how often farms may be inspected, and requirements will vary by state. Contact your state PSA team or representative for more information; a list of contacts is available on the University of Florida, Institute Of Food And Agricultural Sciences website.
Strawberry Fertility
To optimize growth, fruit quality, and economic return, commercial strawberry production requires intensive and precise fertilization throughout the season. In high-value crops like strawberry, using a combined strategy of pre-season soil testing and in-season plant tissue analysis is inexpensive and highly effective at optimizing both yield and quality. Plant tissue testing measures nutrient levels in the leaflets and compares them to established target concentrations for healthy strawberries (Table A-1). This analysis can reveal nutrient deficiencies and imbalances within the plant and allow growers to adjust fertility in response to changing crop needs. Plant tissue analysis of strawberries should include nitrogen (N), phosphorus (P), potassium (K), calcium (Ca), magnesium (Mg), and sulfur (S), iron (Fe), manganese (Mn), zinc (Zn), copper (Cu), and boron (B). In North Carolina, the most commonly encountered nutrient deficiencies in June-bearing strawberries are N, S, Mg, and B.
Nitrogen and nitrate-nitrogen. Of the 11 essential nutrients, nitrogen, the biggest driver of yield, is needed in the highest amount yet is found most frequently at insufficient levels. Of the over 4,000 June-bearing strawberry tissue samples submitted to NCDA&CS for analysis from 2010–2021, 44% were below the critical concentration of 3.0% N. Due to strawberry production’s need for a steady supply of nitrogen, analysis of nitrate-nitrogen (NO3-N) in the petioles is recommended. Petiole NO3-N levels represent a snapshot of N absorption by the plant from the soil, are a better predictor of N needs than leaf tissue N, and should serve as the basis for weekly nitrogen rate determinations. The optimum amount of petiole NO3-N changes over the 12-week season; the target concentration is low at first bloom as the plants are emerging from winter dormancy but quickly reaches maximum demand in weeks 2 to 4. As heavy fruiting begins, NO3-N levels begin to decrease, preventing the harmful effects of excess N on fruit quality (Table A-2).
Sulfur and Nitrogen: Sulfur ratio. Elevated N can create an imbalance with S in plant metabolism. Monitoring the nitrogen-to-sulfur ratio (N:S) is thus an essential component of fertility management in strawberry. When N:S is greater than 18:1, it can poorly utilize both N and S, even at sufficient tissue levels of those nutrients. In North Carolina, 33% of strawberry samples had N:S ratios greater than 18:1, and 11% were below the critical concentration of 0.15% S. An excessively high N:S ratio or low S levels can be easily corrected with an injection of 1 to 2 pounds S per acre. Common fertilizers used are Epsom salts (13% S and 10% magnesium sulfate (MgSO4)) and potassium sulfate (18% S).
Magnesium. Over the same sample period (2010–2021), 7% of strawberry tissue samples were below the critical concentration of 0.25% Mg. Magnesium deficiency causes yellowing between the veins of older mature leaves before progressing to the leaf edges. Epsom salts is often the fertilizer of choice as it supplies S and moderates the N:S ratio. Injections of 7 to 10 pounds of Epsom salts per acre per week is generally sufficient to supply adequate amounts of both Mg and S throughout the production season.
Boron. Essential to good quality fruit, boron deficiency causes many symptoms. Among the most obvious examples are deformed berries, asymmetrical leaves, and stubby roots. If B was not applied pre-planting, a one-time application of 0.125 pounds per acre with the first or second fertigation is advisable. Any additional B application should be based solely on tissue analysis. Common B fertilizers include borax (11% B) and Solubor (20.5% B). In managing B fertility, of equal or greater importance than preventing B deficiency is avoiding B toxicity. In fact, B has been shown to be much more likely to cause crop loss through over-application than under-application. In strawberry, B toxicity presents as scorching of the leaf edges, at which point it is difficult to mitigate. Be very careful to apply only the recommended amount of B, as the line between B sufficiency and B toxicity is very narrow.
How to collect a tissue sample. For routine in-season monitoring, plant tissue analysis should start when spring growth begins, and continue every one to two weeks throughout the blooming and fruiting stages. Plant tissue analysis is also useful if plants are showing signs of poor growth or health; these diagnostic samples can be collected at any growth stage and should include both samples of unhealthy and of healthy plants for comparison. Nutrient concentrations within the plant vary, depending on the growth stage and on the plant part. Improperly collected tissue samples can produce unreliable results and lead to incorrect interpretations.
To collect a tissue sample from strawberry, select most recently mature, trifoliate leaves (MRMLs). These leaves are full-sized, green, and consist of one petiole (leaf stalk) with three leaflets (Figure A-1). MRMLs are usually located three to five leaves back from the growing point and are neither newly emerging from the crown nor laying on the plastic (Figure A-2). When collecting MRMLs, it is very important to detach the petiole from the leaflets immediately. This prevents nutrient transfer between the two plant parts and allows them to be analyzed individually (Figure A-3).
Each sample should include leaves and petioles from 20 to 25 locations within a uniform area. For example, the plant material in a single sample should be of the same variety, growing on the same soil type, at the same growth stage, and having the same management history. When submitting tissue samples, be sure to include fertilization history and environmental conditions. In order to receive a correct interpretation, it is particularly important to accurately report the growth stage (bloom or fruit) and the number of weeks since first bloom.
A pictorial guide to collecting and submitting strawberry tissue samples is available online on the North Carolina Department of Agriculture & Consumer Services: Agronomic Services website.
Table A-1. Plant tissue nutrient sufficiency ranges for strawberry*.
|
Nutrient |
Sufficiency Range |
|---|---|
| N (%) | 3.0–4.0 |
| P (%) | 0.2–0.4 |
| K (%) | 1.1–2.5 |
| Ca (%) | 0.5–1.5 |
| Mg (%) | 0.25–0.45 |
| S (%) | 0.15–0.4 |
| Fe (ppm) | 50–300 |
| Mn (ppm) | 30–300 |
| Zn (ppm) | 15–60 |
| Cu (ppm) | 3–15 |
| B (ppm) | 25–50 |
Table A-2. Petiole nitrate nitrogen (NO3-N) target ranges for strawberry from week of first bloom.
|
Week |
Low |
High |
|---|---|---|
| 1 | 250 | >500 |
| 2–3 | 2500 | 4000 |
| 4 | 2000 | 4000 |
| 5–8 | 1700 | 3200 |
| 9 | 900 | 2800 |
| 10 | 900 | 2500 |
| 11 | 600 | 1700 |
| 12+ | 450 | 900 |
Plant tissue analysis measures nutrient concentrations within growing plants. Testing of strawberry leaves and petioles reveals whether or not nutrients are at sufficient levels for optimal crop development. Petiole analysis measures nitrate-nitrogen levels, while leaf analysis measures levels of nitrogen, phosphorus, potassium, calcium, magnesium, sulfur, manganese, copper, zinc, iron, boron, aluminum, and sodium. Petiole analysis identifies and verifies nutrient deficiencies and toxicities before symptoms appear. When nutrient levels are outside of the optimal range, nutrient management recommendations are provided with the tissue sample test results.
Plant tissue samples can be predictive or diagnostic. Predictive samples are for routine fertility monitoring in order to fine-tune the fertilization program. Diagnostic samples are submitted to troubleshoot apparent nutrient problems. Samples should be submitted from both "good areas” (normal-looking plants) and "bad areas” (discolored, stunted or misshapen plants).
Plant tissue samples must be properly collected and accurately submitted. Nutrient concentrations within the plant vary depending on the plant part and growth stage. Improperly collected tissue samples can yield unreliable results and lead to incorrect interpretations. To collect and submit strawberry tissue samples, follow these guidelines:
- Include leaves and petioles from 20 to 25 plants within a uniform area. All of the plant material in a single sample should be the same variety, growing on the same soil type, planted at the same time and having the same management history.
- Select the most recently matured trifoliate leaves (MRMLs). These leaves are full-sized, green, and consist of one petiole or leaf stalk with three leaflets. MRMLs are usually located three to five leaves back from the growing point.
- Detach the petioles from the leaves as you collect them, but submit them together as one sample.
- Fill out the NCDA&CS Plant Sample Information form, including fertilization history and environmental conditions. Provide correct growth stage at time of sampling. Growth refers to week of bloom and can be coded B1 through B12 (the first week of bloom through the 12th week). Accurate management recommendations depend on this information.
Strawberry U-Pick Detailed Budget
A base production sequence, with per-acre costs based on 5-acre production for a typical North Carolina PYO annual hill strawberry plasticulture operation). Costs are based on 2023 prices and can differ between regions and operations.
| Month | Type operation | Equipment used | Materials used | Labor used | Summary Costs | Cumulative Costs | ||||||||||
|---|---|---|---|---|---|---|---|---|---|---|---|---|---|---|---|---|
| Type | Description | Equipment | Hrs | Cost/Hr | Eq Cost | Material(S) | Price | Unit | Qt | Mat. Cost | Hrs | Cost/Hr | Cost | |||
| June | ||||||||||||||||
| wk 1 | Soil test | Soil sample | $0.00 | each | 1.00 | $0.00 | ||||||||||
| wk 1 | Treat old crop with Gramoxone (x2) | 60 HP-WT & Sprayer | 3.000 | 19.772 | $59.32 | Gramoxone SL 2L | $2.05 | pint | 4.00 | $8.18 | 3.600 | $15.00 | $54.00 | $121.50 | ||
| wk 1 | Remove plastic from previous crop | Hand | 18.000 | $15.00 | $270.00 | $270.00 | ||||||||||
| 60 HP-WT & Lifter | 3.000 | 16.434 | $49.30 | 3.600 | $15.00 | $54.00 | $103.30 | |||||||||
| wk 2 | Dispose plastic and tape | Pickup | 1.000 | 14.161 | $14.16 | 1.200 | $15.00 | $18.00 | $32.16 | |||||||
| wk 2 | Disk | 60 HP-WT & Tandem | 1.000 | 17.930 | $17.93 | 1.200 | $15.00 | $18.00 | $35.93 | |||||||
| wk 2 | Lime | Custom | Lime | $54.75 | ton | 1.00 | $54.75 | $54.75 | ||||||||
| wk 2 | Plant cover crop | 60 HP-WT & Grain drill | 3.000 | 19.052 | $57.16 | 3.600 | $15.00 | $54.00 | $111.16 | |||||||
| Soybean | Soybean (cover crop) | $0.40 | lb | 80.00 | $32.00 | $32.00 | ||||||||||
| Millet | Millet (cover crop) | $0.18 | lb | 40.00 | $7.20 | $7.20 | ||||||||||
| TOTAL June | $197.87 | $102.13 | 31.20 | $468.00 | $768.00 | $768.00 | ||||||||||
| TOTAL LAND PREPARATION STAGE | $197.87 | $102.13 | 31.20 | $468.00 | $768.00 | $768.00 | ||||||||||
| Month | Type operation | Equipment used | Materials used | Labor used | Summary Costs | Cumulative Costs | ||||||||||
|---|---|---|---|---|---|---|---|---|---|---|---|---|---|---|---|---|
| Type | Description | Equipment | Hrs | Cost/Hr | Eq Cost | Material(S) | Price | Unit | Qt | Mat. Cost | Hrs | Cost/Hr | Cost | |||
| July | ||||||||||||||||
| wk 1 | Order transplants and supplies | 0.500 | $32.73 | $16.37 | $16.37 | |||||||||||
| TOTAL July | $0.00 | $0.00 | 0.50 | $16.37 | $16.37 | $784.36 | ||||||||||
| August | ||||||||||||||||
| wk 1 | Soil test | Soil sample | $0.00 | each | 1.00 | $0.00 | ||||||||||
| wk 1 | Rotovate cover crop (x2) | 60 HP-WT & Rototiller | 6.000 | 17.369 | $104.21 | 7.200 | $15.00 | $108.00 | $212.21 | |||||||
| wk 2 | Subsoiling | 60 HP-WT & Subsoiler | 1.500 | 13.711 | $20.57 | 1.800 | $15.00 | $27.00 | $47.57 | |||||||
| wk 2 | Break up soil clods | 60 HP-WT & Tandem | 0.278 | 17.930 | $4.98 | 0.334 | $15.00 | $5.00 | $9.99 | |||||||
| TOTAL August | $129.76 | $0.00 | 9.33 | $140.00 | $269.77 | $1,054.13 | ||||||||||
| September | ||||||||||||||||
| wk 1 | Rotovate for fumigation | 60 HP-WT & Rototiller | 3.000 | 17.369 | $52.11 | 3.600 | $15.00 | $54.00 | $106.11 | |||||||
| wk 1 | Preplant fertilizing | 30 HP-WT & Rot Spreader | 0.750 | 8.791 | $6.59 | 0.900 | $15.00 | $13.50 | $20.09 | |||||||
| Ammonium sulfate (60 lb N/acre) | Ammonium Sulfate (35 lb N/acre) | $0.27 | lb | 285.70 | $77.14 | $77.14 | ||||||||||
| Potassium sulfate (60 lb K20, 22 lb S/acre) | Potassium Sulfate (60 lb K20, 22 lb S/acre) | $0.51 | lb | 120.00 | $60.60 | $60.60 | ||||||||||
| Triple superphosphate (50 lb P20) | Triple superphosphate (50 lb P20) | $0.39 | lb | 100.00 | $38.50 | $38.50 | ||||||||||
| wk 2 | Preplant fumigation | Custom fumigation, bed shaping, drip tape laying, and plastic laying | $2,250.00 | acre | 1.00 | $2,250.00 | 0.000 | $32.73 | $0.00 | $2,250.00 | ||||||
| wk 2 | Seed ryegrass in aisles | 30 HP-WT & Rot Spreader | 0.750 | 8.791 | $6.59 | Ryegrass (aisles) | $0.94 | lb | 20.00 | $18.87 | 0.900 | $15.00 | $13.50 | $38.96 | ||
| TOTAL PRE-PLANT STAGE | $195.06 | $2,445.11 | 15.23 | $237.37 | $2,877.53 | $3,645.53 | ||||||||||
| Month | Type operation | Equipment used | Materials used | Labor used | Summary Costs | Cumulative Costs | ||||||||||
|---|---|---|---|---|---|---|---|---|---|---|---|---|---|---|---|---|
| Type | Description | Equipment | Hrs | Cost/Hr | Eq Cost | Material(S) | Price | Unit | Qt | Mat. Cost | Hrs | Cost/Hr | Cost | |||
| September | ||||||||||||||||
| wk 3 | Pay for transplants | Strawberry plugs | $280.00 | 1000 plants | 15.00 | $4,200.00 | $4,200.00 | |||||||||
| wk 4 | Transplant plugs | 60 HP-WT & Water Wheel | 6.000 | 13.441 | $80.65 | 30.000 | $15.00 | $450.00 | $530.65 | |||||||
| wk 4 | Irrigate plugs (x3) | 30 HP-WT & OH Irrigation System | 9.000 | 25.549 | $229.94 | 10.800 | $15.00 | $162.00 | $391.94 | |||||||
| TOTAL September | $375.88 | $6,645.11 | 46.20 | $693.00 | $7,713.99 | $8,768.12 | ||||||||||
| October | ||||||||||||||||
| wk 1 | Replant (5%) | Hand | Strawberry plugs - replant (5%) | $280.00 | 1000 plants | 0.75 | $210.00 | 1.500 | $15.00 | $22.50 | $232.50 | |||||
| wk 1 | Drip irrigation | Drip System | 2.000 | 6.794 | $13.59 | 0.200 | $32.73 | $6.55 | $20.13 | |||||||
| wk 2 | Inject Ridomil Gold EC | Drip System & Injector | 2.000 | 7.198 | $14.40 | Ridomil Gold EC | $112.98 | pint | 0.50 | $56.49 | 1.000 | $32.73 | $32.73 | $103.62 | ||
| wk 3 | Spray mites (Acramite) | 60 HP-WT & Sprayer | 0.650 | 19.772 | $12.85 | Acramite 50 WS | $73.88 | lb | 1.00 | $73.88 | 0.780 | $15.00 | $11.70 | $98.43 | ||
| wk 3 | Drip irrigation | Drip System | 2.000 | 6.794 | $13.59 | 0.200 | $32.73 | $6.55 | $20.13 | |||||||
| wk 3 | Tissue sample | Hand | Tissue sample | $5.00 | each | 1.00 | $5.00 | 0.250 | $15.00 | $3.75 | $8.75 | |||||
| wk 4 | Winterize drip system | Hand | 2.000 | $15.00 | $30.00 | $30.00 | ||||||||||
| TOTAL October | $54.42 | $345.37 | 5.93 | $113.77 | $513.56 | $9,281.68 | ||||||||||
| November | ||||||||||||||||
| wk 1 | Anthracnose spray and deer control | 60 HP-WT & Sprayer | 0.650 | 19.772 | $12.85 | 0.780 | $15.00 | $11.70 | $24.55 | |||||||
| Captan 50W | Captan 50 W | $7.42 | lb | 3.00 | $22.27 | $22.27 | ||||||||||
| Spotrete | Spotrete | $68.97 | gal | 2.50 | $172.43 | $172.43 | ||||||||||
| Nu Film 17 | Nu Film P | $7.95 | pint | 1.00 | $7.95 | $7.95 | ||||||||||
| TOTAL November | $12.85 | $202.65 | 0.78 | $11.70 | $227.20 | $9,508.88 | ||||||||||
| TOTAL TRANS-PLANT STAGE | $377.86 | $4,748.01 | 47.51 | $737.47 | $5,863.35 | $9,508.88 | ||||||||||
| Month | Type operation | Equipment used | Materials used | Labor used | Summary Costs | Cumulative Costs | ||||||||||
|---|---|---|---|---|---|---|---|---|---|---|---|---|---|---|---|---|
| Type | Description | Equipment | Hrs | Cost/Hr | Eq Cost | Material(S) | Price | Unit | Qt | Mat. Cost | Hrs | Cost/Hr | Cost | |||
| December | ||||||||||||||||
| wk 1 | Weed beds, remove runners | Hand | 24.000 | $15.00 | $360.00 | $360.00 | ||||||||||
| wk 1 | Dormant spray (Captan 50 W) | 60 HP-WT & Sprayer | 0.650 | 19.772 | $12.85 | Captan 50 W | $7.42 | lb | 3.00 | $22.27 | 0.780 | $15.00 | $11.70 | $46.82 | ||
| wk 2 | Apply floating row covers | Hand | Row covers | $1,250.00 | per acre | 1.00 | $1,250.00 | 4.000 | $15.00 | $60.00 | $1,310.00 | |||||
| Apply row cover hold downs | 30 HP-WT | 0.108 | 7.669 | $0.83 | Row cover hold downs (mesh bag with rocks) | $1.00 | bag | 500.00 | $500.00 | 2.000 | $15.00 | $30.00 | $530.83 | |||
| TOTAL December | $13.68 | $1,772.27 | 30.78 | $461.70 | $2,247.65 | $11,756.53 | ||||||||||
| January | ||||||||||||||||
| wk 2 | Order supplies | 0.500 | $32.73 | $16.37 | $16.37 | |||||||||||
| wk 3 | Remove row cover | Hand | 6.000 | $15.00 | $90.00 | $90.00 | ||||||||||
| wk 4 | Remove dead foliage, weed beds | Hand | 40.000 | $15.00 | $600.00 | $600.00 | ||||||||||
| TOTAL January | $0.00 | $0.00 | 46.50 | $706.37 | $706.37 | $12,462.89 | ||||||||||
| February | ||||||||||||||||
| wk 2 | Scout for insects, mites | 1.000 | $15.00 | $15.00 | $15.00 | |||||||||||
| wk 2 | Re-apply row covers | Hand | 6.000 | $15.00 | $90.00 | $90.00 | ||||||||||
| TOTAL DORMANT STAGE | $13.68 | $1,772.27 | 84.28 | $1,273.07 | $3,059.01 | $12,567.89 | ||||||||||
| Month | Type operation | Equipment used | Materials used | Labor used | Summary Costs | Cumulative Costs | ||||||||||
|---|---|---|---|---|---|---|---|---|---|---|---|---|---|---|---|---|
| Type | Description | Equipment | Hrs | Cost/Hr | Eq Cost | Material(S) | Price | Unit | Qt | Mat. Cost | Hrs | Cost/Hr | Cost | |||
| February | ||||||||||||||||
| wk 3 | Pull plants through plastic | Hand | 15.000 | $15.00 | $225.00 | $225.00 | ||||||||||
| wk 3 | Apply herbicide to aisles | 60 HP-WT & Sprayer | 0.650 | 19.772 | $12.85 | 0.780 | $15.00 | $11.70 | $24.55 | |||||||
| Poast 1.5EC | Poast 1.5 EC | $13.80 | pint | 1.50 | $20.69 | $20.69 | ||||||||||
| Crop oil concentrate | Crop oil concentrate | $5.02 | quart | 1.00 | $5.02 | $5.02 | ||||||||||
| wk 3 | Scout for insects, mites | 1.000 | $32.73 | $32.73 | $32.73 | |||||||||||
| wk 3 | Remove row covers | Hand | 6.000 | $15.00 | $90.00 | $90.00 | ||||||||||
| wk 3 | Spray mites, fire ants and deer control | 60 HP-WT & Sprayer | 0.650 | 19.772 | $12.85 | 0.780 | $15.00 | $11.70 | $24.55 | |||||||
| Savey | Savey 50 DF | $21.63 | oz | 7.00 | $151.38 | $151.38 | ||||||||||
| Esteem | Extinguish Professional Fire Ant Bait 0.5 % B | $8.48 | lb | 2.00 | $16.95 | $16.95 | ||||||||||
| Spotrete | Spotrete | $68.97 | gal | 2.50 | $172.43 | $172.43 | ||||||||||
| Nu Film 17 | Nu Film P | $7.95 | pint | 1.00 | $7.95 | $7.95 | ||||||||||
| wk 4 | Connect drip system | Hand | 6.000 | $15.00 | $90.00 | $90.00 | ||||||||||
| wk 4 | Inject Ridomil Gold EC | Drip System & Injector | 2.000 | 7.198 | $14.40 | Ridomil Gold EC | $112.98 | pint | 0.50 | $56.49 | 1.000 | $32.73 | $32.73 | $103.62 | ||
| wk 4 | Check irrigation system | Hand | 0.500 | $32.73 | $16.37 | $16.37 | ||||||||||
| wk 4 | Scout for strawberry weevil | 1.000 | $32.73 | $32.73 | $32.73 | |||||||||||
| TOTAL February | $40.10 | $430.91 | 39.06 | $647.96 | $1,118.96 | $13,581.85 | ||||||||||
| March | ||||||||||||||||
| wk 1 | Tissue sample | Hand | Tissue sample | $5.00 | each | 1.00 | $5.00 | 0.500 | $15.00 | $7.50 | $12.50 | |||||
| wk 1 | Pull plants and weed | Hand | 10.000 | $15.00 | $150.00 | $150.00 | ||||||||||
| wk 1 | Inject fertilizer | Drip System & Injector | 2.000 | 7.198 | $14.40 | 1.000 | $32.73 | $32.73 | $47.13 | |||||||
| Calcium nitrate (0.75lb N/day) (x2) | Calcium Nitrate (0.75 lb N/day) | $0.44 | lb | 33.87 | $14.90 | $14.90 | ||||||||||
| Sul-Po-Mg | Sul-Po-Mg | $0.31 | lb | 10.00 | $3.10 | $3.10 | ||||||||||
| Boron (11% Solubor - 1/8lb/acre) | Boron (11% Solubor - 1/8 lb/acre) | $0.35 | lb | 1.14 | $0.40 | $0.40 | ||||||||||
| wk 1 | Re-apply row covers | Hand | 6.000 | $15.00 | $90.00 | $90.00 | ||||||||||
| wk 2 | Remove row cover | Hand | 6.000 | $15.00 | $90.00 | $90.00 | ||||||||||
| wk 2 | Scout for insects, mites | 1.000 | $32.73 | $32.73 | $32.73 | |||||||||||
| wk 2 | Spray mites (Acramite) | 60 HP-WT & Sprayer | 0.650 | 19.772 | $12.85 | Acramite 50 WS | $73.88 | lb | 1.00 | $73.88 | 0.780 | $15.00 | $11.70 | $98.43 | ||
| Switch 62.5 WG | Switch 62.5 WG | $5.58 | oz | 14.00 | $78.12 | $78.12 | ||||||||||
| Cabrio EC | Cabrio EG | $2.48 | oz | 14.00 | $34.77 | $34.77 | ||||||||||
| wk 2 | Freeze protection | OH Irrigation System | 10.000 | 12.108 | $121.08 | 5.000 | $32.73 | $163.65 | $284.73 | |||||||
| wk 2 | Inject fertilizer | Drip System & Injector | 2.000 | 7.198 | $14.40 | 1.000 | $32.73 | $32.73 | $47.13 | |||||||
| Calcium nitrate (0.75lb N/day) | Calcium Nitrate (0.75 lb N/day) | $0.44 | lb | 33.87 | $14.90 | $14.90 | ||||||||||
| Sul-Po-Mg | Sul-Po-Mg | $0.31 | lb | 10.00 | $3.10 | $3.10 | ||||||||||
| wk 3 | Tissue sample | Hand | Tissue sample | $5.00 | each | 1.00 | $5.00 | 0.500 | $15.00 | $7.50 | $12.50 | |||||
| wk 3 | Freeze protection | OH Irrigation System | 10.000 | 12.108 | $121.08 | 5.000 | $32.73 | $163.65 | $284.73 | |||||||
| wk 3 | Re-apply row covers | Hand | 6.000 | $15.00 | $90.00 | $90.00 | ||||||||||
| wk 3 | Remove row cover | Hand | 6.000 | $15.00 | $90.00 | $90.00 | ||||||||||
| wk 3 | Pollinate with bees | Rental | Beehive (rental cost) | $50.00 | hive | 1.00 | $50.00 | $50.00 | ||||||||
| wk 3 | Spray Captan 5OWG | 60 HP-WT & Sprayer | 0.650 | 19.772 | $12.85 | Captan 50 W | $7.42 | lb | 3.00 | $22.27 | 0.780 | $15.00 | $11.70 | $46.82 | ||
| wk 3 | Inject fertilizer | Drip System & Injector | 2.000 | 7.198 | $14.40 | 1.000 | $32.73 | $32.73 | $47.13 | |||||||
| Calcium nitrate (0.75lb N/day) (x2) | Calcium Nitrate (0.75 lb N/day) | $0.44 | lb | 33.87 | $14.90 | $14.90 | ||||||||||
| Sul-Po-Mg | Sul-Po-Mg | $0.31 | lb | 10.00 | $3.10 | $3.10 | ||||||||||
| wk 4 | Scout for fire ants, clipper, mites | 1.000 | $32.73 | $32.73 | $32.73 | |||||||||||
| wk 4 | Treat fire ants (Esteem) | 60 HP-WT & Sprayer | 0.650 | 19.772 | $12.85 | Extinguish Professional Fire Ant Bait 0.5 % B | $8.48 | lb | 2.00 | $16.95 | 0.780 | $15.00 | $11.70 | $41.50 | ||
| Switch 62.5 WG | Switch 62.5 WG | $5.58 | oz | 14.00 | $78.12 | $78.12 | ||||||||||
| Cabrio EC | Cabrio EG | $2.48 | oz | 14.00 | $34.77 | $34.77 | ||||||||||
| wk 4 | Inject fertilizer | Drip System & Injector | 2.000 | 7.198 | $14.40 | 1.000 | $32.73 | $32.73 | $47.13 | |||||||
| Calcium nitrate (0.75lb N/day) (x2) | Calcium Nitrate (0.75 lb N/day) | $0.44 | lb | 33.87 | $14.90 | $14.90 | ||||||||||
| Sul-Po-Mg | Sul-Po-Mg | $0.31 | lb | 10.00 | $3.10 | $3.10 | ||||||||||
| TOTAL March | $338.29 | $471.28 | 53.34 | $1,083.78 | $1,893.34 | $15,475.20 | ||||||||||
| April | ||||||||||||||||
| wk 1 | Freeze protection | OH Irrigation System | 8.000 | 12.108 | $96.86 | 4.000 | $32.73 | $130.92 | $227.78 | |||||||
| wk 1 | Spray Captan 5OWG | 60 HP-WT & Sprayer | 0.650 | 19.772 | $12.85 | Captan 50 W | $7.42 | lb | 3.00 | $22.27 | 0.780 | $15.00 | $11.70 | $46.82 | ||
| wk 1 | Inject fertilizer | Drip System & Injector | 2.000 | 7.198 | $14.40 | 1.000 | $32.73 | $32.73 | $47.13 | |||||||
| Calcium nitrate (0.75lb N/day) | Calcium Nitrate (0.75 lb N/day) | $0.44 | lb | 33.87 | $14.90 | $14.90 | ||||||||||
| Sul-Po-Mg | Sul-Po-Mg | $0.31 | lb | 10.00 | $3.10 | $3.10 | ||||||||||
| wk 2 | Tissue sample | Hand | Tissue sample | $5.00 | each | 1.00 | $5.00 | 0.250 | $15.00 | $3.75 | $8.75 | |||||
| wk 2 | Freeze protection | OH Irrigation System | 6.000 | 12.108 | $72.65 | 3.000 | $32.73 | $98.19 | $170.84 | |||||||
| wk 2 | Spray mites and fire ants (Kanemite) | 60 HP-WT & Sprayer | 0.650 | 19.772 | $12.85 | Kanemite 15 SC | $3.00 | oz | 31.00 | $92.85 | 0.780 | $15.00 | $11.70 | $117.40 | ||
| Esteem | Extinguish Professional Fire Ant Bait 0.5 % B | $8.48 | lb | 2.00 | $16.95 | $16.95 | ||||||||||
| Cabrio EC | Cabrio EG | $2.48 | oz | 14.00 | $34.77 | $34.77 | ||||||||||
| wk 2 | Inject fertilizer | Drip System & Injector | 2.000 | 7.198 | $14.40 | 1.000 | $32.73 | $32.73 | $47.13 | |||||||
| Calcium nitrate (0.75lb N/day) | Calcium Nitrate (0.75 lb N/day) | $0.44 | lb | 33.87 | $14.90 | $14.90 | ||||||||||
| Sul-Po-Mg | Sul-Po-Mg | $0.31 | lb | 10.00 | $3.10 | $3.10 | ||||||||||
| wk 3 | Inject fertilizer | Drip System & Injector | 2.000 | 7.198 | $14.40 | 1.000 | $32.73 | $32.73 | $47.13 | |||||||
| Potassium nitrate (0.50N/day) | Potassium nitrate (0.50 N/day) | $0.43 | lb | 53.85 | $23.16 | $23.16 | ||||||||||
| TOTAL PRE-HARVEST STAGE | $616.78 | $1,133.18 | 97.21 | $1,981.19 | $3,731.14 | $16,299.04 | ||||||||||
| Month | Type operation | Equipment used | Materials used | Labor used | Summary Costs | Cumulative Costs | ||||||||||
|---|---|---|---|---|---|---|---|---|---|---|---|---|---|---|---|---|
| Type | Description | Equipment | Hrs | Cost/Hr | Eq Cost | Material(S) | Price | Unit | Qt | Mat. Cost | Hrs | Cost/Hr | Cost | |||
| April | ||||||||||||||||
| wk 3 | Field sanitation units | Field Sanitation Units 2 months (Toilet & Handwashing Facility) | $150.00 | month | 1.00 | $150.00 | $150.00 | |||||||||
| wk 3 | PYO supervision | 6.000 | $15.00 | $90.00 | $90.00 | |||||||||||
| wk 3 | Check-out area | 4 Quart Vented Basket | $1.16 | each | 300.00 | $348.00 | 6.000 | $15.00 | $90.00 | $438.00 | ||||||
| wk 3 | Pre-pick harvest labor | 19.800 | $13.64 | $270.00 | $270.00 | |||||||||||
| wk 4 | PYO supervision | 8.000 | $15.00 | $120.00 | $120.00 | |||||||||||
| wk 4 | Check-out area | 4 Quart Vented Basket | $1.16 | each | 450.00 | $522.00 | 8.000 | $15.00 | $120.00 | $642.00 | ||||||
| wk 4 | Pre-pick harvest labor | 29.700 | $13.64 | $405.00 | $405.00 | |||||||||||
| wk 4 | Drip irrigation | Drip System | 2.000 | 6.794 | $13.59 | 0.200 | $32.73 | $6.55 | $20.13 | |||||||
| wk 4 | Spray mites (Kanemite) | 60 HP-WT & Sprayer | 0.650 | 19.772 | $12.85 | Kanemite 15 SC | $3.00 | oz | 31.00 | $92.85 | 0.780 | $15.00 | $11.70 | $117.40 | ||
| Botrytis control (Captan) | Captan 50 W | $7.42 | lb | 3.00 | $22.27 | $22.27 | ||||||||||
| wk 4 | Inject fertilizer | Drip System & Injector | 2.000 | 7.198 | $14.40 | 1.000 | $32.73 | $32.73 | $47.13 | |||||||
| Calcium nitrate (0.75lb N/day) | Calcium Nitrate (0.75 lb N/day) | $0.44 | lb | 33.87 | $14.90 | $14.90 | ||||||||||
| Sul-Po-Mg | Sul-Po-Mg | $0.31 | lb | 10.00 | $3.10 | $3.10 | ||||||||||
| TOTAL April | $279.23 | $1,384.11 | 91.29 | $1,500.43 | $3,163.77 | $18,638.96 | ||||||||||
| May | ||||||||||||||||
| wk 1 | Field sanitation units | Field Sanitation Units 2 months (Toilet & Handwashing Facility) | $150.00 | month | 1.00 | $150.00 | $150.00 | |||||||||
| wk 1 | Tissue sample | Hand | Tissue sample | $5.00 | each | 1.00 | $5.00 | 0.250 | $15.00 | $3.75 | $8.75 | |||||
| wk 1 | Inject fertilizer | Drip System & Injector | 2.000 | 7.198 | $14.40 | 1.000 | $32.73 | $32.73 | $47.13 | |||||||
| Potassium nitrate (0.50N/day) | Potassium nitrate (0.50 N/day) | $0.43 | lb | 53.85 | $23.16 | $23.16 | ||||||||||
| wk 1 | Drip irrigation | Drip System | 2.000 | 6.794 | $13.59 | 0.200 | $32.73 | $6.55 | $20.13 | |||||||
| wk 1 | Spray mites (Radiant) | 60 HP-WT & Sprayer | 0.650 | 19.772 | $12.85 | Radiant SC | $8.56 | oz | 10.00 | $85.55 | 0.780 | $15.00 | $11.70 | $110.10 | ||
| Botrytis control (Elevate) | Elevate 50 WDG | $54.48 | lb | 1.50 | $81.72 | $81.72 | ||||||||||
| wk 1 | PYO supervision | 10.000 | $15.00 | $150.00 | $150.00 | |||||||||||
| wk 1 | Check-out area | 4 Quart Vented Basket | $1.16 | each | 750.00 | $870.00 | 10.000 | $15.00 | $150.00 | $1,020.00 | ||||||
| wk 1 | Pre-pick harvest labor | 49.500 | $13.64 | $675.00 | $675.00 | |||||||||||
| wk 2 | Inject fertilizer | Drip System & Injector | 2.000 | 7.198 | $14.40 | 1.000 | $32.73 | $32.73 | $47.13 | |||||||
| Calcium nitrate (0.75lb N/day) | Calcium Nitrate (0.75 lb N/day) | $0.44 | lb | 33.87 | $14.90 | $14.90 | ||||||||||
| wk 2 | Drip irrigation | Drip System | 2.000 | 6.794 | $13.59 | 0.200 | $32.73 | $6.55 | $20.13 | |||||||
| wk 2 | PYO supervision | 12.000 | $15.00 | $180.00 | $180.00 | |||||||||||
| wk 2 | Check-out area | 4 Quart Vented Basket | $1.16 | each | 600.00 | $696.00 | 12.000 | $15.00 | $180.00 | $876.00 | ||||||
| wk 2 | Pre-pick harvest labor | 39.600 | $13.64 | $540.00 | $540.00 | |||||||||||
| wk 3 | Drip irrigation | Drip System | 4.000 | 6.794 | $27.17 | 0.400 | $32.73 | $13.09 | $40.27 | |||||||
| wk 3 | PYO supervision | 10.000 | $15.00 | $150.00 | $150.00 | |||||||||||
| wk 3 | Check-out area | 4 Quart Vented Basket | $1.16 | each | 450.00 | $522.00 | 10.000 | $15.00 | $150.00 | $672.00 | ||||||
| wk 3 | Pre-pick harvest labor | 29.700 | $13.64 | $405.00 | $405.00 | |||||||||||
| wk 3 | Botrytis control (Elevate) | 60 HP-WT & Sprayer | 0.650 | 19.772 | $12.85 | Elevate 50 WDG | $54.48 | lb | 1.50 | $81.72 | 0.780 | $15.00 | $11.70 | $106.27 | ||
| wk 4 | Drip irrigation | Drip System | 4.000 | 6.794 | $27.17 | 0.400 | $32.73 | $13.09 | $40.27 | |||||||
| wk 4 | PYO supervision | 6.000 | $15.00 | $90.00 | $90.00 | |||||||||||
| wk 4 | Check-out area | 4 Quart Vented Basket | $1.16 | each | 450.00 | $522.00 | 6.000 | $15.00 | $90.00 | $612.00 | ||||||
| wk 4 | Pre-pick harvest labor | 29.700 | $13.64 | $405.00 | $405.00 | |||||||||||
| wk 4 | Dis-assemble irrigation system | 6.000 | $15.00 | $90.00 | $90.00 | |||||||||||
| TOTAL May | $136.02 | $3,052.05 | 235.51 | $3,386.89 | $6,574.95 | $25,213.91 | ||||||||||
| TOTAL HARVEST STAGE | $176.85 | $4,205.17 | 314.99 | $4,532.86 | $8,914.88 | $25,213.91 | ||||||||||
| TOTAL PER GROWING SEASON | $1,578.10 | $14,405.87 | 590.42 | $9,229.95 | $25,213.91 | |||||||||||
| Month | Type operation | Equipment used | Materials used | Labor used | Summary Costs | Cumulative Costs | ||||||||||
|---|---|---|---|---|---|---|---|---|---|---|---|---|---|---|---|---|
| Type | Description | Equipment | Hrs | Cost/Hr | Eq Cost | Material(S) | Price | Unit | Qt | Mat. Cost | Hrs | Cost/Hr | Cost | |||
| Real Estate Taxes | Real Estate Taxes | $25.00 | 1 acre | 1.00 | $25.000 | $25.00 | ||||||||||
| Net Land Rent | Net Land Rent | $150.00 | 1 acre | 1.00 | $150.000 | $150.00 | ||||||||||
| Overhead | Overhead | $25.00 | 1 acre | 1.00 | $25.000 | $25.00 | ||||||||||
| Other | Other | $0.00 | 1 acre | 1.00 | $0.000 | $0.00 | ||||||||||
| Total Annual Administrative Costs + Taxes | $200.000 | $200.000 | $25,413.91 | |||||||||||||
| Cumulative Total | $25,413.91 | |||||||||||||||
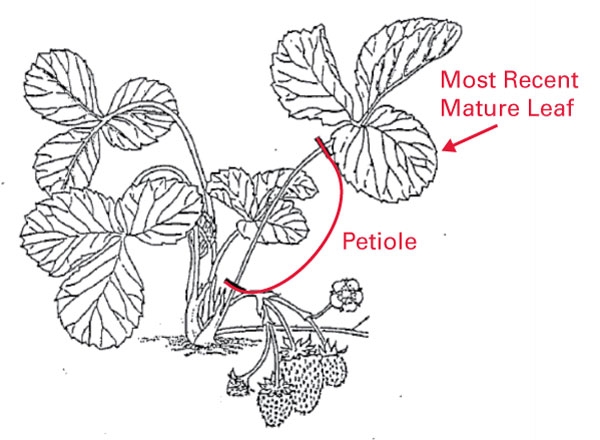
Figure A-1. Illustration of strawberry physiology with most recent mature leaf and petiole labeled.
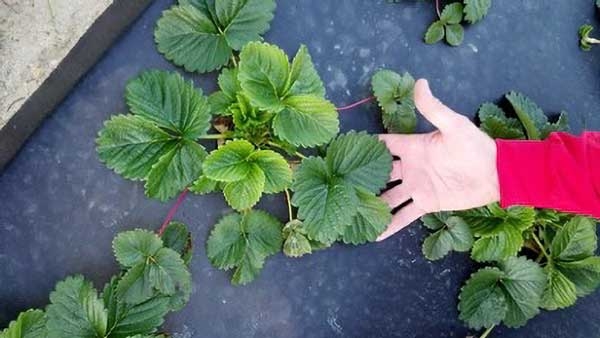
Figure A-2. Approximate location of the most recent mature leaf in strawberry.
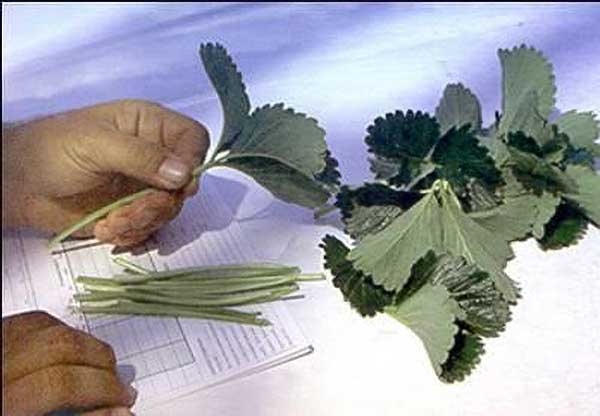
Figure A-3. Detach strawberry leaflets from petioles immediately after field collection and before submission.
Publication date: April 26, 2024
AG-645
Recommendations for the use of agricultural chemicals are included in this publication as a convenience to the reader. The use of brand names and any mention or listing of commercial products or services in this publication does not imply endorsement by NC State University or N.C. A&T State University nor discrimination against similar products or services not mentioned. Individuals who use agricultural chemicals are responsible for ensuring that the intended use complies with current regulations and conforms to the product label. Be sure to obtain current information about usage regulations and examine a current product label before applying any chemical. For assistance, contact your local N.C. Cooperative Extension county center.
N.C. Cooperative Extension prohibits discrimination and harassment regardless of age, color, disability, family and marital status, gender identity, national origin, political beliefs, race, religion, sex (including pregnancy), sexual orientation and veteran status.