
About This Publication
Many timberland owners value their land for more than just timber. They realize that the land can provide many benefits and that management plans can be designed to achieve these benefits. A North Carolina survey shows that aesthetics is the primary reason many people own timberland.1 Other benefits include recreation, timber production, water quality protection, and wildlife preservation.
Improving small woodlands is a step-by-step process. This publication will help woodland owners become familiar with these steps, with the concepts of woodscaping, and with ways to integrate concerns for wildlife, beauty, and resource management in a manner that is compatible with current land-use activities.
1 Report of the Governor’s Task Force on Forest Sustainability. 1996. Raleigh, NC, 54 pp. Responses are from 25% of the owners surveyed, which represents 10% of the timberland in North Carolina. ↲
Developing a Plan
Before you start managing your woodland, you need an orderly plan for reaching specific goals. Management plans can help you improve aesthetics and water quality, enhance wildlife habitat, and increase recreational benefits. Specific practices include thinning, crop tree management, wildlife plantings, trail development, and edge creation.
Some of these practices may also enhance timber management and production, which may offset their cost. Developing a management plan for your woodland involves the following:
- Finding out what you have
- Identifying potential management practices
- Assessing labor and financial resources
- Developing an activity schedule
- Keeping good records
For a sample management plan, see Appendix A.
Since forests take so long to grow, today’s decisions can have long-term impacts and benefits. A management plan can save you money, increase your profits, and decrease your taxes. Management plans consist of goals and objectives.
Goals are long-term desires or statements of future conditions. In all cases, goals should be consistent with your ultimate reason for owning the land. Goals must be realistic and achievable; they must be compatible with the resources available and the with the potential of the land. Examples of typical landowner goals are listed below:
- To improve the aesthetic value of the woodlot
- To improve wildlife habitat
Objectives are specific actions or concrete steps that refine goals into workable tasks. By fulfilling the various objectives, forest owners achieve their goals. Realistic, achievable objectives are specific, precise, and measurable; they also specify a target date of completion. Objectives guide management decisions and also help evaluate success and failure.
To understand the relationship between goals and objectives, consider the following examples.
Goal: To improve the aesthetic value of the woodlot . . .
Objective: by planting ten flowering dogwoods and releasing them from competition over the next five years.
Goal: To see wildlife . . .
Objective: by creating diverse cover types to increase the variety of song birds by 20% over the next 4 years.
If flowering dogwood trees do not survive or if the variety of song birds do not increase to 20%, the landowner will need to develop a new set of objectives.
Plans should be evaluated and adjusted every so often as goals and objectives change. The important thing is to develop and implement a plan. Seek advice when developing a plan. Talk with natural resource professionals about your ideas, and learn from their experience. Many times, such professionals can make on-site visits to discuss your plan and verify that your goals and objectives are ecologically possible, economically feasible, and socially and politically acceptable.
The following landowner profiles and questionnaires will help you develop goals and objectives for your woodland property.
Establish Priorities for Your Management Plan
Use the Establishing Priorities for Your Management Plan worksheet to establish priorities and develop objectives for managing your land by answering questions about the following:
- land use
- acreage
- priorities for the property
- activities the property is used for
- woodland management goals
- wildlife management orientation
- featured or target wildlife species
- soil and water management focus
- management constraints
- property history
- outstanding or unique features
- management philosophy ownership/family situation
Box 1. Landowner Profiles
Owners: Craig and Diane
Age: Mid-60s
Tract size: 5 acres
Distance to property: Home site
Interests: Walking, bird watching, visits from grandchildren
Constraints: Not physically capable of conducting manual work. Are fairly comfortable in retirement and are willing to pay for service to improve woodlot.
Goals: Want to provide a place for wildlife, improve the aesthetic value of the property, and have a place to walk and enjoy the woods.
Objectives: Increase the number of songbirds by scalloping the forest edge near the home site in year 1. Improve the attractiveness of the forest by crop tree release in year 1. Extend existing walking trail by building a foot bridge over the creek and developing a loop trail through the back five acres of property in year 2.
Owners: Chuck and Tamia
Age: Late 30s
Tract size: 35 acres
Distance to property: Future home site
Interests: hunting, hiking, camping
Constraints: Have small farm equipment and manpower to do wildlife and timber improvement. Would like to subsidize immediate projects with a partial harvest.
Goals: Make the family forest a source of recreational enjoyment, a place to enjoy nature, and a future home site.
Objectives: Do a partial harvest in year 1 using a forestry consultant. Improve recreational access by reseeding logging road and skid trails with clover and orchard grass following the harvest. Mow annually to maintain a clear walking path. Perform crop tree management annually to improve wildlife and aesthetics by removing poor quality hardwoods for firewood.
Obtaining Assistance
Some landowners are do-it-yourselfers who get satisfaction by working with their hands. And when actively managing your woodland, there will be plenty of tasks to do yourself. But even the most self-reliant owner occasionally needs advice, and most people need all the help they can get. One of the most difficult parts of problem solving is determining where to seek advice.
Contact information is available online for the local N.C. Cooperative Extension center (agent), the North Carolina Forest Service (County Ranger), the North Carolina Wildlife Resources Commission (County Wildlife Protector2), the Natural Resources Conservation Service (District Soil Conservationist), and the Farm Service Agency. When requesting information, be as specific as possible about the subjects that interest you. If you want information about pond management, a request for facts about fish may not produce the information you want.
Most organizations, agencies, and associations have both free and for-sale publications. Likewise, some slide sets and films are loaned free; others are rented or sold. Also, the number of free publications available may be limited. A list of available publications and visual aids, along with their accompanying cost is usually available upon request.
NC State Extension provides a wealth of information online about various topics related to forestry and wildlife.
The federal and state governments have implemented financial-incentive programs for woodlot owners. Many of these programs offer cost-share assistance to reimburse land owners for forest and wildlife management activities. Other programs include tax incentives, tax credits, and deductions for reforestation expenses. Many of the federal and state government programs require an approved management plan. Programs that provide cost share are listed below:
- The North Carolina Forest Development Program (FDP) (state funding)
- The North Carolina Agriculture Cost-Share Program (state funding)
- The Southern Pine Beetle Prevention Program (SPBPP) (federal funding)
- The Conservation Reserve Program (CRP) (federal funding)
- Environmental Quality Incentives Program (EQIP) (federal funding)
Tax credits and deductions are as follows:
- Reforestation tax credit and amortization deductions
- Exclusion of cost-sharing payments from income
- Annual deductions
- Long-term capital gains
- Forestry present-use valuation (property tax relief)
For further information on cost-share programs, contact your local N.C. Cooperative Extension Center, North Carolina Forest Service, Wildlife Resources Commission, Natural Resources Conservation Service, and Farm Service Agency in your area.
2 Do not ask for the game warden. Ask for the district biologist. Call 919-733-7291 for the local biologist. ↲
Planning the Landscape
Management for scenic beauty and diversity can be viewed as landscaping on a grand scale. Just as you might consider the size, color, arrangement, texture, and form of plants in your home or business landscape, so should you consider these factors when surveying your woodlands.
Defining Scale
Woodlands can be viewed at two levels or scales at the same time: as a number of small micro-landscapes or as one of a few macro-landscapes. Micro-landscapes are distinct areas within a woodland; they are usually visible from a single vantage point. They can include a dense pine stand, a shady oak grove, or a hillside. Micro-landscapes break up the uniformity of the woodland. Slight differences in light, tree density, and species composition characterize the woodland and affect the way the land is viewed and appreciated.
Macro-landscapes, on the other hand, refer to primary landforms and their scale, texture, contour, shape, and space. Macro-landscapes are fixed by natural formations and by the vegetative patterns established by traditional land use. They are usually visible from many vantage points and thus should be managed carefully. Be sure to evaluate carefully the effect that topography has on your management options. In mountainous forest terrain, management activities are elevated and on display for all to see. Visual and spatial impacts must be considered during the planning process before any management activities occur. Remember, management activities that affect or alter the visual appearance of familiar landscapes must conform to the macro-landscape.
Inventory the Property
The purpose of inventorying the property is to gain a better understanding of what you own. Inventories provide information about aesthetic issues, recreational possibilities, timber, wildlife, and water quality benefits. Anyone can take a simple inventory. The experience can be a useful project and an enjoyable recreational activity.
Landowners who do not want to hire a professional will find that a systematic inventory offers an opportunity to gain a better understanding of their land and its natural resources. A good inventory will provide landowners information necessary to develop a management plan. The information that one collects during an inventory will guide future land use activities. An inventory guide and a method for measuring trees can be found in Appendix B and Appendix C.
To begin an inventory, sit down and think about what you want to know about your land. Do you want to know the number of trees per acre and the quality of those trees as timber? What about wildlife habitat? Or the number of snags per acre? Do you have deeds, surveys, or maps of your land? These are just some of the questions you need to ask when you develop a property inventory.
One of the best ways to take inventory is by using aerial photographs, which provide a bird’s-eye view of land uses and vegetative cover within your boundaries and on adjacent land. Your tax department, local Natural Resources Conservation Service (NRCS), or Farm Services Agency (FSA) offices should have aerial photographs of your land on file.
Once you obtain an aerial photo of your land, you can use a sketch or photocopy to develop a working map that can be taken into the woods for closer survey.
Preparing a Resource Map
A useful resource map might include clearings, property boundaries, prominent land and water features (e.g., ponds, creeks, ridges, or swamps), and details on current or past land uses. The map might also include roads, trails, and developed areas such as houses or recreation sites; soil types or classes; unique and sensitive areas such as waterfalls or vistas; and the location of special projects such as wildlife improvement areas, firewood reserves, or wildflower meadows.
Fitting all of this information on a single map can be difficult. Choose a workable map scale, and be selective when compiling the map. Put the most important features in plain view. To avoid clutter, you may choose to make several copies for separate resource maps, or you may want to create separate, clear acetate overlays and use transparent markers to highlight features. Overlays are especially useful because they put the total resource puzzle together and simplify your management decisions. Regardless of your approach, always display and record resources with enough detail to make sound decisions later.
One way to visualize the outcome of various management options is to make photocopies of panoramic photographs. With colored pencils, you can mark proposed treatments — such as clearings, thinnings, and so on — on these photocopies. This inexpensive process depicts potential visual impacts without physically removing any vegetation. Use this simple method to explore different management options before making final decisions.
Identifying Diversity
Your aerial photograph can also be used to create a diversity map, which can help identify areas where more than three vegetational or successional types converge. These areas are associated with high levels of wildlife activity and can be easily managed or reworked to improve diversity. The map can also help you identify and maintain corridors (important travel routes for wildlife). Figure 1 demonstrates five different management types: open field; young stand (10 to 20 years old); mature stand (45 to 55 years old); riparian zone; bottomland stand (35 to 45 years old).
Note all resource information is suitable for display on a map. Wildlife, timber, and other high-value resources usually require detailed inventories; records are typically kept on tally sheets.
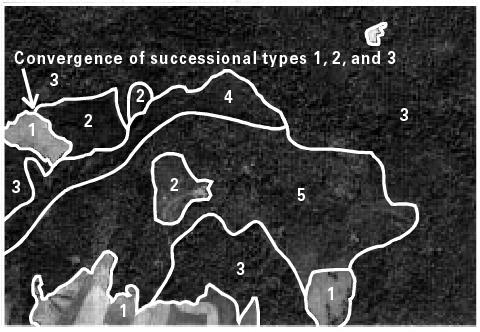
Figure 1. A diversity map depicting five management types: (1) open field; (2) young stand; (3) mature stand; (4) riparian zone; (5) bottomland stand. High levels of wildlife diversity occur where 1, 2, and 3 converge on the left side of the figure.
Woodscaping
When the planning process is complete and the inventory conducted, you are ready to implement your plan. How are you going to do it? What technique and services are available?
Woodscaping may provide the answer to these questions. It is the art and science of enhancing aesthetics, recreational opportunities, and wildlife habitats by using forest management principles and practices. Woodscaping assumes a landscaping point of view: it is service-oriented and emphasizes the residual forest.
Landowners often have to pay for woodscaping services, and the costs of such services may not be offset by forest products. In that sense, woodscaping differs from the product-oriented logging business. This difference should not suggest that landowners interested in woodscaping are not interested in producing timber products or other alternative products. Woodscaping can blend service-oriented and production-oriented forestry to achieve multiple goals. As a consequence, landowners can make ecologically and socially aware decisions about how to manage and defray woodscaping costs by using funds earned from wood products.
Woodscaping is for the small woodlot owner (i.e., someone who owns somewhere from 1 to 40 acres). Site preparation, planting, weeding, thinning, and pruning are all components of woodscaping and all performed with small equipment. When used to manipulate forested land, these techniques can enhance aesthetics, recreation opportunities, wildlife diversity and woodlot health.
Site Preparation and Planting
Because of natural regeneration, seedlings need not be planted on many woodlots. Natural regeneration occurs through the combination of (1) some disturbance (harvesting, tree blow-down) and (2) sprouts, root suckers, or natural seed sources that reestablish a stand of trees.
Woodlot owners sometimes plant seedlings or employ direct seeding (artificial regeneration) to change species composition, improve wildlife habitat, or enhance aesthetic quality. For artificial regeneration to be a success, the site must be carefully prepared and competition carefully controlled.
Proper site-preparation is essential to seedling establishment and survival. Preparation methods can vary widely. For large planting jobs, heavy equipment is sometimes required; on other jobs, hand tools can be used to scrape away the competition. Some common tools and issues related to site preparation are listed below.
Machines
Heavy machinery such as a bulldozer may be needed if a large area is to be planted. Using heavy machinery is an expensive alternative, but it is often the most effective way to control hardwood competition.
Fire
Used with care, prescribed burning is a good way to clean up debris (called slash) and control hardwood competition while improving wildlife habitat and enhancing aesthetics. Wildlife habitat is improved because food and cover are increased after burning. Aesthetic qualities are enhanced because burning increases plant diversity and produces a more transparent (open) stand. Burning is often conducted in older pine stands (30 or more years) in the coastal plains and piedmont. Burning a site prior to planting also opens up the site allowing for easier access for planting crews.
Poor-quality, low-value, shade-tolerant hardwoods, if not controlled, often crowd out young pine seedlings and eventually dominate the stand. Prescribed burning can be very effective in controlling hardwood competition when trees are less than three inches in diameter; such burning is most effective in controlling hardwood competition during spring or summer burns. Later in the year, hardwoods have used their stored carbohydrates in producing new leaves and initial height growth.
When burned during this period, hardwoods are less likely to sprout back and survive. Landowners interested in prescribed burning can contact their local county forest ranger for assistance.
Herbicides
Herbicides can be a safe, economical alternative to manual or mechanical methods, since herbicides may be broadcast by air or ground (Figure 2). They can also be used to treat individual stems by tree injection, stump treatment, or basal spraying. Herbicides applied shortly after plants leaf-out or green-up will be most effective at controlling undesirable competition. Applied in the fall, herbicides will have less impact visually because hardwoods are losing their leaves.
The success of chemical weed control depends on the size, density, and composition of vegetation; on the kind and formulation of herbicide; on the volume and timing of application; and on proper equipment selection and calibration. Herbicides applied according to the label can be used with a minimal risk to humans, wildlife, soil, air, or water.
Other Alternatives
Hand tools can provide an effective, inexpensive method for clearing small areas, often just around the area where the seedling will be planted. Tools often used in clearing include the machete, hoe, shovel, and bush-ax.
Source of Seedlings
Seedlings can be obtained through a variety of commercial and government-owned nurseries. To find out about nurseries in your area, contact your local N.C. Cooperative Extension agent or county forest ranger.
Planting Seedlings
Hand planting is the best method for most owners of small acreages. A variety of tools are available to assist in planting, but a shovel will often be all that you need. Proper planting techniques are illustrated in Figure 3. Always remember to tamp the soil firmly after planting to remove air pockets and ensure root contact with the soil.
Edge Planting
Edge planting is a common method for enhancing wildlife habitat. Edge plantings can be established or enhanced along roads, forest openings, yard edges, or on lake or pond borders. Plantings should be at least 20 feet across (Figure 4). Shrubs, vines, and other vegetation can be planted or existing vegetation favored. Species such as grape vines, blackberry, plum, dogwood, or serviceberry are excellent sources of wildlife food (see Table 1). To establish an edge, remove overstory trees and let succession take place. If more control over species is desired, transplant desired species from other parts of the property.
| Species | Type | Fruit | Site requirements |
| Black cherry (Prunus serotina) |
tree | Aug.-Sep. | intermediate, rich moist |
| Eastern redcedar (Juniperus virginiana) |
tree | Sep.-Nov. | intermediate, dry to moist |
| Dogwood (Cornus florida) |
small tree | Oct.-Nov. | tolerant, deep, moist to light, well-drained |
| Persimmon (Diospyros virginiana) |
small tree | Sep.-Nov. | intolerant, moist to dry, well-to poorly drained |
| Plum (Prunus sp.) |
small tree | Jun.-Oct. | intolerant, moist |
| Blackberry (Rubus sp.) |
shrub | Aug.-Sep. | intolerant, barren-infertile |
| Inkberry (Ilex glabra) |
shrub | Oct.-Dec. | tolerant, wet to well drained |
| Serviceberry (Amelanchier arborea) |
shrub | Jun.-Oct. | tolerant, moist to dry |
| Bittersweet (Celastrus scandens) |
vine | Aug.-Oct. | intolerant, rich soils |
| Grape (Vitis sp.) |
vine | Aug.-Oct. | intolerant, moist to dry |
| Virginia creepervine (Parthenocissus quinquefolia) |
vine | Aug.-Feb. | intolerant, moist to dry |
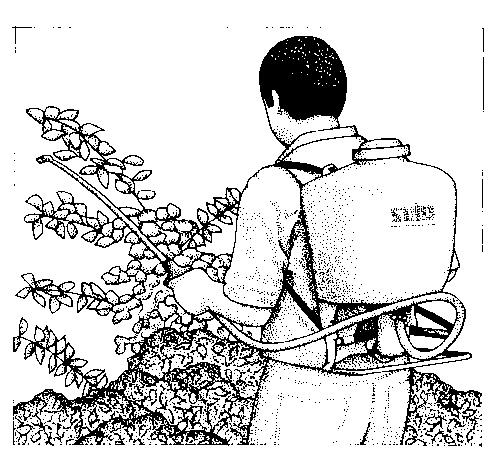
Figure 2. Herbicides applied with a backpack sprayer.
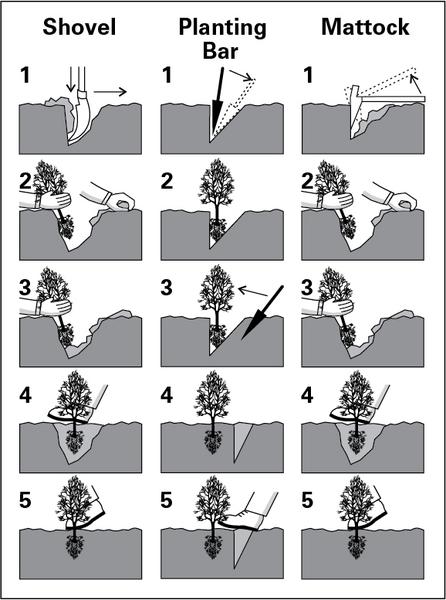
Figure 3. How to plant seedlings. With any method, tamp the soil firmly after planting to remove air pockets and ensure root contact with the soil.
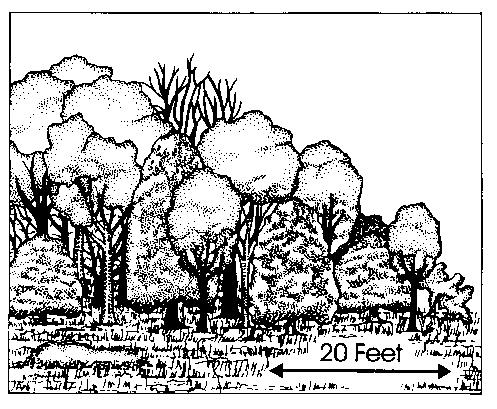
Figure 4. The relationship of edge planting to the larger forest.
Intermediate Stand Improvement
Alternatives
Hand tools can provide an effective, inexpensive method for clearing small areas, often just around the area where the seedling will be planted. Tools often used in clearing include the machete, hoe, shovel, and bush-ax.
Source of Seedlings
Seedlings can be obtained through a variety of commercial and government-owned nurseries. To find out about nurseries in your area, contact your local N.C. Cooperative Extension agent or county forest ranger.
Planting Seedlings
Hand planting is the best method for most owners of small acreages. A variety of tools are available to assist in planting, but a shovel will often be all that you need. Proper planting techniques are illustrated in Figure 3. Always remember to tamp the soil firmly after planting to remove air pockets and ensure root contact with the soil.
Edge Planting
Edge planting is a common method for enhancing wildlife habitat. Edge plantings can be established or enhanced along roads, forest openings, yard edges, or on lake or pond borders. Plantings should be at least 20 feet across (Figure 4). Shrubs, vines, and other vegetation can be planted or existing vegetation favored. Species such as grape vines, blackberry, plum, dogwood, or serviceberry are excellent sources of wildlife food (see Table 1). To establish an edge, remove overstory trees and let succession take place. If more control over species is desired, transplant desired species from other parts of the property.
Weeding and Cleaning
Weeding and cleaning are used to release seedlings and small trees (less than 4 inches in diameter at breast height) from unwanted competition. Weeding is the process of pulling or otherwise removing unwanted weeds from around newly planted seedlings. Weeding can often be avoided with proper site preparation. Cleaning is similar to weeding but is carried out later in the life of the stand when the planted seedlings reach sapling size. Guidelines for cleaning are as follows:
- Clean before unwanted growth suppresses the trees to be favored.
- To minimize resprouting, clean in mid-summer when food reserves in the roots are at their lowest.
- Species that are tolerant of shade need less cleaning than intolerant species.
- When cleaning by mechanical means, take out favored species if doing so will improve the stand. For example, remove crooked or damaged hardwood stems of wildlife value, since hardwoods are capable of resprouting.
Make a list of desired species so that the least desired species are the first to be removed.
Thinning
Thinning is used to control the growth of stands by adjusting stand density. Thinning improves forest health and aesthetics by enabling trees to grow. Unthinned stands may stagnate in growth, leading to more stress, which often enables pests and pathogens to attack the suppressed trees. Trees require space to grow, and thinning is used to provide such space. Thinning is a science-based procedure and is species-dependent. Landowners should consult with a professional to determine how many trees to thin. Foresters have rules of thumbs to determine spacing between trees. In the South, two such rules are as follows, both of which indicate the number of feet between trees:
D + 6 (used for second-growth southern pines) and
D x 1.75
where D = the average diameter at breast height (in inches) of the pre-thinned stand.
Thus, in the first example, if the tree has a diameter of 10 inches, you add (10 + 6 = 16) to determine that there should be 16 feet between trees. In the second example, you multiply (10 x 1.75 = 17.5) to determine that there should be 17.5 feet between trees.
A good thinning technique for small woodlots is to use crop tree release, which involves the marking of “crop trees” and then eliminating any tree in direct competition with the crop tree. Fifteen feet of free space between crowns provides adequate growing space for the crop tree for 7-8 years. Crop trees are selected based on criteria established in land-owner objectives. Selection criteria can be developed for benefits to any or all of the following: aesthetics, wildlife habitat, water quality, and timber growth. A complete guide on crop tree management can be found in Appendix C.
When trees to be thinned are small or when no market exists, girdling or the use of herbicides offers an effective and safe method for thinning. Girdling is the process of destroying the cambium and bark in a rough ring around the stem (Figure 5). This is often done with an ax or chainsaw. Using an ax, you cut away a band of bark and living tissue 3 to 5 inches wide in a circular pattern around the tree. Using a chainsaw, you make two cuts, approximately 1 inch deep and 3 to 5 inches apart, in a circular pattern completely around the tree. By destroying the cambium and bark you have destroyed the tree’s ability to transport food. Herbicides if used properly are a very safe and effective tool for controlling competing vegetation (Figure 6). Herbicides are designed for specific purposes, and the directions on the label must be followed to ensure personal safety and to protect the environment.
For small woody vegetation, less than 1 to 2 inches in diameter, a foliar or basal spray is the most appropriate. Foliar spray is applied in mist to the vegetation’s foliage. Basal application is either by brush or nozzle spray to the stem. The chemicals are then absorbed by the plant, killing it within a few months to a year. For larger trees (two or more inches in diameter), herbicides are injected directly into the stem. The herbicide is squirted into a frill that encircles the stem.
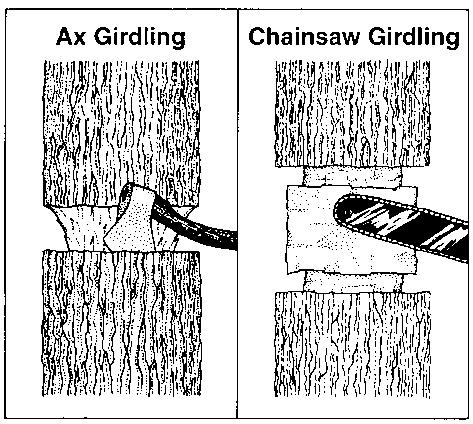
Figure 5. Examples of ax and chainsaw girdling.
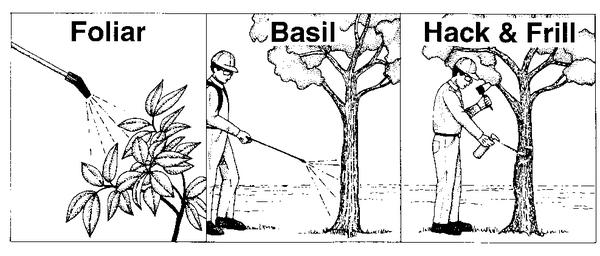
Figure 6. Three methods of applying herbicides: foliar, basal, and hack and frill.
Pruning
Pruning is often done to improve the quality of high-value timber species. But pruning can also improve the aesthetic quality of a stand or recreational access. For aesthetic quality, trees are often pruned to obtain a more park-like appearance.
Trees are often pruned along a trail to improve access or to allow more light to reach the forest floor. Pruning is costly because it is labor intensive. But many landowners want to do hands on work and are often willing to do the pruning themselves Sharp tools are essential to successful pruning. A pole-saw enables efficient pruning up to and beyond the first 16 feet. The teeth of these saws cut on the pull stroke, easily removing small limbs with a few strokes.
Pole-saws can be purchased in sectional lengths of 4 to 8 feet. A 4-foot pole-saw is efficient for removing lower branches and limbs up to 8 feet high.
Prune branches before they reach 1.5 inches in diameter to enhance wound closure (Figure 7). When pruning, never remove more than 1⁄3 of the live crown. This will leave enough foliage for the tree to produce food necessary to support itself and continue to grow. Prune early and frequently for best results. Prune in stages, removing only a few branches at a time. Remember, young, vigorously growing trees have a disproportionate amount of foliage in the lower portion of their crown. Limit pruning to the dormant season, when weather and working conditions are comfortable. Always avoid pruning during leaf-out when tree energy reserves are lowest. Also, avoid pruning during leaf-fall when trees are recovering vital compounds from the foliage.
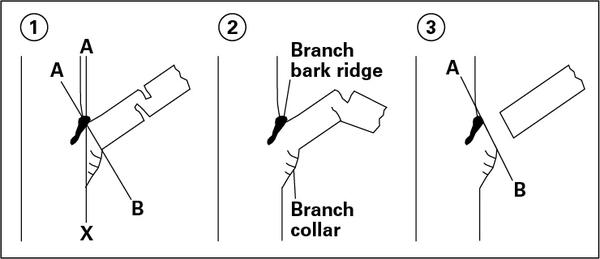
Figure 7. Always prune bark immediately beyond the branch bark ridge and branch collar (line AB): (1) under cut, (2) limbing cut, (3) final cut.
Selling Timber
Timber removed during woodscaping can be sold to help offset the cost of the woodscaping service. How much of the cost can be offset depends on the markets in your area. To improve your chance of getting a fair price for your timber, seek professional help. Timber sales and matters that involve deeds, contracts and other legal formalities are often confusing. When selling timber, you need to know what you are selling and its value; you also need to sell in a competitive market. A professional forester should help you protect your interest. Remember, buyers are trying to get the most timber for the cheapest price.
Small-Scale Equipment
Farm tractors are the most commonly used machine on small wooded acres. Most often, tractors range in size from 17 hp to 200 hp, with PTO and three-point hitches. Accessories include a winch, a knuckle boom loader and trailer for forwarding operations, a chipper for cleaning up debris, or a brush hog for weed control. To ensure operator safety and to protect the farm tractor vital components such as an oil pan, electric wires and fuel lines, windows, lights, and valve stems should be protected or reinforced. Tire chains will assist in traction. And at all times, keep a first-aid kit and fire extinguisher readily available.
Skidding
Skidding is the process of dragging the trees out of the woodlot to a landing. In small woodlots, skidding can be done with a tractor and winch or by a horse (Figure 8). Key points to remember include:
- Plan and mark skid trails prior to skidding.
- In general, leave 200 feet between skid trails.
- Avoid side leaning, skid slightly uphill or downhill.
- Skid short distances.
- Do not skid over rough terrain: drive through it, and then winch the load to you.
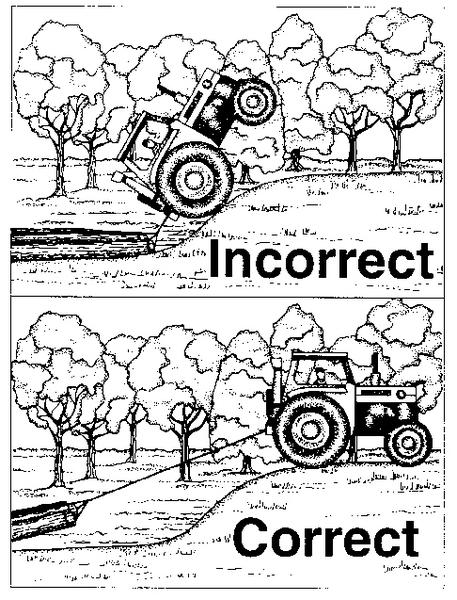
Figure 8. Skidding done correctly (bottom) and incorrectly (top).
Winching
Winching is the process of dragging the trees from where they are cut to the skid trail. This is usually a short distance of 50 to 100 feet. Key points to remember include:
- Position the tractor on flat ground in line with the direction of pull.
- Do not winch from angles exceeding 3000 sideways
- Use a snatchblock to avoid winching sideways or when obstacles prevent direct winching.
- Several logs can be winched at one time
Forwarding
Forwarding is the process of loading logs onto a forwarder (i.e., a tractor and trailer with uprights or bunks) and then hauling them to a log deck or pickup point (Figure 9). The forwarding method begins after the logs are winched to the skid trail. The logs are loaded with a knuckle boom loader onto a trailer. After loading is complete, the grapple is placed on top of the load. The logs are then hauled to the log deck.
Some knuckle boom loaders can be mounted on to the trailer tongue or the three-point hitch of the tractor. An advantage of mounting the loader on the tongue of the trailer is that disconnecting the trailer from the tractor also disconnects the loader. Forwarding enables more trees to be moved to the log deck with fewer skidding trips and less soil disturbance.
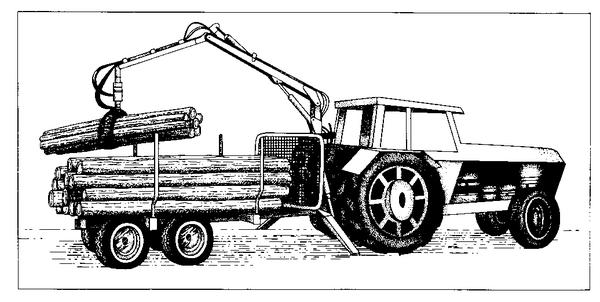
Figure 9. Logs being loaded onto a forwarder.
Chippers
Chippers can produce chips to be used for burning, animal bedding, landscaping, and mulch. Chippers range from the small homeowner size used in the yard for chipping up small limbs and debris less than 1.5 inches in diameter to larger whole-tree chippers. The size and type of chipper to get will depend on what is to be accomplished and how often it is to be used. A common chipper used in small woodlot management is mounted on the three-point hitch of a tractor. Power requirements vary from chipper to chipper, but a rule of thumb is 7 to 10 hp per 1-inch diameter of round wood. Thus, to chip a piece of wood 5-inches in diameter, you need a 35 to 50 hp tractor.
Brush Hogs
Brush hogs or brush slashers are multi-use machines mounted behind a tractor using the threepoint hitch. They can be used to keep vegetation down under power lines, reduce the size of pruning residue in orchards, clear fire breaks, and control unwanted competition around plantings; they can also be used to clear and maintain recreational trails, access roads, and skid trails.
Conclusion
This publication focuses on just one aspect of natural resource management. To continue learning about natural resource management, seek further information and advice from your local N.C. Cooperative Extension agent or County Forest Ranger. Or join a local landowner association. If there is not one in your area, begin one. Seek opportunities to learn more by attending workshops or college classes.
Appendix A: Sample Management Plan
Landowner
Mr. and Mrs. Tree
Prepared by
Your Consulting Forester
Management Objectives
- Manage current timber stands to generate immediate income, improve future income potential, provide periodic income in the future, and maintain mature forest.
- Manage woodland to improve quality and health of forest.
- Improve wildlife habitat for deer, fox, rabbits, squirrels, quail, mourning dove, beaver, waterfowl, raccoon, raptors, and songbirds.
- Manage and protect riparian zones to at least maintain, if not enhance, water quality and stream-side management zone.
| Forest Type | Acres | Recommended Activity |
|---|---|---|
| Forest Type 1 Shortleaf pine |
16 | Seedtree harvest. Preharvest treatment to control competition. Vegetative screen between roads. Leave snags for wildlife. Maintain and mow trail periodically. Pile slash to create wildlife cover. Seed landings and skid trails with wildlife mixture. |
| Forest Type 2 Upland hardwood |
16 | Thin the stand to 70 square feet of basal area. Use area wide thinning or crop tree release method. Maintain and mow trail periodically. Pile slash to create wildlife cover. Protect stream side management zones. |
| Forest Type 3 | 18 | Make group selection cut 1/2 to 1 acre in size. Perform competition control. Pile stash to create wildlife cover. Seed landings and skid trails with wildlife mixture. Maintain and mow trail periodically. Protect stream side management zones. |
| Year | Forest Type | Activity |
|---|---|---|
| 1 | 1-3 | Maintain and mow trail. |
| 1,3 | Control preharvest competition. | |
| 1-3 | Prepare contract for harvest and thinning. | |
| 2 | 1-3 | Maintain and mow trail. |
| 1-3 | Harvest and thin. | |
| 1-3 | Rehab landing and skid trails. | |
| 3 | 1-3 | Maintain and mow trail. |
| 1 | Control postharvest competition. | |
| 4 | 1-3 | Maintain and mow trail. |
| 1 | Control postharvest competition. | |
| 5 | 1-3 | Maintain and mow trail. |
| 1 | Control postharvest competition. | |
| 1-3 | Revise management plan. |
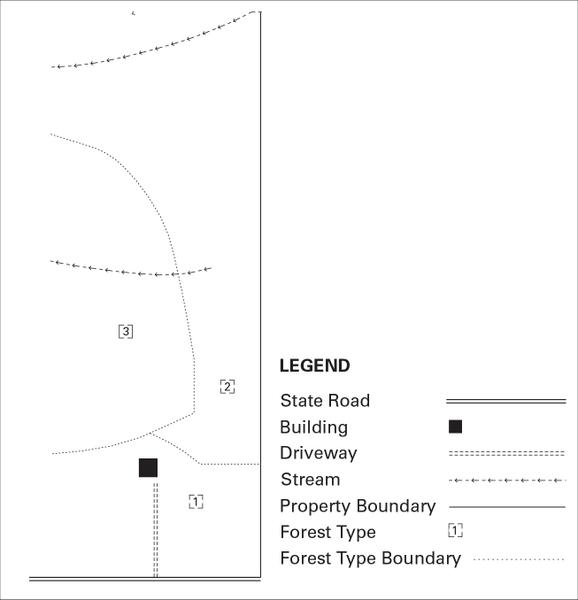
Figure A1. Forest-type map.
Appendix B: Measuring a Tree
To conduct a tree inventory, you must know how to measure a tree. We often measure trees to estimate timber volume, but measuring is also useful (for example when you think you have a champion big tree to measure. The two most frequently measured characteristics of a tree are diameter and height.
General agreement and ease both dictate that diameter is measured at 4.5 feet above the ground (on the uphill side). This measurement is expressed as diameter at breast height or DBH. Diameters are commonly measured with a Biltmore stick or diameter tape (Figure B1). Using a Biltmore stick: hold the stick 25 inches from your eye; check with a tape measure until you get the proper distance. With the left end of the stick in your line of sight to the left edge of the tree and without moving your head, read the scale where your line of sight intersects the right edge of the tree. On trees that are oblong, instead of round, take two readings and calculate the average.
If a Biltmore stick is not available, a regular cloth tape can be used to measure circumference.
Circumference can be converted to diameter as follows:
circumference (inches) ÷ 3.1416 = diameter.
In forestry, tree height is often based on the number of merchantable logs or half-logs. A log is 16 feet in length; a half-log is 8 feet in length. Height measurement is taken from the estimated stump height to the highest usable portion of the tree trunk. This is usually the minimum top diameter of 4 inches.
A Merritt hypsometer, which is often found on the back side of a Biltmore stick, is used for measuring tree height (Figure B2). Pace out 66 feet from the tree, remaining level with it—neither uphill or downhill from its base. Hold the hypsometer vertically 25 inches from your eye. With the bottom of the stick aligned to where you want to estimate the stump height, read the scale where your line of sight intersects the hypsometer as you look up at the minimum diameter (usually 4 to 6 inches) near the top of the tree.
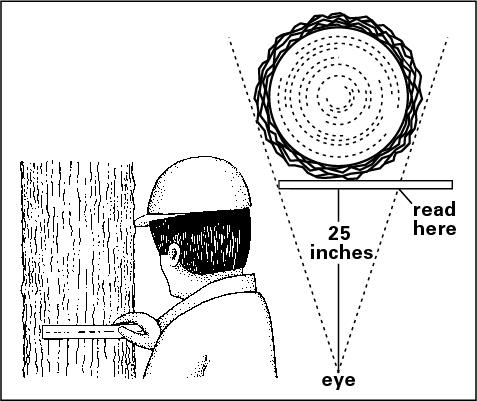
Figure B1. Measuring tree diameter using a Biltmore stick.
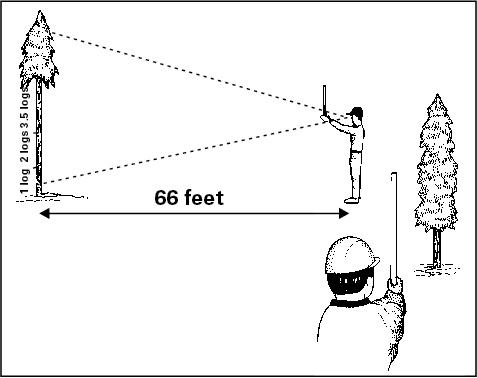
Figure B2. Using a Merritt hypsometer to measure tree height.
Appendix C: Cruising
The following equation can be used to determine the number of plots to sample:
T ÷ S × P = Number of plots to sample
where:
T = total area of woodland
S = size of sample plot
P = percent of total area to be sampled
Thus, if you owned 7.5 total acres of woodland, and the size of your sample plot is 0.1 of an acre, and you are sampling 0.30 of your total area, you would apply the equation as follows:
7.5 acres ÷ 0.1 acres per plot × 0.30 = 22.5 plots or 23 plots
On a map of the area to be inventoried, draw parallel lines that cover the tract reasonably well. Draw the lines perpendicular to drainage patterns so that you pick up changes in vegetation caused by changes in soil moisture and elevation. Figure C1 depicts a typical layout.
A 0.1-acre plot has a radius of 37.24 feet. Using a tape, measure several radii from plot center, like spokes on a wheel. Indicate the outer margins of the plot by marking boundary trees with flagging or chalk. Measure trees within the boundary, marking them off with an X. It is best to measure in a clockwise direction. When collecting data, develop a tally sheet for the information that is needed in guiding future decisions. In general, the information gathered includes species, diameter (measured at 4.5 feet above the ground), and estimated height. Other information that may be of interest includes nests, cavities, and signs of pest or pathogens.
Download an example of a woodland inventory tally sheet.
To summarize the data for the total tract, determine the trees in all plots by species and size class. Calculate the correction factor for expanding the samples as follows:
T ÷ A = Correction factor
where:
T = total area of woodland
A = total area in plots
Thus, if you owned 7.5 total acres and you had 23 sample plots each of which was 0.1 acre, your correction factor would be:
7.5 ÷ (23 × 0.1) = 2.3
Multiply your totals by the correction factor to get a reasonable estimate of the trees in your tract.
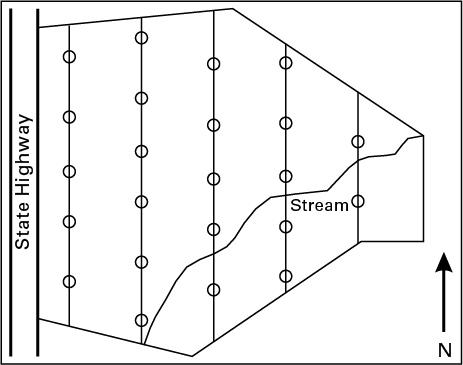
Figure C1. Preparing an inventory map.
Appendix D. Crop Tree Management
Landowners today are interested in a management system that promotes forest stewardship and provides other benefits as well. Crop tree management is just that kind of system. It consists of seven steps that provide multiple benefits to the landowner, including the enhancement of wildlife, the protection of water quality, the production of timber, and the development of an aesthetically pleasing environment. Crop tree management focuses on individual trees and their potential for meeting the landowner’s objectives. The system thus requires the landowner to make decisions at the tree level rather than the stand level.
Crop Tree Management: The Process
Step 1. Identifying Property Goals.
Goals reflect your ultimate reason for owning the land. They should be realistic and achievable, and they should be based on a long-term view of your land. In all cases, they should be compatible with the resources available and the land’s potential.
Goals provide the foundation for developing sound objectives. Here are some examples of typical landowner goals:
- Improve deer and turkey habitat for increase opportunity in hunting
- Enhance recreational use of the property.
- Enhance the beauty of the property around the house and road.
Step 2. Establish Stand-Specific Objectives
By developing stand-specific objectives, you focus your attention on the stands that have the greatest potential of meeting your goals. Not every stand will have that potential. Remember, objectives must be specific to be effective. Specific objectives include:
- Improve deer habitat by increasing hard-mast production of the oak-hickory stand.
- Improve recreational use by turning old logging roads into hiking trails.
- Increase the variety of fall colors that can be seen from the road and house.
Step 3. Develop Crop Tree Selection Criteria
Crop tree selection criteria are developed to match specific objectives. Like objectives, selection criteria may differ from stand to stand. Any tree that meets multiple selection criteria will be especially valuable. Examples of selection criteria for different benefits are listed below; trees with attractive fruits, flowers, and fall color are listed in Table D1.
| Fruits | Flowers | Fall leaf color | |
|---|---|---|---|
| Red | Yellow | ||
| apple | apple | blackgum | ash |
| blackgum | catalpa | cherry | beech |
| cherry | cherry | dogwood | birch |
| dogwood | plum | hornbeam | catalpa |
| holly | redbud | maple | elm |
| hophornbeam | sourwood | red oak | hickory |
| maple | yellow-poplar | white oak | pecan |
| mulberry | persimmon | redbud | |
| pawpaw | sassafras | sycamore | |
| persimmon | sourwood | yellow-poplar | |
| plum | sweetgum | ||
| redcedar | |||
Timber
- Dominant or co-dominant Trees
- Large, healthy crown
- No forks or major branches for the first 20 feet
- No dead upper crown branches
- Stump sprouts ok
- U-shaped connections ok
- High valued commercial species
- Expected longevity of 20 or more years
Wildlife: Mast Producing Trees
- Dominant or codominant trees
- Large, healthy crowns
- Hard mast producers
- Expected longevity of 20 or more years
Wildlife: Cavity Trees
- Any species, size class, and crown position
Aesthetic
- Attractive flowers or colorful foliage
- Large, healthy crowns
- Stump sprouts and understory trees ok
- Expected longevity of twenty or more years
- Distinctive trees
- Visible from house and travel ways
Water Quality
- Dominant or co-dominant Trees
- Large, healthy crown
- Tree tolerant of flooding
- Species that are good nutrient accumulators
- Trees that are young 15 to 25 years of age
Step 4. Inventory the Property
Take an inventory of the property to determine the number of crop trees per acre. By using a tally sheet for crop tree release, the landowner can determine how many crop trees there are per acre, which trees to cut, and which trees may be left uncut.
Step 5. Review the Proposed Treatment
Review the proposed treatment by setting up a few fifth-acre plots. A fifth-acre plot is larger than a tenth-acre plot and thus allows for a better demonstration of the proposed treatment. Use brightly colored flagging to mark the crop trees. Review how the crop trees were selected and which competing trees will be cut. Mark the trees to be cut with a different color flagging. Remember that only trees in direct competition with the crop trees will be cut. Those trees whose crowns are not in direct competition with the crop tree will remain in the stand.
Step 6. Decide How Many Crop Trees to Cut per Acre
The number of crop trees cut per acre depends on the number of trees meeting the criteria and the landowner’s objectives. If the number of crop trees per acre to release will create a cutting that is too heavy, then reduce the intensity of the cutting by reducing the number of crop trees selected for release, not by reducing the amount of release for each crop tree crown (Figure D1).
Step 7. Decide Which Trees to Cut to Release the Crop Trees
To determine which trees are to be cut, look up into the crown of the crop tree and divide the crown into four equal quadrants. Examine each quadrant to determine if the crop tree has adequate space to grow. This is known as determining the free-to-grow ratio (Figure D2). A crop tree is not free to grow in that quadrant if there is only 1 to 2 feet between the crop tree’s crown and the neighboring crown. Free-to-grow ratios range from 0 to 4. A ratio of 0 means the crop tree crown has competition from neighboring crowns on all four sides. A free-to-grow ratio of 4 means the crop tree has adequate space to grow on all four sides. Fifteen feet of free space between crowns provide adequate growing space for the crop tree for 7 to 8 years.
Summary
Crop tree management focuses on individual trees and their potential to meet the landowner’s objectives. It is a system that puts stewardship principles into practice while obtaining multiple landowner benefits. It was developed for implementation on small (i.e., 100 acres or fewer) forested acreage, but can be used quite successfully on larger areas.
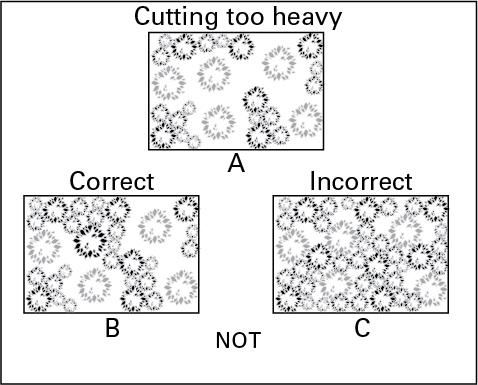
Figure D1. If the cutting is too heavy (A), adjust the cutting intensity by releasing fewer trees (B). Do not compromise the system by selecting more crop trees than you can fully release (C).

Figure D2. The crop tree in the center of this illustration has been divided into four equal quadrants. A free-to-grow rating is determined by evaluating each quadrant for competition from neighboring crowns.
Acknowledgments
Some of the information in this bulletin is from the following NC State Extension Woodland Owner Notes: Note 28, Forest Stewardship: Planning for Beauty and Diversity, by Mark A. Megalos, and Note 34, Pruning Woodland Trees, by James R. McGraw and Mark A. Megalos.
Partial funding to support this project was provided through an Urban and Community Forestry Grant by the North Carolina Forest Service
Publication date: June 17, 2019
Reviewed/Revised: May 28, 2024
AG-584
N.C. Cooperative Extension prohibits discrimination and harassment regardless of age, color, disability, family and marital status, gender identity, national origin, political beliefs, race, religion, sex (including pregnancy), sexual orientation and veteran status.