
Harvest Aids
A shift to earlier maturity groups and earlier planting dates by some growers across North Carolina means that the use of harvest aids has become more common. At the most basic level, harvest aids desiccate green material to facilitate a more efficient or earlier harvest. Determining the best timing is tricky, however, because if the leaves and stems are killed before they are done sending photosynthate to the seeds, yields will be reduced.
The Basics
Much of the work on harvest aids thus far has been done in the mid-South, where growers adopted an early production system about 20 years ago. The following information is compiled from experts in Louisiana, Arkansas, and Tennessee.
Common approved desiccant products for soybeans include Gramoxone (paraquat), Sharpen (saflufenacil), and Defol 5 (sodium chlorate). Harvest aids offer a number of benefits, but there are also limitations.
Harvest aids CAN:
- Protect yield that has already been determined
- Improve harvest efficiency
- Protect seed quality
- Promote an earlier harvest
Harvest aids WILL NOT:
- Change the maturity of the crop
- Increase yield
- Remove excessive moisture from seeds
- Protect the crop from shattering
Essentially, harvest aids can be used as a tool to protect what you have, but they won't increase yield.
Application Timing
Based on work out of the mid-South, the ideal timing for a harvest aid is R6.5 or later. R6.5 is the stage where (1) seeds have separated from the white membrane in the pod and (2) seed margins are prominently defined (or when upper canopy pods are at about 50% moisture). If applied too early, a harvest aid can significantly reduce yield, as it prevents the immature seed from maturing.
Harvest Aid Evaluation
In 2015, paraquat, saflufenacil, and sodium chlorate were evaluated for timing and effectiveness. Averaged over five North Carolina locations, with the test repeated four times at each location, Gramoxone and sodium chlorate were more effective than Aim at desiccating soybeans. However, yields were reduced whenever desiccation occurred.
In 2020, paraquat, saflufenacil, and sodium chlorate were evaluated for their impact on seed quality, yield, and harvest timing. Products were applied when defoliation reached 65% (approximately R7), which was later than what is recommended in the mid-South. Plots were harvested at 3 days after application (DAA), 7 DAA, and 14 DAA. In this evaluation, there were no significant differences between the three products evaluated, suggesting that any of these three products could be used interchangeably at the R7 timing.
Seed Damage
When looking at percent damage pooled across all locations and all products, there were no significant differences between the treated plots and the untreated control. More research is needed to determine the best fit for harvest aids and soybean quality.
Yield
Though a harvest aid will not increase yield, there are concerns that applying too early may negatively impact yield. Across all timings and products evaluated, there was no significant difference in yield compared to the untreated control. This suggests that at the timing used in this trial, approximately R7, yield was not significantly impacted by the application of a harvest aid.
Green Material
One motivation of using a harvest aid is to reduce green material to aid in harvest efficiency. A significant difference in percent green material (stem and leaves) was noted between the harvest timing treatments. Green material present at harvest 3DAA was 40%, while at 7DAA it was 5%. This suggests a harvest aid can be useful for reducing green material, especially by waiting at least seven days after application before harvest.
Days to Harvest
Another common reason to use a harvest aid is to reduce the days to harvest. Applying a harvest aid and harvesting 3DAA saved about 10 days compared to the untreated control. The 7DAA timing saved 5 days compared to the untreated control. This data confirms that a harvest aid can help reduce the days to harvest. Saving 5 to 10 days can make a big difference for a grower who is facing a weather event like a hurricane or low-pressure system.
The decision to use harvest aids should be made on a farm-by-farm basis. When deciding, you should weigh the gain in time from being able to harvest earlier versus the loss in yield if plants are killed before they reach physiological maturity. In addition, these products all have different labels and slightly different modes of action, so there could be a time when one is more beneficial than another. Remember to follow the label for any product used. The work done here was for experimental purposes, and therefore some of the combinations tested were not on-label.
Combining Soybeans Effectively
Harvest Equipment
Combine Overview
The modern combine is an impressive and versatile piece of equipment. With relatively minor modification (switching headers or making adjustments), the combine can harvest soybeans, corn, or small grains. Changes in crop properties and conditions can place heavy demands on the combine. The machine can meet these demands through the constant monitoring and adjustments performed by an alert and well-trained operator.
All combines perform five basic functions to successfully harvest a crop:
- gathering and cutting
- threshing
- separation
- cleaning
- material handling
A wide array of sensors, instruments, and displays continuously informs the operator of the combine's status. The operator can read the information coming from the instruments and displays and make appropriate adjustments, often from the cab, to keep the combine in optimum harvest form.
Combine Classes
Combines are sized according to classes established by the Association of Equipment Manufacturers (AEM). These class designations are created to facilitate sales reports, but they also constitute a convenient way for consumers to compare combines of similar size and capacity from different manufacturers. The primary criterion for designating a combine class is engine horsepower; however, horsepower is also correlated to harvest capacity to some extent. Combines have gotten larger and more powerful over the years. Current classes offered by major manufacturers are:
- Class 7—323 to 374 HP
- Class 8—375 to 410 HP
- Class 9 and 10—462+ HP
Header Choices
Headers for soybeans use the cutter bar and reel design. This is a versatile platform that performs well in soybeans and small grains. A row crop head for soybeans was once available but is no longer manufactured. The cutter bar and reel design has a few options for the grower to consider:
- Cutter bar
- Fixed cutter bar: The fixed cutter bar is a rigid cutting mechanism that is fixed with the frame of the header. If you are operating on uneven ground, it is possible for one end of the header to be too high while the opposite side is too low. It cannot compensate for uneven field surfaces.
- Flexible cutter bar: The flexible cutter bar is designed so it can bend or flex and follow the contour of the ground. This will help save beans that are set low on the stalk. Flexible cutter bars can be locked into a fixed cutter bar mode if necessary.
- Draper cutter bar: The draper header uses a belt conveyer to feed crop into the feeder house rather than just a feed auger. Wide conveyor belts collect the crop from the cutter bar and feed it into the center, where another belt may be used to deliver crop to the feeder house. A feed auger is also used at the back of the header to feed any crop material that falls beyond the belt. Draper headers can be rigid or semiflexible.
- Reel
- Speed: Reel speed should be adjusted to match crop conditions. Typically, a reel speed 10% to 25% faster than ground speed will ensure good feed rate.
- Position: Reel position should be adjusted to match crop conditions. Reel height and fore/aft positioning are adjustable. In general, keep the reel close to the feed auger and adjust the height to match the crop. The reel should contact the top third of the crop.
Threshing
Threshing units in combines fall into two categories: tangential (cylinder/concave) and rotary. Rotary threshers can be designed as axial flow or tangential flow. Cylinder/concave threshers use impact force to accomplish threshing. Rotary systems use more of a rubbing action for threshing. Both systems use a combination of cylinder speed and cylinder (rotor) to concave spacing to control threshing action.
The operator should avoid overthreshing the crop. As the cylinder or rotor speed is increased, the threshing action becomes more aggressive. Higher cylinder speeds will decrease threshing losses but introduce the potential for more seed damage. Pay close attention to the cylinder or rotor to concave spacing recommended for the combine. Some manufacturers offer grates or rotor sections for specific crops; most provide more universal options that serve a range of crops.
Separation
Once threshed from the pod, soybeans must be separated from the stalks, pods, and chaff. In a well-adjusted combine, 80% to 90% of the beans are separated during threshing. The beans that remain in the stalks and pods after threshing should be removed during the separation step.
In the rotary combine, separation occurs due to centrifugal force applied to the beans in the separator section of the rotor, which is just behind the threshing section. The speed of the rotor is sufficient to propel or push the beans out of the stalks and trash and through the separator grate.
In the conventional combine, separation is accomplished using straw walkers or, in some cases, a rotary separator. Straw walkers are the most commonly used device. Separation occurs as the walker oscillates forward and back with some eccentric motion. The straw is lifted and moved to the rear, step by step. The beans will separate due to gravity as they fall back to the straw walker.
Cleaning
The cleaning section is designed to remove fine stalks, pods, and chaff from the beans; to allow clean beans to be delivered to the tank; and to allow any unthreshed beans to be returned to the thresher to process again.
The cleaning section consists of the chaffer, the sieve, and the cleaning fan. Chaffer and sieve adjustments are made to match the openings in these screens to the size of the beans. Once properly set, little daily adjustment should be needed.
The cleaning fan should be adjusted as conditions change throughout the day. Fan speed is a critical adjustment for good cleaning. If too much trash is making its way to the tank, fan speed may be too low. If too many beans are found in the chaff behind the combine, fan speed may be too high. Likewise, a large amount of threshed beans in the tailings return may indicate the fan speed is too high.
Handling
Material handling on the combine consists of the tailings return, clean grain auger, grain tank, and unloading system.
The tailings return collects unthreshed beans from the cleaning section and sends them back through the threshing section. Monitoring the tailings return is a good way to monitor combine performance. You should see minimum tailings return if the threshing action is properly adjusted.
The clean grain auger routes the crop from the cleaning section up to the grain tank. Worn or damaged components can contribute to crop loss and crop damage. The tank is the holding space for the harvested crop. The operator should check the condition of the harvested crop in the tank periodically to ensure the combine is performing well. Tanks are sized to the combine. You should avoid adding tank extensions to increase capacity unless approved by the manufacturer. Overloading the tank can lead to losses as beans are thrown from the tank while the combine is travelling across a rough field surface. Unloading augers should be checked for wear or damaged components. Wear can occur on the auger flighting, which will reduce its diameter and decrease its unloading capacity. Less seed will be moved up the auger per rotation. Wear can also occur on the auger tube, creating a leak that will spill beans onto the ground. A worn auger will unload inefficiently and may slow down the unloading process.
Field Capacity
Theoretical field capacity (TFC) for a combine is a function of its ground speed and the width of the header. If the combine could always use 100% of its header width and spend 100% of its time in the field actually harvesting the crop, TFC could be easily calculated using the following equation:
TFC, ac/hr = (Header Width, ft x Ground Speed, mph) ÷ 8.25
Agricultural engineering standards quote a ground speed range of 2 to 5 mph, with 3 mph being typical (ASABE 2017). Many operators report speeds in the upper part of the range as being more common. Modern combines have higher engine horsepower to match the range of header sizes currently available. A combine with the maximum header width may need to operate at a slower ground speed, while a smaller header may allow for a faster ground speed. The operator will have to find the best speed for the crop considering yield, crop condition, crop mass, engine power, header size, and field conditions.
Combine operators recognize that they can rarely use the full width of the header for every pass through the field. For example, in soybeans planted with a row spacing of 36 inches, a 25-foot-wide header would have an effective swath of 24 feet (8 rows at 36 inches, or 3 feet, each). If harvesting drilled beans, most operators will allow 1 foot or so overlap between swaths to ensure all beans are harvested and a strip of standing beans is not left in the field.
Likewise, a combine cannot be expected to actually harvest beans 100% of the time it is in the field. Some productive time is lost turning around at the end of the field, slowing down or stopping to unload, waiting for a truck or grain cart, stopping to make machine adjustments or clear components, or taking a rest break.
Field efficiency (FE) takes the lost harvest productivity factors mentioned above into account to determine effective field capacity (EFC) as follows:
EFC,ac/hr = TFC,(ac ÷ hr) x FE
Effective field capacity can be determined by noting the size of each field and how long it takes you to harvest it. Average several fields together and you have a good measure of your EFC. For planning purposes, you can estimate EFC using the following equation:
EFC,ac/hr = (Header Width, ft x Ground Speed, mph x FE) ÷ 8.25
Field efficiency for soybean harvesting ranges from 78% to 75% (Hanna 2016). Wider headers tend to have lower FEs, while narrower headers tend to have higher FEs.
Precision Ag Technology for Soybean Harvest
Designed to show the farmer relative differences in yield across the field, yield monitors are available for most if not all combines currently available. They can be retrofitted to most older combines as well. When coupled with a GPS (Global Positioning System) or GNSS (Global Navigation Satellite System) receiver, the yield monitor can record the data and create a yield map for the field. Yield maps are valuable management tools. You can review your management decisions for the year and see how the crop responded. Once you have collected a few years of yield data from a field, you can use the results in the following years to fine-tune your management program.
To collect quality management data with the yield monitor, it should be calibrated at the start of the harvest season. Do not rely on last year’s calibration or the default calibration numbers that may be programmed in the monitor. You may need to do follow-up calibration checks later in the harvest as well.
To calibrate the yield monitor, you will need to collect accurate weights for the calibration loads. You can use an instrumented grain wagon, field scales, or transport the loads in a truck or trailer (wagon) to a fixed scale, such as a grain elevator, farm supply center, or other source.
Yield monitors can be programmed to divide a field or fields into multiple loads. Load sizes and areas can be configured by the operator as needed for calibration. A load can be a partially filled grain tank emptied into a trailer or wagon for weighing, a full tank, or multiple grain tank fills combined to make a load. The key is to create the load in the yield monitor, let the monitor calculate the yield based on its current or default values, and save each load independently so that true weights for the load can be entered when they are measured. Once a load is completed, close the load to save the data and create a new one to continue collecting loads.
Loads should be collected so that you have a range of flow rates being measured by the yield sensor. This is especially true for impact-based yield sensors. Use the following methods to achieve a range of flow rates:
- Harvest in fields with uniform yields but vary the ground speed. For example, collect one or more loads with minimum harvest ground speed (2 to 2.5 mph), one or more with an average ground speed (3.5 to 4 mph), and one or more with the maximum ground speed (4.5 to 5 mph) you would likely use.
- Harvest in uniform yield fields with varying header widths. For example, harvest one or more loads using only ¼ to 1/3 of the width, one or more loads with ½ to 2/3 of the width, and one or more loads with full header width. Be sure to adjust the header swath setting in the yield monitor for each load.
- Harvest one or more loads each in low, medium, and high yielding areas of the field. Keep the header width and ground speed constant.
Refer to your manual for the number of loads required to calibrate your yield monitor. Typically, three to five loads are needed. You can collect more than the minimum number and choose the best available loads for calibration.
Once loads are collected in the field and the true weights are obtained from the scales, you can perform the calibration routine in the yield monitor. The goal should be calibration accuracy of 5% or less. If you don’t get the error down to 5%, try collecting additional loads. You should also check your sensor diagnostics panel in the yield monitor for any error messages.
After the initial calibration to start the season, you should recheck the calibration periodically. This would be very important if you have large differences in moisture content, bean variety, or other factors that affect the size and density of the beans.
Another type of precision ag technology that can be used at harvest is GPS/GNSS-based guidance or automatic steering. Lightbar guidance gives the operator a visual indicator of the swath. Using the lightbar can improve steering by making it easier to stay on the swath line. Automatic steering takes over steering the combine, once on the swath, allowing the operator the freedom to monitor other instruments and displays to track combine performance. Lightbar guidance or automatic steering can improve field efficiency by allowing the operator to use more of the header width. Particularly with a high-accuracy automatic steering system, the swath overlap can be reduced from 1 foot or more to just a few inches.
Performance of the auto steer or lightbar system will be based on the accuracy of the GPS/GNSS system used. Lower accuracy systems will use a WAAS (Wide Area Augmentation System) or similar correction. This may only provide a pass-to-pass accuracy of 6 inches. That means the swaths could be up to 6 inches too wide or too narrow. Higher accuracy GPS/GNSS systems such as RTK (Real Time Kinematic) or PPP (Precise Point Positioning) systems will guarantee a pass accuracy to 1 to 2 inches.
Harvest Losses
This section is adapted from Reduce Soybean Harvest Losses written by E.O. Beasley for NC State Extension.
The best way to manage harvest losses is to identify where the losses are coming from. Once you have pinpointed the source of the loss, combine or otherwise, you can determine what you can do to improve your harvest.
Soybean losses in the field fall into one of the following categories:
Preharvest loss: Loose beans or beans in pods detached from the stalk that you find on the ground prior to harvesting. These losses may be due to overmaturity, storm damage, or other losses that are not due to the combine.
Gathering unit loss: Beans that are attached to plants at harvest but do not make it into the combine. Most harvesting losses are in this category. The gathering unit is the header and feeder housing. Critical components are the cutter bar, reel, augers, and conveyers. These losses are measured in a portion of a swath where only the combine header passes over it. There are four types of gathering unit losses:
- shatter loss—loose beans and detached pods found on the ground, excluding any preharvest loss
- stubble loss—beans remaining in pods still attached to stubble; these pods most likely passed under the cutter bar
- lodged stalk loss—beans remaining in pods attached to stalks that were not cut by the combine header
- loose stalk loss—beans remaining in pods attached to stalks that were cut but not delivered to the threshing mechanism of the combine
Cylinder/rotor loss: Beans that pass through the combine mechanism but remain in the pod. These beans escaped the threshing mechanism due to improper adjustment or poor handling.
Separation loss: Threshed beans (removed from the pods) that go out of the combine with the trash. Separation and/or cleaning action is not adjusted for best performance.
Procedure for Checking Losses
The best way to estimate harvest loss is to estimate the bushels per acre of soybeans lost based on the number of beans per square foot left in the field after harvesting. About four average-size beans per square foot are equivalent to one bushel per acre.
Start by preparing a test frame you can carry to the field with you to define your sample area. Bean counts are typically made in a 10-square-foot area. You can make a collapsible rectangular frame from four stiff wire pegs and string, which can be rolled up and carried on the combine. You can also use PVC conduit or pipe. Width of the rectangle should be based on a multiple of the row spacing. For drilled beans, you can use the header width or a fraction of the width. For some of today’s larger combine headers, working with the full width in one sample may be difficult. In that case, break the swath width down into more convenient measurements such as one-half width, one-third width, or one-fourth width. You should use the smaller sections to sample the full swath width.
The length needed to enclose 10 square feet can be determined by dividing 10 square feet by the header width. For example: (10 sq ft)/ 12 ft = 0.83 ft or 10 in. Your test area would be 12 feet wide (perpendicular to the path of the combine) by 10 inches long (parallel to combine travel path). Example dimensions are in Table 11-1.
|
Swath Width (Header Working Width) |
Distance along row to enclose 10 sq ft |
|
12 |
10 |
|
15 |
8 |
|
18 |
6.7 |
|
24 |
5 |
|
30 |
4 |
Step by Step
- Determine total field loss. Choose an area of the field where the yield appears close to the average yield. Start harvesting a swath. Once you are well into the field and the combine is delivering a steady flow of beans to the tank, stop the combine and harvesting mechanism (do not clear the combine). Disengage the gathering unit and back up about 15 feet. Place the rectangular sample frame across the harvested swath at the rear of the machine. Count all beans within the frame area and record in column A, line 1, of Table 11-2. If you are using more than one sample rectangle to cover the swath, enter the average of your samples. Divide by 40 (in average-size beans) to get bu/A of preharvest plus harvesting loss, and record this value in column B, line 1.
If the total field loss is no greater than 3% of yield (1.2 bu/A in 40 bu/A beans), continue harvesting. Your combine is performing well. If total loss exceeds 3%, proceed with Steps 2 through 5 to see where the losses occur and make the necessary adjustments to reduce them. - Determine preharvest loss. Move in front of the combine header into standing beans and carefully place your sample frame on the ground. Be careful when placing the frame or you may inadvertently create more lost beans than were originally present. With the sample frame on the ground, count all beans lying loose on the ground within the frame, both in and out of pods. If you are using more than one sample area, be sure to average the numbers. Record the total count in column A, line 2, of Table 11-2. Divide by 40 to get bu/A, and enter the result in column B, line 2.
- Determine the overall machine loss. Subtract the preharvest loss (line 2) from the total field loss (line 1) in columns A and B, respectively, of Table 11-2. If the machine loss is not more than about 3% of yield (1.2 bu/A in 40 bu/A beans), you can continue harvesting. If more, proceed with the remainder of the loss analysis to determine where adjustments to reduce harvest losses are needed.
- Determine the gathering unit losses. Place the frame across the harvested swath between the combine header and the standing beans. This is the area in front of the header after you backed up as indicated in Step 1. Make the following counts:
- Shatter loss. Count all loose beans and beans in detached pods lying on the ground. Subtract preharvest loss (column A, line 2) and record the remainder in column A, line 4a. Divide by 40 and enter bu/A in column B, line 4a.
- Stubble loss. Count beans in pods attached to stubble, and enter in column A, line 4b. Divide by 40 and enter bu/A in column B, line 4b.
- Lodged stalk loss. Count beans in pods attached to stalks that were not cut, and enter in column A, line 4c. Divide by 40 and enter bu/A in column B, line 4c.
- Loose stalk loss. Count beans in pods attached to loose stalks or portions of stalks that were cut but not gathered by the header, and enter in column A, line 4d. Divide by 40 and enter bu/A in column B, line 4d.
- Determine total gathering unit losses by adding the number of beans representing shatter, stubble, lodged, and loose stalk loss (column A, lines 4a-4d). Enter the total in column A, line 4. Divide by 40 and enter the resulting bu/A in column B, line 4. This value will represent the total gathering unit loss.
- Determine cylinder and separating losses. Subtract gathering unit loss (column B, line 4) from overall machine loss (column B, line 3), and record in column B, line 5.
| Step | Type of Loss | Where is Loss Measured | Column A Beans in 10 Sq. Ft. Area |
Column B Loss, Bushels Per Acre |
Column C Maximum Acceptable Loss, Bu/Ac (for 40 bu./ac beans) |
|
1 |
Total |
Behind Combine |
|
|
1.2 (3%) |
|
2 |
Preharvest |
In standing beans |
|
|
0.1 |
|
3 |
Machine |
Total – Preharvest |
|
|
1.2 |
|
4 |
Gathering Unit |
Between Header and Standing Beans |
|
|
1.1 |
|
a |
Shatter |
Loose beans minus preharvest loss |
|
|
0.4 |
|
b |
Stubble |
Beans in pods still attached to stubble |
|
|
0.3 |
|
c |
Lodged Stalk |
Beans in pods still attached lodged stalks |
|
|
0.2 |
|
d |
Loose Stalk |
Beans in pods still attached to loose stalks |
|
|
0.2 |
|
5 |
Cylinder and Separation |
Machine loss minus gathering unit loss |
|
|
0.1 |
Examine the various types of gathering unit losses, and the cylinder and separating losses, to see where adjustments should be made. Compare with the “acceptable” losses in column C, lines 4a-4d, to help identify the problem source. Bear in mind this table is based on 40 bu/A beans. If your yields are averaging significantly higher or lower than 40 bu/A, you may want to adjust column C accordingly.
Make only one change in combine adjustment (for example, reel speed, reel height, ground speed, cutter-bar height, cylinder speed, or concave clearance) at a time, and recheck losses to see if the change improved performance. If you make more than one adjustment at a time, it is difficult to tell which adjustment was beneficial. If your adjustment had no positive effect, go back to the original setting and try another approach, rechecking losses after each change. Only with this systematic approach can you isolate and correct the cause of excessive harvesting losses.
Operational Guidelines
Typically, more than 75% of soybean machine harvesting losses are gathering losses, so greatest attention should be given to proper header adjustment and operation. Keep the following points in mind:
- Keep ground speed to 3 mph or less. Long stubble, uneven cutting height, and shatter losses due to knife stripping are indications that ground speed is too fast.
- Always operate the cutter bar as close to the ground as possible. A floating flexible cutter bar with automatic header height control is virtually essential for low loss levels.
- Keep knife sections sharp, and make sure guards, wear plates, and hold-down clips are in good condition and properly adjusted. Narrowsection knives reduce shatter and may permit slightly higher ground speeds.
- Operate the reel about 25% faster than ground speed. Position the reel axis 6 to 12 inches ahead of the cutter bar. Bars should enter crop only enough to gain control.
- Complete harvest as quickly as possible after beans first reach 15% moisture. When beans reach 13% moisture or less, take advantage of damp pod conditions brought on by dew, light rain, or high humidity to reduce shattering.
- Operate the cylinder at the slowest speed (RPMs) that will give complete threshing to reduce splitting. Refer to your manual for the recommended speed. Check and adjust, if necessary, as conditions change from damp to dry.
- Measure losses when field and crop conditions, varieties, or machine settings change.
References
ASABE. 2015. ASAE D497.7 MAR2011 (R2015). Agricultural Machinery Management Data. American Society of Agricultural and Biological Engineers: St. Joseph, MI.
Hanna, M. 2016. Estimating the Field Capacity of Farm Machines. Iowa State University: Ames, Iowa.
Huitink, G. Harvesting Soybeans, Arkansas Soybean Handbook, Ch 14. University of Arkansas Cooperative Extension.
Kutzbach, H.D. and G.R. Quick. 1999. Harvesters and Threshers. CIGR Handbook of Agricultural Engineering. Vol III, Plant Production Engineering. Ed B.A. Stout. 311-347. American Society of Agricultural and Biological Engineers: St. Joseph, MI.
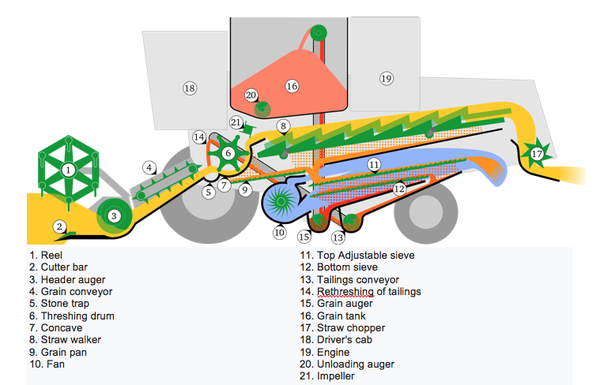
Figure 11-1. Conventional combine harvester (cut).
From: Hans Wastlhuber & Tucvbif (derivative) via Wikimedia Commons license
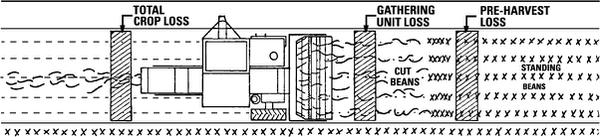
Figure 11-2. Locations for checking various components of harvest loss.
Source: Huitink, G. Harvesting Soybeans, Arkansas Soybean Handbook, Ch 14. University of Arkansas Cooperative Extension.
Drying and Storage
Soybeans can be successfully stored for sale/delivery at a later date, but they are a little more difficult to manage than corn. With the high oil content of soybeans (for example, 18 +/- 2%), they cannot tolerate as high a storage temperature as corn. Soybeans should not be exposed to temperatures above 110°F; thus, drying soybeans is typically a slower process than drying corn.
Whether soybeans need to be dried or not, they should have air moved through them periodically to disrupt wet spots that typically develop in pockets of finer material or at the top center portion of the stored grain. Table 11-3 shows the equilibrium moisture content of soybeans that will be achieved at any given temperature and relative humidity of the air moving through the soybeans. Notice that 90°F air, with 70% relative humidity, will dry the soybeans down to 13.0%, but no farther. Cooler, or more humid air, will not dry the soybeans down to 13.0%. Hotter, or less humid air, will dry the soybeans to lower than 13.0%.
|
Temp |
Relative Humidity |
||||||||||
|
°C |
°F |
10 |
20 |
30 |
40 |
50 |
60 |
65 |
70 |
80 |
90 |
|
1.7 |
35 |
4.2 |
5.3 |
6.5 |
7.8 |
9.4 |
11.5 |
12.8 |
14.4 |
19.1 |
28.9 |
|
4.4 |
40 |
4.1 |
5.3 |
6.4 |
7.7 |
9.3 |
11.3 |
12.6 |
14.2 |
18.9 |
28.7 |
|
10 |
50 |
4 |
5.2 |
6.3 |
7.6 |
9.1 |
11.1 |
12.4 |
14 |
18.6 |
28.2 |
|
15.6 |
60 |
4 |
5.1 |
6.2 |
7.4 |
8.9 |
10.9 |
12.2 |
13.7 |
18.3 |
27.8 |
|
21.1 |
70 |
3.9 |
5 |
6.1 |
7.3 |
8.8 |
10.7 |
11.9 |
13.5 |
17.9 |
27.3 |
|
25 |
77 |
3.8 |
4.9 |
6 |
7.2 |
8.3 |
10.6 |
11.8 |
13.3 |
17.7 |
27 |
|
32.2 |
90 |
3.7 |
4.8 |
5.8 |
7 |
8.4 |
10.3 |
11.5 |
13 |
17.3 |
26.5 |
|
40 |
104 |
3.6 |
4.6 |
5.6 |
6 |
8.2 |
10 |
11.2 |
12.6 |
16.9 |
25.9 |
|
43.3 |
110 |
3.6 |
4.6 |
5.6 |
6.7 |
8.1 |
10 |
11.1 |
12.5 |
16.7 |
25.6 |
|
46.1 |
115 |
3.5 |
4.5 |
5.5 |
6.6 |
8 |
9.9 |
11 |
12.4 |
16.5 |
25.4 |
|
50.1 |
112 |
3.5 |
4.5 |
5.4 |
6.6 |
7.9 |
9.7 |
10.8 |
12.2 |
16.3 |
25.2 |
|
Source: ASAE Data D245.5 / Halsey Eqn. |
|||||||||||
Soybeans, like any other grain, will dry at the bottom of the pile of grain sooner than higher up in the pile. Therefore, one of the challenges of drying soybeans is to get the whole pile of soybeans dry without overdrying the bottom of the pile. Table 11-3 is useful to help determine when to, and when not to, run the fan to move more air through the pile of soybeans.
Another challenge is to match up the configuration of the space under the floor of the bin with the size and orientation of the fan and with the size of the motor that moves the fan. Your grain bin supplier should be able to help you get these factors matched up to let you dry, but not overdry, what you can harvest in one day. Realize that the fan and motor may be big enough that noise while the fan is running will be a concern; you can help alleviate the problem by locating the fan and motor on the opposite side of the bin from the home.
Table 11-4 gives an estimate of how long you can store soybeans without encountering significant damage and price discounts. To hold soybeans as long as Table 11-4 suggests, it is advisable to run the fan at least once a month to alleviate moisture migration in the bin. Which way the moisture inside the bin moves depends on the temperature outside the bin compared to the temperature inside the bin, but running the fan periodically when the temperature and relative humidity are close to those shown in Table 11-4 to generate close to the desired moisture content can make the moisture migration a nonissue. Storing soybeans gives you much more flexibility in when to price and deliver your soybeans.
Rarely is the market year high price (typically April to September) not $2/bu greater than the market year low price (typically October to December). Having your own bin to unload your harvest into also eliminates the waiting in line to get to the scales at the elevator. The disadvantage of storing soybeans is the cost of the bin and the risk of the soybeans deteriorating in quality while in storage.
|
Temperature (ºF) |
Soybeans Moisture Content |
|||||
|
11% |
12% |
13% |
14% |
15% |
16% |
|
|
40 |
150 |
61 |
29.0 |
15.0 |
9.4 |
6.1 |
|
50 |
84 |
34 |
16.0 |
8.9 |
5.3 |
3.4 |
|
60 |
47 |
19 |
9.2 |
5.0 |
3.0 |
1.9 |
|
70 |
26 |
11 |
5.2 |
2.8 |
1.7 |
1.1 |
|
80 |
15 |
6 |
2.9 |
1.6 |
0.9 |
0.9 |
|
*Based on 0.5% maximum dry matter loss, calculated on the basis of USDA research at Iowa State University. Corresponds to one grade number loss; 2 to 3% points of total damaged seeds. |
||||||
Publication date: Jan. 6, 2022
AG-835
Other Publications in North Carolina Soybean Production Guide
- The Soybean Plant
- Soybean Production and Marketing in North Carolina
- Rotational Considerations
- Variety Selection
- Planting Decisions
- Fertilization and Nutrient Management
- Weed Management
- Disease and Nematode Management
- Insect Management
- Key Management Strategies to Increase North Carolina Soybean Yield: What We Have Learned From 877 Soybean Yield Contest Entries
- Harvesting, Drying, and Storage
- Soybean Facts
Recommendations for the use of agricultural chemicals are included in this publication as a convenience to the reader. The use of brand names and any mention or listing of commercial products or services in this publication does not imply endorsement by NC State University or N.C. A&T State University nor discrimination against similar products or services not mentioned. Individuals who use agricultural chemicals are responsible for ensuring that the intended use complies with current regulations and conforms to the product label. Be sure to obtain current information about usage regulations and examine a current product label before applying any chemical. For assistance, contact your local N.C. Cooperative Extension county center.
N.C. Cooperative Extension prohibits discrimination and harassment regardless of age, color, disability, family and marital status, gender identity, national origin, political beliefs, race, religion, sex (including pregnancy), sexual orientation and veteran status.
