
This publication shows how to build a simple, economical bale press and gives instructions on baling plastic bottles and jugs. The baler is ideal for small recycling programs with limited resources. Using the bale press, plastic bottles and jugs can be compressed into bales approximately 3 feet long, 2 feet wide, and 1 foot deep. Each bale holds at least 200 plastic milk jugs and weighs 35 to 40 pounds. This baling method requires no fork-lift or electricity.
The baler described here is well suited for staffed recycling and solid waste convenience centers. Two balers can be placed at each site, with a collection container for milk jugs (HDPE) next to one baler and a bag or barrel for plastic soft drink bottles (PETE) next to the other. When the containers are almost full, a worker can transfer the contents into the respective balers and make bales.
This bale press is based on a design originally developed to bale burley tobacco. Reinforcing the baler at strategic points with angle iron makes it capable of withstanding the pressures needed to bale plastic containers. In addition, a high-lift-capacity presshead can be substituted for the automobile jack used in the original, providing greater compression force.
Depending on what materials are used, the bale press may cost between $50 and $150. Using scrap or used goods will obviously lower the expense, but be sure to use materials of the specified sizes. A high-lift capacity presshead costs more than an automobile jack but it is more effective for making plastic bales.
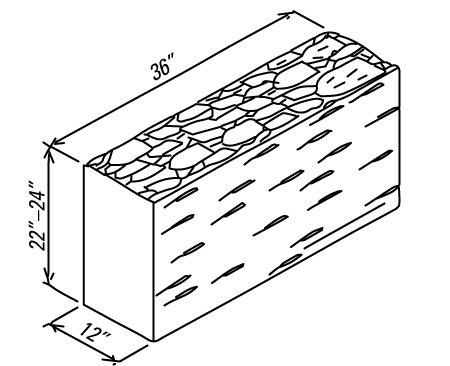
Plastic bottles and jugs can be compressed into bales similar to Burley bales.

A one-box bale press can be used to make a bale press but may be more costly than other options.
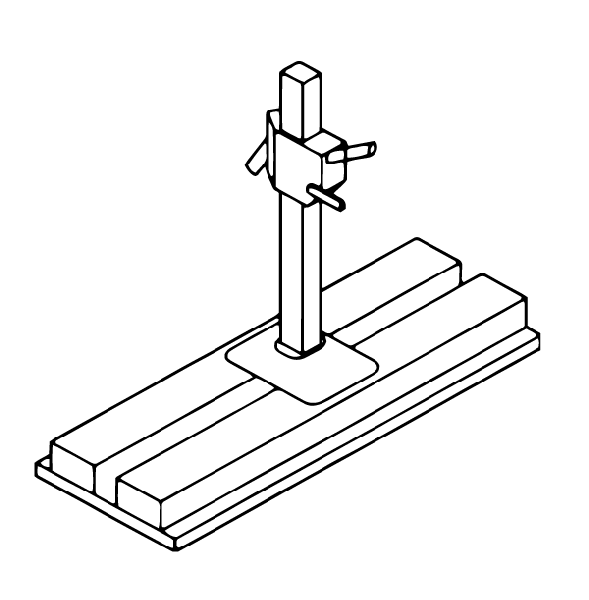
An automobile jack may be an economical option for making a bale press.
Materials
The materials needed to build the baler are shown in the box below.
|
Materials Needed to Construct a One-Box Bale Press |
||
|
Plywood |
1⁄2-in. A-C Ext. |
1 4-ft by 8-ft sheet |
|
Wood |
2 in. by 4 in. (dressed) |
4 pieces each 8 ft long. Note: One 2-by-4 is ripped lengthwise to form two 8-foot 2-by-2s. |
|
2 in. by 6 in. (dressed) |
1 piece 433⁄8 in. long |
|
|
Screws |
No. 8 by 15⁄8 in. |
2 lbs |
|
Bolts |
1⁄2 in. by 5 in. |
2 (for Jack anchor frame) |
|
Miscellaneous sizes |
To attach jack frame to presshead. |
|
|
Angle iron |
3⁄16 in. by 2 in. by 2 in. |
Various lengths to reinforce box and presshead. |
|
Latch |
6-in. heavy-duty safety hasp with 1⁄2-in. or 5⁄8-in. No. 10 flat-head screws |
2 (OR make latches from angle iron) |
|
Rod |
1⁄2-in. dia. by 4-in. long |
1 (Needed only if an automobile jack is used.) |
|
Jack |
high-lift-capacity OR automobile bumper type |
1 |
Construction
Follow these steps to construct the baler.
- Step 1. Cut the plywood pieces.
- Step 2. Cut the 2-by-4 and 2-by-6 wood pieces.
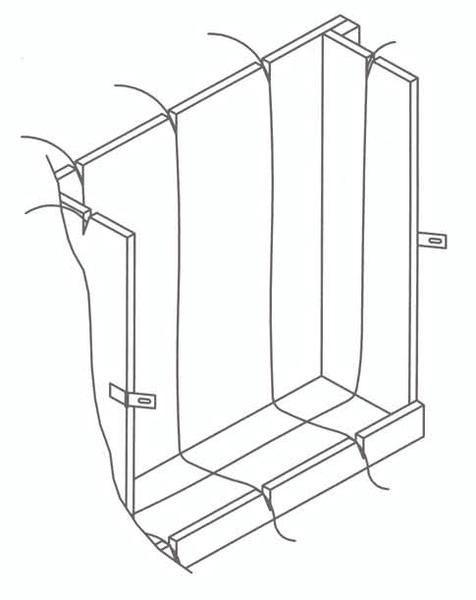
- Step 3. Assemble the bale box.
Note: One of the 2-by-4s is ripped lengthwise into two 8-foot 2-by-2s. Put the ripped edges of the 2-by-2s toward the plywood and attach with No. 8 screws spaced 6 to 8 inches apart.- Screw a 421⁄2-inch 2-by-2 to the smooth side of the plywood back.
- Screw an 87⁄8-inch 2-by-2 to the smooth side of the plywood ends.
- Screw the ends to the back.
- Set the box upright and put the bottom snugly in the box with the wide edge to the front.
- Put the front and rear 2-by-4 sills in notches under the box and fasten them with screws through the bottom and back.
- Screw the plywood base to the front sill with 1 inch extending above the bottom to serve as a stop for the door.
- Cut saw notches and slits for twine in the back, base, and sides.
- Fabricate the door.
- Set the door in position and install hasp fasteners or angle iron.
- Fabricate the press head and reinforce it with angle iron.
- Bolt the jack base to the press head.
- Fabricate the jack anchor frame.
- Mount the jack anchor frame on the box.

Cut plywood for the back ends, door, bottom, and press head boards of the bale press.
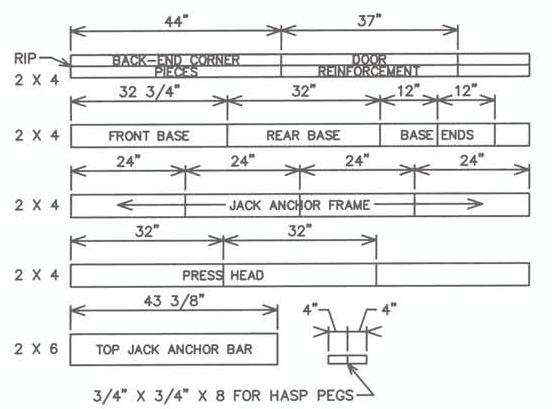
Cut 2-by-4 and 2-by-6 wood pieces for the back-end corner pieces, door reinforcement, front and rear base, ends, jack anchor frame, press head, and top jack anchor bar.
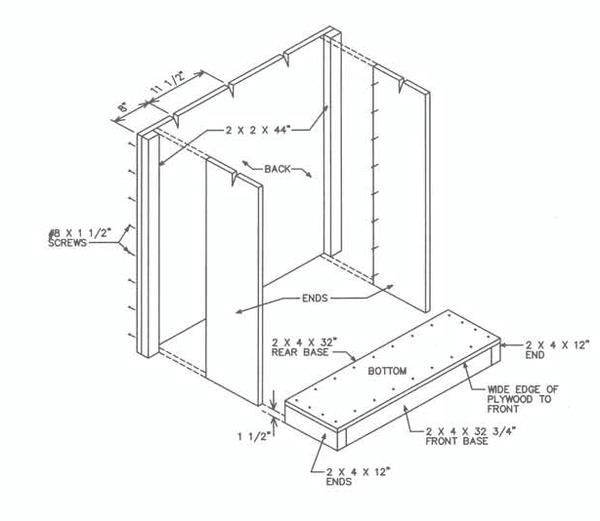
With the box upright, place the bottom in the box.
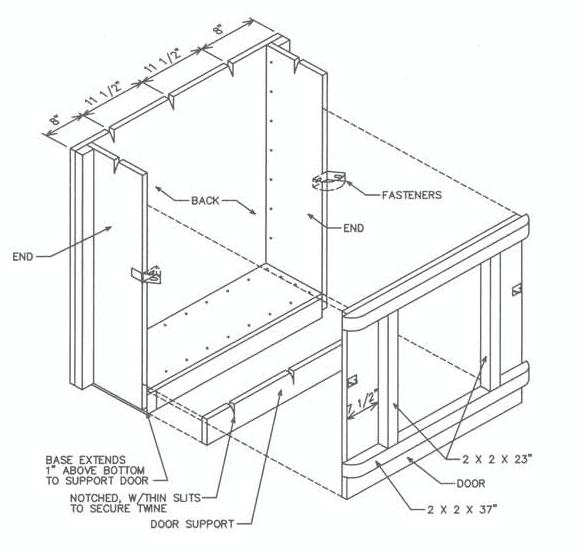
After building the box and installing the sills, install the door support and door.
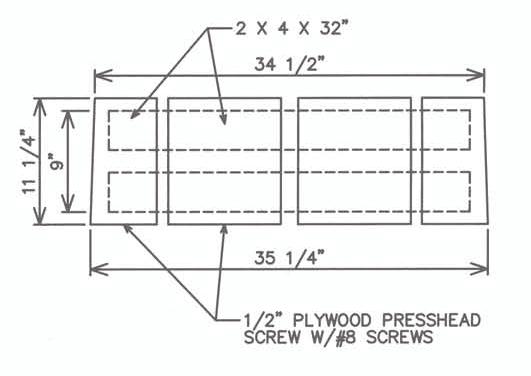
Build the press head with ½-inch plywood and 2-by-4-by-32-inch lumber.
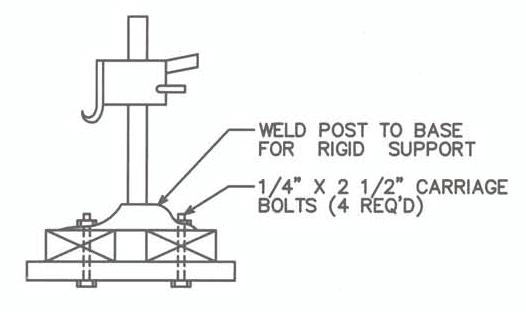
Weld post to base for rigid support and use four ¼-inch by 2 ½-inch carriage bolts to secure the jack base to the press head.
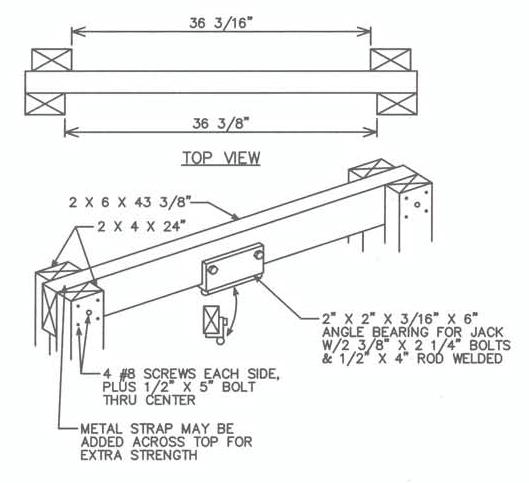
Build the jack anchor frame. A metal strap may be added across the top for extra strength.
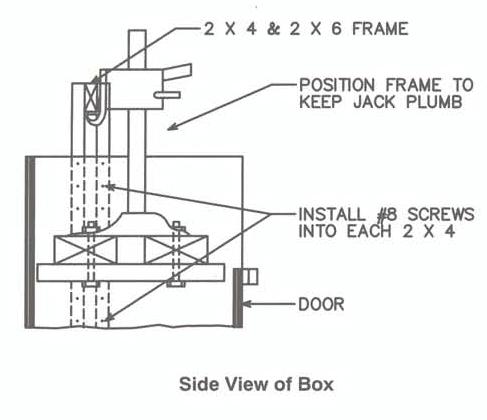
To mount the jack anchor frame on the box, position the frame to keep jack plumb and install #8 screws into each 2-by-4.
Making Bales
- Set the bale press box next to the plastic bottle or jug collection bag or container. If you are working outdoors, set the baler firmly on concrete blocks, wood, or other material to keep it off the ground so its base is protected from moisture.
- Cut a supply of 85- to 90-inch-long twine. (Use the cotton type approved for tobacco baling use; haybaling twine will break too easily.)
- Remove the door and put three pieces of twine along the back and bottom of the box. Also run a piece from one side across the bottom and up the other side.
- Replace and latch the door.
- Set a piece of appropriately sized cardboard on the bottom of the baler.
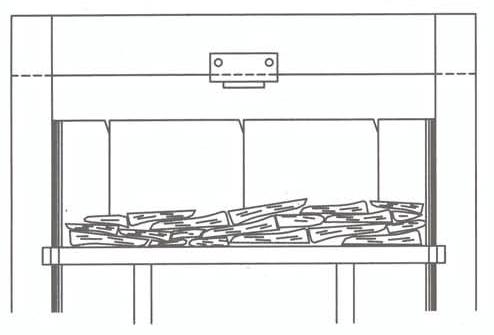
- Fill each box with plastic bottles or jugs.
- Use the jack to compress the plastic containers.
- Refill the box with plastic containers as needed to get the right amount for a firm bale.
- Before final pressing of the bale, place a piece of cardboard across the top of the plastic containers. Pull the ends of the twine from the back toward the front across the cardboard.
- Press the bale to a firm height of 21 to 24 inches. Remove the front door. Pull each piece of twine snug and tie it with a bow knot.
- Retract the bale presshead and tie the side pieces of twine across the top of the bale. Remove the bale and take it to a storage area. To help maintain the integrity of the bale and increase ease of handling, you can place the bale into a clear plastic bag.
CAUTION: ANY EQUIPMENT INVOLVING COMPRESSION CAN CAUSE INJURY THROUGH THE SUDDEN AND UNEXPECTED RELEASE OF PRESSURE if operator error or structural failure occurs. Do not use excessive force in compressing bales. Examine the baler before each operating period for damaged or loose components and correct any problems before using the unit. Use the baler only for its intended purpose. Caution persons other than the operator to stay a safe distance away when the baler is in use.
Place three pieces of twine along the back and bottom of the box and place one piece from one side to the other.
After replacing the door and setting a piece of cardboard on the bottom of the baler, fill each box with plastic containers.
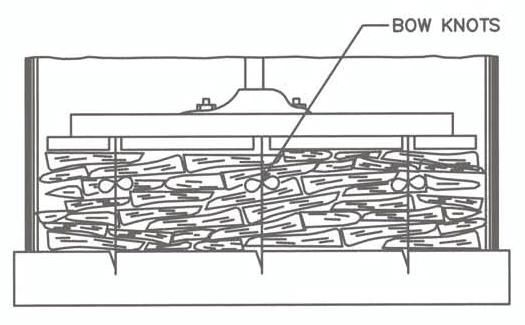
Once the bale is pressed to 21 to 24 inches, remove the door and tie the twine with a bow knot.
Acknowledgments
The material in this publication was adapted from Preparing Burley in Bales, published by the University of Kentucky, College of Agriculture, Cooperative Extension Service.
Publication date: Feb. 1, 1994
Reviewed/Revised: July 23, 2019
AG-473-12
There is an alternate Spanish language version of this document here: Empacadora Económica para Reciclar Botellas y Garrafas de Plástico
N.C. Cooperative Extension prohibits discrimination and harassment regardless of age, color, disability, family and marital status, gender identity, national origin, political beliefs, race, religion, sex (including pregnancy), sexual orientation and veteran status.
