
Even the best herbicides will not provide effective weed control if they are not applied accurately and uniformly. Too little product results in poor weed control and higher hand-weeding costs. Too much can injure crops, reducing the number available for sale. Most granular herbicide labels contain some recommended settings for common application equipment. However, these recommendations are just starting points. To obtain the correct dose, you need to calibrate the spreader. Spreader calibration is essentially a very simple process:
- measure the width of spread;
- apply the granules to a small area;
- measure the amount applied to this area;
- compare this amount to the desired dose and adjust the spreader settings until the desired output is obtained.
Simple, right? However, in practice, this is easier said than done. In this factsheet we cover the steps required to determine the effective swath width and application rate.
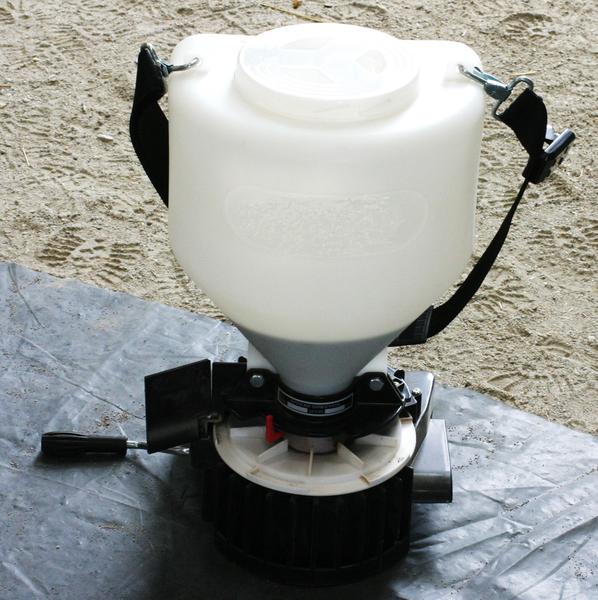
Generic spreader.
The Importance of Maintaining a Consistent Speed
Both your walking speed and the speed at which you turn the spreader handle will influence the rate at which the product is applied. A consistent speed will help maintain a uniform application rate and distribution. See factsheet AG-826, Using a Hand-Cranked, Hand-Held Spreader to Apply Herbicides in Container Nurseries for more information on how walking speed affects spreader output.
Walking Speed
- Measure a distance of 100 feet in an area that is similar to the location where you will be applying the granules.
- Using a stopwatch, determine how long it takes to walk 100 feet. Most spreader manufacturers recommend walking about 2 to 3 mph. At 3 mph it takes about 23 seconds to walk 100 feet. A 2 mph pace requires about 34 seconds per 100 feet.
- You may use a metronome to help keep a consistent walking speed (Figure 1). Experiment with a few different settings until you find one that allows you to walk at the desired pace. To achieve a 3 mph pace, a good starting point is between 99 and 103 beats per minute. But this number will be different for different applicators. A mobile phone application metronome also works.
- The metronome can be clipped to the spreader while applying the granules.
Handle Cranking Speed
- Turn the spreader crank at a consistent speed that is easy to maintain— generally one rotation per second.
- You can practice with the metronome set to 60 beats per minute until you can walk with a consistent pace.
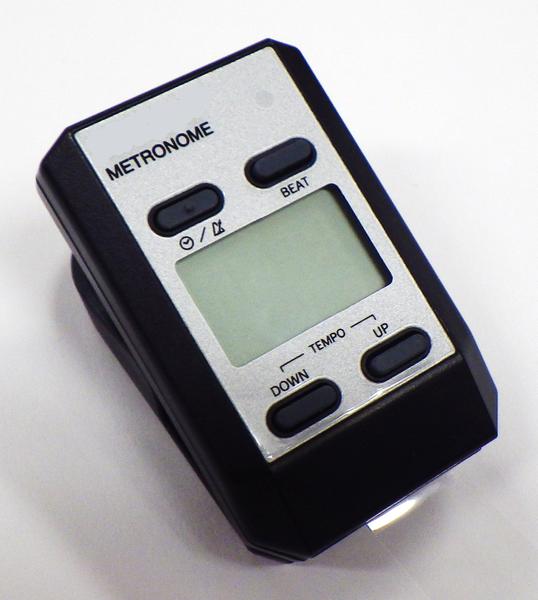
Figure 1. A portable metronome like this can help you maintain a consistent walking pace and cranking speed.
Spreader Calibration Step 1: Determining the Effective Swath Width and Distribution Pattern
Granular spreaders do not distribute the same amount of material across the width of the treated area. More granules are deposited directly in front of the applicator than at the edges. Consequently, the applicator will have to overlap each pass when applying herbicides. For this reason, you need to determine the effective swath width. The effective swath width will be narrower than the entire width of spreader throw. Here are the supplies you will need:
- Granular spreader
- Herbicide of choice
- 7 to 9 containers such as catch bins, trays, or 1 gallon (3 or 4L) nursery pots lines with plastic bags
- Measuring tape
- A small scale (able to measure 1 gram)
- Metronome (battery operated, clip on)
- Stop watch
- Numbered bags/jars to hold herbicide granules
- Personal protective equipment
Steps:
- Set out the catch pans or bins 2 feet apart on center, perpendicular to the direction you will be walking (Figure 2 and Figure 3). Place the pans on a flat, dry, and empty nursery bed covered with landscaping fabric or plastic.
- Mark a starting point about 20 feet in front of the center box. Mark a point along your walking path to open the hopper (at least 12 feet in front of the center box).
- Practice walking toward the boxes at a consistent pace, using a steady handle cranking speed and stepping over the center box (use the metronome).
- Fill the spreader at least 1⁄2 full.
- Use the center rudder position (or just right of center) as shown in Figure 4.
- Adjust the spreader to the herbicide manufacturer’s recommended output setting and spread granules while walking toward and over the boxes. Open the hopper at least 12 feet in front of the center bin and always walk toward the bins from the same direction. Keep the hopper open until just past the catch bins. Repeat the process at least two more times. NOTE: When spreading, start turning the handle before you open the spreader hopper and continue turning the handle after closing the hopper until no more granules spread out. This helps reduce spreader jamming.
- Weigh the granules collected in each bin.
- Measure the weight of granules collected in the center bin. Divide this number by two and find the collection bins on either side of center that have about half as much product as the center bin. The distance between the two bins is the effective swath width (Example A).
- To determine the distribution pattern (Example B), use a piece of graph paper to chart the amount of granules in each bin and draw a line through the center (Figure 5). If the pattern is lopsided, plan to spread granules in one direction or make two passes in opposite directions over the same path.
- If the test site was dry, you can sweep up the granules and reuse them.
Example A: Determining the Effective Swath Width
In this example, the weight of the herbicide collected in each bin is recorded in the chart below.
| Collection tray or bin (by distance from center) | |||||||
| - 6 ft | - 4 ft | - 2 ft | 0 (center) |
2 ft | 4 ft | 6 ft | |
| (left of center) | (right of center) | ||||||
| Grams collected | 0.0 | 0.6 | 2.4 | 2.4 | 2.4 | 1.2 | 0.0 |
- 2.4 grams were collected in the center bin. Half that amount would be 1.2 grams.
- The bin 4 feet to the right of center contained this amount.
- On the left side, the area to receive 1.2 grams of material would be about halfway between the bins 2 and 4 feet left of center.
Thus, we would conclude that the effective swath width would be from about 3 feet left of center to 4 feet right of center, or 7 feet wide. This is the width used in Spreader Calibration Step 2: Determining the Application Rate.
Example B: Determining Distribution Pattern
Graph the amount of granules in each bin (Figure 5). This particular distribution pattern is balanced with similar amounts spread to the left and right. However, depending upon the granule, the spreader, and the dose applied, the amount spread to the right may be greater than the amount applied to the left.
|
Alternative Swath Width Method: If you don’t have a scale, you can use a technique developed by NC State University Pesticide Education Specialist Dr. Wayne Buhler. This approach uses a clear seven-day pill organizer to visually estimate swath width (Figure 6). Caution: clearly label the box as having been used with pesticides and keep the box in the pesticide storage facility.
|

Figure 2. Layout of catch bins, two feet apart, on center.
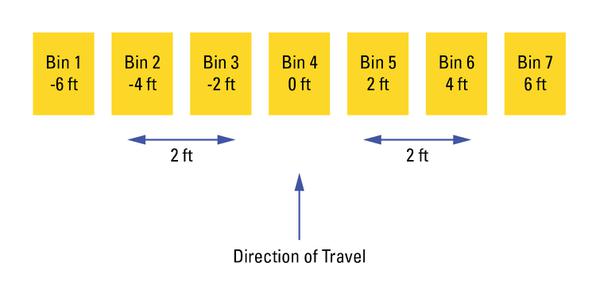
Figure 3. Calibration catch pan/tray setup. Set collection trays or bins 2 feet apart, on center. Walk down the center (carefully stepping over the center collection tray). Repeat at least three times.
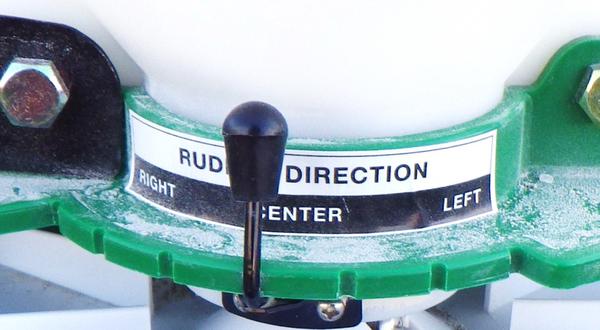
Figure 4. Use only the center rudder position (or just right of center) to achieve the most uniform pattern.
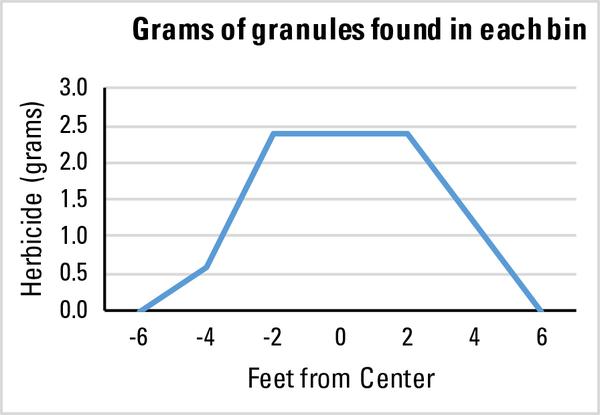
Figure 5. Distribution pattern created by graphing the amount of herbicide in each bin.
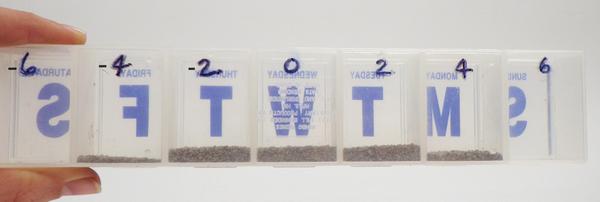
Figure 6. A clear pill box can be used to determine the swath pattern. The numbers correspond to the distance from center (in feet) as in Example A.
Spreader Calibration Step 2: Determining the Application Rate
Bins, trays, and pots are useful for collecting granules when determining swath width. However, our research indicates that they are not a reliable tool for calculating the application rate. Instead, it is better to weigh the amount of herbicide applied to a known area, and then adjust the spreader settings to obtain the desired dose.
- Fill the hopper on the spreader at least 3⁄4 full of product.
- Weigh the filled spreader and record the weight (Figure 7).
- Operate the spreader over a known distance (at least 25 feet).
- Reweigh the spreader and subtract the current weight from the original weight to determine how much product was used.
- Calculate the area covered (distance the granules were spread multiplied by the swath width of the spreader).
- Calculate the dose (weight of granules used divided by the square feet of area covered).
- Adjust the spreader output setting or your walking speed until your application dose is within 10% of the labeled (or target) dose.
For more information on determining application rates using granular spreaders, see North Carolina State University publication AG-628, The Calibration of Turfgrass Boom Sprayers and Spreaders.
Example C: Determining the Dose
- Assumptions:
- Labeled (target) herbicide dose: 150 lb/A
- Effective swath width: 7 ft
- Length of walking area: 30 ft
- Area = 210 sq ft (swath width x length of area treated)
- Beginning weight of spreader with herbicide granules: 195 oz
- Ending weight of spreader with herbicide granules: 186 oz
- Difference: 9 oz applied
- Convert ounces to pounds: 9 oz ÷ 16 oz per lb = 0.56 lb applied
- Calculate the dose:
- Divide the amount applied by the area to obtain the amount per sq ft:
0.56 lb ÷ 210 sq ft = 0.0027 lb/sq ft - Multiply by 43,560 (number of sq ft per acre) to obtain the dose in lb/A.
0.0027 lb/sq ft x 43,560 sq ft/ acre = 118 lb/A
- Divide the amount applied by the area to obtain the amount per sq ft:
- This dose is more than 10% below the target dose of 150 lb/A. Adjust the spreader settings (or walking speed) to allow slightly more output and repeat the process until the rate falls within the acceptable range (135 to 165 lb/A).
You will need to follow this calibration procedure for each herbicide.
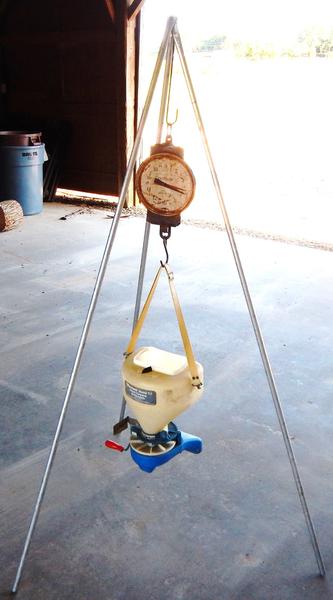
Figure 7. A milk scale, or a similar scale, can be used to weigh the spreader.
Acknowledgement
This publication was made possible by funding from the Southern IPM Enhancement Grant Program.
Publication date: Feb. 27, 2017
AG-828
Recommendations for the use of agricultural chemicals are included in this publication as a convenience to the reader. The use of brand names and any mention or listing of commercial products or services in this publication does not imply endorsement by NC State University or N.C. A&T State University nor discrimination against similar products or services not mentioned. Individuals who use agricultural chemicals are responsible for ensuring that the intended use complies with current regulations and conforms to the product label. Be sure to obtain current information about usage regulations and examine a current product label before applying any chemical. For assistance, contact your local N.C. Cooperative Extension county center.
N.C. Cooperative Extension prohibits discrimination and harassment regardless of age, color, disability, family and marital status, gender identity, national origin, political beliefs, race, religion, sex (including pregnancy), sexual orientation and veteran status.