
Here are techniques and tips that will enable you to prune just about any landscape plant. There is nothing quite like getting the pruners in hand and getting out there, so once you get the basics down, go practice!
Timing of Pruning
You first must know the species, its condition, and the reasons you are pruning. As always, remove broken, dead, weak, or heavily shaded branches anytime. You can do light pruning about anytime. Remove unwanted growth to improve the structure of trees when the plant is young to prevent large pruning wounds. It is critical to train young trees for future form as early as possible. Pruning early means better health for the plant and the pocketbook! If you are unsure about how to prune trees, contact a certified arborist for guidance.
General Pruning Guidelines
- All Plants:
- Pick the right cultivar and you should not need to prune as much or as often.
- Remove dead branches, suckers, crossing branches, and other weak stems that do not contribute to the overall form early in the plant’s life.
- Summer: Do not prune heavily during hot, dry weather. After an extended drought, wait until the following growing season to see what has died due to water stress. This will help you avoid removing live wood unnecessarily.
- Begin building good structure in trees when the plants are young to avoid large wounds. If you know you will not be able to return to the plant within a year or two, prune at planting. This is not the preferred method, but it is the best way to correct form problems and make small wounds rather than waiting to prune years later.
- The “one-third rule” provides a basic guide. Typically, you should not remove more than a third of the total crown of a plant in any one year. This is especially true of mature or older trees. In addition, when thinning, remove a terminal (bud or branch) back to a lateral bud or branch that is at least a third if not half the diameter of the branch you are removing.
- Late Summer:
- Prune after most of the seasonal growth is complete to slow growth and maintain plant size.
- Do not prune too severely or too early, which may encourage new shoot growth.
- Winter:
- Delay pruning until late winter or early spring to avoid creating wounds when decay fungi are sporulating (developing reproductive spores) in autumn.
- Do not prune excessively during the dormant season, particularly large, mature trees. Do not remove a large number of branches that are larger than about 2 inches in diameter. Keep pruning to a minimum.
- Spring:
- If extensive pruning takes place before spring growth, cold injury may be a problem. Additionally, open wounds will be exposed to an influx of air, drying out living tissue. If possible, postpone pruning until after a new flush of leaves has hardened and turned dark green in late spring or summer and the chance of extreme weather has passed.
- Investigate the influence of timing on infection and development of various vascular or foliar diseases and the flight of boring insects before you prune highly susceptible species. For example, Dutch elm disease is vectored by elm bark beetles. Remove dead and infected branches in fall, when adult beetles are not flying. For more information on Dutch elm disease, see the U.S. Forest Service website on How to Identify and Manage Dutch Elm Disease.
- If your aim is to maximize flowering, take care not to cut off the flower buds. Determine whether flower buds develop in the previous year or the current season.
- How can you tell when they bloom? Flower buds are typically much larger than leaf buds, so begin by looking at the buds on the stems. Take note of when the key plants in your landscape flower.
- In general, if plants bloom before June, they bloom on old-season growth, and you should prune them directly after blooming.
- If they bloom later in summer, they bloom on new growth and you can prune during their dormant season or before growth begins in the spring.
- The final publication in this series, How to Prune Specific Plants (AG-780-04), includes recommendations on how and when to prune the most commonly used landscape plants.
- Deciduous Plants:
- Growing season: Conduct light structural and corrective pruning now because it is easier to see what is dead, and the wounds close over more quickly while plants are growing.
- Bark and cambium are damaged and separate from wood when pruned during a growth flush. Energy for wound closure is low then because it is diverted to shoot elongation, flowering, and fruit production.
- Autumn: Prune those species such as birch, elm, and maple that “bleed” heavily (sap flows from the roots to the top of plant) in late winter or spring when sap is not flowing. Although bleeding is seldom harmful to trees, some researchers have found that heavy and persistent bleeding can cause bark injury below the pruning cut and retard callusing.
- Cambial dieback around pruning wounds can increase when cuts are made in autumn compared to other times. Wood water content is lower at this time.
- Late summer/early autumn: Limit pruning because it may stimulate a flush of growth or delay dormancy in species such as elms and maples that flush many times in a growing season. Shoots or cambium on limbs or trunks may be damaged by an early frost. One of the worst times to prune trees is when they are going into dormancy.
- Dormant season: General pruning. This is the best time to direct growth on young plants if kept to a minimum. Moderate to heavy pruning can stimulate cambial activity and new growth on plants like crape myrtle and species that may be on the edge of their hardiness zones, such as subtropicals. The new succulent stems are not cold hardy, and a light frost can cause damage. Cambium damage is displayed as cracks near the pruning cuts.
- Growing season: Conduct light structural and corrective pruning now because it is easier to see what is dead, and the wounds close over more quickly while plants are growing.
- Evergreens:
- Late winter: Prune just before spring growth begins. Many broadleaved evergreens will respond well to this type of pruning.
- Summer maintenance: Prune after growth is complete for the season, when you can slow growth and maintain plant size much more easily. Do not prune too severely or too early, which may encourage new shoot growth.
Pruning Methods
Size Reduction
There are a number of acceptable ways to reduce plant size. Heading or heading back (Figure 1) removes currently growing or one-year-old shoots back to a bud or an internode. You can also cut an older branch or stem back to a stub or a small twig (one that is less than a third to half the size of that being removed). There are several ways to head back a plant: pinching, tip-pruning, and shearing. Professionals refer to the heading of large branches or trunks as topping or stubbing, and this is an inappropriate pruning practice.
In response to heading young branches and leaders, new growth develops from buds just below the cut. This new growth may be quite vigorous, growing densely and upright. When you head back (top) large branches or trunks, latent buds grow and are attached only by the thin layer of the current season growth. Branches formed by these buds are typically weakly attached. This explains why topping can lead to an increased hazard due to branch failure.
Reduction cuts (Figure 2) are used to train young trees and shrubs, to shorten branches, to control the direction of growth, and to remove unwanted branches. When performing a reduction cut, shorten a branch to a lateral large enough to assume the role of the terminal you are removing. The lateral branch should be a third to half the size of that being removed. When a reduction cut is made, no stub is left, unlike when making a heading cut. When properly reduced, a plant will not grow back as vigorously as when headed back. These cuts direct growth, retain a more natural shape, and allow greater light penetration, thereby increasing interior growth. A removal cut takes off a branch at the collar. This is used to thin plants, direct growth, and to elevate limbs, particularly on trees. Elevating limbs is also referred to as crown raising. Nursery or landscape professionals remove lower branches at a branch collar to obtain clearance for equipment and human or vehicular traffic. Most cities have ordinances that require certain height clearance above a road and the sidewalk.
Cutting Small Branches or Twigs
Cut back to ¼ inch above a vigorous branch or bud that is pointing in the direction in which you want the plant to grow. Do not leave a stub (which could make it difficult for the plant to seal the wound) or cut too close to the bud or branch, as that could damage the branch collar.
Cutting Larger Branches
Use a removal cut to take branches back to the collar. The collar is an area of tissue where the branch attaches to the trunk or to a larger branch and is often somewhat swollen. The branch collar is made up of protective tissue that chemically protects the interior wood and allows the cambium to grow over the wound, sealing it off with a protective cover. If you remove the collar by making a flush cut, you remove the protective zone and increase the chance of fungal organisms infecting the plant. Always look for the branch collar and branch bark ridge (see Important Terms) to determine the location and angle of the cut. When determining the angle of the cut, you should be able to visualize a 45° angle between the cut line and the branch bark ridge if present (Figure 3 and Figure 4). Figure 4A, Figure 4B, and Figure 4C illustrate how the locations of the branch collar and branch bark ridge vary based on species, which then varies the angle of the proper cut.
Branch collars are not always visible. Some branches do not form a distinct collar, so there is a smooth transition from the trunk to the branch. Branches with a bark inclusion (Figure 5) do not typically have a collar, nor do codominant stems. A tree with codominant stems has more than one central leader, and a bark inclusion may occur in the branch union as these branches grow.
If you need to remove a limb larger than 2 inches in diameter, you should use the three-cut method (Figure 6, Figure 7, Figure 8, and Figure 9). The first cut is an undercut and prevents bark from ripping potentially down into the collar. This cut should be between 4 inches and 6 inches from the collar, depending on the diameter of the branch. The second cut removes the branch’s weight. The final cut removes the stub left at the collar. The third and final cut will determine how quickly and well the plant closes the wound. This is the most important cut. Its success is based on the placement (proximity to branch collar), the angle (which determines both the size and shape of the wound), and the proficiency (whether the wound is smooth and clean). When cutting a limb of this size, use a hand saw to make the cleanest possible cut.
If you wait until later in the life of the tree to make corrective and structural pruning cuts, you will necessarily be making larger wounds (Figure 10, Figure 11, and Figure 12). Doing so incorrectly by making a flush cut only makes the damage much more significant, and the wound will likely never close over. It is much more important to make correct cuts if you are removing large limbs to ensure sound wound closure (Figure 13).
Never apply wound paint or tar, as this is typically used for cosmetic reasons and may actually lead to a greater chance of infection. Tar keeps moisture and darkness in the wound, creating the perfect environment for disease organisms.
On occasion, a plant will “tell you” that you made an incorrect cut (Figure 14). If you make a flush cut or leave a stub behind, the plant may respond by producing adventitious growth. This growth begins when a bud develops from places other than a shoot’s apical meristem, such as on stems, roots, or leaves. Adventitious growth is not necessarily bad. We use this biological function to our advantage when propagating plants by vegetative cuttings. In addition, if terminal or lateral buds are lost, adventitious growth can allow plants to continue to elongate. Adventitious growth also photosynthesizes, providing energy that the plant will need to respond to a potentially poor cut.
Choosing which branches to remove is a matter of science and art. Take your time. Make the easy cuts first. Remove diseased, damaged, and crossing branches and then take out weak branches and those growing toward the middle of the plant. Next, remove any V-shaped branch unions with bark inclusions, as these are weakly attached. After you make these cuts, step back and look over the plant from all sides. This will give you perspective and allow you to prune in keeping with the plant’s natural form. This is where the art comes in. When you have to make a choice between two branches, consider which is growing in the desired direction, which has the wider angle of attachment to the trunk, and which appears healthiest. Look for a branch with an angle between 45° and 90°. U-shaped branch unions have a stronger attachment and are preferred over those with a tight V-shaped branch union.
The one-third rule is helpful to keep in mind if you are just learning. In many cases, you should not remove more than a third of the total crown of a plant in any one year. As you become more proficient at pruning, you must begin to consider the age of the plant to determine the appropriate pruning dose. A young, healthy tree can tolerate a pruning dose of around 50 percent, while healthy trees in their 20s to 40s (depending on how long they may live) tolerate a dose of about 25 percent, and old trees in good health can stand no more than 10 percent.
In addition, when conducting a reduction cut, remove a terminal (bud or branch) back to a lateral bud or branch that is at least a third if not half the diameter of the branch you are removing. By doing so, you will be leaving sufficient leaf area to take over the photosynthesis work lost with the branch removed. Additionally, if you leave a large enough lateral branch, decay should not enter the remaining branch. If you do not have one branch that meets that requirement, it is fine to take the terminal back to two or more laterals that equal a third or half the diameter. As trees get older, your goal is to remove only dead or damaged branches. If you have trained the plant well, that will be the case. In some instances, you may be forced to remove a large limb because it poses a safety hazard or was damaged in a storm. In that case, be aware that the wound might never close over. This does not mean certain doom; it does mean a bit more stress for the tree and greater risk of decay leading to disease infection. Always consider contacting a certified arborist for large tree pruning, as they have the equipment and knowledge to make the best cuts.
Remember that pruning is wounding a plant. Only remove live branches for a good reason. Additionally, the more accurate the cut, the more likely the wound will close over quickly with little or no decay.
Unlike animals, trees cannot heal their wounds. Sometimes, depending on the severity of the injury an animal receives, there will be a scar, but the tissue is repaired. Woody plants cannot repair cells, however, so they wall off the wound from the surrounding tissues (Figure 15). This system is termed CODIT, or compartmentalization of decay in trees. It is what allows trees and shrubs to endure injuries without succumbing to them. This is critical to a plant’s survival because plants cannot move out of the way of danger—such as construction, lawn mowers, or storms.
The following series of pictures illustrates various plant growth habits and shows how to make a variety of pruning cuts. Learning how to use removal, reduction, and heading cuts will help you become an accomplished pruner. We cover this subject in detail in a companion publication in this series, How to Prune Specific Plants (AG 780-04).
Whether you are removing a watersprout (Figure 16A and Figure 16B) or a lateral branch (Figure 17), you typically make a removal cut. Use this type of cut to remove a branch back to a trunk or parent stem at the collar (sometimes called a collar cut).
A reduction cut (Figure 18A and Figure 18B) is used to reduce the height of plants or the length of branches. Cut back to a lateral branch that is ⅓ to ½ the diameter of the one being removed.
One last useful cut to know is a heading cut (Figure 19). Heading is a type of pruning that severs a shoot or stem that is no more than one year old, cutting it back to a bud. Additionally, a heading cut can be made when a stem is removed back to a lateral branch less than ⅓ the diameter of the cut stem. Most commonly, heading cuts are made along a stem without regard to the location of nodes (buds or stems). We typically use heading cuts to maintain shrubs such as forsythia and privet.
When making a heading cut, be aware that the plant will grow back vigorously from any remaining buds below the cut. Heading cuts on oppositely arranged plants, like privet or viburnum, will cause the plants to become much bushier. To prevent this, you can make a reduction cut (Figure 20) and use your finger to rub off the bud you do not want (or snip it off with pruners). The remaining bud will grow in the direction you want it to, and the plant will not get as bushy.
You can also make plants shorter by thinning. This is done with removal cuts (Figure 21).
While many landscapers and homeowners “head” back their crape myrtles (Figure 25A), the type of pruning they are actually employing is called topping. Topping is an inappropriate means of reducing the height of a tree. These cuts destroy the tree’s architecture and will likely lead to the entrance of decay-causing organisms. Decay can then lead to stem failure. Do not confuse topping with pollarding (Figure 25B). Pollarding is done by removing very small branches yearly with a hand pruner.
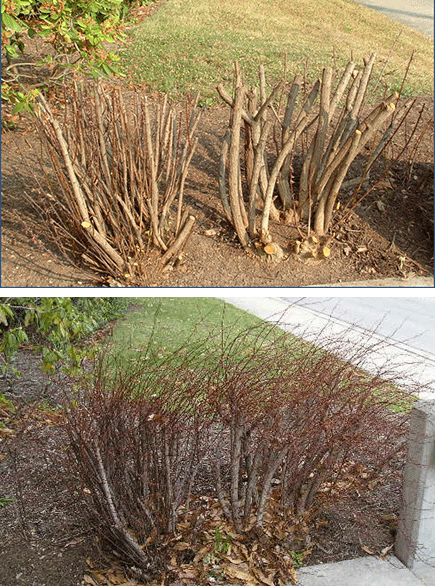
Figure 1. Left, barberry shrubs headed back to rejuvenate them. The plants produced a flush of growth at the top of the stems (right). For a bushier appearance, it would have been better to have cut these plants back to about 6 inches above the ground.
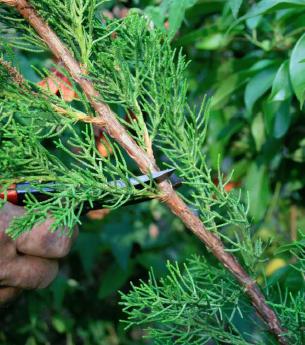
Figure 2. Reduction cut made back to a lateral branch.
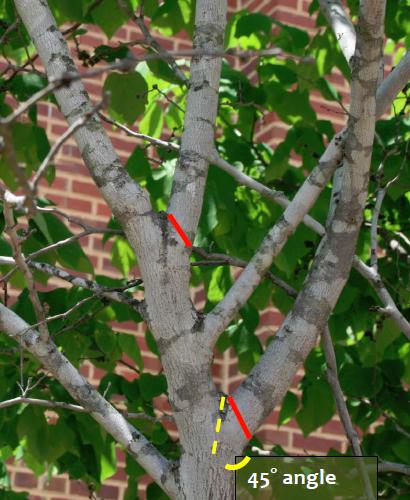
Figure 3. Red lines indicate where to make the cut on these branches. These are for removal cuts.
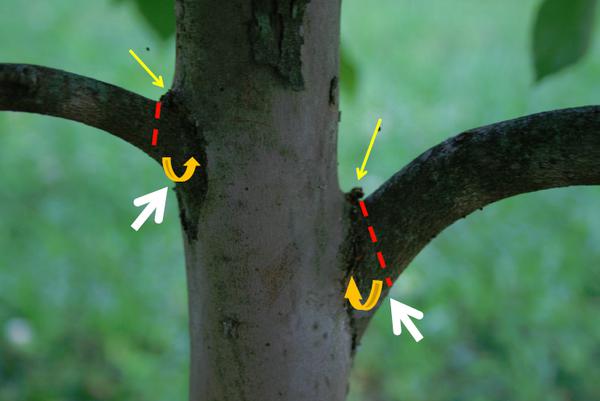
Figure 4A. Branch collar shown at white arrows on a sycamore. Branch bark ridge shown at yellow arrows. Gold arrows show correct angle of cut along the dashed red lines.

Figure 4B. Branch bark ridge shown on oak at yellow arrow. Dashed red line shows correct cut.
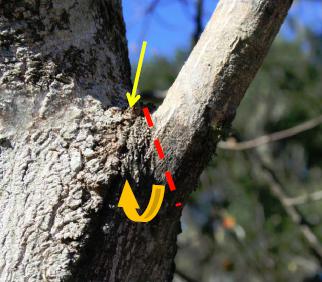
Figure 4C. Branch bark ridge shown on a different oak species at yellow arrow, and dashed red line shows correct cut. Gold arrow shows the correct angle.
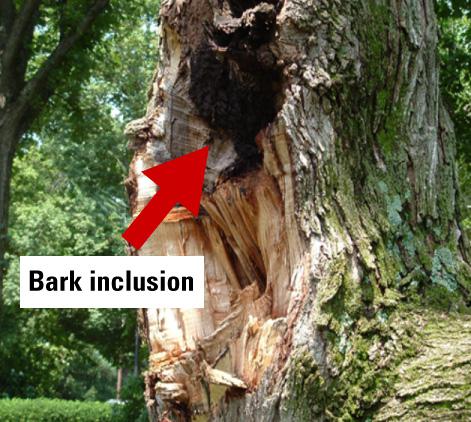
Figure 5. Bark inclusion on large maple tree. This contributed to branch failure.
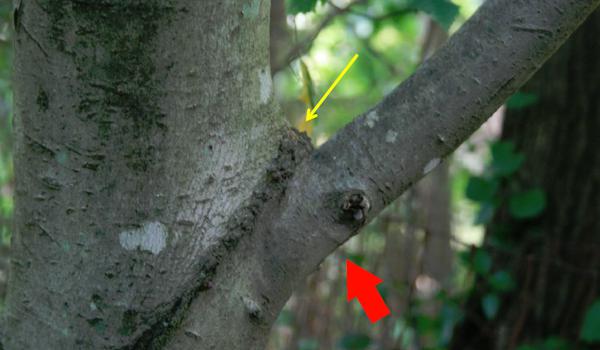
Figure 6. For branch removal, locate branch bark ridge (yellow arrow) and branch collar (red arrow).
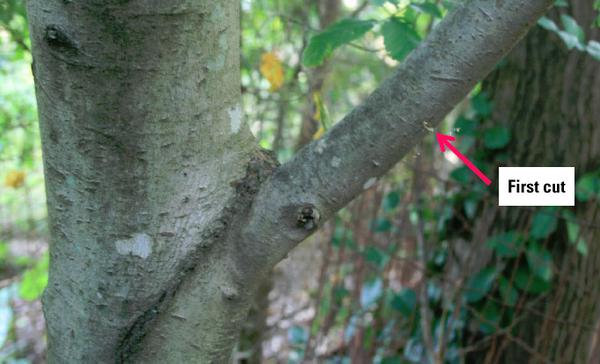
Figure 7. Make first cut (undercut at pink arrow). This prevents bark ripping, which causes poor wound closure.
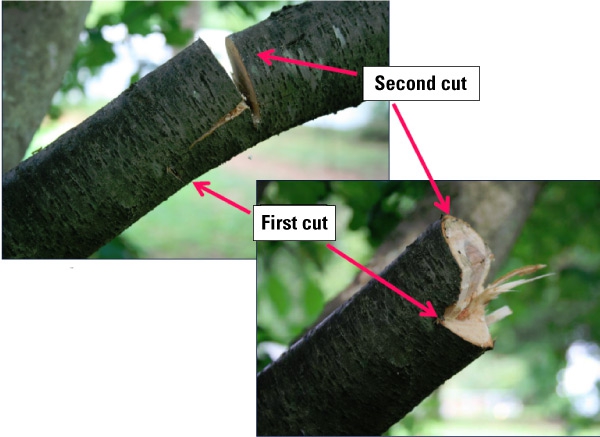
Figure 8. Remove weight of branch with the second cut.
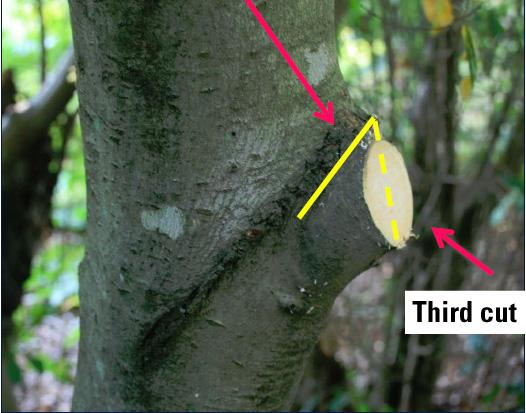
Figure 9. Remove remaining stub with cut at the branch collar. The angle between the cut and branch bark ridge approximates a 45° angle.
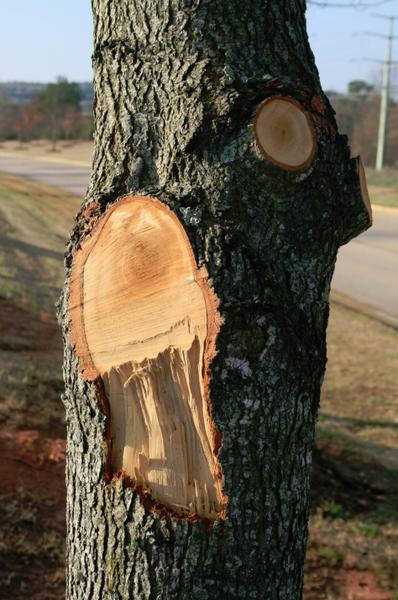
Figure 10. On this tree, the proper first undercut would have prevented bark ripping, particularly important on larger-diameter branches.
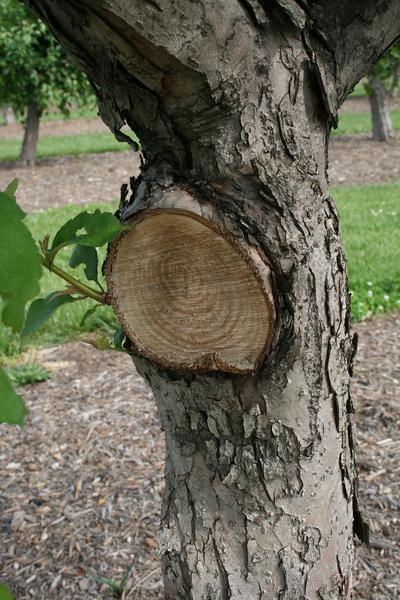
Figure 11. Landscape managers should have removed this branch long before it got to this size. But they also made two other mistakes. They didn’t undercut, and they cut into the collar by making a flush cut.
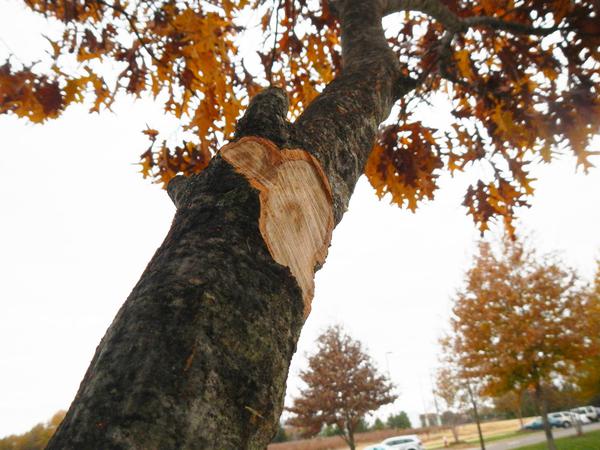
Figure 12. These flush cuts will likely not close over and will likely lead to decreased health and vigor of the tree.
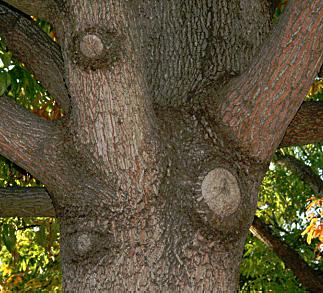
Figure 13. The closure of these wounds indicates that the arborist made proper pruning cuts.
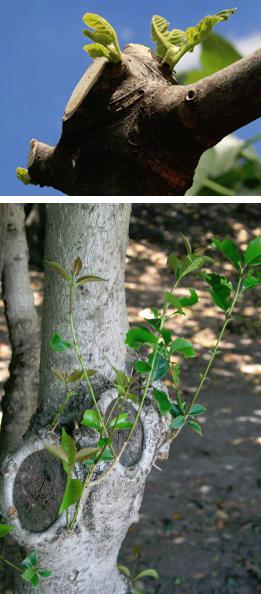
Figure 14. This common fig and Nellie Stevens holly illustrate what happens when an incorrect cut initiates the development of adventitious growth.
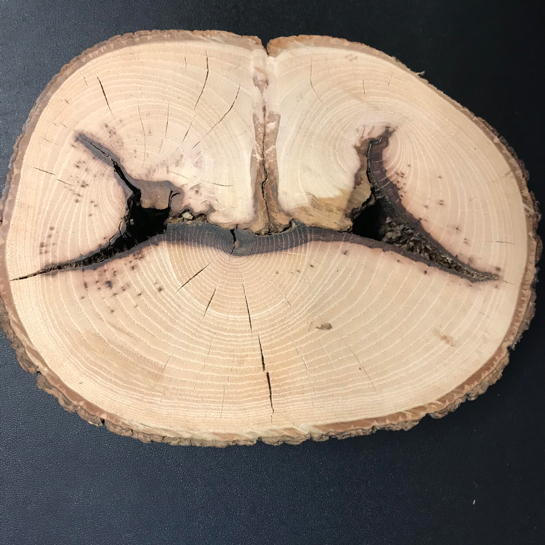
Figure 15. When injured, a tree closes the wound off from surrounding tissues.
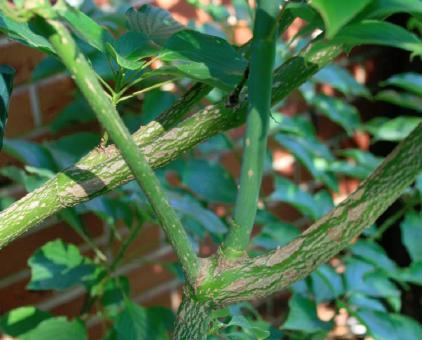
Figure 16A. These watersprouts formed from latent buds.
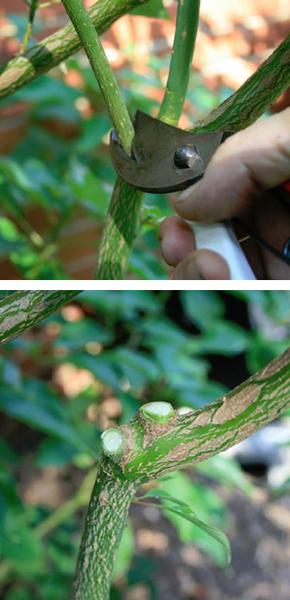
Figure 16B. Remove watersprouts with a removal cut at the branch collar before they become woody to prevent regrowth.
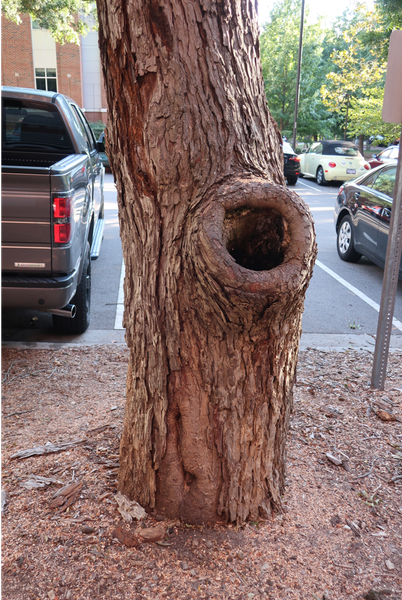
Figure 17. This branch was removed for clearance, but many years later than it should have been. Therefore, you see decay inside the collar.
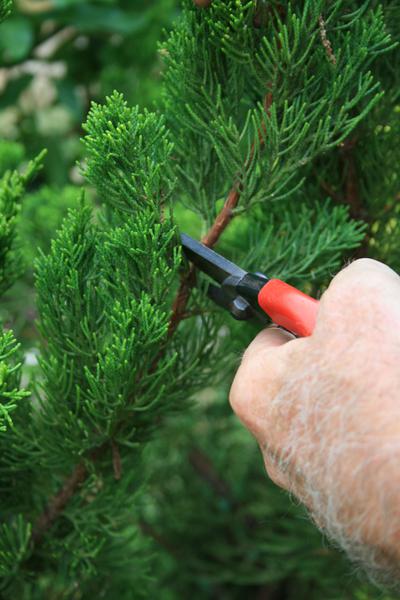
Figure 18A. This reduction cut reduces the height of a juniper. Cut to a lateral growing in the direction you desire the branch to grow.
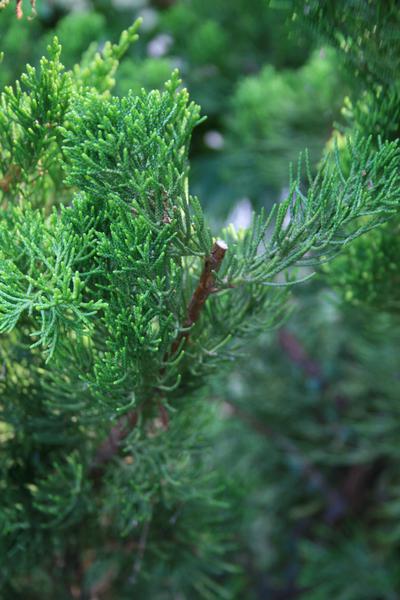
Figure 18B. Reduction cut to reduce height of a juniper.
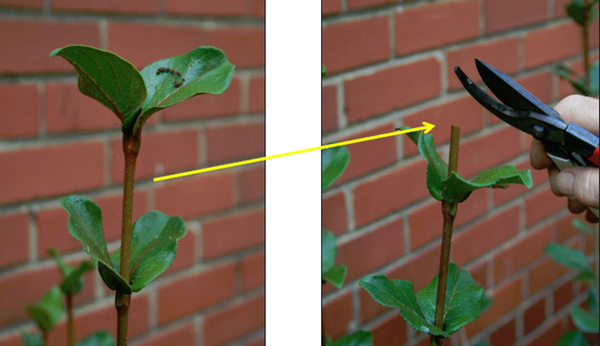
Figure 19. A heading cut was made to control growth of a viburnum shrub. Use heading cuts to shear plants into hedges and other shapes.
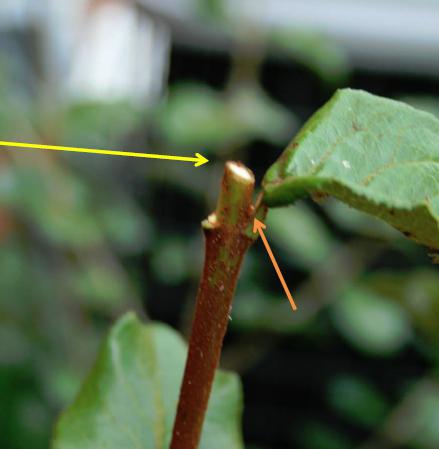
Figure 20. Instead of a heading cut, use a reduction cut to shorten a stem and direct its growth. In oppositely arranged plants, such as viburnum, remove one bud to prevent both from developing. The branch will grow in the direction of the remaining bud.
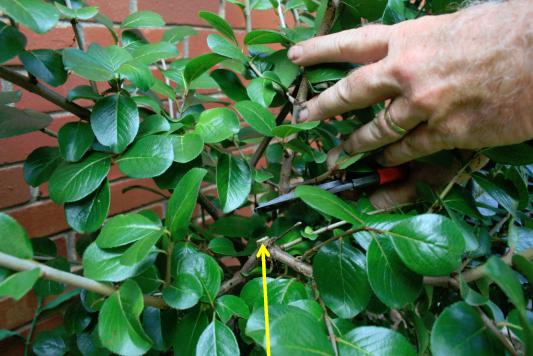
Figure 21. Another option for shortening a plant is to use a removal cut. You can even hide such cuts in the body of the plant.
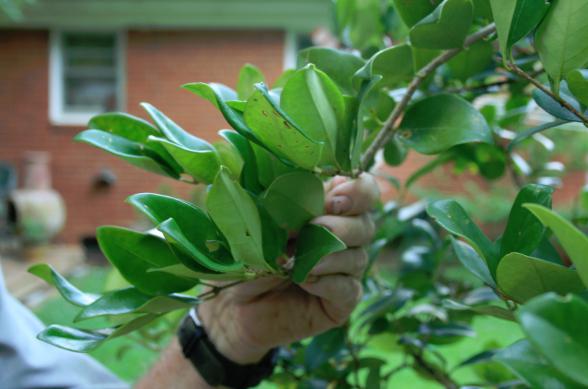
Figure 22. How would you prune this glossy privet? Prior to making the first cut, you must know the plant species and how it grows.
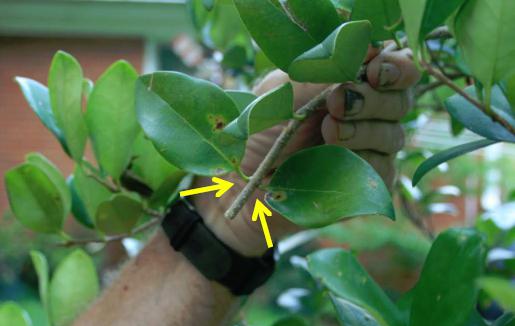
Figures 23A. A privet is oppositely arranged (note arrows). Reduce height by heading back, which is a typical way to shear privet. You can also cut back to the buds. But be sure to remove one bud unless you want bushier growth.
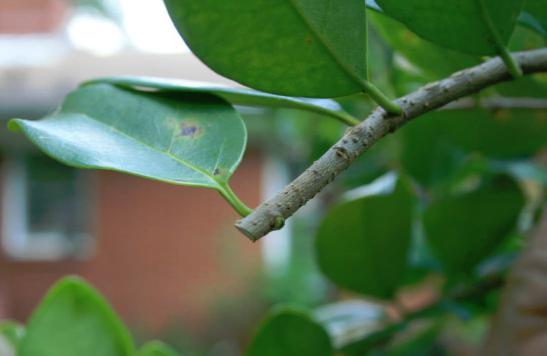
Figure 23B. Privet cut back and one bud removed.
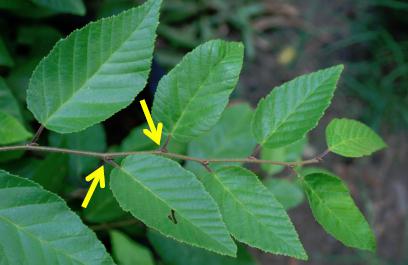
Figure 24. This hornbeam is alternately arranged (yellow arrows at nodes). Directing growth on alternately arranged plants is much easier because growth will occur in only one possible direction.
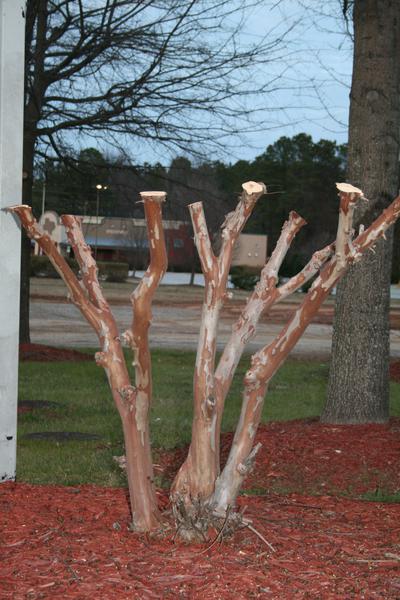
Figure 25A. Topped crape myrtle, which was inappropriately pruned.
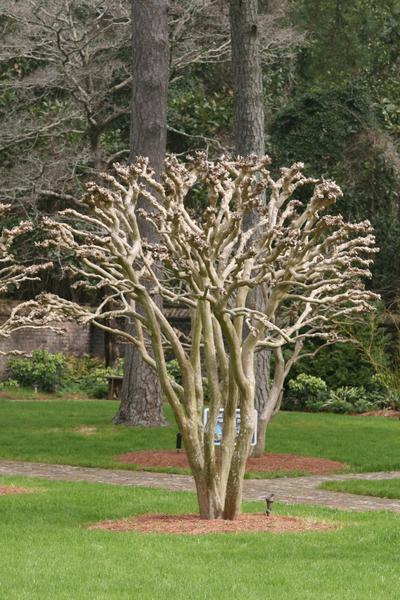
Figure 25B. Pollarded crape myrtle, which was appropriately pruned.
Maintaining Shrubs
Shrubs provide different pruning challenges than trees simply because there are so many species. Often shrub pruning will require a greater time investment because it is frequently done yearly to maintain a plant’s function in the landscape, such as for hedges. Understanding a few basic pruning techniques will help you determine how and when to prune shrubs.
We can place shrubs in a few categories. Knowing the category in which your plants fit will help you determine when to prune (in most cases). We can generally separate shrubs as follows:
- Deciduous (loses leaves every year)
- Blooms on one-year-old wood. This category includes most azaleas, forsythia, some spirea, quince, and many viburnums. Pruning is typically done directly after flowering.
- Blooms on new wood. This category includes beautyberry, butterfly bush, clethra, peegee, and panicled hydrangeas. Pruning is typically done in late winter or early spring, although it can be done in fall if fruit is not a key feature.
- Broadleaved evergreen (has broad leaves, some of which are lost each year)
- Some broadleaved evergreens bloom in spring, while others bloom in summer.
- Many are grown for foliage and not necessarily for flowers, such as aucuba. For example, evergreens such as ternstroemia and boxwood are not grown for flowers; they are grown for hedges or screens. Determining when to prune these shrubs will depend on their landscape function. Boxwood can be pruned a number of times throughout the growing season, depending on the plant’s growth rate, to maintain a hedge or topiary form.
- Hollies are typically placed in this category, although not all hollies are evergreen. For example, Ilex verticillata (winterberry holly) is deciduous. Although most hollies are not grown for flowers, they are often grown for fruit. Be sure not to remove the flowers to allow fruit to develop later in the year. Remember, many hollies are dioecious (male and female flowers occur on two different plants), so you must include both plants somewhere in the landscape to ensure that females will produce fruit. Sometimes you can rely on the plants in someone else’s landscape for fertilization of your holly flowers. Hollies are not always picky about the species that contributes the pollen.
- Needled evergreen (has narrow, very thin leaves, some of which are lost each year [two or more years old])
- Most needled evergreens, such as juniper (Figure 26) and false cypress, are grown for their foliage. This means pruning is easier. Often it is not needed at all! For example, rug juniper, Juniperus spp., is planted for ground cover. If planted correctly in the right location, it will need pruning only to remove dead or broken branches.
When you shear hedges, remember to leave the bottom of the plants a bit wider than the tops (Figure 28). This allows light to reach the lower limbs, keeping them lush and green. In addition, you may want to schedule some hand thinning for your hedges every three to five years. Using hand pruners, thin out portions of the canopy of each plant so light gets into the inner areas, allowing foliage to grow here as well. This goes a long way in preventing the thin veneer of leaves that often develops on hedges after being sheared for years (Figure 29).
Other than thinning and shearing, you need to know how to rejuvenate a plant. We have already covered how to make a removal cut versus a heading-back cut (which is shearing). Rejuvenation (Figure 30) is simply cutting older wood back to a few inches above the ground. For many plants, like abelia and shrub roses, you can remove all the stems in one year; for others, such as edgeworthia and some azaleas, it may be best to remove no more than about a third of the entire shrub crown each year. For some plant species, removing only older wood (1 inch in diameter or larger) allows young wood to thrive and produces better flowers. This is often true of slow-growers. This means it will take about three years to get the plant where you want; plus, you (or your customer) may prefer this approach because it is not as severe! Remember, rejuvenation is only meant for fully established plants. For shrubs, it may take only three to six months for a plant to become established in a site. For trees and larger shrubs, it may take half a year or a full year per caliper inch of size at planting to establish. For example, if a tree is 2 inches caliper at planting, it will take at least a year for this plant to establish. Establishment success depends on weather, proper planting, species, site conditions, and good after-planting care. Do not rejuvenate newly installed plants. This technique is a valuable tool, and you can actually do it on many species, even every year.
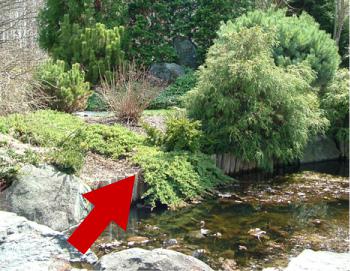
Figure 26. Dwarf Japanese garden juniper requires little pruning, as long as you consider its mature size.
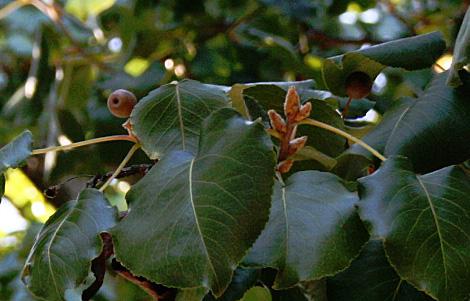
Figure 27. Callery pear in late summer with both fruit and flower buds for next year. Prune directly after blooming. However, it is best not to plant Callery pear as it is extremely invasive!
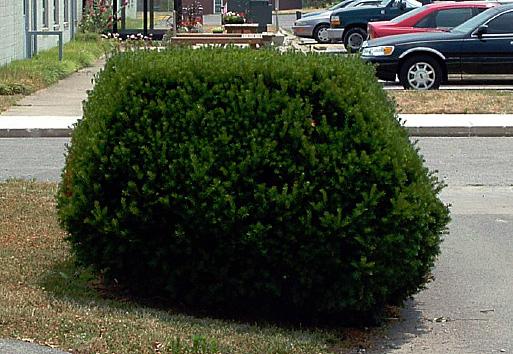
Figure 28. A yew properly sheared.
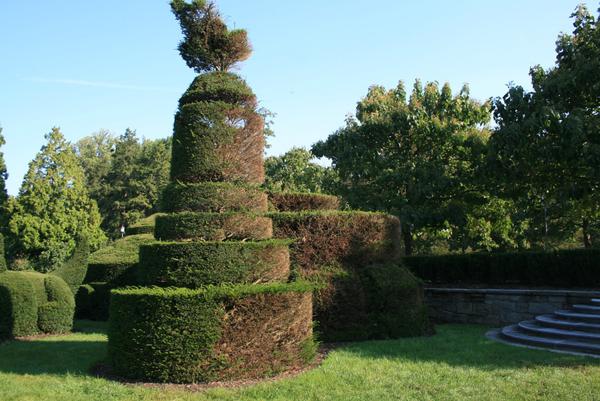
Figure 29. This yew has been pruned for years into this incredible topiary. Excessive shearing can lead to brown or dead areas. This plant could be rejuvenated with some long work and years of hand pruning.
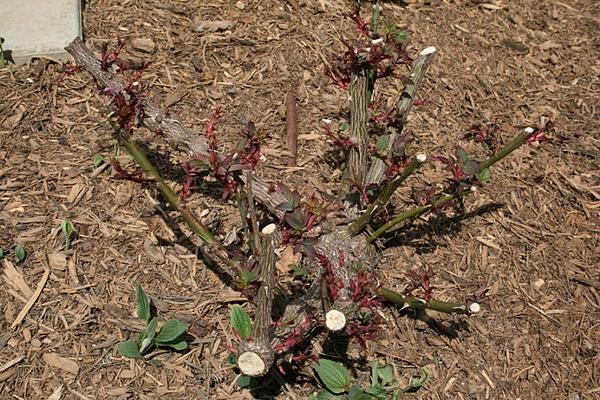
Figure 30. Rejuvenate Knock Out® roses by cutting back to about 6 inches from the ground. You can do this in fall or spring.
Specialty Pruning
Aside from shaping plants naturally, you can create other forms using the same pruning techniques we have discussed here, such as shearing and thinning cuts. We will present a few of the most common forms.
Espalier (Figure 31) is an ancient horticultural and agricultural practice used to control woody plant growth. Originally, growers used this method to produce fruit in limited space. We, of course, can do the same, as well as create espaliers simply for their unique beauty. Typically, this is done through removal cuts. To create an espalier, prune branches into a formal shape of your choosing (such as a horizontal branch pattern, squarish shape, or fan shape). Then either tie the branches to a frame or onto a flat vertical surface of some type, such as a wall, fence, or trellis. You can even attach branches to a building or allow them to stand free-form.
From late medieval times through the early 18th century, pleaching (Figure 32) was commonly used in gardens and on farms to create shaded paths or living fences out of trees or shrubs. It is not as common today in the landscape, but certainly should be because of its usefulness. This unique technique weaves living and dead branches together to form a living wall or fence. Farmers often used this method on established hedges to strengthen property lines. Often young branches will naturally graft together, strengthening the living structure even further. It requires some pruning to train the branches to grow in the desired directions.
As mentioned earlier, pollarding (Figure 33) uses a heading cut to remove all annual (or biennial) growth back to the same point on a branch, creating the pollard head. Sprouts will grow from the pollard head, creating lush new growth each year. This technique is much more popular in Europe than here in the United States. Do not confuse this technique with topping, which shortens branches incorrectly to a different point on the branch each year.
Topiary is the practice of pruning shrubs or trees to create unique shapes or living sculptures (Figure 34). This approach is typically accomplished with shearing or heading-back cuts.
A friend of the Roman Emperor Augustus was the first to write a description of topiary, indicating that this pruning art dates back to at least 38 B.C. Most likely, however, the Romans did not begin the practice. Instead, it was probably absorbed from earlier Mediterranean and Asiatic cultures. No matter where it started, topiary has become a familiar form of garden art.
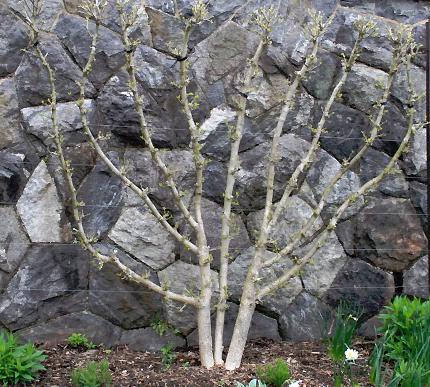
Figure 31. A fan-shaped, espaliered rose-of-Sharon.
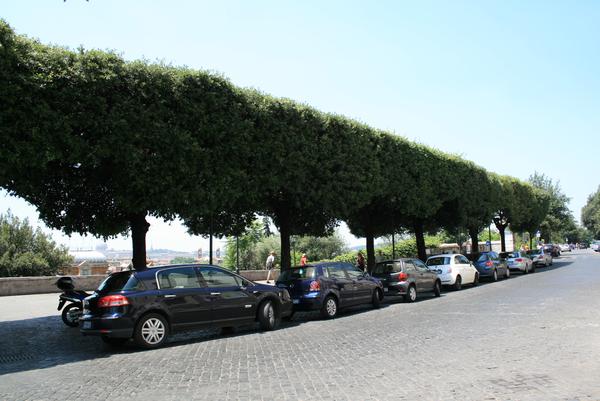
Figure 32. Pleached trees in Florence, Italy.
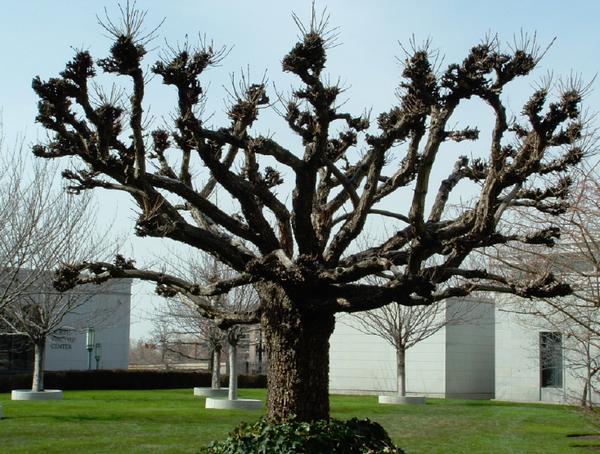
Figure 33. A properly pollarded tree. You may not like this look, but it is one way to control the size of some trees.
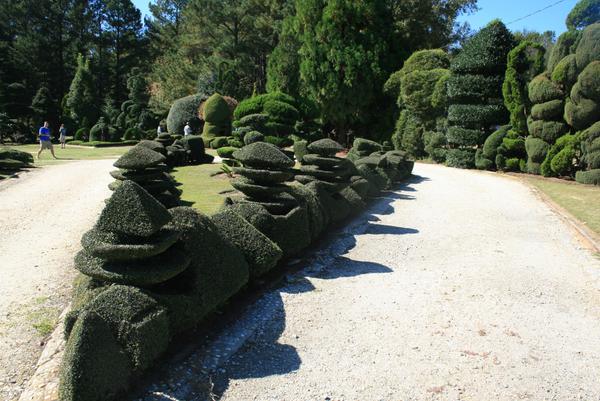
Figure 34. These incredible topiaries are growing in the small yard of Pearl Fryar in South Carolina. He began creating these in 1980.
Summary
See the other publications in the Pruning Trees & Shrubs series to learn more:
Before the Cut (AG-780-01)
Tools to Make the Cut (AG-780-02)
How to Prune Specific Plants (AG-780-04)
This series is a revision of a previous publication: Powell, M. A. 1998. Pruning Trees & Shrubs: A Guide for Grounds Managers (AG-071). Raleigh: NC State University, NC Cooperative Extension.
Important Terms
Know these terms before making the first cut! You can find these terms in italics in the text.
adventitious growth—growth that develops from places other than a shoot’s apical meristem, such as on stems, roots, or leaves. When axillary or lateral buds are destroyed, adventitious buds may develop on stems as secondary growth. These buds often form after wounding, such as pruning (often from incorrectly placed cuts), and they may develop on tree trunks due to stress. Those that develop on roots are referred to as suckers.
apical meristem—located at the tip of a plant shoot or root; produces auxin and causes the shoot or root to increase in length. Growth that originates in the apical meristem is called primary growth.
aspect ratio—the ratio between branch diameter and trunk diameter measured just beyond (above) branch union; ideally should be less than ½ the diameter of the trunk.
bark inclusion—bark developing between two codominant stems; weakens the union between the branch and trunk and can be a factor in branch failure.
bleeding—the oozing of sap through a pruning or other wound.
branch bark ridge—a mustache-like layer of bark located on the upper side of a branch in the branch union.
branch collar—the wood at the branch base that turns abruptly downward to wrap around trunk wood where a branch with a small aspect ratio joins with a larger parent stem.
cambium—a thin area of cells that accounts for growth of girth; located beneath the bark.
canopy—the total area of the branches of a tree or large shrub (crown).
codominant stem—a stem or branch growing at about the same rate and nearly of the same diameter as another stem or branch; both branches originate from the same union. A codominant stem does not have the same structure as a true branch.
crotch—the angle between two branches or between a branch and the trunk.
crown—refers to either the area of the main stem that is just underground or the total area of the branches of a tree or large shrub (canopy).
cultivar—a variety of plant that was produced from a natural species and is maintained under cultivation.
elevate (crown raising)—the removal of low branches to produce a taller, clear trunk that increases access under the canopy.
espalier—a plant trained through pruning to grow in a formal, two-dimensional form.
flush cut—destructive removal cut that cuts off or through branch collar and branch bark ridge.
heading cut—a pruning cut that removes only a portion of a stem, often an internode (a cut made between two buds or nodes).
internode—the area of stem between nodes.
latent bud—bud that fails to develop in the season it was formed but remains dormant and may later be stimulated into growth. If a branch breaks or is removed just above a latent bud, the bud will likely develop a new shoot to replace the lost wood.
lateral—bud or branch located along the length of a stem or branch.
leader—a stem that forms the main axis of a woody plant; a plant may have one or many leaders.
node—point on a stem where a leaf (bud) or stem was or is attached.
pinching—nipping out the tip of a growing shoot with your fingers.
pleaching—informally weaving tree branches together to form a living wall or fence.
pollarding—heading back all annual (or biannual) growth to the same point on a branch (scaffold branches, typically), creating a knobby growth called the pollard head that will sprout again the following year; not to be confused with topping, which removes branches to a different point on the branch each year.
pruning dose—the amount of pruning a plant needs; this will vary based on the age and health of a plant, as well as the plant species.
reduction cut—pruning cut that reduces the length of a branch or stem back to a live lateral branch large enough to assume apical dominance, typically ⅓ to ½ the diameter of the cut stem.
rejuvenation—involves removing oldest branches by pruning them near the ground. Rejuvenation can be done in stages or all at once, depending on pruning goals; plants should be fully established prior to rejuvenation.
removal cut—removing branches at the branch collar; typically done to open the canopy to air movement and increase light penetration.
scaffold branches—major branches that will make up the primary crown of a tree.
shearing—tip-pruning without selecting individual laterals or buds (topiary or hedge maintenance).
sucker—a shoot that arises at or below ground level from a plant’s root or underground stem; on grafted plants, any shoot that arises below the graft union (from the root stock).
terminal—a bud located at the end of a stem.
thinning—in pruning, increasing light and air penetration and reducing mechanical stress by removing branches primarily from the outer edge of the entire crown, or from selected branches.
tip-pruning—pinching out or cutting back the growing tip of a shoot either to encourage side shoots or to remove damaged growth.
topiary—practice of pruning a shrub or tree to create a shape or living sculpture; typically accomplished with shearing or heading-back cuts.
topping—heading a large branch or trunk, leaving large stubs; removes the plant’s natural form and can lead to internal decay and extensive sprout development.
U-shaped branch union—broad branch angle shaped like a “U,” which is less prone to breakage because it is strongly attached to main trunk or larger branch.
V-shaped branch union—very sharp, narrow branch angle that may be prone to breakage and likely formation of a bark inclusion.
watersprout—a vigorous vertical shoot growing from a branch above the ground or graft union, mainly from latent buds along the trunk or older branches and often stimulated by overpruning or some other stress.
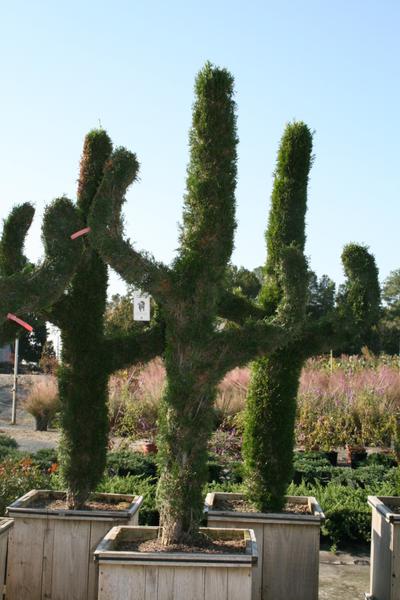
Arborvitae trimmed into cactus topiary.
Publication date: April 7, 2020
Reviewed/Revised: March 5, 2025
AG-780-03
N.C. Cooperative Extension prohibits discrimination and harassment regardless of age, color, disability, family and marital status, gender identity, national origin, political beliefs, race, religion, sex (including pregnancy), sexual orientation and veteran status.