
Although rainwater harvesting has been practiced for thousands of years, recent concerns over water supplies and the environment have prompted a renewed interest in this method of water sourcing. While advanced systems are commercially available, a homeowner can construct a simple rainwater harvesting system for home use with a basic understanding of its components and function.
A prolonged drought in North Carolina in 2007 and 2008 that necessitated mandatory water restrictions got consumers’ attention. Residents started thinking more about the options for alternative water sources. Most homeowners use potable water (treated drinking water) to satisfy all of their water needs, but this type of water can be replaced by captured rainwater for many purposes. For example, harvested rainwater can be used for watering gardens, washing vehicles, and flushing toilets. With special treatment and plumbing, it is even possible for harvested rainwater to become the primary water supply for a home or business.
A rainwater harvesting system captures stormwater runoff, usually from a rooftop, and stores that water for later use. Using harvested rainwater for purposes that don’t require treated drinking water has many advantages:
- It reduces the demand on municipal water supplies and thus increases the sustainability of drinking water supplies.
- Its use may be exempt from restrictions during a drought.
- It can reduce water bills, meaning the system can partially pay for itself.
- It can improve the environment by capturing nutrients and other pollutants from rooftop runoff, preventing them from contaminating surface waters.
- It can contribute valuable plant nutrients, such as nitrogen and phosphorus, to garden irrigation water.
A rainwater harvesting system consists of four main components (Figure 1).
- The cistern — or water storage tank — stores runoff for later use.
- The gutter system collects runoff from the rooftop and directs it into the cistern.
- The overflow pipe allows excess runoff to leave the cistern in a controlled manner.
- The outlet pipe, which is sometimes connected to a pump, draws water from the bottom of the cistern for use.
Consider all of these components and how they work together before installing a rainwater harvesting system. The cistern is the primary component, so select and locate it based on anticipated water needs. Remember that local plumbing codes might affect the installation, and periodic maintenance will be required.
Newer cistern designs intended to meet stormwater requirements often include a designed slow leak (called a passive drawdown). This publication does not address passive drawdown design, but information on this design feature is available in the Rainwater Harvesting section of the N.C. Division of Environmental Quality’s Stormwater Design Manual (PDF, 3.1 MB).
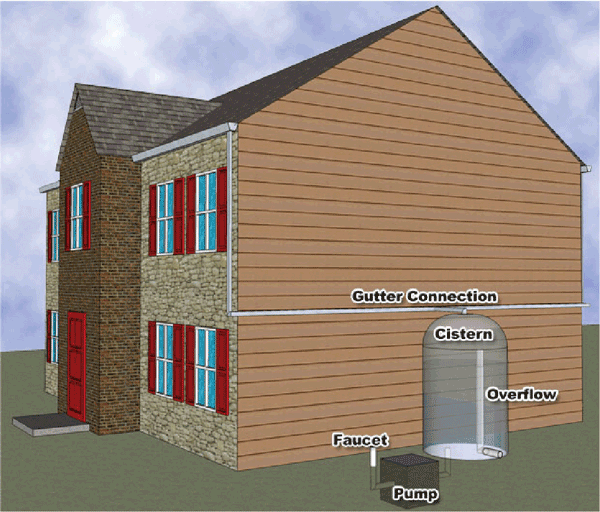
Figure 1. Basic rainwater harvesting system components.
Cistern Selection
Many online retailers sell tanks that can be used for rainwater harvesting. Some companies focus specifically on rainwater harvesting systems. Homeowners can also find water tanks at local stores that sell agricultural, lawn and garden, or industrial supplies. For most systems, the cistern will have to be ordered and shipped directly to the location where it will be installed. Due to the large size and weight of many cisterns, delivery charges can be substantial. Select a cistern based on its material, size, whether it will be installed aboveground or underground, and where it will be located.
Cistern Materials
Cisterns can be constructed from a variety of materials. The most commonly available cisterns are made of plastic, concrete, fiberglass, or galvanized metal.
Plastic cisterns are generally less expensive than other materials and don’t require assembly, but they may not be the most aesthetically pleasing choice. Their appearance can be improved with wraps made of wood or other materials. Plastic cisterns can be moved into place without much difficulty. They are relatively lightweight, and the plastic material can be easily cut or drilled with standard tools to install the necessary valves and fittings. The color of plastic cisterns is important. Translucent materials may permit algae growth within the cistern. Paint or other coatings can be used to prevent algae growth. Plastic tanks are relatively easy to paint or decorate. Check with your local paint store to make sure you are purchasing paint that will adhere long term to the type of plastic you will be coating.
Metal cisterns are often adapted from grain bins, and their basic appearance is generally preferred to plastic cisterns. Metal cisterns are typically assembled from sections of corrugated galvanized metal, and a plastic or neoprene liner is installed inside the cistern (Figure 2). Because a liner is needed, it may be difficult for an inexperienced installer to construct a metal cistern.
If the rainwater harvesting system will be used to supply drinking water, special cistern materials are required. If cistern-stored water is to be used for drinking, please consult a water-harvesting vendor and local drinking water ordinances. Only certain resins are approved by the U.S. Food and Drug Administration for storing potable water. Use of other materials may leach harmful chemicals into the stored water supply that cannot be easily removed by subsequent water treatment.
Cistern Size
The size of the rainwater cistern can have the greatest impact on system cost and performance. Several factors must be considered, including contributing rooftop area, rainfall patterns, and anticipated usage. Researchers at NC State University have developed a simulation tool that can help homeowners determine the ideal cistern volume to meet the desired outcome from a rainwater harvesting system. The free rainwater harvester model is available to download from the NC State Stormwater Downloads page.
Determining Contributing Rooftop Area
Examine the location of downspouts — and the gutters that drain to them — to determine cistern volume. You must estimate the rooftop area that flows to the gutters. Ignore the degree of pitch of the rooftop, as what is important is the horizontal projection (think of the 2-D view a bird sees when flying over). Then you can measure the area that drains to the downspout using a tape measure or by pacing. Estimate the contributing area by measuring the area of the roof at the ground or foundation level.
Anticipating Water Usage
Estimating how much water you want your rainwater harvesting system to provide is crucial to selecting an appropriate cistern size. One of the best ways to estimate water usage is to use a simple garden water meter to record how much water you use for purposes that will be served by harvested rainwater. Garden water meters measure the number of gallons flowing through a hose or other device. They are available from a variety of online retailers for $10 to $15. Additional methods for estimating water usage are discussed online in the user manual for the Rainwater Harvester™ model found at the NC State Stormwater Downloads page.
Rain Barrels
Rain barrels are less expensive alternatives to large rainwater harvesting systems and can be used to meet small outdoor water demands. A rain barrel is typically constructed from a 55-gallon container and has the same main components as a large rainwater harvesting system, including a gutter connection, overflow, and outlet valve or faucet (Figure 4). Because 55-gallon barrels are used to store and transport a variety of materials, used barrels are inexpensive to obtain. But they may require special cleaning, depending on their previous use. The relatively small size of a rain barrel usually does not merit the cost of installing a pump because gravity flow is generally adequate to fill a watering can. Although a rain barrel does not provide enough water to irrigate a lawn, it can be used to store water for hand-watering plants in a small garden area.
Above or Below?
Several factors will influence whether you choose to install your rainwater cistern aboveground or underground. Aboveground cisterns are typically easier to install than underground cisterns because neither excavation nor a buried plumbing network is necessary. Moreover, underground cisterns have limited accessibility after installation, making it difficult to repair leaks or other problems. Due to their increased structural requirements and the chance that they could float due to temporarily high water tables, underground cisterns are generally more expensive than their aboveground counterparts. (Do not place a plastic cistern manufactured for aboveground use in the ground; it will collapse.)
Unlike an aboveground cistern, in which some low pressure needs and casual uses can be satisfied without a pump, a pump is required to obtain water from an underground cistern. A suitable pump must be installed below the water level or be capable of providing adequate suction lift. A submersible pump or jet pump designed for shallow wells will pull water from an underground cistern. Pump selection is discussed in detail in Choosing a Pump for Rainwater Harvesting (AG 588-08).
The main advantage of underground cisterns is that they do not occupy valuable space in a yard. Underground cisterns also offer flexibility as to cistern location because rooftop runoff can be routed through buried pipes.
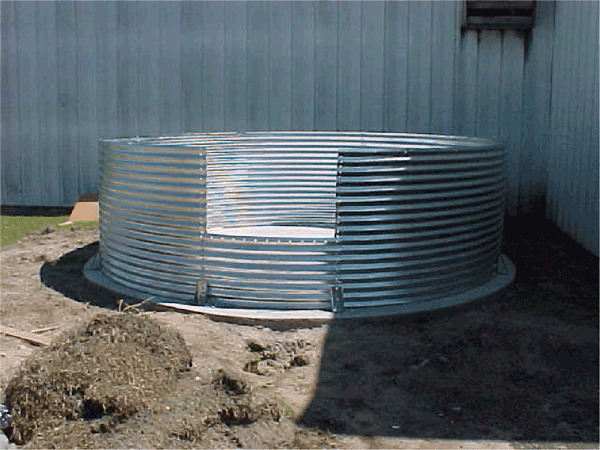
Figure 2. Metal rainwater cistern being assembled.
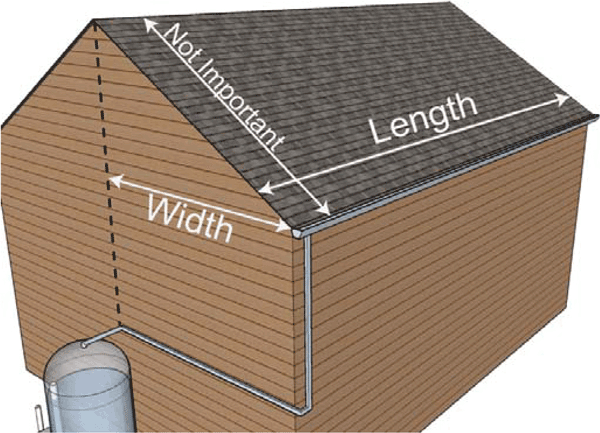
Figure 3. Contributing rooftop area measurements.
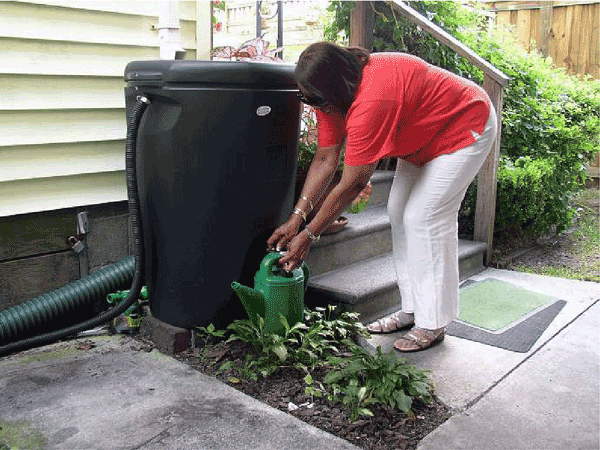
Figure 4. A manufactured rain barrel installed for watering flowerbeds.
Cistern Location
The primary constraint in selecting a cistern location is the position of the gutter downspouts. Although there is some flexibility in routing gutter pipes to various locations, it is generally easiest and most cost effective to place the cistern near an existing downspout (Figure 5). When possible, locate the cistern near the site where water will be used. Transporting water over long distances will increase the need for — and costs of — pumping.
Before deciding where to locate a cistern, contact your local utility companies to locate any underground pipes or cables that might be affected by a cistern or its structural support. Because water-filled cisterns can be incredibly heavy, avoid placing the cistern over any buried pipes, septic tanks, or drain fields that may not support the load. (Your local health department can provide assistance if you have difficulty locating your septic system.) Do not install an underground cistern immediately adjacent to a building, because excavation and installation could damage or compromise the foundation.
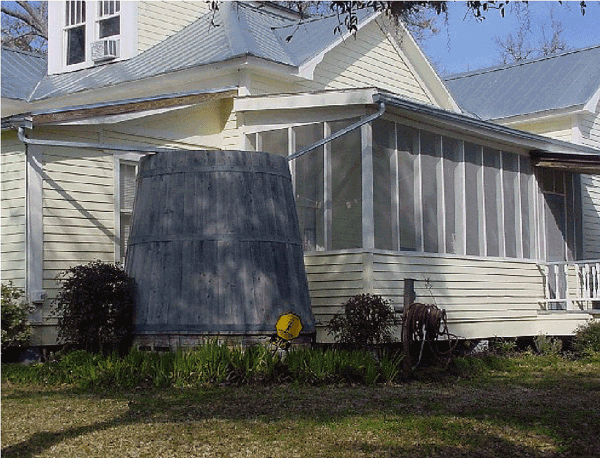
Figure 5. Aboveground cistern located at the corner of a house near existing downspouts (
Image courtesy of LSU AgCenter
Cistern Structural Support
In some cases, the weight exerted by the cistern and the water it holds may require more structural support than what the in-situ soil can provide. North Carolina soils are generally presumed to support at least 2,000 pounds per square foot. Based on the cistern’s volume, footprint (the square footage it occupies), and the density of water, you can determine whether additional structural support for a cistern is necessary. The load exerted by the cistern can be calculated using the equation provided here. If the calculated load is greater than the load-bearing capacity of the soil (2,000 pounds per square foot), some type of structural support will be required. For an aboveground cistern, structural support could consist of a concrete or gravel pad installed using standard building design practices. In lieu of structural support, you might reduce the load by choosing an aboveground cistern with a larger footprint or smaller volume. To support an underground cistern, sand, stone, or gravel backfill anchoring — or even a poured concrete pad — may be necessary. Be sure to follow the manufacturer’s instructions and any local regulations when installing an underground cistern.
Equation for Calculating Load
Calculation of cistern load to determine need for structural support
Cistern Load = (Capacity × 8.35 lb/gal + Cistern Weight) ÷ Footprint Area
Capacity: Cistern volume in gallons
Cistern Weight: Weight of the empty cistern in pounds. The weight of an empty plastic cistern can be approximated as 0.3 lb/gal if the specific weight is unknown.
Footprint Area: Area of the cistern that will be in contact with the ground in square feet.
Example
A 1,000-gallon plastic cistern has a diameter of 7.25 feet. Determine if additional structural support is required.
Cistern Load = [(1,000 gal × 8.35 lb/gal) + (1,000 gal × 0.3 lb/gal)] ÷ [π × (7.25 ft ÷ 2)2] = 210 lb/ft2
The cistern load of 210 pounds per square foot is well below the soil load-bearing capacity of 2,000 pounds per square foot; therefore, the example cistern does not need additional structural support.
Overflow Sizing and Installation
Some type of overflow or bypass is required to release water when the cistern has reached its capacity. The cistern overflow must be able to handle the same flow as the gutter system, which is runoff from a 100-year, one-hour storm event. Table 1 provides required overflow size (diameter in inches) for proposed cistern installations in 11 municipalities in North Carolina. Choose your location or the one that is closest to you. Using the row for that location, select an overflow diameter such that the maximum roof area is greater than the rooftop area contributing water to the cistern.
Install the overflow near the top of the tank, leaving several inches between the overflow and top of the tank for storage during intense storms. A bulkhead fitting installed near the top of the tank will provide a sturdy connection point for the overflow pipe (Figure 6a); however, these fittings can be expensive, especially for large diameter pipes. Because an overflow connection at the top of the tank will not be submerged under pressure, and a perfect seal with the cistern wall is not necessary, a variety of PVC fittings can be adapted to connect the overflow pipe. If the overflow is routed through the bottom of the tank, as shown in Figure 6b, a bulkhead fitting is required to prevent leaks. For underground cistern installations (Figure 6c), the overflow can be installed with a T-fitting on the pipe carrying water from the gutter to the cistern. For both aboveground and underground cisterns, it is important to protect, armor, or reinforce the soil around the overflow outlet to prevent erosion.
|
Municipality |
Maximum Roof Area (sq ft) by Overflow Diameter (in.) |
|||||
|---|---|---|---|---|---|---|
|
0.5 in. |
1 in. |
2 in. |
2.5 in. |
3 in. |
4 in. |
|
|
Asheville |
38 |
157 |
720 |
1,170 |
1,740 |
3,320 |
|
Boone |
33 |
144 |
631 |
1,020 |
1,530 |
2,910 |
|
Charlotte |
37 |
155 |
710 |
1,150 |
1,720 |
3,280 |
|
Elizabeth City |
32 |
132 |
60 |
981 |
1,460 |
2,780 |
|
Fayetteville |
33 |
142 |
624 |
1,010 |
1,510 |
2,880 |
|
Franklin |
38 |
165 |
724 |
1,170 |
1,760 |
3,340 |
|
Greenville |
31 |
131 |
598 |
973 |
1,450 |
2,760 |
|
Raleigh |
38 |
160 |
715 |
1,160 |
1,740 |
3,300 |
|
Rocky Mount |
36 |
150 |
687 |
1,110 |
1,670 |
3,170 |
|
Wilmington |
26 |
110 |
498 |
810 |
1,210 |
2,300 |
|
Winston Salem |
40 |
165 |
756 |
1,230 |
1,830 |
3,490 |

Figure 6a. Aboveground cistern with overflow connection near top of the tank.
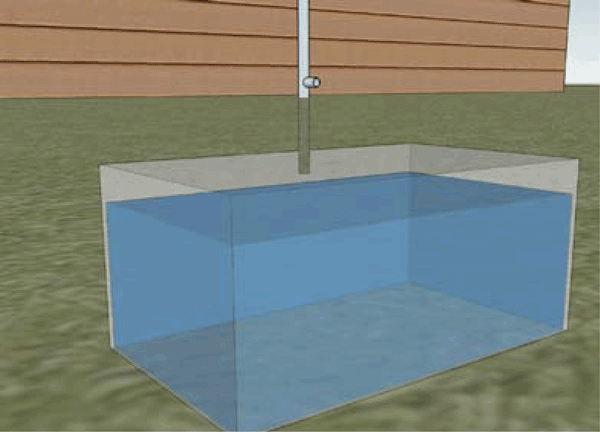
Figure 6b. Aboveground cistern with overflow released at ground level.
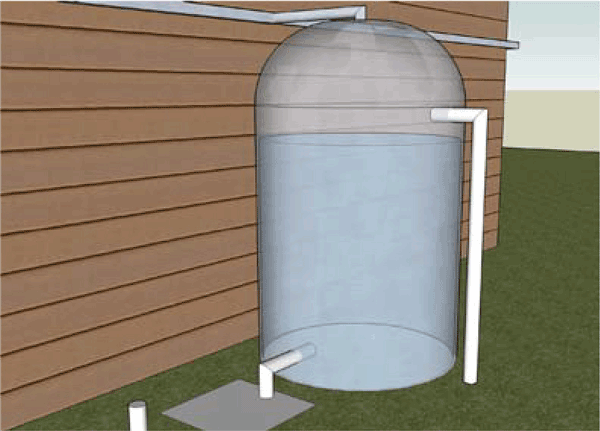
Figure 6c. Underground cistern.
Faucet or Outlet Installation
To draw water from the cistern, some type of faucet or outlet pipe must be installed. For minimal uses, such as filling watering cans, a valve located near the bottom can be used to pull water from the cistern. A pump, however, is necessary to supply adequate pressure for many demands. Pump selection is discussed in detail in Choosing a Pump for Rainwater Harvesting (AG 588-08).
Install the outlet at least 6 inches above the bottom of the cistern to provide room for sediment storage. Because the outlet connection will be subject to substantial water pressure, a bulkhead fitting is necessary to prevent any leaks. Install a bulkhead fitting by drilling a hole into the cistern and threading the fitting through the hole (Figure 7). Because installing a bulkhead requires access from the inside of the tank, it is often worth the extra expense to hire a cistern vendor for this task.
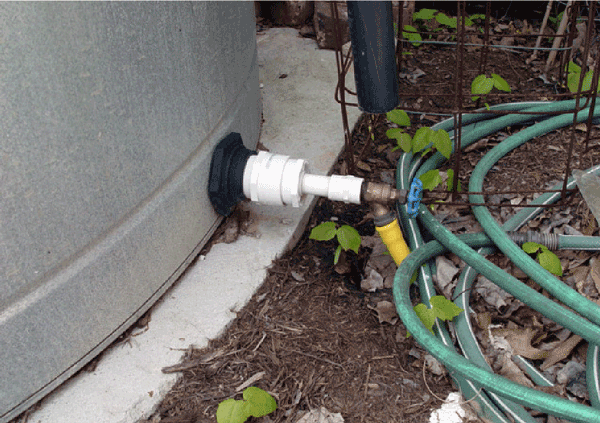
Figure 7. Bulkhead fitting installed at the base of a cistern.
Underground Cisterns: Special Considerations
Underground cisterns offer some location flexibility because runoff can be piped underground to the cistern. Piping runoff away from the house is preferred because installing an underground cistern immediately adjacent to a house may cause damage to the house foundation during excavation. Because of the potential structural and safety concerns, it is important to comply with all underground cistern installation instructions and regulations.
- Before beginning an underground cistern installation, contact your local utility companies to locate any underground pipes or cables.
- Depending upon the specific underground cistern being installed, sand, pea gravel, or crushed stone backfill material may be required.
- Consult the product literature to determine the required specifications for backfill material, excavation depths, and the depth of soil required over the cistern.
- In areas where the water table can rise above the bottom of the underground cistern, the cistern must be properly anchored against any potential buoyancy and structurally suited to handle these additional forces.
- An underground tank must be properly vented to the atmosphere to prevent the buildup of pressure or vacuum within the tank. Vents are often incorporated into a tank, or they can be attached as a basic fitting.
Gutter System
An existing gutter system can be modified to direct rainwater into a cistern. Metal gutter downspouts and fittings are available from home improvement stores and can be used to route rainwater into a nearby cistern. Remember that metal downspouts, which are typically attached to a building, may require additional structural support when spanning any substantial distance to a cistern. Corrugated plastic pipes are an alternative to metal downspouts that may ease installation and require less structural support.
Several approaches can be used to direct a larger volume of water to a rainwater harvesting system. The easiest and safest way is to pipe water from multiple existing downspouts into the cistern. Using this approach provides water from a greater rooftop area without risk of exceeding the downspout or gutter capacity. Where it is not practical to direct water from multiple downspouts into the cistern, it may be possible to modify the gutter system so that more water is directed to a single downspout.
Standard gutter systems are designed to efficiently remove water from the rooftop and gutter through numerous downspouts. Careless modifications to a gutter system can result in overflows or structural failure. In North Carolina, gutters are designed to carry water for the 100-year, one-hour storm event, the same event used for sizing the cistern overflow. Carefully consider Tables 2 and 3 before modifying gutters to direct water into a cistern. Table 2 lists the maximum rooftop area that can be safely drained by various gutter configurations, while Table 3 lists the maximum roof area that can be drained by a downspout.
In most cases, some type of gutter screen or filter is desirable to prevent debris from entering the system. Although more expensive, screens installed along the entire length of the gutter are less likely to clog and cause gutter overflows than filters located only at the downspout.
To prevent mosquitoes from breeding within the cistern, any open pathways to the captured water should be covered by a mesh screen of 1 millimeter or smaller. A thorough discussion of mosquito prevention is provided in Urban Waterways: Mosquito Control for Rainwater Harvesting Systems (AG 588-28).
|
Municipality |
Maximum Roof Area (sq ft) by Gutter Slope (%) and Diameter (in.) |
|||||||
|---|---|---|---|---|---|---|---|---|
|
0.5% Gutter Slope |
1% Gutter Slope |
|||||||
|
3 in. |
4 in. |
5 in. |
6 in. |
3 in. |
4 in. |
5 in. |
6 in. |
|
|
Asheville |
216 |
457 |
794 |
1,210 |
305 |
648 |
1,110 |
1,720 |
|
Boone |
189 |
401 |
697 |
1,070 |
267 |
568 |
980 |
1,510 |
|
Charlotte |
213 |
451 |
784 |
1,200 |
301 |
640 |
1,100 |
1,700 |
|
Elizabeth City |
181 |
383 |
665 |
1,020 |
255 |
543 |
936 |
1,440 |
|
Fayetteville |
187 |
397 |
689 |
1,050 |
264 |
562 |
969 |
1,490 |
|
Franklin |
217 |
460 |
799 |
1,220 |
307 |
652 |
1,120 |
1,730 |
|
Greenville |
179 |
380 |
660 |
1,010 |
253 |
538 |
929 |
1,430 |
|
Raleigh |
214 |
454 |
789 |
1,210 |
303 |
644 |
1,110 |
1,710 |
|
Rocky Mount |
206 |
436 |
758 |
1,160 |
291 |
618 |
1,060 |
1,640 |
|
Wilmington |
149 |
316 |
550 |
844 |
211 |
449 |
773 |
1,190 |
|
Winston Salem |
227 |
480 |
833 |
1,280 |
320 |
680 |
1,170 |
1,810 |
|
Municipality |
Maximum Roof Area (sq ft) by Gutter Diameter (in.) |
||
|---|---|---|---|
|
2 in. |
3 in. |
4 in. |
|
|
Asheville |
914 |
2,790 |
5,840 |
|
Boone |
802 |
2,450 |
5,120 |
|
Charlotte |
902 |
2,750 |
5,760 |
|
Elizabeth City |
765 |
2,340 |
4,890 |
|
Fayetteville |
793 |
2,420 |
5,060 |
|
Franklin |
920 |
2,810 |
5,870 |
|
Greenville |
759 |
2,320 |
4,850 |
|
Raleigh |
908 |
2,770 |
5,800 |
|
Rocky Mount |
872 |
2,660 |
5,570 |
|
Wilmington |
632 |
1,930 |
4,040 |
|
Winston Salem |
960 |
2,930 |
6,130 |
Water Supply Plumbing Codes
Because widespread public interest in rainwater harvesting systems is a relatively recent development, many plumbing codes do not address the use of harvested rainwater. Plumbing codes are constantly evolving. Consult someone familiar with local codes to determine which plumbing fixtures (for example, tubs, toilets, and sinks) can legally be supplied with harvested rainwater and what specific regulations apply. Many of the restrictions associated with plumbing codes can be avoided by maintaining separate plumbing networks and using harvested rainwater for outdoor purposes only. Any faucet or fixture supplied by the rainwater harvesting system must be properly labeled to indicate the water’s source. All distribution pipes connected to a rainwater harvesting system should be purple (Figure 8a). Harvested rainwater may contain pathogens and other pollutants at levels that pose health concerns if consumed without proper treatment. You should install warning signs or labels to prevent any potential hazards (Figure 8b).
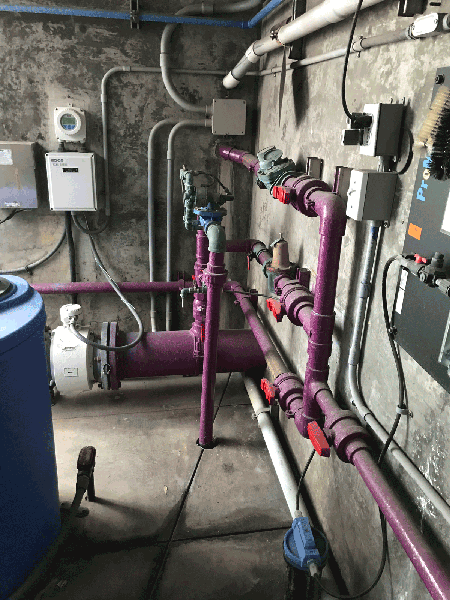
Figure 8a. Purple piping in rainwater plumbing indicates water source.
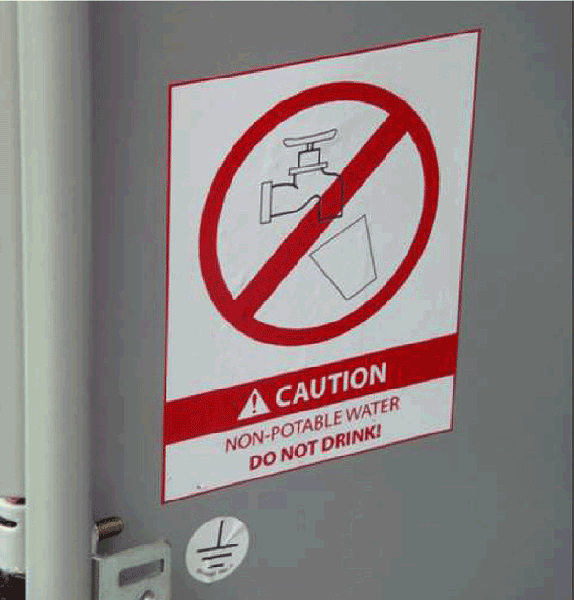
Figure 8b. Clearly identify cisterns that contain untreated nonpotable water.
Rainwater Harvesting System Maintenance
With routine maintenance, rainwater harvesting systems should provide a sustainable nonpotable water supply for many years. Over time, sediment carried by incoming runoff will be deposited inside the bottom of the cistern and may require removal. Using a first-flush diverter or sediment trap will reduce sediment inputs into the cistern (Figure 9a). In most cases, a 6-inch sediment storage zone at the bottom of the cistern should be adequate to accommodate years of sediment input. If sediment buildup is a concern, install a valve at the bottom of the cistern to regularly drain the sediment-laden water. Due to the risk of drowning and exposure to toxic gases, a homeowner should never enter a cistern for maintenance or any other purpose.
Inspect gutter connections every three to four months and after intense rainfall for any damage. Clean leaves and debris from gutters and debris screens (Figure 9b) as needed and at least seasonally. Check mosquito screens periodically to ensure they are in place and not blocked by debris. Please reference Urban Waterways: Mosquito Control for Rainwater Harvesting Systems for further maintenance procedures to limit mosquito populations. Maintain any pumps or filters used in the rainwater harvesting system according to the manufacturer’s recommendations.
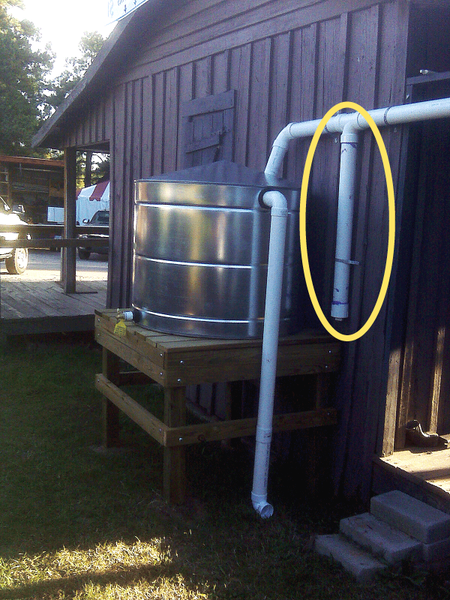
Figure 9a. A first flush diverter designed to fill with initial runoff.
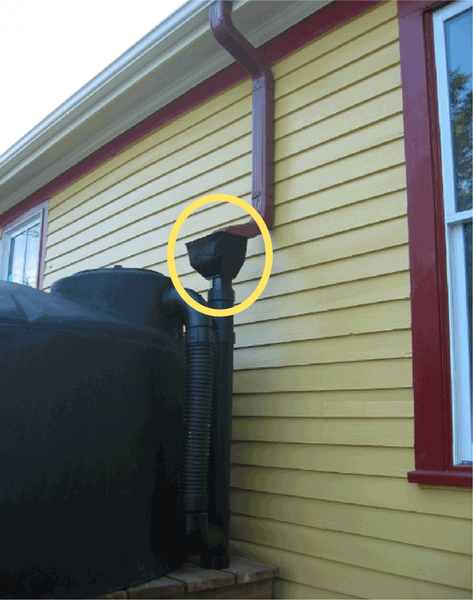
Figure 9b. A filter screen can keep debris out of the cistern.
Resources
Related fact sheets in the Urban Waterways series (AG-588), NC State Extension:
Jones, M.P. and W.F. Hunt. 2006. Choosing a Pump for Rainwater Harvesting (AG588-08). Raleigh, NC: NC State Extension.
Gee, K.D. and W.F. Hunt. 2020. Mosquito Control for Rainwater Harvesting Systems (AG 588-28). Raleigh, NC: NC State Extension.
Web Resources
NC State University Stormwater Engineering Group’s Stormwater Publications
NCDEQ Stormwater Design Manual: Rainwater Harvesting (PDF, 3.1 MB)
Acknowledgments
A version of this publication was originally published in 2008 and written by Matthew P. Jones, Ph.D., P.E., Hazen and Sawyer (current), and William F. Hunt, Ph.D., P.E., NC State University Assistant Professor and Extension Specialist.
Publication date: Feb. 23, 2021
AG-588-11
N.C. Cooperative Extension prohibits discrimination and harassment regardless of age, color, disability, family and marital status, gender identity, national origin, political beliefs, race, religion, sex (including pregnancy), sexual orientation and veteran status.
