Vermicomposting (earthworm composting) turns many types of kitchen food scraps into nutritious soil amendments or growth media for plants. When vermicompost is added to soil, it boosts the nutrients available to plants and enhances soil structure and drainage. Vermicompost helps plants grow bigger and produce higher yields, and it can reduce the impact of some pests and diseases.
Using worms to process food discards offers several advantages:
- Reduces the amount of garbage that needs to be collected from your home, and thus, it may reduce your garbage collection bill;
- Saves the water and electricity that kitchen sink garbage disposal units consume;
- Requires little space, labor, or maintenance;
- Allows you to compost food discards indoors year-round;
- Produces a free, high-quality soil amendment (vermicompost);
- Spawns free earthworms for fishing.
Equipment and Supplies
The materials needed to start a vermicomposting system are simple and inexpensive. All you will need are an earthworm bin, bedding, water, composting earthworms, and food scraps or any appropriate organic materials.
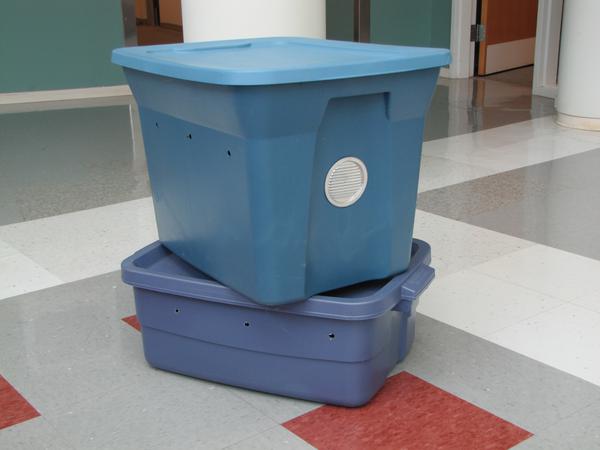
Worm Bin. A suitable bin can be constructed of untreated wood or a plastic container can be purchased. Wooden earthworm bin-construction plans are posted on several Internet sites. Manufactured worm bins can be purchased online or at some garden centers. Otherwise, you can make your own plastic worm bin by buying a storage bin with a tight-fitting lid (Figure 1). Make sure the bin is a dark color because earthworms are highly sensitive to light. If a plastic container is used, it should be thoroughly washed and rinsed to remove manufacturing residues before earthworms and bedding are added. The bin size depends on the amount of food discards produced by your household. The general rule of thumb is one square foot of surface area for each pound of food discards generated per week. So if your household creates two pounds of food scraps weekly, you will need a 2-foot by 1-foot worm bin that is 8 to 20 inches deep.
Homemade worm bins will need holes drilled for aeration and drainage. To provide oxygen for your earthworms, drill holes on the upper sides of the bin near the lid. Do not drill holes in the lid, as they will let in light and dry out your bedding. There are three options for drilling aeration holes in the upper sides of the bin: 1) using a 3-inch hole saw, drill one hole on each upper, narrow end of the bin and insert a 3-inch screened soffit vent (available at hardware stores), OR 2) drill four 1⁄2-inch holes on the upper long sides of the bin and either leave the holes open or glue hardware cloth/screen over them, OR 3) drill a number of 1⁄8-inch holes all the way around the upper sides of the bin. For drainage, drill six 1⁄4-inch holes, equally dispersed, in the bottom of the bin.
There are several suitable locations for your worm bin, such as a garage or carport, porch or deck, kitchen, basement, bathroom, closet, or apartment balcony. Make sure there is room for air to circulate around the bin. If your worm bin is properly maintained, it should not emit odors or attract pests. If you choose to keep your bin outdoors, place it in a location that is always shady. Your worm bin should never be placed in the direct sun because it can cause the system to overheat and kill your earthworms. Wherever it is located, the temperature inside the bin should be maintained between 59° and 77°F (15° to 25°C). There are several ways to maintain the bin above the minimum temperature, such as gluing blueboard insulation to the outer walls of the bin or surrounding it with straw or other insulating materials. Alternatively, cut a plastic gallon jug in half, fill it with water, insert an aquarium heater and place it inside the bin. If it is hot and you need to cool the worm bin, mix in some dry bedding or put ice in a container and place it in your bin.
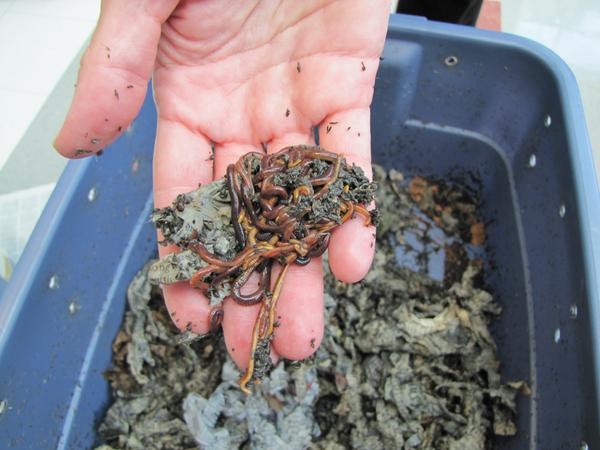
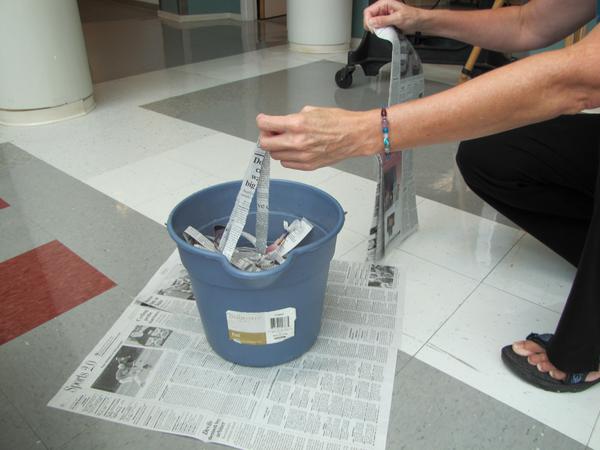
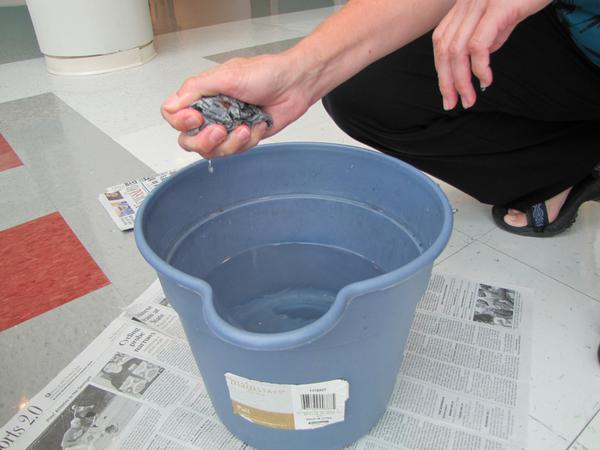
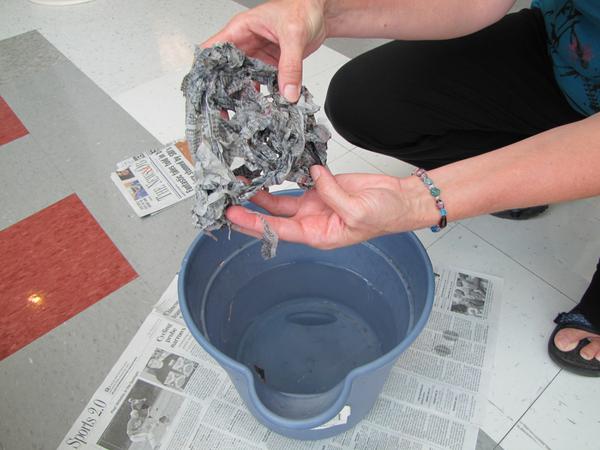
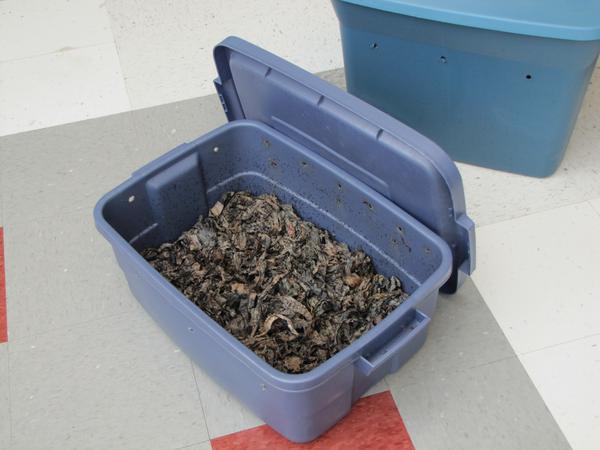
Bedding. To provide a suitable environment for the earthworms and to cover food scraps, you will need to add bedding to the earthworm bin (Figure 2). Bedding should be a nontoxic fluffy material that holds moisture and allows air to circulate. Suitable materials include shredded paper (such as black-and-white newspapers, paper bags, office paper, or cardboard), decaying leaves, or coconut pith fiber (coir). Do not use glossy paper or magazines. For newspapers, fold a section in half and tear off long, half-inch-wide strips (go with the grain of the paper and it will tear neatly and easily) (Figure 3). Soak any bedding material for 5 to 10 minutes in a bucket of water and then wring it out so it is a little wetter than a moist sponge (Figure 4 and Figure 5). Aim for the bedding to be very damp, but not soaking wet (only two to three drops of water should come out when you squeeze the bedding material). Fluff up the bedding as you add it to the bin, filling the bin about halfway (Figure 6). Mix in a handful of soil from a healthy garden to introduce beneficial microorganisms and aid the earthworms’ digestive process. The earthworms will eat the bedding along with the food discards, so you will need to add more within a couple of months. Use a plant mister to spritz some water on the bedding to keep it moist. Never pour water into your worm bin!
Also, do not agitate, turn, or stir the contents of the worm bin. It does not need to be aerated like a compost pile, and earthworms can be killed if handled roughly. Earthworm castings should be left undisturbed on the bottom of the worm bin.
Composting Worms. It is important to use the type of earthworms that will thrive in a worm bin. There are more than 9,000 species of earthworms, and only 7 species have been identified as suitable for vermicomposting. Of those, only one species of earthworm is used for vermicomposting by most people worldwide: Eisenia fetida (common name: red wiggler). You need to start with at least one pound (about 1,000) of red wigglers to one square foot of surface area of the worm bin to have a chance of developing a sustainable system. Do not get the earthworms from a bait shop (you would need to buy 33 to 38 bait cups!) or your yard (how could you tell what species is Eisenia fetida?). Instead, buy them from a worm grower. Be sure to check around, as prices for earthworms vary significantly. When you acquire the red wigglers, gently place them on top of the bedding in the worm bin. The earthworms will immediately move underneath the bedding to avoid the light, but they need a few days to acclimate to their new home. If the red wigglers try to leave the bin, keep the bin in a bright area around the clock for a few days, while the earthworms get used to their new environment.
After awhile, other organisms will appear in your worm bin—they come to eat and help break down organic materials. Most of the organisms will be too small to see, but you may spot pot worms, springtails, pill bugs, molds, and mites.
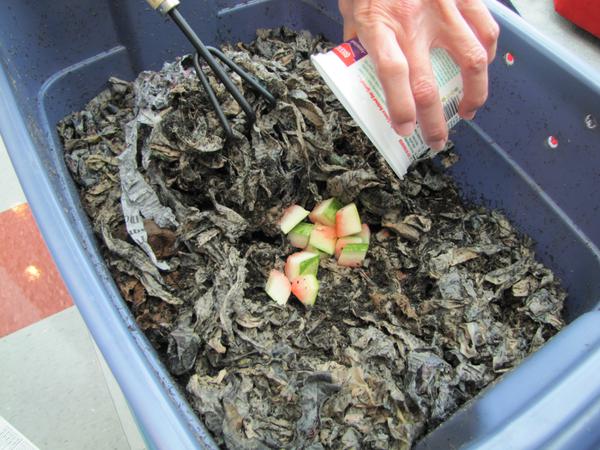
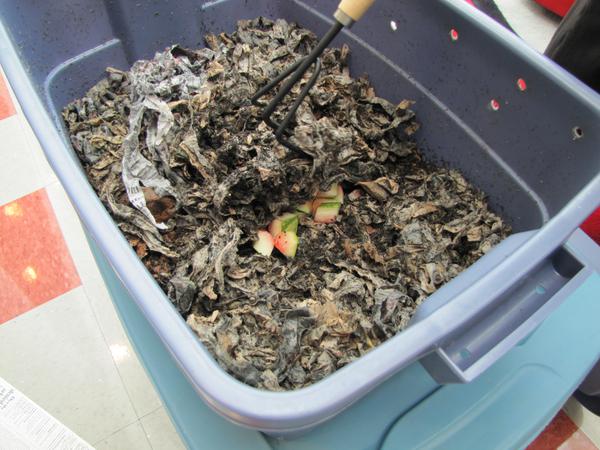
Food Scraps. Once the earthworms have settled into their new home (after a couple of days), add a small amount of food scraps on the surface of the bedding (Figure 7). The amount should not exceed 1-inch high. This will prevent the food scraps from building up heat. Feed your earthworms any non-meat foods such as vegetables, fruits, crushed eggshells, tea bags, coffee grounds, shredded paper coffee filters, and shredded garden debris. Red wigglers especially like cantaloupe, watermelon, and pumpkin. Do not add citrus fruits or peels to the bin, as they can cause the bin environment to become too acidic. Chop food scraps into small pieces so they break down easier. Never add meat scraps or bones, fish, greasy or oily food, onions, garlic, fat, tobacco, citrus, salty foods, or pet or human manure. Once you have fed your earthworms, use a three-prong garden tool to cover the food scraps completely with 1 to 2 inches of bedding to prevent fruit flies from finding the food (Figure 8).
Food scraps can be stored for a few days before adding them to the worm bin. Many people store food residuals in a container with a lid next to or under their kitchen sink. Others store their food scraps in a container or bag in the freezer.
One pound of red wigglers will eat up to two pounds of food scraps a week. If you add more food than the earthworms can consume, it will start to rot and become smelly. Ideally, do not add more food until the worms have consumed the last feeding. If you produce more food scraps than your bin can handle, buy more earthworms or start another worm bin. It’s a good idea to have a backyard composting bin in addition to your worm bin, because you can put excess food scraps in it, along with citrus, onions, and garlic.
The worms may be fed any time of the day. Do not worry if you go on vacation, as the earthworms can be fed as seldom as every two to three weeks, depending on how many earthworms are in the bin. If you are going away for a couple of weeks, apply 1⁄2-inch layer of food scraps and cover it with two inches of moistened, shredded paper.
| Food Scrap Considerations |
| Particle size: chop or grind it into small pieces |
| Amount of liquid contained: coffee grounds, canned goods, and cooked food are wetter |
| pH: degree of acidity |
| Hardness: broccoli is harder than lettuce because it takes longer to be consumed |
| Worm Bin Troubleshooting | ||
| Problems | Causes | Solutions |
| Bin smells bad | Overfeeding | Stop feeding for 2 weeks |
| Non-compostables present | Remove non-compostables | |
| Food scraps exposed to air | Bury food completely | |
| Bin too wet | Mix in dry bedding, leave lid off | |
| Not enough air | Drill more holes in the bin | |
| Bin attracts flies | Food scraps exposed to air | Bury food completely |
| Rotten food | Avoid putting rotten food in bin | |
| Too much food | Don't overfeed worms | |
| Worms are dying | Bin too wet | Mix in dry bedding; leave lid off |
| Bin too dry | Thoroughly dampen bedding | |
| Extreme temperatures | Move bin where temperature is between 59° and 77°F | |
| Not enough air | Drill more holes in bin | |
| Not enough food | Add more bedding and food | |
| Worms are crawling away | Bin conditions are not right | See solutions above; leave lid off and worms will burrow back into bedding |
| Mold is forming | Conditions are too acidic | Cut back on acidic foods; remove mold; moisten bread products |
| Bedding is drying out | Too much ventilation | Mist bedding; keep lid on |
| Liquid collecting in bottom | Poor ventilation; over-watering | Leave lid off for a couple of days, add dry bedding |
| Feeding too many watery scraps | Cut back on coffee grounds and food scraps with high water content; mix with bedding material before feeding | |
| Optimal Conditions for Raising Red Wiggler Earthworms |
| Temperature: 59° - 77° F (15-25° C) (limits 32° - 95° F, 0°-35° C) |
| Moisture: 80% (limits 60% - 90%) |
| Oxygen requirement: Aerobic |
| pH: > 5 and < 9 |
| Ammonia content of waste: Low; < 0.5mg/g |
| Salt content of waste: Low; < 0.5% |
Harvesting the Vermicompost
After a few weeks, you will begin to see vermicompost on the bottom of the bin. Vermicompost is soil-like material containing a mixture of earthworm castings (feces) and partially decomposed bedding and food scraps. In about four months, it will be time to harvest the vermicompost. You may harvest the vermicompost by one of three methods:
Method 1: Sideways Separation. Feed the earthworms on only one side of your worm bin for several weeks, and most of the worms will migrate to that side of the bin. Then you can remove the vermicompost from the other side of the bin where you have not been adding food scraps, and add fresh bedding. Repeat this process on the other side of the bin. After both sides are harvested, you can begin adding food scraps to both sides of the bin again.
Method 2: Light Separation. Empty the contents of your worm bin onto a plastic sheet or used shower curtain where there is strong sunlight or artificial light. Wait five minutes, and then scrape off the top layer of vermicompost. The earthworms will keep moving away from the light, so you can scrape more vermicompost off every five minutes or so. After several scrapings, you will find worms in clusters; just pick up the worms and gently return them to the bin in fresh bedding (with the old bedding mixed in).
Method 3: Vertical Separation. Before you begin vermicomposting, either buy a manufactured stacking bin or make your own by purchasing two identical storage bins and drilling extra holes in the bottoms. Set one bin aside and vermicompost in the other bin for a few months. When the bedding in the bin fits snug against the bottom of the bin you set aside, simply fit the second bin inside the first one, and begin only feeding in the top bin for the next several months. Most of the earthworms will move up into the upper bin to eat, and eventually the lower bin will just contain vermicompost.
Be on the lookout for earthworm egg capsules; they are lemon-shaped and about the size of a match head, with a shiny appearance and light-brownish color. The capsules contain between two and seven baby earthworms. Place the egg capsules back inside your bin so they can hatch and thrive in your bin system.
Using Vermicompost
Vermicompost is a fully stabilized organic soil amendment that is much more microbially active than the original organic material that was consumed. It has a fine particulate structure and good moisture-holding capacity. Vermicompost contains nutrients such as nitrogen, phosphorus, potassium, calcium, and magnesium in forms readily taken up by plants. It also has plant growth hormones and humic acids, which act as plant growth regulators.
You can either use your vermicompost immediately or store it and use it later. The material can be mixed into the soil in your garden and around your trees and yard plants. You can also use it as a top dressing on outdoor plants or sprinkle it on your lawn as a conditioner. It’s best to protect the vermicompost from direct sunlight by incorporating it in soil or covering it with mulch.
Make sure there are no earthworms or egg capsules in the vermicompost, because red wigglers do not survive typical conditions in a plant pot.
You can also make “vermicompost tea” to spray on your plants. Simply add two tablespoons of vermicompost to one quart of water and allow it to steep for a day, mixing it occasionally. Water your plants with this “tea” to help make nutrients in the soil available to the plants. Be sure to use the vermicompost tea on your plants within 24 hours of making the batch of solution. Do not use vermicompost tea on the edible portion of a plant unless you are absolutely certain that the solution does not contain pathogens.
Large-Scale Vermicomposting
Vermicomposting can take place wherever organic materials are generated or delivered. Worm bins can be found in classrooms, offices, colleges, prisons, hospitals, nursing homes, military bases, and other institutions. Large-scale worm farms are found throughout the United States, processing animal manures, food scraps, and paper fibers.
North Carolina State University hosts North America’s only large-scale vermicomposting training. An annual two-day conference has been held since 2001, drawing participants from all over the world who want to start or expand a worm farm.
Sources of Additional Information
In North Carolina, contact your local county Cooperative Extension center.
Publication date: March 29, 2017
AG-473-18
N.C. Cooperative Extension prohibits discrimination and harassment regardless of age, color, disability, family and marital status, gender identity, national origin, political beliefs, race, religion, sex (including pregnancy), sexual orientation and veteran status.

