This publication focuses on easy-to-grow, child-friendly, cool-season vegetables suitable for childcare center gardening. This is the fourth of fifteen publications about childcare center production gardens.
Early childhood educators can easily engage children in growing, harvesting, and preparing healthy, fresh fruits and vegetables at your center and provide numerous opportunities for hands-on learning. This publication provides information on easy-to-grow, child-friendly, cool-season vegetables suitable for a childcare production garden. Growing and Cooking Fruits and Vegetables at Childcare Centers (LF-007-01) includes tips for engaging children of varying ages in gardening. Snacking and Cooking with Cool-Season Produce from Childcare Production Gardens (LF-007-06) includes simple recipes that can be used by childcare center cooks and educators to engage children in snacking and cooking with fresh, cool-season produce. Enjoying fruits and vegetables from their own gardening efforts can help children develop lifelong healthy eating habits. Happy gardening!
Note: Planting dates noted here are general guidelines and will vary by region across North Carolina depending on the average date of first and last frosts. Generally, the coastal plain has an earlier planting date while in the mountains it is necessary to wait for the first spring planting. Varying weather conditions can affect growing times as well. Contact your local North Carolina Cooperative Extension center for guidance on planting dates, soil testing, and varieties that perform well in your area.
Planting Options
- Direct seed: Seeds are planted directly in the soil.
- Transplants: Small plants (seedlings), usually started in a greenhouse, are planted in the soil.
Growing Guidelines
- Each growing season, mix 1 to 3 inches of good-quality compost into the garden beds before planting.
- Water after planting until plants are established, then watering can be reduced to every couple of days as needed.
The crops listed below are cool-season vegetables that perform well in North Carolina. Those at the beginning of the list are the easiest to grow. Those at the end of the list require more care.
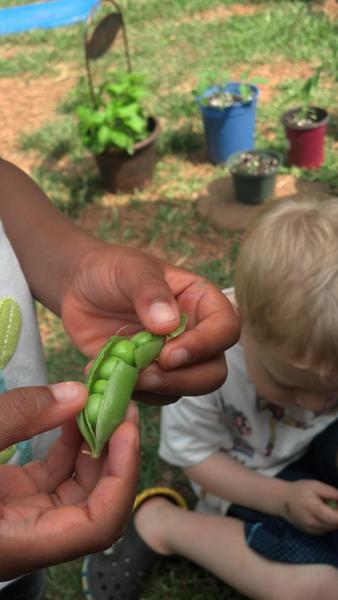
Peas (Sugar/Snap)
Planting:
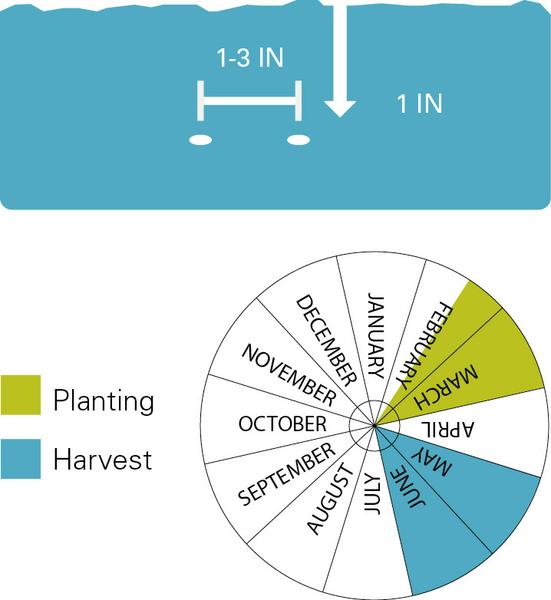
Direct seed 1 inch deep and 1 to 3 inches apart late February to March. Gently guide pea vines up a vertical growing structure, such as a bamboo teepee, trellis, or fence.
Harvest:
May to June. Pea pods can be picked earlier to eat the entire pod, or left on the vine until they are round and can be shelled.
Varieties:
- Sugar Snap (eat entire pod or just peas)
- Super Sugar Snap (a mildew-resistant variety, eat entire pod or just peas)
- Snow Bird (snow pea variety, eat entire pod)
Tips:
Peas grown on a well-anchored teepee make a fun setting for play!
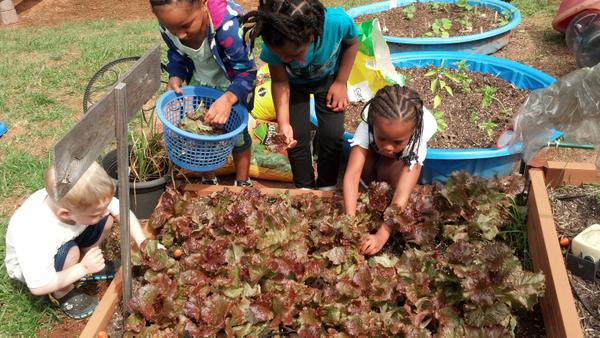
Lettuce
Planting:
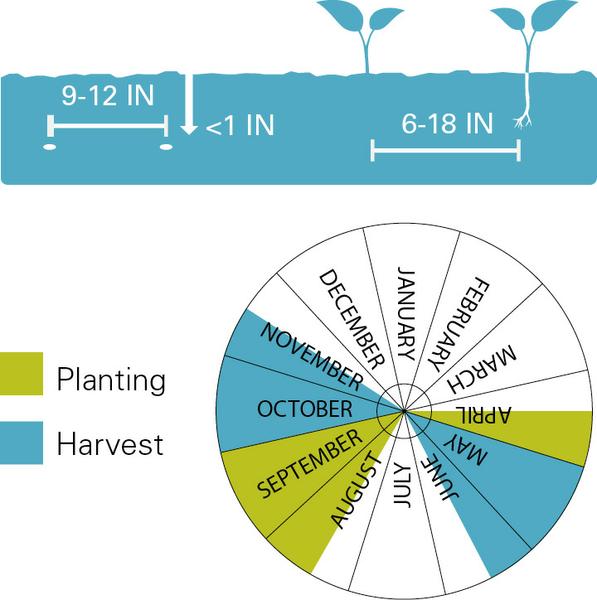
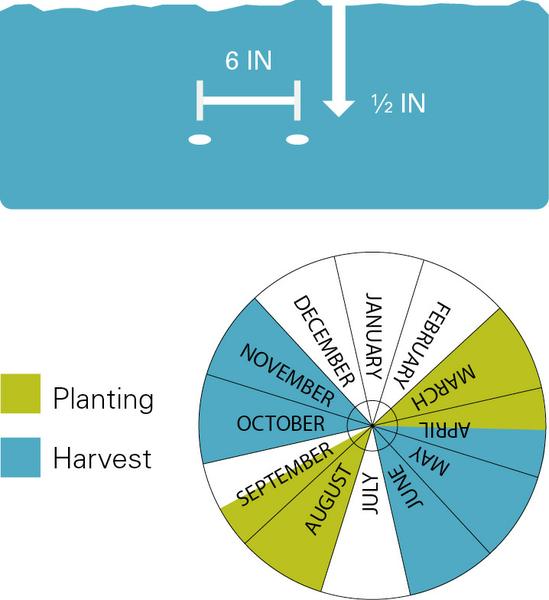
Direct seed or transplant in the fall from mid August to late September and in the spring after the danger of a hard freeze has passed. For direct seeding, create a clear flat space in the garden bed. Loosen and smooth the soil with a hard rake. For salad mix or loose leaf lettuce types, sprinkle the seeds onto the soil and gently use fingertips to mix seeds into the top inch of soil. If growing the lettuce as heads, seeds need to be planted 9 to 12 inches apart. Lettuce can also be started as transplants, spacing them 6 to 18 inches apart depending on the variety’s requirements on the label.
Harvest:
Harvest lettuce as it grows, cutting individual leaves for a salad mix or harvesting the entire head once it is mature. Salad mix or leaf lettuce can be harvested when the leaves are as small as 2 to 3 inches long. To extend the harvest, pick the largest leaves from the exterior of the lettuce head, allowing the smaller central leaves to continue to grow. For harvesting a head of lettuce, allow the plant to mature and cut the head at the base.
Varieties:
- Buttercrunch and Bibb (mild flavor and green leafed, forms loose head)
- Jericho (romaine type, green leafed, heat tolerant, good for spring planting, forms head)
- Black-seeded Simpson (green leafed, forms loose head)
- Green Oakleaf (green leafed with slender, deeply lobed leaves that resemble oak tree leaves, forms loose head)
- Red Sails (red variety, forms loose head)
- New Red Fire (red variety, forms loose head)
- Allstar Mix (mix of high performing green and red varieties, leaf lettuce)
Tips:
Lettuce can be grown easily and successfully in containers.
Radishes
Planting:
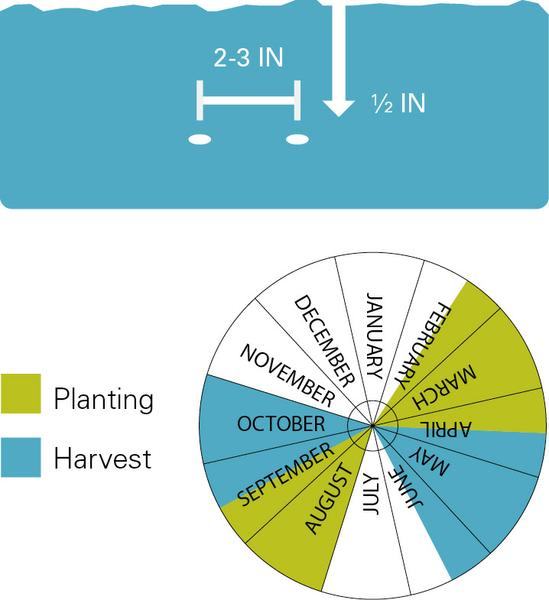
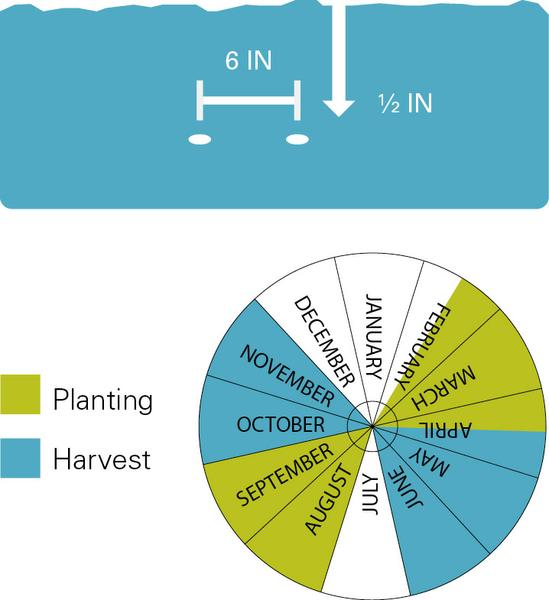
Direct seed in the fall from August until mid September and in the spring, mid February to early April. Plant 1⁄2-inch deep and 2 to 3 inches apart.
Harvest:
Late September until the first frost and early April to early June. Radishes are ready to harvest when you can see their rounded tops peeking through the soil. Radishes mature very quickly and are usually ready to harvest within four to six weeks after planting.
Varieties:
- Easter Egg (mix of red, purple, and white, round roots)
- Cherry Belle (red round roots, 3⁄4-inch wide)
- Sparkler (round roots, 1 inch wide, red on top and white on the bottom with speckles in between)
Tips:
Radishes make great container vegetables.
Broccoli
Planting:
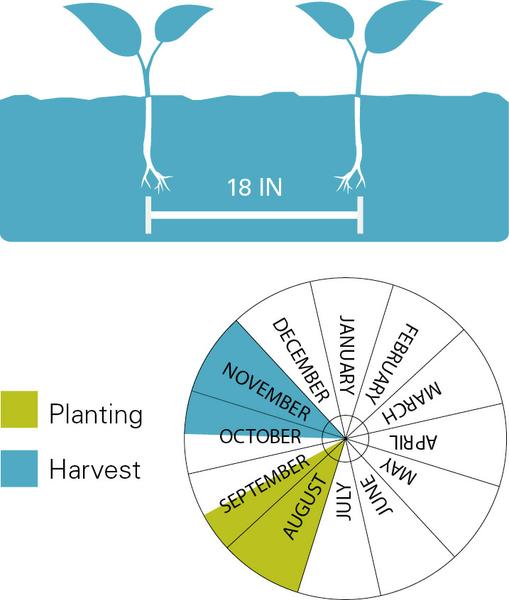
Plant transplants 18 inches apart in August to mid September.
Harvest:
Cut broccoli floret in mid October to November when it reaches a desirable size (usually around 3 inches wide). After cutting the main floret, additional smaller florets (1 to 2 inches across) will begin to grow and can be harvested until the plant begins to flower.
Varieties:
- Packman Hybrid (standard variety)
Carrots
Planting:
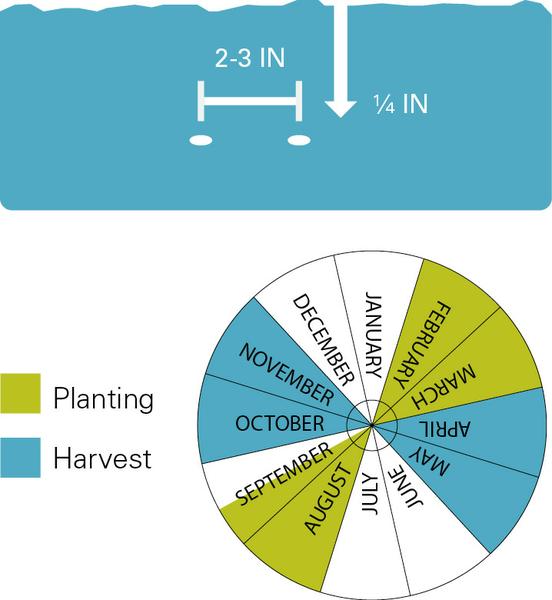
Direct seed 1⁄4-inch deep and 2 to 3 inches apart in deep, loose soil in the fall from August mid September and in the spring from early February to late March. If the seeds sprout too closely together, thin by cutting off at the base with garden shears.
Harvest:
Carrots take around eight to 10 weeks to mature and are ready when they reach a thickness of 1⁄2-inch to 1 inch. They will also begin to slightly rise out of the soil, with their orange “shoulders” just visible.
Varieties:
- Nantes type (6- to 7-inch-long roots, grows well in heavy soils)
- Atlas (small round roots)
- Little Finger (4-inch-long roots)
- Purple Haze (purple roots, 7 to 8 inches long)
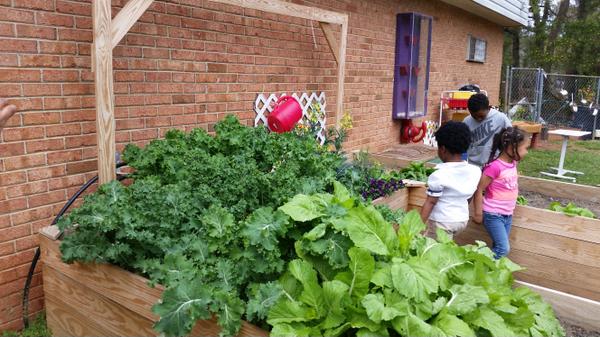
Kale
Planting:
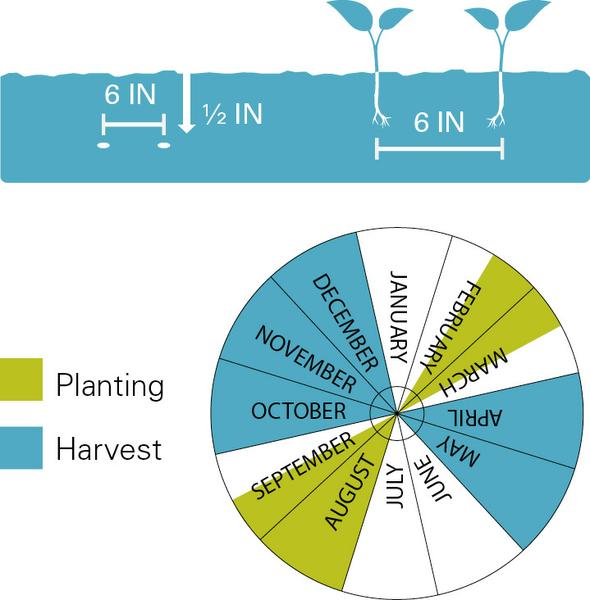
Direct seed in the fall from August to mid September and in the spring from mid February to mid March. Sprinkle the seeds onto the soil, and gently use fingertips to mix seeds into the top 1⁄2-inch of soil. Kale is also commonly transplanted, spacing plants 6 inches apart.
Harvest:
There will be a medium harvest in October through December, followed by a larger harvest in April to May (until the plant starts to flower). To extend the harvest, pick the largest leaves from the exterior, allowing the smaller central leaves to continue to grow.
Varieties:
- Dwarf Siberian (curly leafed kale)
- Winterbor (curly leafed kale)
- Red Russian (large leaves with purple-red veins reaching as tall as 2 to 3 feet)
- Lacinato or Toscano type (Also called Italian or dinosaur kale, this type has narrow leaves with a texture that resembles a dinosaur’s skin and is not as cold hardy as the Dwarf Siberian and Winterbor varieties.)
Tips:
Kale becomes sweeter after the first frost, so harvest after the first frosty night.
Collard Greens
Planting:
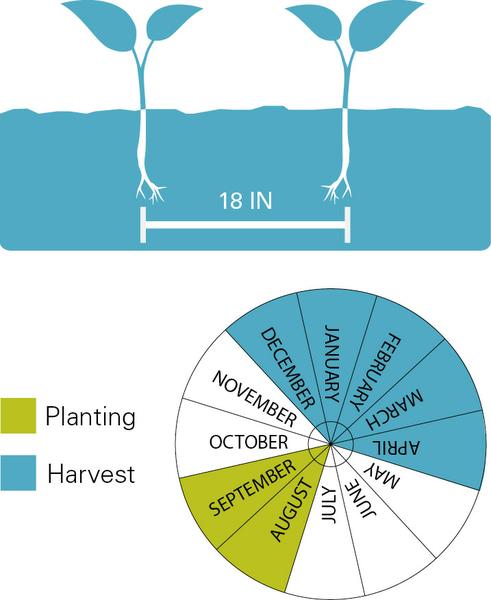
Plant transplants 18 inches apart in August to September.
Harvest:
Pick larger exterior leaves from mid November through April or until plants start to flower.
Varieties:
- Georgia (cold hardy, nonheading)
- Flash (nonheading, slow to flower in spring)
Tips:
Collard greens become sweeter after the first frost, so wait to harvest until after the first cold night.
Onions
Planting:
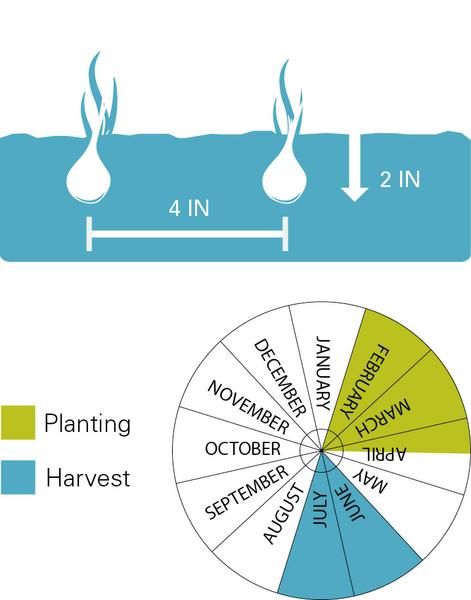
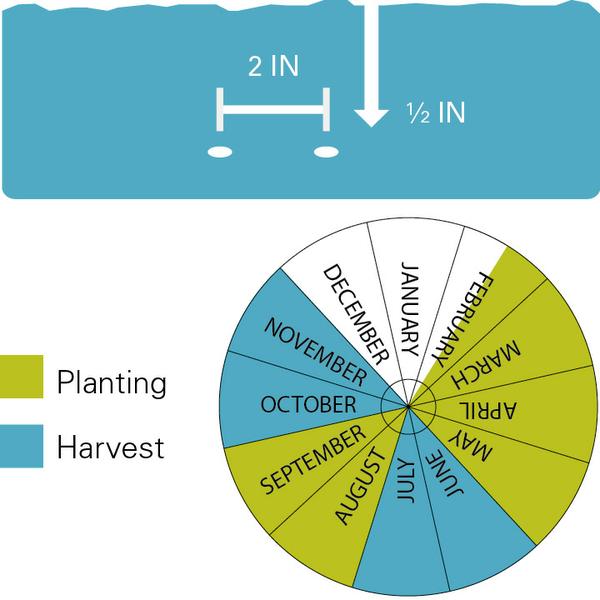
Plant individual onion bulbs (called sets) 2 inches deep and 4 inches apart in February to early April.
Harvest:
Onions are ready when the bulbs have reached a desired size and the tops of the plants have yellowed and started to fall over. Harvest in June to July by pulling out of the soil, shaking the soil off, and allowing them to cure or dry in a warm and dry location.
Varieties:
- Walla Walla (4-inch wide, yellow-skinned sweet onion, does not store well)
- Texas Sweet (3-inch wide, white skinned sweet onion)
Spring Onions, Scallions, and Green Bunching Onions
Planting:
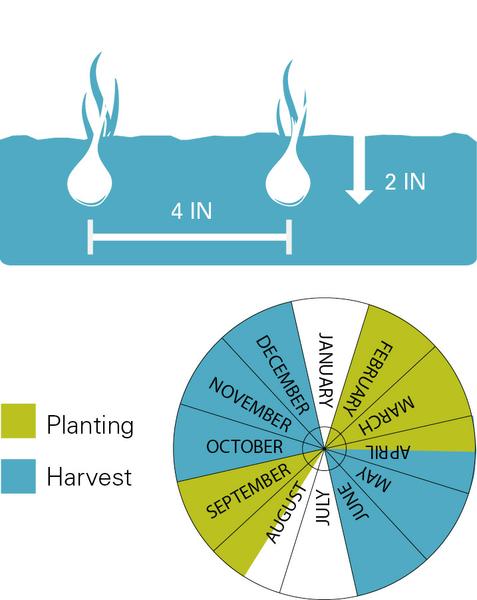
Plant individual small onion bulbs (called “sets”) 2 inches deep and 4 inches apart in fall from mid August to September and in the spring from February to early April.
Harvest:
October to December and mid April to June when bulbs reach 1⁄2-inch in diameter. Dig below the onions with a pitchfork to more easily pull them out.
Varieties:
- Beltsville Bunching (standard green onions)
- Evergreen Bunching (standard green onions)
Spinach
Planting:
Direct seed in the fall when days become cooler, usually in August to late September and in late February to early April. Plant seeds 1⁄2-inch deep and 6 inches apart.
Harvest:
Individual leaves are ready to harvest four to six weeks after planting. Pick from the exterior of the plant to extend the harvest period.
Varieties:
- Space (upright and smooth plants with medium-green, round leaves)
- Melody (large and triangular dark-green leaves)
- Bloomsdale (dark-green curled leaves)
Tips:
Spinach can tolerate shade and can be planted under taller crops.
Chard
Planting:
Direct seed in August to mid September and March to early April. Plant seeds 1⁄2-inch deep and 6 inches apart.
Harvest:
Individual leaves are ready to harvest four to six weeks after planting. To extend the harvest, pick the larger exterior leaves, leaving the smaller interior leaves to continue growing.
Varieties:
-
Bright Lights (a colorful mix of red-, green-, and yellow-stemmed chard that will turn the garden into a rainbow)
-
Ruby Red (dark-green with stunning red veins)
Tips:
This beautiful vegetable brings a pop of color to flower beds.
Mustard Greens
Planting:
Direct seed 1⁄2-inch deep and 2 inches apart in August until September and from mid February to May. Sprinkle the seeds onto the soil, and use fingertips to gently mix seeds into the top inch of soil.
Harvest:
Individual leaves are ready to harvest four weeks after planting.
Varieties:
- Florida Broadleaf (mild flavor, broad leaves)
- Southern Giant Curled (heavily curled, bright-green leaves)
Acknowledgments
Funding for this publication was provided in part by the John Rex Endowment.
The authors wish to express appreciation to Sara Konradi, Joanna Lelekacs, Shawn Banks, Alison Duncan, Chris Gunter, Robert Jones, Debra Ireland, and Barbara Scott for their assistance in preparing this publication.
Local Foods Publication Series Editor
Hannah Dankbar, Manager
Local Foods Program
NC State Extension
Childcare Center Production Gardens Factsheet Editor
Robin C. Moore, Director
Natural Learning Initiative (NLI)
NC State College of Design
With the NLI Early Childhood Gardening Team:
Nilda Cosco
Sarah Konradi
Mary Archer
Caroline Asher
Karli Stephenson, Graphic Designer
About the Local Foods Series: Childcare Center Production Gardens
This publication in the Local Foods series is the fourth of fifteen publications about childcare center production gardens:
- Growing and Cooking Fruits and Vegetables at Childcare Centers (LF-007-01)
- Creating Childcare Center Production Gardens (LF-007-02)
- Growing Warm-Season Fruits and Vegetables in Childcare Production Gardens (LF-007-03)
- Growing Cool-Season Vegetables in Childcare Production Gardens (LF-007-04)
- Snacking and Cooking with Warm-Season Produce from Childcare Production Gardens (LF-007-05)
- Snacking and Cooking with Cool-Season Produce from Childcare Production Gardens (LF-007-06)
- Composting in Childcare Center Production Gardens (LF-007-07)
- Vermicomposting in the Childcare Center Production Gardens (LF-007-08)
- Introducing Children to Insects in Childcare Center Gardens (LF-007-09)
- Easy Fruits to Grow at Childcare Center Gardens (LF-007-10)
- Growing Strawberries in Childcare Center Gardens (LF-007-11)
- Managing Weeds in Childcare Center Gardens (LF-007-12)
- Growing Fruit Trees in Childcare Center Gardens (LF-007-13)
- Growing Muscadines in Childcare Center Gardens (LF-007-14)
- Growing Blueberries in Childcare Center Gardens (LF-007-15)
Publication date: Sept. 16, 2015
Reviewed/Revised: Oct. 9, 2023
LF-007-04
N.C. Cooperative Extension prohibits discrimination and harassment regardless of age, color, disability, family and marital status, gender identity, national origin, political beliefs, race, religion, sex (including pregnancy), sexual orientation and veteran status.

