
Outline
10 Steps for Gathering Facts to Understand the Problem
Secondary Problems and their Abiotic or Cultural Start
Appendix C, "Diagnostic Tables"
Objectives
This chapter teaches people to:
- Effectively use a 10 step strategy to diagnose plant problems.
- List 3 normal plant characteristics commonly misidentified as plant problems.
- Describe 5 common distributions of plant damage and identify potential causes for each.
- List 3 common criteria you can use to separate biotic and abiotic problems.
Introduction
Every gardener will eventually encounter plant problems. This chapter reviews a systematic approach to plant problem diagnostics. This approach does not require vast knowledge of every plant pest or pathogen. Instead it helps gardeners identify a pest or pathogen based on cultural practices, environmental conditions, signs, symptoms, distribution of the problem in the landscape and on the plant, and timing of the problem. Often pests or pathogens are blamed for the decline of plants but this chapter discusses the links between cultural or abiotic factors and how pathogens or pests can be secondary problems. By following the steps in this chapter, garden invesigators will feel more confident in their diagnosis of plant problems.
10 Steps for Gathering Facts to Understand the Problem
The answers to each of the questions below help to either indicate or rule out specific causes of plant problems.
Step 1. Identify the plant
Some plants are predisposed to certain types of problems to which other plants are immune. Some plants are normally a color that on another plant would indicate a nutrient deficiency or disease. Some plants thrive in conditions that would stress another type of plant. Correctly identifying the plant is key to successful plant problem diagnosis. There are a variety of online tools and books to help with identification, or you can send in a photo or take a sample to your local Cooperative Extension center for assistance.
Step 2. Describe the problem
Specifically identify what appears to be wrong. Is there a change in leaf color? If so, where? Is the change on the entire plant or just certain parts? On new growth or old growth? The entire leaf or just between the veins? Is there tissue damage? If so, is it in the center of the leaves or the edges? Is it circular or irregular? Observe carefully and gather detailed information that will help to identify the cause.
Step 3. Identify what is normal
Determine if the described observations are normal for this plant. Normal characteristics that are sometimes confused with problems are:
- Spore-bearing structures on ferns (Figure 7–1)
- Stem growth on certain plants including sweetgum (Liquidambar styraciflua) and winged elm (Ulmus alata) (Figure 7–2)
- Silvery stem and leaf characteristics onRussian olive Elaeagnus angustifolia (Figure 7–3)
- Leaf spot on Japanese aucuba Aucuba japonica 'Variegata' (Figure 7–4)
- Pollen-bearing structures (strobili) on some conifers (Figure 7–5)
- Normal fall leaf and needle color (Figure 7–6)
- Normal leaf or needle drop, which can be in the spring for some plants (Magnolia grandiflora, Ilex opaca)
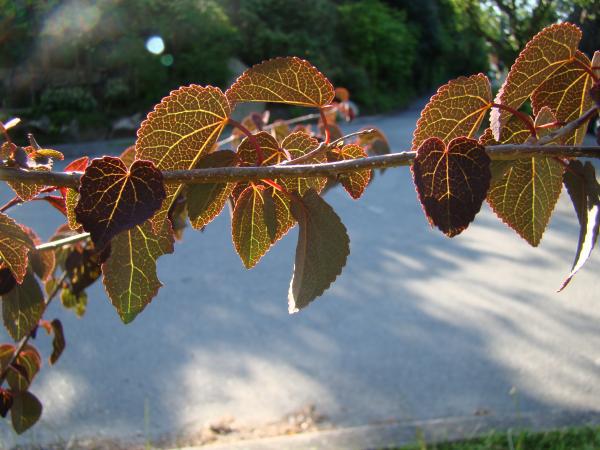
- Variegation or coloration selected as a desirable plant characteristic (Figure 7–7)
- Raised lenticels on certain woody stems (Figure 7–8) such as Chinese elm and Prunus spp.
What is Normal?
Fall needle color in white pine is often submitted as a plant problem because it is unusual for pine needles to turn yellow and drop in the fall and it is also unusual for a plant to shed only half its leaves in the fall. But that is normal for a white pine (Pinus strobus). Each fall, half of its needles turn yellow and drop off while the other half stays green (Figure 7–9).
Step 4. Review cultural practices
Review plant care and other human impacts. When was the plant transplanted? If the plant hasn’t been moved within the past 12 months, it is probably not a transplanting error. However, consequences from excessive root damage or planting too deeply may not become visible until the plant is stressed. What fertilizers and pesticides have been applied recently, in what quantities, and under what conditions? Applying too much, or in the heat of the day, can cause damage. When and how has the plant been pruned? Each pruning cut creates a potential entry for insects and diseases. What other activity, such as construction or trenching, has taken place within the root zone of the plant?
- Damage to roots during transplant may result in wilting and marginal leaf burn due to water stress. Often these symptoms show up almost immediately; however, in some cases the plant stays stunted for a year or more before dying.
- Planting too deeply may result in pale yellow discoloration on the interior portion of the leaf blade or needle. Sometimes the leaves on these plants will droop like they are wilting. They may also flag which means certain branches will die back.
- Improper watering can cause plant damage. Overwatering causes symptoms identical to being planted too deeply. This problem shows up the first growing season after transplanting. Underwatering causes wilting and marginal leaf burn. The effects of underwatering will be evident the first time the plant gets dry (Figure 7–10).
Step 5. Identify environmental conditions
What recent environmental conditions could have affected the plant, for example: excessive cold, heat, drought, rain, lightning, wind, or hail (Figure 7–11)? What chronic environmental conditions could be affecting the plant, for example: too much or too little sunlight, soil pH, soil compaction?
Step 6. Look for signs of pests and pathogens
Look for signs of insects, mites, other animals, or pathogens. There may be physical evidence of a pest, including the actual animal, cast skins, egg casings, excrement, frass, silken threads, slime trails, tracks, holes, or teeth marks. Make a note of where the evidence of a pest is seen on roots, stems, or the top or the bottom of leaves. Plant pathogen signs include mushrooms, conks, rust, ooze, slime mold, powdery mildew, sooty mold, and smut. The presence of a sign is not proof that the animal or pathogen that left the sign is the cause of the problem, but it does make them a suspect. Some signs are easy to identify, but look online or in common reference books for help identifying others.
Step 7. Identify symptoms of pathogens
Look for symptoms of insects, animals, or pathogens. Symptoms are physical plant responses to the insect, animal, or pathogen.
Symptoms include:
- Blight — A nonspecific term, applied to a wide variety of symptoms, usually refers to rapid death of leaves and other plant parts (Figure 7–12).
- Canker — A plant lesion where part of the plant quits growing and the surrounding parts continue to grow. There may be sunken, discolored, dead areas on twigs or branches, usually starting from an injury, wound, or pathogen (Figure 7–13).
- Chlorosis — A yellowing or whitening of normally green tissue (Figure 7–14).
- Dieback — Progressive death of shoots, branches, or roots, generally starting at the tips and moving back toward the roots.
- Distorted growth — Twisted or misformed growth (Figure 7–15).
- Gall — An abnormal growth or swelling in the plant (Figure 7–16).
- Leaf Drop — Leaves fall off the plant.
- Mosaic — Nonuniform foliage coloration with a more or less distinct intermingling of normal green and light green or yellowish patches (Figure 7–17).
- Rot (fruit, root) — Soft spoiling or decomposing of stems, crowns, and fruit, often accompanied by strong and unpleasant odors.
- Spot (leaf, fruit) — May be dry and colorful, may have a yellow circle inside the spot, may have small structures inside the spot, may be tan and have a water-soaked appearance (Figure 7–18).
- Smut — A specific type of fungus that produces black masses of spores that may form on stems or ears (such as corn), or grain heads. (Figure 7–19).
- Wilt — Leaves appear limp, droopy.
- Witches'-broom — All buds in a certain part of the plant start growing, resulting in a lot of tiny stems; abnormal brush-like development of many weak shoots (Figure 7–20).
Step 8. Determine distribution of damage in the landscape
Is more than one plant affected? If so, are different types of plants affected or only one type? What is the pattern of distribution of affected plants (uniform, random, hot spots, linear, high areas, low areas, and increasing or originating from a specific point or direction)?
If the problem is focused on a single plant family, consider theories involving living animals or pathogens. Living organisms have often co-evolved with one particular plant family. If more than one plant family is showing the same symptom in the same location, environmental or nonliving problems are more likely to be the culprit. Common environmental problems include temperature extremes, drought, soluble salt damage, air pollution, herbicides, and pesticides.
The distribution of damage among plants in the landscape can provide useful clues to the cause. Distribution among the same species may indicate:
- Uniform—likely an abiotic problem (even more likely when all plant parts are affected within a short period of time)
- Random—often caused by a living pathogen
- Hot spots—generally caused by a living pathogen, occasionally caused by nutrition
- Linear—likely man-made, possibly trenching
- High areas—problems associated with limited water
- Low areas—problems associated with excess water
- Originating from a specific direction or source—problem is toward the direction of the most damage (examples include a point source of air pollution or insects dispersing from overwintering sites in nearby woodlands)
Step 9. Examine distribution of damage on the plant and specific plant parts
Look at the distribution of damage on the individual plant. Does it affect the entire plant or just specific limbs or leaves? Is the problem random across the canopy or does it occur mostly on the outside of the canopy or inside the canopy? Is the damage restricted to new growth or old growth? Does it affect this year’s needles/leaves, or older ones? What do the roots look like? Is there evidence of a canker, a sharply delineated dead area of wood or cambium on a branch or main stem (it may require a shallow cut below the bark to reveal this)?
Look for patterns on specific plant parts. On the leaves, does the pattern affect the inside of the leaf, the margin of the leaf, randomly across the leaf, the veins, or between the veins? Is the problem limited by veins or does it go across the veins? On needles, are all needles affected at the same length, or is there a random variation in how much of the needle is affected? On the flowers or the fruit, is the problem distributed randomly or is it concentrated on the distal (blossom) end, or only on the stem end?
- If the entire plant is affected, the problem is likely either environmental or from a pathogen that has compromised the root system, lower stem, or vascular system.
- If random above-ground parts of the plant are affected, the problem is likely a living airborne pathogen or pest. If only the lower parts are affected, consider shade or temperatures. Often fungal and bacterial diseases are progressively less severe as you move up the plant. Viruses, on the other hand, are systemic and can affect new growth as well as old.
- If only the upper parts are affected, again it may relate to temperature.
- If only the interior parts of evergreens are affected, the problem most likely relates to something that occurred last year. Consider secondary leaf spot. However, Rhizosphaera needlecast and Passalora needle blight affect lower and interior portions of a plant first.
- When looking at a leaf, a marginal leaf burn usually indi- cates lack of water, too much soluble salts, or a problem with the transport system, such as xylem-inhabiting bacteria.
- A random pattern on the leaf indicates an airborne pathogen or pollutant.
- Uniform patterns between the veins are typically nutri- tional problems, although spider mites can also bleach out the interveinal area while leaving the veins green.
- Vein clearing patterns are typically caused by specific pesticides and certain viruses.
- Most fungal leaf spots will often cross the veins, while bacteria leaf spots, downy mildew, and foliar nematodes are often limited by the veins. When veins limit the advance of a leaf spot, the resulting pattern is called “angular” in dicots or a “streak” in monocots.
- On needles, compare adjacent needles. If all the needles are damaged at the same length, this is typically an environmental problem. If some needles have extensive damage while other needles are not damaged, this is typically an airborne pathogen.
- On flowers or fruit, a random pattern is typically an airborne problem. Problems on the blossom end of a fruit are typically nutrition-related.
- Nonliving problems do not spread; for example, when a lightning strike occurs, the damage is done all at once and shows up over a short period of time.
- Living problems generally start small and spread. In addition, they are usually season-specific.
Step 10. Review timing
When did the symptoms first appear? What season? Did more plants and plant parts become affected over time?
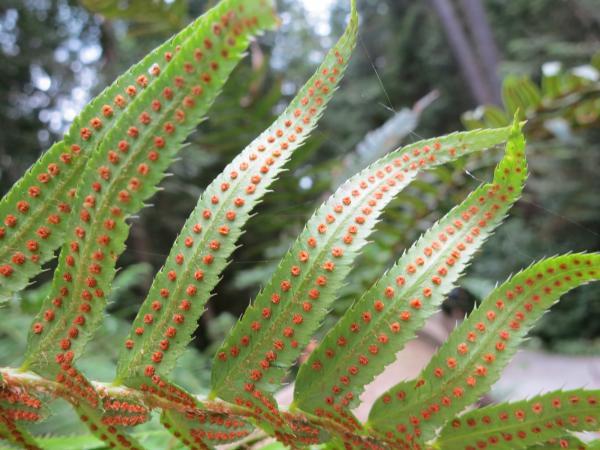
Figure 7–1. These sori are the reproductive structures on ferns, but their appearance can be alarming for those who do not know what they are.
Ruth Hartnup, Flickr CC BY 2.0
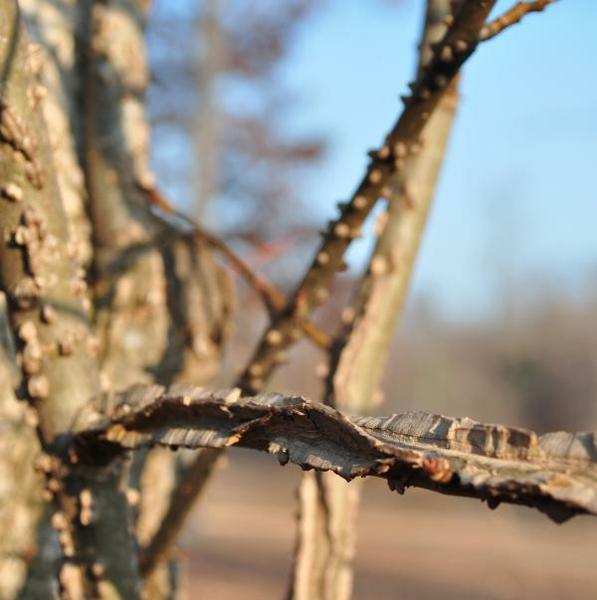
Figure 7–2. The corky growth on sweetgum is often mistaken for a problem. This growth causes the tree no harm.
Trish Walters, Flickr CC BY 2.0
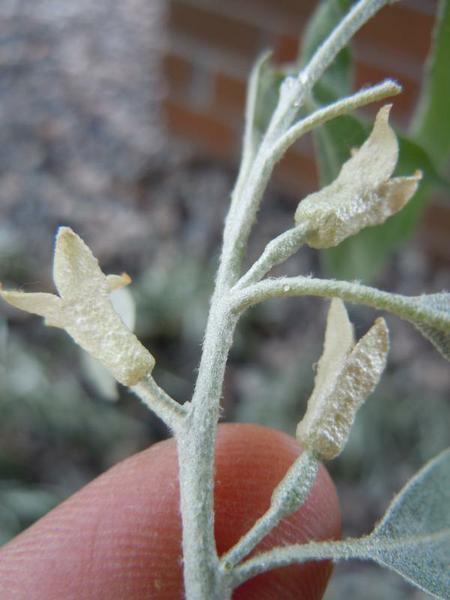
Figure 7–3. The healthy leaves and stems on Elaeagnus angustifolia have a silvery color that can sometimes be confused with a sick plant.
Matt Lavin, Flickr CC BY-SA 2.0

Figure 7–4. The yellow spots on this Aucuba japonica 'Variegata' are perfectly normal.
Julie Anne Johnson, Flickr CC BY 2.0

Figure 7–5. Male strobili are normal pollen-producing cones on conifers. This is a Cupressus macrocarpa.
Forest and Kim Starr, Flickr CC BY 2.0
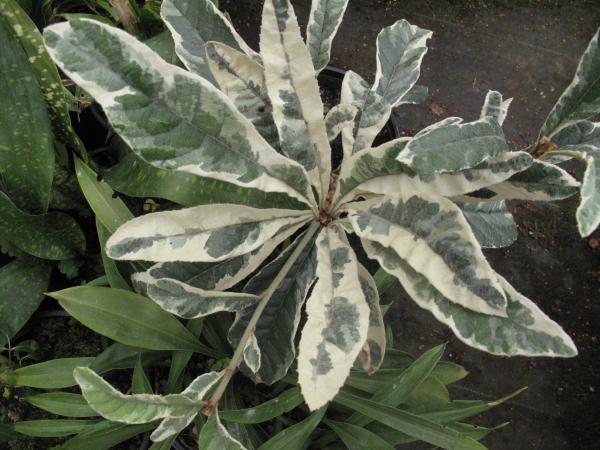
Figure 7–7. Variegation can be a desirable selection. The leaves of this loquat plant (Eriobotrya japonica 'Variegata') are variegated, not suffering from a nutrient problem.
Megan Hansen, Flickr CC BY-SA 2.0
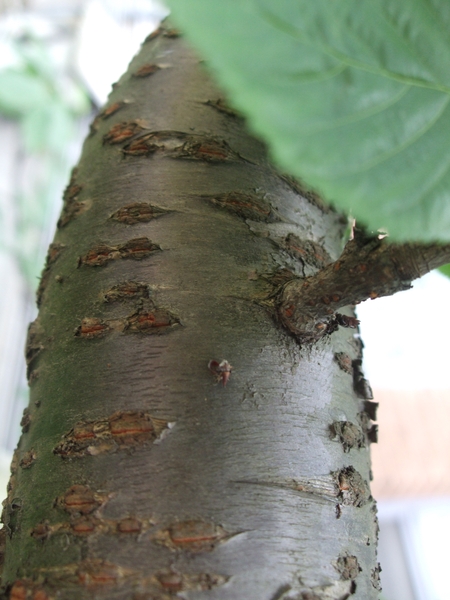
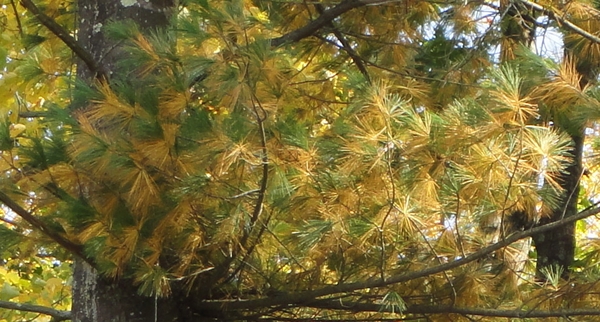
Figure 7–9. Abnormal needle coloration in white pine. Only the latest flush of needles are green. Cause unknown.
Jay Cross, Flickr CC BY 2.0
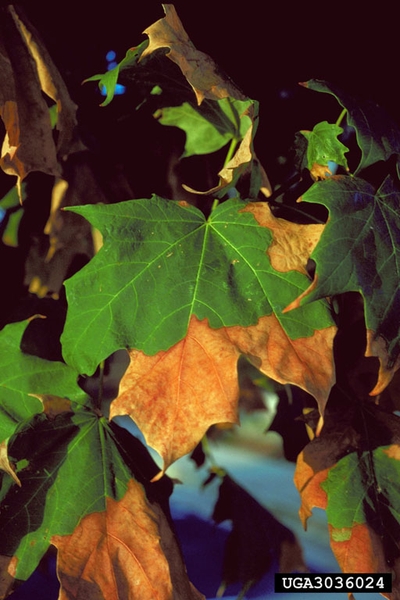
Figure 7–10. The leaves on this maple tree(Acer spp.) show leaf burn from underwatering and drought.
Robert L. Anderson, USDA Forest Service, Bugwood, CC BY-3.0
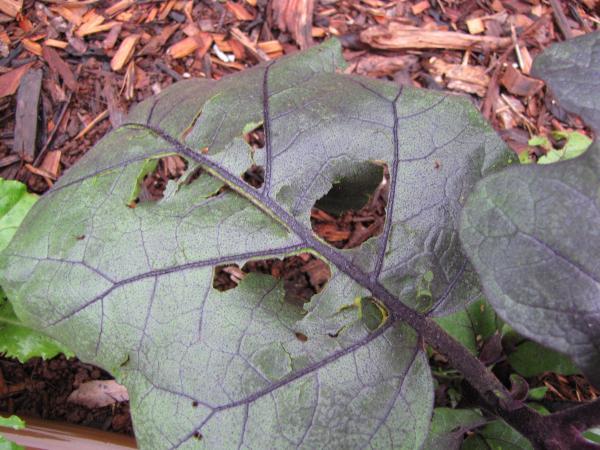
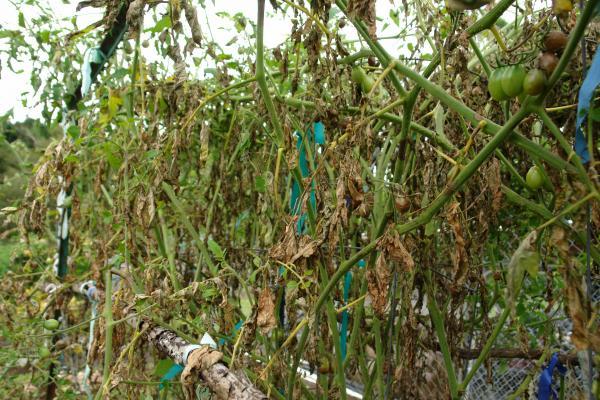
Figure 7–12. This tomato (Solanum lycopersicum) had a rapid death of leaves and stems.
Scot Nelson, Flickr CC0
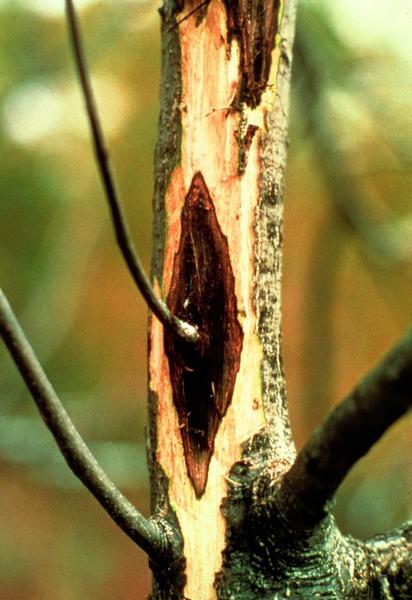
Figure 7–13. Cankers are sunken, discolored, dead areas on twigs or stems.
Mike Ostry, USDA Forest Service, Bugwood CC BY - 3.0
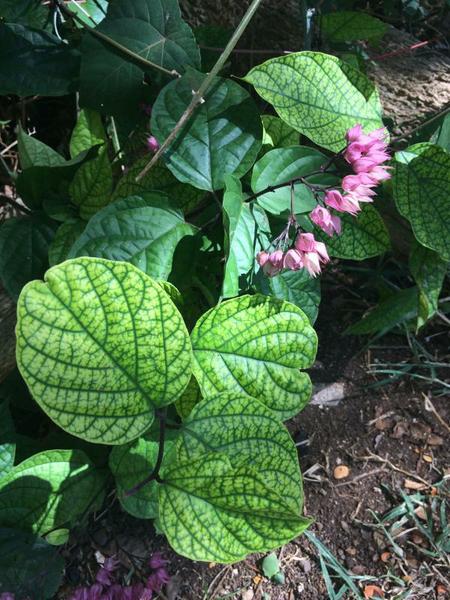
Figure 7–14. Interveinal chlorosis is the yellowing of leaves between green veins.
Scot Nelson, Flickr CC0
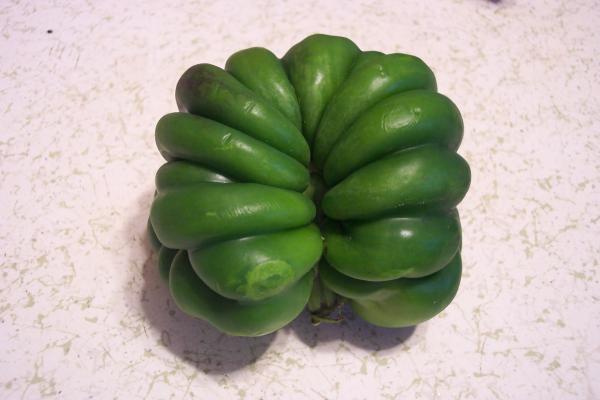
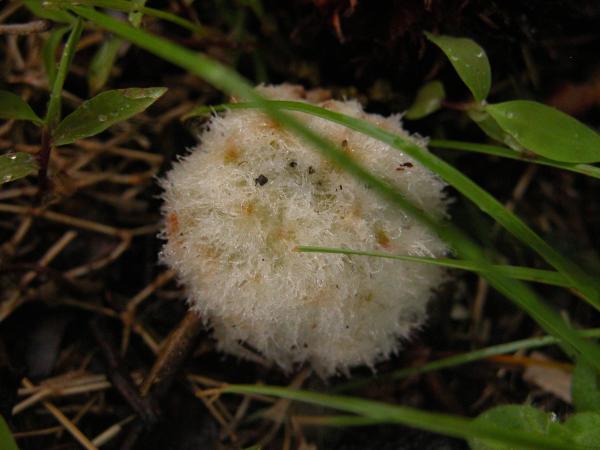
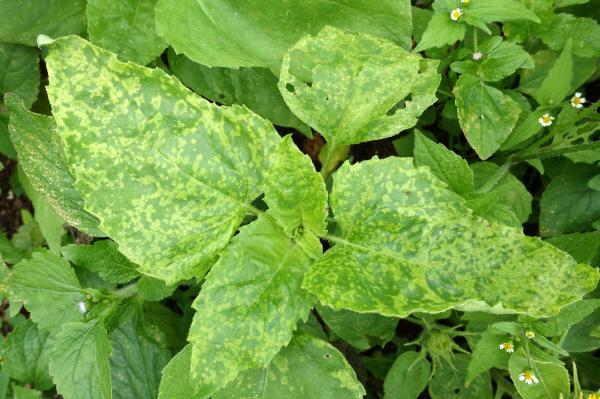
Figure 7–17. Mosaic presents as light green and yellow patches dispersed across the leaf surface.
Scot Nelson, Flickr CC0
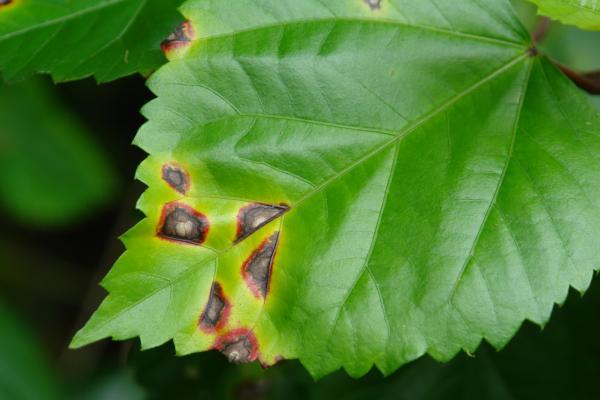
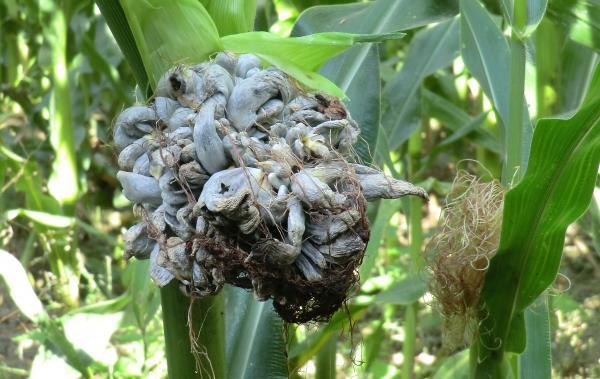
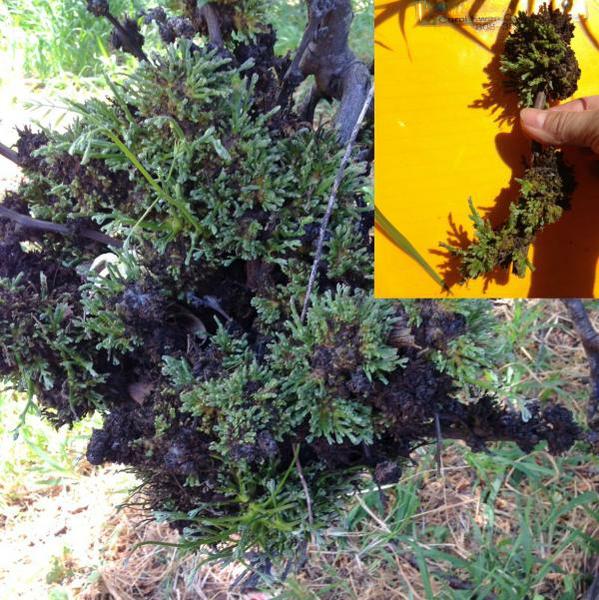
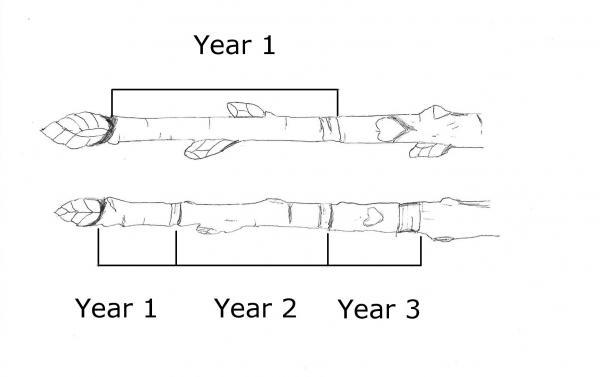
Figure 7–21. The terminal bud scar is a way to determine tree vigor. The top branch shows much greater growth in year 1, the bottom branch suffered from drought stress.
Secondary Problems and their Abiotic or Cultural Start
Why is this (insect, fungus, disease) killing my plant?
Insects and pathogens rarely attack healthy plant tissue. Often a plant has been stressed by abiotic or cultural factors before insects and diseases move in. However, when a gardener finally notices that a plant is suffering. these pests and pathogens are easy to spot and are wrongly blamed for the entire problem.
Abiotic, or nonliving, factors that can affect a plant include: sunlight, temperature, wind, and precipitation. Too much sunlight can burn plant tissue while too little can prevent the plant from photosynthesizing properly. High temperatures can scorch a plant while freezing temperatures can damage plant tissue. High winds can break branches and stems or cause a plant to transpire and lose water. Too little precipitation can stunt growth or cause plant tissues to dry out. Too much precipitation can lead to root rot.
Cultural factors such as humans planting, irrigating, fertilizing, or pruning plants can also have a large impact on plant health. Selecting the “right plant for the right place” goes a long way in ensuring a plant stays healthy. A proper irrigation schedule of deep, infrequent waterings will help establish a plant so it does not suffer drought or overwatering. Fertilizing based on recommendations from a soil test will allow for healthy growth. Excess fertilizer initiates a spurt of new growth, which may be more susceptible to pests and diseases, or can cause fertilizer burn. Read more about fertilizing and soil testing in chapter 1, “Soils and Plant Nutrients.” Proper pruning at the right time of year will help wounds close over and not leave the plant open for pathogens to enter. Read more about proper pruning in chapter 11, “Woody Ornamentals.”
By taking care to ensure abiotic and cultural factors support plant health, secondary problems of pests and pathogens can be greatly reduced.
Develop a Hypothesis
Use the information gathered in the 10 steps to rule out those insects, other animals, and pathogens that could not have caused the problem and focus in on the likely culprits.
Symptoms and Potential Causes:
- Blight—Fungal, bacterial, or environmental condition (Figure 7–12).
- Canker—Bacteria and fungi. Mechanical injury may look similar (Figure 7–13).
- Chlorosis—Poor nutrition, overwatering, some insects, some pesticides (Figure 7–14).
- Dieback—Insect, fungi, bacteria, or pesticides.
- Distorted growth—Pesticide, virus, insect, or gene mutation (Figure 7–15).
- Gall—Fungus, bacteria, or insect (Figure 7–16).
- Leaf Drop—Typically drought; less commonly, toxic chemicals and certain diseases.
- Mosaic—Virus or genetic mutation (Figure 7–17).
- Rot (fruit, root)—Fungi or bacteria. Bacteria do not decay roots, but can cause soft rots of stems, crowns, and fruit
- Spot (leaf, fruit)—Spots that are dry and colorful are typically fungal, though yellow halos can be present around bacterial or fungal spots. Spots with small structures inside the spot are fungal. Spots that start out water-soaked and turn tan are often caused by bacteria (Figure 7–18).
- Smut—Fungal pathogen that most commonly affects members of the grass family (Figure 7–19).
- Wilt—Drought, root rot, or anything interfering with the plant’s water transport system (xylem) will cause plants to wilt.
- Witches'-broom—Virus, possibly genetic mutation (Figure 7–20).
Secondary Leaf Spot
Evergreen leaves do not stay on the plant forever. Most of the broadleaf evergreens will hold their leaves for 14 to 18 months. By the time these leaves drop, the plant usually has new leaves. So the plant always appears green, but individual leaves get old and drop. With both evergreens and deciduous trees and shrubs, it is not uncommon for leaves to get fungal spots as they approach the end of their life. Sometimes the leaves may get the spots in early spring before the new leaves arrive. There may be as many as 50 different fungi that can infect old azalea or rhododendron leaves. As a simple description, plant pathologists call this phenomenon “secondary leaf spot” (Figure 7–22). There is no need to worry about these leaf spots or attempt to identify them or to treat them. The leaf has already contributed to the plant and is going to fall off in a few months anyway. Secondary leaf spots will not attack the new growth.
Table 7–1. Comparison of symptom distribution for living and nonliving factors.
| Living Insect or Pathogen | Nonliving (Environmental) |
|---|---|
| Not widespread | Widespread |
| Species specific | Several species |
| Hot spots | 100% of vulnerable parts affected |
| Progressive with time | Sudden death or decline |
| Occurs in specific seasons | Not necessarily limited to specific seasons |
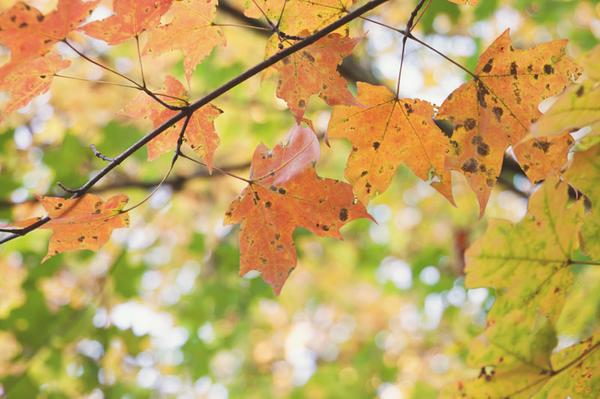
Figure 7–22. Secondary leaf spot on a maple. These leaves are old and are going to die and drop off anyway. You will know it is secondary leaf spot because there will be no spots on new growth.
Emily Carlin, Flickr CC BY-ND 2.0
Submitting Samples
Good samples or photographs will make it much easier to identify a problem.
Some tips for bringing in live samples to your local Cooperative Extension center:
Plant Samples
- Gather samples from the healthy part of the plant as well as the damaged or diseased sections. This will help identify what the “normal” growth looks like next to the problem. If possible, it is helpful to gather samples from older growth and new growth. If multiple plants of the same type are present, taking samples of plants in various stages of the problem will be helpful.
- Take a large enough sample that leaves are still attached to stems. Pulling a few individual leaves from the plant will not provide as much information as intact stems.
- Look for evidence of cankers along the stem and gather a sample.
- For roots, remove sections of healthy, as well as diseased root tissue, along with some of the surrounding soil.
- Bring samples in immediately. If they do need to be stored, put them in a dry plastic bag in the refrigerator or cooler.
Insect Samples
- Collect any insects present; looking for adult as well as immature forms.
- Be sure to collect any samples of the damage the insects are believed to have caused.
- Place insects in a tightly lidded glass jar and fill with rubbing alcohol or put in the freezer for several hours.
If it is not possible to bring in a sample, quality photographs can be submitted.
Quality Photographs
- To help identify a plant, document the leaf pattern (alternate, opposite), leaf margins, bark, and flowers or fruits if present. See chapter 3, "Botany", to help identify plant anatomy and structure.
- To identify an insect, look for both mature and immature forms. Close-ups of legs and antennae can be particularly helpful. Images of damage they have done, frass, or casings can also help with identification. See chapter 4, "Insects."
- To diagnose a problem, be sure to capture healthy parts of the plant, as well as parts that are damaged. Include an image of the entire landscape, the entire plant, as well as close-up images of the problem area, and an image that shows both the problem area and healthy tissue if possible. If symptoms are occurring on leaves, take pictures of both the top and the underside of a leaf.
- Take multiple shots with different camera settings to help ensure the best shot.
- Use a scale object like a coin or a thumb (Figure 7–23).
- Use a fast shutter speed for moving insects and animals to lessen blurring.
- Use macro settings to ensure an in-focus image when taking close-ups.
- For birds, butterflies, or other fast-moving subjects, set the camera up on a tripod, turn it on, focus, and wait for a good shot.
For more detailed information about gathering samples for submittal, please review the steps on the North Carolina Plant Disease and Insect Clinic’s (PIDC) website.
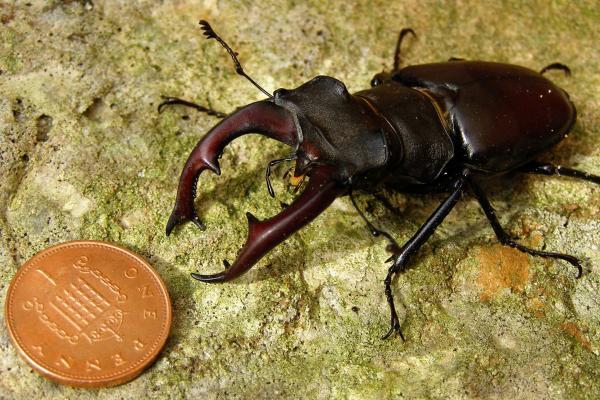
Figure 7–23. Use a scale item when capturing images like the penny used in this stag beetle photo.
Jim Champion CC BY-SA 2.0
Case Studies—Diagnostics
Case Study 1 – Wilted Tomato
Presenting problem: A sample of a wilted tomato plant.
Step 1. Identify the plant: Tomato
Step 2. Describe the problem: Wilting
Step 3. Identify what is normal: While it is normal for tomatoes to wilt in the middle of a hot summer day, they generally regain turgor in the evening. Extended wilting is not normal for tomatoes.
Step 4. Cultural practices: The tomato was transplanted several weeks ago. It was hand watered once but it has not been sprayed, fertilized, or pruned.
Step 5. Environmental conditions: Within the last two weeks, it has rained lightly, for an hour or less, twice. No other relevant environmental conditions.
Step 6. Signs of pathogens: A close examination of the plant reveals no obvious signs of pest or pathogens.
Step 7. Symptoms: The only symptom is the wilting.
Step 8. Distribution of damage in the landscape: No other types of plants in the garden are affected. Cucumbers and green beans are doing fine. Three of nine tomato plants in the garden have wilted and there does not appear to be a uniform, linear, and high or low pattern to the arrangement of the plants.
Step 9. Distribution of damage on the plant and specific plant parts: All the above ground portions of the plant are affected and all parts are affected equally.
Step 10. Timing: Two plants were wilted on one day and the third plant about a week later.
Steps 4, 5, 6, and 7 were inconclusive, but steps 8, 9, and 10 indicate a living pathogen. Consult chapter 5, "Diseases and Disorders," and chapter 16, "Vegetable Gardening," or use a reference book or online tool to identify living pathogens that cause wilt on tomatoes: (Fusarium wilt, Verticillium wilt, Southern blight, bacterial wilt, root-knot nematodes, and Tomato spotted wilt virus). Nematodes would – eventually – affect the cucumbers and beans, as well as tomato. Cutting into the lower stem reveals darkening of the vascular tissue, which makes Fusarium, Verticillium, or bacteria a suspect. Verticillium wilt of tomato would be found only in the cooler portions of the state of North Carolina.
A review of the literature reveals that both Fusarium and Verticillium cause some yellowing and curling of the leaves (Figure 7–24), while Tomato spotted wilt virus causes some necrotic spotting on the foliage and fruit (Figure 7–25). Southern blight causes a dark spot encircling the stem at the base of the plant (Figure 7–26). Since these leaves and stem are completely green, each of these are ruled out, leaving bacterial wilt. A reference book may explain a test for bacterial wilt of suspending a stem in clean water and seeing if the water turns murky from the bacteria (Figure 7–27). This test confirms bacterial wilt (Note: the streaming may not be visible if populations of the bacteria are low). An internet search for “bacterial wilt site:ncsu.edu” finds a blog from the Plant Disease and Insect Clinic that states, “if your plants have bacterial wilt, there is nothing you can do to save them. Infected plants will not recover and should be removed and destroyed. “
Case Study 2 – Pine Tree Death
Presenting problem: Twenty to 30 mature native pines in a neighborhood have died over a few months (Figure 7–28).
Step 1. Identify the plant: Native pines may mean several species. For most of the state, the identification to species level isn’t necessary. In places where both white pines and yellow pines are native, you should further identify the pine since the major problems are different.
Step 2. Describe the problem: A whole group of trees died within a few months.
Step 3. Identify what is normal: Plants do not have indefinite life spans so the death of one individual may be normal. However, the rapid death of 20 or 30 adjacent pines is abnormal.
Step 4. Cultural practices: No recent cultural management.
Step 5. Environmental conditions: No environmental conditions out of the ordinary; however, it has been dry.
Step 6. Signs of pathogens: An examination of the pines showed no signs of insects, animals, or pathogens.
Step 7. Symptoms: The needles are brown and are clinging to the tree. The wood inside a broken branch is dark. Remember that pathogens are not always visible, so they cannot be ruled out based on their absence to the unaided eye.
Step 8. Distribution of damage in the landscape: Under the pines, there was Japanese honeysuckle that showed some dieback. In addition, there was an understory dogwood that showed some dieback. So other types of plants were affected. The distribution of damage on the pines was uniform.
Step 9. Distribution of damage on the plant and specific plant parts: Every plant that was dead, the entire plant was affected.
Step 10. Timing: All the pines died within a few months.
Steps 8, 9 and 10 show the uniform nature of the problem across the plant, the fact that additional plant families were affected, and the rapid onset of symptoms. This suggests an abiotic problem, like drought.
Case Study 3 – Orange Growth on Cedar Tree
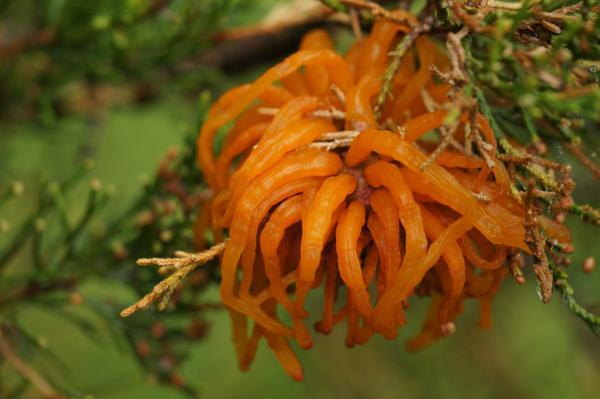
Presenting problem: Orange jelly-like growth on the needles, branches, and trunk of a mature cedar tree (Figure 7–29).
Step 1. Identify the plant: Native red cedar (Juniperus virginiana).
Step 2. Describe the problem: Orange jelly-like growth on the needles, branches, and trunk of a mature cedar tree.
Step 3. Identify what is normal: Orange jelly is not normal.
Step 4. Cultural practices: No cultural issues.
Step 5. Environmental conditions: No specific environmental conditions identified.
Step 6. Signs of pathogens: The orange jelly-like growth is a sign.
Step 7. Symptoms: No noticeable exterior change to the branches, needles, or bark itself.
Step 8. Distribution of damage in the landscape: No plants other than cedars exhibit this sign and only some of the cedar trees exhibit this sign. The location of the orange jelly on the trees appears random, with no apparent patterns connecting the affected trees.
Step 9. Distribution of damage on the plant and specific plant parts: Only one side of the tree's needles, branches, and trunk appear affected.
Step 10. Timing: The orange jelly appeared rapidly, shortly after some spring rains.
With the exception of Step 10 stating the rapid appearance of the substance, all indications point toward a living, airborne pathogen. A review of references for diseases of cedar that fits this pattern identifies cedar-quince rust as a possibility. Examining pictures and a description identifies cedar-quince rust as the likely pathogen. A search of available references indicates there are no recommended control measures for this problem.
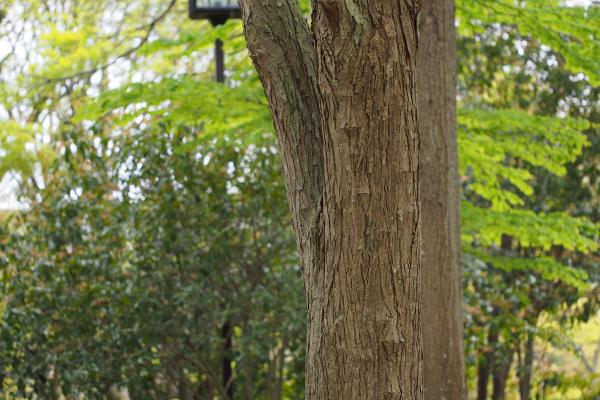
Case Study 4 – Katsura Tree Stunted Growth
Presenting problem: Katsura tree is not growing.
Step 1. Identify the plant: Katsura Tree (Cercidiphyllum japonicum) (Figure 7–30 and Figure 7–31).
Step 2. Describe the problem: Not growing properly. It is growing slowly and has small leaves.
Step 3. Identify what is normal: Larger leaves and faster plant growth is normal. There is a problem with this Katsura tree.
Step 4. Cultural practices: Tree has been in the landscape for four years. No cultural practices identified that would cause problems.
Step 5. Environmental conditions: No adverse environmental conditions noted.
Step 6. Signs of pathogens: No signs.
Step 7. Symptoms: Smaller than normal leaves and short stature of plant.
Step 8. Distribution of damage in the landscape: Liriope (Liriope muscari) in the same area is growing well.
Step 9. Distribution of damage on the plant and specific plant parts: Entire plant affected.
Step 10. Timing: Symptoms observed over the past four years.
No obvious answer, take plant sample to your local Cooperative Extension center for assistance.
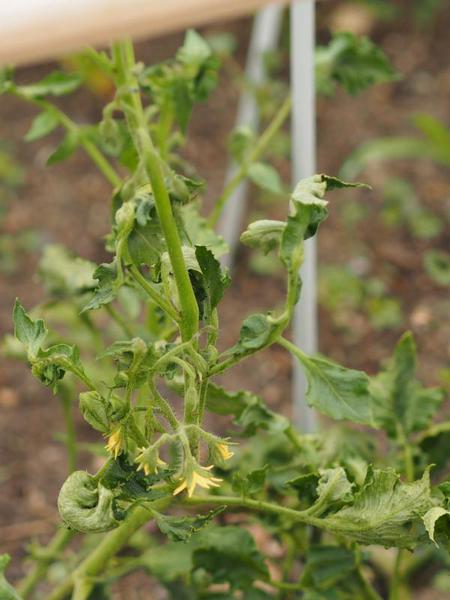
Figure 7–25. Tomato spotted wilt virus causes spotting on foliage and fruit.
Scot Nelson, Flickr CC0
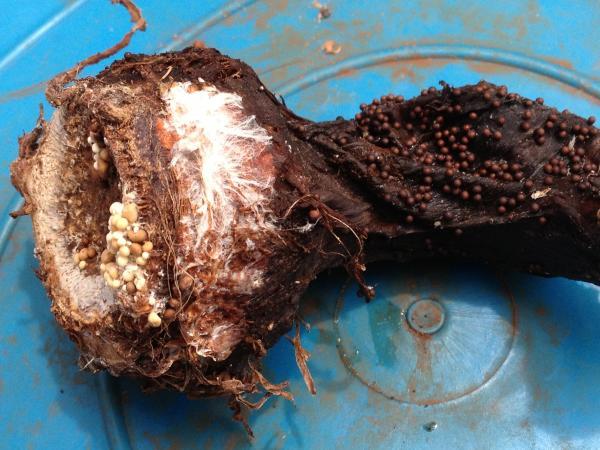
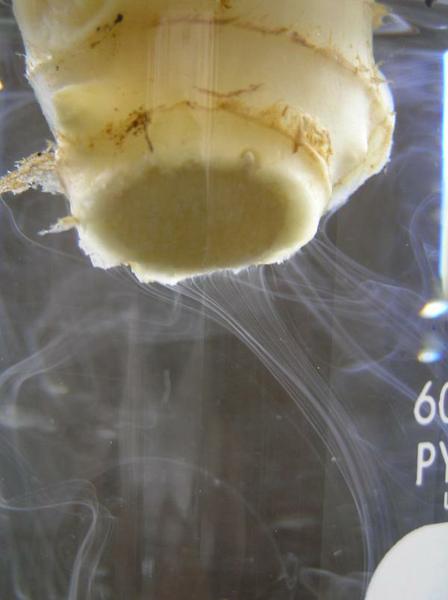
Figure 7–27. The severed stem of an infected ginger rhizome placed in clean water. Moments later, bacteria can be seen streaming out of the rhizome.
Scot Nelson, Flickr CC0
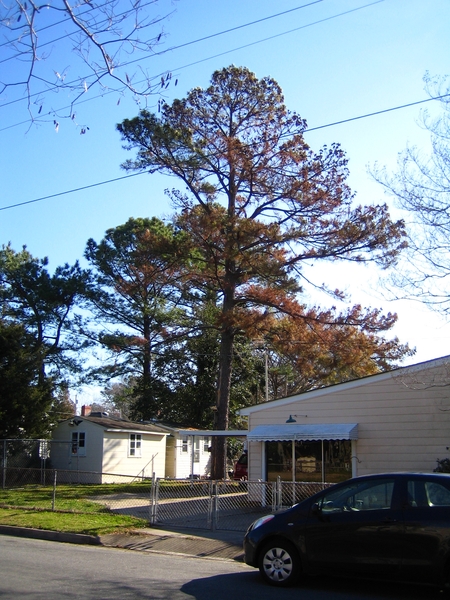
Figure 7–28. Mature dead pine tree that died over the period of a few months.
Dirk, Flickr CC BY 2.0
Frequently Asked Questions
- My plants have some black spots on them, what can I spray? Before even thinking about chemicals, the host and pest or pathogen must be identified. Using the 10 steps outlined in this chapter, work to identify the plant and develop a theory. Once the plant and issue have been identified, use IPM strategies from chapter 8, to manage the problem.
- What do I do when I cannot identify the pest or pathogen? If you go through the diagnostic steps and are unable to develop a sound theory, use the directions above to take samples and photographs to Extension Master Gardeners at your local County Extension Center. If the volunteers and the county agent are unsure, samples can be sent in to NC State’s Plant Disease and Insect Clinic. A fee may apply. Processing times vary depending on the volume of samples. A report will be emailed to you if you provide an address.
To learn more about common plant problems see Appendix C, "Diagnostic Tables."
If you have questions about this chapter contact your local NC State Extension expert at your local Cooperative Extension Center.
Further Reading
Brown-Rytlewski, Diane, ed. A Pocket Guide for IPM Scouting of Woody Landscape Plants. East Lansing, Michigan: Michigan State University Extension, 2008. Print.
Byrne, Jan, and Raymond A. Cloyd. A Pocket Guide for IPM Scouting in Herbaceous Perennials. East Lansing, Michigan: Michigan State University Extension, 2007. Print.
Carr, Anna. Rodale's Color Handbook of Garden Insects. Emmaus, Pennsylvania: Royale Press, Inc., 1983. Print.
Horst, R. Kenneth. Westcott's Plant Disease Handbook. 8th ed. New York: Springer Publishing Company, 2013. Print.
Narayanasamy, P. Plant Pathogen Detection and Disease Diagnosis. 2nd ed. New York: Marcel Dekker, Inc., 2001. Print.
Pirone, Pascal P. Diseases and Pests of Ornamental Plants. 5th ed. Hoboken, New Jersey: John Wiley & Sons, Inc., 1978. Kindle file. Note: This is a good resource for diagnostics; refer to the North Carolina Agricultural Chemicals Manual for the latest chemical information.
Schumann, Gail L. Essential Plant Pathology. 2nd ed. St. Paul, Minnesota: American Phytopathological Society, 2009. Print.
Chapter Text Hyperlinks
North Carolina Extension Gardener Plants Toolbox
Plant Disease Factsheets, NC State University Plant Disease and Insect Clinic
How to Submit a Sample, NC State University Plant Disease and Insect Clinic
For More Information
NC State Resources
- Diagnostic Tables
- How to Submit a Sample to the Plant Disease and Insect Clinic
- Insect Notes
- Plant Disease Factsheets
More NC State Resources
Other Resources
- Diagnosing Poor Plant Health, Penn State Extension
- Guidelines to Identification and Management of Plant Disease Problems, University of Florida
- How to recognize Plant Disease, University of California Television Part 1 (33:31) Part 2 (27:19)
- Identification and Management of Plant Disease Problems, University of Florida
- Plant Disease Diagnosis, American Phytopathological Society
- Training and Educational Site, National Plant Diagnostic Network
Contributors
Authors: Mike Munster, Diagnostician, NC State Plant Disease and Insect Clinic and David Goforth, Horticulture Agent, Cabarrus County
Contributions by Extension Agents: Jeana Myers, Julie Flowers, Kerrie Roach
Contributions by Extension Master Gardener Volunteers: Kim Curlee, Jackie Weedon, Karen Damari, Ann Barnes, Lee Kapleau, Chris Alberti, Edna Burger
Content Editors: Lucy Bradley, Associate Professor and Extension Specialist, Urban Horticulture, NC State University; Director, NC State Extension Master Gardener program; Kathleen Moore, Urban Horticulturist
Copy Editor: Barbara Scott
How to cite this chapter:
Munster, M. 2022. Diagnostics, Chapter 7. In: K.A. Moore, and. L.K. Bradley (eds). North Carolina Extension Gardener Handbook, 2nd ed. NC State Extension, Raleigh, NC. <http://content.ces.ncsu.edu/7-diagnostics>
Publication date: Feb. 1, 2022
AG-831
Other Publications in North Carolina Extension Gardener Handbook
- 1. Soils & Plant Nutrients
- 2. Composting
- 3. Botany
- 4. Insects
- 5. Diseases and Disorders
- 6. Weeds
- 7. Diagnostics
- 8. Integrated Pest Management (IPM)
- 9. Lawns
- 10. Herbaceous Ornamentals
- 11. Woody Ornamentals
- 12. Native Plants
- 13. Propagation
- 14. Small Fruits
- 15. Tree Fruit and Nuts
- 16. Vegetable Gardening
- 17. Organic Gardening
- 18. Plants Grown in Containers
- 19. Landscape Design
- 20. Wildlife
- 21. Youth, Community, and Therapeutic Gardening
- Appendix A. Garden Journaling
- Appendix B. Pesticides and Pesticide Safety
- Appendix C. Diagnostic Tables
- Appendix D. Garden Tools
- Appendix E. Season Extenders and Greenhouses
- Appendix F. History of Landscape Design
- Appendix G. Permaculture Design
- Appendix H. Community Gardening Resources
- Appendix I. More NC State Resources
- Glossary
N.C. Cooperative Extension prohibits discrimination and harassment regardless of age, color, disability, family and marital status, gender identity, national origin, political beliefs, race, religion, sex (including pregnancy), sexual orientation and veteran status.