
Outline
A Vegetable Garden for Every Lifestyle
Vegetable Harvesting Guidlines
Objectives
This chapter teaches people to:
- Determine the type of garden that works best for a given environment and interests.
- Properly plan a vegetable garden.
- Prepare soil, plant, and care for a vegetable garden throughout the year.
- Identify and manage the major pests and diseases that affect vegetable crops.
- Understand the basics of culinary herb cultivation in the home garden.
Introduction
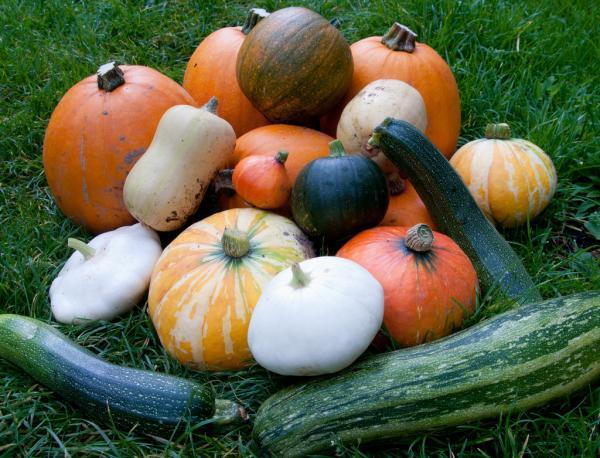
Many gardeners grow vegetables for the outstanding flavor and freshness of homegrown produce or to reduce the family food budget. Others are inspired by the wide variety of options and easy access to hard-to-find and unusual varieties. For example, a grocery store may have only three types of squash, whereas a seed catalog may have 49 or more (Figure 16–1). Still others view vegetable gardening as a relaxing escape from everyday pressures. The food they produce may be secondary to the sense of joy and accomplishment they get from tending the garden and sharing produce with neighbors and friends.
Successful vegetable gardening begins with selecting a site, planning what to grow, and preparing the soil. Once the garden area is ready, vegetables are selected, planted, and nurtured until the produce is ready to harvest. Vegetable gardening can be accessible to anyone with a sunny space, some seeds, water, fertilizer, and patience (Figure 16–2).

A Vegetable Garden for Every Lifestyle
Before donning garden gloves and putting seeds in the soil, give careful thought to the type or types of vegetable gardens that work best for your lifestyle. Consider the size of your family, the vegetables you wish to grow, the health of the soil, and how much time and money you have to invest in a vegetable garden.
If you have a sunny backyard with space to spare and good quality soil, you have the option of planting a traditional in-ground vegetable garden. If your soil is poor, you may wish to consider planting in raised beds. Front yards are often overlooked—underused spaces that could provide food if located in a neighborhood with no restrictions. Many vegetable plants are beautiful. If your landscape is already well-established and you have no room for a traditional vegetable garden, interplanting vegetables in your ornamental beds is a great option. Interplanting is also an easy first step to try vegetable gardening if you are unsure about dedicating a new space to vegetables.
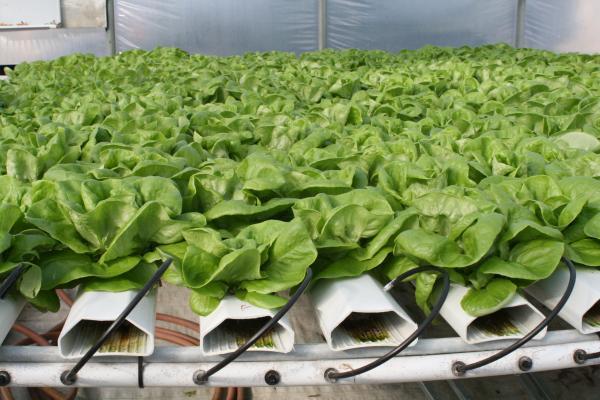
Many vegetables thrive in containers, and container gardening is ideal for those with limited outdoor space. Vegetables cannot survive indoors without supplemental light, but growing plants indoors hydroponically is an option that is gaining popularity (Figure 16–3). Hydroponics allows the gardener to control temperature, light, and nutrients, all without as many pathogen pressures as plants grown outdoors. It can involve a large initial investment, so it may not be the best choice for someone new to growing plants.
These methods are not mutually exclusive. For example, you could grow cucumbers and corn in a traditional in-ground garden bed in your backyard while growing carrots and broccoli in a raised bed in your front yard. At the same time, you could interplant a perennial border with kale and Swiss chard, grow herbs in containers on your back patio, and produce microgreens hydroponically inside your home.
Selecting a Garden Site
Prior to selecting a site, consider previous uses of the land and potential contaminants. Review NC State Extension publication AGW-439-78, Soil Facts: Minimizing Risks of Soil Contaminants in Urban Gardens, which provides indicators for concern, guidelines for when to have the soil tested for contaminants, directions for how to interpret the results, and strategies for minimizing risks—for example, using raised beds with imported soil or containers.
The most important factor to consider when selecting a garden site is sunlight. The garden must receive at least 6 hours of direct sunlight each day; 8 to 10 hours is ideal. Vegetables should be planted away from the shade of buildings, and the shade and competing root systems of trees and shrubs. Some vegetables tolerate shade better than others. Those vegetables that produce edible stems and leaves (such as broccoli, cabbage, collards, kale, lettuce, parsley, and spinach) as well as those that produce edible roots (such as beets, carrots, radishes, and turnips) are more tolerant of shade. Plants that flower and set fruit, such as eggplants, melons, peppers, and tomatoes, require more light.
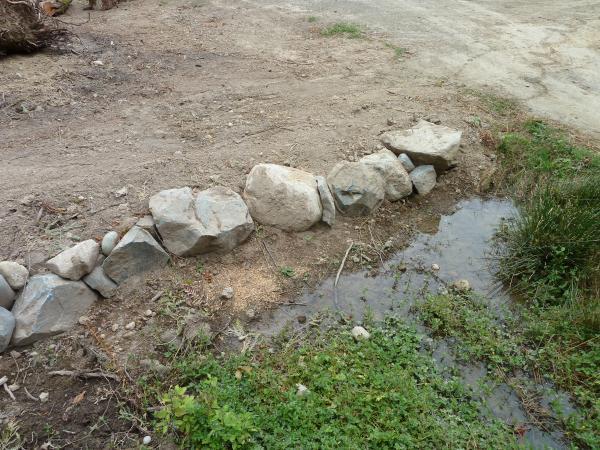
Good soil drainage is also very important. Observe your yard after a rain. Areas where water pools have poor drainage and without serious remediation would not be a good site for a garden (Figure 16–4). Chapter 1, “Soils and Plant Nutrients,” provides more information about the soil in your garden as well as soil testing. Learn about amending your soil in chapter 2, “Composting.” More about preparing garden soil is covered in the following sections.
Placing a garden near the home or near a pattern of foot traffic through the yard ensures easy access for garden tasks and facilitates frequent inspections. Consider convenient availability to clean water sources when locating your garden. Access to a hose bib or irrigation system saves the effort of hauling water during dry months.
Another important consideration is good air movement. Avoid locating the garden in a low spot, such as at the base of a hill. These areas are slow to warm in the spring, and frost forms more readily in them because cold air cannot drain away. Vegetable gardens located on high ground are more likely to escape light freezes, which may permit an earlier start in the spring and a longer harvest in the fall. If access to land is a problem, explore opportunities at a community garden. Visit the NC Community Gardens Directory for a list of active community gardens.
Got Shade?
Very few plants grow well in dense shade. If you have partial, filtered, or high shade, however, you may be able to grow vegetables. Select large-leafed plants from which you harvest the roots, stems, or leaves. Producing flowers, fruits, and seeds (part of a plant’s reproductive process) requires more sunlight. In shade, try collards, spinach, cabbage, carrots, kale, turnips, parsley, radishes, and lettuce. Avoid planting tomatoes, beans, eggplant, and other plants from which you harvest flowers, fruit, and seeds.
Garden Types and Techniques
There is a garden type, or a combination of types, to fit each gardener’s needs. Gardens can be grown in-ground, in a raised bed, or in containers. In addition, a variety of techniques can be used to manage the garden. Plants can be laid out in traditional rows or intensely planted, or can take advantage of vertical spaces. Review the following types and techniques, and select the strategies that work best for your unique situation.
Garden Types
In-ground Gardens
In ground gardens are less expensive, the water does not drain away as quickly, and the roots stay cooler in the summer. While water does not drain as quickly from in-ground beds, it can be difficult to supply water only to planting beds and not to adjoining areas. An in-ground garden generally requires more space than raised bed or container gardens. Care must be taken to create paths for traffic to avoid compaction of planting areas. Weeds from adjacent pathways can be challenging to manage (Figure 16–5).
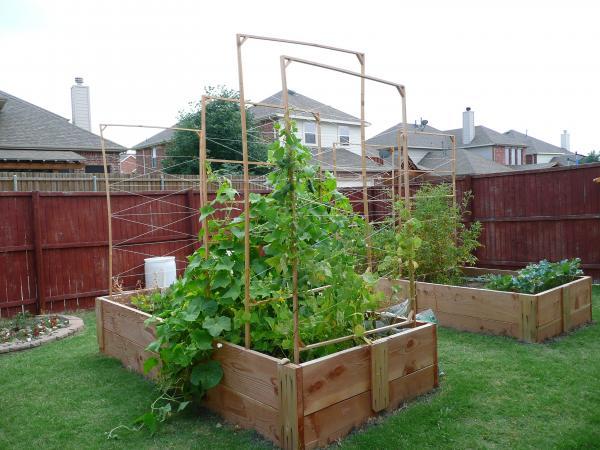
Raised Bed Gardens
Raised beds are garden spaces elevated 6 to 8 inches or more aboveground (Figure 16–6). They are connected to the native soil beneath them and they may or may not have constructed sides. They can simply consist of soil piled high with a flattened top, or they can be framed with logs or rocks, constructed out of lumber boards, or made of straw bales (Figure 16–7). Raised beds, arranged just wide enough to reach to the center, are ideal for growing vegetables. Having defined beds not only makes a garden attractive, it also limits foot traffic in the bed, which can compact soil. Soil raised aboveground will likely drain well and warm up earlier in the spring. Raised beds do require more frequent irrigation than those planted in a traditional in-ground garden. As a higher percentage of the available growing space is used, there is less room for weeds to grow and water can be used more efficiently. When planted properly, one 4-foot by 8-foot raised bed can supply the majority of produce during the growing season for one or two people. Raised beds are generally 8 to 12 inches high, 3 to 4 feet wide, and as long as desired or as dictated by the materials used.
If the raised bed has sides, they should be made of a rot-resistant material. Wood products can be naturally rot-resistant or can be comprised of wood shavings mixed with synthetic materials such as plastic. Naturally rot-resistant woods include Eastern red cedar (Juniperus virginiana), redwood (Sequoia sempervirens), and black locust (Robinia pseudoacacia).
Container Gardens
Growing edibles in containers is a popular way to produce food for the home. Many vegetables can be grown in containers deep enough to support their roots (Figure 16–8). Container size is directly related to gardening ease and success—larger is better. Vegetables that thrive in containers include beans, beets, carrots, collards, cucumbers, eggplants, garlic, kale, leeks, lettuces, mustard greens, peas, peppers, potatoes, spinach, squash, Swiss chard, and tomatoes. Gardening in containers is particularly useful for people with limited space, soil problems, or heavy wildlife pressure. Containers can be placed on a rooftop, balcony, patio, deck, entrance area, or walkway. Containers should be placed in locations that favor the growth of the crop being grown. For instance, a container can be moved to a sunny spot if growing tomatoes, a partly shady area when growing lettuce, or a protected microclimate during the winter for growing year-round kale. Container gardening of edibles offers more flexibility than traditional gardening and is great for children, renters, new gardeners, people with physical limitations, or experienced gardeners wanting to downsize. With container gardening, there is no digging or tilling and crops are virtually weed-free. Container gardening can also be a way of containing aggressive herbs, such as mint, that may otherwise take over traditional garden spaces. Vegetables grown in containers do require more care than plants grown in traditional garden beds in the ground. Learn more about growing edibles in containers in chapter 18, “Plants Grown in Containers.”
Where do I get soil for my raised beds?
Raised beds can take many forms, and so can the soil used inside the beds. For shallow beds with no support, use topsoil from neighboring pathways and mix it with existing soil and organic matter. Soil can be piled up and flattened to make a raised bed less than 6 inches high. To prevent soil erosion, gently slope the sides of the bed.
If making a taller raised bed or one in a framed box, you may need additional soil. If your soil is good quality loam, you can screen your soil into the raised bed and add 50% compost. You can also purchase raised garden soil blends bagged from a nursery. Or soil can be ordered by the cubic yard from a landscape company. To calculate how many cubic yards of soil you need, consider that one cubic yard of soil is:
3 feet × 3 feet × 3 feet = 27 cubic feet
To find out how many cubic feet you need in a raised bed, multiply the length by the width and depth of your raised bed (convert all measurements to feet). If your bed is 4 feet wide by 10 feet long by 18 inches deep, that would be:
4 feet × 10 feet × 1.5 feet = 60 cubic feet
Divide the number of cubic feet by the number of feet in a cubic yard (27):
60 cubic feet / 27 cubic feet = 2.22 cubic yards of material
Be sure to ask about the components of the blend. A quality blend consists of topsoil, compost, and a soilless mix, such as vermiculite. Are the materials organic? What is the source? Is this blend high in animal manures? Have they been fully composted? Is it guaranteed to be topsoil free of pollutants, weeds, insect pests, diseases, and pathogenic nematodes? Simply purchasing a raised bed mix is not enough to maintain a garden over the long term.
To keep nutrient levels high in the soil, raised beds need to be amended after each growing season by adding a 1-inch to 4-inch layer of organic material.
Treated Lumber and Pallets
Several concerns exist about the safety of using treated lumber in food gardens.
Avoid using creosote-treated railroad ties. Freshly treated creosote lumber can leach into the soil for several years and continue to give off vapors for seven to nine years. Pressure-treated lumber using chromated copper arsenate (CCA) as a preservative is a concern because of the carcinogenic potential of leached arsenic. CCA manufacturers no longer manufacture products for residential uses, but the U.S. Environmental Protection Agency (EPA) has not banned CCA and does not require the removal of existing structures made with CCA-treated wood or the surrounding soil. Do not use any remaining stock in raised beds for growing food crops. Alkaline copper quaternary (ACQ) is another preservative choice for pressure-treated lumber. Although ACQ does not contain arsenic or chromium, it does contain copper, which can leach into the soil from treated lumber. Although copper is an essential element for both plants and animals, excessive amounts can be harmful.
Pallets have become a popular choice for garden construction because they are inexpensive and readily available, but exercise caution before using wood pallets in a garden. Understanding the stamps and markings on a pallet helps in making an educated choice.
Pallets are marked with these identifiers (Figure 16–9):
1. Country of origin
2. An International Plant Protection Convention (IPPC) logo, for pallets that are used and shipped internationally
3. How the pallet was treated (HT: heat treated, DB: debarked, KD: kiln dried, MB: methyl bromide, or a combination of these)
4. Possibly a numerical code and a logo identifying the inspector
If a pallet is unmarked, it may be safe to use. It is better, however, to reject a pallet without origin and treatment information.
Pallets that are safe for use in vegetable gardens
HT: Heat-treated wooden pallets manufactured in Canada or the United States undergo HT pest control treatment, which involves heating the pallet to a minimum core temperature of 56°C (132°F) for softwoods and 60°C (140°F) for hardwoods, for a minimum of 30 minutes in a kiln. Some pallets may be marked DB-HT.
DB: Debarked pallets means that the bark was cut off the wood using a scraping tool before the pallets were constructed. This has no effect on the wood of the pallet.
KD: Kiln-dried pallets have the moisture in the wood reduced to a level below 19%. This helps control warping and some fungal problems. The kilns do not necessarily reach the same temperatures (132°F) as wood that is labeled as HT.
Pallets that should not be used in vegetable gardens
MB: Methyl bromide is a pesticide used to treat pallets that ensures insects, weeds, pathogens, and rodents do not travel on shipped items. This pesticide has been linked to human health problems and ozone depletion. Dispose of them at a hazardous waste facility.
Gardening Techniques
Row Gardening
Single-row planting started when mules were used to cultivate the garden. Out of habit, many gardeners still use this system for in-ground, and even some raised beds. If space is not an issue, a traditional row garden is an option. Row gardens allow for the use of a tractor and tiller for garden chores (Figure 16–10). Create planting “beds” with rows planted close together, or use wide rows to shade out weeds.
If you are making traditional garden rows, make them straight to aid in cultivation, weed management, and harvesting. In traditional beds with rows, the entire garden is amended—both the rows and the pathways. To make a straight row, drive a stake into the ground at each end of the row and draw a string taut between the stakes.
Intensive Gardening
The purpose of an intensively grown garden is to harvest the most produce possible from a given space. Intensive gardening has become a popular model as urban areas have become more crowded and yards have become smaller. Many home landscapes cannot accommodate the traditional row garden, and intensive gardening provides a viable alternative. Intensive gardens optimize the use of space and use succession planting to maximize production, but they require careful planning. Although intensive gardens are often in raised beds, they can also be in-ground gardens or even in large containers (see Table 16–1 for recommended spacing in intensive gardening).
One method of intensive planting is “square foot gardening,” an approach that was formalized by Mel Bartholemew in his 1981 book Square Foot Gardening and his subsequent 2006 All New Square Foot Gardening. The French were using these intensive gardening techniques in the late 1800s, but Bartholemew popularized the concept. Vegetables are grown in 1-foot by 1-foot squares within a raised bed (Figure 16–11). Beds are designed to be no more than 4 feet across so they can be managed from the outside. The gardener never compacts the soil by stepping where the vegetables grow. Gardeners can arrange their square-foot beds in multiple ways to fit the available space. Beds are marked in 1-foot squares using a wood lattice, string, plastic tape, or re-used slats from window blinds. These markings help clearly define planting spaces and make it easy to follow planting density recommendations. Within each square, many vegetables can be grown. The spacing is determined by the ultimate size of the vegetables grown within that square. Large plants, such as broccoli or tomatoes, may require multiple squares to allow each plant to grow to full size. Smaller plants (like beets) can be planted up to 16 plants per square, while others (such as carrots) can have 32 per square.
Unlike in traditional row gardens, where there is generally as much empty space as plant-occupied space, no wasted space occurs within a square-foot garden. In intensive gardens, the fertilization, watering, and management efforts are concentrated on the planting beds. See Table 16–1.
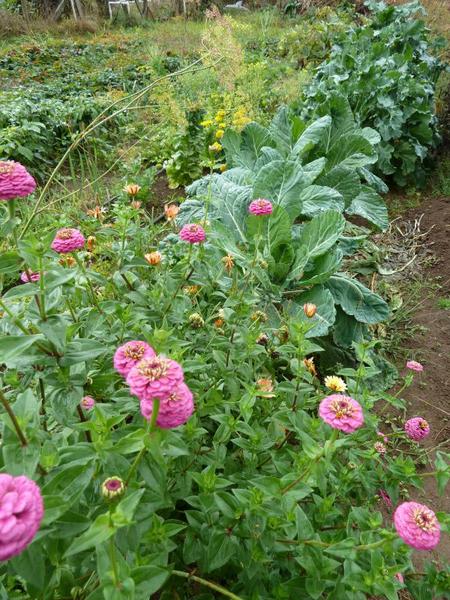
Another method of intensive gardening is interplanting, or growing two or more types of vegetables in the same place at the same time (Figure 16–12). This technique has been practiced for thousands of years by American Indians, but is now regaining widespread support in this country. The benefits include increased production and a decrease in weeds. Proper planning is essential to obtain high production and improved quality of the crops planted. Another type of interplanting is to grow flowers among vegetable plants. This brings insect pollinators and predators, may deter pests, and adds color to a vegetable garden (Figure 16–13).
The following factors must be considered for each plant combination:
- The length and pattern of growth. Is the vegetable tall, short, belowground, or aboveground?
- Allelopathy or the possible negative effects of one crop on another. Some plants, such as sunflowers, produce toxins that impede the growth of other crops.
- The length to maturity. Mixing up maturity dates helps to extend harvesting.
- Light, nutrient, and moisture requirements of the plants. Using plants with like cultural requirements promoates optimal health of all the crops.
Possible plant combinations include planting long-season, slow-maturing plants and short-season, quick-maturing ones at the same time. An example of this combination would be peppers and radishes. The radishes are harvested before they begin to be crowded by the peppers. Another example of combining growth patterns is planting smaller plants close to larger plants, such as radishes at the base of beans or broccoli. Shade-tolerant species, such as lettuce, spinach, and celery, can be planted in the shadow of taller crops, like beans or squash.
Interplanting can be accomplished by alternating rows within a bed (plant a row of peppers next to a row of onions), by mixing plants within a row (leeks and parsley), by distributing various species throughout the bed, or by planting edibles among ornamentals. Swiss chard could be planted between azalea shrubs, or carrots could pop up along a walkway between perennial beds.
Table 16–1. Intensive vegetable planting guide.
| Plant | Intensive Planting Distance (inches) Between Plants |
|---|---|
| Asparagus | 12 |
| Bean, bush | 2–3 |
| Bean, lima | 4–6 |
| Bean, pole | 6–12 |
| Beets | 2–3 |
| Broccoli | 6–12 |
| Brussels sprouts | 14–18 |
| Cabbage | 9–12 |
| Carrot | 2–3 |
| Cauliflower | 15–18 |
| Chard, Swiss | 4–6 |
| Collards | 12–15 |
| Corn, sweet | 12 |
| Cucumber | 12 |
| Eggplant | 18–24 |
| Endive | 8–12 |
| Kale | 6 |
| Kohlrabi | 4 |
| Leek | 3–4 |
| Lettuce, head | 10 |
| Lettuce, leaf | 4–6 |
| Mustard | 4–6 |
| Okra | 12–18 |
| Onion | 2–4 |
| Pea | 1–3 |
| Pepper | 9–12 |
| Potato | 10–12 |
| Pumpkin | 24–36 |
| Radish | 1–2 |
| Southern pea | 3–4 |
| Spinach | 4–6 |
| Squash, summer | 18–24 |
| Squash, winter | 24–36 |
| Tomato | 18–24 |
| Turnip | 3–4 |
Vertical Gardening
The use of trellises, nets, strings, cages, or poles to support growing plants constitutes vertical gardening (Figure 16–14). This technique is especially suited to gardeners with only a small garden space. Vining and sprawling plants, including cucumbers, tomatoes, melons, and pole beans, are obvious candidates for this type of gardening. Some plants twine themselves onto the support; others require tying.
Vertical plantings cast a shadow, so place them on the north side of a garden bed to reduce shading, and plant shade-tolerant crops near the vertical ones. Plants grown vertically take up much less ground, and though the yield per plant may be less, the yield per square foot is much greater. Because vertically growing plants are more exposed, they dry out faster and require more water than if they were spread over the ground. This fast drying is advantageous to plants susceptible to fungal diseases. Vertical gardening is often used with raised beds.
In summary, any of these garden types and techniques can be used in isolation or combined to create a garden that works best for a given space. A raised bed can be planted intensively, or a container garden may use vertical gardening to its advantage. Whichever garden type or combination of types and techniques you choose, remember to start small, select plants appropriate for the season, that thrive in the light you have, make amendments to the soil based on your soil test report, manage the weeds and diseases, and only plant what you can manage easily and joyfully. As your interests and skills expand, so can your garden space.
For a family of four, an area of 1050 square feet should be adequate space to provide most of the produce needs during the growing season. Start small and expand the garden as you have time and interest. Be careful not to start with too large a space; it is easy to become overwhelmed by the weeds and work of creating a new garden. Once you get started, it is easy to expand.
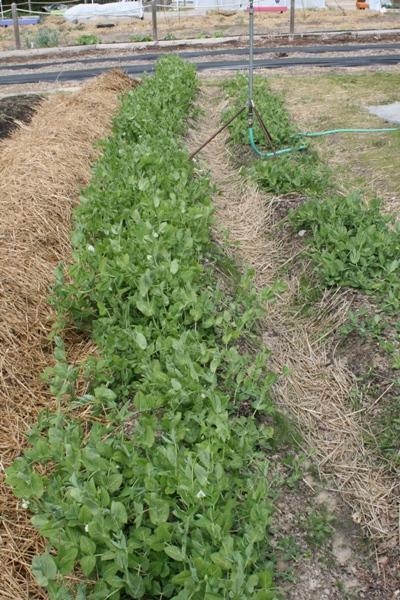
Figure 16–5. Weeds can be a challenge with in-ground garden beds. Straw is used here as a mulch to help suppress weeds.
Chris Alberti CC BY 2.0
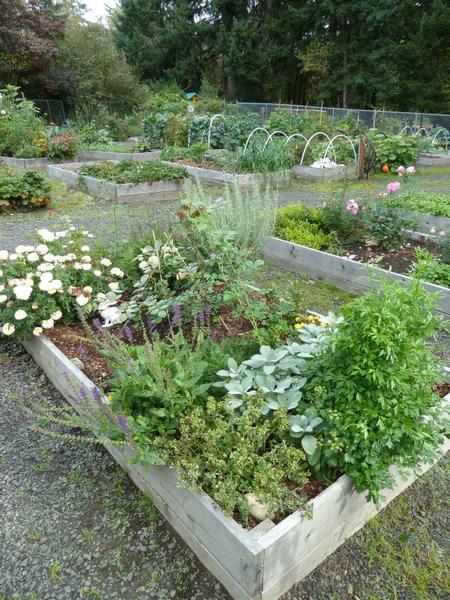
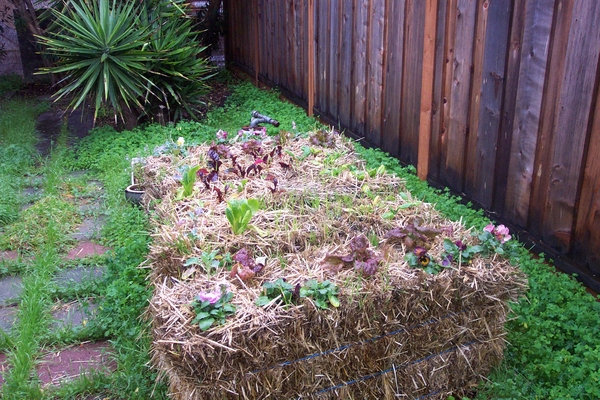
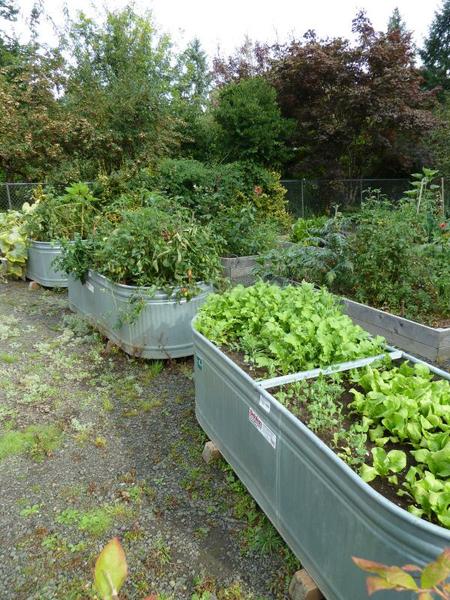
Figure 16–8. Growing vegetables in containers is a popular option. Here vegetables are grown in old water troughs. Make sure that any containers used have good drainage.
Kathleen Moore CC BY 2.0
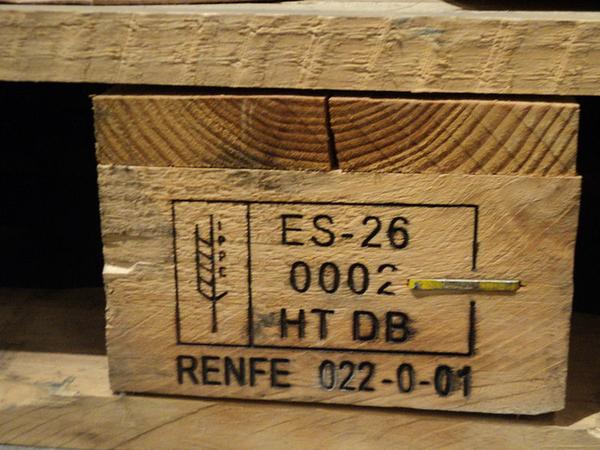
Figure 16–9. A pallet stamp gives information about the pallet's origin and how the wood was treated. This pallet has the IPPC logo, ES is the abbreviation for Spain, and was heat treated and debarked. It is safe for garden use.
Oaktree Brian, Wikimedia CC BY-SA 2.5 CA
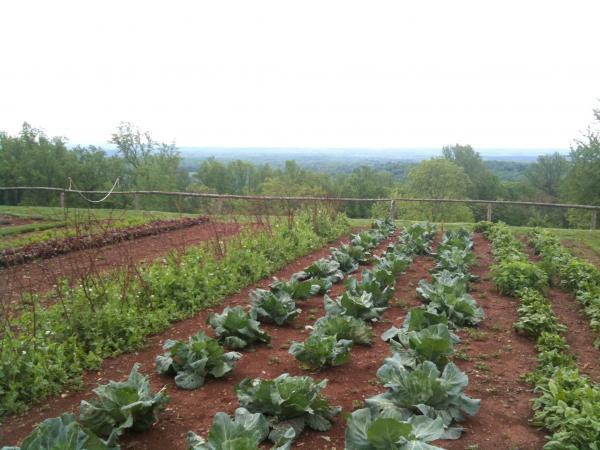
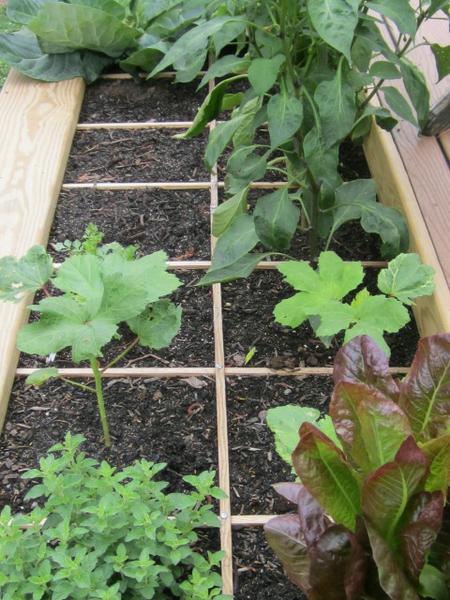
Figure 16–11. Square foot gardening.
Karen Jevsevar
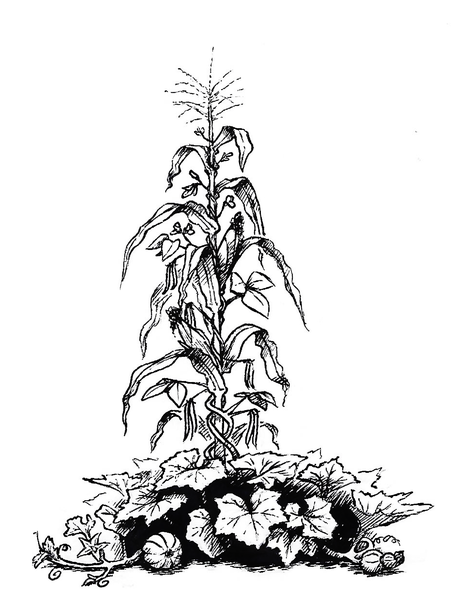
Figure 16–12. Three sisters intensive planting technique. The corn provides a trellis for the beans, the beans give nitrogen to the corn, and the squash sprawls out, conserving water and suppressing weeds.
Garlan Miles CC BY-SA 4.0
How to Organize the Garden
Once you have decided on the space and the type of garden that best suits your needs, a diagram helps you organize the garden. There are several things to consider when creating a garden diagram.
- Use graph paper or a scale so you can accurately draw the size of the garden bed and plants.
- Draw a north arrow and make note of the sun’s pattern throughout the day.
- Note water access and composting locations.
- Use a different color or shape for each type of vegetable.
- Review planting dates of each crop to help you plan for succession throughout the growing season (see Table 16–2 for an example of succession planting). Ideally, once a crop has been harvested, another crop is ready to be planted in its place.
- Plant north to south to make the best use of sunlight.
- Group tall crops (corn, okra, sunflowers) and trellised vines (peas, beans, squash) together on the north side of the garden to avoid shading shorter plants. Follow this principle unless you are planting crops that are marginal in the summer, like lettuce, that can take advantage of the shade.
- Leave pathways so you can easily access the plants or beds from multiple sides.
- Show the plant size at maturity to ensure adequate space is allotted.
What to Plant
The simple answer to that question is this: “Grow what your family likes to eat and what you have space for.” Consult your garden plan. If you are planting in a limited space, consider vegetables that give the highest yield for the least amount of space, such as leafy greens, root crops, pole beans, and tomatoes. If you have plenty of square footage in your garden, you can plant crops like pumpkin, squash, and corn. If you are an adventurous chef, try planting vegetables that are unusual or expensive to buy at the market, such as broccolini, kale sprouts, or shallots. If your family hates zucchini, by all means, avoid planting any.
Be sure to consider the growing season when deciding what to plant. What to plant is infulenced by when you plant and vice versa. Most vegetables are annuals and reach maturity in one growing season. They are grouped according to the season that best meets their growth requirements. Spring and fall have short, cool days, so vegetables that do best during these times are called “cool-season annuals.” Summer is hot with long days, and vegetables that do best during this season are called “warm-season annuals.” Cool-season annuals include beets, broccoli, Brussels sprouts, cabbage, carrots, cauliflower, collards, kale, kohlrabi, lettuce, mustard, onions, peas, potatoes, radishes, rutabagas, spinach, Swiss chard, and turnips. These vegetables grow well and produce leaves and roots in the cool temperatures of early spring and fall. Some cool-season annuals can be planted in the late summer and if they are well established, can survive the winter and continue growing again in the early spring. Warm-season annuals include beans, corn, cucumber, eggplant, melons, peppers, squash, sweet potatoes, and tomatoes. These vegetables grow best when the weather and soils warm up in the late spring and summer. Warm-season vegetables are generally not planted in the ground until after the last frost date. Check the days until fruit production and maturity on each variety you select. It may be necessary to plant starts instead of seeds, or start seeds early in a greenhouse, to get the highest yield. Some crops live for more than one season or year.
Biennial crops, such as artichokes and parsley, grow in the first year, and flower, fruit, and die in the second year.
Perennials live for many years once established. Examples include asparagus, horseradish, and rhubarb.
When to Plant
With proper planning, your vegetable garden can provide produce almost year-round. Keeping track of planting and harvest dates, however, can be a challenge without an effective system. Writing planting and harvest dates on a calendar is a tactic many farmers and gardeners use. If you have a garden diagram, adding planting and harvesting dates can make it an even more powerful tool. By careful planning, even a small space can realize its full potential for vegetable production.
Gardening Through the Year
Spring. Cool-season annuals are cold-hardy plants that thrive in the early spring and fall when temperatures fall below 70°F. To get a jumpstart on the spring season, use a cold frame, low tunnel, or frost cloth. Warm-season annuals are frost-sensitive crops that grow well in the late spring when temperatures are above 70°F and soils have warmed up.
Summer. As temperatures rise, cool-season crops bolt and become bitter. Use shade cloth or taller crops to provide shade and extend cool-season crops into summer. Warm-season crops planted in late spring grow until the first frost. Late summer is the time to plant cool-season annuals for a fall harvest.
Fall. Cool-season annuals that are well-established grow through cold temperatures and sometimes even moderate freezing.
Winter. Crops considered cold hardy (such as collards, kale, turnip greens, spinach, and Swiss chard) planted in fall may live through the winter or may go dormant for a period in the winter and flourish again in early spring. A cold frame or frost cloth can help protect and extend this growing season. Many of these plants bolt quickly in the spring.
For specific planting dates, consult the North Carolina Planting Calendar for Vegetables, Fruits, and Herbs. To help extend the garden season, see Appendix E.
Succession Planting
Succession planting is a technique in which vegetables are planted at staggered intervals to extend the harvest. If you want to have a huge harvest of tomatoes all at once so you can do all your canning in one weekend, this strategy is not for you. In addition to enabling an extended harvest, succession planting also buffers against total crop failure as another group of plants is in the queue. The easiest strategy for succession planting is to plant different varieties of the same vegetable that have different days to maturity. These crops naturally stagger their harvest times. The second strategy is to plant the same variety multiple times. The interval of time between planting should be as long as the harvest time for each particular vegetable. Filling in with a new vegetable in place of a vegetable that was harvested is also a way to make sure the garden stays in production for a longer period. When a head of lettuce is harvested in May, plant some carrots in the space that is made. If you remove a tomato plant because it has finished producing in the early fall, plant kale or rutabaga in its place to grow through the late fall and perhaps even overwinter. If you start some seeds in trays about four to five weeks ahead of the planned harvest schedule, you can get an even bigger jumpstart on your garden’s production. See Table 16–2.
Prepare Soil
To grow quality vegetables you need a soil that is fertile, deep, easily crumbled, well-drained, and high in organic matter. If you are gardening in containers, purchase potting soil or make your own mix by combining equal parts of compost, shredded pine bark, and vermiculite. Never use soil from your yard in containers. Using yard soil in a container will likely result in poor drainage and may introduce pathogens that thrive in an enclosed environment. For more about outdoor container gardening, read chapter 18, “Plants Grown in Containers.”
To plant in raised beds or in-ground gardens, start by amending the soil with 2 inches to 3 inches of homemade or certified compost. Then take a sample and submit it to the NC Department of Agriculture & Consumer Services (NCDA&CS) for a soil test. The soil test gives you information about the makeup of your soil (mineral or organic), the pH (acidity or alkalinity), the nutrient content, and the amounts of lime or fertilizer per 1,000 square feet of growing area that might be needed to correct pH or nutrient levels.
A soil test should be repeated every two to three years. The ideal pH range for most vegetables is between 6.0 and 6.5. If lime is needed, try to apply it several months before planting. Lime reacts relatively slowly in soil; therefore, a fall application of lime can correct soil acidity before spring planting. Read more about soils and soil testing in chapter 1, “Soils and Plant Nutrients.”
The fastest way to improve sandy soil or heavy clay soil is by repeatedly adding organic matter. You can incorporate a 2-inch to 3-inch layer of well-rotted leaves or compost in the spring before preparing the soil and again in the fall after harvest. Green manure crops—such as winter rye, ryegrass, or wheat—can be planted in the garden in the fall and turned under in the spring when growth is about knee-high. For best results, seed fall cover crops between September 15 and October 20 in the NC piedmont (one to two weeks later in the NC coastal plain, and one to two weeks earlier in the NC mountains). Cover crops are not limited to fall planting. Clover or buckwheat can be planted after harvesting early spring vegetables like lettuce or spinach and turned under in time to plant a frost-tolerant crop in the late summer. Seeding rates per 1,000 square feet for winter rye are 1 to 2 pounds, and for ryegrass and wheat, 3 to 4 pounds. Read more information about cover crops in “Organic Gardening,” chapter 17.
Apply fertilizer, if recommended by a soil test, shortly before or at planting time. The best way to fertilize a traditional row garden is to broadcast half to two-thirds of the total amount and apply the remainder by banding. To broadcast, spread the fertilizer over the top of the soil with a cyclone or drop spreader in an east-west and north-south movement with half of the broadcast amount in each direction. Then till the fertilizer into the soil to a depth of 3 to 4 inches. For banding, apply fertilizer in furrows 3 inches from the center of the row and slightly below the level of the seed (Figure 16–15). For raised beds, sprinkle fertilizer evenly over the bed and scratch or rake it in. Water the soil before planting.
Some garden vegetables, such as beans, cabbage, peppers, potatoes, squash, and sweet corn, need extra nitrogen applied to the soil in the form of a side-dressing to keep them growing rapidly and continuously. See the NCDA&CS publication Note 4: Fertilization of Lawns, Gardens, and Ornamentals for more information.
Side-dress individual plants or hills with 1 level tablespoon of a high nitrogen fertilizer per plant (Figure 16–16). For organic fertilizer alternatives and application rates, see chapter 17, “Organic Gardening.” For widely spaced plants, such as cucumbers or cantaloupe, place the side-dressing fertilizer in bands 6 inches from the plant's base. Vegetable plants should be side-dressed about midway through their maturity cycle, except when grown on sandy soils and during periods of excessive rainfall; these conditions require more frequent side-dressing applications. Crops such as tomatoes, eggplant, and okra require two or three side-dressings per season because of their long growth cycles. For more information on fertilization, refer to chapter 1, “Soils and Plant Nutrients."
Using Composted Manure in the Garden
Manure can be a valuable addition to any garden soil, supplying nitrogen, potassium, and phosphorus. But take the following precautions before adding it to a vegetable garden:
- Use manure from vegetarian animals, including cows, horses, chickens, goats, or sheep.
- Make sure you know if any herbicides or other chemicals were used where the animals were grazing. Some herbicides can persist through an animal’s digestive tract, through the composting process, and remain active in the vegetable garden, where they affect your lettuce and tomatoes the same way they affected the broadleaf weeds they were initially purchased to manage.
- Avoid manures from animals kept in a confined area; these manures may contain high amounts of salts from urine.
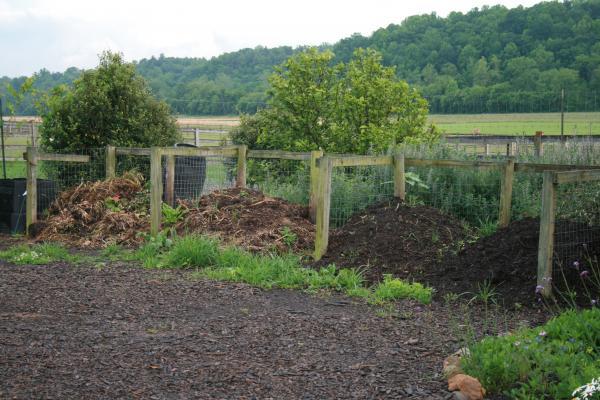
- Fresh is not best. Use manure in a garden only after it ages for at least six months in an open pile or after the manure is composted (Figure 16–17). To compost, mix fresh manure with a high carbon source, such as straw or dried leaves, rather than adding to an existing compost pile. Or mix fresh manure into a garden bed that will remain fallow for an entire growing season.
- Kiln-dried manure that has been heated to kill any pathogens can be purchased from a garden center.
Table 16–2. Succession planting template for large traditional row garden.
The 25-foot by 42-foot garden below could produce the majority of the vegetables needed for canning, freezing, and fresh use for one year for a family of four. In most of the rows, as soon as one crop is harvested, another is planted so that two crops can be grown in succession during the growing season. Because sweet corn requires a large space, the overall yield from the garden would be higher if lima beans or snap beans were planted in place of corn. Find out more about yield amounts in the “When to Harvest” section of this chapter.
|
North ← |
25' | ||
|---|---|---|---|
| Asparagus bed (November-March) | Asparagus bed (November-March) | 42' | |
| Asparagus bed (November-March) | Asparagus bed (November-March) | ||
| Sweet corn * (April 15) | Broccoli (March 1) | ||
| Sweet corn * (April 15) | Broccoli (March 1) | ||
| Sweet corn * (April 15) | Irish potatoes (March 1) | ||
| Sweet corn * (April 15) | Irish potatoes (March 1) | ||
| Pole beans (April 15) | Irish potatoes (March 1) | ||
| Pole beans (April 15) | English Peas (March 1) | ||
| Tomatoes (May 1) | Cabbage (March 1) | ||
| Okra (May 1) |
Beets (March 1) Southern peas (May 15) Mustard (September 1) |
||
| Eggplant and Peppers (May 1) |
Radishes (March 1) Southern peas (May) Collards (August 1) |
||
| Lima beans (May 1) | Leaf lettuce (March 1) | ||
| Summer squash (May 1) | Cucumber (May 1) | ||
| Summer squash (May 1) | Cantaloupe (May 1) | ||
|
25' × 42' = 1050 square feet with 3.0 feet between rows. *Lima and snap beans can be planted in place of sweet corn if desired. All planting dates are for NC upper coastal plain and lower piedmont. |
|||
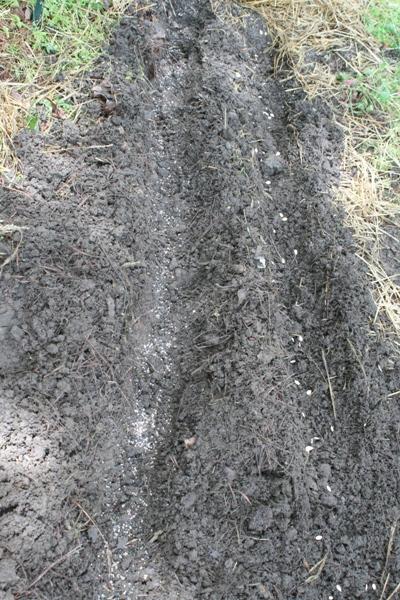
Figure. 16–15. Fertilizer applied by banding 3 inches from the center of the row and slightly below the seed.
Chris Alberti CC BY-ND 2.0
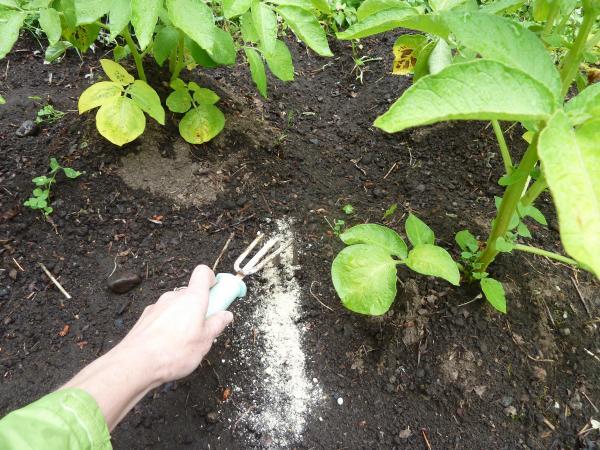
Figure 16–16. Side dressing a potato plant with 1 tablespoon of high nitrogen fertilizer.
Kathleen Moore CC BY 2.0
Planting
Seeds
Old seeds bought on sale may not be a bargain because their germination rate may be reduced and the resulting seedlings can be weak and grow very slowly. Check the date stamped on the seed packet to make sure the seeds were produced for the current gardening year. Many vegetable seeds, however, are viable for three to five years if kept in a dark dry place that stays below 85°F. Seed packets can be a wealth of information, and it is worth becoming familiar with all of the information on the back (Figure 16–18).
Bulk vegetable seeds sold by the ounce or pound in garden centers and farm supply stores are shipped to the store in a container or bag with a date and germination rate label attached. Look for the information before making a purchase. Seeds with high germination rates should be the first choice.
Review the North Carolina Planting Calendar for information on the crops that are best started as seeds in the ground, rather than as transplants. To be successful with directly sowing seeds, the garden soil should contain enough moisture at seeding to initiate germination. If it does not, water the soil thoroughly (4 to 6 inches deep) and allow the surface to dry before seeding. If preferred, the open furrow can be watered directly before depositing the seeds in the soil and covering firmly with dry soil. In the spring when the soil is cool, vegetable seeds are much less likely to germinate if they are planted too deeply. As a general rule, in the spring and summer plant the seeds 1 to 2 times their greatest diameter; in fall plant them 1½ to 2 times deeper.
Small seeds like lettuce and carrot can be difficult to distribute thinly and evenly. To sow small seeds, tear off a corner of the seed packet, then move the packet along the furrow while tapping it with an index finger. You can also mix the seeds with dry sand or dry, pulverized soil to help with even distribution.
Seeds that are large enough to handle can be planted by hilling or by row planting (drilling). Hilling is placing several seeds in one spot at definite intervals. Squashes, pumpkins, and melons are often planted this way. Once the seeds germinate, the hills are thinned, leaving one or two plants per hill, depending on the vegetable. Drilling is spacing seeds more or less evenly down the row. Beans and peas are planted this way. Plant them closer than the desired final spacing because after germination, extra plants can be removed. Planting extra seeds compensates for poor germination and loss of seedlings to disease and insects. If seeds are one year old or older, plant them thicker than fresh seeds.
Once the seeds are placed, cover them with soil. Firm the soil, but do not pack it, around the seeds with the flat blade of the hoe or your hands. Be careful to plant seeds at the recommended depth; seeds covered with too much soil may rot before germinating or the seedling may use up all of its stored energy before it grows to the surface and can produce food by photosynthesizing. On the other hand, seeds planted too close to the surface may die from overheating or drought.
The formation of a hard layer, or crusting, of the soil's surface developing shortly after seeding can prevent seedlings from emerging. Heavy rains or use of overhead sprinklers may cause soil crusting. To avoid this problem, incorporate 2 to 4 inches of organic matter into the soil, cover the seeds with the newly amended soil, and use a soaker hose instead of an overhead sprinkler.
Transplants
Seedlings may be referred to as starts, sets, or transplants. They are started in containers indoors or in a greenhouse (see Appendix E) and can help plants get a jumpstart on growth when weather outside is unfavorable.
Warm-season plants can be transplanted to the garden when the danger of frost has passed. Starting cool-season crops, like lettuce and spinach, from seed in a greenhouse can help them mature before high outdoor temperatures can cause bolting. See Table 16–3 for temperatures and times to germinate vegetable seeds for later planting outside. Chapter 13, “Propagation,” provides additional information on starting transplants from seed. The North Carolina Planting Calendar gives suggested outdoor planting dates, cultivars, and spacing distance between plants.
The most common vegetables bought as young plants for transplanting are broccoli, cabbage, cauliflower, celery, eggplant, lettuce, peppers, and tomatoes. If you buy vegetable transplants, larger and taller are not necessarily better. Tomato plants that have already started to flower are not optimal, because flowering places the plant under stress. Good-quality transplants are stocky and medium size with a healthy appearance and good green color (not too pale and not too dark), are free from insects and diseases, and have a well-developed root system (Figure 16–19). Allow the transplants to harden off gradually, acclimatizing them to the conditions in the garden prior to planting.
Before transplanting to the garden, make sure the soil has been prepared according to the directions above and determine that the timing is appropriate for the crop. To prevent wilting, try to transplant on a cloudy day or in early evening. Check the weather forecast for the days after you intend to plant to avoid conditions like extreme heat, heavy rain, or hail, that could harm new transplants (Figure 16–20). Handle the plants carefully to avoid disturbing the roots and bruising the stem.
For container-grown plants, dig a hole large enough to accommodate the container. Peat and other biodegradable pots can be set directly in the planting hole. Although the pots eventually disintegrate in the ground, remove any part that is above the ground as it may wick water away from the roots. For most vegetables, place the transplant in the ground at the same depth as it grew in the container. Tomato plants are exceptions: They do develop roots all along buried stem tissue, dramatically expanding their root system (Figure 16–21). Plant by removing all but the top three sets of leaves, laying them sideways in a 3-inch to 4-inch-deep trench and burying all but the leaves (Figure 16–22).
If cold or windy conditions threaten spring transplants, place row covers, boxes, baskets, plastic milk jugs, or flower pots over the new transplants. Try to keep the covers from touching the plants, and do not leave them over the plants longer than necessary. If it gets warm during the day, remove the covers to provide proper ventilation. Summer transplants may need protection from heat for several days after they have been planted. A piece of wood or cardboard stuck in the ground at a slant on the south side of a plant can serve as a sunshade. Irrigation also helps to lower the air and soil temperature.
Contaminants in the Garden
Soil testing for contaminants is essential prior to gardening in an urban setting. If high levels are found, consider gardening in an alternate spot. If moderate levels are found, consider gardening in containers or take steps to minimize exposure and prevent health risks.
- Garden design. If the contamination is in only one part of the garden, avoid those areas. Consider planting contaminated areas with non-edible ornamental perennials, shrubs, and trees to minimize soil disturbance. Consider installing raised beds with imported healthy soil. Seal off the bottom of the bed with an impermeable barrier so roots do not penetrate contaminated soil. Be sure to drill holes near the bottom of the raised beds to allow for drainage.
- Soil management. Maintain a neutral soil pH of 6.5 to 7.0 by incorporating organic matter. This neutral pH chemically binds contaminants and makes them less available to plants. Mulch the soil to reduce contaminated dust being picked up by the wind.
- Plant selection. Avoid root crops that have their edible parts in contact with the soil. Even though peeling reduces some risk, beets, carrots, onions, parsnips, potatoes, radishes, and turnips, should not be planted in high-risk soils. Shoot and leaf crops, such as asparagus, broccoli, cabbage, celery, lettuce, and spinach, represent an intermediate level of risk. Fruit crops, such as beans, cucumbers, eggplant, peas, pumpkins, and tomatoes, have the lowest contaminant concentrations.
- Food safety. Remove outer leaves of leafy crops, and wash all produce with a mild detergent to remove dirt and dust. Conduct plant tissue testing to assess the level of contaminants actually in the produce.
- Personal hygiene. Wear gloves and wash your hands well after working in the garden. Remove shoes outside to avoid tracking soil into the house.
Read NC State Extension publication AG-439-78, Minimizing Risks of Soil Contaminants in Urban Gardens, for more information about urban soil contamination.
Table 16–3. Temperatures and time required to grow plants for transplanting into the garden.
| Vegetable | Optimum Temperature | Growing Time from Seed Weeks |
|
|---|---|---|---|
| Day (°F) | Night (°F) | ||
| Asparagus | 70–80 | 65–70 | 8–10 |
| Broccoli | 60–70 | 50–60 | 5–7 |
| Brussels sprouts | 60–70 | 50–60 | 5–7 |
| Cabbage | 60–70 | 50–60 | 5–7 |
| Cauliflower | 60–70 | 50–60 | 5–7 |
| Corn, sweet | 70–75 | 60–65 | 3–4 |
| Cucumber | 70–75 | 60–65 | 2–3 |
| Eggplant | 70–80 | 65–70 | 6–8 |
| Lettuce | 55–65 | 50–55 | 4–5 |
| Muskmelon | 70–75 | 60–65 | 3–4 |
| Onion | 60–65 | 55–60 | 10–12 |
| Pepper | 65–75 | 60–65 | 6–8 |
| Summer squash | 70–75 | 60–65 | 3–4 |
| Tomato | 65–75 | 60–65 | 5–7 |
| Watermelon | 70–80 | 65–70 | 3–4 |
Table 16–4 is located at the end of this chapter.
Table 16–5. Effective crop rotation. By selecting plants from different families, you can avoid pathogen and pest buildup that can occur if the same type of plant is used in the same place year after year.
| PLANT FAMILY | VEGETABLES & COVER CROPS |
|---|---|
| Carrot, Parsley (Apiaceae) | Caraway, carrots, celery, chervil, cilantro, coriander, dill, fennel, parsley, parsnips |
| Composite, Sunflower (Asteraceae) | Artichoke, chamomile, chicory, dandelion, echinacea, endive, escarole, Jerusalem lettuce, radicchio, safflower, salsify, sunflowers, tarragon |
| Goosefoot (Chenopodiaceae) | Beets, spinach, sugar beets, Swiss chard |
| Grass (Poaceae) | Barley, corn, fescue, lemon grass, millet, oats, rice, rye, ryegrass, sorghum, sorghum-sudangrass, sugar cane, timothy, wheat |
| Knotweed (Polygonaceae) | Buckwheat, rhubarb |
| Legume, Pea (Fabaceae) | Alfalfa, bean, birdsfoot trefoil, black medic, clovers, cowpeas, edamame, fava beans, garbanzo bean, garden peas, green/string beans, hairy vetch, lentil, peanuts, southern peas, soybeans, vetches |
| Lily (Liliaceae) | Asparagus, chives, garlic, leeks, onions, shallot |
| Mallow (Malvaceae) | Okra |
| Morning-glory (Convolvulaceae) | Sweet potatoes |
| Mustard (Brassicaceae) | Arugula, Bok choi, broccoli, broccoli raab, broccolini, Brussels sprouts, cabbage, cauliflower, Chinese cabbage, collards, cress, horseradish, kale, kohlrabi, mizuna, mustard, mustard greens, pak choi, radishes, rape, rutabagas, tatsoi, turnips, watercress |
| Nightshade (Solanaceae) | Eggplant, peppers (bell and chile), potatoes, tobacco, tomatillo, tomato |
| Squash, Gourd, Melon (Cucurbitaceae) | Cantaloupe, cucumber, gourd, luffa, muskmelon, pumpkin, squash (summer and winter), watermelon, zucchini |
Thinning Seedlings
Anytime seedlings grow too close together, thinning can benefit the plants selected to remain. Thinning is the process of reducing the number of seedlings in the soil or container media, giving those that remain more room to grow (Figure 16–23). If seeds are sown at the desired rate from the beginning, as with square foot gardening, thinning may not be necessary.
Thinning is a valuable practice for several reasons:
- It reduces competition among the seedlings for soil nutrients, sunlight, and water.
- It can reduce some early disease problems by providing better air circulation around the plants.
- It contributes to higher yields by giving plants the proper amount of space in which to flourish.
Leaf lettuce, beets, radishes, carrots, spinach, turnips, and other plants with small seeds are easily overplanted. Start thinning when the plants have one or two pairs of true leaves. Evening is a good time to thin because the remaining plants have the cool, dark night to recover from any disturbance. Pinch or cut out seedlings rather than pulling them out of the soil to avoid potentially damaging nearby root systems. The cut seedlings may be edible and tasty.
Fall Gardening
Growing a productive fall vegetable garden takes thoughtful planning and good cultural practices. August is the main planting time for fall gardens. Vegetables that have a 60-day to 80-day maturity cycle should be planted around August 1 in the NC piedmont. Seeding of shorter-season vegetables, such as turnips and leafy greens, can be delayed until September 1 in the NC piedmont. Keep in mind that the planting dates can be as much as 10 to 20 days earlier in western North Carolina and 7 to 14 days later in the NC coastal plain. Be sure to adjust the planting dates for a specific location by noting the frost date and counting backward on the calendar the days to maturity of the vegetables.
Before preparing the soil for a fall garden, remove the remains of the spring garden. In most cases, the spring-planted crops have already matured and the warm-season vegetables are beginning to decline.
Vegetables that can be grown in the fall garden include beets, beans, broccoli, Brussels sprouts, cabbage, cauliflower, carrots, collards, kale, kohlrabi, leaf lettuce, mustard, radishes, rutabagas, spinach, turnips, southern peas, and sugar snap peas.
Seeds should be planted deeper in the fall because the moisture level is lower in the soil and the soil surface temperatures are higher. In many cases, the planting depth may be 1½ to 2 times as deep as for spring planting of the same crop. The seeded area may need to be covered with burlap, newspaper, or boards to keep the soil cool and moist. Remove covers as the seeds begin to germinate.
Direct seeding is often used in the fall for crops such as broccoli and collards. The success of this planting method, however, depends on having enough moisture available to keep the young seedlings actively growing after germination. If there is no irrigation source, buy vegetable transplants from a local garden center instead of seeding. Most fall vegetables benefit from an application of nitrogen three and six weeks after planting.
Some Hints about Hybrids
Hybrids are the result of intentionally crossing (breeding) two or more plants. Hybrid cultivars are often superior to older, nonhybrid cultivars because they combine such desirable traits as consistency of plant and fruit type, uniform maturity, disease resistance, improved quality, and vigor. Seeds saved from hybrids do not "come true": appear and perform the same as the hybrid parents. Seeds from hybrids are either sterile or express a range of parental characteristics. Hybrid seeds are often more expensive than open-pollinated seeds.
Open-pollinated seeds are those that are naturally pollinated through wind, birds, insects, or other natural mechanisms. Open-pollinated cultivars do "come true" from seed in the same way that children resemble their parents. “Heirloom varieties” refer to historically grown seeds that were prized for their superior taste and texture. By saving seeds from the healthiest plants that produce the best tasting fruit, gardeners gradually create their own cultivar. If plants are selected over time in a region, those cultivars are specially adapted to a particular region’s climate, soil, and pests. Heirloom crops keep the gene pool rich and can offer gardeners a taste of the past.
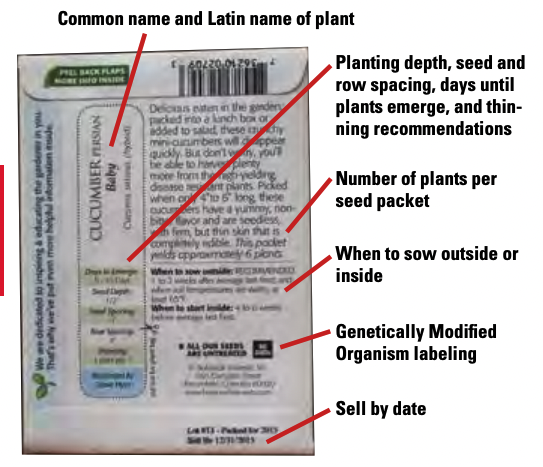
Figure 16–18. The back of seed packets contain a lot of information.
Brook Williams
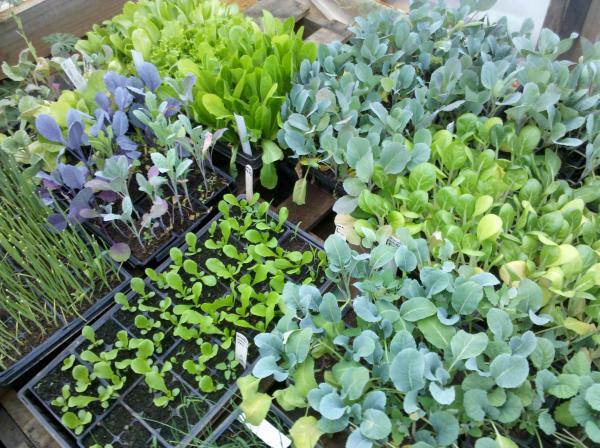
Figure 16–19. Choose transplants that are stocky, have good color, well-developed roots, and have not gone to flower.
Lucy Bradley CC BY 2.0

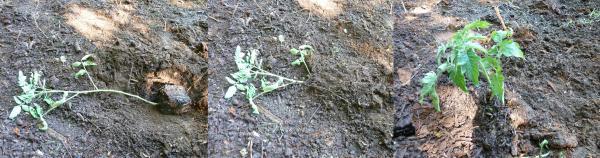
Figure 16–22. Plant tomatoes by digging a shallow trench and laying the stems down to promote more root growth.
Kathleen Moore CC BY 2.0
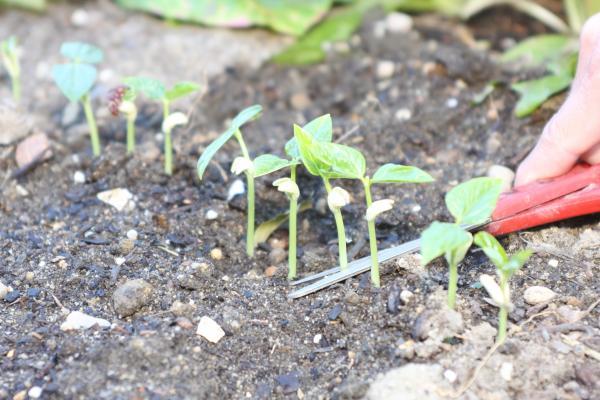
Figure 16–23. Thin seedlings by snipping with scissors rather than pulling.
Brook Williams
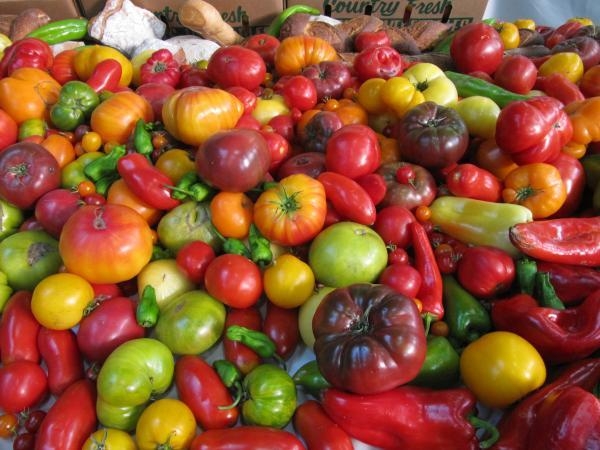
Heirloom vegetables come in a variety of colors, tastes, and textures.
Cody Maureen, Flickr CC BY 2.0
General Garden Care
Watering
On average, vegetable gardens need 1 inch of water per week; provide only what is not supplied by rain. Keep a rain gauge in the garden to track precipitation, and adjust your watering times accordingly. Water the soil, not the plant. Many diseases are spread by water splashing from the soil up on the leaves or from a diseased leaf to a healthy one. Organic mulches (straw, leaves, or compost) help conserve moisture and prevent splash.
When providing an inch of water to the garden, the goal is to wet the soil to a depth of 6 inches. After some experimenting it is easy to tell how long it takes for water to reach that depth. One way to check is to dig into the soil with a long trowel or shovel to see how far the water has penetrated into the root zone. Another way is to measure how long it takes to apply 1 inch of water (which can moisten the soil to 6 inches deep, depending on soil type) by placing small, straight-sided containers in a grid pattern over the area being watered. Check the containers every 30 minutes until they contain l inch of water. As a general guide, the average house spigot must be left running approximately l ½ to 2 hours to apply 1 inch of water to 1,000 square feet. Gardens with sandy soil must be watered more frequently than those with a high percentage of clay. Failure to provide adequate moisture stresses the plants and reduces yields. On the other hand, overwatering can lead to insect and disease problems, as well as wash nutrients away, converting a valuable garden resource into pollution in nearby streams.
From a water conservation perspective, the most efficient time to water plants is at night. During a hot, dry, summer, this may be ideal as night-time temperatures remain high. Cooler night temperatures in the spring or fall, however, can keep water from evaporating. The longer water stays on the leaves, the higher the likelihood of disease problems. If it is cool and wet enough for dew to form on plants, the best time to water is mid-morning after the dew has dried. Watering the soil directly instead of overhead not only promotes water conservation but also saves money on your water bill. Drip and trickle irrigation systems allow a gardener to irrigate slowly and efficiently. A soaker hose is the least expensive and easiest to use. It operates at low pressure and delivers small amounts of water to the soil very slowly. A full drip irrigation system provides water to individual plants and can be controlled by a timer. Gardeners can install these systems or hire a contractor. Periodically check the emitters to ensure all the heads are functioning properly.
A portable lawn sprinkler is also an option, but be sure to keep the application rate low enough that water does not run off the soil. Also make sure that the vegetable plants themselves do not interfere with the application pattern. Often this requires mounting the sprinkler on a small platform above the plants.
Avoid frequent shallow watering, which promotes the development of roots in the top 1 to 2 inches of soil rather than at a greater depth.
Weed Management and Mulching
As you recall from chapter 6, “Weeds,” weeds compete for available soil nutrients, water, air and sunlight, and provide a home for insects and diseases. A steel hoe is one of the most effective weapons in fighting the war against weeds. When used regularly, it is effective and inexpensive. It is not possible, however, to control all weeds with a hoe alone. Weeds at the base of the plant should be pulled by hand rather than running the risk of damaging the roots (Figure 16–24). Do not allow weeds to become well-established before they are removed because pulling large weeds can damage the root system of vegetable plants. Mulch can significantly decrease the amount of hoeing needed.
Mulches help retain soil moisture and reduce weed growth. They fall into two categories—organic types that decompose naturally in the soil and inorganic types that do not decompose and, therefore, must be removed after serving their purpose.
Organic mulches are by far the most common. Typical examples are bark chips, compost, ground corncobs, chopped cornstalks, grass clippings, leaves, newspapers, peanut shells, pine needles, sawdust, and grain straw. Organic mulches conserve soil moisture and reduce the soil temperature by 8°F to l0°F during the summer. For this reason, they should not be used too early in the spring. If mulches are applied to cold garden soils, the soil warms up slowly, causing plant maturity to be delayed. After the soil warms in the spring, organic mulch may be applied to a depth of 2 to 4 inches around well-established plants. Be sure that there is adequate moisture in the soil before applying the mulch as dry mulch can pull moisture out of the soil.
Inorganic mulches, such as plastic sheeting that comes in good contact with the soil, can increase soil temperature early in the growing season and reduce the weed population by excluding light. Install plastic mulch after fertilization, but before planting, when the soil is neither too wet nor too dry. Bury the edges to prevent the wind from blowing it away (Figure 16–25). Make short slits in the material with a pocketknife when planting seeds or transplants. Black plastic, which can raise soil temperatures by 5°F to 6°F, is recommended for crops that produce fruit on the ground, such as melons, cucumbers, squash, and tomatoes, because diseases are reduced when plant foliage has no contact with the soil. Clear plastic allows sun rays to penetrate and can increase the soil temperature more than any other type of mulch—by 8°F to 14°F. Because light can penetrate clear plastic, it is possible for weeds to grow underneath if temperatures do not get high enough. Plastic mulches have hidden financial and labor costs. Plants mulched with plastic need supplemental water as roots do not receive water from rainfall, and irrigation needs to be monitored carefully. Plastic mulches degrade and should be removed and replaced regularly. Unintended environmental cost is disposal in a landfill.
Herbicides are chemicals that kill existing weeds or interrupt the germination. No single herbicide controls all weeds or can be safely used for all vegetable crops. It is difficult to apply relatively small amounts of the herbicide evenly to the garden surface. Miscalculation or faulty calibration of the application equipment can cause some areas of the garden to be treated with too much or too little herbicide, leading to growth problems for some vegetables. Consult “Weeds,” chapter 6 of this handbook, or the North Carolina Agricultural Chemicals Manual for more information.
Appendix D reviews tools that can be used while tending a garden.
Record Keeping
As with other hobbies and important tasks, keeping a journal or record of what was done and how it worked is helpful. See Appendix A to this handbook for more information on keeping a garden journal. Information from previous years helps to assess what to do better when planning next year’s garden. Records can be kept in a notebook or on a garden calendar. Items that can be included are a diagram of the garden, plant varieties, dates of planting, how many transplants were planted and how many survived, descriptions of diseases or pests with any action taken and its effect, dates of harvest, amount of rain, amount and type of fertilizer used, evaluation of overall results, ideas for next year, and photographs of plants.
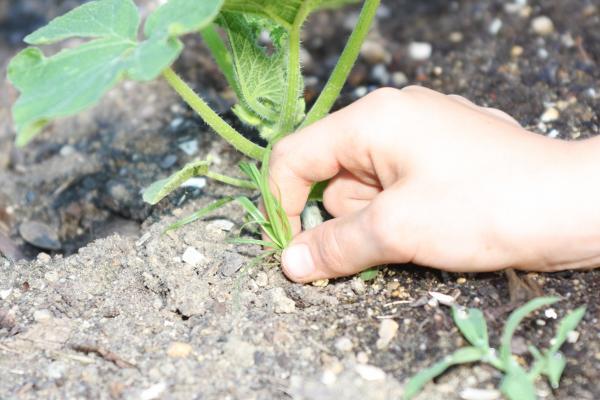
Figure 16–24. When cultivating around plants, be careful not to disturb the roots. Consider weeding by hand.
Brook Williams
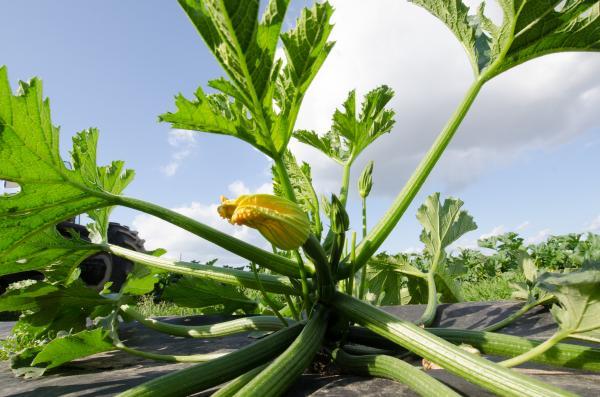
Figure 16–25. Black plastic mulch keeps squash leaves off the ground, helping to reduce diseases.
Lance Cheung, USDA CC0
Pest and Disease Management
Integrated Pest Management in the vegetable garden involves the same practices we learned about in chapter 8, “IPM”:
- Cultural management. Practices include planting on the recommended dates, spacing plants properly, rotating crops, mulching, providing good soil fertility, and removing debris.
- Mechanical management. Uses strategies such as installing physical barriers like mulch or placing plastic collars to protect vegetable stems.
- Biological management. Practices include planting resistant vegetable cultivars or using natural predators for plant pathogens.
- Chemical management. Involves the use of herbicides and pesticides.
Many of the cultural practices that help prevent disease also discourage pest infestations. Interplanting can help keep insect and disease problems under control. Pests are usually crop-specific; they prefer vegetables from one plant family. Mixing plant families breaks up expanses of pest-preferred crops and confines early pest damage within a small area, thus allowing more time to manage the pests. Avoid overcrowding of vegetables, which decreases air movement and increases humidity, the perfect conditions for many diseases.
Because many insects and diseases have preferred host plants within the same plant family, crop rotation helps prevent the buildup of insects and disease problems. Table 16–5 provides information about which vegetables are related. Avoid planting related vegetables (same family) in the same location more often than once every three years. Rotation also keeps plants healthy and less prone to insect and disease problems by managing soil structure and fertility. Planting crop families with varying root depths helps keep soil structure loose. Plant families have different nutrient requirements, so a good plan would be planting legumes, which replace nitrogen in the soil through nitrogen-fixing bacteria in their roots, after a heavy nitrogen feeder like broccoli or cabbage. Leaving garden beds fallow or planting with a green manure for a season is another method for breaking an insect or disease cycle and a chance for soil nutrients to be replenished.
Insects and diseases can be more abundant and difficult to control in a fall garden. Most insect and disease problems result from a buildup of their populations during the previous spring and summer. Pests can be kept at tolerable levels by managing irrigation and fertilization to optimize plant health. Plants under stress are more susceptible to insect and disease development. Check the plants frequently for insect and disease damage. If sufficient damage is detected, use Integrated Pest Management strategies to manage the pest (see chapter 8, “IPM”).
As with most gardening practices, preventing insects from damaging crops is partly a matter of timing. Some of the most common vegetable insects are discussed in Appendix C-Diagnostic Tables. AG-295, Insect and Related Pests of Vegetables, and the NC State Vegetable Pathology Lab Disease Fact Sheets are other sources of information. Read more about "Diseases" in chapter 5 and "Insects" in chapter 4.
When to Harvest
Vegetable nutritional content, freshness, and flavor depend on the stage of maturity and time of day that vegetables are harvested. Overly mature vegetables are stringy and coarse. When possible, harvest vegetables during the cool part of the morning and process them as soon as possible.
Vegetable Harvesting Guidelines
Some guidelines for harvesting vegetable crops based on average yield expected per square foot are provided below.
Asparagus (0.08 to 0.1 pound). Harvest the spears when they are at least 6 to 8 inches tall by snapping or cutting them at ground level. Up to eight spears per plant may be harvested the second year after planting. A full harvest season lasts four to six weeks during the third growing season (Figure 16–26).
Beans, lima (0.08 to 0.17 pound shelled). Harvest when the pods first start to bulge with the enlarged seeds. Pods must still be green, not yellowish (Figure 16–27).
Beans, snap (0.38 to 0.6 pound). Begin harvesting before seeds develop in the pod (when pods are about the diameter of a pencil). Beans are ready to pick if they snap easily when bent in half (Figure 16–28).
Broccoli (0.33 to 0.5 pound). Harvest the dark-green, compact cluster or head (about 6 inches in diameter) while the buds are tight, before any yellow flowers appear. Smaller side shoots develop later, providing a continuous harvest (Figure 16–29).
Brussels sprouts (0.25 to 0.38 pound). Harvest the lower sprouts (small heads) when they are about 1 to 1½ inches in diameter by twisting them off. Remove lower leaves along the stem to hasten maturity (Figure 16–30).
Cabbage (0.5 to 0.75 pound). Harvest when the heads feel hard and solid (Figure 16–31).
Carrots (0.5 to 0.8 pound). Harvest when the roots are ¾-inch to 1 inch in diameter. The largest roots generally have the darkest tops. Mulched fall carrots can be left in the ground all winter and harvested as needed (Figure 16–32).
Cauliflower (0.33 to 0.5 pound). Exclude sunlight (blanch) when the curds, or heads, are 1 to 2 inches in diameter by loosely tying together the outer leaves above the curd with a string or rubber band. Some varieties are self-blanching. Harvest the curds when they are 4 to 6 inches in diameter but still compact, white, and smooth. The head should be ready 10 to 15 days after tying (Figure 16–33).
Collards (0.33 to .67 pound). Harvest older, lower leaves when they reach a length of 8 to 12 inches. New leaves grow as long as the central growing point remains, providing a continuous harvest. Whole plants may be harvested and cooked if desired (Figure 16–34).
Corn, sweet (n/a). Silks begin to turn brown and dry out as the ears mature. Check a few ears for maturity by opening the top of the ear and pressing a few kernels with a thumbnail. If the liquid exuded is milky, rather than clear, the ear is ready for harvest (Figure 16–35).
Cucumbers (0.2 to 0.5 pound). Harvest when the fruits are deep-green, before any yellow appears. The length should be 2 to 3 inches for sweet pickles, 5 to 6 inches for dill pickles, and 6 to 8 inches for slicing. Pick cucumbers four to five times per week to encourage continuous production. Mature cucumbers left on the vine stop production of new fruits (Figure 16–36).
Eggplant (0.33 to 0.5 pound). Harvest when the fruits are 3 to 5 inches in diameter and their color is a glossy purplish-black. (Lilac and white cultivars of eggplant are also available.) The fruit is getting too old when the color starts to dull or become bronzed. Because the stem is woody, cut—do not pull—the fruit from the plant. A short stem should remain on each fruit (Figure 16–37).
Kale (0.33 to 0.67 pound). Twist off the outer, older leaves when they reach a length of 8 to 10 inches and are medium-green in color. New leaves grow, providing a continuous harvest. Heavy, dark-green leaves are overly mature and are likely to be tough and bitter (Figure 16–38).
Kohlrabi (0.38 to 0.6 pound). Harvest when the bulb (the edible part) is 2 to 3 inches in diameter. Cut off the plant just below the bulb. Stems become woody if the bulb is left too long before harvest (Figure 16–39).
Lettuce (0.33 to 0.4 pound). Harvest the older, outer leaves from leaf lettuce as soon as they are 4 to 6 inches long. Harvest heading types when the heads are moderately firm and before seed stalks form (Figure 16–40).
Muskmelons (cantaloupe) (0.28 pound). Harvest when the stem slips easily from the fruit with a gentle tug. Other indicators of ripeness are that the netting on the skin becomes rounded and the flesh between the netting turns from green to tan (Figure 16–41).
Mustard (0.33 to 0.67 pound). Harvest the leaves and leaf stems when they are 6 to 8 inches long; new leaves provide a continuous harvest until they become strong in flavor and tough in texture from temperature extremes (Figure 16–42).
Okra (0.29 to 0.33 pound). Harvest young, tender pods when they are 2 to 3 inches long. Pick at least every other day during the peak growing season. Overly mature pods become woody and are too tough to eat (Figure 16–43).
Onions (0.5 to 0.8 pound). Harvest when the tops fall over and begin to turn yellow. Dig the onions and allow them to dry out in the open sun for a few days to toughen the skin. Then remove the dried soil by brushing the onions lightly. Cut off the stems, leaving 2 to 3 inches attached to the bulbs, and store them in a netted bag in a cool, dry place (Figure 16–44).
Peas, English and Southern (.07 to 0.13 and 0.13 to 0.2 pound). Edible-podded cultivars should be harvested when pods are well-rounded, but before seeds are more than half of their full size. Harvest shelling peas when the pods are well rounded and the seeds are fully developed but still fresh and bright-green. Pods are getting too old when they lose their brightness and turn light-green or yellowish-green (Figure 16–45 and 16–46).
Peppers (0.2 to 0.3 pound). Harvest sweet peppers when the fruits are firm, crisp, and full size. Green peppers turn red if left on the plant. Allow hot peppers to attain their bright color (color depends on variety) and full flavor while attached to the vine; cut and hang them to dry (if desired) (Figure 16–47).
Potatoes, Irish (0.33 to 0.6 pound). Harvest the tubers when the plants begin to yellow and die down. Store the tubers in a cool, high-humidity location with good ventilation. Avoid exposing the tubers to light. Greening, which denotes the presence of dangerous alkaloids, occurs even with small amounts of light (Figure 16–48).
Pumpkins (0.5 to 0.6 pound). Harvest pumpkins and winter squash before frost and after the vine dries, the fruit color darkens, and the skin surface resists puncture from a thumbnail. Avoid bruising or scratching the fruit while handling it. Leave a 3-inch to 4-inch portion of stem attached to the fruit and store in a cool, dry location with good ventilation (Figure 16–49).
Radishes (0.08 to 0.11 pound). Harvest when the roots are ½-inch to 1½ inches in diameter (Chinese radishes grow much larger). The shoulders of radish roots often appear through the soil surface when they are mature. If left in the ground too long, they become tough and woody (Figure 16–50).
Rutabagas (0.33 to 0.57 pound). Harvest when the roots are about 3 inches in diameter. Mulched roots may be left in the ground and used as needed (Figure 16–51).
Spinach (0.23 to 0.36 pound). Harvest by cutting all the leaves off at the base of the plant when they are 4 to 6 inches long. New leaves will grow, providing additional harvests (Figure 16–52).
Squash, summer (0.3 to 0.5 pound). Harvest when the fruit is soft, tender, and 6 to 8 inches long (3 to 4 inches across for patty pans). The skin color often changes to a dark, glossy green or yellow, depending on cultivar. Pick every two to three days to encourage production (Figure 16–53).
Sweet potatoes (0.25 to 0.33 pound). Harvest the roots when they are large enough for use and before frost. Avoid bruising or scratching during handling (damaged sweet potatoes rot easily in storage). Ideal storage conditions are a temperature of 55°F and a relative humidity of 85%. The basement or crawl space of a house may suffice (Figure 16–54).
Swiss chard (0.33 to 0.67 pound). Harvest by breaking off the developed outer leaves 1 inch above the soil. New leaves will grow, providing a continuous harvest (Figure 16–55).
Tomatoes (0.25 to 0.5 pound). Harvest the fruits at the most appealing ripeness stage, up to fully red (Figure 16–56). (There are some yellow, purple, pink, and green cultivars of tomatoes.) Flavor is best at room temperature, but ripe fruit may be held in the refrigerator at 45°F to 50°F for seven to 10 days.
Turnips (0.38 to 0.6 pound). Harvest the roots when they are 2 to 3 inches in diameter, but before heavy frosts occur in the fall. The tops may be used as greens when the leaves are 3 to 5 inches long (Figure 16–57).
Watermelons (0.17 pound). Ripe watermelons produce a dull thud rather than a sharp, metallic sound when thumped. Other ripeness indicators are a deep-yellow rather than white color where the melon touches the ground, brown tendrils on the stem near the fruit, and a rough, slightly ridged feel to the skin surface (Figure 16–58).
What to Do with Harvested Vegetables
Your garden may be so prolific that your harvest produces more vegetables than can be eaten fresh (Figure 16–59). There are many options for using the produce, including canning, freezing, pickling, and drying. These practices allow you to eat from your garden all year. Learn more about preserving your harvest from NC State Extension— Family and Consumer Sciences.
Saving Seeds
Saving seeds dates back thousands of years and is the practice that moved humans from a hunting and gathering existence to the agricultural one we are familiar with today. Saving seeds from a garden can be a fascinating, fun way to develop an improved strain, with better qualities and better adapted to the conditions of your garden. Seed-saving also saves money and provides another way to share your bounty. To maximize your success, follow these guidelines.
Select parent plants carefully:
- Avoid hybrid plants, which are often sterile or do not reproduce offspring similar to the parent.
- Many plants are self-pollinating so they produce seeds like the parent plant. Beans, eggplant, lettuce, peas, peanuts, peppers, and tomatoes are usually self-pollinating and remain true to type.
- Open-pollinated plants that are pollinated by wind or visited by insects can cross-pollinate with plants from their own family and could produce disappointing offspring. Basil, beets, broccoli, cabbage, cauliflower, celery, corn, cucumbers, kale, melon, mustard greens, onions, parsley, pumpkin, spinach, squash, radish, Swiss chard, and turnips are open-pollinated plants. To ensure you have the original variety of these vegetables, grow only one type and be sure there are no other varieties within several hundred feet. This is often impractical for the home gardener, so cultivars can be isolated in screened cages or individual flowers can be covered and hand-pollinated. Timed isolation or timing plantings so that different varieties are flowering at different times is another strategy.
- Determine the characteristics you want to select for: flavor, color, fragrance, size, harvest time, vigor.
- Select fruits of plants that best express the traits you want to save.
- Select fruit from disease-free plants.
Harvest at the optimum point:
- Seeds are ready when the fruit is ripe, and in some cases, overripe.
A few examples:
- To save seeds from tomatoes, pick the fruit when ripe, remove the seeds, and eat the rest of the fruit. Rinse the pulp from the seeds and air dry thoroughly over the next few weeks.
- To save seeds from a pole bean, allow the pods to brown and dry on the vine. Place pods on a tray to further air dry and remove seeds.
Store seeds safely:
- Package the seeds in paper envelopes or glass jars labeled with the cultivar name and date (Figure 16–60). Plastic bags may cause the seeds to rot.
- Place the seeds in the freezer for two days to kill pests.
- Store in a cool, dark place. The fridge or freezer is ideal. Most seeds stay viable for several years in a freezer.
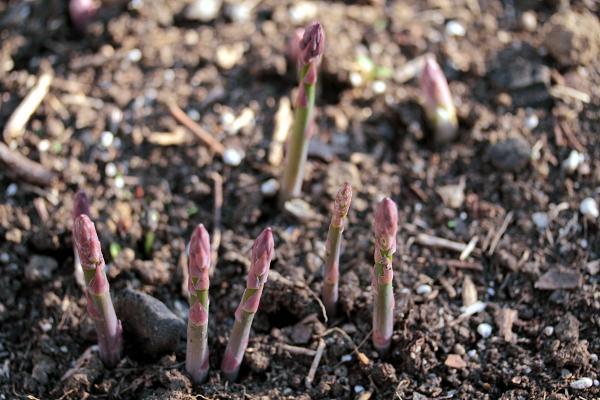
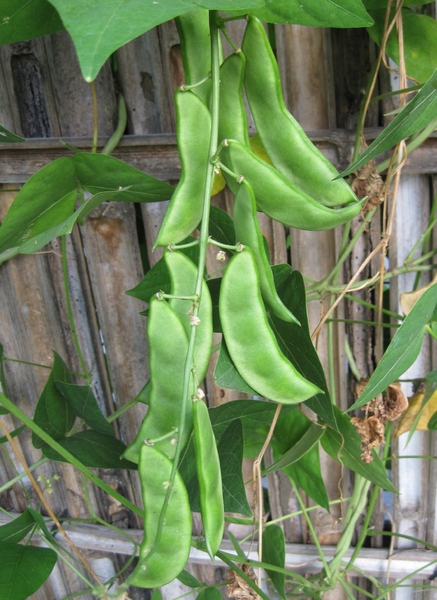
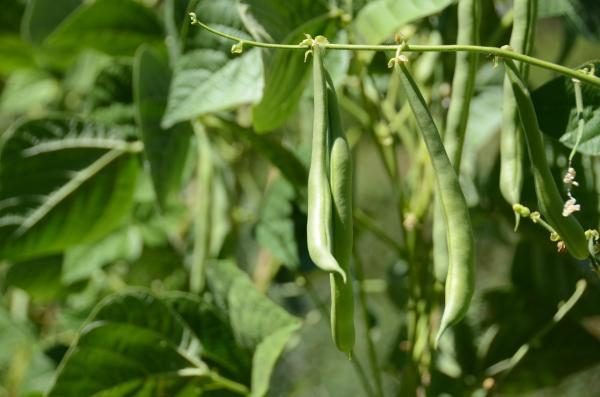
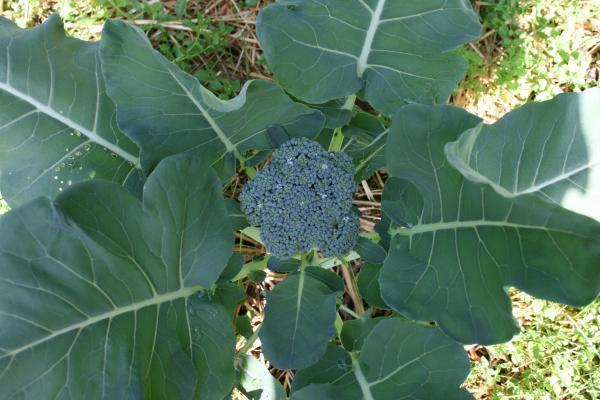
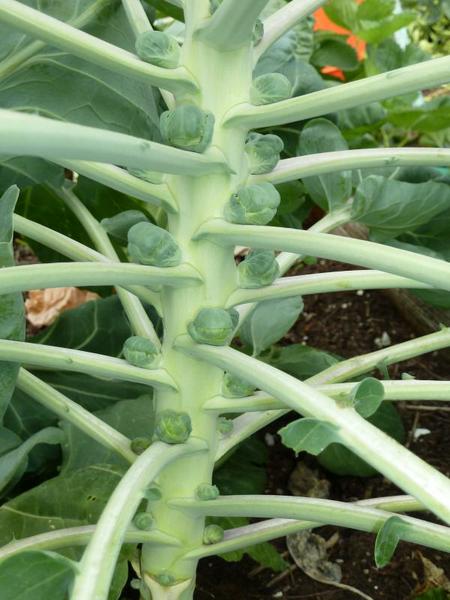
.jpg)
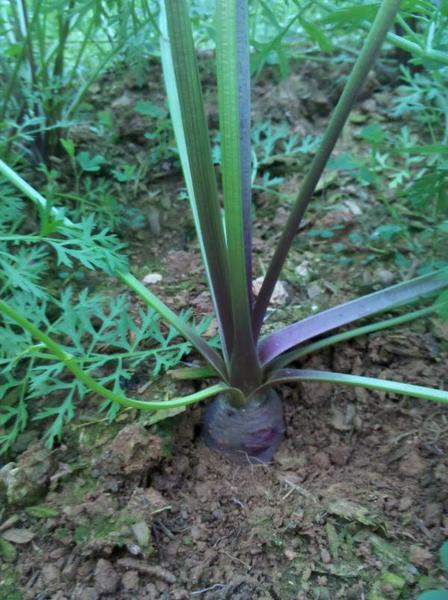
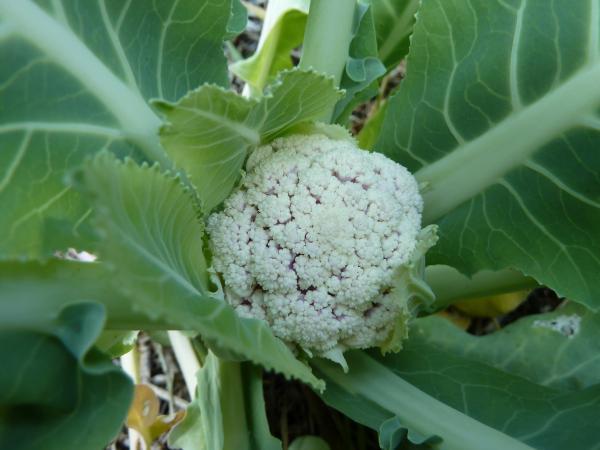
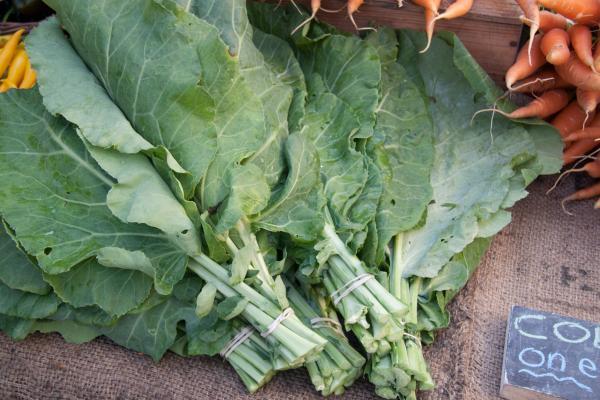
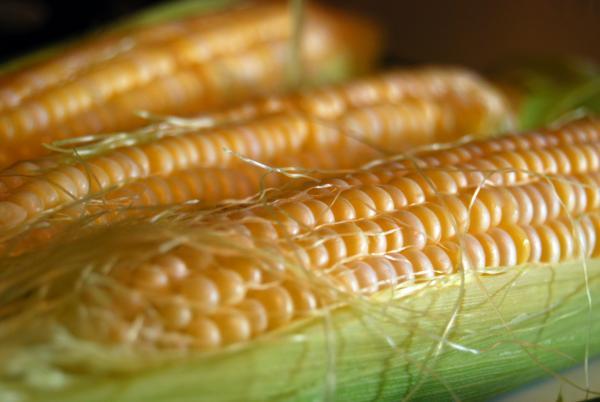
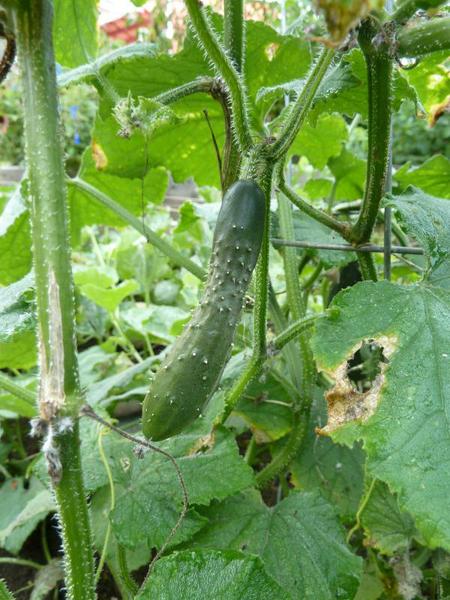
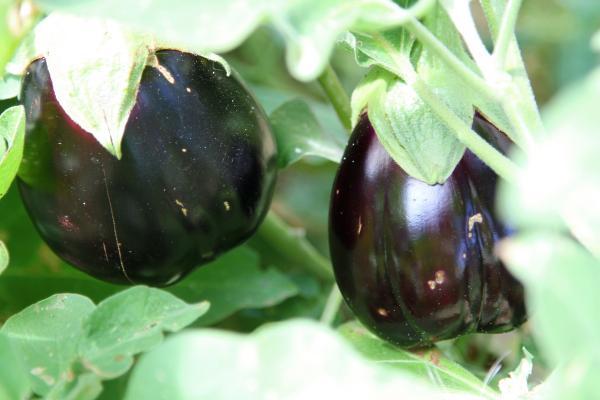
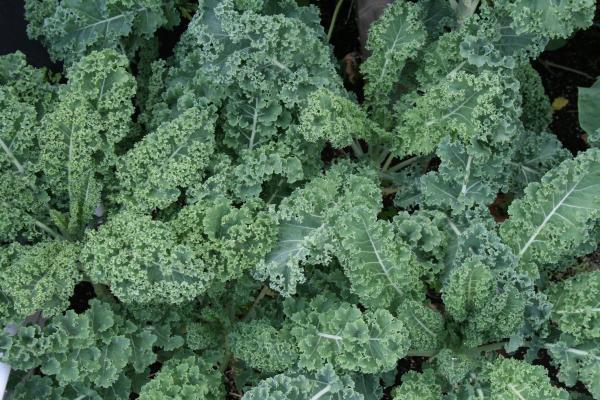
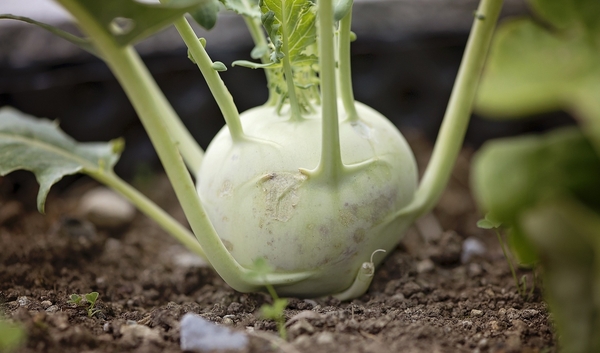
Figure 16–39. Kohlrabi.
Pezibear, Pixabay, CC BY0
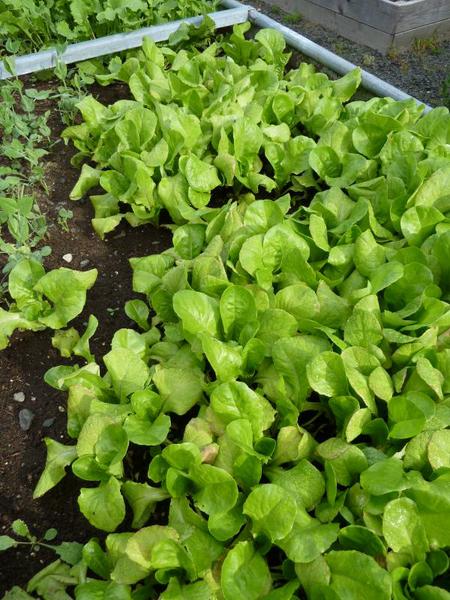
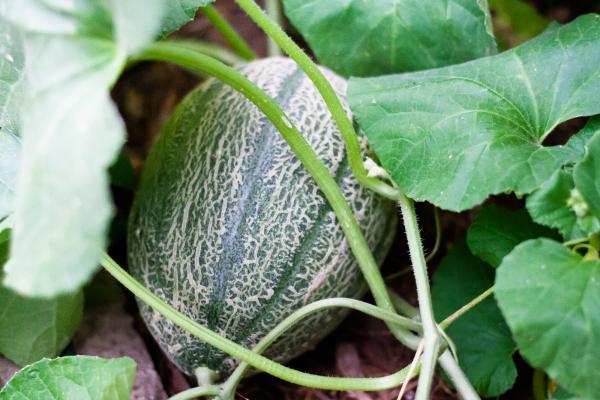
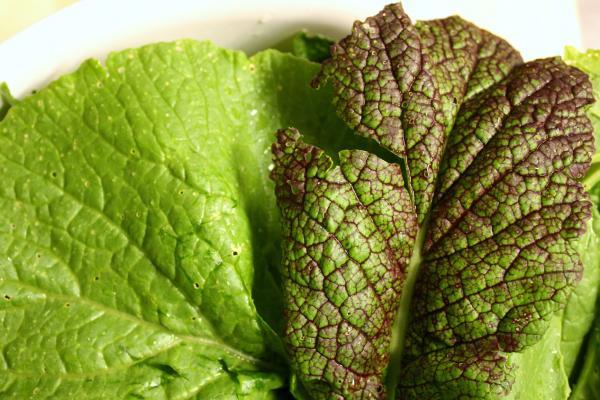
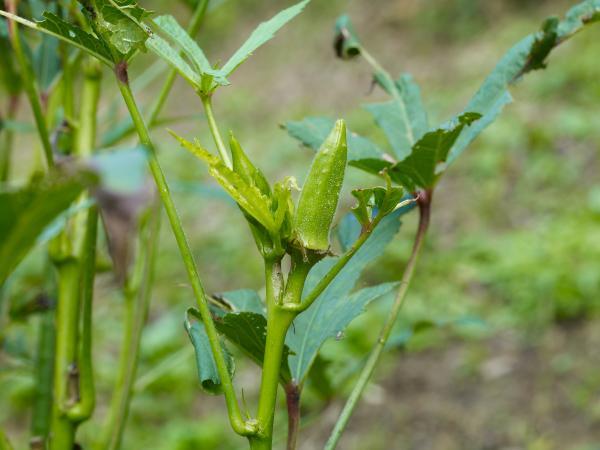

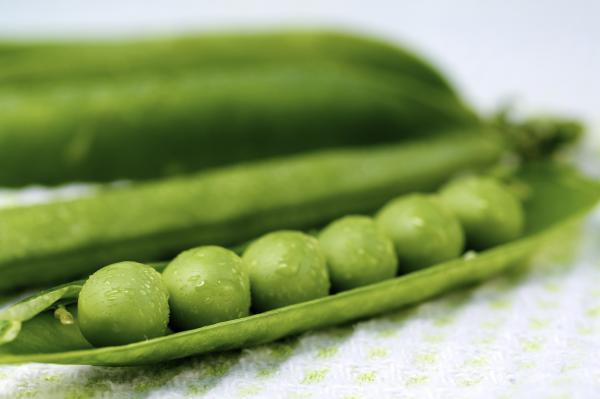

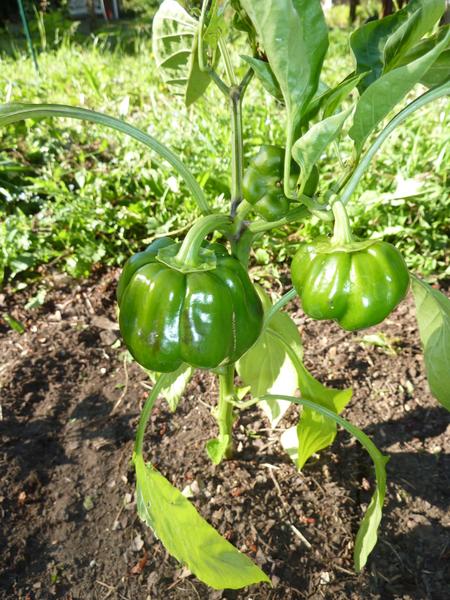
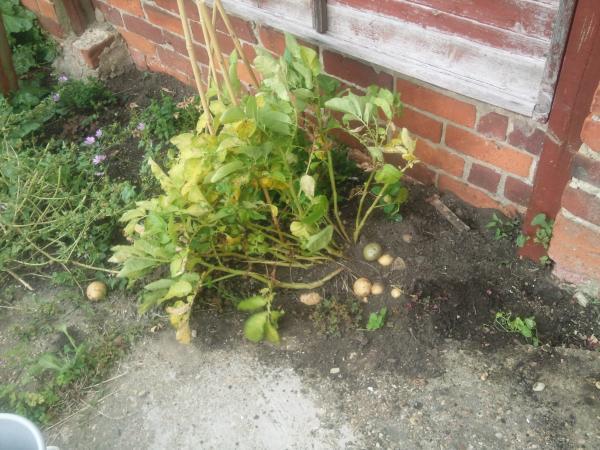
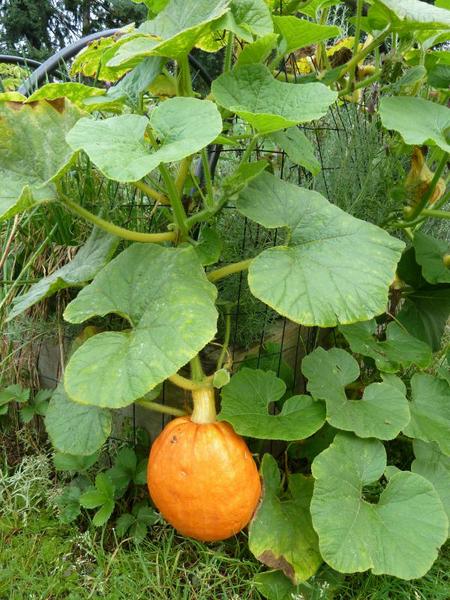
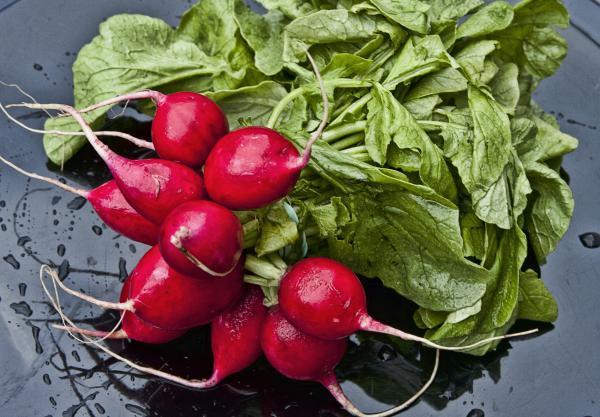
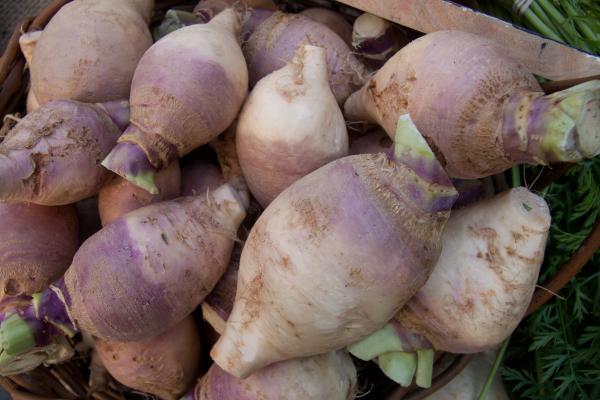
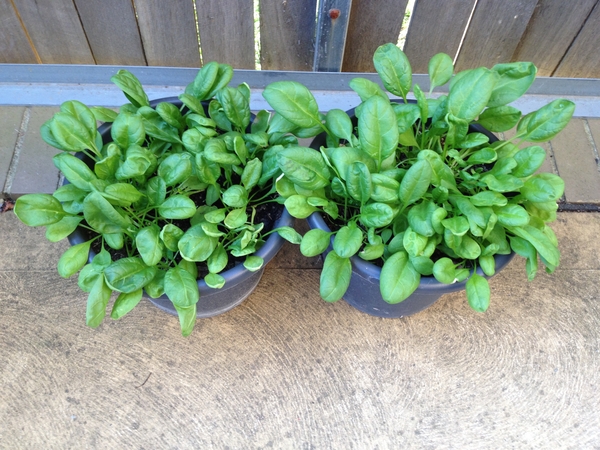
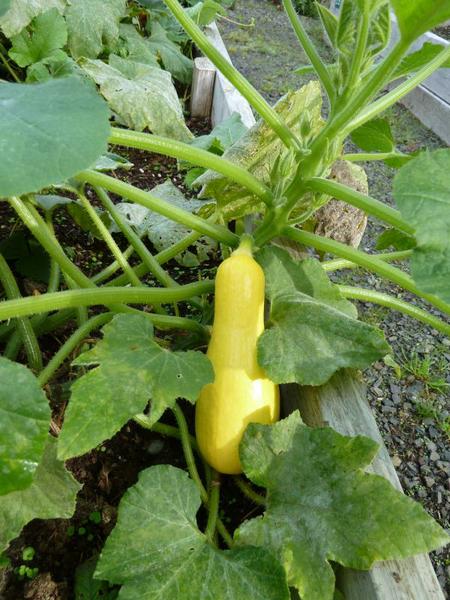
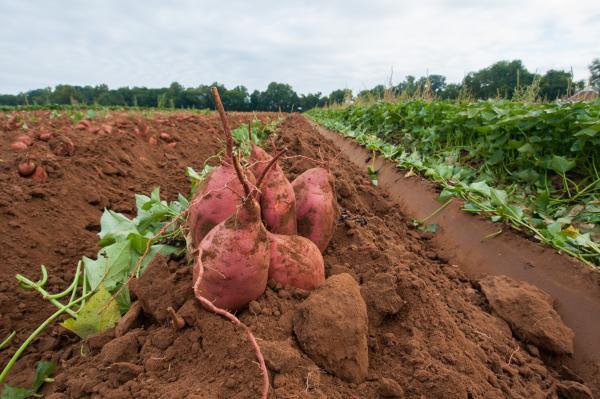
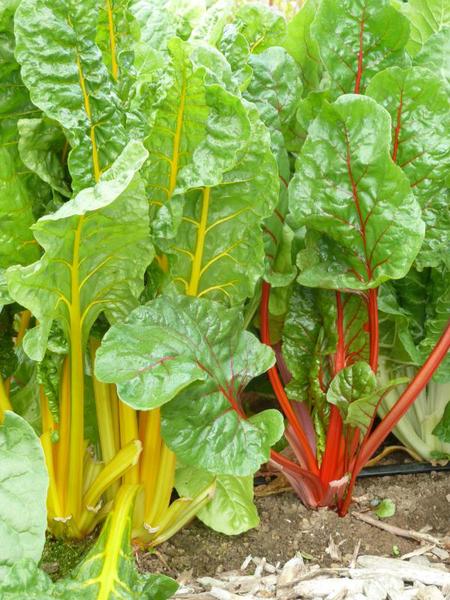
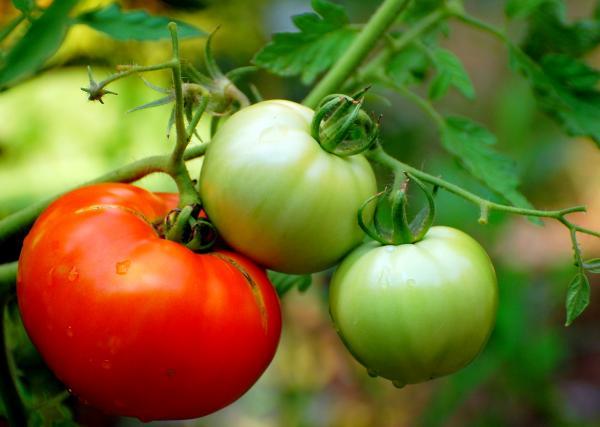
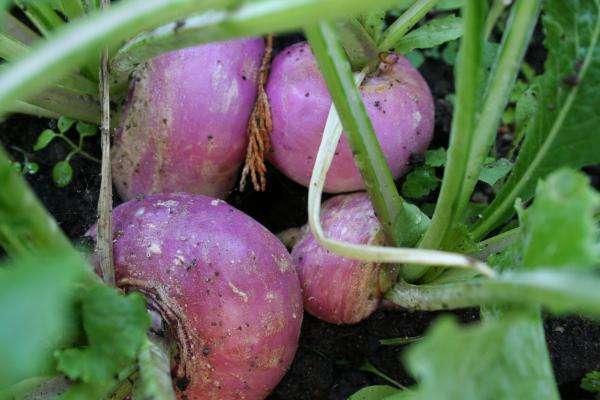
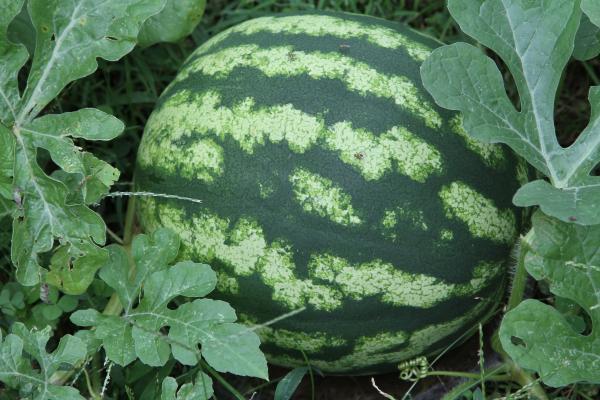
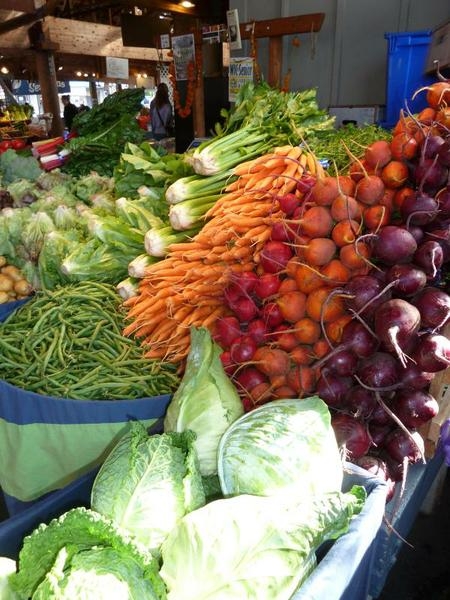
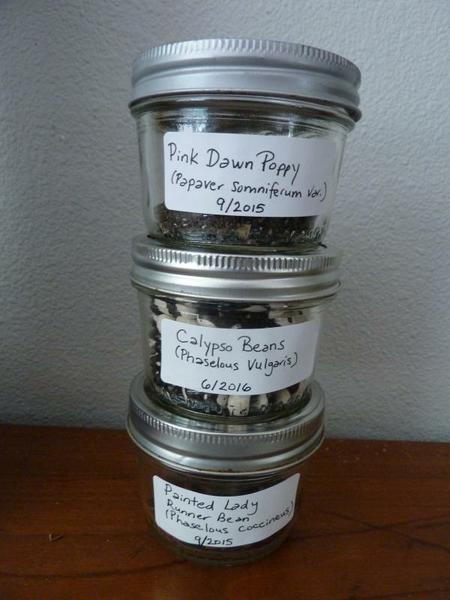
Figure 16–60. Saving seeds in glass jars with tight fitting lids. Be sure seeds are thoroughly dry. Jars can be stored in the freezer to prolong the viability of the seeds.
Kathleen Moore CC BY 2.0
Herbs
Herbs are plants that add interest and flavor to our foods and perfume our homes (Figure 16–61). Herbs are pest-resistant plants that are relatively easy to grow. If you are adding herbs to your garden, start with the herbs that are used the most. For example, choose basil, fennel, and oregano for Italian cooking; lavender and lemon verbena for making potpourri; or chamomile and mints to make teas.
Some of the herbs familiar to North Americans, such as bay laurel, dill, lavender, marjoram, oregano, rosemary, and thyme, are native to the Mediterranean region. These herbs grow best in soils with excellent drainage, bright sun, and moderate temperatures.
When growing herbs, follow these basic guidelines:
- Plant herbs in average garden soil with organic matter added to improve texture and drainage.
- Choose a site that receives at least 6 hours of direct sun each day.
- Avoid ground where water stands or runs during rains.
- Compensate for poor drainage with raised beds.
- Apply balanced fertilizers sparingly to leafy, fast-growing herbs. Heavy applications of fertilizer, especially those containing large amounts of nitrogen, may decrease the concentration of essential oils in the lush green growth.
Most herbs require little special care after being established. Plan an herb garden by grouping herbs according to light, irrigation, and soil requirements. Most herbs enjoy full sun, but a few tolerate shade. Herbs can be classified as either annual, biennial, or perennial. Be aware of the growth habits of the plants before purchasing them. Some herbs—such as anise, borage, caraway, chervil, coriander, dill, and fennel—should be direct-seeded because they do not transplant well. Other herbs, such as mints, oregano, rosemary, tarragon, and thyme, should be transplanted to ensure production of the right plant and to obtain desired growth the first year. Additional information on specific herbs can be found in the NC State Extension Gardener Plant Toolbox.
To conserve moisture and prevent splashing mud on the plants, mulch an herb garden after planting. If you are planting from seed, wait until germination and establishment of the plants and then mulch. Use 1 to 2 inches of organic material. Many growers mulch with hardwood bark or a mixture of bark and sawdust.
When grown outdoors and given ample air circulation, sunlight, and water drainage, herbs rarely suffer severe disease or insect damage. Natural predators and parasites usually keep mite and aphid populations low. Traditional pesticides are not labeled for use on culinary herbs, so rely on cultural, biological, and physical management techniques. Insecticidal soap is useful against severe outbreaks of aphids, mites, and whiteflies. Hand -pick larger pests such as beetles and caterpillars.
Growing a diverse group of herbs can be attractive. Herbs provide color, fragrance, and interest throughout the season, and they help to keep pest problems at a minimum.
Harvesting Herbs
Most herbs grow healthier and fuller if they are harvested frequently. The method of harvesting depends on which herbs and their use.
- Begin harvesting herb leaves when the plants are well-established, but before flowering to keep leaf production high
- Harvest up to three-quarters of the current season’s growth.
- Harvest early in the morning, after the dew dries but before the sun becomes hot.
- Herb flowers have their most intense oil concentration and flavor when harvested after flower buds appear but before they open.
- Herb flowers harvested to dry for craft purposes should be picked just before they are fully open.
- Annual herbs can be harvested until frost.
- Perennial herbs can be clipped until late August. Stop harvesting about one month before the frost date. Later pruning could encourage frost-tender growth.
- Harvest lavender flowers in early summer, and then shear the plants to half their height to encourage a second flowering period in the fall.
Preserving Herbs
Herbs acquire their fragrance and flavor from oils that evaporate into the air when the leaves are crushed. Ideally, use fresh herbs for cooking. But to preserve and retain quality for later use, freezing is one of the easiest methods. Rinse the herbs quickly in cold water, shake off excess moisture, and chop coarsely. Freeze generous pinches of herbs in filled ice cube trays to prevent freezer burn, or loosely spread the herbs onto a cookie sheet to freeze. Then transfer the herbs into a large plastic bag and seal. Thawed herbs are unsuitable for garnish, but they can be used in cooking.
Drying is the traditional method of herb preservation. Simply tie fresh herb stems into small bundles and hang upside down in a dark, warm, airy place (Figure 16–62). UV rays from the sun and moisture from dew and frost can discolor and severely reduce the quality of many herbs. Shade drying allows the crop to be dried more slowly and uniformly than in direct sun.
When the leaves are dry, separate them from their stems and package in rigid, light-proof containers. To preserve full flavor, avoid crushing the stems. Sage, thyme, summer savory, dill, and parsley are easy to dry. Basil, French tarragon, and mints mold if not dried quickly. An alternative method of drying is to spread the herbs out on window screens. Keep them out of the sun and turn them often.
Herbs can also be dried in a microwave. Lay a single layer of clean, dry leaves between dry paper towels and put them in the microwave for 1 minute to 2 minutes on high power. Let the leaves cool. If they are not brittle, reheat for 30 seconds and retest. Repeat as needed, until they are brittle.
Store dry herbs ready for cooking in an airtight bottle, preferably brown glass, in a cool place out of direct sunlight and away from heat. Use for cooking within a year for maximum freshness.
To air dry herbs for seeds, tie the herbs in small bundles and suspend inside a paper bag with holes. Suspend the bag in a dark area that has good air circulation. Collect the seeds when they are dry, and store in rigid, light-proof containers.
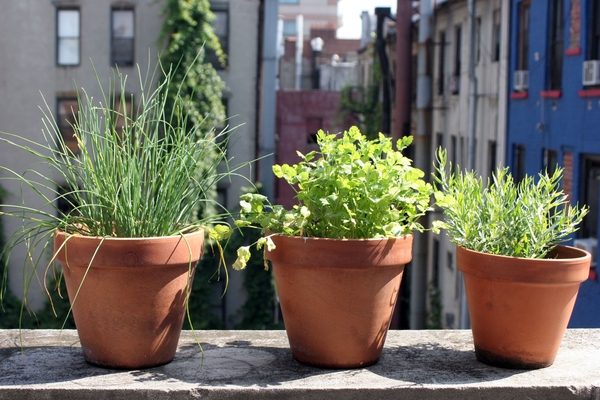
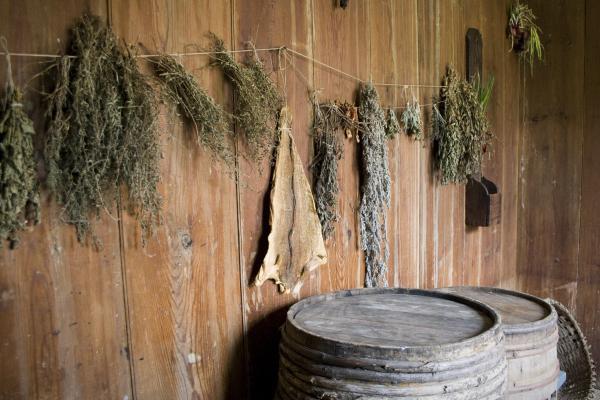
Case Study—Think IPM: Pole Bean Problems
You have noticed your pole bean plants looking damaged and unhealthy. You are wondering what is causing the damage and if there is anything you can do to prevent it.
Review the five Integrated Pest Management (IPM) steps summarized in this section, and conduct some background research on problems with pole beans.
1. Monitor and scout to determine pest type and population levels.
You have planted a vegetable garden in the same location for the past five years. This June, you noticed your pole beans looking sick. You inspect the plants and see an olive-green square-shaped insect congregating in large groups on the plants. You notice it has a strong foul aroma. You take pictures of the insect (Figure 16–63).
2. Diagnostics: Accurately identify pest and host.
The following diagnostic steps and questions will help you accurately identify the problem. Responses are included in italics.
Step 1. Identify the plant: Green pole beans
Step 2. Describe the problem: About half of my pole beans (10 plants) are showing signs of damage and look very unhealthy. The leaves have chunks missing, and some of them are turning brown.
Step 3. Identify what is normal:
What does the healthy part of the plant look like? The healthy beans are dark-green and have no damage on the leaves.
Have you had a soil test? No. (For information on how to submit a soil test see chapter 1,“Soils and Plant Nutrients.”)
Step 4. Cultural practices:
Describe the age and history of the plants: The bean plants are about seven weeks old. I have planted beans in this spot for the last five years.
Irrigation: I water the garden with a soaker hose so it gets 1 inch of water a week.
Fertilizer: I amended my garden soil with compost before planting the beans this spring.
Maintenance: I have monitored the beans every other day, kept weeds to a minimum, and have put a 2-inch layer of compost on top of the soil.
Step 5. Environmental conditions:
Are there any significant water issues? It has been a warm summer, but I have been diligent about watering.
Describe the light near this garden bed. How many hours of sunlight? The garden gets about 7 hours of full sun a day.
Describe any recent changes or events: I did expand my garden by 10 feet this year just to the south of this bed.
Step 6. Signs of pathogens:
On the leaves: Many small, square, mottled olive and brown insects (about the size of a ladybird beetle) are clumped together. On the underside of the leaves, tiny oval-shaped tan eggs are visible. The insects emit a strong odor. There is a whitish looking substance on the leaves.
On the stems: There are some slightly smaller, hairy, greenish insects on the stems.
On the roots: No insects are visible; no other pathogens are visible on the roots.
On the soil: A few dead insects are on the soil; no other pathogens are visible on the soil.
Step 7. Symptoms of pathogens:
On the leaves: Some of the leaves are missing completely, and some appear mottled.
On the stems: The stems show some damage and scraped missing tissue.
On the roots: Roots are yellowish-white and appear healthy.
Step 8. Distribution of damage in the landscape:
Are other plants in the landscape affected? My wisteria (Wisteria fructescens) vine at the front of the garden also has these insects on it.
Step 9. Distribution of damage on the plant and specific plant parts:
Where is the damage seen on the plant? On the leaves (aboveground portion).
Step 10. Timing:
When did you notice this problem? Yesterday when I did my routine garden check. I did not see any insects or insect damage a few days ago.
Steps 6 and 7 lead you to believe you are dealing with a pathogen. Based on the description of damage to the leaves and of the insect present (Steps 2, 9), we form a hypothesis that this is a kudzu bug (Megcopta cibrara) (Figure 16–63). Though it looks like a beetle, kudzu bugs are more closely related to a stink bug (Step 6). They are an olive-green to brown square-shaped insect (Step 6) native to Asia and first seen in North Carolina in 2011. They attack members of the bean family including kudzu, wisteria, soybeans, peanuts, butter beans, green beans, and field peas (Step 8). Their nymph form is quite hairy (Step 6) as seen in Figure 16–64. Sooty mold commonly follows damage by kudzu bugs, hence the white substance seen on the leaves (Step 6).
3. Consider economic, aesthetic, and injury thresholds.
Half of your beans are affected. Considering the numbers of insects, the likelihood is high that your entire bean crop will be lost. You are also concerned about the wisteria plant that is a focal point of the arbor at your garden entrance. The problem is severe enough to warrant management.
4. Implement a treatment strategy using physical, cultural, biological, or chemical control, or combine these strategies.
From the information found by searching “kudzu bug + extension” on the Internet, you learn that kudzu bugs appear in the spring but can overwinter in homes causing damage by staining and leaving behind a strong foul odor.
Physical. This insect is difficult to manage when it is in full reproductive swing, but hosing off adults, nymphs, and eggs into a bucket of soapy water can help to disrupt reproduction. Do not remove the insects by hand as they can release a yellow substance that can cause skin irritation. Removing all foliage from the wisteria in the fall and disposing of it also helps break the cycle. Monitor any bean family plants in the immediate area. You notice your neighbor has a kudzu vine on his fence, and you plan to work with him to remove that vine as well. To prevent the insects from overwintering in a home, all cracks should be sealed with caulk. Vents, windows, and doors should also be checked and sealed.
Cultural. To help break the cycle, do not plant any bean family crops next year. Keep the wisteria vine well-watered and fertilized to keep it as healthy as possible.
Biological. Some beneficial insects, such as assassin bugs and predatory stinkbugs, have been seen feeding on kudzu bugs. Some research is being conducted on the use of predatory wasps.
Chemical. Identify insecticides that are labeled for use on kudzu bugs on beans. Check the North Carolina Agricultural Chemicals Manual for an up-to-date list. Only spray affected bean family plants and follow label directions. Check the label for information on when, or if, the beans can be eaten after the plant is sprayed.
5. Evaluate treatment success.
You removed as many insects as possible with the soapy water method and decided not to plant beans in your garden next year and not to plant them in that location again for at least five more years. You disposed of all the bean family plant material in the fall and helped your neighbor manage his kudzu vine. You plan to plant some native wildflowers to attract more beneficial insects to your yard and have decided against spraying insecticides as this time. You have sealed up any cracks in the windows and doors around your home to prevent them from overwintering there. You started a garden journal to keep track of the insect sightings and other events in your garden so you have records to look back on when future problems occur.
Table 16–4. Garden Planting Calendar for Annual Vegetables, Fruits, and Herbs in North Carolina
| Fruit, Herb, or Vegetable | Days to Harvest (from seed unless otherwise noted) |
Distance Between Plants (inches) |
Jan | Feb | Mar | Apr | May | Jun | Jul | Aug | Sep | Oct | Nov | Dec | ||||||||||||
|---|---|---|---|---|---|---|---|---|---|---|---|---|---|---|---|---|---|---|---|---|---|---|---|---|---|---|
| 1 | 15 | 1 | 15 | 1 | 15 | 1 | 15 | 1 | 15 | 1 | 15 | 1 | 15 | 1 | 15 | 1 | 15 | 1 | 15 | 1 | 15 | 1 | 15 | |||
| Artichokes, globe | T=1 year | 30 in | E | E | E | |||||||||||||||||||||
| P | P | P | ||||||||||||||||||||||||
| W | W | W | ||||||||||||||||||||||||
| Artichokes, Jerusalem (Best grown in a pot because plants can spread aggressively.) |
Tu=6-8 months | 9-12 in | E | E | E | |||||||||||||||||||||
| P | P | P | ||||||||||||||||||||||||
| W | W | W | ||||||||||||||||||||||||
| Arugula | 40-50 | 6-9 in | E | E | E | E | E | E | E | E | E | |||||||||||||||
| P | P | P | P | P | P | P | P | |||||||||||||||||||
| W | W | W | W | W | W | |||||||||||||||||||||
| Asparagus | C=2 years | 18 in | E | E | E | E | E | E | ||||||||||||||||||
| P | P | P | P | P | P | |||||||||||||||||||||
| W | W | W | W | |||||||||||||||||||||||
| Basil |
T=14-35 S=50-75 |
2-8 in | E | E | E | E | E | E | ||||||||||||||||||
| P | P | P | P | P | P | |||||||||||||||||||||
| W | W | W | W | W | ||||||||||||||||||||||
| Beans, lima/bush | 65-80 | 6 in | E | E | E | E | E | E | E | |||||||||||||||||
| P | P | P | P | P | P | P | ||||||||||||||||||||
| W | W | W | ||||||||||||||||||||||||
| Beans, lima/pole | 75-95 | 6 in | E | E | E | E | E | |||||||||||||||||||
| P | P | P | P | P | ||||||||||||||||||||||
| W | W | W | ||||||||||||||||||||||||
| Fruit, Herb, or Vegetable | Days to Harvest (from seed unless otherwise noted) |
Distance Between Plants (inches) |
Jan | Feb | Mar | Apr | May | Jun | Jul | Aug | Sep | Oct | Nov | Dec | ||||||||||||
| 1 | 15 | 1 | 15 | 1 | 15 | 1 | 15 | 1 | 15 | 1 | 15 | 1 | 15 | 1 | 15 | 1 | 15 | 1 | 15 | 1 | 15 | 1 | 15 | |||
| Beans, snap/bush | 50-55 | 2 in | E | E | E | E | E | E | E | E | E | E | E | |||||||||||||
| P | P | P | P | P | P | P | P | P | P | P | P | P | ||||||||||||||
| W | W | W | W | W | ||||||||||||||||||||||
| Beans, snap/pole | 65-70 | 6 in | E | E | E | E | E | E | E | E | E | E | E | E | E | |||||||||||
| P | P | P | P | P | P | P | P | P | P | P | P | |||||||||||||||
| W | W | W | W | W | ||||||||||||||||||||||
| Beets | 55-60 | 2 in | E | E | E | E | E | E | E | |||||||||||||||||
| P | P | P | P | P | P | P | ||||||||||||||||||||
| W | W | W | W | W | ||||||||||||||||||||||
| Broccoli | T= 70-80 | 18 in | E | E | E | E | E | E | E | |||||||||||||||||
| P | P | P | P | P | P | P | ||||||||||||||||||||
| W | W | W | W | W | ||||||||||||||||||||||
| Brussels sprouts |
T=40-50 S=90-100* |
14-18 in | E | E | E | E | ||||||||||||||||||||
| P | P | P | P | |||||||||||||||||||||||
| W | W | |||||||||||||||||||||||||
| Cabbage |
T=63-75 S=90-100* |
12 in | E | E | E | E | E | E | E | E | E | |||||||||||||||
| P | P | P | P | P | P | P | P | P | ||||||||||||||||||
| W | W | W | W | W | W | |||||||||||||||||||||
| Cabbage, Chinese |
T=45-55 S=75-85 |
12 in | E | E | E | E | E | |||||||||||||||||||
| P | P | P | P | P | ||||||||||||||||||||||
| W | W | W | W | |||||||||||||||||||||||
| Carrots | 75-80 | 2 in | E | E | E | E | E | E | E | E | E | E | ||||||||||||||
| P | P | P | P | P | P | P | P | P | P | |||||||||||||||||
| W | W | W | W | W | W | W | W | |||||||||||||||||||
| Fruit, Herb, or Vegetable | Days to Harvest (from seed unless otherwise noted) |
Distance Between Plants (inches) |
Jan | Feb | Mar | Apr | May | Jun | Jul | Aug | Sep | Oct | Nov | Dec | ||||||||||||
| 1 | 15 | 1 | 15 | 1 | 15 | 1 | 15 | 1 | 15 | 1 | 15 | 1 | 15 | 1 | 15 | 1 | 15 | 1 | 15 | 1 | 15 | 1 | 15 | |||
| Cauliflower |
T=55-65 S=85-95 |
18 in | E | E | E | E | E | E | E | E | E | |||||||||||||||
| P | P | P | P | P | P | P | P | |||||||||||||||||||
| W | W | W | W | |||||||||||||||||||||||
| Celery |
T=60-70 S=120-150* |
6-8 in | E | E | E | E | E | E | E | |||||||||||||||||
| P | P | P | P | P | P | P | ||||||||||||||||||||
| W | W | W | W | W | ||||||||||||||||||||||
| Chard, Swiss |
T=32-42 S=60-70 |
6 in | E | E | E | E | E | E | E | |||||||||||||||||
| P | P | P | P | P | P | P | ||||||||||||||||||||
| W | W | W | ||||||||||||||||||||||||
| Cilantro | 50-55 | 2-4 in | E | E | E | E | E | E | ||||||||||||||||||
| P | P | P | P | P | ||||||||||||||||||||||
| W | W | W | W | W | W | |||||||||||||||||||||
| Collard greens |
32-73 S=60-100 |
18 in | E | E | E | E | E | E | E | E | E | E | E | E | E | |||||||||||
| P | P | P | P | P | P | P | P | P | P | P | P | P | ||||||||||||||
| W | W | W | W | W | W | W | W | W | ||||||||||||||||||
| Corn, sweet | 85-90 | 12 in | E | E | E | E | E | |||||||||||||||||||
| P | P | P | P | P | ||||||||||||||||||||||
| W | W | W | W | W | ||||||||||||||||||||||
| Cucumbers |
T=28-37 S=56-65 |
12 in | E | E | E | E | E | E | E | E | ||||||||||||||||
| P | P | P | P | P | P | P | P | |||||||||||||||||||
| W | W | W | W | W | ||||||||||||||||||||||
| Dill | 40-55 | 2-4 in | E | E | E | E | ||||||||||||||||||||
| P | P | P | P | |||||||||||||||||||||||
| W | W | W | W | W | W | |||||||||||||||||||||
| Fruit, Herb, or Vegetable | Days to Harvest (from seed unless otherwise noted) |
Distance Between Plants (inches) |
Jan | Feb | Mar | Apr | May | Jun | Jul | Aug | Sep | Oct | Nov | Dec | ||||||||||||
| 1 | 15 | 1 | 15 | 1 | 15 | 1 | 15 | 1 | 15 | 1 | 15 | 1 | 15 | 1 | 15 | 1 | 15 | 1 | 15 | 1 | 15 | 1 | 15 | |||
| Eggplant |
T=90-95 S=150-155* |
24 in | E | E | E | E | E | E | ||||||||||||||||||
| P | P | P | P | P | P | |||||||||||||||||||||
| W | W | W | W | |||||||||||||||||||||||
| Florence fennel | 60-90 | 6-12 in | E | E | E | E | E | E | E | E | ||||||||||||||||
| P | P | P | P | P | P | P | P | |||||||||||||||||||
| W | W | W | W | W | ||||||||||||||||||||||
| Garlic | B=180-210 | 4-6 in | E | E | E | E | E | |||||||||||||||||||
| P | P | P | P | P | ||||||||||||||||||||||
| W | W | W | W | W | ||||||||||||||||||||||
| Kale |
T= 14-22 S=40-50 |
6 in | E | E | E | E | E | E | E | E | E | E | E | E | E | E | ||||||||||
| P | P | P | P | P | P | P | P | P | P | P | P | P | ||||||||||||||
| W | W | W | W | W | ||||||||||||||||||||||
| Kohlrabi | T=22-32 S=50-60 | 4 in | E | E | E | E | E | E | E | E | E | E | E | E | ||||||||||||
| P | P | P | P | P | P | P | P | P | P | P | P | |||||||||||||||
| W | W | W | W | W | W | W | ||||||||||||||||||||
| Leek |
T=50-80 S=120-150 |
4 in | E | E | E | E | E | E | E | E | E | |||||||||||||||
| P | P | P | P | P | P | P | P | P | ||||||||||||||||||
| W | W | W | W | W | W | W | W | |||||||||||||||||||
| Lettuce, head | T=45-60 S=70-85 | 10 in | E | E | E | E | E | E | E | E | E | E | ||||||||||||||
| P | P | P | P | P | P | P | P | P | P | |||||||||||||||||
| W | W | W | W | W | W | |||||||||||||||||||||
| Lettuce, leaf |
T=15-25 S=40-50 |
6 in | E | E | E | E | E | E | E | E | E | E | E | |||||||||||||
| P | P | P | P | P | P | P | P | P | P | |||||||||||||||||
| W | W | W | W | W | ||||||||||||||||||||||
| Fruit, Herb, or Vegetable | Days to Harvest (from seed unless otherwise noted) |
Distance Between Plants (inches) |
Jan | Feb | Mar | Apr | May | Jun | Jul | Aug | Sep | Oct | Nov | Dec | ||||||||||||
| 1 | 15 | 1 | 15 | 1 | 15 | 1 | 15 | 1 | 15 | 1 | 15 | 1 | 15 | 1 | 15 | 1 | 15 | 1 | 15 | 1 | 15 | 1 | 15 | |||
| Melons, canteloupe |
T=57-62 S=85-90 |
24 in | E | E | E | E | E | E | ||||||||||||||||||
| P | P | P | P | P | P | |||||||||||||||||||||
| W | W | W | W | |||||||||||||||||||||||
| Melons, watermelon |
T=62-72 S=90-100 |
60 in | E | E | E | E | E | |||||||||||||||||||
| P | P | P | P | P | ||||||||||||||||||||||
| W | W | W | ||||||||||||||||||||||||
| Mustard | 30-40 | 2 in | E | E | E | E | E | E | E | E | E | E | E | E | E | E | ||||||||||
| P | P | P | P | P | P | P | P | P | P | P | P | P | ||||||||||||||
| W | W | W | W | W | W | W | W | W | W | W | ||||||||||||||||
| Okra |
T=18-28 S=60-70 |
12 in | E | E | E | E | ||||||||||||||||||||
| P | P | P | P | |||||||||||||||||||||||
| W | W | W | W | W | ||||||||||||||||||||||
| Onions, bulb |
B=75-10 S=90-120 |
4 in | E | E | E | E | E | E | E | E | E | E | E | E | E | E | E | E | ||||||||
| P | P | P | P | P | P | P | P | P | P | P | P | P | P | P | P | |||||||||||
| W | W | W | W | W | ||||||||||||||||||||||
| Onions, green |
T=42-50 S=60-70 |
1-2 in | E | E | E | E | E | E | ||||||||||||||||||
| P | P | P | P | P | P | |||||||||||||||||||||
| W | W | W | W | W | W | W | ||||||||||||||||||||
| Pac choi, bok choy |
T=30-75 S=45-90* |
7-12 in | E | E | E | E | ||||||||||||||||||||
| P | P | P | P | |||||||||||||||||||||||
| W | W | W | W | |||||||||||||||||||||||
| Parsley |
T=33 S=75 |
9-12 in | E | E | E | E | E | E | E | E | E | |||||||||||||||
| P | P | P | P | P | P | P | P | |||||||||||||||||||
| W | W | W | W | W | W | W | ||||||||||||||||||||
| Fruit, Herb, or Vegetable | Days to Harvest (from seed unless otherwise noted) |
Distance Between Plants (inches) |
Jan | Feb | Mar | Apr | May | Jun | Jul | Aug | Sep | Oct | Nov | Dec | ||||||||||||
| 1 | 15 | 1 | 15 | 1 | 15 | 1 | 15 | 1 | 15 | 1 | 15 | 1 | 15 | 1 | 15 | 1 | 15 | 1 | 15 | 1 | 15 | 1 | 15 | |||
| Parsnips | 100-130 | 3-4 in | E | E | E | E | E | E | E | E | E | E | E | |||||||||||||
| P | P | P | P | P | P | P | P | P | P | |||||||||||||||||
| W | W | W | W | W | W | W | W | W | ||||||||||||||||||
| Peanuts | 145-160 | 6-8 in | E | E | ||||||||||||||||||||||
| P | P | |||||||||||||||||||||||||
| W | W | |||||||||||||||||||||||||
| Peas, dwarf/bush | 54-60 | 4 in | E | E | E | E | E | E | E | E | E | E | E | |||||||||||||
| P | P | P | P | P | P | P | P | P | P | P | ||||||||||||||||
| W | W | W | W | |||||||||||||||||||||||
| Peas, vining | 54-72 | 2-3 in | E | E | E | E | E | E | E | E | E | E | ||||||||||||||
| P | P | P | P | P | P | P | P | P | P | P | ||||||||||||||||
| W | W | W | W | |||||||||||||||||||||||
| Peas, field/southern | 55-65 | 4 in | E | E | E | E | E | E | E | E | E | |||||||||||||||
| P | P | P | P | P | P | P | P | P | ||||||||||||||||||
| W | W | W | W | |||||||||||||||||||||||
| Peppers |
T= 75-80 S=145-150* |
18 in | E | E | E | E | E | |||||||||||||||||||
| P | P | P | P | P | ||||||||||||||||||||||
| W | W | W | ||||||||||||||||||||||||
| Potatoes, Irish | Tu=95-120 | 10 in | E | E | E | |||||||||||||||||||||
| P | P | P | ||||||||||||||||||||||||
| W | W | |||||||||||||||||||||||||
| Potatoes, sweet | T=95-125 | 10 in | E | E | E | E | E | |||||||||||||||||||
| P | P | P | P | P | ||||||||||||||||||||||
| W | W | |||||||||||||||||||||||||
| Fruit, Herb, or Vegetable | Days to Harvest (from seed unless otherwise noted) |
Distance Between Plants (inches) |
Jan | Feb | Mar | Apr | May | Jun | Jul | Aug | Sep | Oct | Nov | Dec | ||||||||||||
| 1 | 15 | 1 | 15 | 1 | 15 | 1 | 15 | 1 | 15 | 1 | 15 | 1 | 15 | 1 | 15 | 1 | 15 | 1 | 15 | 1 | 15 | 1 | 15 | |||
| Pumpkin | 115-120 | 48 in | E | E | E | E | E | E | ||||||||||||||||||
| P | P | P | P | P | P | |||||||||||||||||||||
| W | W | W | ||||||||||||||||||||||||
| Radishes | 20-25 | 1 in | E | E | E | E | E | E | E | E | E | E | E | E | E | |||||||||||
| P | P | P | P | P | P | P | P | P | P | P | P | P | ||||||||||||||
| W | W | W | W | W | W | |||||||||||||||||||||
| Rutabaga | 70-80 | 4 in | E | E | E | E | E | E | E | E | E | E | E | E | ||||||||||||
| P | P | P | P | P | P | P | P | P | P | P | ||||||||||||||||
| W | W | W | W | W | ||||||||||||||||||||||
| Spinach | 50-60 | 6 in | E | E | E | E | E | E | E | E | E | E | E | E | E | E | ||||||||||
| P | P | P | P | P | P | P | P | P | P | P | P | P | P | |||||||||||||
| W | W | W | W | W | W | W | W | |||||||||||||||||||
| Squash, summer |
T=30-40 S=50-60 |
24 in | E | E | E | E | E | E | E | E | E | |||||||||||||||
| P | P | P | P | P | P | P | P | P | ||||||||||||||||||
| W | W | W | W | W | ||||||||||||||||||||||
| Squash, winter |
T=42-67 S=70-95 |
36 in | E | E | E | E | E | E | E | E | ||||||||||||||||
| P | P | P | P | P | P | P | P | |||||||||||||||||||
| W | W | W | ||||||||||||||||||||||||
| Sunflower | 55-110 | 9-24 in | E | E | E | E | ||||||||||||||||||||
| P | P | P | P | |||||||||||||||||||||||
| W | W | W | W | |||||||||||||||||||||||
| Tomatoes |
T=75-85 S=125-135* |
18 in | E | E | E | E | E | E | E | |||||||||||||||||
| P | P | P | P | P | P | P | ||||||||||||||||||||
| W | W | W | W | |||||||||||||||||||||||
| Turnips | 55-60 | 2 in | E | E | E | E | E | E | E | E | E | E | E | E | E | |||||||||||
| P | P | P | P | P | P | P | P | P | P | P | P | P | ||||||||||||||
| W | W | W | W | W | W | |||||||||||||||||||||
|
E= Eastern, P= Piedmont, W= Western B = Bulbs; C = Crowns; S = Seeds; T = Transplants; Tu = Tubers For more information on gardening in North Carolina, see the North Carolina Extension Gardener Handbook and the NC State Extension Gardening Website. Acknowledgments: This publication is based on prior work by Charlotte Glen, Danny Lauderdale, Kerrie Roach, Donna Teasley, Debbie Roos, Doug Jones, Erv Evans, and Larry Bass. The authors would like to thank Jeanine Davis, Bill Jester, Issac Lewis, Jonathan Schultheis, Allan Thornton, Kathleen Moore, and Debra Ireland for their assistance with this publication. Prepared by: Lucy K. Bradley, Extension Specialist, Urban Horticulture; Christopher C. Gunter, Extension Specialist, Vegetable Crop Production; Julieta T. Sherk, Assistant Professor; and Elizabeth A. Driscoll, Extension Associate |
||||||||||||||||||||||||||

Figure 16–63. Adult kudzu bug.
Matt Bertone

Figure 16–64. Kudzu bug nymph.
Matt Bertone
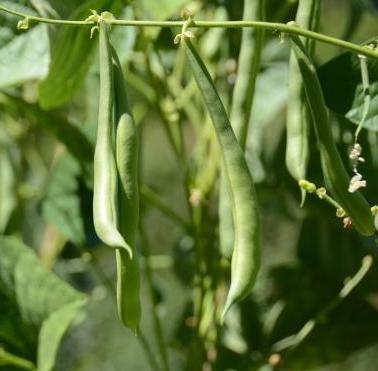
Rob Berholf CC BY 2.0
Frequently Asked Questions
1. My tomatoes, peppers, or melons have dry rotten spots on the ends.
Blossom-end rot occurs on tomatoes, peppers, squash, eggplant, and watermelons from a lack of calcium in the developing fruits. It can be caused by fluctuations in the soil moisture, rapid early-season growth followed by extended dry weather, excessive rain, excess soil salts caused by overfertilization (especially with high nitrogen fertilizers), and improper soil pH. Fungi or bacteria that invade the damaged tissue may cause moldy growths on the rotted area. The rotten area looks unsightly, but the rest of the fruit is edible. Applying preventive sprays of calcium chloride to the tomatoes is not very effective. To prevent the problem in the future, maintain an even moisture level by regular watering and using good mulch. Plant in well-drained soil and avoid using high nitrogen fertilizers. Do not cultivate deeply close to the plant. Test soil and use lime as recommended to bring the pH up to 6.5 to 6.8. Smaller-fruited varieties, such as cherry tomatoes, are less susceptible to blossom-end rot.
2. My tomatoes do not set fruit.
This may be due to extreme temperatures causing blossoms to drop without setting fruit. This occurs when nighttime temperatures fall below 55°F or stay above 70°F, or daytime temperatures rise above 90°F for extended periods. Recently, new "hot-set" varieties of tomatoes, such as Sun Leaper and Solar Set, have been developed that continue to set fruit at high temperatures. There could be other explanations.
- Does the plant get enough sun? Tomatoes need at least 6 hours of sunlight per day.
- If there is vigorous leafy growth but no fruit, there may be too much nitrogen in the soil, which stimulates leaf production at the expense of fruit formation.
- Drought also causes tomato plants to not set fruit, so make sure the tomato plant is getting 1 inch to 2 inches of water per week and is kept evenly moist.
3. Can my vegetables cross-pollinate each other?
Pollination is the transfer of pollen from the anther to the stigma (ovary) of a flower that results in seed and enlargement of the ovary producing a fruit. Cross-pollination is the transfer of pollen from a flower on one plant to a flower of another plant. Different varieties of the same vegetable can cross-pollinate (yellow and white corn) and some closely related species in the same family (squash and pumpkins), but not species in different families (corn and melons). Even if your pumpkin and squash or cantaloupe and Crenshaw did cross-pollinate, however, the fruit would still look the same. Only if the seeds from the fruit produced were saved and planted the next season would you possibly see differently colored or shaped fruit produced. There are some exceptions, such as planting hot and sweet peppers near each other. The gene for hotness is dominant, and insect cross-pollination can occur in peppers. Therefore, the seed produced in the current season’s sweet pepper may contain capsaicin, which causes heat, and your sweet pepper could taste hot. Corn kernels are seeds, and planting white and yellow corn near each other can result in cobs with mixed yellow and white kernels. Likewise, a supersweet corn planted near a traditional corn cultivar does not develop its sweet flavor.
4. Why is my broccoli, spinach, lettuce, or other cool-season crop flowering? Can I still eat it?
Cole crops or cold weather crops thrive in cooler temperatures. When the weather warms up in the spring, it can signal to cole crops that it is time to flower and reproduce. This rapid growth of flowering structures is often called bolting. While you can still eat plants that have bolted, they often contain a bitter sap that makes them unpalatable. Consider planting cole crops in the fall rather than the spring.
5. Why do my cucumbers taste bitter?
Cucumbers grown under environmental stress—such as a lack of water, uneven watering practices, high heat or cool conditions, wide temperature swings, low soil fertility, or low soil pH—produce increased levels of chemicals called cucurbitacins. These compounds are bitter and concentrated in the cucumber’s skin. Misshapen fruit from poor pollination can also be bitter. Bitterness also varies to some degree with the particular variety of cucumber grown. Overly mature or improperly stored cucumbers may also develop a mild bitterness.
6. My tomato starts from the nursery do not have many leaves on the lower stem, but they do have a few blossoms and one tiny tomato. How deep should I plant?
Good early root establishment makes for the most prolific tomato plants. Tomato plants can produce adventitious roots all along their stem (see Figure 16-21), so burying the plant up to the first set of leaves can allow the plant to produce the most roots. If your plant is more than 6 to 7 inches tall, the soil below that depth could be too cool to promote the best root growth. In this case, consider digging a shallow trench and laying the tomato plant on its side (see Figure 16–22). Gently bend up the tip of the plant so it is above the soil line and cover the rest of the stem. Any blossoms or fruits should be pinched off because they can take energy away from developing roots.
7. Why are my broccoli or cauliflower heads small? And why is my cauliflower turning green?
When small heads form on broccoli or cauliflower, the condition is called “buttoning.” Excessive cold, nutrient deficiency, or drought stress (usually soon after planting) can cause buttoning. Large transplants are much more susceptible to buttoning, so look for plants with no more than four to six leaves. Cauliflower heads begin to turn green because they are starting to photosynthesize due to light exposure. When your head is approximately 3 inches across, you can keep light off of it by pulling leaves up and tying them together. This is known as “blanching.” Be sure to check on your plant frequently. If you notice it starting to bolt or elongate, harvest the entire head immediately.
8. There is a little tomato growing on my potato plant. Did they cross-pollinate?
Potatoes, tomatoes, eggplants, and peppers are in the Solanaceae or nightshade family. This family is self-pollinating, so unlikely to cross-pollinate. What you are seeing is the true fruit of a potato, which contains many tiny seeds. Do not eat the fruit, which is poisonous.
9. My zucchini plant has only produced a couple of fruits this summer. What is wrong with it?
Zucchini are members of the cucurbits family, along with squash, melons, and cucumbers. Cucurbits produce separate male and female flowers. The male flowers produce large, sticky, yellow pollen that is not easily transferred by wind. The most effective pollinators for cucurbits are bees. Encourage native and honey bees in your yard by not spraying insecticides and by planting other nectar-producing plants. If you are in an urban area and have not seen many bees working your plants, try hand pollination. First distinguish male flowers from female flowers: Both have yellow petals, but female flowers have a tiny fruit at their base. Use an artist’s brush to collect some pollen from the stamen of a male plant, or remove the male flower, pull off the petals to expose the stamen, and place the pollen from the stamen or from your brush directly on the stigma of the female plant. It is best to try this technique early in the morning. It is important to use freshly opened flowers as they are only receptive for one day.
Further Reading
Adams, William D., and Thomas LeRoy. The Southern Kitchen Garden: Vegetables, Fruits, Herbs and Flowers Essential for the Southern Cook. Lanham, Maryland: Taylor Trade Publishing, 2007. Print.
Coleman, Eliot. The Winter Harvest Handbook: Year Round Vegetable Production Using Deep Organic Techniques and Unheated Greenhouses. White River Junction, Vermont: Chelsea Green Publishing Company, 2009. Print.
Harrington, Geri. Growing Chinese Vegetables in Your Own Backyard. North Adams, Massachusetts: Storey Publishing, 2009. Print.
Kemble, J. M, ed. Southeastern U.S. 2014 Vegetable Crop Handbook. Lincolnshire, Illinois: Vance Publishing Corporation, 2014. PDF file. Publication AREC-63NP.
Kowalchik, Claire and William H. Hylton, eds. Rodale's Illustrated Encyclopedia of Herbs. 1987. Emmaus, Pennsylvania: Rodale Press, Inc., 1998. Print.
Maynard, Donald N., and George J. Hochmuth. Knott's Handbook for Vegetable Growers. 5th ed. Hoboken, New Jersey: John Wiley & Sons, Inc., 2007. Print.
Raymond, Dick. Garden Way's Joy of Gardening. North Adams, Massachusetts: Storey Publishing, 1982. Print.
Rogers, Marilyn K, ed. All about Vegetables. Des Moines, Iowa: Meredith Books, 1999. Print.
Rubatzky, Vincent E., and Mas Yamaguchi. World Vegetables: Principles, Production, and Nutritive Values. 2nd ed. New York: Chapman & Hall, 1997. Print.
Specialty and Minor Crops Handbook. 2nd ed. Davis, California: University Of California Division Of Agriculture And Natural Resources, 1998. Print.
Van Wyk, Ben-Erik. Food Plants of the World: An Illustrated Guide. Portland, Oregon: Timber Press, Inc., 2005. Print.
Wallace, Ira. The Timber Press Guide to Vegetable Gardening in the Southeast. Portland, Oregon: Timber Press, Inc., 2013. Print.
Chapter Text Hyperlinks
SoilFacts: Minimizing Risks of Soil Contaminants in Urban Gardens, AGW-439-78
NCDA&CS Agronomic Services – Soil Testing
“Understanding the Soil Test Report”, USDA
NC Community Gardens Directory, North Carolina Community Garden Partners
NC State Extension Gardener Plant Toolbox
Environmental Soil Issues: Garden Use of Treated Lumber, by PennStateExtension
Square Foot Gardening Foundation
North Carolina Planting Calendar for Annual Vegetables, Fruits, and Herbs
NOTE 4: Fertilization of Lawns, Gardens and Ornamentals, NCDA&CS Agronomic Division
SoilFacts: Minimizing Risks of Soil Contaminants in Urban Gardens, AG-439-78
North Carolina Agricultural Chemicals Manual
Insect and Related Pests of Vegetables, AG-295
Home Food Preservation, NC State Extension, Family & Consumer Sciences
Kudzu Bug, by NC State Extension, Chatham County Center
For More Information
NC State Resources
- Container Garden Planting Calendar for Edibles in the Piedmont
- Entomology Insect Notes, NC State University
- Extension Plant Pathology – Vegetables Website
- Extension Plant Pathology Facebook
- Fertilization of Lawns, Gardens and Ornamentals, NCDA&CS
- Herbicide Carryover in Hay, Manure, Compost, and Grass Clippings
- Home Food Preservation, NC State Extension, Family & Consumer Sciences
- Insect and Related Pests of Vegetables, AG-295
- Insects and Related Pests of Vegetables-Publications
- Local Food Information Portal
- North Carolina Planting Calendar for Annual Vegetables, Fruits, and Herbs
- Plan for a Year-round Harvest, Carolina Farm Stewardship Association
- A Small Backyard Greenhouse for the Home Gardener
- SoilFacts: Minimizing Risks of Soil Contaminants in Urban Gardens, AG-439-78
- Vegetable Gardening: A Beginner's Guide
More NC State Resources
Other Resources
- Garden Use of Treated Lumber, by Penn State
- Home Vegetable Gardening, by University of California TV
- Part I: (59:27 minutes)
- Part II: (59:05 minutes)
- Vegetable Gardening Basics, by University of Illinois
- Vegetable Growing Guides, by Cornell University
Contributors
Author: Christopher Gunter, Associate Professor, Department of Horticultural Science
Contributions by Extension Agents: Lisa Rayburn, Donna Teasley, Julie Flowers, Danny Lauderdale, Silas Brown
Contributions by Extension Master Gardeners: Deborah Green, Margaret Genkins, Barbara Goodman, Jacquelyn Weedon, Karen Damari, Connie Schultz, Judith Bates, Chris Alberti, Brook Williams, Karen Jevsevar, Kim Curlee, Caro Dosé
Content Editors: Lucy Bradley, Extension Specialist, Urban Horticulture and Director of the Extension Master Gardener Volunteer program;
Kathleen Moore, Urban Horticulturist
Copy Editor: Barbara Scott, Debbi Braswell
Based in part on text from the 1998 Extension Master Gardener manual prepared by:
Larry Bass, Extension Specialist, Department of Horticultural Science
Erv Evans, Extension Associate, Department of Horticultural Science
Ken Sorensen, Extension Specialist, Department of Entomology
Doug Saunders, Extension Specialist, Department of Horticultural Science
Jeanine Davis, Extension Specialist, Department of Horticultural Science
Frank Louws, Extension Specialist, Department of Plant Pathology
How to cite this chapter:
Gunter, C. 2022. Vegetable Gardening, Chapter 16. In: K.A. Moore, and L.K. Bradley (eds). North Carolina Extension Gardener Handbook, 2nd ed. NC State Extension, Raleigh, NC. <http://content.ces.ncsu.edu/16-vegetable-gardening>
Publication date: Feb. 1, 2022
AG-831
Other Publications in North Carolina Extension Gardener Handbook
- 1. Soils & Plant Nutrients
- 2. Composting
- 3. Botany
- 4. Insects
- 5. Diseases and Disorders
- 6. Weeds
- 7. Diagnostics
- 8. Integrated Pest Management (IPM)
- 9. Lawns
- 10. Herbaceous Ornamentals
- 11. Woody Ornamentals
- 12. Native Plants
- 13. Propagation
- 14. Small Fruits
- 15. Tree Fruit and Nuts
- 16. Vegetable Gardening
- 17. Organic Gardening
- 18. Plants Grown in Containers
- 19. Landscape Design
- 20. Wildlife
- 21. Youth, Community, and Therapeutic Gardening
- Appendix A. Garden Journaling
- Appendix B. Pesticides and Pesticide Safety
- Appendix C. Diagnostic Tables
- Appendix D. Garden Tools
- Appendix E. Season Extenders and Greenhouses
- Appendix F. History of Landscape Design
- Appendix G. Permaculture Design
- Appendix H. Community Gardening Resources
- Appendix I. More NC State Resources
- Glossary
N.C. Cooperative Extension prohibits discrimination and harassment regardless of age, color, disability, family and marital status, gender identity, national origin, political beliefs, race, religion, sex (including pregnancy), sexual orientation and veteran status.