
Outline
Color
Texture
Structure
Water-Holding Capacity
How to Remediate Compaction
Cation Exchange Capacity
Tips for Collecting a Good Soil Sample
How to Use a Soil Test Report
Example Soil Test Reports
Soil pH
Nutrient Availability and pH
Adjusting pH
Plant Nutrition and Fertilization
Soil Nutrients
Fertilizers
Plant Nutrients and the Environment
When to Apply Fertilizer
Objectives
This chapter teaches people to:
- Realize the importance of, and the difference between, soil structure and soil texture.
- Recognize the key characteristics of several different soil types.
- Understand that many different soil types occur in North Carolina.
- Explain the importance of organic matter in the soil.
- Accept this gardening principle: Selecting plants that will do well in a given soil is often a better strategy than trying to alter the soil to meet the plants' needs.
Introduction: What Is Soil?
Soil is a living, breathing, natural entity composed of solids, liquids, and gases. Soil has five major functions:
- Provides a habitat for organisms
- Recycles waste products
- Filters water
- Serves as an engineering material
- Provides a medium for plant growth
Our focus will be on the fifth function. In this role, soil provides structural stability for plants and retains and relinquishes water and the nutrients necessary for plant growth.
An ideal soil for plant growth contains 50% pore space and 50% solids, with the pore space filled with equal parts air and water. This distribution rarely occurs because pore space varies with soil texture and soil management. For example, tilling increases pore space, while poor drainage and compaction reduce it.
Soil solids are a blend of mineral materials and organic matter. The mineral materials are typically weathered rock of varying sizes called sand, silt, and clay. The organic matter consists of decaying plant and microbial residues. The relative amounts of pore space and mineral and organic matter vary greatly among different soil types. But for plant growth, most soil scientists agree that 50% pore space, 45% mineral matter, and 5% organic matter make up an ideal ratio. The distribution of solids and porespace in ideal, compacted, and poorly drained soils is illustrated in Figure 1-1a, Figure 1–1b, and Figure 1–1c.
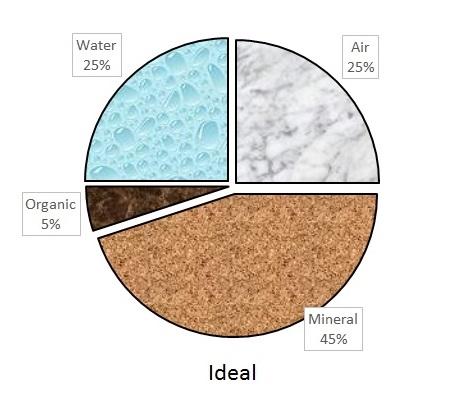
Figure 1–1a. The distribution of solids and pore space in an ideal soil.
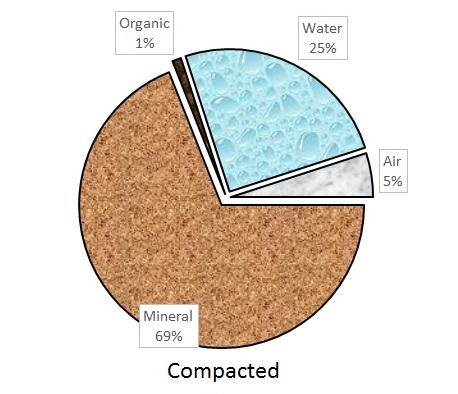
Figure 1–1b. The distribution of solids and pore space in a compacted soil.
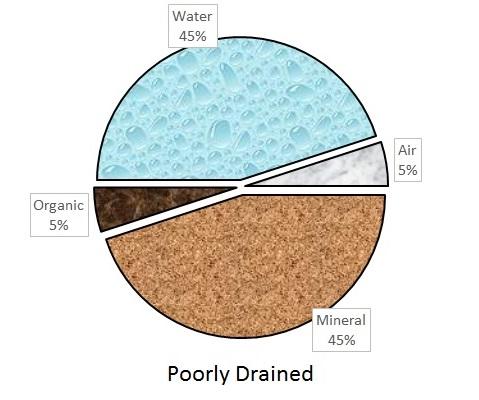
Figure 1–1c. The distribution of solids and pore space in a poorly drained soil.
The Soil Profile
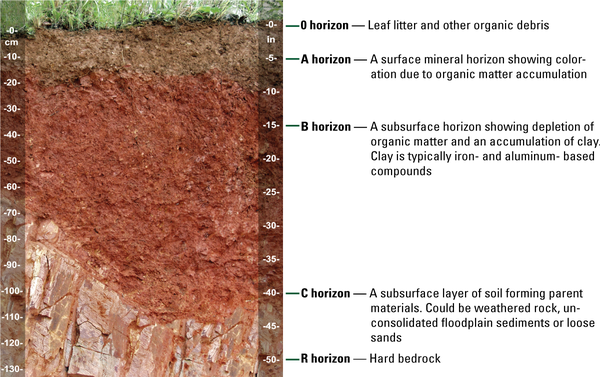
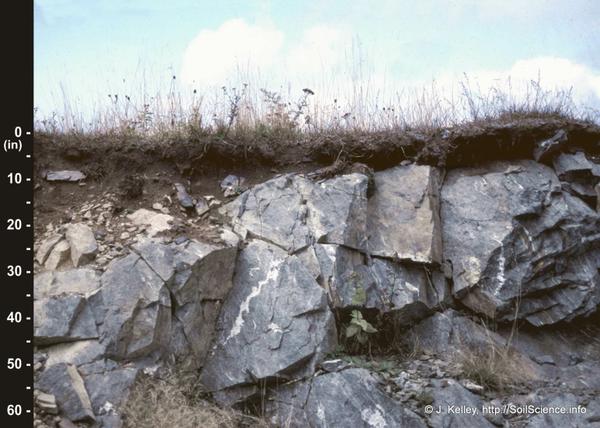
Most naturally occurring, undisturbed soils have three distinct layers of variable thicknesses. The layers are the topsoil, subsoil, and parent material. Each layer can have two or more sublayers called horizons. Collectively, the horizons make up the soil profile. The predominate parent material varies by location in North Carolina. In the NC piedmont and mountains, the parent material is typically weathered bedrock known as saprolite. In the river bottoms and stream terraces of the NC piedmont and mountains, the parent materials are the floodplain sediments delivered from upstream where erosion has occurred. In the NC coastal plain, the parent materials are marine sediments deposited over eons as the oceans go through the natural cycles of advance and retreat. In the easternmost NC coastal plain, the dominant parent material is organic matter. These organic soils are typically found in areas that just 50,000 years ago were below sea level. Such areas are swamps where plants grow and thrive. But these areas are too wet for the plant residues (leaves, branches, roots, trunks, and the like) to efficiently decompose.
Soils’ properties vary with the soil depth. The surface soil, or topsoil layer (O and A horizon in Figure 1–2), usually contains less clay, but more organic matter and air, than the lower soil layers. Topsoil is usually more fertile than the other layers and has the greatest concentration of plant roots.
The subsurface layer (B and C horizon in Figure 1–2), known as subsoil, usually has a higher clay content and lower organic matter content than the topsoil.
Soil properties often limit the depth to which plant roots can penetrate. For example, roots will not grow through an impenetrable layer. That layer may be bedrock (Figure 1–3), compacted soil, or a chemical barrier, such as an acidic (very low) pH. A high water table can also restrict root growth due to poor soil aeration. Few big trees grow in shallow soils because big trees are unable to develop a root system strong enough to prevent them from toppling over. Shallow soils also tend to be more drought-prone because they hold less water and thus dry out faster than deeper soils. Water lost to runoff on shallow soils would instead be absorbed by a deeper soil. In addition, deep soils allow the roots to explore a greater volume, which means the roots can retain more water and plant nutrients.
Soils change in three dimensions. The first dimension is from the top to the bottom of the soil profile. The other two dimensions are north to south and east to west.
The practical meaning of this three-dimensional variability is that as you move across a state, a county, or even a field, the soils change. Five factors of soil formation account for this variation:
- Parent material
- Biological activity
- Climate
- Topography
- Time
Differences in even one of these factors will result in a different soil type. Soils forming from different parent materials differ. Soils forming from the same parent material in varying climates differ. Soils at the top of a hill differ from soils at the bottom. The top of the hill loses material due to natural erosion; the bottom gains the material from above. Considering the number of possible combinations of these five factors, it is not surprising that more than 450 unique soil series are currently mapped in North Carolina. Globally, more than 20,000 different soil series occur. Neighborhood level soil series can be found by typing “Web Soil Survey” into any Internet search engine.
Physical Properties of Soil
The physical properties of soil are characteristics that can be seen, felt, or measured. These include color, texture, structure, and water-holding capacity. Such properties usually determine the suitability of soil as a growth medium. Some physical properties, such as texture, are not economically feasible to change on a large scale.
A soil’s fertility, which is a chemical property, is easier to change than the soil’s physical properties.
Color
Organic matter, the soil minerals present, and the drainage conditions all influence soil color. Color alone is not an indicator of soil quality, but color does provide clues about certain conditions. For example, light or pale colors in grainy topsoil are frequently associated with low organic matter content, high sand content, and excessive leaching. Dark soil colors may result from poor drainage or high organic matter content. Shades of red indicate a clay soil is well-aerated, while shades of gray indicate inadequate drainage (Figure 1–4). In well-drained soils of the North Carolina Mountains and Piedmont, the subsoil colors are often shades of red, brown, and yellow. In poorly drained soils, the subsoil is grayer in color.
Texture
Soil texture, which refers to the proportions of sand, silt, and clay, influences nearly every aspect of soil use and management. Sand is the largest particle (at 2.0 to 0.05 mm), silt is much smaller (0.05 to 0.002 mm), and clay is the smallest (less than 0.002 mm) (Figure 1–5). To compare particle sizes, imagine that a sand particle is the size of a basketball. On that scale, a silt particle would be the size of a marble, and a particle of clay would be a pinpoint. How fine (clayey) or coarse (sandy) a soil is will determine many of the soil’s physical and chemical properties.
Much of a soil particle’s ability to react with water and nutrients is related to the amount of surface area available (Table 1–1). When the individual particle size is small, more individual particles will fit in a given space, and thus make more surface area available. Clay, with its tiny particle size and platelike structure, holds water and nutrients effectively, while sand, which has a large chunky structure, does not. In addition to being smaller, clay particles are composed of different minerals than sand and silt, and a clay particle’s structure is more like a stack of paper plates than a grain of sand (Figure 1–6).
The relative proportions of sand, silt, and clay determine a soil’s textural class (Figure 1–7). For example, a soil that is 12% sand, 55% clay, and 33% silt is in the clay textural class. Soil texture is a permanent feature, not easily changed by human activity. Consider a typical mineral soil that is 6 inches deep on 1 acre. That soil weighs about 2 million pounds. To change the sand content just 1% would require adding 20,000 pounds (or 10 tons) of sand. A 1% change in sand content would have minimal effect. A significant effect might require a 10% change, which would mean adding 100 tons of sand.
Table 1–1. Particle type, number of particles per gram, and the average surface area per gram.
| Particle Type | Diameter (mm) | Number of Particles per gram | Specific surface area (cm2/g) |
|---|---|---|---|
| Clay | < 0.002 | 90,260,853,000 | 8,000,000 |
| Coarse sand | 1.00-0.50 | 720 | 23 |
| Fine sand | 0.25-0.10 | 46,000 | 91 |
| Medium sand | 0.50-0.25 | 5,700 | 45 |
| Silt | 0.05-0.002 | 5,776,000 | 454 |
| Very coarse sand | 2.00-1.00 | 90 | 11 |
| Very fine sand | 0.10-0.05 | 722,000 | 227 |
Adding organic matter is a more economically feasible alternative for improving soil. Adding organic matter does not change a soil’s texture—the percentage of sand, silt, and clay in the soil—but adding organic matter will alter soil structure by increasing the pore space and improving drainage. Gardeners can be successful with any soil texture, as long as they know the attributes and limitations of that soil.
Typically, laboratory procedures are used to determine the soil texture. It is possible, however, to use the procedure outlined in Figure 1–8 to determine the textural class by the “feel” method. It takes practice and calibration, but it can provide a reasonable estimate of the soil texture.
Feel Method for Soil Textural Class Determination
- Place approximately 25g of dry soil in palm.
- Add water dropwise and knead the soil to break down all aggregates. Soil is at the proper consistency when plastic and moldable, like moist putty.
- Does the soil remain in a ball when squeezed? If yes, go to Step 4. If not, and it's too dry, return to Step 2. If not, and it's too wet, add dry soil and return to step 2. If not and neither too wet nor too dry, it is sand.
- Place ball of soil between thumb and forefinger. Gently push the soil with the thumb, squeezing it upward into a ribbon. Form a ribbon of uniform thickness and width. Allow the ribbon to emerge and extend over the forefinger, breaking from its own weight. Does the soil form a ribbon? If yes, go to Step 5. If not, it is loamy sand.
- Does the soil make a weak ribbon less than 2.5 cm long before breaking? If yes, go to Step 6a. If not, does the soil make a medium ribbon 2.5 and 5.0 cm long before breaking? If yes, go to Step 6b. If not, does the soil make a strong ribbon 5 cm or longer before breaking? If yes, go to Step 6c.
- Excessively wet a small pinch of soil in palm and rub with forefinger. Does the soil feel very gritty?
- If yes, it is sandy loam. If not, go to Step 7a.
- If yes, it is sandy clay loam. If not, go to Step 7b.
- If yes, it is sandy clay. If not, go to Step 7c.
- Does soil feel very smooth?
- If yes, it is silt loam. If not, go to Step 8a.
- If yes, it is silty clay loam. If not, go to Step 8b.
- If yes, it is silty clay. If not, go to Step 8c.
- Neither grittiness or smoothness predominates.
- Yes — loam.
- Yes — clay loam.
- Yes — clay.
How Do Soil Types Affect Gardeners?
Compaction. Compaction occurs when pressure is applied to soil particles and the air and water are pushed out of the pore spaces. Large, cubic sand particles are not easily compacted. Clay particles, small and platelike, are easily aligned and can compact, especially when wet. Compaction inhibits the movement of water, gases (air), and roots. Compacted soils have less infiltration, greater runoff, a higher risk of erosion, and more restricted root growth than soils without compaction. Water drains slowly, which may increase the likelihood of plant root diseases.
Erosion. Sand particles are heavy, so they are not easily picked up and moved by water or wind. Clay particles are sticky, so they are not easily moved. Silty loam particles are light and not sticky, so erosive forces easily move them. Eroded soils are usually harder to till and have lower productivity than soils without erosion. The main causes of soil erosion in North Carolina are insufficient vegetative or mulch cover, and improper equipment and methods used to prepare and till the soil (Figure 1–9).
Soil erosion can be minimized by following a few preventive measures:
- Choose plants suited to the soil so they establish well.
- Mulch the surface each year with organic materials 1 inch to 3 inches deep.
- Adequately fertilize to promote vigorous, but not excessive, plant growth.
- Create a water diversion, such as a grass waterway, to capture and slow water movement.
- Align rows to follow the land’s contour so that water flowing downhill is slowed.
- Use proper tillage methods, such as not tilling when the soil is overly wet and not overtilling.
- Plant a winter cover crop.
- Consider installing rain gardens to capture sediment and runoff.
Surface Area. The most active part of a soil particle is its surface area. A particle’s surface is where nutrient exchange takes place. Sand particles have a small surface area relative to their mass, meaning they do not hold on to nutrients well. Clay particles have a large surface area relative to their mass, so a small amount of clay can add a significant amount of surface area to a soil, increasing the nutrient-holding capacity.
Sandy or Coarsely Textured Soils (Figure 1–10)
- Low in organic matter content and native fertility.
- Rapidly permeable and do not hold soil moisture.
- Nutrient leaching is a concern, so proper fertilization is a must. Apply smaller amounts of nutrients, and apply them more frequently.
- Low in cation exchange and buffer capacities.
- Well-suited for road foundations and building sites.
- Feel gritty.
Loamy or Medium-Textured Soils (Figure 1–11)
- Contains more organic matter.
- Permit slower movement of water and are better able to retain moisture and nutrients.
- Are generally more fertile.
- Have higher cation exchange and buffer capacities.
- Feel crumbly.
Clayey or Finely Textured Soils (Figure 1–12)
- Higher nutrient-holding capacity.
- Higher available water-holding capacity.
- Finely textured soils exhibit properties that are somewhat difficult to manage or overcome.
- Often too sticky when wet and too hard when dry to cultivate.
- May have shrink-and-swell characteristics that affect construction uses.
- Feel slippery.
Structure
Soil structure refers to the grouping of individual soil particles into larger pieces called peds or aggregates. The structure of topsoil is usually granular and resembles chocolate cookie crumbs (Figure 1–13). Good granular structure allows rapid movement of air and water within the soil. Poor granular structure decreases movement of air and water. Good soil structure allows for extensive root development; poor structure can limit root growth. Supplying an adequate amount of organic matter and working the soil only when it is not excessively wet promotes good topsoil structure.
Water-Holding Capacity
Water enters the soil from precipitation or irrigation. It exits by draining from the soil, evaporating from the surface, and through transpiration from plant leaves. Water-holding capacity—the retention of water moving through soil—depends on differences in soil pore space. Ideal soils are half pore space with equal amounts of air and water filling the pores. Too much air means plants will wilt. Too much water means reduced plant vigor and susceptibility to root rot, which occurs due to anaerobic conditions.
Soils differ in the number of large (macro), medium (meso), and small (micro) pores. Macropores, which are more common in sandy soils, take up water more quickly and drain faster than meso- and micropores. This rapid draining from macropores is called “gravitational water” because the weaker forces of adhesion and cohesion in macropores cannot overcome gravity's pull. Within 24 hours after a saturating rain, gravitational water reaches the lower soil horizons, and the soil is at field capacity: the meso- and micropores are still full of water because their adhesive and cohesive forces are stronger than gravity. Water in the mesopores is available to plants. But when the mesopores lose water as the soil dries through plant uptake and transpiration, soil moisture reaches the permanent wilting point. At the permanent wilting point, micropores are still full of water, but this water is so tightly held that it is not plant-available. Note that plants may wilt before the permanent wilting point if the plant transpires water through the leaves faster than it can take water up from the soil through its roots. This is why plants may wilt on hot days and then recover once the sun goes down and why plants can balance uptake with transpiration (Figure 1–14).
How to Remediate Compaction
Compaction is a likely problem if there has been recent construction or other traffic over the area. Deep cultivation, which is mixing the top 6 inches to 2 feet of soil with a tiller, disk, or hand tools, may be needed to loosen the soil. Incorporation of organic matter during deep cultivation can help to rehabilitate soil structure by creating aggregates and both macropores (for drainage) and mesopores (for plant-available water). Digging or cultivating soil when it is wet or excessively dry can destroy structure.
Be wary of quick fixes, such as starting over with a truckload of topsoil. Unfortunately, there are no standards on material sold as “topsoil.” New problems may be brought on site, such as weed seeds and disease organisms. Adding new topsoil to existing soil may also create drainage problems when water moves through the purchased topsoil and reaches the compacted layer. The water can pool and create unfavorable conditions for root growth.
Clay soils, which tend to hold excessive amounts of water and become compacted easily, present some tricky problems. Common mistakes are adding sand or peat moss to improve drainage. Adding sand to clay will reduce soil structure, lowering pore space. Adding peat moss will increase the clay soil's high moisture-holding capacity. The best advice is to add smaller amounts of organic matter consistently every year, minimize compaction, and let soil biology naturally improve the structure over time.
Urban Soils
As the locally grown food movement gains momentum, more people are gardening in urban areas. Urban soils can be host to contaminants such as lead, pesticide residue, or petroleum products. Before gardening and especially before producing any food on an urban soil, it is important to understand the history of the land and to properly identify any possible contaminants. SoilFacts: Minimizing the Risks of Soil Contaminants in Urban Gardens (NC State Extension publication number AG 439-78) provides in-depth information about risk levels for individual soil contaminants, remediation techniques, and resources for professionals that can assist with analysis and consulting.
Here are some tips for gardening in contaminated soils:
Garden design:
- Plant ornamentals in contaminated areas and locate edibles as far from contaminants as possible.
- Do not plant near roads or buildings.
- Consider using raised beds with imported soil (Figure 1–15).
Soil Management:
- Raising the pH of the soil may help to slow the uptake of some contaminants by a plant.
- Organic matter, such as compost, may bind some contaminants in the soil.
- If large-scale remediation is necessary, contact a professional for help with excavation, washing, or vapor extraction.
Planting Considerations:
- Avoid root crops where edible portions come into direct contact with soil.
- Shoot and leaf crops (lettuce, cabbage, broccoli, celery, rhubarb) will have less of a contamination risk.
- Fruit crops (tomato, zucchini, beans, peppers) will have the least amount of contamination risk.
Garden Hygiene:
- Wear gloves and wash hands and clothes after gardening.
- Do not wear garden shoes in the house.
- Watch children closely so no soil is ingested.
- Wash produce in mild detergent, remove the first leaves of leafy crops (those closest to the ground), and peel root crops.
Rocks and Gravel
Rocks and gravel, which are large, coarse materials, can be found in many soils, but they are not considered when determining soil texture. Although some rocks and gravel in the soil will not affect plant nutrient uptake, they can make the soil difficult to dig. If the garden is mostly rocks or gravel, the soil will have a reduced water- and nutrient-holding capacity, and will be unfit for growing plants. In such a situation, it may be easiest to install raised beds and import soil.

Figure 1–4. Color as an indicator of drainage. The soil on the left is the Cecil series, a well-drained mineral soil typical of the NC piedmont. The soil on the right is the Coxville series, a poorly drained mineral soil found in the NC coastal plain.
John A. Kelley, USDA-NRCS, Flickr CC BY 2.0
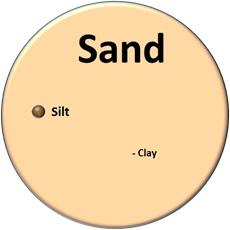
Figure 1–5. Relative sizes of sand, silt, and clay.
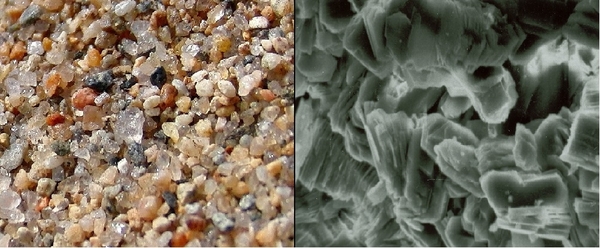
Figure 1–6. The image on the left shows a close-up of sand particles, which appear grainy as seen by the naked eye. The right image shows the platelike texture of clay visible only under a microscope.
(Left) zoosnow, Pixabay. (Right) Wikimedia. CC0

Figure 1–7. Pyramid diagram showing soil types are based on the percentage of clay, sand, and silt each contains.
Mikenorton, Wikimedia CC BY-SA 3.0
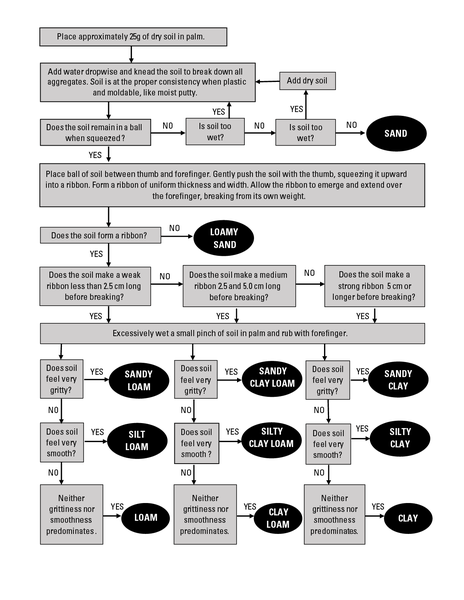
Figure 1–8. Feel method for soil textural class determination.
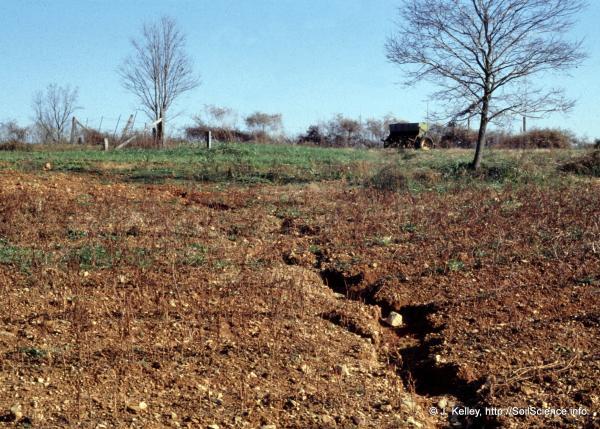
Figure 1–9. The soil on this hill eroded because of runoff and lack of vegetation.
John A. Kelley, USDA-NRCS, Flickr CC BY 2.0
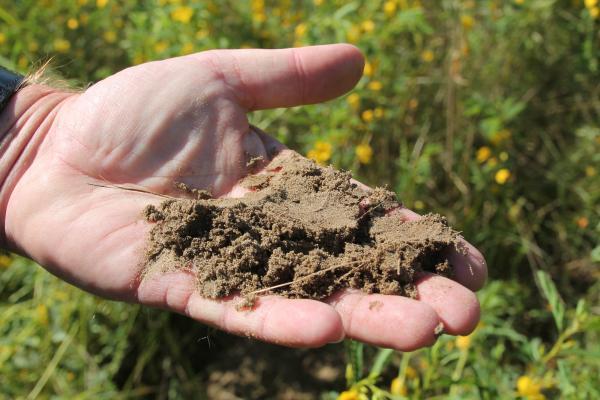
Figure 1–10. Sandy soils are low in fertility and do not hold onto soil moisture.
Loretta Sorenson, USDA-NRCS, South Dakota, Flickr CC BY-SA 2.0
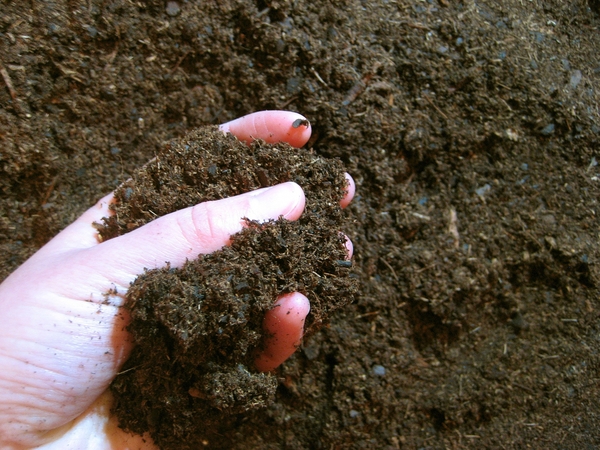
Figure 1-11. Loamy soils feel crumbly, and generally are darker because they contain organic matter.
Haanala 76, PublicDomainImages CC0
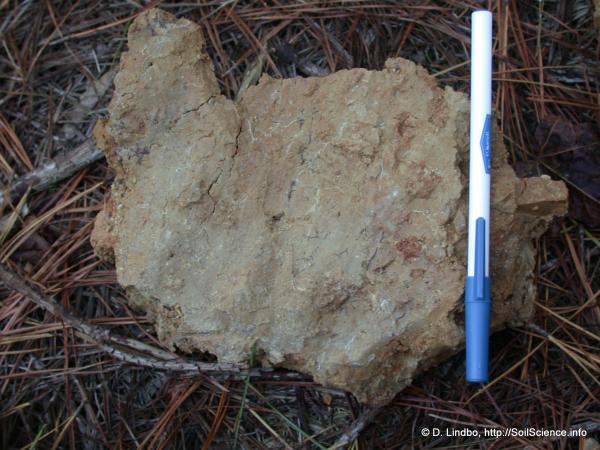
Figure 1–12. Clay soils are sticky when wet and very hard when dry.
D. Lindbo, Soil Science, NC State, Flickr CC BY 2.0
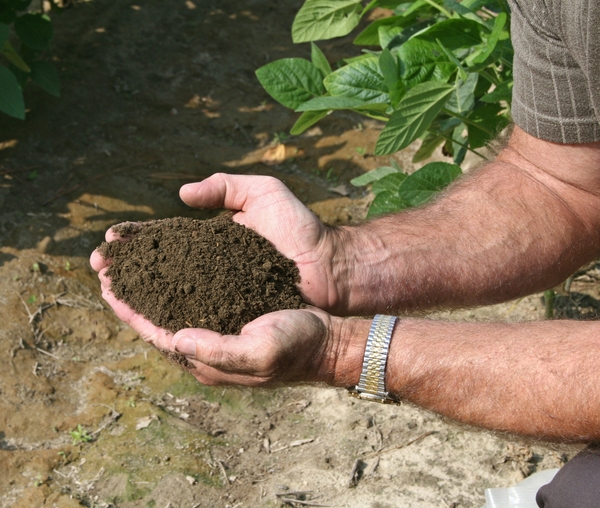
Figure 1–13. Examples of granular soil structure (looks like chocolate cookie crumbs) in topsoil.
John A. Kelley, USDA NRCS, Flickr CC BY 2.0

Figure 1–14. Plants can wilt during the hot part of the day, but recover once the sun goes down. Plants can balance water uptake with water loss through transpiration.
Scot Nelson, Flickr CC0
Figure 1–15. Gardening in urban areas requires careful consideration of soil conditions. If contaminated or poorly drained soils are present, raised beds may be necessary.
David Crummey, Flickr CC BY 2.0
Organic Matter
Organic matter consists of the remains of plants and animals and gives soil a gray to very-dark-brown color. Organic matter is home to many soil organisms.
Earthworms, insects, bacteria, fungi, and animals use organic matter as food, breaking it down to obtain energy and essential nutrients. Humus is the portion of organic matter that remains after most decomposition has taken place (Figure 1–16).
When organic matter decomposes in the soil, carbon dioxide is released and replaces some of the oxygen in soil pores. Carbon dioxide is dissolved by water in soil to form a weak acid. This solution reacts with soil minerals to release nutrients that can be taken up by plants. The digested and decomposing organic matter also helps develop good air-water relationships. In sandy soil, organic material occupies some of the space between the sand grains. This binds them together and increases water-holding capacity. In a finely textured or clay soil, organic material creates aggregates of soil particles. This allows water to move more rapidly around soil particles.
The amount of organic matter in the soil depends primarily on rainfall, air temperature, the kinds of plants that have been growing in a soil, management practices, soil temperature, and drainage. Soils that are tilled frequently are usually low in organic matter because tilling decreases residue particle size and increases the amount of air in the soil, increasing the rate of organic matter decomposition. Poorly drained soils tend to have a high percentage of organic matter because low oxygen levels limit decomposition organisms. To build organic matter in garden soil, till in compost when the garden is first created, but do not till in subsequent years. Instead, apply thin layers (1 inch to 3 inches) of organic mulch or compost to the soil surface each year (Figure 1–17). This material will break down, and the organic matter levels in the soil will gradually increase.
Organic amendments can improve soils that suffer from high compaction, poor drainage, and erosion. Materials such as compost, manures, and pine bark are more effective and economical than vermiculite, peat moss, sand, topsoil, or perlite. Table 1–2 reviews the amounts of organic material to be added to soil per 100 square feet. When working in small areas, a general rule of thumb is to incorporate a 3- to 6-inch layer of organic material into the soil. The organic matter must be decomposed before plants can use the nutrients. The rate of decomposition of organic matter by soil organisms is affected by moisture, temperature, particle size, the carbon-to-nitrogen ratio, and nitrogen availability. The proper balance of carbon and nitrogen is needed for rapid decomposition, as are warm temperatures and adequate moisture. When using straw, leaves, or sawdust (which are high in carbon), add nitrogen fertilizer while the material is decomposing. Soil microbes use nitrogen during decomposition and may deprive plants, resulting in slow or stunted plant growth. Incorporating organic matter some months before planting the garden allows the material time to decompose and have plant-available nutrients in place for good plant growth.
Table 1–2. Organic materials and their application rates.
| Organic Material | Amount to Be Added per 100 Square Feet |
|---|---|
| Compost | 10–20 cubic feet |
| Corncobs | 50 pounds (2 bushels) |
| Hay | 60 pounds (1 bale) |
| Leaves | 75 pounds (3–4 bushels) |
| Sawdust | 50 pounds (2 bushels) |
| Straw | 60 pounds (1 bale) |
| Wood chips | 50 pounds (2 bushels) |
Improving the Soil
Good aeration and drainage, as well as the ability to hold adequate moisture and nutrients, are key components of an ideal soil environment. Although there is no cookbook recipe for creating this ideal environment, these are some of the most important strategies for improving soil quality:
- Minimize soil compaction (do not walk on garden beds or work wet soil) (Figure 1–18).
- Reduce drainage problems.
- Decrease erosion.
- Plant a cover crop (Figure 1–19).
- Incorporate organic matter.
- Provide a 1- to 3-inch layer of organic mulch on the soil’s surface.
Figure 1–16 Humus is the organic matter that remains after most decomposition has occured.
Kathleen Moore CC BY 2.0
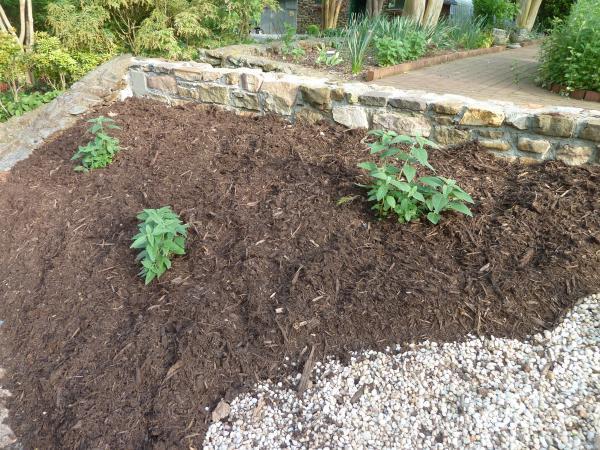
Figure 1–17. Mulching with a 1-3 inch layer of organic material will help to build good air and water relationships in the soil as well as add nutrients for uptake by plants.
Kathleen Moore CC BY 2.0
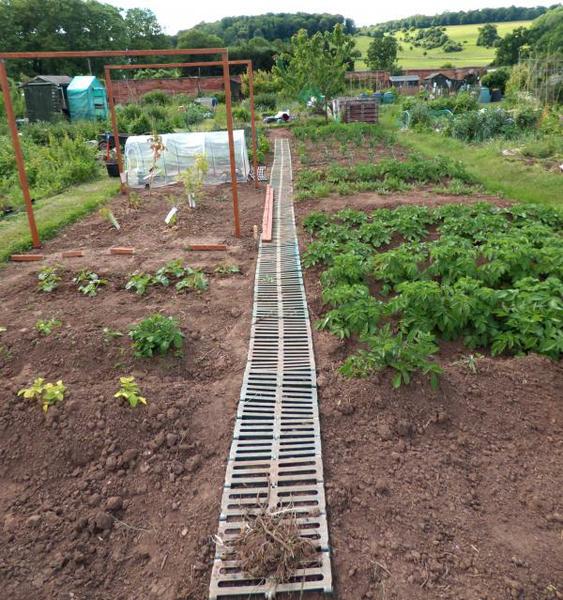
Figure 1–18. To avoid compaction in the vegetable garden, recycled plastic lattice was laid down to walk on.
Sam Saunders, Flickr CC BY-SA 2.0
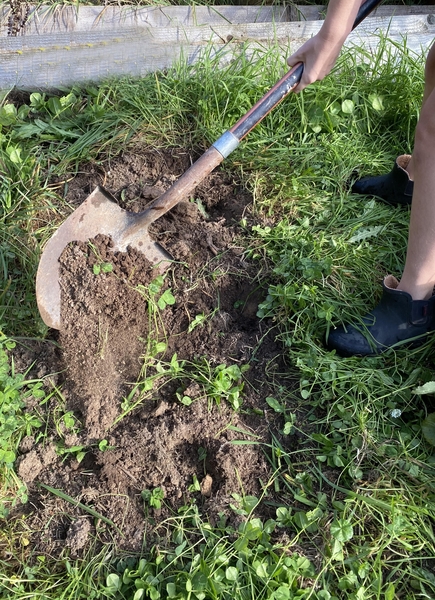
Figure 1-19. A cover crop of crimson clover was planted in this annual flower bed. It is being turned under to add nutrients to the soil before planting.
Kathleen Moore CC BY 2.0
Chemical Properties of Soil
There are strong relationships between soil physical properties and soil chemical properties. For example, surface area is directly related to chemical reactivity.
Cation Exchange Capacity
The negative ends of two magnets repel each other. The negative end of one magnet attracts the positive end of another magnet. This same principle affects the retention of plant nutrients in soil. Some plant nutrients are cations, which have a positive charge, and some are anions, which have a negative charge. Just like the opposite poles on magnets, cations will be attracted to anions.
Soil particles are similar to a magnet, attracting and retaining oppositely charged ions and holding them against the downward movement of water through the soil profile. The nutrients held by the soil in this manner are called “exchangeable cations” and can be displaced or exchanged only by other cations that take their place. Thus, the negative charge of a soil is called the cation exchange capacity (CEC). Soils with high CEC not only hold more nutrients, they are better able to buffer or avoid rapid changes in the soil solution levels of these nutrients. A soil test will tell you the CEC number of your soil. Soils high in clay, silt, or organic matter will have a CEC number of 10 or greater, and no remediation is needed. Sandy soils will have a CEC number between 1 and 5. Adding organic matter to these soils will help increase the CEC.
Soil Testing
Soil testing provides valuable information on pH and plant-available nutrients. Test your soil before planting and every two to three years thereafter. Inexpensive soil test kits are unreliable. To accurately determine your soil characteristics and the proper amount of lime and fertilizer to apply, contact the NC Department of Agriculture & Consumer Services (NCDA&CS). The accuracy of these reports, however, depends on the quality of the sample submitted.
Tips for Collecting a Good Soil Sample
- Collect samples with stainless steel or chrome-plated tools. Using brass, bronze, or galvanized materials could contaminate the sample.
- The bucket in which material is collected should be made of plastic.
- Make sure the collection bucket is clean because even small amounts of residual lime or fertilizer can affect the test results.
- Avoid taking samples from areas that are obviously different from the norm, such as wet spots, compost piles, animal urine spots, and brush piles, or from under eaves or sites where trash has been burned.
- Remove large pieces of organic material, such as roots, stalks, and leaves, from the sample.
- For gardens, new lawns, and other cultivated areas, sample to the depth the soil has been, or will be, tilled. For established lawns, collect the sample 2 to 4 inches deep. For trees and shrubs, take a sample to a depth of 6 inches near the plant's drip line. Even if the soil looks the same, take separate samples for flower beds, vegetable gardens, fruit orchards, shrub borders, and lawn areas.
- If using a trowel or spade, dig a hole, then take a slice of soil down one side. Repeat this procedure in five to eight spots for each area to be tested. Mix these cores together to obtain one composite sample. If the soil is very wet, it could be more difficult to mix, but do not attempt to heat the soil to dry it (Figure 1–20).
- Place about a pint of the composite sample for each area sampled in a soil testing box and label with a return address on the side of the box. Make up a code that will be easy to remember, such as “flawn” for front lawn, “byard” for backyard, or “veg” for vegetable garden. Any combination of letters and numbers can be used. Make notes about where the samples came from so that when you receive the results, you can easily identify how to treat the areas differently based on the results.
- Do not tape the boxes in any way. The lids are removed before the boxes go in the soil lab ovens, and tape makes this process difficult. Do not put the soil in a plastic bag before placing it in the box as doing so will prevent proper drying in the lab oven.
Fill out the soil test report sheet, giving as much information as possible. The required items are name, address, county, sample codes, and the crops planned.
Too Much of a Good Thing: Nitrogen Leaching
Just like magnets, negative charges repel negative charges. Soils with high CEC tend not to hold anions. As a result, water moving through the soil profile will leach negatively charged nutrients, such as chloride, nitrate, and sulfate out of the root zone. This leaching can result in contamination of groundwater, streams, and lakes or have other environmental implications (Figure 1–21). Excess fertilizer becomes a contaminant and can have adverse effects on human health. The U.S. Environmental Protection Agency has set standards for nutrients in groundwater used for drinking water. This is one of many reasons that appropriate levels of fertilization are essential.
Reports are sent by mail only if there is a special request submitted to the lab. Otherwise, provide an email address on the form to receive notification that the report is complete and online. Farmers also use the form, so some of the information requested may not apply to gardeners (pounds of lime per acre, for example). Forms and boxes are available from the NCDA&CS or any county Cooperative Extension center.
Learn more about collecting soil samples in SoilFacts: Careful Soil Sampling —The Key to Reliable Soil Test Information (NC State Extension publication number AG-439-30). For detailed information about the soil test results, refer to NCDA&CS Agronomic Division’s Understanding the Soil Test Report.
How to Use a Soil Test Report
Fertilizing trees and shrubs in a landscape should be based on the amount of rainfall, soil type, the plant's age, the amount of current growth, and desired future growth. Overapplication of fertilizer to home landscapes wastes money, contributes to pollution in our rivers, streams, lakes, and estuaries, and may damage or kill desired plants.
In addition, excess fertilizer can increase the likelihood of disease problems, lead to weak growth, attract pests, and increase the amount of pruning needed to keep mature plants within appropriate boundaries. A soil test report provides accurate guidance for applying fertilizer. Figure 1–22 shows the main components of a soil test report.
Example Soil Test Reports
Depending on the crop indicated when the soil sample was submitted, the soil test report provides results in one of two ways:
- Home garden scale: Recommendations for pounds of lime and a rate and grade of fertilizer per 1,000 square feet (for example, an area 50 feet by 20 feet or 10 feet by 100 feet).
- Farm/Forest scale: Recommendations for tons of lime and a rate and grade of fertilizer per acre.
At the home gardener scale:
- Measure the area to be limed or fertilized.
- Multiply the length by the width to determine the number of square feet.
- Divide by 1,000 to obtain the number of units to be treated.
- Multiply the number of units by the pounds of material to treat 1,000 square feet. This calculation will give the amount of fertilizer and lime needed (Figure 1–23).
Example 1: If the area is 500 feet by 20 feet, and the suggested lime or fertilizer treatment is 30 pounds per 1,000 square feet:
- 500 × 20 = 10,000 square feet
- Divide 10,000 by 1,000 = 10 units
- Multiply 30 pounds times 10 units = 300 pounds of material (fertilizer or lime) per 10,000 square feet
Example 2: If the area is 10 feet by 15 feet, and the suggested lime or fertilizer rate is 10 pounds per 1,000 square feet:
- 10 × 15 = 150 square feet
- Divide 150 by 1,000 = 0.15
- Multiply 10 pounds times 0.15 units = 1.5 pounds of material per 150 square feet
Or, look at fertilizer/lime calculations as ratios:
If 5 pounds of fertilizer are applied per 1,000 square feet, how many pounds should be applied to 150 square feet (using the garden size in Example 2)?
5 lb/1,000 sq ft = X lb/150 sq ft
5 lb × 150 sq ft /1,000 sq ft = X lb
750/1,000 = .75 lb
Example soil test reports and their recommended fertilizer applications can be found in Figure 1–24, Figure 1–25, Figure 1–26, and Figure 1–27.
Soil pH
Soil pH is a measure of the soil’s relative acidity or basicity. The pH scale ranges from 0 to 14. A pH of 7 is a neutral state, representing the value found in pure water. Values above 7.0 are basic, while values below 7.0 are acidic. The pH scale is logarithmic, meaning each unit has a 10-fold increase of acidity or basicity. Thus, compared to a pH of 7.0, a pH of 6.0 is ten times more acidic, and a pH of 5.0 is 100 times more acidic.
North Carolina soils tend to be acidic, as are nearly all soils in the Southeast. These soils were acidified over thousands of years by inputs of acids from atmospheric sources (carbonic, sulfuric, and nitric acid), the decay of plant and animal residues, and removal of basic cations by the natural processes of leaching. If our native soils are not limed (basic), the pH is often in the 4.5 to 5.5 range.
Regardless of the fertilizers used, be aware that excess fertilizer can damage plants and move into our stormwater systems, which can cause serious environmental problems.
Incorporating Soil Amendments
Conditioning soil requires increasing organic matter content to 25% by volume. Incorporating a minimum of 2 inches of material into the top 6 inches of soil will create approximately 8 inches of amended soil. These additions raise the planting bed, improving drainage and making plants more visible. Incorporating more than 50% organic matter may negatively affect plant growth. Be careful when using organic material, making certain that it is fully composted and not merely aged. Microbes attracted to partially decomposed materials will compete with plants for nutrients, especially nitrogen and sulfur, resulting in nutrient deficiencies and poor plant growth.
The best organic matter amendments for clay soils are pine bark (less than 1⁄2 inch in diameter) and composted leaf mold. The following amendments are not recommended because they do not adequately improve the physical properties of clay soil: peat moss, sand, hardwood bark, wood chips, and pine straw.
For sandy soils, organic matter amendments, such as pine bark or compost, will improve water retention.
Calibrating a Spreader
Fertilizers are more effective if they are applied at the proper rate and with uniform coverage. To accomplish this, calibrate the spreader, which requires a little labor and math.
The two types of spreaders used to apply fertilizer and lime are drop spreaders (Figure 1–28) and rotary spreaders (Figure 1–29). The amount of fertilizer that is spread depends on the opening setting, the type of fertilizer, and the speed at which the spreader is pushed. The drop spreader has a series of holes at the base that can be adjusted to apply different amounts of material. With the rotary spreader, the fertilizer falls into a rotating plate and is spread by the centrifugal force of the plate spinning. Instructions for calibrating a spreader should be available on the Internet at the home page for the spreader manufacturer.
Nutrient Availability and pH
The optimum pH for a plant varies with organic matter content and plant type. Plant nutrient availability is strongly tied to the pH in the soil solution (Figure 1–30). Decreasing soil pH directly increases the solubility of the plant nutrients manganese (Mn), zinc (Zn), copper (Cu), and iron (Fe). Acidic soils make these nutrients more available. At pH values less than about 5.5, toxic levels of Mn, Zn, or aluminum (Al), a non-nutrient element very common in our southern soils, may be released. The impact of pH on nutrient availability is very important—both for maximum plant availability and to avoid potentially toxic levels at very low or very high pH.
The optimal pH for growth differs among plants. For example, regardless of organic matter content, azaleas and blueberries are well-suited for a soil pH of about 5.0. In contrast, asparagus can tolerate a basic soil with a pH up to 8.0. A soil pH of 6.5 to 7.0 is often considered “ideal” for most plants, but a little research can help you identify the proper pH for the plants you wish to grow. After obtaining a soil test report, you can take measures to adjust soil pH or select plants that will thrive at the current pH. Extreme pH measures of 4.0 (acidic) or 10.0 (basic) will support little plant life and are very difficult to modify.
Adjusting pH
If the soil pH is too basic for the desired plant, incorporating an acidic soil amendment such as pine bark or compost, or applying elemental sulfur, will lower soil pH. Apply sulfur with caution; too much can harm plants.
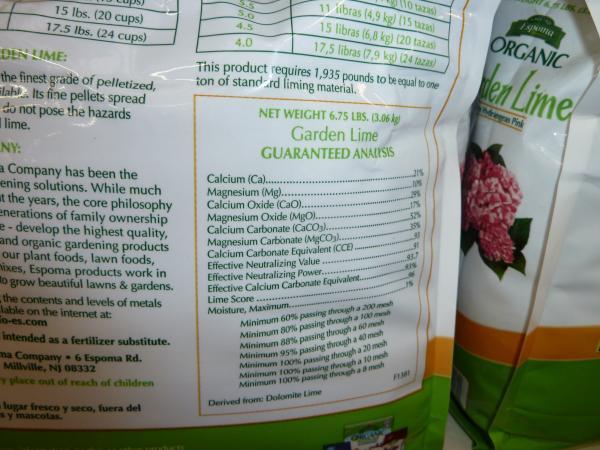
If the soil pH is too acidic, apply lime to raise the soil pH. There are two general classes of liming materials: calcitic (without magnesium) and dolomitic (with magnesium). Calcitic lime is composed of calcium carbonate (CaCO3) and can be used on soils high in magnesium. Dolomitic lime is a mixture of calcium and magnesium carbonates (CaCO3 and MgCO3), which is the preferred liming material for soils low in magnesium.
Knowing the soil type or even the current pH is not enough to determine the amount of lime needed. The texture of the soil, organic matter content, crop to be grown, target pH, level of soil acidity, CEC, type and amount of clay, and the current pH are all factors to consider in adjusting pH. Soils low in organic matter or high in sand content require less lime to change the pH than clay soils or those with high organic matter.
Lime is heavily regulated in North Carolina. Lime must be labeled with a guarantee of percent calcium and magnesium. The percent of calcium carbonate equivalent also must be included on the label, as well as the pounds of material that equal 1 ton of standard lime (Figure 1–31).
Each type of lime must meet a screening requirement for particle size. Lime pellets are formed from lime that has been finely ground. The pelleted product is less dusty and easier to apply, but is slower to react with the soil.
Lime moves slowly in the soil and neutralizes acidity only in the area where it is applied. To be effective, it should be spread and thoroughly incorporated. It takes several months for lime to react in the soil, which is why it is good to soil test and plan for proper soil pH management.
For established lawns, gardens, and ornamentals that require lime, apply the recommended amount up to 50 pounds of lime per 1,000 square feet in one application to the soil's surface. For recommended rates over 50 pounds, wait several months to make a repeat application to avoid a surface buildup of lime. For new plantings where the area will be tilled, apply the entire recommended amount at one time.
Learn more in SoilFacts: Soil Acidity and Liming: Basic Information for Farmers and Gardeners (NC State Extension publication number AG-439-51).
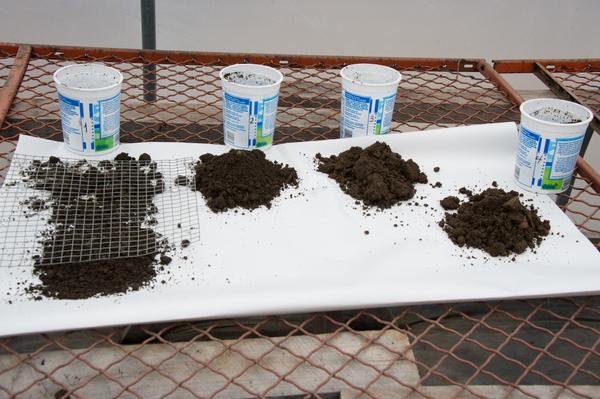
Figure 1–20. Collect soil samples using plastic buckets, let soil air dry and screen out any big chunks (rocks, sticks). Mix several soil samples from the same location before sending it in for testing.
Dwight Sipler, Flickr CC BY 2.0
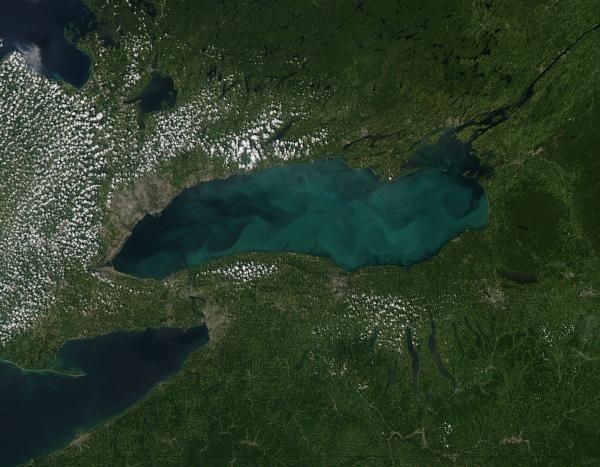
Figure 1–21. The milky blue-green swirls are a phytoplankton bloom in Lake Ontario as seen from space. This bloom is, in part, from nutrient loading (nitrogen and phosphorus) and runoff.
Jeff Schmaltz, MODIS Land Rapid Response Team, Flickr CC BY 2.0
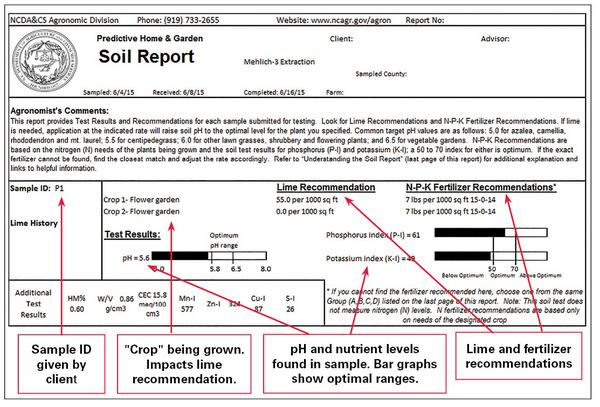
Figure 1–22. The main components of a soil test report.
Figure 1–23. Soil test report example showing lime and fertilizer recommendations.
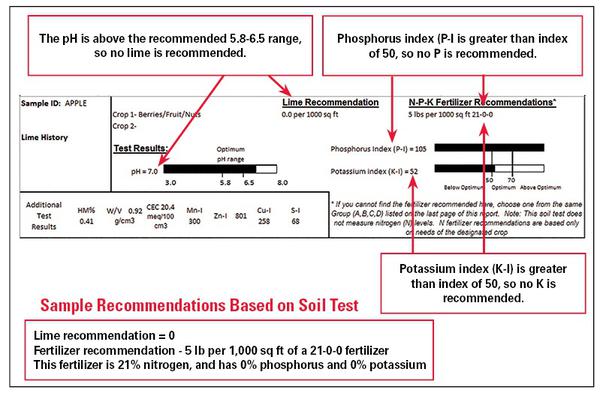
Figure 1–24. Soil test report example 2.
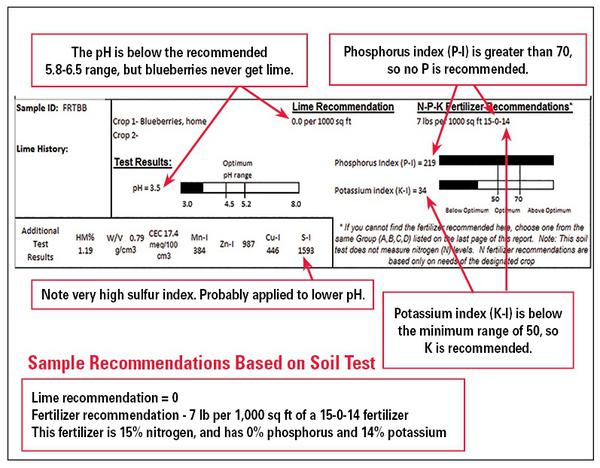
Figure 1–25. Soil test report example 3.
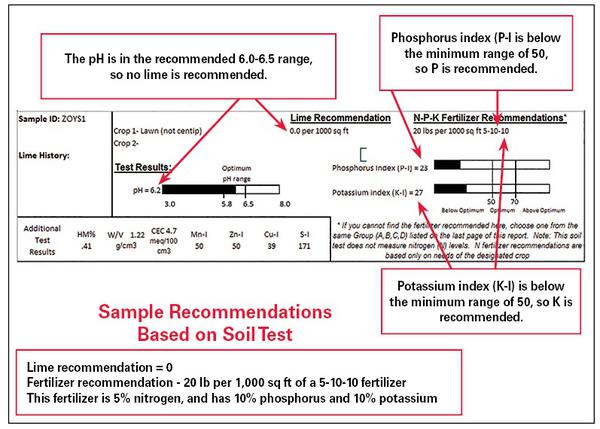
Figure 1–26. Soil test report example 4.
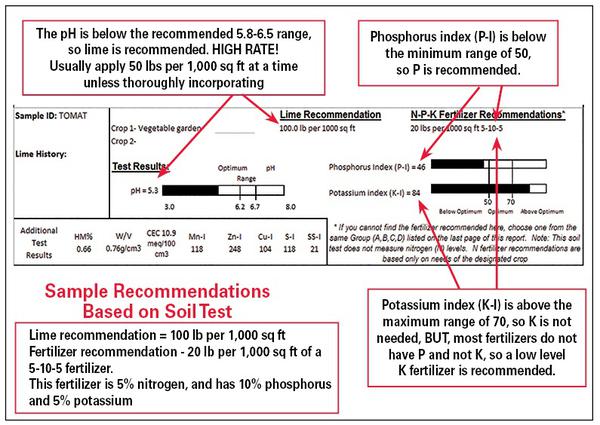
Figure 1–27. Soil test report example 5.
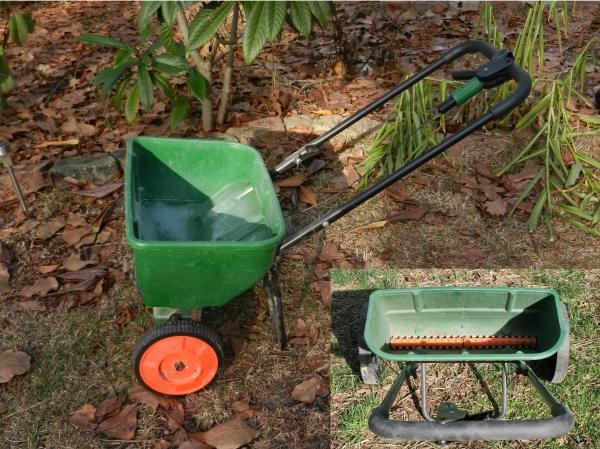
Figure 1–28. A drop spreader has a cylindrical spinning mechanism (bottom right) that releases fertilizer directly below the spreader as it is pushed along.
Chris Alberti, Ira Rozenski CC BY 2.0
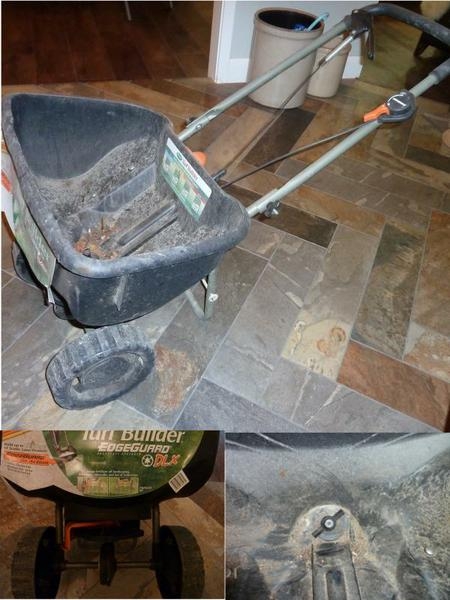
Figure 1–29. A rotary spreader. Bottom left shows the orange disk that spins when the wheels turn. Bottom right shows the spinning mechanism inside the spreader that moves the fertilizer onto the plate below.
Kathleen Moore CC BY 2.0
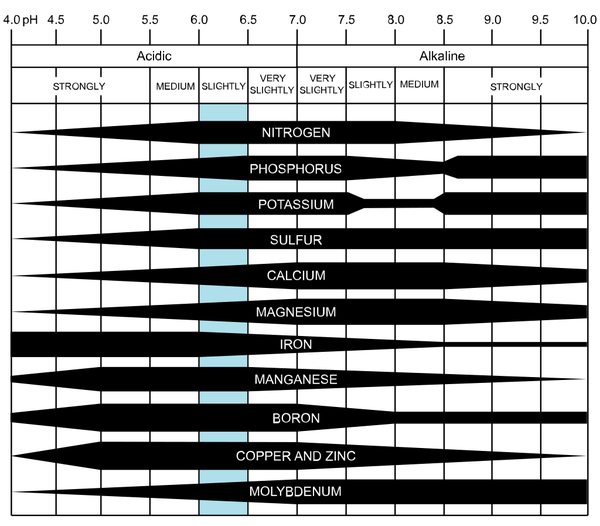
Figure 1–30. Nutrient availability as affected by soil pH. The wider areas represent greater availability. The blue bar shows the optimum pH level for nutrient uptake by plants.
CoolKoon, Wikimedia CC BY 4.0
Plant Nutrition and Fertilization
Many people confuse plant nutrition with fertilization. Plant nutrition refers to the needs of the plant and how a plant uses the basic chemical elements. Fertilization is the term used when these elements are supplied to the soil as amendments. Adding fertilizer during unfavorable growing conditions will not enhance plant growth and may actually harm or kill plants.
To complete their life cycle, plants need 17 essential nutrients, each in varying amounts (Table 1–3). Of these nutrients, three are found in air and water: carbon (C), hydrogen (H), and oxygen (O). Combined, C, H, and O account for about 94% of a plant’s weight. The other 6% of a plant’s weight includes the remaining 14 nutrients, all of which must come from the soil. Of these, nitrogen (N), phosphorus (P), and potassium (K), the primary macronutrients, are the most needed. Magnesium (Mg), calcium (Ca), and sulfur (S), the secondary macronutrients, are next in the amount needed. The eight other elements—boron, chlorine, copper, iron, manganese, molybdenum, nickel, and zinc—are called micronutrients because they are needed in much smaller amounts than the macronutrients.
Soil Nutrients
For a plant to absorb an element, it must be in a chemical form used by the plant and dissolved in the soil water. In addition to those nutrients already dissolved in soil water, nutrients can be present in the soil in these forms:
- Undissolved or granular form, as from newly applied fertilizer
- Chemicals bound to soil particles
- The chemical structure of soil organic matter released by microbial decomposition
Undissolved or granular nutrients, and those that are chemically bound to soil particles, are not immediately useful, although they have the potential to benefit the plant. For many plant nutrients, the soil acts as a bank. Withdrawals are made from the soil solution, much as you would withdraw money from a checking account. The undissolved pool of soil nutrients is like a savings account. When checking funds are low, transfers are made from the savings account to the checking account. When a checking account is flush with money, some can be moved to savings for long-term retention. In the same way, for many plant nutrients, when the soil solution has excess nutrients, some bind to the soil to become temporarily unavailable, and some react with other chemical elements to form insoluble minerals, which can dissolve again later.
Table 1–3. Relative amounts (out of 100) of the essential nutrients required by most plants.
| Primary Nutrients | Amount |
|---|---|
| Carbon (C) | 45 |
| Oxygen (O) | 45 |
| Hydrogen (H) | 6 |
| Nitrogen (N) | 1.5 |
| Potassium (K) | 1 |
| Phosphorus (P) | 0.2 |
| Secondary Nutrients | Amount |
|---|---|
| Calcium (Ca) | 0.5 |
| Magnesium (Mg) | 0.2 |
| Sulfur (S) | 0.1 |
| Micronutrients | Amount |
|---|---|
| Iron (Fe) | 0.01 |
| Chlorine (Cl) | 0.01 |
| Manganese (Mn) | 0.005 |
| Boron (B) | 0.002 |
| Zinc (Zn) | 0.002 |
| Copper (Cu) | 0.0006 |
| Molybdenum (Mo) | 0.00001 |
Amounts unknown for Nickel (Ni) and Cobalt (Co)
Several factors improve a plant's ability to use nutrients:
- Type of soil: The more clay and organic matter a soil has, the higher its CEC will be, and the more cationic (positively charged) nutrients it will retain.
- Soil pH: The pH affects how tightly nutrients are bound to soil particles. If the soil pH is extremely high (basic) or very low (acidic), many nutrients become inaccessible to the plant because they are no longer dissolved in the soil water.
- Types of nutrients in the soil: Some nutrients affect the availability of other nutrients. In fact, an apparent deficiency of one nutrient may actually be caused by a large amount of another.
- Amount of soil water: Too much rain leaches nutrients from the soil. If there is too little water, the nutrients cannot dissolve and move into the plant.
- Anything that affects the plant's growth: If growing conditions are good, a plant will absorb nutrients from the soil. If the plant experiences extremes in temperature, incorrect light levels, or waterlogged or compacted soil, it will have a limited ability to absorb nutrients. Also, plants in dormant stages absorb few nutrients.
The presence or absence of nutrients can cause outward symptoms to appear on the plant. Table 1–4 reviews the essential nutrients for plant growth and symptoms that may appear if a plant is suffering a deficiency or an excess of that nutrient.
Fertilizers
Fertilizers provide some elements that might be lacking in the soil and stimulate healthy, vigorous growth. How much and when to apply fertilizers should be based on observing plant performance, a reliable soil test, and an understanding of the factors that affect growth: light, water, temperature, pests, and nutrition. Simply applying fertilizer because a plant is not growing adequately will not solve many plant problems (insects, disease, or poor drainage, for example), and, in fact, excess nitrogen can often increase insect and disease infestation.
All fertilizers are labeled with three numbers, giving the percentage (by weight) of nitrogen (N), phosphorus (P), and potassium (K). This is referred to as the fertilizer grade.
A 100-pound bag of fertilizer labeled 0-20-10 has 0 pounds of N, 20 pounds of P (reported as P2O5), 10 pounds of K (reported as K2O), and 70 pounds of filler. Filler is added to make the fertilizer easier to spread and to reduce the likelihood of burning plants with too much fertilizer (the fertilizer salts can pull water out of the plant). A fertilizer may also contain secondary macronutrients or micronutrients not listed on the label because the manufacturer does not want to guarantee their exact amounts.
Fertilizers can be divided into two broad categories: natural and synthetic.
Natural fertilizers are commonly misnamed “organic.” “Natural fertilizers” is a more accurate description because these materials can be both complex chemical substances containing carbon (organic materials) or inorganic ores, such as rock phosphate, which are mined. Natural fertilizers containing organic materials include manures and composts, animal byproducts (such as bone meal, blood meal, feather meal), and seed meals. Natural fertilizers that are inorganic ores include potassium and lime.
Natural fertilizers typically release nutrients at a slower rate and over a longer period than synthetic fertilizers because microorganisms are involved in a breakdown and release cycle called mineralization. Moisture, temperature, and the microbial species and populations in the soil affect mineralization. Some water-soluble natural fertilizers, such as fish emulsion, are available when rapid nutrient delivery is desired.
When using natural fertilizers, it is helpful to incorporate them and provide adequate moisture for active microbial populations.
When packaged as fertilizers, natural fertilizers will have the nutrient analysis stated on the labels. How much to use varies with the nutrient content of the material. The age of the material is also a factor. Producers are not required by law to state the nutrient content on bulk organic materials, such as compost, manure, and sludges. The source of these materials should be investigated and possible analysis performed at the Plant, Waste, Solution, and Media Lab at the NCDA&CS Agronomic Division before applying large amounts to a home garden.
The age of the natural fertilizers is another important factor. When natural material decays and is rained on, it loses nutrients, especially potassium and, to some extent, nitrogen. Even natural sources of nutrients can be overapplied and damage plants. Fresh manures, for example, may injure plants by adding excessive nitrogen or potassium, especially when applied in large quantities.
Natural fertilizers can be expensive if applied in amounts adequate to supply nutrients for good plant growth, but have the added benefit of improving soil structure and plant vigor. When applying natural fertilizers, calculate as closely as possible the amounts of nutrients being supplied. Always err on the low side of application rates, then test the soil and augment as recommended on the soil test report. The nutrient content may need to be supplemented with other natural or synthetic materials to achieve a balanced ratio of nutrients.
Synthetic fertilizers are made through industrial processes or mined from deposits in the earth. They are purified, mixed, blended, and altered for easy handling and application. Most are noncarbonaceous chemicals from nonliving sources and are usually cheaper than natural fertilizers. In general, nutrients are more rapidly available to plants because they are more water-soluble or in a form plants can use. The disadvantage is that it may be easier to overapply a synthetic fertilizer than a natural one, which may result in fertilizer burn. In addition, synthetic fertilizers may not support beneficial microbial populations to the same extent as natural fertilizers.
Special-purpose fertilizers are packaged for plants such as camellias, rhododendrons, and azaleas (Figure 1–32). Some of the compounds used in these fertilizers have an acid reaction that can be beneficial to acid-loving plants if the soil they are growing in is naturally neutral or alkaline; however, most soils in North Carolina are usually acidic so these special fertilizers are unnecessary.
Fertilizer spikes or pellets are fertilizers compressed into a form placed in the soil or pots (Figure 1–33). They are convenient, but are expensive per unit of fertilizer and do not provide uniform distribution. Nutrients are often concentrated around the spikes or pellets.
Liquid fertilizer can be purchased as a dry powder or as a concentrated liquid (Figure 1–34). Liquid fertilizers are frequently used for houseplants or as a starter solution for transplants. They tend to be more expensive per unit of fertilizer because they are made from refined chemicals.
Foliar fertilizers are dry powders or concentrated liquids that are mixed with water and sprayed on plants (Figure 1–35). Foliar feeding is used when insufficient fertilizer was applied before planting, when a quick growth response is wanted, when micronutrients are locked in the soil, or when the soil is too cold for the plant to use fertilizer in the soil. Foliar-applied nutrients are absorbed and used by the plant quite rapidly. They are expensive per unit of nutrient and only give short-term fertilization (completely absorbed within one to two days). Relying totally on foliar fertilization can be time consuming because the fertilizer must be applied regularly. Improper foliar application of fertilizers can also lead to plant tissue burn. Learn more about fertilizer usage and nutrient concentrations in the North Carolina Agricultural Chemicals Manual, Chapter IV – Fertilizer Use.
Incomplete fertilizers can be used separately or combined to supply the needed nutrients, often at a reduced cost compared to using a complete fertilizer. For example, gardeners who have a soil with sufficient P and K can save money by applying a nitrogen-only fertilizer, such as ammonium nitrate (34-0-0). If a soil test indicates N and K are needed, but not P, use an appropriate amount of ammonium nitrate and muriate of potash (0-0-60), a naturally occurring material composed almost entirely of potassium, processed to remove impurities and concentrate the product. If a soil needs only P, use triple super phosphate (0-46-0), or for an organic nutrient source apply bone meal (approximately 3-15-0; note that this will add some N) or compost.
Plant Nutrients and the Environment
Fertilizer misuse causes environmental and water quality issues. Nitrogen fertilizers, for instance, break down into ammonium and nitrate. The nitrate form of N, while essential for plant growth, is highly mobile and can move through the soil after rainfall or irrigation and contaminate drinking water supplies. Phosphorus holds tightly to soil particles and does not leach through the soil, but affects water quality through runoff and soil erosion. Excess nitrogen and phosphorus are associated with algal blooms (heavy growth of aquatic plants) and limited oxygen, and cause fish kills in lakes, bays, and non-flowing water bodies.
There are several ways to reduce fertilizers’ impacts on water quality:
- Apply only materials that are recommended based on results of a soil test. If possible, use slow-release fertilizers and incorporate into the soil. Avoid applying excess nitrogen and phosphorus fertilizer.
- Calibrate fertilizer spreaders properly and clean spreaders over the lawn area instead of a hard surface.
- Keep the amount of hard surfaces in a landscape to a minimum. When installing a new sidewalk or patio, consider using gravel, porous concrete, stepping-stones, wood decking, or bricks on a sand base (Figure 1–36).
- Avoid applying fertilizer to hard surfaces, such as sidewalks, patios, driveways, and streets. Sweep up material that falls on hard surfaces.
- Maximize water absorption by aerating lawns and incorporating organic matter in planting beds and gardens.
- Prevent runoff by turning off irrigation when the soil is no longer absorbing water.
- Avoid applying fertilizer in natural drainage areas or ditches.
- Minimize soil erosion by using ground covers, windbreaks, terraces, and mulches.
- Mulch under trees and shrubs to reduce impact of falling water.
- Maintain a lawn border around planting areas and plant a grass strip between rows in fruit and vegetable gardens.
- Plant cover crops on bare soil, such as barren vegetable gardens.
- Use a rain barrel under drains to collect runoff and direct excess runoff from roofs onto grassy areas (Figure 1–37).
When to Apply Fertilizer
Soil type affects the frequency of fertilizer application. Sandy soils require more frequent applications of smaller amounts of nitrogen and potash than do clay soils because these nutrients leach more readily in sandy soils. Other factors that affect application frequency include the plant to be grown, the amount of plant growth desired, the amount of water, and the type and release rate of fertilizer applied.
The best time to apply fertilizer and the most effective method of applying it depends on the type of plants being grown. Leafy vegetables require more nitrogen than root crops. Corn is a heavy nitrogen feeder and may require several small nitrogen applications when actively growing. Most established woody plants perform well without fertilization, or with just one application per year. Young plants may benefit from several light applications of fertilizer per year.
Fertilizer is needed when plants are actively growing, never when they are dormant. Nitrogen application will have its greatest effect three to four weeks after application. Excess or improperly timed nitrogen can delay flowering and fruiting or promote tender new growth vulnerable to frost or freeze damage.
Research has shown it is best to broadcast or incorporate fertilizer uniformly over an area rather than concentrating fertilizer in holes or bands in the soil. The most effective method of fertilizing a large area is with a fertilizer spreader; for home gardens, hand fertilization works fine. For new plantings, incorporate fertilizer into the soil and mix it thoroughly. For established plantings, surface application is appropriate.
When fertilizing from overhead, make certain plant foliage is dry and use a broom to brush fertilizer off the foliage, or water thoroughly after applying fertilizer to remove it from plant leaves to prevent burn spots. It is not necessary to remove mulch when fertilizing; irrigation or rainfall will carry fertilizer to the roots. Fertilization should be reduced or delayed during dry weather because the salts in the fertilizer can burn roots if there is inadequate moisture.
Table 1–4. Essential nutrients for plant growth.
| MACRONUTRIENTS | ||||
|---|---|---|---|---|
| Nutrient | Why Nutrient is Needed | Deficiency Symptoms | Excess Symptoms | Comments |
| Nitrogen (N) | Responsible for rapid foliage growth and green color Easily leaches from soil Mobile in plant, moving to new growth |
Reduced growth (Figure 1–38) Light-green to yellow foliage (chlorosis) Reds and purples may intensify with some plants Reduced lateral breaks Symptoms appear first on older growth |
Succulent growth; leaves are dark green, thick, and brittle Poor fruit set Excess ammonia can induce calcium deficiency |
High N under low light can cause leaf curl Uptake inhibited by high P levels |
| Phosphorus (P) | Promotes root formation and growth Affects quality of seed, fruit, and flower production Increased disease resistance Does not leach from soil readily Mobile in plant, moving to new growth. |
Reduced growth Leaves dark-green; purple or red color in older leaves, especially on the underside of the leaf along the veins (Figure 1–39) |
Shows up as micronutrient deficiency of Zn, Fe, or Co | Rapidly fixed on soil particles When applied under acid conditions, fixed with Fe, Mn, and Al High P interferes with micronutrient and N absorption Used in relatively small amounts when compared to N and K Availability is lowest in cold soils |
| Potassium (K) | Helps plants overcome drought stress Improves winter hardiness Increases disease resistance Improves the rigidity of stalks Leaches from soil Mobile in plant |
Reduced growth Shortened internodes Margins of older leaves become chlorotic and burned Necrotic (dead) spots on older leaves (Figure 1–40) Reduction of lateral breaks and tendency to wilt readily Poorly developed root systems Weak stalks |
Causes N deficiency and may affect the uptake of other nutrients | High N/low K favors vegetative growth Low N/high K promotes reproductive growth (flower, fruit) Calcium excess impedes uptake of K |
| Magnesium (Mg) | Leaches from sandy soil Mobile in plant |
Reduction in growth Yellowish, bronze, or reddish color of older leaves, while veins remain green (Figure 1–41) Leaf margins may curl downward or upward with a puckering effect |
Interferes with Ca uptake Small necrotic spots in older leaves Smaller veins in older leaves may turn brown In advanced stage, young leaves may be spotted |
Mg is commonly deficient in foliage plants because it is leached and not replaced Epsom salts at a rate of 1 teaspoon per gallon may be used two times a year Mg can be absorbed by leaves if sprayed in a weak solution Dolomitic limestone can be applied in outdoor situations to rectify a deficiency |
| Calcium (Ca) | Moderately leachable Limited mobility in plant Essential for growth of shoot and root tips |
Inhibition of bud growth Roots can turn black and rot Young leaves are scalloped and abnormally green Leaf tips may stick together Cupping of maturing leaves Blossom end rot of many fruits (Figure 1–42) Pits on root vegetables; stem structure is weak Premature shedding of fruit and buds |
Interferes with Mg absorption High Ca usually causes high pH |
Ca is rarely deficient if the correct pH is maintained |
| Sulfur (S) | Leachable Not mobile Contributes to odor and taste of some vegetables |
Rarely deficient General yellowing of the young leaves, then the entire plant (Figure 1–43) Veins lighter in color than adjoining interveinal area Roots and stems are small, hard, and woody |
Sulfur excess is usually in the form of air pollution | Sulfur excess is difficult to control, but rarely a problem |
| MICRONUTRIENTS | ||||
|---|---|---|---|---|
| Nutrient | Why Nutrient is Needed | Deficiency Symptoms | Excess Symptoms | Comments |
| Iron (Fe) | Accumulates in the oldest leaves and is relatively immobile Necessary for the maintenance of chlorophyll |
Interveinal chlorosis primarily on young tissue, which may become white (Figure 1–44) Fe deficiency may occur even if Fe is in the soil when: soil is high in Ca; soil is poorly drained; soil is oxygen deficient; nematodes attack roots; or soil is high in Mn, pH, or P Fe should be added in the chelate form; the type of chelate needed depends upon the soil pH Foliar fertilization will temporarily correct the deficiency May be deficient in centipede grass where pH and P are high |
Rare except on flooded soils | |
| Boron (B) | Important in enabling photosynthetic transfer Very immobile in plants |
Failure to set seed Internal breakdown of fruit or vegetable Death of apical buds, giving rise to witches' broom Failure of root tip to elongate normally Young leaves become thick, leathery, and chlorotic (Figure 1–45) Rust-colored cracks and corking on young stems, petioles, and flower stalks (such as heart rot of beets, stern crack of celery) Breakdown occurs at the base of the youngest shoots |
Tips and edges of leaves exhibit necrotic spots coalescing into a marginal scorch (similar to high-soluble salts) (Figure 1–46) Oldest leaves are affected first Can occur in low pH soils Plants are easily damaged by excess application Looks like Mg deficiency,green veins on a yellow leaf. |
|
| Zinc (Zn) | Needed for enzyme activity | Young leaves are very small, sometimes missing leaf blades Short internodes Distorted or puckered leaf margins Interveinal chlorosis |
Severe stunting, reddening Poor germination Older leaves wilt Entire leaf is affected by chlorosis; edges and main vein often retain more color Can be caused by galvanized metal. |
|
| Copper (Cu) | Needed for enzyme activity | New growth small, misshapen, wilted (Figure 1–47) In some species, young leaves may show interveinal chlorosis while tips of older leaves remain green |
Can occur at low pH Shows up as Fe deficiency |
|
| Manganese (Mn) | Needed for enzyme activity | Interveinal chlorosis with smallest leaves remaining green, producing a checkered effect (Figure 1–48) Gray or tan spots usually develop in chlorotic areas Dead spots may drop out of the leaf Poor bloom size and color Induced by excessively high pH |
Reduction in growth, brown spotting on leaves Shows up as Fe deficiency Found under strongly acidic conditions |
|
| Molybdenum (Mo) | Needed for enzyme activity | Interveinal chlorosis on older or midstem leaves (Figure 1–49) Twisted leaves whiptail Marginal scorching and rolling or cupping of leaves Nitrogen deficiency symptoms may develop |
Intense yellow or purple color in leaves Rarely observed |
|
| Chlorine (Cl) | Needed for enzyme activity | Wilted leaves, which become bronze, then chlorotic, then die Club roots |
Salt injury Leaf burn May increase succulence |
|
| Cobalt (Co) | • Needed by plants recently established • Essential for nitrogen fixation |
Little is known about its deficiency symptoms | Little is known about its toxicity symptoms | |
| Nickel (Ni) | • Needed by plants recently established Essential for seed development |
Little is known about its deficiency symptoms | Little is known about its toxicity symptoms | |
Fertilizer Terms
Fertilizer analysis: The minimum amount of each element in a fertilizer as stated on the label, such as 16-4-8.
Fertilizer ratio: The relative proportion of N, P2O5, and K2O. The ratios of 16-4-8 and 8-2-4 are both 4:1:2, which means 4 parts nitrogen to 1 part phosphorus to 2 parts potassium.
Balanced fertilizer: A fertilizer containing equal parts of each major element, such as 10-10-10.
Complete fertilizer: A fertilizer containing nitrogen, phosphorus, and potassium. Examples of commonly used fertilizers are 10-10-10, 16-4-8, and 12-4-8.
Incomplete fertilizer: A fertilizer missing one or two of the macronutrients, such as 0-20-0.
Weed and feed fertilizers: A combination of fertilizer and herbicide. They are often used on lawns to prevent certain weeds from germinating, or to kill existing broadleaf weeds.
High analysis: A fertilizer containing 30% or more active nutrients, such as ammonium nitrate 33-0-0. The cost per bag is usually more, but the cost per pound of nutrient is less, lowering the cost for fertilizing a given area.
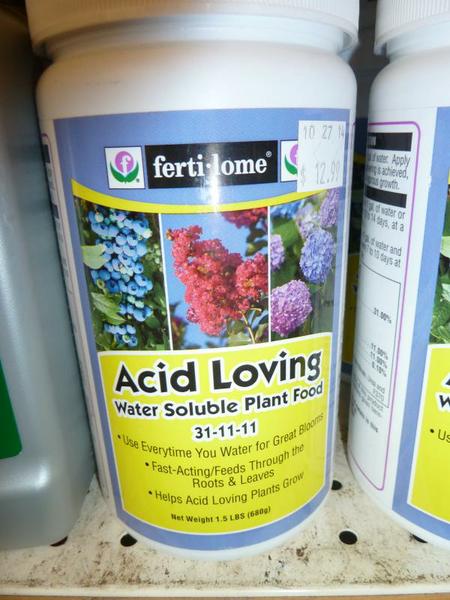
Figure 1–32. A fertilizer specially formulated for acidic plants such as azaleas or rhododendrons. These fertilizers are usually unnecessary in North Carolina’s acidic soils.
Kathleen Moore CC BY 2.0
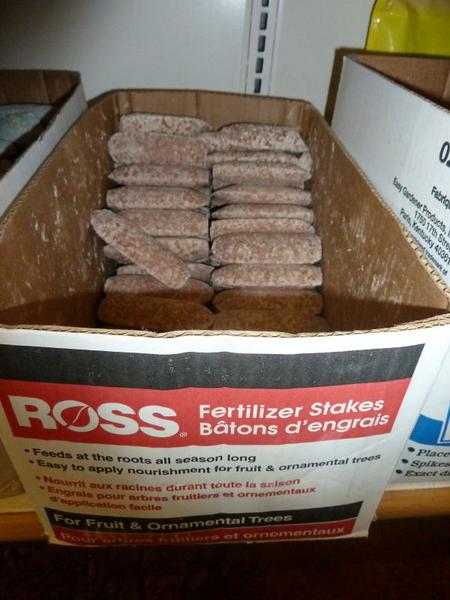
Figure 1–33. Fertilizer spikes are compressed fertilizer that can be pushed into the soil.
Kathleen Moore CC BY 2.0
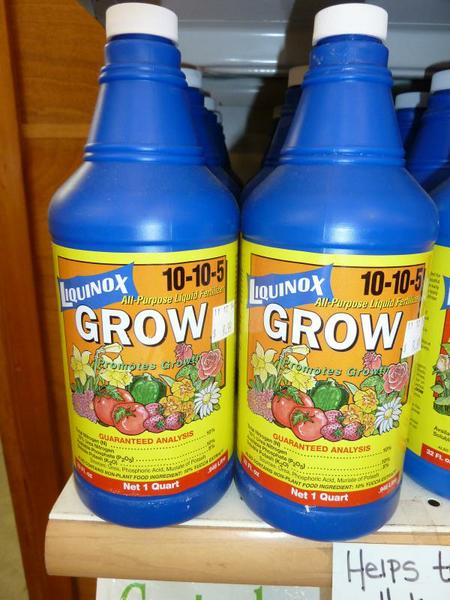
Figure 1–35. Foliar fertilizers are dry powders mixed with liquid and then sprayed on the leaves of plants.
Jerry Norbury, Flickr CC BY-ND 2.0
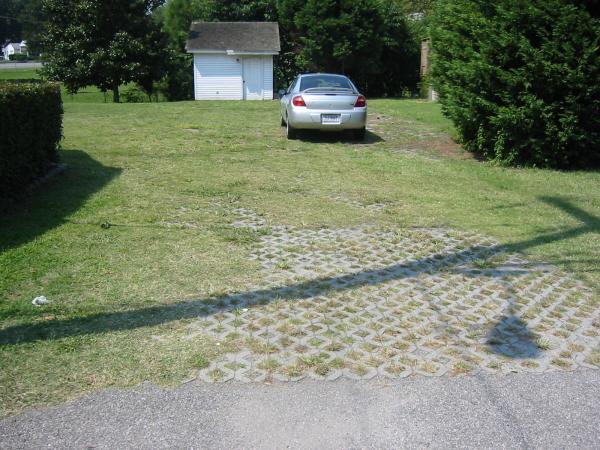
Figure 1–36. This homeowner used permeable pavers for their driveway allowing grass to grow in the spaces and reducing runoff from the property.
Center for Watershed Protection, Inc., Flickr CC BY 2.0
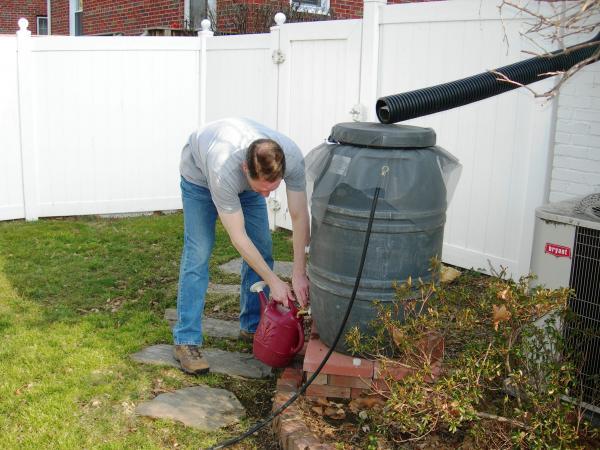
Figure 1–37. A rain barrel catches runoff from a roof top and can be used to water plants in the landscape.
Arlington County, VA, Flickr CC BY-SA 2.0
Figure 1–38. Nitrogen deficiency in Bacopa. Note the severely reduced growth and light green-yellow leaves.
Paul Nelson
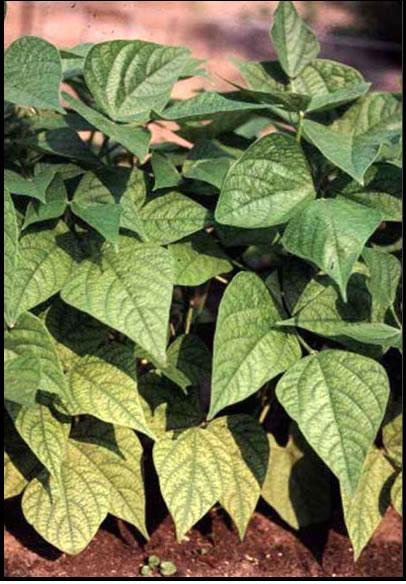
Figure 1–41. Magnesium deficiency appears first in older leaves. On this bean plant, the veins remain green while the rest of the leaf turns yellow.
Paul Nelson
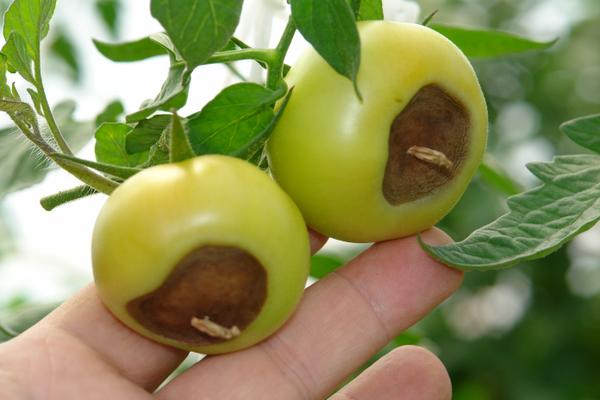
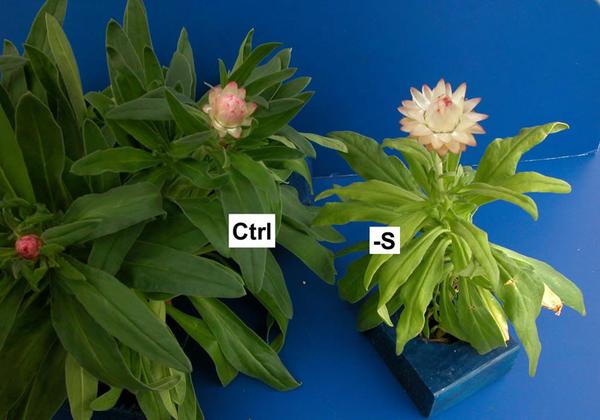
Figure 1–43. Sulfur deficiency rarely occurs, but on this strawflower, it has affected the shoot size and leaves with a yellowing of the veins.
Paul Nelson

Figure 1–44. Iron deficiency causing interveinal chrolorosis on young leaves.
Scot Nelson, Flickr CC0

Figure 1–45. This geranium is deficient in boron which is evident by the thick, leathery, chlorotic younger leaves.
Paul Nelson
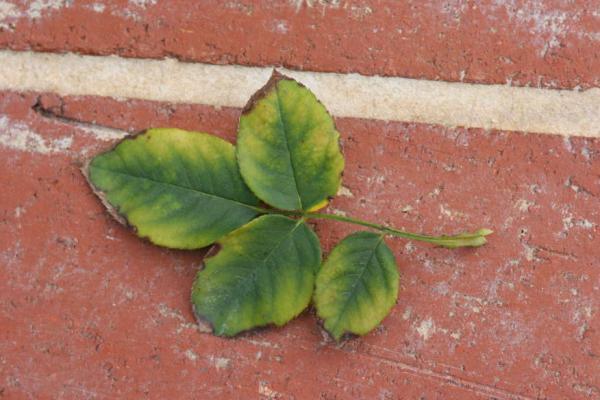
Figure 1–46. Boron toxicity on a rose bush. Can look like the inverted "V" of green on a yellow leaf that is characteristic of magnesium deficiency, but uptake of too much boron by the plant often occurs when pH is too low.
Malcolm Manners, Flickr CC BY 2.0
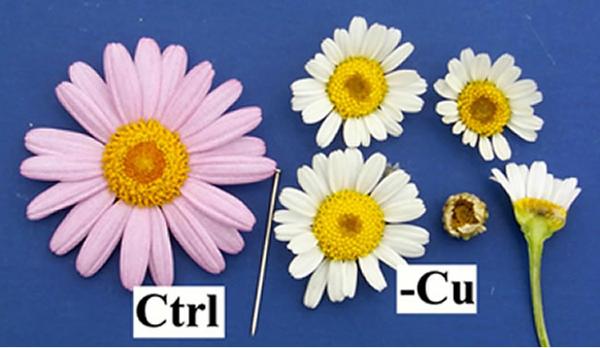
Figure 1–47. Copper deficiency in this daisy appears as small misshapen growth.
Paul Nelson
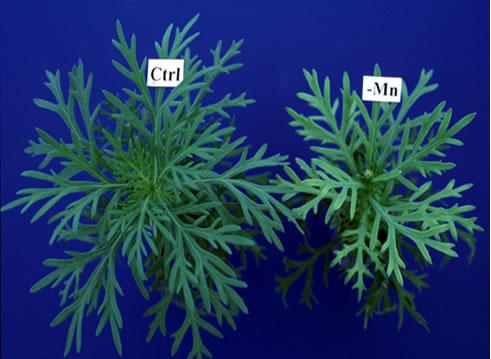
Figure 1–48. Manganese deficiency in a chrysanthemum exhibited as reduced growth while the youngest leaves remain green.
Paul Nelson
Figure 1–49. Molybdenum deficiency on poinsettia.
Paul Nelson
The Biology of Soil
There is more life below the soil surface than there is above. Soil life consists of burrowing animals, such as moles and earthworms, insects, and other soil creatures that are difficult or impossible to see without a microscope, such as mites, springtails, nematodes, viruses, algae, bacteria, yeast, actinomycetes, fungi, and protozoa. There are about 50 billion microbes in 1 tablespoon of soil. In a typical soil, each gram (what a standard paperclip weighs) likely contains these organisms, listed from largest to smallest:
- Nematodes—10 to 5,000
- Algae—1,000 to 500,000
- Protozoa—1,000 to 500,000
- Fungi—5,000 to 1,000,000
- Actinomycetes—1,000,000 to 20,000,000
- Bacteria—3,000,000 to 500,000,000
Soil-dwellers move through the soil, creating channels that improve aeration and drainage. Nematodes and protozoa swim in the film of water around soil particles and feed on bacteria. Mites eat fungi, and fungi decompose soil organic matter. The microorganisms’ primary role is to break down organic matter to obtain energy. Microorganisms help release essential nutrients and carbon dioxide and perform key roles in nitrogen fixation, the nitrogen and phosphorus cycles, denitrification, immobilization, and mineralization. Microbes must have a constant supply of organic matter, or their numbers will decline. Conditions that favor soil life also promote plant growth.
Unfavorable soil conditions, such as high temperatures, compaction, or oversaturation can injure beneficial soil life. This can lead to a proliferation of disease-causing fungi, bacteria, or viruses. To read more about common soil diseases see chapter 5,“Diseases and Disorders.” Plants that are stressed by disease are often more susceptible to insect damage. More information on insects can be found in chapter 4, “Insects.” To learn more about managing insects and diseases, please see chapter 8, “IPM.”
To promote soil organisms, incorporate organic matter, till as little as possible, minimize soil compaction, maintain favorable soil pH and fertility, and use organic mulch on the soil surface.
Frequently Asked Questions
1. Do I have to get a soil test report or can you just tell me how much fertilizer to add?
A soil test is the only accurate way to determine the amount of fertilizer needed for each individual yard. A soil test is a process by which nutrients are chemically removed from the soil and measured for their “plant available content” within the sample. The quantity of nutrients extracted is used to determine the type and amount of fertilizer to be recommended. The pH and acidity of the soil sample is also measured and used to determine if lime is needed and how much. Soil testing is provided by the NCDA&CS. There is a small fee for each soil sample submitted to the NCDA&CS during December through March, which is the peak season for soil testing in North Carolina. There is no fee for soil samples submitted to the NCDA&CS during the rest of the year (April through November). Samples must be mailed in to the NCDA&CS and boxes are available at their main office, 4300 Reedy Creek Road, Raleigh, NC, or at any county Cooperative Extension center. More information and forms are available on the NCDA&CS website.
2. How often should soil be tested?
If a soil test report indicates the pH and nutrient levels are in the range needed for plants to be grown, you may not need to sample every year. As a general rule, sandy-textured soils should be tested every two to three years and clay soils every three to four years. However, if nutrient or pH levels are excessively high or low, you should submit a sample every year to determine how much improvement has been achieved and what additional amendments should be made. In addition, if problems occur during the growing season, collect a sample and have it analyzed.
3. Can I add Epsom salts to my plants?
Epsom salt (magnesium sulfate) can sometimes be beneficial, especially in sandy soils that may be low in sulfur or magnesium. However, the best recourse is to rely upon a soil test and make adjustments to the soil pH and nutrient content based on the soil test report’s lime and fertilizer recommendations.
4. Why are my (azalea, blueberries, maple, rhododendron) leaves yellow?
Ruling out water issues, the likely culprit is pH. Azaleas, blueberries, maples, and rhododendrons are acid-loving plants requiring a pH of 4.5–6.0 to thrive. Knowing your soil pH will help you select plants that will thrive in your soil. Altering the pH of a soil is difficult, but can be done in small areas. Refer back to the section on soil pH for more information.
5. My shrubs/trees are wilting, the leaves are brown on the edges, and are falling off. What is causing this?
This could be the result of salt injury due to improper application of fertilizer. High salts decrease a plant's ability to extract water from the soil, and salts can move through the plant's vascular system to the leaves where the water evaporates and concentrates the salt to toxic levels. Plants may recover from salt/fertilizer injury if high levels of salts are reduced through repeated, deep irrigation. The best defense against this problem is to obtain a soil test and follow the fertilizer recommendations. Avoid the use of high salt fertilizers such as sodium nitrate; use slow release fertilizers and apply correctly. Azaleas and blueberries are very susceptible to salt/fertilizer injury.
6. My soil is very heavy clay. What can I do?
- There are several ways you can manage your clay soil.
- The easiest thing you can do is select plants that perform well in clay soil. Water moves slowly into clay soil so be sure to irrigate slowly. A soaker hose is a good option.
- Clay soil compacts very easily when wet so keep foot traffic and vehicles away from your garden beds.
- Adding organic matter like compost or pine bark to the soil is another option. Add a few inches of organic matter to the top of the soil. This will need to be repeated for several years to see results.
- Build a raised bed on top of the clay soil and bring in soil from a reputable source. Loosen the clay layer in the existing soil before adding new soil to the raised bed so water can adequately drain.
7. The soil in my lawn is compacted; what can I do to resolve this?
Foot traffic, mowing, recent home construction, and even rainfall can contribute to soil compaction, which can be especially problematic in clay soils. Turf grass roots need air and water to grow. Core aeration is the removal of small cores from the top few inches of soil to allow air, water, and nutrients to enter the root zone of your turf. The result is reduced water runoff and enhanced water and nutrient uptake, gas uptake, thatch breakdown, and heat and drought tolerance of your turf.
The best time to perform core aeration is when grass is actively growing. That means late spring or early summer for warm-season grasses and fall for cool-season grasses. The soil should be moist, but not wet. Be sure to mark sprinkler heads, shallow lines from the sprinkler, and underground utility, cable, and septic lines to prevent damage. Soil cores should be left on the lawn; they will work their way back into the soil within two to four weeks. Lawns may be fertilized, seeded, or top dressed with a soil amendment immediately after coring, although ensure the timing of fertilization corresponds with the recommendations on the maintenance calendar (content.ces.ncsu.edu/catalog/series/227) for your turf. Lawns can be aerated once a year, especially under heavy use conditions and with heavy clay soils. Note that spike aeration is not recommended, as this method of aeration only further compacts the soil.
Further Reading
Brady, Nyle C., and Ray R. Weil. The Nature and Properties of Soils. 14th ed. Upper Saddle River, New Jersey: Prentice Hall, Inc, 2007. Print.
Buol, S. W., et al. Soil Genesis and Classification. 6th ed. Hoboken, New Jersey: John Wiley & Sons Inc., 2011. Print.
Dunne, Niall, ed. Healthy Soils for Sustainable Gardens. Brooklyn, New York: Brooklyn Botanic Garden, 2009. Print.
Maynard, Donald N., and George J. Hochmuth. Knott's Handbook for Vegetable Growers. 5th ed. Hoboken, New Jersey: John Wiley & Sons, Inc., 2007. Print.
Soil Fertility Manual. 5th ed. Peachtree Corners, Georgia: International Plant Nutrition Institute, 2003. Print.
Chapter Text Hyperlinks
SoilFacts: Minimizing Risks of Soil Contaminants in Urban Gardens, AG-439-78
NCDA&CS Agronomic Services Soil Test Forms & Information
NCDA&CS Agronomic Services “Understanding the Soil Test Report”
NCDA&CS Agronomic Services Waste/Compost Analysis
SoilFacts: Careful Soil Sampling – The Key to Reliable Soil Test Information, AG-439-30
SoilFacts: Soil Acidity and Liming: Basic Information for Farmers and Gardeners, AG-439-51
For More Information
NC State Resources
- A Gardener’s Guide to Fertilizing Trees & Shrubs AG-613
- A Gardener’s Guide to Protecting Water Quality AG-612
- A Gardener’s Guide to Soil Testing AG-614
- NC State Soil Science Extension
- NC State Department of Crop & Soil Sciences Departmental Publications – Factsheets
More NC State Resources
Other Resources
- The Agronomy Guide, Soil Fertility Management, by Penn State Extension
- Soil-Net.com, Cranfield University, UK
- USDA Natural Resources Conservation Service, “Soil Health Profiles”
Videos
- The Symphony of Soil, by Catherine Skousen (7 videos, 1 hour, 23 minutes, Aug 16, 2010)
- 2015: International Year of Soils (IYS), by The USDA NRCS (12 Videos, Jan-Dec 2015)
- Unlock the Secrets in the Soil, by The USDA NRCS (32 Videos, Jan 29, 2015)
Contributors
Author:
Luke Gatiboni, Extension Soil Fertility Specialist and Assistant Professor, Department of Crop and Soil Sciences
Contributions by Extension Agents:
Jeana Myers
Contributions by Extension Master Gardener Volunteers:
Deborah Green, Kim Curlee, Judy Bates, Jackie Weedon, Karen Damari, Connie Schultz, Edna Burger
Content Editors:
Lucy Bradley, Associate Professor and Extension Specialist, Urban Horticulture, NC State University; Director, NC State Extension Master Gardener program
Kathleen Moore, Urban Horticulturist
Copy Editor:
Barbara Scott
How to Cite This Chapter:
Gatiboni, L. 2022. Soils and Plant Nutrients, Chapter 1. In: K.A. Moore, and. L.K. Bradley (eds). North Carolina Extension Gardener Handbook, 2nd ed. NC State Extension, Raleigh, NC. <https://content.ces.ncsu.edu/extension-gardener-handbook/1-soils-and-plant-nutrients>
Publication date: Feb. 1, 2022
AG-831
Other Publications in North Carolina Extension Gardener Handbook
- 1. Soils & Plant Nutrients
- 2. Composting
- 3. Botany
- 4. Insects
- 5. Diseases and Disorders
- 6. Weeds
- 7. Diagnostics
- 8. Integrated Pest Management (IPM)
- 9. Lawns
- 10. Herbaceous Ornamentals
- 11. Woody Ornamentals
- 12. Native Plants
- 13. Propagation
- 14. Small Fruits
- 15. Tree Fruit and Nuts
- 16. Vegetable Gardening
- 17. Organic Gardening
- 18. Plants Grown in Containers
- 19. Landscape Design
- 20. Wildlife
- 21. Youth, Community, and Therapeutic Gardening
- Appendix A. Garden Journaling
- Appendix B. Pesticides and Pesticide Safety
- Appendix C. Diagnostic Tables
- Appendix D. Garden Tools
- Appendix E. Season Extenders and Greenhouses
- Appendix F. History of Landscape Design
- Appendix G. Permaculture Design
- Appendix H. Community Gardening Resources
- Appendix I. More NC State Resources
- Glossary
N.C. Cooperative Extension prohibits discrimination and harassment regardless of age, color, disability, family and marital status, gender identity, national origin, political beliefs, race, religion, sex (including pregnancy), sexual orientation and veteran status.