
Objectives
This chapter teaches people to:
- Become familiar with recommended cultivars of small fruit.
- Understand important considerations in selecting fruits and fruit cultivars for home landscapes.
- Select a good site for planting small fruit.
- Be aware of the common pests and diseases associated with growing small fruits.
Introduction
Berries and grapes, when properly tended, are well-suited to the home garden. A small planting can produce an abundance of fruit to eat fresh, make juice and bake with, and can, freeze, or dry for future enjoyment. The most popular small fruits in North Carolina are strawberries, grapes, blackberries, raspberries, and blueberries. Small fruits have several advantages over tree fruits. Most small fruits bear fruit in less time, require less room, and suffer from fewer insect and disease problems than tree fruits. A blueberry hedge, a strawberry border, or a grape arbor can also enhance the beauty of a landscape. With a little creativity, fruit can be incorporated into an edible landscape. This chapter provides information on the establishment and care of small fruits in home gardens. Table 14–1 summarizes the characteristics of small fruits commonly grown in North Carolina gardens.
Currants and gooseberries cannot be grown legally in North Carolina. Both serve as alternate hosts for diseases that affect important economic crops in our state. For further clarification, contact the N.C. Department of Agriculture & Consumer Services, Plant Protection Division.
Strawberries
First among small fruits to produce berries after planting, strawberries are also the first fruit to ripen in the spring. From just 25 plants and their resulting runner plants, 25 quarts of berries can be harvested. Strawberries can be raised throughout North Carolina, are relatively easy to grow, and require a minimum of space. They can be grown in the home garden with virtually no pesticides. When grown commercially, however, strawberries are in the top 12 types of produce with pesticide residue, according to the U.S. Department of Agriculture. If you would like to reduce your pesticide exposure, consider growing your own strawberries.
Types of Strawberries
The small wild strawberry often found along roadsides and at woodland edges is one of the parents of today's hybrid strawberries. The yellow-flowered plant with strawberry-like fruits found in our lawns and gardens is the Indian or false strawberry (also called snake berry). These plants are not poisonous, but their fruits have little flavor and a pulpy texture. True wild strawberries have white flowers.
The cultivars recommended for home gardens in North Carolina are June-bearing strawberries such as ‘Galletta’, ‘Chandler’, and ‘Jewel’. June-bearing cultivars produce a single crop of fruit in the spring. The name “June-bearing” is somewhat confusing because these cultivars bear most of their crop in May (although in more northern climates, they do produce fruit in June). June bearers are short-day plants, which means they start forming flower buds when days are less than 12 hours long. Runner production is a long-day response; it occurs only when day length is more than 12 hours.
The so-called everbearing strawberry is one that produces a crop in spring and another crop in late summer to early fall. This type initiates most of its flower buds under long-day conditions. All of the everbearing strawberries advertised in nursery catalogs originated in the northern states; they are poorly adapted to southern heat. But ‘Albion’, a cultivar from California, has done well in the NC mountains.
Strawberry cultivars best adapted to North Carolina are listed in Table 14–2. ‘Galletta’ strawberry was developed in North Carolina and is well-adapted to our climate. Strawberries developed for other regions of the country are generally poorly adapted here. Exceptions are the cultivars ‘Chandler’, ‘Albion,’ and ‘Jewel,’ which have a wide area of adaptation.
Choose disease-free, certified plants from a reliable nursery. Cornell University maintains a list of nurseries and cultivars. The harvest season can be extended with a mix of early, midseason, and late cultivars. Early cultivars are more subject to frost damage because they bloom earlier in the spring. The open blossom stage of developement is the most suseptible to cold injury.
Table 14–1. Bearing age, average yield, plant quantity, and life span of small fruits.
| Fruit | Type | Bearing Age | Average Annual Yield (pounds/plant) |
Number of Plants for Four People |
Life Expectancy (years) |
|---|---|---|---|---|---|
| Blueberry | Highbush | 3 | 8 | 6 | 20–30 |
| Rabbiteye | 3 | 12 | 4 | 20–30 | |
| Blackberry | Erect | 2 | 4 | 6 | 5–12 |
| Semi-trailing | 2 | 20 | 2 | 5–20 | |
| Raspberry | Red and black | 2 | 2–4 | 6 | 5–10 |
| Grape | Bunch | 3 | 15 | 4 | 15–20 |
| Muscadine | 3 | 25–50 | 2 | 15–30 | |
| Strawberry | Everbearing | 1 | ⅓ | 50 | 2–3 |
| June-bearing | 2 | ½ | 50 | 3–4 |
Site Selection, Preparation, Planting, and Maintenance
Strawberries grow best in full sun but tolerate light shade (with decreased yields). A southern exposure encourages earlier blooming and earlier fruit, but this may not be desirable in locations where late spring frosts often damage the flower buds. Strawberries can be grown in most garden soils. But because they are very shallow-rooted, they grow best in sandy loam soils with good drainage. Because clay soils drain poorly, they are not the best choice; poorly drained soils induce small root systems and encourage the proliferation of many fungal diseases. Planting in raised rows or beds and incorporating organic matter can help overcome this problem. The raised row should be 6 inches to 9 inches high and 15 inches wide. Leaves, chopped straw, rotted sawdust, and pine bark mulch can be used to improve soil texture. Manure (two to three bushels per 100 square feet) is a good source of organic matter. Incorporate the organic matter in the fall, so the material will be partially decomposed by spring planting.
Kill perennial weeds the season before planting. Do not plant strawberries on a site that has recently grown sod as the grubs and weevils that feed on grass roots can also feed on strawberry roots.
Have a soil test done to determine the amount of lime and fertilizer that may be needed. The pH should be between 6.0 and 6.5.
If you purchase bare root strawberries and plan to plant soon after they arrive, keep them in a cool, moist place. If they cannot be planted immediately, moisten the plants and place them in a plastic bag in the refrigerator. Set plants any time from October to March in the NC coastal plain, and during March or April in the NC piedmont and western North Carolina. In the spring, the temperature should be 40 to 50°F; a spring frost generally does not harm the vegetative growth of new strawberry plants.
Spread out the roots and set the plants so the midpoint of the crown (the point where the stem and root merge) is level with the soil (Figure 14–1). If they are set too deep, the growing point of the crown may be damaged or may rot. If they are set too shallow, the crown and the tops of the plants may dry out. Water newly set plants, and press the soil firmly around the roots. Remove flower buds that develop on new plants (first year only) so the plant's energy can go into runner production. The runners that form early produce more fruit than runners that form late in the season.
Table 14–2. Recommended strawberry cultivars for North Carolina.
| Cultivar | Areaa | Season | Berry Size | Yield | Fresh | Processing | Comments |
|---|---|---|---|---|---|---|---|
| Albion | M | Spring–fall | Medium | Medium | Good | Good | Everbearing |
| Chandler | All | Mid–late | Large | High | Good | Good | Commercial standard |
| Galletta | All | Early | Large | High | Good | Poor | Glossy fruit |
| Jewel | P, M | Late | Medium | High | Good | Good | Rot resistant |
| a S = sandhills-coastal plain; P = piedmont; M = mountains-foothills | |||||||
Strawberry Pyramids
A strawberry pyramid is an easy-to-build planter that can grow lots of strawberries in a limited space (Figure 14–2).
Materials Needed
- 4 boards – 6 feet long and 6 inches wide
- 4 boards – 5 feet long and 6 inches wide
- 4 boards – 4 feet long and 6 inches wide
- 4 boards – 3 feet long and 6 inches wide
- 10 feet of 2-inch by 2-inch boards for corners
- 1 lb of sixpenny galvanized nails
- 33 bushels of soil
- 2 lb of 8-8-8 fertilizer
- 6 lb of lime
Instructions
- Nail four 6-foot boards together to make a square.
- Place the 6-foot square on the ground and fill with good garden soil. Use a 2-inch by 2-inch stake in each corner to add stability. Add 1 ounce of 8-8-8 fertilizer and 3 ounces of lime for each bushel of soil and mix well.
- Build a 5-foot square to set on top of the 6-foot square. Then fill the 5-foot square. Continue the process for each square.
- Place the first plants 3 inches from any corner. Set the rest of the plants 6 inches apart. Fill all tiers this way. Mulch the plants.
- Remove runners as they form during the summer.
- Apply 1 teaspoon of sodium nitrate or 10-10-10 around each plant after new growth starts and again in August.
- Mulch again heavily in December to protect the plants during the winter.
Training Systems
The matted row system is the easiest to follow. Set plants 1½ feet to 2½ feet apart in the row. Space the rows 3 feet to 4 feet apart. Allow most of the runners from mother plants to grow during the first season, but keep them in a band 24-inches wide. The ideal plant density is four to six plants per square foot.
The hill system is ideal for most everbearing cultivars. Set plants 12 inches apart in double rows, leaving 2 feet to 3 feet between double rows. Remove all runners that form during the summer. Large individual hills can produce abundant crops of excellent quality fruit.
The annual hill system is the type of planting system that is used by many commercial growers in North Carolina. In this system, plants are set in the ground in the fall and harvested in the following spring. This system is more costly as new plants have to be set each year. The disease and insect pressure, however, is not as significant. In this system, plants are set on a 12-inch staggered span in 3-foot-wide raised beds. This system has been used in the schools as part of the Strawberries in Schools project.
Fertilization
Before planting, follow the soil test recommendations. One month after planting, fertilize each newly planted strawberry with 2 teaspoons of fertilizer containing 16% nitrogen (N). Apply the fertilizer at least 4 inches from the plant crown. Apply 16% nitrogen fertilizer again between August 15 and September 15. Three pounds of a 16% nitrogen material, 2½ pounds of 20%, or 1½ pounds of a 33% nitrogen material are adequate for each 100 feet of row (Table 14–3). Scatter the material over the top of the plants while they are dry and use a soft broom to brush it off the foliage.
Very sandy coastal soils usually need additional nitrogen again in late January or early February. The rate suggested is half that of the fall application. Measure and apply nitrogen carefully; too much causes rank top growth and soft berries that rot easily. For mature plantings, use the same amounts and same timing as for new plantings.
Table 14–3. Strawberry fertilization schedule for North Carolina.
| Before Planting | One Month After Planting | Between August 15 and September 15 | Between Late January and Early February (only in Sandy Soils) | |
|---|---|---|---|---|
| Per plant | Follow recommendations from soil test | 2 tsp of 16% N applied 4 inches from the crown | 2 tsp of 16% N applied 4 inches from the crown | 1 tsp of 16% N applied 4 inches from the crown |
| Per 100 ft row | Follow recommendations from soil test | 3 lb of 16% N | 3 lb of 16% N | 1.5 lb of 16% N |
Mulching
Mulching helps to manage weeds, conserves water, and keeps the fruit clean. In eastern and central North Carolina, spread pine needles or grain straw in February before new growth starts. Scatter over the plants and in the middle of the rows so only a few strawberry leaves show. The plants grow easily through the straw.
In the western part of the state, mulch is also used to protect plants during the winter. In December when the night temperature drops to 20°F, broadcast pine needles or grain straw in the row middles and around the plants to protect the crowns. At high elevations, cover plants with 2 inches of mulch. Remove half of the straw in the spring; rake the excess straw into the row middles (Figure 14–3).
Strawberry plants have a shallow root system and cannot withstand severe drought. Plants need a total of 1 inch of water per week (rain plus irrigation). It is critical that plants receive adequate moisture at the following times:
- When plants are first set and during dry periods after setting.
- Just before harvest and during harvest when berry size appears to be suffering.
- After renovation, to encourage new runner plants.
- In late August, September, and early October, when fruit buds are forming for next season's crop.
Fruit size can be increased by watering. Excessive water, however, can result in diluted flavor and increased fruit rot.
Weed Management
Because strawberries are shallow-rooted plants, they do not compete well against weeds. Weeds can be managed by mulching, cultivating, hoeing, or pulling by hand. Chemical herbicides can be used to manage many grasses and some broadleaf weeds. Consult the North Carolina Agricultural Chemicals Manual for recommendations. Herbicides should not be applied when plants are blooming, when runner plants are taking root, or during late summer and early fall, when fruit buds are forming. See “Weeds,” chapter 6, for more information on weed management.
Frost Protection
Spring, with its temperature swings, is a likely time for frost to damage strawberry blooms. When the flower is completely open, a temperature of 30°F at plant level can cause some damage. A temperature of 28°F can cause considerable damage. In earlier stages, before the flower is fully open, the plants can withstand these temperatures but are still at risk if lower temperatures occur. After a frost or freeze, the flower petals may still be white. But if the center of the flower has turned brown, it will not produce fruit. Some protection from frost can be obtained by covering plants with 2 inches to 3 inches of straw, old cloth, paper, or row covers of materials that block the loss of heat. It is best to tent the material over the plants, because damage is likely where the material touches the plant (Figure 14–4). Placing a blanket over the strawberry bed during the peak afternoon heat helps to trap heat overnight.
Harvest
Harvest normally begins 30 days after bloom. For strawberries, this period usually starts in the latter part of April in eastern North Carolina, early May in the North Carolina Piedmont, and late May in the North Carolina Mountains. Harvest strawberries every other day or three times a week. Pick the fruit with about a fourth of the stem attached. The best time to pick is early morning when berries are still cool. Not all berries ripen at the same time; pick only those that are fully red.
Renovation
Matted row strawberry plantings can bear fruit for more than one season, although yield and berry size decrease after the first year. Renovation helps renew the strawberry planting by keeping plants from becoming too crowded. Do not attempt to renew strawberry beds heavily infested with weeds, diseases, or insects; it is better to set a new planting. To renew a planting, follow these five steps immediately after harvest:
- Manually remove all broadleaf weeds. Then mow the leaves off with a lawn mower or weed trimmer. Be careful not to damage the crowns. Rake the leaves away and dispose of them.
- Reduce the row width with a rototiller or hoe to a strip 12 inches to 18 inches wide.
- Thin the plants, leaving only the most healthy and vigorous. Plants should be about 6 inches apart in all directions.
- Fertilize and water to promote new runner production.
Insects and Diseases
Although strawberries can have their share of insect and disease problems, most homeowners ignore these problems unless they become serious. Appendix C, "Diagnostic Tables," reviews common problems associted with strawberries. If the plants’ symptoms are serious, visit NC State University’s Strawberry Portal.
Following these six precautions should minimize insect and disease problems:
- Use only certified, disease-free plants. Do not use plants from a neighbor or an existing planting.
- Plant in well-drained soil, follow crop rotation recommendations, and have the soil tested for nematodes.
- Remove berries damaged by insects and diseases as the damage occurs (Figure 14–5).
- Properly renovate beds to remove older, diseased foliage and to keep plants from getting too crowded.
- Do not keep a planting in production too long; start a new planting to replace old plantings after their second or third crop.
- Do not allow insects and diseases to build up. Follow the NC State University recommendations.
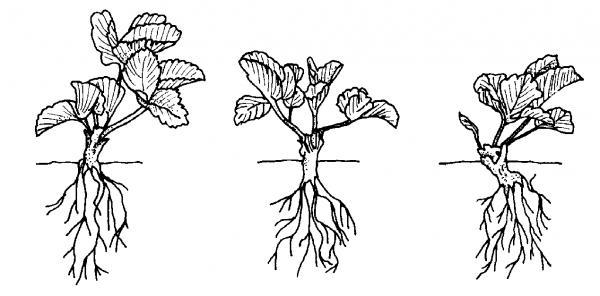
Figure 14–1. Set strawberry plants so the crown is level with the soil line. The plant on the left is too shallow. The plant on the right is too deep.

Figure 14–2. A strawberry pyramid allows many strawberry plants to be grown in a limited space.

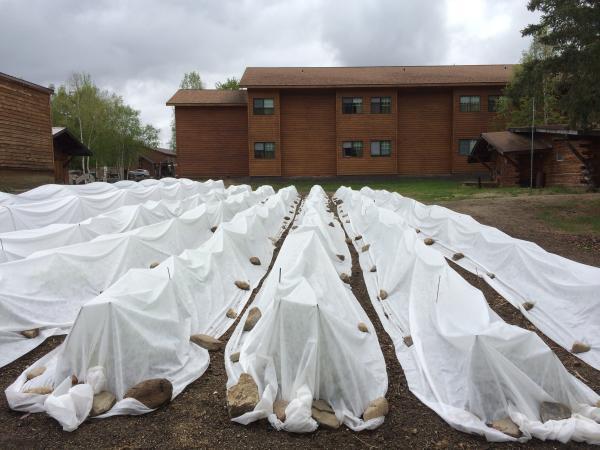
Figure 14–4. Tent row covers over strawberry plants. Stakes are used to keep the material from touching the plants.
Scot Nelson, Flickr CC0

Blackberries and Raspberries (Brambles or Caneberries )
Brambles are any plant belonging to the genus Rubus. They have an average life expectancy of 5 years to 8 years. Raspberries and blackberries are the most commonly grown brambles. Other types of brambles include tayberries, tummelberries, loganberries, and boysenberries, all of which are hybrids between red raspberries and blackberries. These fruits are often scarce in local markets, and homeowners may have to grow them or do without.
Brambles
Although the term “bramble” is well known in the South, raspberries and blackberries are often called “caneberries” in other parts of the country. The term “bramble” has a negative connotation for some folks. In Latin, bramble means thorny shrub. However, most of the new blackberry cultivars and many of the raspberries are now essentially thornless.
BLACKBERRIES
Types and Growth Habits of Blackberries
Blackberries are classified as trailing, semi-trailing, and erect. Trailing blackberries (dewberries) produce canes that are not self supporting and have low yields. Boysenberry is the main trailing cultivar currently available. Semi-trailing (semi-erect) types (Table 14–4) are fully trailing the first year but become more erect the following year. Current cultivars are thornless and include ‘Chester’ and ‘Triple Crown.’ Their fruit ripens about one month after that of the erect type. The semi-trailing and trailing types should not be grown in areas where winter temperatures may drop below 0°F. Erect blackberries (Figure 14–6) have arching, self-supporting canes; some cultivars can tolerate temperatures of 10°F to 15°F without significant injury. Cultivars include ‘Arapaho,’ ‘Apache,’ ‘Ouachita,’ and ‘Navaho.’
Recently a new type of blackberry has been released. Primocane-fruiting blackberries produce fruit on the first year (primo) canes. Fruit can be produced well into the fall, and this type of plant does well in the foothills and lower elevations of western North Carolina.
Most bramble plants take two years to bear fruit. They produce new shoots from the crown of the original plant and from buds on the roots (shoots from the roots are called suckers). Shoots grow for one season and produce laterals (side branches). The second year, shoots and flowers develop from buds on the laterals. Fruit is borne on the tips of these new shoots (Figure 14–7). The canes (2-year-old shoots) are biennial and die after bearing fruit. However, some raspberry cultivars (such as ‘Heritage’) and blackberry cultivars (such as ‘Prime-Jan’) can produce fruit on the tips of first-year canes.
Table 14–4. Recommended blackberry cultivars for North Carolina.
| Cultivar | Areaa | Season | Hardiness | Yield | Fruit Character | |
|---|---|---|---|---|---|---|
| Erect | ||||||
| Apache | All | Mid | Good | Moderate | White drupelets | |
| Arapaho | All | Early | Good | Moderate–high | Earliest thornless; sweet | |
| Cheyenne | All | Mid | Good | Moderate | Large, firm fruit, good for processing | |
| Choctaw | M, P | Early | Moderate | High | Smaller seeds than most cultivars | |
| Navaho | All | Mid–late | Good | Moderate | Sweet; aromatic; large seeds; thornless; rust susceptible | |
| Ouachita | All | Mid | Good | High | Very sweet; large | |
| Shawnee | All | Mid | Good | Moderate-high | Produces heavily for several weeks | |
| Semi-trailing | ||||||
| Chester | All | Mid–late | Moderate | High | Semi-tart; large | |
| Triple Crown | All | Mid | Moderate | High | Semi-tart; large | |
| Primocane-fruiting | ||||||
| Freedom | All | Very late | Good | High | Tart, thornless canes | |
| Prime-Jan | M | Very late | Good | Moderate | Tart | |
| a S = sandhills-coastal plain; P = piedmont; M = mountains-foothills | ||||||
Site Selection, Planting, and Maintenance
Blackberries grow best in full sun but can tolerate light shade. Good air drainage is preferred because it helps protect the fruit from frost damage, but air drainage is not critical because blackberries bloom later than most fruits. Blackberries grow in a variety of soil types but prefer a well-drained soil. Have a soil test conducted to determine lime and fertilizer needs. The pH should be between 5.8 and 6.8.
Destroy perennial weeds and sod before planting. Avoid a site previously planted in peaches, apples, grapes, or brambles because of potential crown gall infection. Avoid planting within 600 feet of wild blackberries, which can spread double-blossom and orange-rust diseases.
For all types of blackberries, allow at least 10 feet between rows. Erect blackberries can be set as close as 3 feet apart in the row. Semi-trailing plants are very vigorous and should be spaced 6 to 10 feet apart in the row. Less vigorous trailing plants can be set 4 to 6 feet apart. Align plants carefully within a trellis, or build the trellis first.
Early spring is the best time to plant dormant plants. If the plants are dry when they arrive, soak the roots in water for several hours. Keep plant roots moist until planting time by either temporarily placing them in a shallow trench and loosely covering with soil or wrapping them in wet burlap. Prepare a planting hole large enough to allow the roots to spread out naturally. Do not prune the roots except to remove damaged ones. Plant so the crown is 1 inch below ground level; tissue culture plants should be set at ground level. Be sure to ask at the nursery if the plants were produced through the tissue culture process. Tamp the soil firmly to remove air pockets around the roots. Water all new plantings immediately.
Training and Pruning
Erect blackberries develop many root suckers in addition to new shoots that arise from the crown during the first and subsequent years. If all the suckers were allowed to develop, the planting would soon become a tangled thicket. Let the suckers grow in a band 12 inches wide; remove all others. Erect blackberries can be grown with or without a trellis, but tying the shoots to a trellis yields more berries. A single wire attached to posts about 3 feet above the ground can serve as a quick, easy trellis (Figure 14–8). When the new shoots reach a height of 30 inches to 36 inches in the summer, cut off the tips. This makes the canes branch and grow stout.
During late winter, prune the laterals back to 12 to 18 inches for convenient harvesting and larger berries. Remove any dead and diseased wood. Thin the canes and leave the most vigorous ones spaced to leave about six canes per plant. After harvest, remove all the fruiting canes and burn them or throw them away; this helps manage disease. Be careful not to damage the new green shoots because they will produce next year's crop.
During their first year, allow semi-trailing blackberry shoots to grow on the ground without trellising or tie them to bamboo stakes to keep them out of the way. The following spring, tie the shoots to the trellis. In the second and succeeding years, the shoots are more vigorous and upright. Tie them to a trellis as soon as they reach a height of 4 feet to 6 feet and then tip them (cut the tips off) to encourage lateral shoot growth.
Construct the blackberry trellis by stretching a wire between posts set 20 feet to 30 feet apart in the row. End posts should be 8 feet long and set 2 feet into the ground. For semi-trailing blackberries, use two wires at heights of 3 feet and 5 feet from the ground. The wire should be stapled loosely to allow for contracting in cold weather and manual tightening in the spring.
When primocanes reach 3 feet to 5 feet tall, they need to be pinched or tipped. Pinching does two things. First, it maintains a manageable canopy height. Second, it enables the canes to produce laterals. These laterals will produce fruit next year.
The ideal diameter to pinch is small enough to remove easily by hand and not use a pruner. Wider diameter cuts that need a pruner create larger wounds. These large wounds do not heal as quickly and are therefore more prone to infection. Figure 14–9 shows a cane before tipping and the same cane after it has been tipped.
The primary disease that occurs as a result of large pruning wounds is cane blight. Cane blight of blackberry is caused by Leptosphaeria coniothyrium. For more information on cane blight, see University of Georgia Extension Plant Pathologist Dr. Phil Brannen's interview and publication.
In the spring of the second season, prune the laterals back to 12 inches to 18 inches tall. This greatly increases fruit size. After harvest, remove all the old fruiting canes. Do not remove the new shoots that have started in the spring except to thin them to four to six shoots per crown. The best shoots should be trained to the trellis.
Allow first-year shoots on trailing blackberries to grow along the ground. In late winter or early spring, remove weak canes. Spread the remaining canes along the ground parallel to the trellis, with half the canes going in one direction and half in the other. Each group of canes should be divided again into two groups, one group twisted along the top trellis wire and the other group along the lower trellis wire, and tied securely to the wires. Then tip the canes back to no more than 10 feet in length to improve fruit size.
As with other types of blackberries, remove all the old fruiting canes after harvest.
Fertilization
A blackberry plant requires ½ ounce to 1 ounce of nitrogen per year depending on soil fertility. Well-balanced fertilizers such as 10-10-10 or 16-16-16 are well-suited to blackberries. To calculate the amount of fertilizer to apply, divide the desired amount of nitrogen you wish to apply by the percentage of nitrogen in the fertilizer (for a 10-10-10, the percentage of nitrogen is 10%, or for 16-16-16 it is 16%).
If you wanted to apply ½ ounce of N using a 10-10-10 fertilizer, this formula would apply:
\(\frac{0.5\ ounce}{0.10\ percent}\ N\ =\ 5\ ounces\)
If you wanted to apply 1 ounce of N using a 16-16-16 fertilizer:
\(\frac{1\ ounce}{0.16\ percent}\ N\ =\ 6.25\ ounces\)
The fertilizer amount should be broken up, with half being applied in early spring when growth starts and half applied in summer just after harvest. Spread the fertilizer in a 12-inch radius around the base of each plant. For late-ripening thornless blackberries, apply the fertilizer no later than July to avoid forcing late-season growth that would be subject to winter injury.
Weed Management
Blackberry plantings should be cultivated frequently or mulched well to manage grass and other weeds. Once they get started, weeds are difficult to control. Begin cultivating in the spring as soon as the soil is workable. Avoid deep cultivation that may cut the blackberry roots; undesirable suckers develop when roots are damaged. Herbicides can be useful on established blackberry plantings; consult the North Carolina Agricultural Chemicals Manual.
Irrigation
Young plants may need to be irrigated throughout the first season to improve survival and to promote root development. Blackberries require abundant moisture while the berries are growing and ripening. Moisture stress at that time can reduce both yields and the production of shoots for the following year. If rainfall is less than 1 inch per week, provide supplemental water.
Using drip irrigation or a soaker hose rather than overhead irrigation reduces the total amount of water needed and minimizes the potential of fruit rot (Figure 14–10). A minimum rate of drip irrigation for mature blackberry plants is 2 gallons of water per day per plant while berries are developing.
Mulching reduces watering frequency and aids in the management of weeds and grasses that compete for moisture and nutrients. Good mulching materials include pine straw, wood chips, and seed-free grain straw, such as wheat or rye.
Harvesting
The harvest of trailing and some erect thorny blackberries begins about a week or two after the strawberry season (about the first of June in the NC piedmont). Semi-trailing thornless types usually do not begin ripening until midsummer. For direct-marketed berries that are not shipped, do not harvest fruit when it first turns black; wait until the fruit is dull black in appearance. Sugar levels increase as the berry becomes dull colored.
For more information on blackberries, see NC State Extension's Blackberry and Raspberry Portal.
RASPBERRIES
Raspberries grow best in cool climates and are not well-suited for hot, humid southern weather. The cultivar ‘Dormanred’ is an exception that does reasonably well in the South (Table 14–5).
Types and Growth Habits of Raspberries
Like blackberries, raspberries have a biennial growth habit and can be divided into two groups based on their fruiting pattern. Primocane-fruiting types produce fruit on the first-year canes in late summer through fall and on those same canes the next spring. Floricane-fruiting types produce fruit on the second-year canes in early summer.
Raspberries may or may not need trellising depending on whether they have an erect, semi-erect, or trailing habit. ‘Dormanred’ has a trailing habit and ‘Mandarin’ a semi-erect habit. Black raspberries (blackcaps) have arching canes that root at the tip; they do not require trellising.
Purple and yellow raspberries are less common (Figure 14–11). Though they are not very productive, they can provide a range of fruit color to harvest.
Site Selection, Planting, and Maintenance
Site selection, planting, and, maintenance are basically the same as for blackberries (see Site Selection, Planting, and Maintenance for blackberries). In the NC piedmont and NC coastal plain, however, raspberries do best when planted in partial shade provided by a canopy of medium-tall trees (30 feet to 40 feet tall).
Plant Selection and Installation
Plants grown from tissue culture are preferred as they should be free of viruses and phytophthora root rot.
Plant red raspberry cultivars 2 inches to 3 inches deeper than they grew in the nursery. Space them 2 feet to 3 feet apart in the row. Set black raspberry cultivars at the same depth they grew in the nursery, and space plants 2½ feet apart. Rows should be 8 feet to 10 feet apart. The middles can be planted in sod. Cut off all canes to ground level at planting to help manage disease.
Training and Pruning
Black raspberries: They have arching canes so they do not need to be trellised. The plants, however, can benefit from a trellis. Black raspberries are treated much the same as erect blackberries (see above). Summer prune by pinching them back when new shoots reach 18 to 24 inches. It is sometimes necessary to do this a number of times, as not all shoots will be tall enough for pinching on the same date. The three to five buds below the pinched area develop vigorous lateral growth; this allows the canes to become self-supporting. In the spring, prune the laterals back to 12 to 18 inches (Figure 14–12).
Red Raspberries: Because the most productive portion of red raspberry canes is the top third of the cane, trellising is strongly recommended rather than pruning the plants into hedgerows. Space posts 20 feet to 30 feet apart and attach wires at a 4-foot to 5-foot height (Figure 14–13). For the ‘Dormanred’ cultivar, use two wires located 5 feet above the ground. A single wire can be used (for cultivars other than ‘Dormanred’), and the canes should be loosely tied to the wire.
Allow root suckers to develop in a 12-inch to 15-inch band in the row; all other shoots should be removed. Do not pinch the tips of new shoots in the summer. During late February, thin the canes to 4 inches to 6 inches apart along the width of the row. Be sure to select healthy canes and remove weaker ones. Head the canes back to about 5 feet tall.
Remove all fruiting canes after harvest; make cuts close to the ground. Thin new shoots, leaving three to four shoots per foot of row. If a trellis is used, tie the new shoots loosely to it.
Primocane-fruiting types may be grown exclusively for a late-summer crop. For the trellis, use a cross bar or horizontal trellising system. Two-foot cross arms are attached to the posts at a height of 4 feet, and two wires are secured at the ends of the cross arms. The new canes grow between and are supported by the wires with a minimum of tying. Cut the canes to within 2 inches of the ground before new growth starts in the spring. This does not work with other, nonprimocane red raspberry cultivars because it would eliminate the wood that bears fruit.
Researchers have found that yields on raspberries double when grown under a high tunnel. Tunnels also allow for an extended harvest season.
Harvesting
Raspberries can have a long fruiting season. Floricane-fruiting types ripen soon after the strawberry season finishes, whereas primocane-fruiting types can be harvested until a hard frost occurs in the North Carolina mountains. Ripe berries should be rolled off the plant rather than squeezed or pulled. Raspberries are notorious for their poor shelf life. Pick them in the morning after the dew has dried and when the air is cool. Refrigerate or use promptly.
For more information on raspberries, see the Blackberry and Raspberry Portal at NC State.
Table 14–5. Recommended raspberry cultivars for North Carolina (yield in the NC piedmont may decline in time due to stress).
| Type | Cultivar | Season | Region* | Yield | Berry Size | Flavor | Remarks |
|---|---|---|---|---|---|---|---|
| Red Cultivars | Dormanred | Summer | CP, P, M | Medium | Medium | Fair | Shiny fruit, good for jams |
| Latham | Summer | P, M | Medium | Medium | Fair | Fruit can be soft, plant is vigorous | |
| Joan J | Everbearing | M | High | Large | Good | Early everbearing season | |
| Caroline | Everbearing | M | High | Large | Good | Mid everbearing season | |
| Nantahala | Everbearing | M | Medium | Medium | Excellent | Sold as 'Sweet Repeat' in some catalogs, late everbearing season | |
| Black Cultivars | Allen | Summer | M | Medium | Large | Good | Good adaptation, early to midseason |
| Bristol | Summer | M | Medium | Large | Good | Disease susceptible, midseason | |
| Jewell | Summer | M | High | Large | Excellent | Firm berry; hardy, most widely adapted and reliable yield, mid-season | |
| *M= Mountain, P=Piedmont, CP=Coastal Plain | |||||||
Table 14–6. Raspberry cultivation in North Carolina.
| Type | REGION | |||||
|---|---|---|---|---|---|---|
| Coastal Plain | Piedmont | Foothills & Mountains | Fruit Production | Trellis | Prune | |
| Primocane | None recommended | None recommended | Caroline, Heritage, Nantahala (Figure 14–14), Autumn Britten, Himbo Top, Joan J, Anne | First-year canes, late summer, and second year | Cross bar or Horizontal | |
| Floricane | Dormanred | Dormanred, Mandarin if available | Dormanred, Lauren, Moutere, Nova, Latham | Second-year canes, early summer | Summer prune new shoots at 18 to 24 inches | |
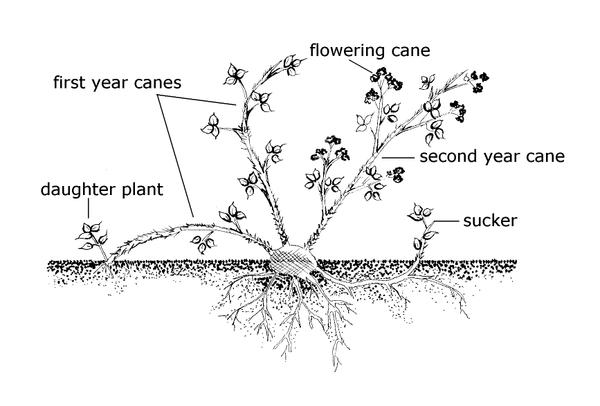
Figure 14–6. Parts of a bramble plant.
Renee Lampila
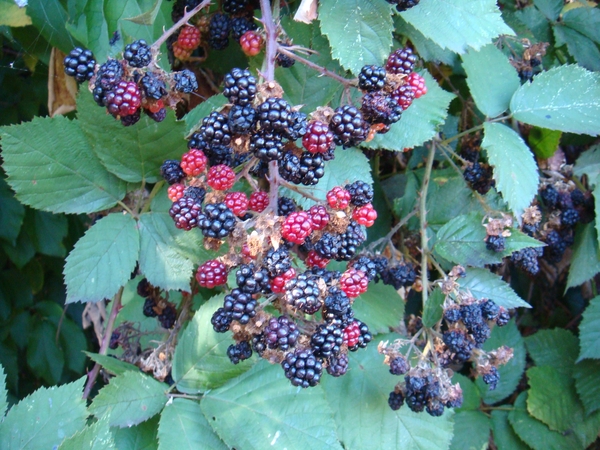
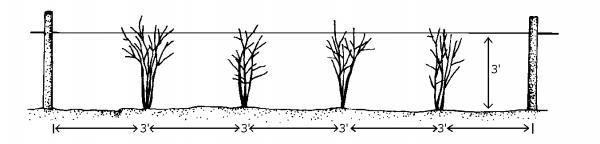
Figure 14–8. A single wire and post trellis for brambles.
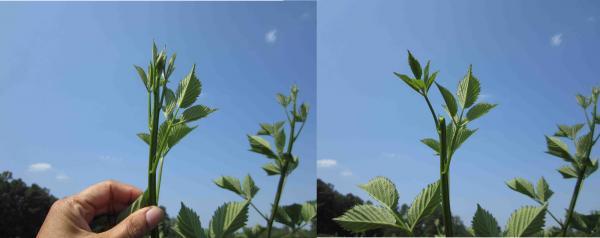
Figure 14–9. Blackberry primocane before and after tipping.
Gina Fernandez
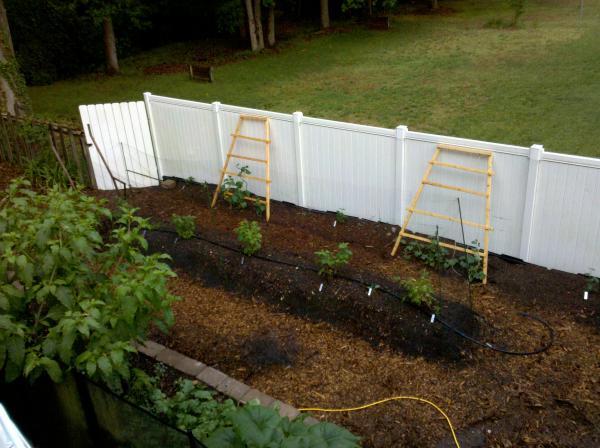
Figure 14–10. A soaker hose on these newly planted raspberry and blackberry plants conserves water.
Lucy Bradley CC BY 2.0
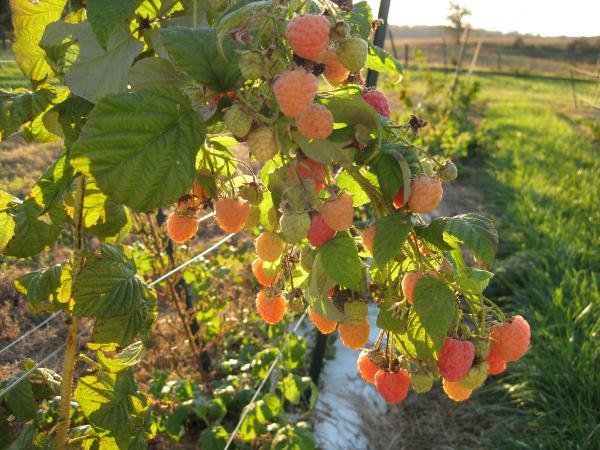
Figure 14–11. Yellow raspberries.
Gina Fernandez
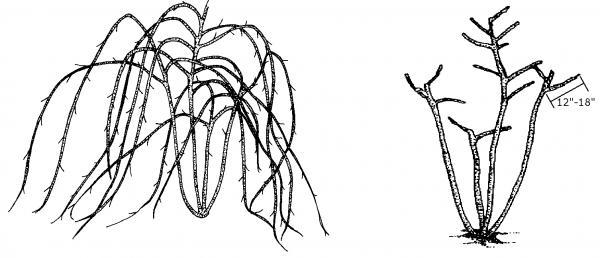
Figure 14–12. Left: Black raspberry plant before spring pruning. Right: The same plant after pruning.
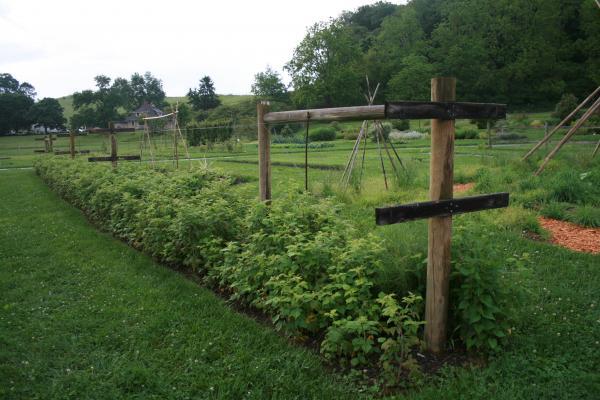
Figure 14–13. To trellis raspberries, space posts 20 feet to 30 feet apart and attach wires at a 4-foot to 5-foot height.
Lucy Bradley CC BY 2.0

Blueberries
Blueberries (Vaccinium species) are native to North America, and several species may be found growing wild in North Carolina. These wild-growing bushes are well-known to hikers and other outdoor enthusiasts, but their berries are not often harvested due to the small berry size and sparse yield. Economically important types of blueberries grown in North Carolina are improved cultivars (cultivated varieties) of three types: highbush (Vaccinium corymbosum), southern highbush (V. corymbosum interspecific hybrids), and rabbiteye (V. virgatum, syn. V. ashei).
Other well-known Vaccinium species that are not grown in North Carolina due to lack of sufficient winter chilling include lowbush blueberries (V. angustifolium and V. myrtilloides) and the cranberry (V. macropcarpon).
Blueberries are relatively easy to grow but demand special site and soil preparation. They are acid-loving, wetland plants requiring a well-drained, highly organic soil with constant moisture. Blueberries do not grow well under conditions where other plants may be expected to thrive. They can be grown successfully throughout the state if the grower has a clear understanding of the crop requirements. Large-scale commercial production, however, is limited to certain soils in the southeastern NC coastal plain. Despite their name, highbush and southern highbush plants (6 feet to 8 feet tall) are not as tall as rabbiteye plants (15 feet tall). Bushes are fully mature by year 8 and can remain productive for 20 years or more with proper care.
Highbush blueberries, sometimes called “northern highbush blueberries,” were first selected from the wild in New Jersey (Figure 14–15). They are well-adapted to colder climates and are the best species for the western North Carolina mountains at higher elevations (> 2,500 ft). Highbush cultivars often do not grow well in the North Carolina piedmont and North Carolina coastal plain because highbush blueberries are not adapted to those soils. Often the North Carolina coastal plain does not receive enough winter chilling to allow highbush plants to leaf and flower normally the following spring.
Southern highbush blueberries are intermediate between highbush and rabbiteye in their chilling requirements, winter hardiness, and soil adaptability (Figure 14–16). Southern highbush cultivars account for a large proportion of new commercial acreage in the Southeast, but many cultivars are early blooming and are not suitable for home garden use because of the increased risk of crop loss due to spring freezes.
Rabbiteye blueberries get their name from the immature fruit; the light color and pink blush on the blossom end look like a rabbit's eye (Figure 14–17). The rabbiteye blueberry is a southern species native to the Gulf Coast states. Rabbiteye blueberries are well-known for their vigor and productivity. They ripen later and over a longer period than highbush berries. The fruit has a slightly tougher skin and better storage life than highbush. Rabbiteyes are more tolerant of drought, heat, and a wider range of soil types than highbush.
Table 14-7. Blueberry cultivation in North Carolina.
| Mountains | Piedmont | Coastal Plain | |
|---|---|---|---|
| Does Well | Highbush, Rabbiteye (at elevations below 2,000 ft to 2,500 ft, depending on site) |
Rabbiteye | Rabbiteye |
| Can Survive | Highbush, Southern highbush |
Highbush, Southern highbush |
Cultivar Selection
Cultivars vary in their ability to grow on different soil types and also vary in their need for cold winter temperatures (hours below 45°F). For instance, in the North Carolina coastal plain, cultivars with a chill requirement between 350 hours and 1,000 hours do best. Cultivars that require fewer than 350 hours often bloom too early and are damaged by a late frost, while those requiring more than 1,000 hours may not receive enough chilling to leaf and bloom normally. You must plant at least two different varieties of blueberry for pollination and fruit set. There are many cultivars that thrive in North Carolina (Table 14–8).
Table 14–8. Recommended blueberry cultivars for North Carolinaa.
| Highbushb | Rabbiteyec | Highbush and Southern Highbushd |
|---|---|---|
| Duke | Robesone (early pentaploid) |
O'Neal (begins May 15 in sandhills-coastal plain) |
| Sunrise | Climax | Stare |
| Drapere | Premier | Duke |
| Bluecrop | Columbuse (mid-season) |
New Hanovere |
| Echota | Ira | Legacy (begins June 1 in sandhills-coastal plain) |
| Blueray | Tifblue | |
| Toro | Powderblue | |
| Berkeley | Onslowe | |
| Jersey | ||
| Patriot | ||
| Libertye | ||
| Elliott | ||
| Aurorae | ||
| a Listed in order of ripening, earliest to latest. You must plant at least two different varieties of blueberry for pollination and fruit set. b For the western mountains above 2,500 feet or with extended winter temperatures below 10°F. c For most sandhills-coastal plain, piedmont, and foothills sites below 2,500 feet with minimum winter temperatures usually above 10°F. d For sand-based, high-organic soils in the sandhills-coastal plain; on a trial basis only for well-drained, amended, mulched, and irrigated sites in the piedmont and foothills. e Trial basis only. |
||
Growth Cycle
Blueberries are upright, deciduous, thornless woody perennials, forming multi-trunked bushes.
Winter. Blueberries lose their leaves in winter. Healthy new canes have smooth red bark, while older wood is gray (Figure 14–18). Winter pruning is performed every year to remove some gray, older canes and encourage new growth. Bushes that are not pruned eventually become less productive, with smaller, less flavorful fruit.
Spring. Flower buds formed the previous fall open in spring, and flowers are pollinated by both native insects (bumblebees, solitary bees) and honey bees (Figure 14–19); most blueberry cultivars cannot form fruit without insect pollination. Flower buds open sequentially in the spring, from the tip down. The flowers within a bud open in a similar manner, with the flowers nearest the tip opening first. Flower bud age affects blooming; buds on older, thinner fruiting twigs open before buds on younger, thicker wood.
Summer. Berries develop and ripen 45 to 80 days after bloom, depending on the cultivar, and ripen over a period of three weeks to five weeks. Throughout the year, leafy blueberry shoots grow in flushes of rapid growth, stopping as the uppermost (apical) leaf bud aborts, causing the very tip of the shoot to stop growing. Then, another leaf bud near the tip of the shoot opens, and another flush of growth begins. Each shoot may have several of these growth flushes during the season, and each may grow 6 inches to 10 inches long. Extensive growth usually ceases in midsummer as flower buds begin forming in leaf axils at the tips of twigs (Figure 14–20).
Fall. Most healthy shoots develop three to eight flower buds; each flower bud can produce up to 10 flowers the following spring. Blueberries develop attractive fall colors (mostly deep reds, but some yellows), and the leaves drop in early winter (Figure 14–21).
Site Selection, Planting, and Maintenance
Site Selection
Free air movement is especially important in the spring when late spring freezes can kill the emerging flowers. Low-lying planting sites with poor air movement tend to be colder than surrounding higher areas. Avoid areas surrounded by trees. Trees provide too much shade, compete with plants for water and nutrients, and interfere with air movement around the plants. Highbush blueberries should be planted in areas that have 800 to 1,200 hours below 45°F each winter and a minimum winter temperature of not less than -10°F. In North Carolina, highbush blueberries can be grown in the coastal plain, piedmont, and mountains, but they are more difficult to grow than rabbiteyes. Rabbiteyes generally need 400 to 600 hours of winter chilling and a minimum temperature not below 5°F to 10°F. They can be grown in the North Carolina coastal plain, piedmont, and in the mountains at elevations below 2,500 feet.
Blueberries require soil that is acidic and well-drained but with good moisture retention. Have a soil test taken in the fall before planting. The optimum pH for blueberries is around 4.5. Poor growth and leaf chlorosis can be expected when the pH is above 5.0 for highbush and above 5.3 for rabbiteye.
Preparation
Many home garden soils have a pH that is too high for blueberries. If the pH is above 6.0, planting is not recommended. If sandy soil has a pH below 6.0 but above 5.3, apply wettable sulfur (90% S) at the rate of 1 pound (2½ cups) per 100 square feet to lower the pH by one unit (from 6.0 to 5.0, for example). On soils containing silt, clay, or more than 2% organic matter, apply 2 pounds per 100 square feet for the same pH reduction. Some soils in the NC mountains are very high in manganese. When growing blueberries on such soils, keep the pH around 5.0. Any sulfur applications should be made a year before the anticipated planting time. Check the pH one or two times during the first year (after applying sulfur) to determine if more sulfur is needed. Do not plant in high pH soils without first lowering the pH and adding acidifying organic matter.
Prior to planting, all blueberries benefit from the incorporation of organic materials such as peat moss, composted pine bark, or decomposed softwood sawdust into the soil. Hardwood sawdust is not recommended because it is often attacked by decay fungi. Do not use undecomposed sawdust or wood chips to amend soil. Instead, compost the sawdust and use wood chips as a surface mulch to suppress weeds.
A blueberry plant's root system is shallow, fibrous, and lacks root hairs. Often 90% of the root system is in the top 6 inches of soil. Highbush blueberry roots do not penetrate tight, clay soils easily and require a loose, crumbly soil to develop an extensive root system. For heavier soils, incorporate organic materials such as composted pine bark or decomposed softwood sawdust to improve soil aeration.
Blueberry roots cannot tolerate standing water for extended periods during any part of the year. Check for drainage problems before planting; dig a hole 6 inches to 8 inches deep and observe the water level after heavy rains. Water should not remain for more than 24 hours. If the drainage is not good, choose another planting site or prepare a 4-foot-wide raised bed.
Blueberries grow best in soils with high levels of organic matter (3% or more), such as those found in areas of the southeastern North Carolina coastal plain where the commercial blueberry industry is located and in certain high-elevation sites in the NC mountains. Most mineral soils in the North Carolina piedmont contain less than 1% organic matter. To increase the organic matter content, apply and incorporate a 3-inch to 4-inch layer of organic matter in a band 36 inches to 48 inches wide.
Planting
Do not plant in heavy clay soil; raised beds are necessary on most of these sites. Apply the band of organic material on the soil surface and rototill into the surface soil, but make sure to form a mound (for single plants) or ridge (for rows of plants) at least 10 inches to 12 inches above the surrounding soil surface. The mound or ridge ensures adequate drainage, but it still needs to be watered thoroughly two to three times per week during drought periods.
Two-year-old potted or bare root nursery plants (12 inches to 36 inches tall) are generally used. Bare root plants should be transplanted in late winter to early spring. Roots must be kept moist at all times. Plants more than 3 years old or less than 2 years old may die from water stress the first growing season. Potted plants can be transplanted in the late fall or spring. Problems with survival and growth often occur if plants are pot-bound. With container plants it is essential to score (cut with a knife) the root ball several times to prevent the roots from growing in a circular manner.
Space rabbiteye plants 6 feet apart in the row; rows should be 10 feet to 12 feet apart. Space highbush plants 4 feet to 5 feet apart; rows should be 8 feet to 10 feet apart. Plant in a raised bed at the same depth as the plants grew in the nursery, and apply a 3-inch to 5-inch layer of pine bark, wood chips, aged sawdust, or pine needle mulch. Leave at least 3 inches around the trunk clear of mulch to prevent insect, disease, and pest problems. Avoid using fine hardwood sawdust as it may form a crust that prevents water from entering the soil.
Prune the plant to leave only the strongest three or four shoots. The plant has the best chance of survival and subsequent development if two-thirds of the top growth on bare root and one-half on potted plants is removed. Also, after planting, remove all flower buds to stimulate good shoot and root development (Figure 14–22). Blueberry flowers and fruits drain considerable energy from the plant; fruit yields in subsequent years can suffer because of poor plant development in the first two establishment years.
Setting out new plants (Figure 14–22) — Always prune or rub off all flower buds and cut back 1//2 to 2/3 of the height at the time of planting. For potted plants, gently separate and spread out the roots so that the root mass is no longer the shape of a pot.
Fertilization
Blueberries are easily damaged by excess fertilizer. Fertilizer dropped in lumps or piles under the bush can cause serious root damage or death. Do not fertilize immediately after planting; wait until the first leaves have emerged, then apply 1 tablespoon of an azalea fertilizer or 10-10-10 in a circle 1 foot from the plants. Repeat at approximately six-week intervals before rainfall or irrigation until mid-August in the NC coastal plain and mid-July in the NC mountains. Use ½ tablespoon of urea (48-0-0) instead of a complete fertilizer for the second and subsequent applications if the phosphorus index was above 60 on the soil test.
For the second year, double the first year's rates and increase the circle around the plants to 1½ feet. Make the first application when new growth begins in spring. For bearing plants, apply 1 cup of a complete fertilizer such as 10-10-10 in a circle 3 feet from the plant as new growth begins. If more vigorous growth is desired, side-dress with ¼ cup of ammonium nitrate at six-week intervals until July 1. For mature plants, 6 inches to 12 inches of new growth per year is adequate; if the plant has grown beyond this range, decrease the fertilizer rate.
Ammonium nitrate (33-0-0) may be difficult to obtain due to security concerns about its explosive properties. If necessary, urea (46-0-0) can be used as a substitute for ammonium nitrate.
If the soil pH is 5.0 to 5.5 in an established planting, side-dress with ammonium sulfate (21-0-0) rather than ammonium nitrate (33-0-0). If the pH is above 5.5, apply wettable sulfur in a narrow band under the drip line of the bush at the rate of 1/10 pound per bush to lower the pH by one unit (for instance, 6.0 to 5.0). Do not overapply sulfur, and use only after soil testing to determine pH. Sulfur requires months of warm weather to break down and reduce pH and should not be applied every year.
Mulching
If mulch is applied after planting and replaced at the rate of 2 inches per year, few weed problems should develop. Hand pull the occasional weeds that do grow. Try to avoid using a hoe around blueberries as they are shallow rooted and easily damaged. If row middles are in sod, mow often to prevent running grasses and weed seeds from invading the mulched area.
Irrigation
Blueberries are very sensitive to drought, and supplemental irrigation is absolutely essential the first and second years after planting. Hand watering the soil around the plant with a hose is possible for a few bushes; a soaker hose usually gives more uniform watering for maximum yield. Large-scale plantings are most often watered with drip irrigation lines using pressure-compensated emitters. In the southeastern NC coastal plain where surface and well water is abundant, overhead irrigation is used both for drought relief and for freeze protection.
Pruning
All cultivated species require annual pruning to remove dead, diseased, or insect-infested wood and to manage bush height and shape. Pruning stimulates new, vigorous growth on which the next year's fruit is borne. And pruning helps to manage fruit production by increasing berry size and preventing overcropping, which can result in small, poor-quality fruit and may shorten the life of the plant.
The following steps can be used at each bush to rapidly eliminate undesirable growth and to select for flexible, upright, and productive canes.
Tools and Techniques
Most blueberry pruning is done during the dormant (winter) season after the leaves have fallen. Mature canes can be up to 2 inches in diameter, so long-handled loppers capable of cutting large stems are essential. Smaller one-handed pruners are used for finish work and for shaping young bushes. Avoid leaving stubs and do not treat pruning cuts.
Steps in Winter Pruning (November – March) (Figure 14–23)
-
Define the crown. Pruning starts at the ground, not at the top of the bush. Visualize a circle 12 to 18 inches in diameter around the crown of the bush, and remove ALL shoots of any age that have emerged from the ground outside the circle. This narrows the base of the bush to facilitate hand-harvesting.
-
Remove low-angled canes and crossovers. Low-angled canes that are too close to the ground are undesirable because the fruit is more likely to contact the ground, or to be contaminated by rain-splashed soil. Remove these low-lying branches, and also any canes that angle through the bush (crossovers). What remains is a narrower bush consisting of the most upright canes.
-
Open the center. If needed, remove one to three large canes from the center of the bush to reduce crowding, improve air circulation and phase out older canes. Old canes to target for removal are larger and grayer in color, and are more likely to be covered with a fuzzy growth of foliose lichens.
-
Thinning and heading back. As a blueberry cane ages, it branches repeatedly, resulting in smaller and smaller diameter lateral twigs in successive years. If left unpruned, this results in excessive numbers of unproductive, matchstick-sized shoots, each with a few tiny berries. To avoid reaching this stage, thin canes by making cuts to selectively remove clumps of twiggy, brushy-looking, matchstick-sized laterals (Figure 14–24). At this time also cut (head back) any long whips or canes to a convenient height for picking.
These basic hand-pruning steps can be used with any blueberry bush. Every cultivar has a slightly different growth habit, and only experience will guide how to manage each one. Some cultivars produce too many new shoots from the ground and require a lot of thinning, while others are less prone to sprouting. The goal should be to have a multi-trunked bush with strong canes of all different ages emerging from the ground, so as each older cane is removed, a younger cane is already there to replace it.
About Flower Buds
Yield reduction via flower bud removal occurs when winter pruning is done properly. Flower buds are readily visible during winter pruning, and it is tempting to leave too many, which is a mistake. Expect to remove at least a third of the flower buds during pruning to prevent the bush from being overloaded with fruit in one year. This results in plant stress that causes reduced yields in the following years. Several years of this type of stress eventually requires even more severe pruning to bring the bush back into production.
Pruning Young Blueberry Plants
Young blueberry bushes are usually planted in late winter (February or early March) while fully dormant and leafless. During the first year, flower buds are removed by pruning, or by stripping off flowers by hand after the blooms emerge. In subsequent years, flower buds must be thinned to prevent overcropping and to promote vegetative growth vital to the establishment of a full-sized bush.
The following diagrams show the growth of a single blueberry bush for the first three years, with "before" and "after" pruning comparisons each February.
Year one (Figures 14–25)—The goal is to avoid fruit production entirely. With removal of all flower buds at the beginning of year one, the bush grows vegetatively, and by fall of the first year has increased in size and produced more flower buds.
Year two (Figure 14–26)—In year two, remove low-lying or weak shoots and cross-overs, keeping the healthiest, large upright canes. Some flower buds may be allowed to produce fruit in year two if the bush grew vigorously in year one.
First crop? (Figure 14–27)—The bush may be allowed to produce a few berries in year two; however, the goal is still to promote vegetative growth that will build the structure of the bush for years to come.
Year three (Figure 14–28)—The bush is well established and capable of producing a significant crop. However, routine pruning should still remove 40% to 50% of the flower buds. Begin selecting new basal shoots that will replace older canes.
Harvest
Blueberry fruit ripens approximately two months after blooming, although harvest time varies with cultivar, weather conditions, and plant vigor. Plants should produce about ½ pound per bush in the third year, and 1 pound to 2 pounds per bush in the fourth year.
Highbush cultivars begin ripening in mid-May in the southeastern North Carolina coastal plain and in early July in the North Carolina mountains. Highbush blueberries are the best quality when picked every five to seven days, depending upon temperature. With good care, mature highbush plants should produce more than 8 pounds of fruit each year.
Rabbiteye harvest begins in mid-June in the southeastern North Carolina coastal plain. Rabbiteye fruit continues to increase in size and flavor for some time after berries turn blue and appear to ripen. Allow the fruit to become fully ripe before picking (three to six days after turning blue). Rabbiteye cultivars can produce 12 to 25 pounds per year.
Birds also harvest blueberries. Nylon netting draped over the bushes or supported on a framework is usually the best method, but is not practical for large plantings. Some success with bird management is achieved with scare devices and electronic bird distress calls.
Insects and Diseases
Blueberries have historically been grown successfully in North Carolina without using insecticides or fungicides. In 2009, however, a new exotic fruit fly, the spotted wing drosophila (SWD), became a problem. Most sites are affected by this insect and some may require the use of organic or conventional insecticides. Some homeowner sites may also require fungicide sprays to manage mummy berry and other fungal diseases. See Appendix C “Diagnostic Tables,” for common problems that affect blueberries. For more information, see the NC State Blueberry Portal.
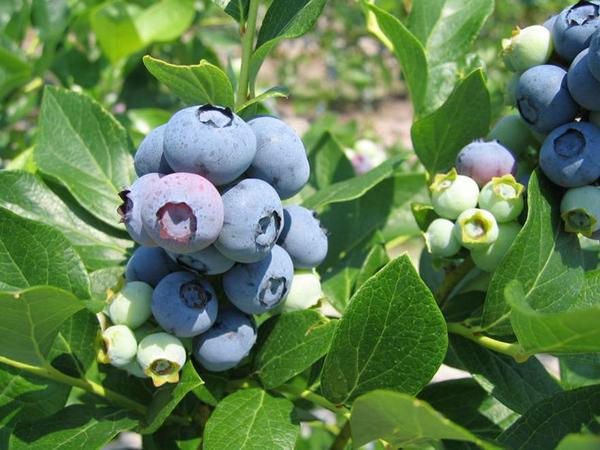
Figure 14–15. Highbush blueberry.
Bill Cline
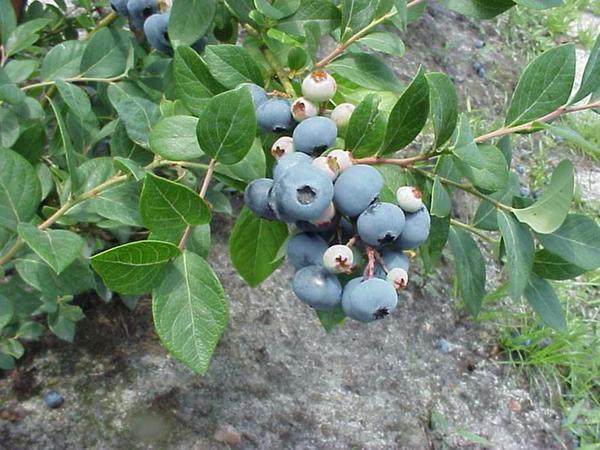
Figure 14–16. Southern highbush blueberry.
Bill Cline
Figure 14–17. Rabbiteye blueberry.
Bill Cline
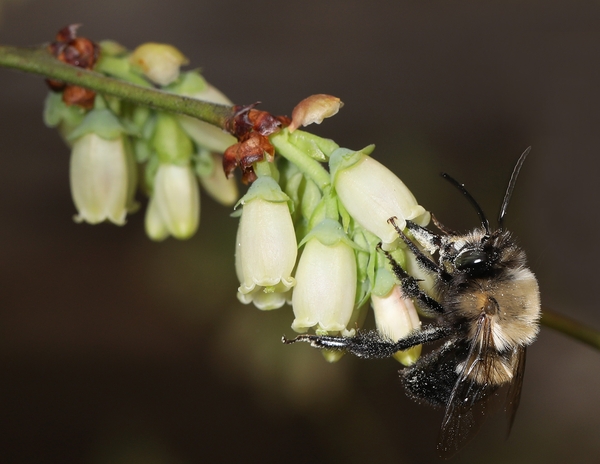
Figure 14–19. Blueberry digger bee (Habropoda laboriosa) pollinating a Highbush blueberry flower.
Judy Gallagher, Flickr CC BY 2.0
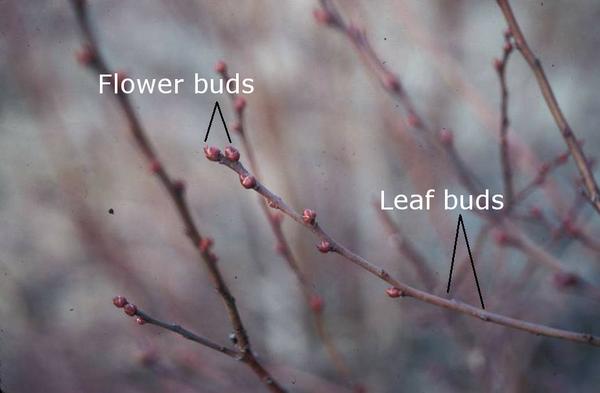
Figure 14–20. Blueberry buds for future flowers and leaves.
Bill Cline
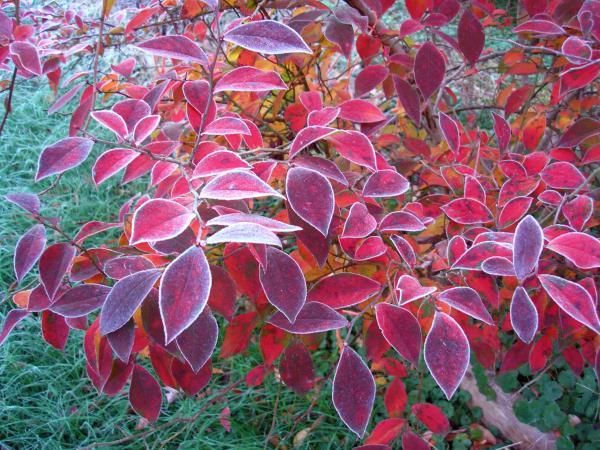
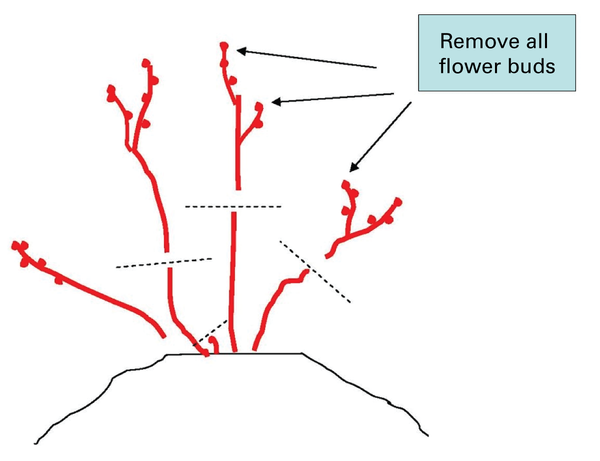
Figure 14–22. Blueberry pruning at planting.
Bill Cline
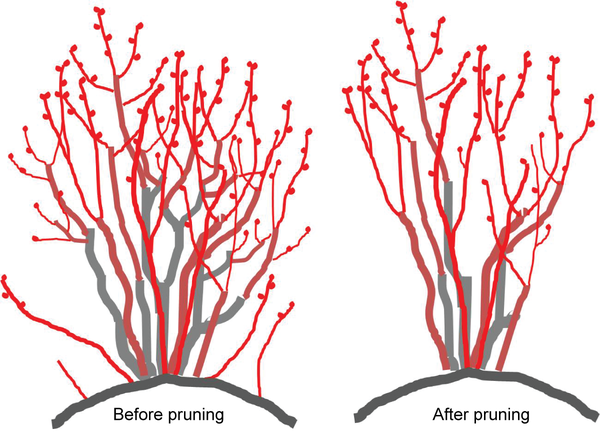
Figure 14–23. Properly pruning a blueberry bush November – March.
Bill Cline
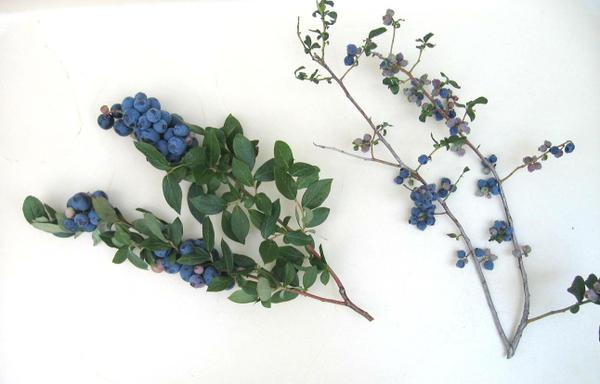
Figure 14–24. Healthy branches on the left, "matchstick" branches on the right.
Bill Cline
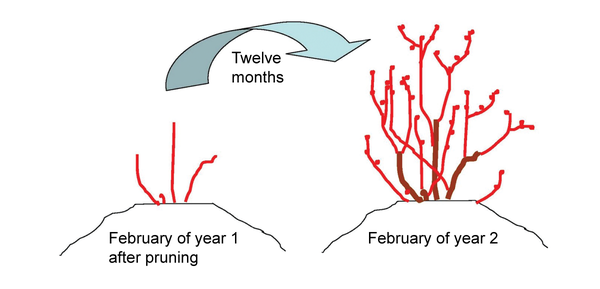
Figure 14–25. Growth during the first year after pruning.
Bill Cline
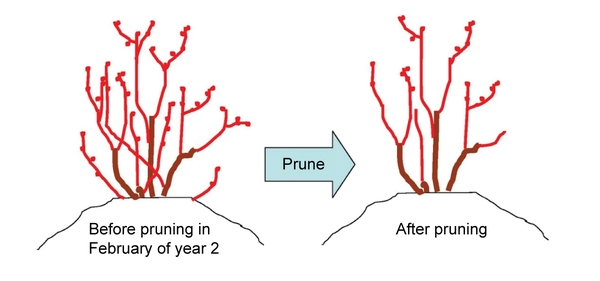
Figure 14–26. Growth February of the second year.
Bill cline
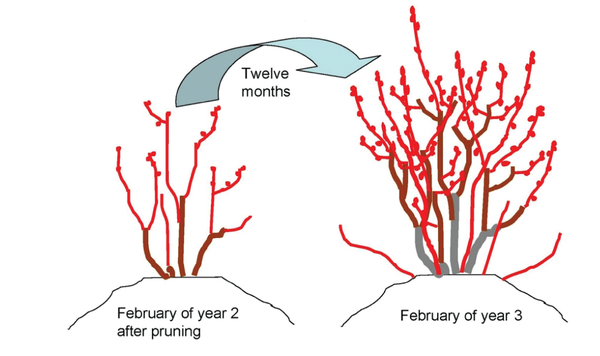
Figure 14–27. Growth during the second year.
Bill Cline
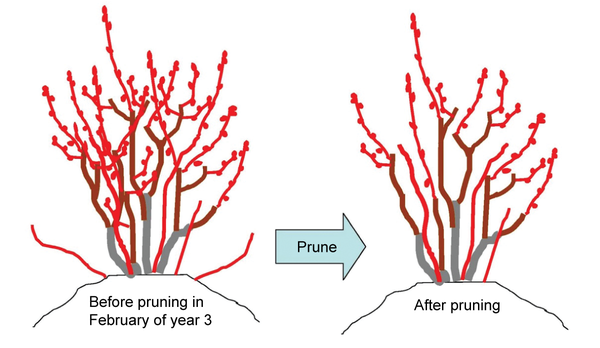
Figure 14–28. Growth during the third year.
Bill Cline
Grapes
Growing grapes in North Carolina home gardens can be challenging, but also rewarding and tasty. Careful selection of cultivars that are well-adapted to your specific soil conditions and climate ensures success. Bunch grapes perform well in the NC Piedmont and NC mountains, while the NC coastal plain can support muscadine grapes. One grapevine can produce up to 10 pounds of fruit. Though grapevines are self-fertile, planting multiple cultivars extends your harvest season (Figures 14–29).
Parts of a Grapevine
Trunk – the main perennial, woody part of the vine.
Buds – the conical swellings found at each node on shoots and canes.
Shoots – the current season's growth; as they mature, they are called canes.
Canes – the mature shoots of the current season or the dormant growth of the preceding season that have five or more nodes.
Arms or cordons – the horizontal perennial part of the vine along which fruiting spurs are distributed.
Renewal spurs – canes pruned to two or three buds; canes from these spurs are selected for fruit production the following season when vines are cane pruned.
Bunch and Wine Grapes
Bunch grapes are one of the most difficult fruits to grow in North Carolina due to disease susceptibility. They also have very specific soil requirements. Success depends on attention to the details of cultivar and rootstock selection, soil management and amendment, training, pruning, and particularly pest and disease management. All bunch grapes are self-fertile and may be planted alone or with other cultivars
Cultivar Selection
Bunch Grapes: There are three basic types of bunch grapes grown in North Carolina. American bunch grapes produce small clusters with big berries and have moderate yields, good disease resistance, and cold hardiness. They grow best in the lower elevations of the NC mountains and NC piedmont. In the NC coastal plain, Pierce's disease kills or shortens the life expectancy of bunch grapes. Some of the newer cultivars are seedless for fresh consumption, but they are also susceptible to Pierce’s disease. Most American grapes are grown on their own roots, although they may benefit from being grafted on rootstock. The bunch grapes listed in Table 14–9 are the most suitable for growing in the NC piedmont and in western North Carolina. Six grapevines should furnish enough fruit for most families. A mature vine can yield 10 to 20 pounds or more of fresh fruit. Early-season table grapes begin ripening in midsummer.
Table 14–9. American bunch grapes recommendations for North Carolinaa (these cultivars are suitable for home production in the NC piedmont and NC mountains).
| Cultivar | Season | Color | Berry Size | Best Useb | Skin | Comments |
|---|---|---|---|---|---|---|
| Catawba | Late | Red | Medium | F, J, W | Slipskin | All purpose grape; thick skin; seeded |
| Concord | Early- Mid | Black | Medium | F, J | Slipskin | Ripens unevenly within the cluster in warm to hot climates; thick skin; seeded |
| Delaware | Mid | Red | Small | F, J, W | Slipskin | Excellent wine quality for American type; good flavor; thick skin; seeded |
| Faith | Early | Blue | Medium | F | Non-slipskin | Seedless though occasional seed traces can be found; uneven fruit set some years; occasional slight skin astringency |
| Gratitude | Mid-Late | White | Medium | F | Non-slipskin | Seedless; exceptionally thin skin; very tight clusters; occasional winter injury |
| Hope | Mid | White | Small–medium | F | Non-slipskin | Seedless; thin skin; slight fruit cracking after rain; tight clusters |
| Joy | Early | Blue | Small–medium | F | Non-slipskin | Seedless; thinnest skin of University of Arkansas cultivars; soft texture; occasional variable berry set (some shot berries) and shatter of ripe berries in some years |
| Jupiter | Very early | Blue | Large | F | Non-slipskin | Semi-crisp; seedless with some small soft seed traces |
| Mars | Early | Blue | Medium | F | Slipskin | Thick skin; seedless with occasional seed traces; very winter hardy |
| Neptune | Early-Mid | White | Medium | F | Non-slipskin | Seedless though some soft seed traces can be found |
| Niagara | Mid | White | Medium | F, J | Slipskin | Harvest early if a reduction in foxy (musty odor/flavor) character is desired; thick skin; seeded |
| Norton | Late | Black | Medium | W | Slipskin | High acid, high pH fruit; small clusters; very vigorous; also known as Cynthiana |
| Reliance | Early | Pink | Medium | F | Slipskin | Hardiest of University of Arkansas cultivars; seedless and seed trace free; susceptible to fruit cracking with rain near maturity |
| Saturn | Early | Red | Medium | F | Non-slipskin | Crisp texture; moderately hardy; seedless but small seed traces observed |
| Sunbelt | Early-Mid | Blue | Large | F, J | Slipskin | Nicknamed “Southern Concord”; characteristics very comparable to Concord grapes, however, it is more adapted to hot weather; ripens more evenly than Concord; thick skin; seeded |
| Venus | Very early | Blue | Medium | F | Slipskin | Seed traces often noticeable |
| a For successful production, all of these cultivars will need a regular control program for fungal diseases and insects. | ||||||
| b F = fresh fruit, J = juice, jams, jelly, W = wine | ||||||
Table 14–10. Wine grape recommendations for North Carolinaa (these cultivars are suitable for home production in the NC piedmont and NC mountains).
| Cultivar | Season | Color | Berry Size | Skin | Comments |
|---|---|---|---|---|---|
| French-American Hybrids | |||||
| Chambourcin | Late | Blue | Small | Non-slipskin | Wine can have herbaceous flavors if fruit is under ripe or with poor wine-making techniques; otherwise, excellent wine quality; cold tender; more disease resistant than European cultivars |
| Chardonel | Early-Mid | White | Small | Non-slipskin | Excellent wine quality; flavor similar to Chardonnay; has similar disease susceptibility as Chardonnay |
| Seyval | Late | White | Small | Non-slipskin | Good wine; crop reduction required to achieve good quality |
| Traminette | Early-Mid | White to pink | Small | Non-slipskin | Fruit and wine flavor similar to Gewürztraminer (“spicy”); more disease resistant than its Gewürztraminer parent, but still susceptible to downy mildew |
| European Wine Grapes (Vitis vinifera L.)b | |||||
| Cabernet Franc | Mid | Blue | Small | Non-slipskin | Performs better than Cabernet Sauvignon |
| Cabernet Sauvignon | Very Late | Blue | Small | Non-slipskin | Wine can be herbaceous if vegetative growth is not controlled |
| Chardonnay | Early-Mid | White | Small | Non-slipskin | Early bud break, frost problems; very susceptible to foliar diseases; excellent wine quality |
| a For successful production, all of these cultivars will need a very regular control program for fungal diseases and insects. b This is a small selection of the hundreds of European grape cultivars that are available. There are other cultivars that are grown in NC with varying degrees of success. |
|||||
Wine Grapes: The European grapes or Vitis vinifera are wine-type grapes. V. vinifera have poor disease resistance and lower cold tolerance than most American bunch grapes. Hybrid bunch grape cultivars resulting from crosses of V. vinifera and native American cultivars are known as French-American hybrids. Many of these hybrid cultivars are more resistant to common diseases of grapes than the pure V. vinifera cultivars. They are primarily bred for winemaking. V. vinifera and French-American hybrids require very intensive cultural practices and must be grafted on rootstock (Couderc 3309, 101-14 MGT, Riparia Gloire). Both types require frequent and careful spraying for disease and insect pests. Ripening begins in late summer and continues into fall depending upon the variety.
V. vinifera and French-American hybrids are very susceptible to Pierce’s disease. Wine grapes that are suitable for growing in the NC piedmont and NC mountains are listed in Table 14–10.
Planting and Maintenance
Planting
Plant grapevines in late winter and early spring. Vigorous 1-year-old plants are best. Two-year-old plants cost more and do not start bearing any earlier than 1-year-old plants. Set bunch grapes 5 feet to 6 feet apart. If there are enough vines to use a tractor, allow row widths wide enough to accommodate it (about 10 feet apart). Otherwise, ideal row width is no less than a 1:1 ratio of row width to canopy height. For example, if a trellis allows for a canopy height of 6 feet, the narrowest the row can be is 6 feet. Dig a hole large enough to let the roots spread out naturally (root pruning is not recommended except to remove damaged roots). Plant the vines the same depth or slightly deeper than they grew in the nursery. If the vine is grafted, the graft union must be 3 inches to 4 inches above the soil line. Do not place fresh manure or fertilizer in the hole. Tamp the soil firmly around the roots and water plants. Eliminate air pockets but do not compact the soil or drown the roots.
Training and Pruning
Erect the trellis before planting or as soon as possible after planting (Figure 14–30). Use 8-foot treated posts 3 inches to 4 inches in diameter. Set the posts 2 feet into the ground and allow for two vines per panel to provide adequate support for a mature vine’s fruit and foliage in a high wind. End posts should be 8 feet apart, 3 feet into the ground, and braced. This bracing system is commonly used in fencing. Regardless of species, 3 feet to 4 feet of canopy are required to properly ripen fruit and sustain the grapevine. A three-wire to five-wire vertical trellis can be used for V. vinifera and French-American hybrid cultivars that have an erect growing habit. The fruiting wire should be about 40 inches above the soil. Foliage wires are equally spaced alternately or in pairs to within a foot of the top of the trellis post. For American and French-American hybrid cultivars with a pendulous growth habit, only one fruiting wire is needed, and no foliage wires are required. The wire should be about 5 feet to 6 feet above the soil surface to provide room for sufficient foliage to support the crop and for ease of weed management under the vine. Use 9-gauge or 11-gauge high tensile wire for the fruiting wire stretched horizontally on firmly set posts. A lighter gauge, galvanized wire can be used for foliage management. If using metal line posts, they must be hot-dipped galvanized posts.
Year 1. During the first season, the primary objective for grapevine growth is the development of a healthy root system. Weed management around the vine during the first growing season is critical in development of a long-lived, productive grapevine. After setting the vine, prune to two or three stems and cut back to two buds each (Figure 14–31). In the first growing season, the vine may be kept upright by loosely tying shoots to a training stake. Most of the training work, however, is done in the second growing season.
Pinch lateral shoots back to the leaf growing on the main shoot. This allows the main shoot to grow more rapidly, possibly saving as much as a year in establishing a healthy vine. Do not pinch laterals at or just below the fruiting wire, however, as these laterals provide the future cordons for the vines.
For best yield, quality, and disease management, grapes should be pruned every year. A vine stores a limited amount of food in its roots, trunk, and canes during the winter. In the spring, food reserves are directed to buds for shoot growth. If left unpruned, those reserves must be distributed to numerous buds. As a result, the vine produces many weak shoots and small, poorly ripened fruit clusters. Pruning reduces the number of buds so the food reserves are concentrated in those that remain. Grapes are borne on the current season's wood that grows from buds formed on last season’s growth.
Year 2. The goal for the second year of the vine’s life is to establish the permanent wood and lay a groundwork for the fruiting structures of the vine. In the spring following planting, leave one or two shoots to form trunks. On each future trunk leave two buds. Select the strongest shoots from the previous growing season. When new growth begins and the first shoots from the two-bud stem reach 6 inches to 10 inches in length, select the one or two most vigorous and prune off the others. Again, tie the shoot gently to a training stake (tomato or bamboo stake).
After the shoot reaches pencil size at the fruiting wire, tip the shoot to force laterals. As the new shoots begin to grow, support their upright growth for as long as possible. This allows for stronger growth and more rapid filling of the fruiting wire (Figure 14–32). When appropriate, orient the lateral shoots or cordons horizontally on the fruiting wire with one cordon in each direction. To support the cordon, at most, loop the shoot 1.5 times for every linear 3 feet of fruiting wire. Once the cordon has filled the allotted space, allow the shoot tip to drop below the fruiting wire. This allows for more uniform bud break of laterals along the horizontal cordon. If the shoot drops too close to the ground for weed management, it is time to cut it back to the fruiting wire. Leave about one hand-width of separation between cordons on adjacent grapevines. Remove any fruit that may develop as it weakens the vine’s vegetative growth. The second winter, prune the laterals back to one-bud “spurs” spaced about one hand-width apart.
Year 3. There is now a small production of fruit on vines that have filled the allotted trellis area. For shoots that are 1 foot or less long, remove fruit from that shoot. For shoots greater than 1 foot long and up to 2 feet long, leave two clusters on that shoot. For shoots greater than 2 feet in length, leave two clusters on those shoots. Follow this basic rule for the life of the vine to maintain long-term health. Shoots should be about a hand-width apart. In the third winter, if cordon training with spur pruning is the selected method, prune back to two buds per cane.
Long-cane training and pruning
Some cultivars respond better to annual long-cane pruning rather than the cordon-and-spur system. There are at least two reasons to cane prune rather than cordon train and spur prune. First, completely replacing the fruiting arm annually can reduce disease pressure within the canopy. Second, some cultivars do not have fruitful base buds (the buds left in normal spur pruning). For this training system, no cordons are established. Each year a new cane is laid down as a replacement for the previous year’s cane (one in each direction). There should be about five buds per foot, and the cane should be long enough to fill the allotted trellis space. In addition to the new fruiting wood, a two-bud renewal spur is left at the head of the vine to develop the fruiting cane for the next year. Cane pruning should be used for the American bunch grape and some European wine grape cultivars.
Shoot tucking
Once European grape vines are established and are producing the vertical shoots off of the fruiting wire, the shoots must be tucked or trapped between the foliage wires. This supports the canopy in an erect configuration, reduces insect and disease pressure, and increases fruitfulness of the buds in the subsequent year. Shoots should be topped during the growing season to maintain a 3-foot to 4-foot length of the shoots in order to reduce shading. One leaf layer captures about 90% of the sunlight striking the vine. The canopy should be no more than two to three leaves in depth.
High-Wire Cordon System
This system is often used with American bunch grapes and French-American hybrids with a pendulous growth habit. The initial training of the trunk is the same as that for the vertical shoot position (VSP) trellis except a longer trunk is needed. With the high-wire system, however, cordons are trained along the one wire at the top of the trellis with no foliage catch wires (Figures 14–33, 14–34, 14–35). The fruiting wire is about 5 feet or 6 feet in height. For American bunch grapes, vines can be either cordon trained—and either spur or cane pruned—or cane “trained.” For the first scenario, which for simplicity we will call short-cane pruning, cordons are established as described for the VSP trellis. In the third and subsequent years, however, rather than pruning back the permanent fruiting positions to two-bud spurs, five to six bud canes are left at each position on the cordon. The number of these short canes left depends on the annual vigor of the vine. The more vigorous the vine, the more short canes can be left and vice versa. For example, a very weak plant might have only 30 buds left on six to eight five-bud short canes, while a very vigorous vine might have 100 buds left on 20 five-bud short canes. For the second scenario, follow the description of long-cane pruning under VSP.
Fertilization
After setting and just before growth starts, apply ½ cup (¼ pound) of 10-10-10 in a 20-inch circle around each vine. If the vine grows vigorously, no other fertilizer is needed. If growth is poor, repeat monthly until mid-July. The second year, double the first-year amounts; follow the same schedule as for the first year. Apply nitrogen fertilizer sparingly to grapevines as it promotes excessive vegetative growth, can reduce fruit set, and promote foliar and fruit diseases. If vines are in or near a lawn that is being fertilized, it is likely that the vines are already receiving more fertilizer than is needed for good vine health. On mature vines (5 years old or older), if leaves become pale green and shoot growth and fruit production are reduced, apply N in a split application of ½ cup pre-bloom and ½ cup post-bloom per vine. Nitrogen fertilization may not be necessary each year. Continue to monitor soil pH and phosphorus status of the soil around the vine. If there is marginal leaf reddening in July, soil phosphorous may be limiting either due to unavailability because of soil pH or phosphorous deficiency in the soil.
Weed Management
For at least the first two years, an area 1 foot to 2 feet around each vine should be kept weed free by hoeing or with a heavy mulch (4 inches to 6 inches deep). Black plastic is a satisfactory mulch material, but it does not add to the humus content of the soil. When using a mulch other than black plastic, care should be taken to maintain the graft union at least 3 inches to 4 inches above the mulch or soil line to prevent scion rooting. Once established, the shade of the vine suppresses weed growth. Again, use organic mulches with discretion as they add nitrogen to the soil. Grapevines use superfluous nitrogen to produce lots of vegetative growth and can reduce fruit production.
Recommended chemical herbicides may also be used for weed management in grapes, but mulching is the preferred management practice. Certain types of herbicides should not be used near grapes because grapes are very sensitive. Do not use the combination of fertilizer plus weed killer on lawns near a grapevine. Weed killer may be picked up by the grape roots and cause vine injury. Vapor from herbicides can also cause foliar symptoms on grapevines. Avoid using herbicides after midsummer as the material is absorbed and moved into the permanent wood. Symptoms of such uptake will appear the following growing season. Grapevines are very sensitive to 2,4-D. Systemic herbicides should not be used after mid-July.
Insects and Diseases
Bunch grapevines require frequent and thorough spraying to avoid diseases and insects; this is especially true of wine-type grapes. Current recommended spray programs are given in the North Carolina Agricultural Chemicals Manual.
Harvest
Acceptable taste is the main criterion for table use. As they ripen, the grapes of black grapevine cultivars lose their red color, and those of white grapevine cultivars change from green to golden-yellow. Ripe grapes become soft, and seeds become brown. Determining the harvest time of wine grapes requires either experience or a means of measuring both sugar and acid content.
MUSCADINE GRAPEVINES
Muscadine grapevines are native to the southern United States. They are known by several common names, such as bullace, scuppernong, and fox grapes. Scuppernong was the first cultivated muscadine cultivar. Many people incorrectly refer to all muscadine grapes as being scuppernong. Some muscadine grapevine cultivars are perfect-flowered (male and female parts in one flower), while others are female and require a perfect-flowered cultivar for pollination. Many wild grapes are male vines and do not produce fruit.
The grapes have a distinct fruity or musky aroma, and the juice by itself is sweet with a light taste and aroma. The fruit can be used for making wine, pies, and jellies and for eating fresh from the vine.
Muscadine grapevines are well adapted to the NC coastal plain, where temperatures seldom fall below 10°F. Considerable injury generally occurs where winter temperatures drop below 0°F. Muscadines have a high degree of tolerance to insects and diseases.
Cultivars
Recommended cultivars are listed in Table 14–11. The old traditional cultivars, ‘Scuppernong’ (bronze) and ‘Thomas’ (black), are the most widely known and asked for by the public. Some of the more hardy cultivars, such as ‘Magnolia’ and ‘Carlos’ (Figure 14–36) survive northward to Virginia and westward to the foothills of the Blue Ridge Mountains.
Table 14–11. Recommended muscadine grapevine cultivars (all recommended cultivars are perfect-flowered).
| Cultivar | Season | Color | Berry Size | Stem Scar | Use |
|---|---|---|---|---|---|
| Carlos | Mid | Bronze | Medium | Very dry | Good fresh or for wine |
| Doreen | Very late | Bronze | Medium | Dry | Good fresh or for wine |
| Magnolia | Early | Bronze | Medium to large | Wet | Excellent fresh flavor; wine and juice |
| Nesbitt | Early | Black | Large | Dry | Good fresh; poor wine color |
| Noble | Early | Black | Small | Wet | Good fresh; wine and juice |
| Regale | Mid | Black | Medium | Wet | Good fresh; wine and juice |
| Scarlett | Mid | Bronze-pink | Very large | Dry | Good fresh |
| Southern Home | Mid | Black | Medium | Dry | Hybrid, ornamental, home winemaking |
| Tara | Early | Bronze | Very large | Dry | Good fresh |
| Triumph | Early | Bronze | Large | Dry | Good fresh; fair wine |
All of the cultivars listed are perfect-flowered (have both male and female flower parts), so a single vine will produce fruit. Other available cultivars such as ‘Fry’, ‘Higgins’, ‘Scuppernong’, and ‘Jumbo’ have flowers with only female flower parts and must be planted near a perfect-flowered cultivar. ‘Southern Home’ is a new cultivar with attractive, unusual fig-shaped leaves. The fruit has a non-muscadine flavor and may be useful in home winemaking.
Site Selection, Planting, and Maintenance
Plant grapevines in full sun. Fruit set and production is reduced if the vines are shaded for several hours each day during the growing season. Muscadine grapevines can survive and produce a crop on a wide range of soils as long as drainage is good. Plants are likely to die in locations where water stands for even short periods after heavy rains.
Soils with a hard, compacted layer below the surface should be avoided, as well as those high in organic matter. Active growth late in the growing season makes vines susceptible to winter injury on soils with more than 1% organic matter content. Apply and work in dolomitic lime at the rate recommended by the soil test to bring the pH to 6.0 before planting.
The best time to plant is late winter after the danger of freezing has passed. One-year-old container-grown plants are preferred. Two-year-old bare root plants are satisfactory. Keep the roots moist (not wet) until planted. Never allow the roots to dry or freeze. Plant at the same depth as or slightly deeper than the previous growing depth. Vines should be set 15 feet to 20 feet apart in the row. Distance between rows can depend on the equipment used for mowing, but they should be at least 10 feet apart.
Training Systems
Provide a space at least 12 feet to 14 feet long by 6 feet wide for each vine. Decide on the trellis system and complete the construction before planting. Many types of trellising are not practical for long-term management. For example, growing muscadine grapevines over a garden arch or a pergola can be aesthetically pleasing and provide shade. But if individual cordons are not maintained, management is likely to be difficult, neglect is likely, and fruit production declines.
A practical system allows for establishing permanent cordons (arms) that can be easily reached for the required annual pruning (Figure 14–37). This requires training the cordons to single strands of high tensile wire (number 12 is recommended). A single wire 5 feet to 6 feet above the ground is the easiest trellis to construct and maintain. Four-foot cross arms of 2-inch by 6-inch treated lumber can be attached to treated posts to support double wires. The double-wire system yields about 30% more than the single-wire system.
Muscadine training is the same as for bunch grapes (see above). Select the most vigorous shoot to become the main trunk; remove all other shoots. A bamboo stake beside the plant is convenient for attaching the growing vine. Tie the shoot to the stake. Paper-covered wire ties that are wrapped around the vine and stake work well; to avoid girdling, do not twist the ties. As the shoot grows it produces side shoots; they should be removed to promote faster growth of the main trunk. When the vine is just below the top trellis wire, cut the growing tip to force lateral buds. Select four shoots to train down the wire to form the cordons. The goal should be to get the vine on the wire the first growing season and to full length in the second season. After the cordon has developed to full length, allow side shoots to develop on the cordon.
Pruning
An unpruned muscadine vine can quickly become a tangled mess. Annual pruning is required to maintain productive vines. Late February or early March is the best time to prune. Remove any dead, damaged, or undesirable wood.
The current season's shoots bear the fruit. These shoots must arise from buds set on last season's growth. Shoots from older wood are nonproductive. Prune back the canes from the previous summer to spurs with three to four buds (4 inches to 6 inches long). The main cordon is left unpruned. After four to five years, the spurs need thinning. Spurs should be spaced about a hand-width apart. This thinning forces new spur growth. Also cut off shoots that arise along the main trunk. Vines that are pruned in late winter or early spring exude sap or "bleed." This is normal and does not harm the vines. If there is no sap flow, the vine is probably dead.
Fertilization
Apply ¼ pound of 10-10-10 in an 18-inch circle around each vine after planting (late April to early May). Repeat every six weeks until early July. The second year, apply in early March, May, and July at double the first year's rate (or ½ pound per vine). On bearing vines, scatter 1 pound to 2 pounds of 10-10-10 uniformly under the vine (60 square feet to 120 square feet) in early to mid-March. Apply another pound in mid-June. If the average length of new vine growth exceeds 3 feet to 4 feet during the season, reduce the amount of fertilizer the following year by 20%. Continue adjusting the fertilizer rate until the desired vigor (based on vine length) is obtained. To minimize winter injury, do not apply any fertilizer after early July. Again, excessive nitrogen fertilizer leads to shaded, crowded canopies that result in reduced fruit production and increased insect and disease incidents.
Weed Management
Keep an area 1 foot to 2 feet in diameter around each vine free of weeds by practicing shallow cultivation for the first two years. Avoid mulching materials such as compost or grass clippings that release nitrogen late in the season and cause increased susceptibility to winter damage. A coarse, non-nitrogen-releasing mulch such as bark helps manage weeds and reduce moisture loss from the soil. Water during dry periods the first two years. After establishment, muscadine grapevines are quite drought-tolerant.
Harvest
Muscadine grapes ripen in August through early October. Muscadine clusters are small compared to those of bunch grapes. Clusters ripen in the order they bloomed; the first are the ones nearest the base of the shoot. Fully mature grapes will fall from the vines. Cultivars with a wet scar (end of grape attached to the vine) do not store well and should be used soon after harvest. Cultivars with a dry stem scar keep well for a week in the refrigerator.
Insects, Disease, and Wildlife
Muscadine grapevines can often be grown successfully without insecticides or fungicides. Japanese beetles feed on the young shoot tips mid to late summer. If the vines are healthy, the beetles may have little impact on overall health and fruit ripening. Japanese beetle management is necessary in all species when vines are young to establish healthy, mature vines.
Selecting cultivars with some disease resistance, such as ‘Carlos’, ‘Nesbitt’ (Figure 14–38), ‘Noble’ (Figure 14–39), ‘Triumph’(Figure 14–40), and ‘Regale’, reduces the need for fungicide applications. See appendix C, “Diagnostic Tables,” for problems that are common to grapes.
Netting is required to protect the bunch of grapes from birds (Figure 14–41). Turkeys eat fruit regardless of netting. Muscadines are less prone to bird damage. Raccoons and opossums eat all types of grapes. Deer eat vines and fruit, even in backyards. Rabbits sometimes eat young vines. Voles feed on the roots of grapevines and can be disguised by mulch. Monitor the vines regularly for any evidence of root-feeding mammals. See chapter 20, “Wildlife,” for more information on protecting crops from wildlife.
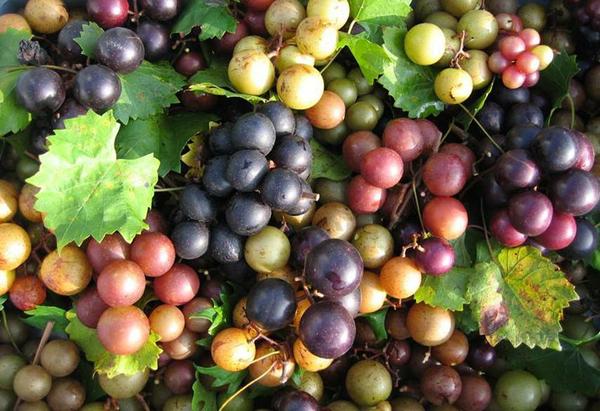
Figure 14–29. Many cultivars of grapes can be grown successfully in North Carolina.
Bill Cline
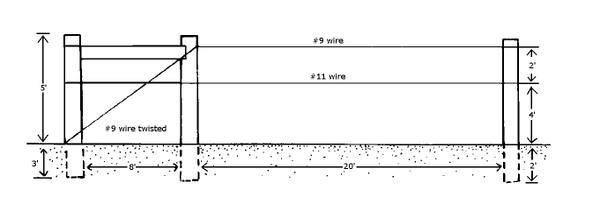
Figure 14–30. Trellis for grapes using a two-wire system.
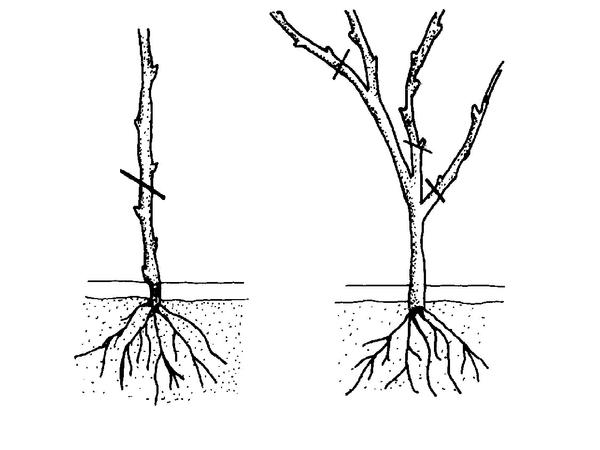
Figure 14–31. Pruning of bare root grape vines after planting.
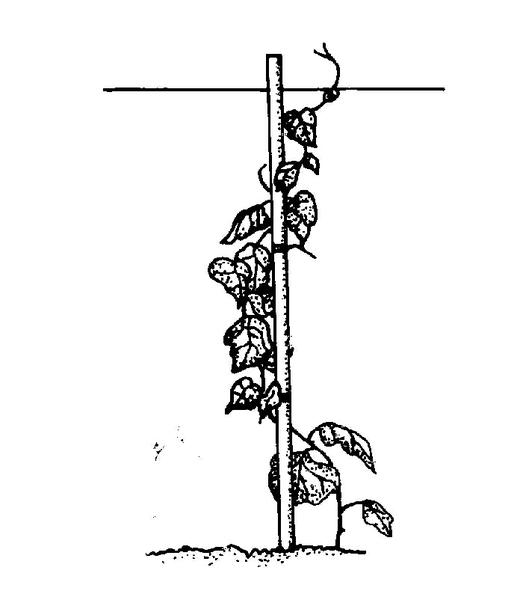
Figure 14–32. Train the young shoots to a training stake. Remove any side shoots that develop. Pinch off the growing tip when the vine reaches the top of the trellis.
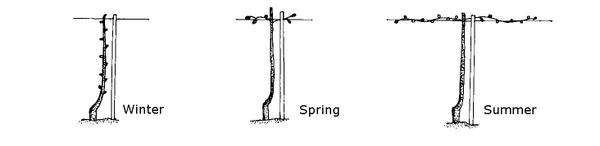
Figure 14–33. High-wire cordon system. Winter: Tie the cane to the wire. Cut it off just at or below the wire. Spring: Select two strong shoots near the wire and remove all others. Summer: Tie both shoots along the wire in opposite directions.
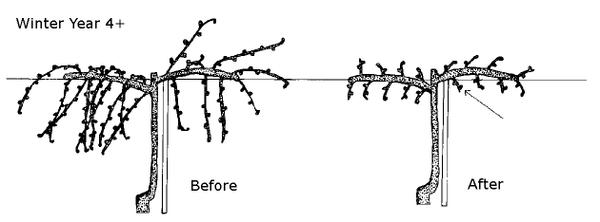
Figure 14–34. High-wire cordon system, fourth year and beyond. Winter: Shorten the canes from each cordon to two buds (these are fruiting spurs). Keep 8 to 15 spurs on each cordon and prune the rest. The spurs should be spaced 3 inches to 8 inches apart.
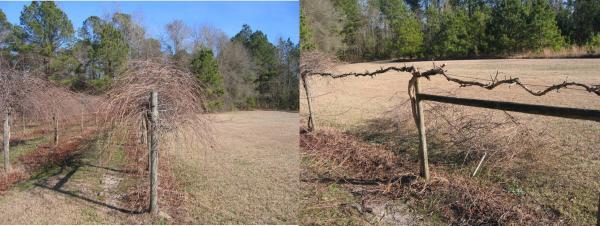
Figure 14–35. Grape vines before pruning (left) and after pruning (right).
Bill Cline
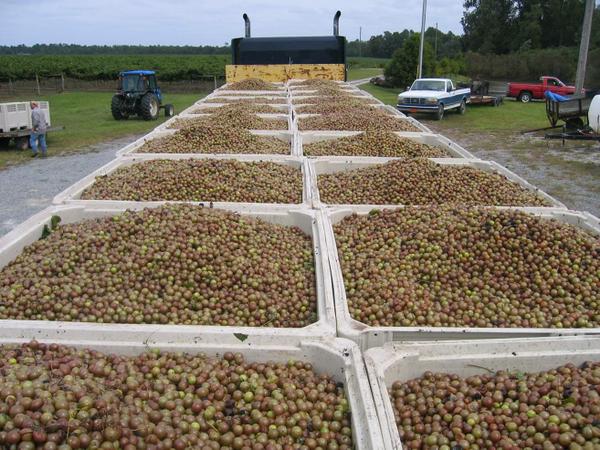
Figure 14–36. 'Carlos' cultivar, the best for making wine.
Bill Cline
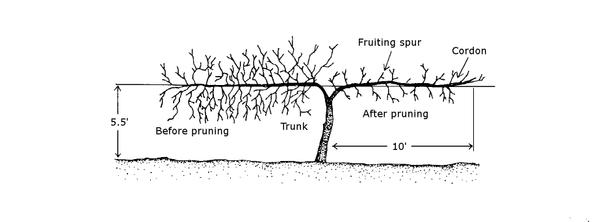
Figure 14–37. Trellising system for muscadine grapes. A one-wire or two-wire system can be used. Prune back all shoots to 4 inches to 5 inches in length, but leave the main arms (cordons).
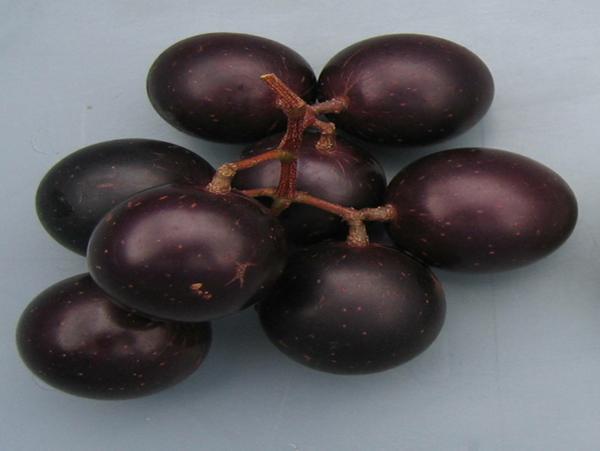
Figure 14–38. 'Nesbit' cultivar, perfect flowered, medium large size, good vigor.
Bill Cline
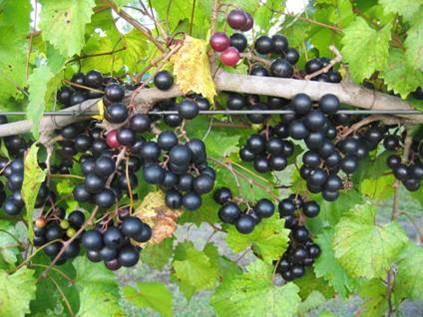
Figure 14–39. 'Noble' grapes, self-fertile and very productive.
Bill Cline
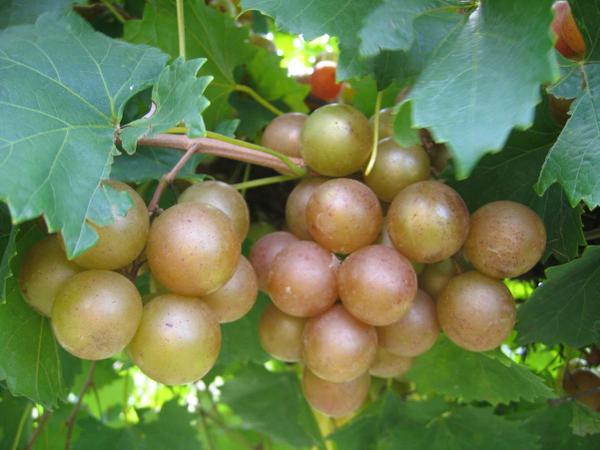
Figure 14–40. 'Triumph' is an early-ripening cultivar that suffers from few rots.
Bill Cline
.jpg)
Kiwis
Cold weather is the limiting factor in growing kiwi vines in North Carolina. During 12 years of testing at the Horticultural Crops Research Station near Wilmington, only one crop of fruit was produced. Three times the vines were killed to the ground. The main site of the winter injury occurred from ground level up to about 18 inches on the plant. Spring freezes also resulted in shoot and blossom damage.
Kiwi flowers develop on shoots that come from buds that formed the previous year. This is similar to the fruiting habit of grapes. Unlike grapes, however, if there is any damage to the new shoots in the spring, no additional flower buds develop or produce flowers.
The commercial kiwi is Actinidia deliciosa. Another species, A. arguta, is often advertised as hardy. Survival in the test planting was much better for A. arguta (Figure 14–42) than for A. deliciosa. The fruit characteristics of the two species differ in the following ways:
- A. arguta has much smaller fruit.
- The skin surface of A. arguta is smooth, unlike the hairy skin of A. deliciosa.
- A. arguta ripens in August, while A. deliciosa does not mature until late October or early November.
- A. arguta must soften on the vine. The fruit does not soften and develop normal flavor and sugar content if picked when still hard. A. deliciosa can be harvested in the mature hard stage and held in cold storage for up to six months. After storage, the fruit softens and develops full sugar content more rapidly in a high ethylene environment.
- A. arguta fruit is less crisp when it is ready to eat than fruit of A. deliciosa.
- In trial plantings, each A. arguta vine had a total yield of only five to 20 fruits each.

Case Study—Think IPM: Berry Problems
Something is wrong with your raspberries. Though the plants appear healthy, the fruit is damaged.
You review the diagnostic procedures from chapter 7, “Diagnostics,” and think about the five steps for IPM:
- Monitor and scout to determine pest type and population levels.
- Accurately identify host and pest.
- Consider economic or aesthetic injury thresholds. A threshold is the point at which action should be taken.
- Implement a treatment strategy using physical, cultural, biological, or chemical management, or combine these strategies.
- Evaluate success of treatments.
1. Monitor and scout to determine pest type and population levels.
You have 10 raspberry plants that produce enough fruit for fresh eating and freezing. You have had great success since planting seven years ago. But now the ripe fruit on half of the raspberries appears wilted and damaged. You notice tiny white worms inside some of the fruit (Figure 14–43). Before sending a sample to NC State’s Plant Disease and Insect Clinic, you decide to do some sleuthing on your own.
2. Accurately identify the host and pest.
Step 1. Identify the plant: They are raspberry plants (Rubus sp.).
Step 2. Describe the problem: About half of my ripe fruit is damaged. I thought the birds might be damaging it. But I added netting, and the damage was not reduced.
Step 3. Identify what is normal:
What does the healthy part of the plant look like? The stems and leaves of the plant look healthy. The unaffected plants at the south end of the planting bed have plump ripe fruit.
What does the unhealthy part of the plant look like? The berries appear wrinkled and deflated with soft areas as if something has been eating them. Some of the berries have dark spots.
Have you had a soil test? Yes. Two years ago I had a soil test done. I put on dolomitic lime in the fall according to the report recommendations. (For information on how to submit a soil test, see chapter 1, “Soils and Plant Nutrients.”)
Step 4. Cultural practices:
Age and history of plants: These were transplants from a neighbor. The canes were planted three years ago. The canes were a little slow producing during the first year, but they have been going strong up until now.
Irrigation: I water about once or twice a week depending on the rain. I have a soaker hose around the base of the plants that I run for about two hours. I do not do any overhead watering so the leaves and fruit do not get wet.
Fertilizer: We added about 3 inches of composted leaves and chicken manure mixed with wood shavings last fall as a top-dressing. This spring (in March and then in May) I fertilized with 10-10-10 at a rate of 8 pounds per 100 square feet as indicated by NC State’s Hort Leaflet 8204, “Raspberries in the Home Garden.”
Maintenance: I have not been great about weeding, so the area has more weeds than it should. No herbicides or pesticides have been used in the area.
Step 5. Environmental conditions:
Are there any significant water issues? None that I can think of. This spring was pretty wet. The area drains well, so no standing water occurs.
What is the soil like? This garden is on acidic clay soil. All parts of this bed have similar soil.
Describe the light near this garden bed. How many hours of sunlight? This bed gets about seven hours of full sun a day, with some afternoon shade from the house.
Describe any recent changes or events: Nothing has changed in this bed in the last three years other than I have added bird netting.
Step 6. Signs of pathogens and pests:
On the leaves: There are no missing pieces of leaf and no discolored spots, insect eggs, frass, or webbing that I can see. I did see a beetle on one of the leaves, and there were a few small flies crawling around (Figure 14–44). The leaves appear healthy.
On the canes: There are no insects, eggs, frass, webbing, missing chunks, or discoloration seen.
On the roots and in the soil: The small roots appear white and healthy, and the base of the plant also appears firm. I did not see any eggs or frass. There was an earthworm and a small white grub in the soil.
On the fruit: Some of the fruits have dark spots. There are some small white worms inside some of the fruits (Figure 14–43).
Step 7. Symptoms:
On the leaves: The leaves appear green and healthy.
On the buds/flowers: Some plants are still flowering. The blossoms look normal.
On the canes: There are no holes or rotten areas on the canes, even at the soil line.
On the roots: The roots are white and firm.
On the fruit: The fruit is discolored and wrinkled and appears rotten in some spots (Figure 14–45). There is no bad odor.
Step 8. Distribution of damage in the landscape:
Are other plants in the landscape affected? The blackberry canes on the back side of the property that border a greenbelt also appear to have the same problem with the fruit. So far, the other plants in the yard that are bearing fruit right now (two peach trees and a muscadine grapevine) do not appear to be affected.
Step 9. Distribution of damage on the plant and specific plant parts:
Where is the damage seen on the plant? On the ripe fruit. Unripe fruit appears okay.
Step 10. Timing:
When did you notice this problem? Starting the first week of June. When the first raspberries ripened, a few of the berries appeared damaged. Now in mid-July, half of the berries appear damaged.
You hypothesize this is an insect, not a disease, because there were insect signs and no disease signs. Because there are no symptoms on the leaves, stems, or roots, you suspect that it is fundamentally a fruit problem. It is affecting the blackberries as well, so you hypothesize that the problem is something that affects caneberries. Based on the other facts gathered, your cultural practices seem to support healthy plants.
You decide to start investigating the insect you saw on both the fruit and the leaf. It reminds you of a fruit fly so you search extension.org or type “fly+raspberry+edu” into an internet search engine to find university-based resources. You find links to several articles that discuss a fly called the spotted winged drosophila (Drosophila suzukii), or SWD. It is one of the few pests that can bother soft-skinned fruits such as strawberries, blueberries, and caneberries. Female SWD lay their eggs on ripe and ripening fruit. This is unusual because most Drosophila species lay their eggs on rotting fruit. The larvae that emerge damage the fruit by feeding on it and may be present when it comes time to harvest. SWD has caused the most damage with caneberries, but it has also been occasionally found in figs, peaches, grapes, and other fruit. SWD takes advantage of other damage to firmer-skinned fruit like grapes or peaches and may not be the primary pest.
SWD are small (2 mm to 3 mm) light-brown flies. Males have a distinctive spot on the end of their wings and dark bands of bristles around the base of the last segment on their front legs (Figure 14–46). Females do not have spots on their wings but can be distinguished by their large, blade-like ovipositor (egg-laying appendage) at the end of their abdomen (Figure 14–47).
Larvae are 3 mm long, are tapered at both ends, and do not have a distinguishable head. True fruit fly (Tephritidae) larvae are larger and have a flat rear end. It is possible to have Tephritidae in blueberries or apples, but they will not be present in caneberries, strawberries, grapes, peaches, or figs.
3. Consider economic or aesthetic injury thresholds.
Spotted winged drosophila can cause significant damage to fruit harvests. The problem is likely to worsen over time and spread to other fruits in the yard.
4. Implement a treatment strategy using physical, cultural, biological or chemical management, or combine these strategies.
While SWD-infested fruit may be unpalatable, larvae are not harmful if consumed. Good cultural practices can limit SWD damage.
Physical.The fruit should be harvested frequently and completely. Any fruit containing larvae should be disposed of off-site or “baked” in clear plastic bags in the sun. When harvesting is complete, strip any unwanted fruit and destroy it. Cover fruits with a fine mesh bag prior to ripening to exclude egg-laying flies.
Cultural. Prune plants to maintain an open canopy. Do not overwater plants. Fruit should be observed regularly for infestation before and during harvest. Placing berries in the refrigerator or freezer immediately after picking helps to slow or stop larval development.
Biological. Research is being done on parasitic wasps and other parasitoids that may prove helpful in managing SWD, but there are no recommended biological controls at this time.
Chemical. There are insecticides registered for use against SWD. See the North Carolina Agricultural Chemical Manual for recommendations.
5. Evaluate treatment success.
Keeping a record, garden journal, or notes about the appearance and numbers of SWD helps you identify patterns that can assist with management strategies. Documenting the strategies implemented and their success or failure helps you make management decisions in the future.
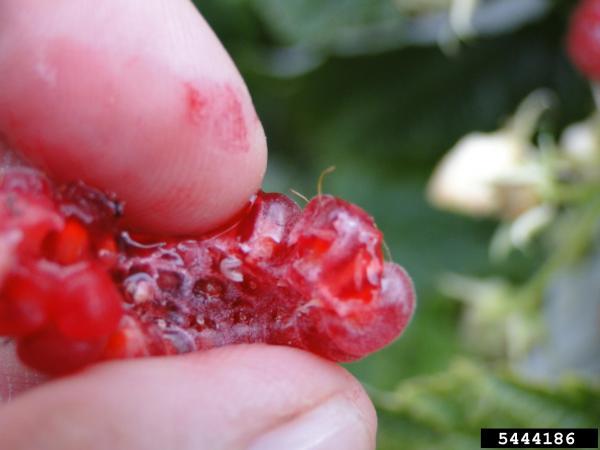
Figure 14–43. A tiny worm inside a raspberry fruit.
Hannah Burrack
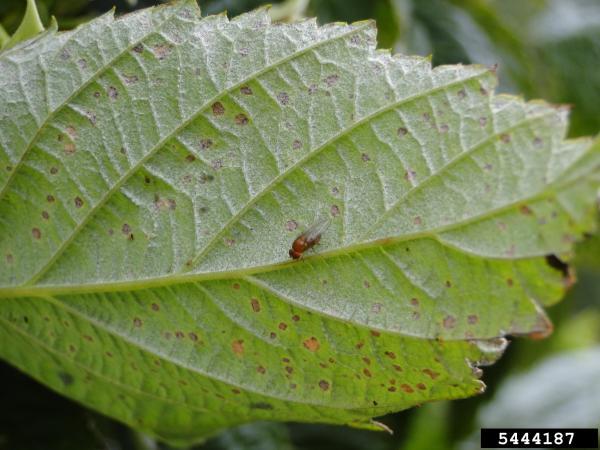
Figure 14–44. A fly on a raspberry leaf.
Hannah Burrack
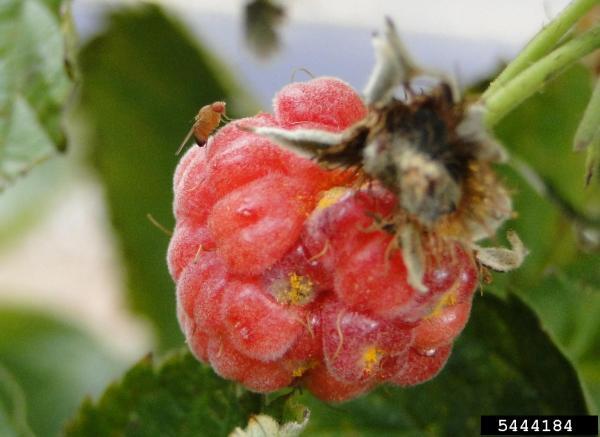
Figure 14–45. The fruit appears discolored and malformed. Another fly is seen on this fruit.
Hannah Burrack
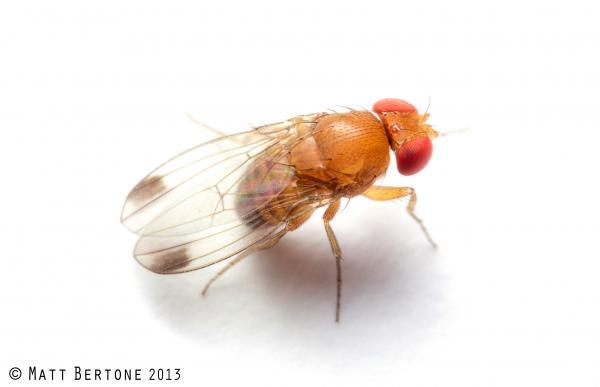
Figure 14–46. A male spotted winged drosophila.
Matt Bertone
Figure 14–47. A female spotted winged drosophila.
Matt Bertone
Frequently Asked Questions
1. What type of small fruit should I plant?
Your family members’ tastes, the amount of space available, microclimate conditions, and soil type are all factors that can help you narrow down fruit selections. Specific recommended cultivars vary by region, but a general list of small fruits is offered below. Also see this Cooperative Extension publication: AG-15, Grapes and Berries for the Garden.
NC mountains: Blackberries, highbush blueberries, bunch grapes, raspberries
NC piedmont: Blackberries, rabbiteye blueberry, bunch grapes, muscadine grapes, raspberries
NC coastal plain: Blackberries, rabbiteye blueberry, muscadine grapes,
Growing gooseberries and currants is illegal in North Carolina. They are alternate hosts for certain fungi that attack some trees grown for timber.
2. How do I fertilize blueberries? When and with what?
Always begin with a soil test to get specific recommendations for your property.
First year: Use caution. Excess fertilizer can easily damage blueberries. Do not fertilize immediately after planting. Wait until the first leaves have reached full size, then apply 1 tablespoon of an azalea fertilizer, 12-12-12 or 10-10-10, in a circle 1 foot from the plants. Repeat at six-week intervals until mid-August. Substitute ½ tablespoon of ammonium nitrate (33-0-0) for the second and subsequent fertilizer applications if the phosphorus index level is above 60 on a soil test.
Second year: Double the first year’s rates and increase the circle to 1½ feet around the plants. Apply the first application when new growth begins in the spring.
Bearing plants (three years to four years old): When growth begins in the spring, apply 1 cup of a complete fertilizer such as 10-10-10 in a circle 3 feet from the plants. Side-dress with ¼ cup of ammonium nitrate (33-0-0) at six-week intervals if desired, but no later than mid--August. On mature bushes (5 years old or more), 6 inches to 12 inches of new growth is adequate. Desirable pH is 5.0 to 5.3. Mulching is very beneficial to blueberries.
3. When do I fertilize muscadines and with what?
Apply ¼ pound of 10-10-10 in an 18-inch circle around each vine after planting (late April to early May). Repeat every six weeks until early July. The second year, apply in early March, May, and July at double the first year's rate (½ pound total per vine) at least 21 inches away from the trunk. On bearing vines, scatter 1 pound to 2 pounds of 10-10-10 uniformly under the vine (60 sq ft to 120 sq ft) in early to mid-March. Apply another 1 pound in mid-June. If the average length of new vine growth exceeds 3 feet to 4 feet during the season, reduce the amount of fertilizer the following year by 20%. Continue adjusting fertilizer rate until the desired vigor (based on vine length) is obtained. To minimize winter injury, don't apply any fertilizer after early July. Avoid mulching materials that release nitrogen late in the season and cause increased susceptibility to winter damage.
4. There is a white foamy substance on my muscadine grapevines, almost as if someone had been spitting on them. What is it?
The cause of this white foamy substance is the spittlebug. The larvae produce this substance to protect themselves from other insects and predators while developing into adults. The spittlebug is a vector for Pierce’s disease in both muscadine and bunch grapes. Unlike bunch grapes, muscadines appear to tolerate the disease with little reduction in yield, and spittlebugs are not known for causing any other injury to muscadines. Therefore, no management is needed. Pesticide use is not recommended because the larvae are protected by the white foamy substance. If you find the appearance of the white foam to be unsightly, hose down the plant early in the morning to wash it away, or wait for the next rainfall to take care of it.
5. My muscadine vine does not have any fruit, or my muscadine has small grapes that did not ripen. What am I doing wrong?
There are many reasons for poor yield in the home garden:
Are you sure you have a perfect-flowered (male and female) cultivar?
- Some cultivars (‘Fry’, ‘Higgins’, ‘Scuppernong’, and ‘Jumbo’) have only female flowers and must be planted near a perfect-flowered cultivar to produce fruit. ‘Carlos’ is a perfect-flowered variety that is fairly common and good for fresh fruit or winemaking.
Does it get enough sun? Fruit set and production can be reduced if the vines are shaded for several hours a day.
Have you been giving it a high nitrogen fertilizer, which could cause leaf growth at the expense of fruit development?
- Use a balanced fertilizer such as 10-10-10. Submit a soil sample to obtain specific fertilizer recommendations. Boron deficiency may also result in poor fruit set, especially on sandy soils with high pH. Submit a foliar sample to determine boron status.
- Poor pollination can occur in adverse weather.
- Drought stress can cause fruit drop.
- Powdery mildew is a fungal disease that can infect blossoms, reducing fruit set.
- A late frost can also kill primary fruit buds. If this happens, vines often set fruit on secondary buds. This fruit usually fails to ripen and is small.
- Bitter rot can cause fruit drop near harvest.
- Improper pruning causes reduced harvests.
- Some heirloom cultivars are low producers, even with the best of care.
- Japanese and June beetles may have fed directly on flowers and small berries.
- Stink bugs can cause severe fruit drop.
To learn more about common small fruit problems see Appendix C, "Diagnostic Tables."
Further Reading
Gough, Robert E. and E. Barclay Poling, eds. Small Fruits in the Home Garden. Binghamton, New York: Food Products Press, 1996. Print.
Chapter Text Hyperlinks
Cornell University Nursery Guide for Berry and Small Fruit Crops
NCDA&CS Agronomic Services – Soil Test Forms & Information
Grapes and Berries for the Garden, AG-15
North Carolina Agricultural Chemicals Manual
Strawberry Information Portal
Cane Blight of Blackberry (C 894), by Phillip M. Brannen and Gerard Krewer
Blackberry & Raspberry Information Portal
Blueberry Information Portal
Spotted Wing Drosophila (SWD) Information Portal
Raspberries in the Home Garden, HIL-8204
Blueberry Production and Pruning in North Carolina, by Dr. Bill Cline
Growing Raspberries in North Carolina, AG-569
For More Information
NC State Resources
- Blackberry & Raspberry Portal
- Blackberry Pruning (7 min)
- Blackberries, Pruning and Training, HIL-8206
- Blueberry Information Portal
- Blueberry Production and Pruning in North Carolina
- Diagnostic Tables
- Disease and Insect Management in the Home Orchard
- Fruit Disease Information Notes Grapes and Berries for the Garden, AG-15
- Bunch Grapes in the Home Garden, HIL-8202
- Grapes, Pruning Muscadine Vines How to extract spotted-wing drosophila larvae from berries (3:50 minutes)
- Insect Notes Muscadine Grapes in the Home Garden, HIL-8203
- Muscadine Grape Production Guide for North Carolina, AG-94
- Raspberries in the Home Garden, HIL-8204
- Small Fruit Entomology Facebook page
- Small Fruit Program
- Small Fruit & Specialty Crop IPM blog
- The Southern Region Small Fruit Consortium
- Spotted Wing Drosophila (SWD) Information Portal
- Strawberry Information Portal
- Strawberry Diseases and Their Control, PDIN-5
- Strawberries-Using a Digital Thermometer to Guide Decisions in Frost and Freeze Events (4:52 minutes)
More NC State Resources
Other Resources
- Cane Blight of Blackberry, UGA
- Growing Blueberries, by Penn State (4:02 minutes)
- Strawberries in Fall, by Penn State (4:51 minutes)
Contributors
Authors:
Gina Fernandez, Extension Specialist, Department of Horticultural Science
Bill Cline, Researcher and Extension Specialist, Department of Plant Pathology
Sara Spayd, Extension Specialist, Department of Horticultural Science
Hannah Burrack, Extension Specialist, Department of Entomology
Contributions by Extension Agents: John Vining, Susan Brown, Jessica Strickland, Cyndi Lauderdale, Danny Lauderdale, Mack Johnson
Contributions by Extension Master Gardener Volunteers: Jacquelyn Weedon, Karen Damari, Lee Kapleau, Sandy Quinn, Patty Brown, Connie Schultz, Judy Bates
Content Editors: Lucy Bradley, Associate Professor and Extension Specialist, Urban Horticulture, NC State University; Director, NC State Extension Master Gardener program; Kathleen Moore, Urban Horticulturist
Copy Editors: Barbara Scott, Debbi Braswell
Based in part on text from the 1998 Extension Master Gardener manual prepared by:
- Erv Evans, Extension Associate, Department of Horticultural Science
- E. Barclay Poling, Extension Specialist, Department of Horticultural Science
- Ken Sorensen, Extension Specialist, Department of Entomology
- James R. Ballington, Professor, Department of Horticultural Science
How to cite this chapter:
Fernandez, G.E., B. Cline, S.E. Spayd, H.J. Burrack. 2022. Small Fruits, Chapter 14. In: K.A. Moore, and L.K. Bradley (eds). North Carolina Extension Gardener Handbook, 2nd ed. NC State Extension, Raleigh, NC. <http://content.ces.ncsu.edu/14-small-fruits>
Publication date: Feb. 1, 2022
AG-831
Other Publications in North Carolina Extension Gardener Handbook
- 1. Soils & Plant Nutrients
- 2. Composting
- 3. Botany
- 4. Insects
- 5. Diseases and Disorders
- 6. Weeds
- 7. Diagnostics
- 8. Integrated Pest Management (IPM)
- 9. Lawns
- 10. Herbaceous Ornamentals
- 11. Woody Ornamentals
- 12. Native Plants
- 13. Propagation
- 14. Small Fruits
- 15. Tree Fruit and Nuts
- 16. Vegetable Gardening
- 17. Organic Gardening
- 18. Plants Grown in Containers
- 19. Landscape Design
- 20. Wildlife
- 21. Youth, Community, and Therapeutic Gardening
- Appendix A. Garden Journaling
- Appendix B. Pesticides and Pesticide Safety
- Appendix C. Diagnostic Tables
- Appendix D. Garden Tools
- Appendix E. Season Extenders and Greenhouses
- Appendix F. History of Landscape Design
- Appendix G. Permaculture Design
- Appendix H. Community Gardening Resources
- Appendix I. More NC State Resources
- Glossary
N.C. Cooperative Extension prohibits discrimination and harassment regardless of age, color, disability, family and marital status, gender identity, national origin, political beliefs, race, religion, sex (including pregnancy), sexual orientation and veteran status.