
Outline
What NOT to Compost and Common Composting Problems
Equipment and Supplies
Worm Bin
Bedding
Water
Composting Earthworms
Food Scraps
Method 1: Sideways Separation
Method 2: Light Separation
Method 3: Vertical Separation
Objectives
This chapter teaches people to:
- Start a compost pile or worm bin.
- Understand the effects different types and sizes of materials have on the rate of composting.
- Recognize appropriate moisture levels for compost piles and worm bins.
- Effectively manage compost and worm bins.
- Utilize compost, vermicompost and their extracts (tea).
Introduction
For centuries, gardeners have made compost and used it to improve their garden soil. Today’s gardeners also see the importance of composting as an alternative to burning or disposing of organic materials in landfills. Food scraps and yard debris comprise 28% of the solid waste generated in the United States (US EPA, 2011). Many people are surprised that the largest category of waste being thrown away is food residuals—over 21% of the total. Instead of being discarded down sink drains or in the garbage, food waste can easily turn into a valuable soil amendment for a landscape, garden, or lawn.
Compost incorporated into the soil increases the organic matter content, improves the physical properties of the soil, helps roots penetrate more easily, holds moisture, provides aeration to plant roots, suppresses some diseases, and supplies some essential nutrients. Compost can also be applied to the soil surface to conserve moisture, control weeds, reduce erosion, improve appearance, and keep the soil from gaining or losing heat too rapidly.
Composting is a process that controls the decomposition and transformation of biodegradable material into a humus-like substance called compost. It can be a fast (hot) or slow (cold) process, depending on the amount of effort put into it. For fast composting, a pile needs a balance of organic materials, moisture, and oxygen to support microorganisms that will heat the pile to 140 to 150°F. At these temperatures, most weed seeds and pathogens will be killed. Organic materials will also break down through slow/cold composting, but the decay will be a lot slower, and seeds and pathogens will not be destroyed.
Many organic materials are suitable for composting. Yard wastes such as leaves, grass clippings, straw, and plant trimmings can be composted. Branches and twigs greater than 1-inch in diameter should be ground up in a shredder or chipper. Kitchen wastes such as vegetable scraps, coffee grounds, and eggshells may also be added.
Slow (Cold) Composting
If hot composting will require too much time or energy, simply gather leaves into a 3 to 4 cubic foot pile or bin, sprinkle them with water, and they will decay on their own. Food wastes may be added, but bury them deep in the pile so they are out of reach of pests. It will take about a year for the leaves to decompose, but eventually rich compost will be ready for landscape use. Disadvantages of slow composting include the length of time it takes for materials to decompose, the possibility of pests being drawn to the decaying matter, and weed seeds and pathogens not being destroyed by high temperatures.
Fast (Hot) Composting
Gardeners who want to produce a higher quality of compost more quickly will choose this composting method. It involves aerating the pile, checking temperatures and moisture levels, and getting the right mixture of materials and particle sizes.
A bin is not needed to make compost. Some choose to use a bin to keep the pile neat, help retain heat and moisture, and keep out pests, or they live in a neighborhood where a bin would be more appropriate than an open pile. Many people make their own compost bin using concrete blocks, wooden pallets, mesh fencing, or 55-gallon drums. A three-compartment wooden bin can be constructed using plans from the internet (Figure 2–1).
There are a variety of manufactured composting bins available, including enclosed, spherical, or tumblers (Figure 2–2). Although meat, fish, bones, and dairy should not be added to a compost pile or bin, they can be placed in an in-ground digester such as the Green Cone.
Composting can be done in a pile or some type of bin, but the size is important for maintaining heat—it should be 27 cubic feet (3 feet wide, deep, and tall). Set it up in a convenient location that is over 6 feet away from the home or other wooden structures. To maximize food safety, the compost should be downhill and as far away as possible from the vegetable garden. Choose a flat space that is protected from flooding or runoff to surface waters or wells. Keep the areas in front of and above the pile or bin clear so it can be worked without difficulty. Place it in a shaded area (to help it retain moisture) and within reach of a garden hose.
There are two basic styles of hot composting: 1) Single Batch, where materials are added all at once to form a pile, and 2) Continuous Pile, where organic materials are added as they become available. Build a pile 3-feet high and at least 3-feet in diameter so it can become self-insulating to retain heat (Figure 2–3). Add 4-to-5 inches of carbonaceous materials (browns), then two or three inches of nitrogenous materials (greens), and keep alternating the layers. Another method is to mix up browns and greens thoroughly before loading. Be sure to water each layer thoroughly to ensure that moisture is evenly distributed. Toss in a handful of soil on each layer to introduce more microorganisms. Top the pile with 4-to-5 inches of carbonaceous materials to keep out flies and other pests and provide a filter for odors.
After the pile is created, it should heat up within a few days and stay hot for several weeks if it is turned weekly. During this time, the pile will shrink and after about a month it may be about half of its original volume. It will take another four to eight weeks for the pile to cure and be ready for use.
A simple compost recipe is to combine leaves, grass, food scraps, and coffee grounds at a ratio of 2-to-1 mix of “browns” and “greens." There are some additives that can help to get a compost pile hot. Small amounts of one or more of the following in “meal” form can be dusted on top of the “greens” in a compost pile: alfalfa, bone, hoof, soybean, canola, cottonseed, or blood. A compost pile can also be activated by adding a mixture of water and molasses, sugar, syrups, or flat soft drinks.
Maple leaves have a perfect carbon-to-nitrogen ratio, so with the right moisture and frequent turning, they can break down in several weeks. Oak leaves have less nitrogen (C/N ratio of about 60 to 1) and contain high levels of tannins which are resistant to decay, so they take a lot longer to break down. Mixing oak leaves with high nitrogen materials will accelerate their decomposition.
Decomposition happens on the surface of materials, so the particle size and shape are very important to the composting process. By chopping, smashing, grinding-or cutting materials into smaller particles (less than 2-inches in diameter), more surface area is created and decomposition happens faster. Use a chipper/grinder or a machete or place materials in a bucket and use a square-end shovel to chop them into pieces. Do not get carried away because very fine particles will prevent air from flowing into a compost pile. A low-cost method of reducing the size of fallen tree leaves is to run a lawn mower over them before or after raking. The shredded leaves can be collected directly if the lawn mower has an appropriate bag attachment. Rigid particles provide structure and ventilation to a pile, so it is good to layer in small batches.
The decomposition process will slow down if there is too little or too much moisture. Approximately 40% to 60% moisture is needed in the pile. At this moisture level, the pile should feel like a wrung-out sponge. The compost pile is within the right moisture range if a drop or two of water can be squeezed from a handful of material. If no water can be squeezed out, the materials are too dry. If the compost pile is too moist, it will slow the decomposition process and produce unpleasant odors. If that happens, add dry leaves, paper, or sawdust to absorb the excess moisture. Most often, compost piles are too dry, which slows down the composting process. Open piles can be covered with a tarp to hold in moisture.
Compost piles need ventilation. Anaerobic (no air) piles smell bad, compost slowly, and produce dense, wet, and smelly compost. Aerobic piles with oxygen throughout will produce little or no odor. To aerate the pile, turn the organic materials with a digging fork or shovel. If turning is not possible, poke it with an aerating device or broom handle to help air flow into the pile. Mixing the pile once a week by moving the material from the outside to the center will hasten the composting process. Turning also exposes seeds, insect larvae, and pathogens to lethal temperatures inside the pile. A pile that is not mixed may take three to four times longer to produce useful compost.
During the early phase of decomposition, organic acids are produced and the compost pile becomes more acidic. Some people advocate adding lime during this stage to increase the pH of the pile and increase microbial activity. However, lime converts nitrogen to ammonia gas, thus removing nitrogen from the pile. Crushed clam or oyster shells, eggshells, and bone meal tend to reduce the acidity of composts. Over time, the pH in the pile rises so that the acidity of the composted material becomes near neutral.
Heat will be given off as microorganisms feed on waste. Temperatures need to reach over 130°F in the pile to kill most pathogens that are harmful to humans and pets, and over 140°F to destroy most weed seeds. If the temperature of the pile climbs to 160˚F, it can kill decomposers and slow the composting process (Figure 2–4). Temperatures in the center of the pile will be hottest and they will be cooler on the outer edges. If the pile does not heat adequately, it may be too small, there may not be enough oxygen or nitrogen, or it may be too dry or too wet (Table 2–1). Turn the pile when the center begins to feel cool to the touch. Turning the pile introduces oxygen and undecomposed material into the center, and helps to revive the heating process.
Table 2–1. Troubleshooting composting problems.
| Symptom | Problem | Solution |
|---|---|---|
| Pile smells like rancid butter, vinegar, or rotten eggs | Too wet or not enough air or too much nitrogen | Turn pile; mix in leaves, straw, sawdust or wood chips |
| Pile is not heating up | Pile is too small, too dry, or has not enough nitrogen | Make pile larger, provide insulation, add water while turning, add nitrogen sources |
| Pile is attracting animals | Food scraps are not well covered or meat or dairy products were added | Cover food with brown leaves, wood chips, or finished compost; keep meat and dairy out of pile; enclose pile in 1/4-in hardware cloth |
| Pile is damp but won’t heat up | Not enough nitrogen | Mix in grass clippings, food scraps, other sources of nitrogen |
| Pile is dry
|
Not enough moisture, too much air flow
|
Water and mix well; cover loosely with tarp or landscape fabric to help hold in moisture
|
| Pile is damp and warm in middle but nowhere else
|
Pile is too small
|
Add more material and moisten
|
| Some people ask "Should I add worms to the pile to help it compost faster?" The answer is no, a compost pile should be too hot for worms to tolerate. During the cooler curing phase of composting, earthworms will naturally be attracted to the pile to help break down the remaining material. Vermicomposting, in which earthworms primarily break down the ingredients, is a different process that is described later in the chapter. | ||
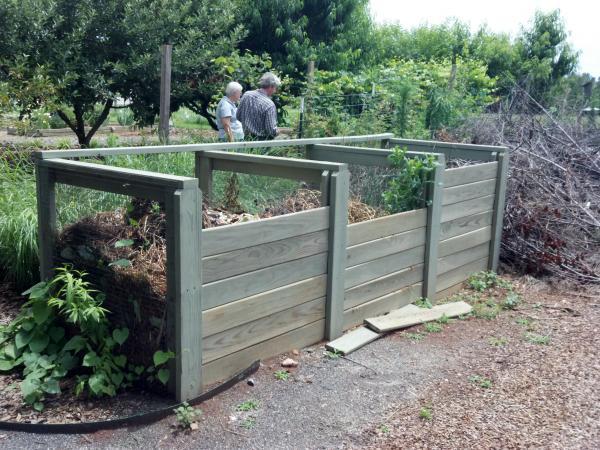
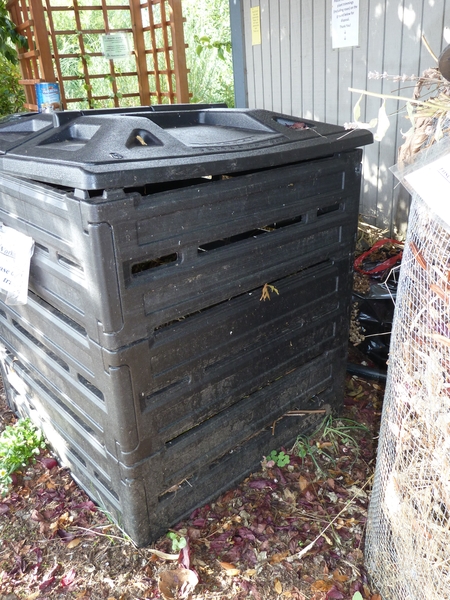
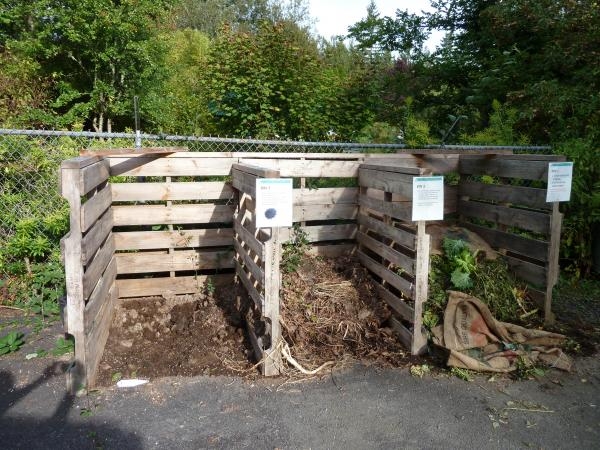
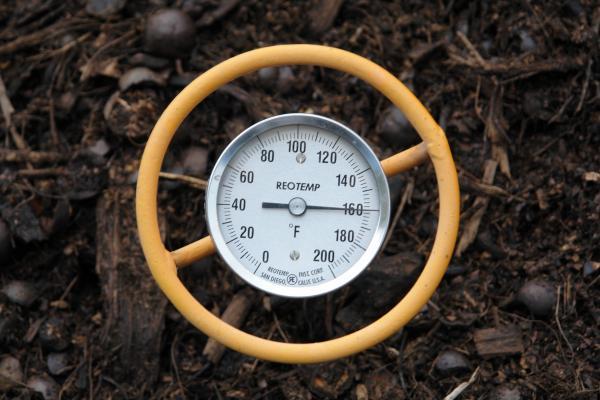
Figure 2–4. A hot compost pile should reach 140˚ Fahrenheit to kill off pathogens and weed seeds.
Scot Nelson, Flickr, CC BY-0 2.0
Composting Materials
The organic materials that can be composted are commonly distinguished as “browns” (high in carbon) and “greens” (high in nitrogen). Some examples are in Table 2–2. The “browns” are sugar-rich carbon sources that provide energy to microorganisms, absorb excess moisture, and provide structure to the pile. “Browns” include brown autumn leaves, newspaper, straw, sawdust, napkins, cardboard, twigs, hay, dryer lint, and bark (Figure 2–5). The “greens” provide protein-rich nitrogen and moisture to microorganisms and include grass clippings, vegetables and fruit, coffee grounds, tea leaves, livestock manures, and alfalfa (Figure 2–6). See Table 2–3 for a more extensive list of raw materials that may be composted.
Food scraps may be stored in a container until they are added to the compost pile (Figure 2–7). Some people like to place food scraps in a container in their freezer until they are taken out to the compost pile. Others reuse a plastic container with a lid or use a purchased compost kitchen container and keep it under their sink or on the kitchen counter. Food scraps should be buried inside the pile to avoid attracting rodents.
Yard waste suitable for composting includes fallen tree leaves, grass clippings, straw, and non-woody plant trimmings. Leaves are the primary organic waste in most backyard compost piles. Although grass clippings can be composted, it is better to leave them on the lawn where they will decay and release nutrients, reducing the need for fertilizer (See NC State Extension publication AG-69, Carolina Lawns). When adding grass to a compost pile, mix it thoroughly with leaves so it does not compact and restrict airflow.
Newspaper and other types of paper can be composted, but the nitrogen content is low, so it decreases the decomposition rate. If paper is composted, it should make up no more than 10% of the total weight of the material in the compost pile. It is better to recycle paper curbside or take it to a community collection site.
Table 2–2. Carbon–to–nitrogen ratios of commonly composted materials.
| Materials High in Carbon (Browns) | C:N |
|---|---|
| Autumn leaves | 30 – 80:1 |
| Straw | 40 – 100:1 |
| Wood chips, sawdust | 100 – 500:1 |
| Mixed paper | 150 – 200:1 |
| Newspaper, cardboard | 560:1 |
| Materials High in Nitrogen (Greens) | C:N |
|---|---|
| Vegetable scraps | 15 – 20:1 |
| Coffee grounds | 20:1 |
| Grass clippings | 15 – 25:1 |
| Livestock animal manure | 5 – 25:1 |
Source: Composting to Reduce the Waste Stream: A Guide to Small-Scale Food and Yard Waste Composting. Northeast Regional Agricultural Engineering Service, Cooperative Extension, #43. 1993.
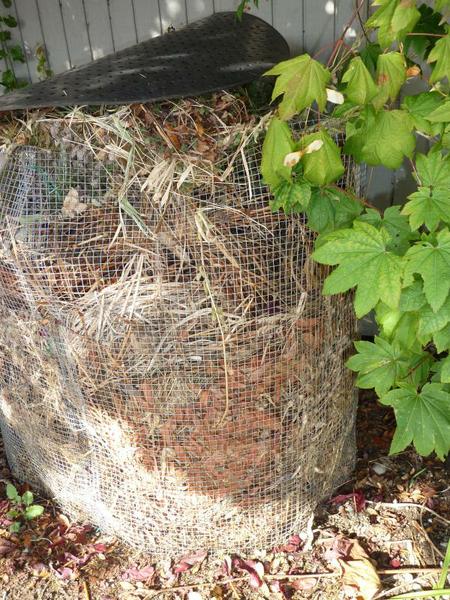
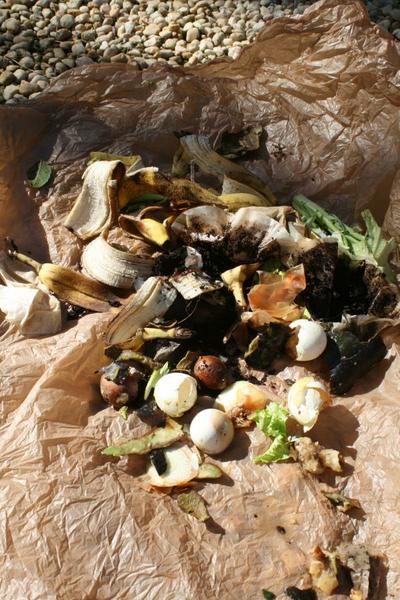

Figure 2–7. Kitchen scraps can be stored in a container (this one is under the sink) until full and ready to be brought out to the compost pile.
Chris Alberti CC BY 2.0
What NOT to Compost and Common Composting Problems
Some materials may pose a health hazard or create a nuisance and therefore should not be used to make compost. Types of organic materials that should NOT go into compost piles include the following:
- Dog or cat feces and litter, and dirty diapers (may contain parasites and pathogens)
- Meat, fish, bones, fats, grease, lard, oils, eggs, or dairy products such as butter, milk, yogurt, and sour cream (may create odors, attract rodents and flies)
- Yard trimmings treated with chemical pesticides (might kill beneficial composting organisms or not break down in the composting process and affect plants where compost is placed)
- Diseased or insect-infested plants (diseases and insects may survive and be transferred to other plants)
- Black walnut tree leaves or twigs (release substances that might harm plants)
- Weeds that have gone to seed
- Weeds with invasive roots, such as Dock weed, Alligator weed, or Bermuda grass
- Used facial or toilet tissue (may contain pathogens)
- Charcoal ash or coal (resistant to decay and may contain substances harmful to plants)
- Pressure-treated lumber, pressed wood, plywood (contain toxic chemicals)
- Heavily-coated paper (magazines, catalogs, wrapping paper, greeting cards with metallic inks, photographs)
- Wood ash (a handful or two may be added, but more may harm microbes, slow the composting process, cause smelly ammonia gas releases, and leave compost with less nitrogen)
- Pine needles (waxy coating is resistant to decay)
- Contents of swollen cans (could contain botulism)
- Rose thorns and other stickers (take longer to compost and can be painful to handle)
Herbicides may persist during the composting process and harm plants grown in compost-amended soils. Hot composting piles can accelerate the breakdown of most herbicides, and they can also be deactivated by binding with organic matter. The source of herbicides in most home composting piles is usually lawn clippings. However, animal manure may contain composting-resistant herbicides. See NC State Extension publication Herbicide Carryover in Hay, Manure, Compost & Grass Clippings: Caution to Hay Producers, Livestock Owners, Farmers & Home Gardeners.
Some people ask “Should I add worms to the pile to help it compost faster?” The answer is no, a compost pile should be too hot for worms to tolerate. During the cooler curing phase of composting, earthworms will naturally be attracted to the pile to help break down the remaining material. Vermicomposting, in which earthworms primarily break down the ingredients, is a different process that is described below.
Curing and Using Compost
When heating ceases, cover the pile with a fabric weed barrier and let it cure for 6 to 12 weeks. During that time, mist the compost to keep it slightly damp and poke it occasionally to let in air. As the compost cures, particles will shrink, organic acids will dissipate, and pH will stabilize and move closer to neutral. Compost is basically “done” when the original materials are unrecognizable, the pile temperature is less than 10 degrees warmer than ambient, and it is dark brown or black and smells earthy (not like ammonia or rotten eggs). To make sure the compost is fully mature and stable, test it on radish seeds to make sure it does not prevent germination or damage the plants. A sample can be sent to the NC Department of Agriculture & Consumer Services to determine the levels of nutrients, carbon-to-nitrogen ratio, pH, and soluble salts.
For smaller particles of compost, a simple screen can be made with half-inch mesh hardware cloth and a wood frame (Figure 2–8). The screen may be placed on top of a wheelbarrow or inclined at an angle on the ground. Load the screen with compost and use a gloved hand or a square-end shovel to scrape the compost against the screen. Remove the screen to reveal sifted compost. Organic materials too large to pass through the screen may be added back into the compost pile.
Potted plants, garden and field crops, lawns, shrubs, and trees can benefit from compost. In clay soils, compost improves aeration and drainage and makes it easier to work with hand tools. In sandy soils, compost increases water-holding capacity and increases soil aggregation. Compost may suppress some plant diseases and pests, and it encourages healthy root systems. Although compost contains macro- and micronutrients, it is often not enough to supply all of plants’ needs. Thus, lawn and garden soils should be tested and fertilized accordingly. Local Cooperative Extension centers have soil test boxes and instructions.
Table 2–3. Organic materials that can be composted.
| Nitrogen (Green) | Carbon (Brown) |
|---|---|
| Grass clippings | Leaves, twigs, yard trimmings |
| Houseplant leaves | Natural fiber yarn, thread, string, rope |
| Hair, fur, nail clippings, feathers | Paper rolls (towel, toilet, gift wrap) |
| Vegetables, fruits | Nut shells (not walnut) |
| Coffee grounds, filters | Cotton balls, swabs |
| Tea bags, leaves | Dryer lint from natural fabrics |
| Egg and crustacean shells (rinsed) | Cotton, wool, silk, felt, hemp, linen, burlap |
| Old herbs, spices | Vacuum contents, floor sweepings |
| Flowers, dead blossoms | Straw, hay, corn cobs |
| Beer, winemaking leftovers | Newspaper, nonglossy paper |
| Juice, beer, wine, dregs | Brewery hops |
| Freezer-burned vegetables, fruits | Loofahs |
| Aquarium water, algae, plants | Paper napkins and bags |
| Seaweed | Sawdust, wood bark and chips |
| Herbivorous animal manure (rabbits, cows, sheep, chickens, horses) | Bamboo skewers, toothpicks |
| Pizza and cereal boxes, paper egg cartons | |
| Pencil shavings | |
| Paper baking cups | |
| Grains, cereal, crackers |
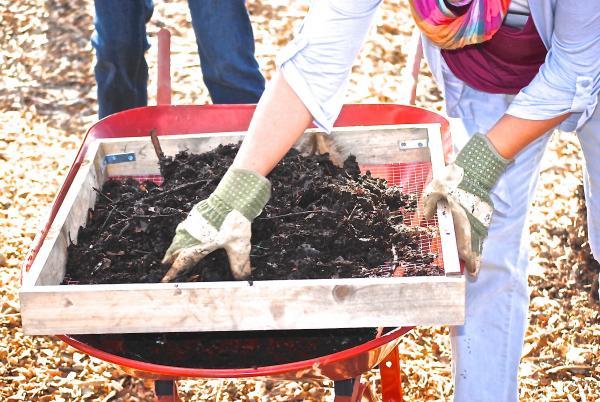
Figure 2–8. Using a screen to remove larger particles of compost. These large particles can be thrown back in the compost pile.
Nadine Ford CC BY 2.0
Compost Tea
There is an increasing interest in using compost tea as a drench or foliar spray, as it has similar effects on plant growth, health, and disease resistance as compost. Compost tea brewers may be purchased or made out of a clean 5-gallon bucket, fine mesh fabric, and two sticks. Add 1 part compost to 10 parts water. For example, for 1 gallon of water (128 ounces), use 13 ounces of compost (about 11⁄2 cups).
If the water has chlorine in it, first let the chlorine evaporate out by filling the bucket with water and letting it sit for at least 24 hours. Measure the compost to the desired solid-to-water ratio. Place compost inside the mesh fabric so that it can easily be removed later. Place a stick across the top of the bucket and tie the fabric bag into a knot. Submerge the mesh bag in the water in the bucket and tie the fabric bag to the stick (Figure 2–9).
Place the bucket out of direct sunlight in an area where the temperatures will remain 60 to 80°F (16 to 27°C). Do not allow leaves or other debris to fall into the bucket (it is best to keep the bucket indoors). Write down the date and time that the brewing begins. Stir the bucket 12 times over the next 48 hours or run an aquarium pump during that time.
After 48 hours of brewing, remove the bag containing the compost. Pour the yellow-brown “tea” into a watering can or sprayer. Use the tea immediately or within 4 hours after brewing. The tea can be poured into the soil around the base of a plant or sprayed onto the leaves. Do not use the tea on any edible portions of a plant. Spray weekly or every two weeks. To prevent microbe loss from ultraviolet rays, spray early in the morning on a cloudy day before it gets hot, or after irrigation or rain.
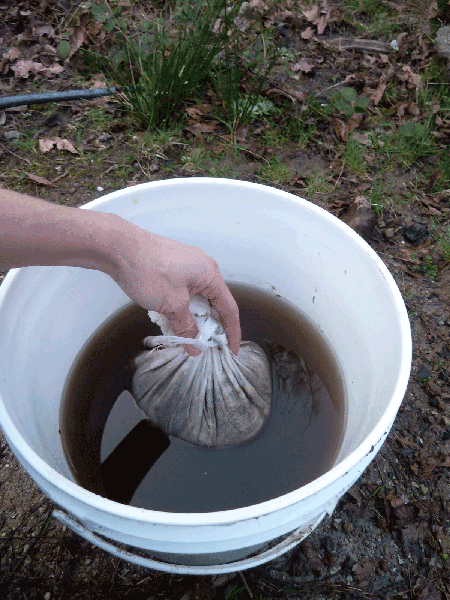
Figure 2–9. Make compost tea in a bucket using one part compost and 10 parts water. Suspend compost in a fine mesh fabric and brew for 48 hours, stirring 12 times.
Kathleen Moore CC BY 2.0
Vermicompost
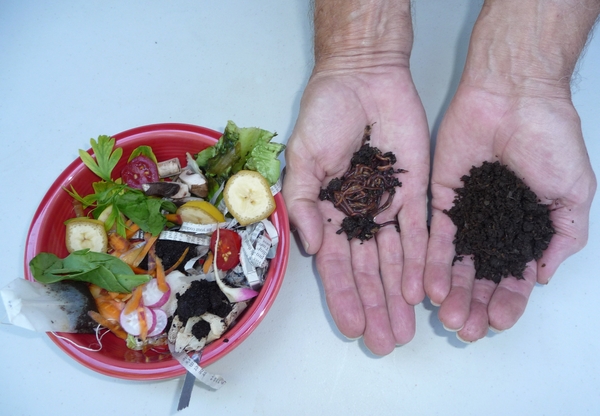
Vermicomposting (earthworm composting) turns many types of kitchen food scraps into nutritious soil amendments or growth media for plants (Figure 2–10). When vermicompost is added to soil, it boosts the nutrients available to plants and enhances soil structure and drainage. Vermicompost helps plants grow bigger, produce higher yields, and it can reduce the impact of some pests and diseases.
Using earthworms to decompose food residuals offers several advantages:
- Produces less odor and attracts fewer pests than putting food scraps into a garbage container.
- Saves the water and electricity that kitchen sink garbage disposal units consume.
- Reduces garbage disposal costs.
- Produces a free, high-quality soil amendment (vermicompost).
- Requires little space, labor, or maintenance.
- Spawns free earthworms for fishing.
Equipment and Supplies
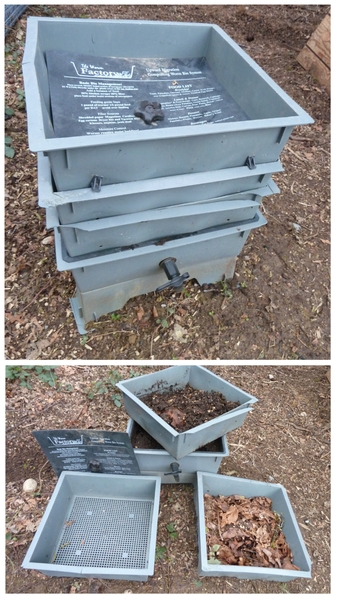
The materials needed to start a vermicomposting system are simple and inexpensive: a worm bin, bedding, water, composting earthworms, and food scraps. (Figure 2–11)
Worm Bin
A suitable bin can be constructed of non-aromatic wood or a plastic container can be purchased. Wooden worm bin construction plans may be found at a number of sites on the internet. Manufactured worm bins can be purchased online or at some garden centers. Or one can be made by buying an 18-gallon storage bin with a tight-fitting lid. Make sure the bin is a dark color because earthworms are highly sensitive to light. If a plastic container is used, it should be thoroughly washed and rinsed to remove manufacturing residues before earthworms and bedding are added. Do not use a container that was used to store toxic chemicals. The bin size depends on the amount of food waste produced by a household. The general rule of thumb is one square foot of surface area for each pound of garbage generated per week. So, if a household creates two pounds of food scraps weekly, it will need a 2-foot by 1-foot worm bin.
Homemade worm bins will need holes drilled for aeration and drainage. To provide enough oxygen for earthworms, drill holes on the upper sides of the bin near the lid. Do not drill holes in the lid, as they would let in light and dry out the bedding. There are three options for drilling holes in the sides of the bin: 1) using a 3-inch hole saw, drill one hole on each upper, narrow end of the bin and insert a 3-inch screened soffit vent (available at hardware stores in the gutter section), OR 2) drill four ½-inch holes on the long sides of the bin and either leave the holes open or glue hardware cloth/screen over them, OR 3) drill a number of tiny holes all the way around the upper sides of the bin. For drainage, drill six ¼-inch holes, equally dispersed, in the bottom of the bin, and place a moisture collection tray under the bin.
There are several suitable locations for a worm bin, such as a garage or carport, porch or deck, kitchen, basement, bathroom, closet, or apartment balcony. Make sure there is room for air to circulate around the bin. If a worm bin is properly maintained, it should not emit odors or attract pests. If the bin is kept outdoors, place it in a location that is always shady. A worm bin should never be placed in the direct sun because it can cause the system to overheat and kill the earthworms. Wherever it is located, the temperature inside the bin should be maintained between 59° and 77°F (15° to 25°C). There are several ways to maintain the bin above the minimum temperature, such as gluing blueboard insulation to the outer walls of the bin or surrounding it with straw or other insulating materials. Alternatively, cut a plastic gallon jug in half, fill it with water, insert an aquarium heater and place it inside the bin. If it is hot and the worm bin needs to be cooled down, mix in some dry bedding or place ice in a container and place it in the bin.
Bedding
To provide a suitable environment for the earthworms to live and to cover food scraps, bedding will need to be added to the worm bin. Bedding should be a nontoxic fluffy material that holds moisture and allows air to circulate. Suitable materials include shredded paper (such as black-and-white newspapers, paper bags, office paper, or cardboard), decaying leaves, or coconut pith fiber (coir). Do not use glossy paper or magazines. For newspapers, fold a section in half and tear off long, half-inch wide strips (go with the grain of the paper and it will tear neatly and easily). Soak any bedding for 5 to 10 minutes in a bucket of water and then wring it out so it is a little wetter than a moist sponge. Aim for the bedding to be very damp, but not soaking wet (only two to three drops of water should come out when squeezed). Fluff up the bedding as it is added to the bin, filling it no more than half way. Mix in a handful of soil from a healthy garden to introduce beneficial microorganisms and aid the earthworms’ digestive process. The earthworms will eat the bedding along with the food discards, so more will need to be added within a couple of months. Use a plant mister to spritz some water on the bedding to keep it moist. Never pour water directly into a worm bin as it can drown the worms.
Also, do not agitate, turn, or stir the contents of the worm bin. It does not need to be aerated like a compost pile, and earthworms can be killed if handled roughly. Earthworm castings should be left undisturbed on the bottom of the worm bin.
Water
Earthworms breathe through their skin, which must remain moist for the gas exchange to take place. Their bedding needs to be at about an 80 percent moisture level. If a worm bin has adequate aeration and it is not over-watered, excess liquid should not puddle or leak out of the bottom of the bin. Excess moisture can be created from wet feedstocks, so limit the amount of coffee grounds and cooked or canned foods that are fed to earthworms.
There is a misconception that the runoff from worm bins (what leaks out of the bottom) can be used to grow plants. It is actually leachate—liquid that has passed through unprocessed organic material. Leachate may contain pathogens, phytotoxins, and anaerobic microorganisms that could be harmful to plants. Never use leachate on food crops, houseplants, or sensitive plants. Leachate should be poured on weeds or down a toilet. Use only finished vermicompost to make vermicompost tea.
Composting Earthworms
It is important to use the type of earthworms that will thrive in a worm bin. There are more than 6,000 species of earthworms, but only seven species have been identified as suitable for vermicomposting. Of those, only one species of earthworm is used for vermicomposting by most people worldwide: Eisenia fetida (common name: red wiggler). Start with at least one pound (about 1,000) of red wigglers to one square foot of surface area of the worm bin to have a chance of developing a sustainable system. Do not get the earthworms from a bait shop (that would require 33 to 83 bait cups!) or a yard (there is no way to tell if the species is Eisenia fetida). Instead, buy them from a worm grower. Be sure to check around, as prices for earthworms vary significantly. When the red wigglers arrive, gently place them on top of the bedding in the worm bin. The earthworms will immediately move underneath the bedding to avoid the light, but they need a few days to acclimate to their new home. If the red wigglers try to leave the bin, keep the bin in a bright area around the clock for a few days, while the earthworms are getting used to their new environment.
After a while, other organisms will appear in the worm bin—they come to eat and help break down the organic materials. Most of the organisms will be too small to see, but pot worms, springtails, pill bugs, molds, and mites may be spotted. None of these is harmful to the worms, nor are they an indication there is a problem with your worm bin.
Optimal Conditions for Raising Red Wiggler Earthworms
- Temperature: 59 – 77°F (15°– 25°C) (limits 32° – 95°F, 0°– 35°C)
- Moisture: 80% (limits 60 – 90%)
- Oxygen requirement: Aerobicity
- pH: > 5 and < 9
- Ammonia content of waste: Low; < 0.5mg/g
- Salt content of waste: Low; < 0.5%
Food Scraps
Once the earthworms have settled into their new home (after a couple of days), add a small amount of food scraps two inches below the surface of the bedding. The amount of food should not exceed 1-inch high. This will prevent the food scraps from building up heat. Feed earthworms any non-meat organics such as vegetables, fruits, crushed eggshells, tea bags, coffee grounds, shredded paper, coffee filters, and shredded garden debris. Red wigglers especially like cantaloupe, watermelon, and pumpkin. Do not add citrus fruits or peels to the bin, as they can cause it to become too acidic. Chop or grind food scraps into small pieces so they break down more easily. Never add meat scraps or bones, fish, greasy or oily food, onions, garlic, fat, tobacco, sugary foods, citrus, salty foods, or pet or human manure. Once the earthworms have been fed, use a three-prong garden tool to cover the food scraps completely with 2 inches of bedding. This will prevent fruit flies from finding the food.
Food scraps can be stored for several days before adding them to the worm bin. Many people store food residuals in a container with a lid next to or under their kitchen sink. Others store their food scraps in a container or bag in the freezer.
One pound of red wigglers will eat up to two pounds of food scraps a week. If more food is added than the earthworms can consume, it will start to rot and become smelly. Ideally, do not add more food until the worms have consumed the last feeding. If more food scraps are produced than one bin can handle, buy more earthworms and start another worm bin. It’s a good idea to have a backyard composting bin in addition to a worm bin, because it can accommodate excess food scraps, along with citrus, onions, and garlic.
The worms may be fed any time of the day. Do not worry about taking a vacation, as the earthworms can be fed as seldom as every three weeks. If extended periods away from the bin are expected, apply ½-inch layer of food scraps across the top of the bin and cover it with two inches of moistened, shredded paper. See Table 2–4. for worm bin troubleshooting.
Table 2–4. Worm bin troubleshooting.
| Problem | Possible Causes | Solutions |
|---|---|---|
| Bin smells bad | Over feeding | Stop feeding for two weeks |
| Noncompostables present | Remove noncompostables | |
| Food scraps exposed | Cover with 2 inches of bedding | |
| Bin too wet | Mix in dry bedding; leave lid off with strong light overhead | |
| Not enough air | Drill holes in bin | |
| Bin attracts flies | Food scraps exposed | Bury food completely |
| Too much food | Add food after most is eaten | |
| Worms are dying | Bin too wet | Mix in dry bedding; leave lid off |
| Bin too dry | Thoroughly dampen bedding | |
| Extreme temperatures | Move bin where temperature is 55 – 77°F | |
| Not enough air | Fluff bedding; drill holes in bin | |
| Not enough food | Add more bedding and food scraps | |
| Worms crawling away | Bin conditions not right | See solutions above |
| Leave lid off with light shining into bin (worms will burrow back into bedding) | ||
| Bedding is drying out | Too much ventilation | Mist bedding; keep lid on |
| Liquid collecting in bottom | Poor ventilation | Mix in dry bedding; leave lid off with strong light overhead |
| Feeding too much watery scraps | Cut back on coffee grounds and food scraps with high water content; mix with bedding material before feeding | |
| Some people ask "Should I add worms to the pile to help it compost faster?" The answer is no, a compost pile should be too hot for worms to tolerate. During the cooler curing phase of composting, earthworms will naturally be attracted to the pile to help break down the remaining material. Vermicomposting, in which earthworms primarily break down the ingredients, is a different process that is described later in the chapter. | ||
Harvesting Vermicompost
After a few weeks, vermicompost will appear on the bottom of the bin. Vermicompost is a soil-like material containing a mixture of earthworm castings (feces) and partially decomposed bedding and food scraps. In four to six months, it will be time to harvest the vermicompost. It may be harvested by one of three methods:
Method 1: Sideways Separation. Feed the earthworms on only one side of the worm bin for several weeks, and most of the worms will migrate to that side of the bin. Then the vermicompost can be harvested from the other side of the bin where no food scraps have been added. Fresh bedding should be added where vermicompost was harvested. Repeat this process on the other side of the bin. After both sides are harvested, food scraps can be added to both sides of the bin again.
Method 2: Light Separation. Empty the contents of a worm bin onto a plastic sheet or used shower curtain where there is strong sunlight or artificial light. Wait five minutes, and then scrape off the top layer of vermicompost. The earthworms will keep moving away from the light, vermicompost can be scraped off every five minutes or so. After several scrapings, the worms will be in clusters; just pick up the worms and gently return them to the bin in fresh bedding (with the old bedding mixed in).
Method 3: Vertical Separation. Before starting vermicomposting, either buy a manufactured stacking bin or make one by purchasing two identical storage bins and drilling extra holes in the bottoms. Set one bin aside and vermicompost in the other bin for a few months. Periodically try to stack the second bin inside the first one. When the bedding in the first bin is high enough to fit snugly against the bottom of the second bin, add bedding material to the top bin and begin feeding in that bin only for the next several months. Most of the earthworms will move up into the upper bin to eat, and eventually the lower bin will just contain vermicompost.
Be on the lookout for earthworm egg capsules--they are lemon-shaped, about the size of a match head, shiny, and light-brown. A capsule contains two to seven baby earthworms (three on average). Place the egg capsules back inside a worm bin so they can hatch and thrive.
If it appears that there is an overabundance of earthworms in a bin, remove some and start a new worm bin. Or gift earthworms to others who would like to begin vermicomposting, such as school or church teachers, Cooperative Extension agents, scout clubs, 4-H clubs, etc.
Using Vermicompost
Vermicompost is a fully stabilized organic soil amendment that is much more microbially-active than the original organic material that was consumed. It has a fine particulate structure and good moisture-holding capacity. Vermicompost contains nutrients such as nitrogen, phosphorus, potassium, calcium, and magnesium in forms readily taken up by plants. It also has plant growth hormones and humic acids, which act as plant growth regulators.
Vermicompost can be used immediately or stored for later use. To store vermicompost, dry it to a moisture level of about 35% and place it in a bag or container pricked with a pin to make holes that will allow oxygen in, yet hold in moisture. Store it in a warm, dark place.
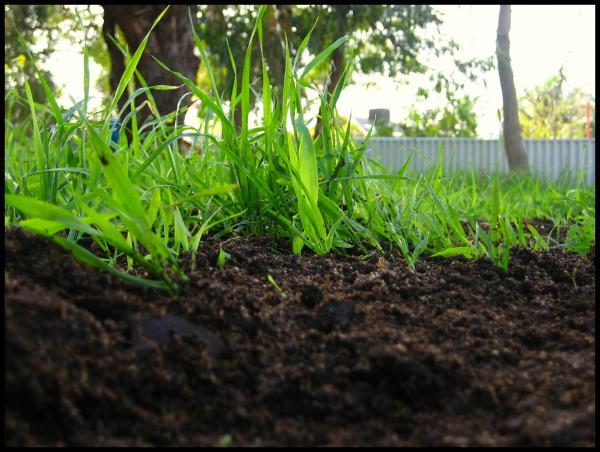
The material can be mixed into the soil in a garden and around landscape plants. It can also be used as a top dressing on container plants or sprinkled on a lawn as a conditioner (Figure 2–12). It is best to protect the vermicompost from direct sunlight by incorporating it in soil or covering it with mulch.
Summary
Backyard composting and vermicomposting are easy ways to keep food scraps and yard wastes out of landfills or burn piles and convert them into valuable soil amendments. There are many similarities and some differences between the two types of composting. Both compost and vermicompost can enrich soils and increase plant productivity (Table 2–5).
Table 2–5. Differences and similarities between composting and vermicomposting.
| Attribute | Composting | Vermicomposting |
|---|---|---|
| Uses vegetable scraps | Yes | Yes |
| Uses brown materials, paper, dried leaves | Yes | Yes |
| Microbes break down materials | Yes | Yes |
| If managed properly can work quickly | Yes | Yes |
| Worms break down material | No | Yes |
| No turning necessary | No | Yes |
| Hot enough to kill weed seeds | Yes | No |
| Heat can kill beneficial microbes | Yes | No |
| Limited by cold weather | No | Yes |
| Bin can be indoors | No | Yes |
Frequently Asked Questions
1. I have bugs in my compost. Will they hurt my plants?
Insects can be an important component in the breakdown of organic material in a compost pile. Very few of these insects are plant pests. If you are trying a “hot compost” method, your pile might not be hot enough; try turning it over and adding more green material. If your pile reaches the correct temperature, insects will stay away. The presence of ants could indicate your pile is too dry and needs to be watered. If your compost is nearing completion and you are noticing insects like sow bugs or earwigs, spread your compost out and let it dry in the sun for a few days before using it in your garden.
2. I want to compost but I have close neighbors and I am worried my pile will smell.
A properly managed compost pile will have a pleasant “earthy” smell when you open the lid to turn it. Your neighbors should not be able to smell it. Your pile will need adequate air incorporated by frequent turning and equal proportions of both green and brown material. A foul odor can come from too much wet green material breaking down in the absence of oxygen. This anaerobic decomposition can produce a strong odor of rancid butter or rotten eggs. To alleviate this, turn the pile over and add straw, wood shavings, or dried leaves.
3. Can I put weeds in my compost pile?
A properly managed hot compost pile will reach 140°F and will easily kill most weed seeds. Unless you are sure your pile is reaching these temperatures, it is best to put only weeds that have not yet gone to seed in your pile.
Further Reading
- Appelhof, Mary. Worms Eat My Garbage: How to Set up and Maintain a Worm Composting System. 2nd ed. 1997. Kalamazoo, Michigan: Flower Press, 2003. Print.
- Bass, Larry, T. E. Bilderback, and M. A. Powell. Composting: A Guide to Managing Organic Yard Wastes. Raleigh, North Carolina: NC State Extension, 1992. PDF file. AG-467.
- Cogger, Craig, Dan M. Sullivan, and Jim Kropf. Master Gardener Manual. Pullman, Washington: Washington State University Extension, 2010. Chapter 22: Composting, pages 22-1 to 22-16. CD file.
- Dickson, Nancy, Thomas Richard, and Robert Kozlowski. Composting to Reduce the Waste Stream: A Guide to Small-Scale Food and Yard Waste Composting. Ithaca, New York: Northeast Regional Agricultural Engineering Service, 1993. PDF file.
- Sherman, Rhonda L. Backyard Composting of Yard, Garden and Food Discards. Raleigh, North Carolina: NC State Extension, 2014. PDF file. AG-791.
- Sherman, Rhonda L. Worms Can Recycle Your Garbage. Raleigh, North Carolina: NC State Extension, 2012. PDF file. AG-473-18 (Revised).
- Composting to Reduce the Waste Stream: A Guide to Small-Scale Food and Yard Waste Composting. Northeast Regional Agricultural Engineering Service, Cooperative Extension, #43. 1993.
Chapter Text Hyperlinks
Building Your Own Composting Bin, Designs for Your Community, CalRecyle
Carolina Lawns, A Guide to Maintaining Quality Turf in the Landscape, AG-69
Herbicide Carryover in Hay, Manure, Compost, and Grass Clippings, AG-727
For More Information
NC State Resources
- Backyard Composting of Yard, Garden and Food Discards, AG-791
- Composting Portal
- Herbicide Carryover in Hay, Manure, Compost, and Grass Clippings, AG-727
- Soil Test Forms & Information, by NCDA&CS
- Vermicomposting in North Carolina
- Waste/Compost Analysis, NCDA&CS
More NC State Resources
Contributors
Author:
Rhonda Sherman, Extension Solid Waste Specialist, Department of Horticultural Science
Contributions by Extension Agents:
Pam Jones, Paige Patterson, Peg Godwin, Tim Mathews
Contributions by Extension Master Gardener Volunteers:
Lee Kapleau, Kim Curlee, Jackie Weedon, Karen Damari, Connie Schultz
Content Editors:
Lucy Bradley, Associate Professor and Extension Specialist, Urban Horticulture, NC State University; Director, NC State Extension Master Gardener program
Kathleen Moore, Urban Horticulturist
Copy Editor: Barbara Scott
How to cite this chapter:
Sherman, R. 2022. Composting, Chapter 2. In: K.A. Moore, and. L.K. Bradley (eds). North Carolina Extension Gardener Handbook, 2nd ed. NC State Extension, Raleigh, NC. <http://content.ces.ncsu.edu/2-composting>
Publication date: Feb. 1, 2022
AG-831
Other Publications in North Carolina Extension Gardener Handbook
- 1. Soils & Plant Nutrients
- 2. Composting
- 3. Botany
- 4. Insects
- 5. Diseases and Disorders
- 6. Weeds
- 7. Diagnostics
- 8. Integrated Pest Management (IPM)
- 9. Lawns
- 10. Herbaceous Ornamentals
- 11. Woody Ornamentals
- 12. Native Plants
- 13. Propagation
- 14. Small Fruits
- 15. Tree Fruit and Nuts
- 16. Vegetable Gardening
- 17. Organic Gardening
- 18. Plants Grown in Containers
- 19. Landscape Design
- 20. Wildlife
- 21. Youth, Community, and Therapeutic Gardening
- Appendix A. Garden Journaling
- Appendix B. Pesticides and Pesticide Safety
- Appendix C. Diagnostic Tables
- Appendix D. Garden Tools
- Appendix E. Season Extenders and Greenhouses
- Appendix F. History of Landscape Design
- Appendix G. Permaculture Design
- Appendix H. Community Gardening Resources
- Appendix I. More NC State Resources
- Glossary
N.C. Cooperative Extension prohibits discrimination and harassment regardless of age, color, disability, family and marital status, gender identity, national origin, political beliefs, race, religion, sex (including pregnancy), sexual orientation and veteran status.