
Outline
Selecting Woody Ornamental Plants
Purchasing Woody Ornamental Plants
Best Practices for Planting Woody Ornamentals
Special Planting Circumstances
Care of Newly Installed Woody Ornamentals
Staking Newly Installed Plants
Care of Established Woody Ornamentals
Organic Mulches
Inorganic Mulches
Considerations for Evergreen Woody Ornamentals
Considerations for Pruning Decidious Woody Ornamentals
Managing Problems of Woody Ornamentals
Objectives
This chapter teaches people to:
- Select healthy plants that will thrive in a specific location.
- Properly prepare a site for and install woody landscape plants.
- Care for newly planted and established woody landscape plants.
- Recognize when, where, why, and how to prune woody plants.
- Avoid common problems caused by the environment or improper care.
Introduction
Woody ornamental plants are the living, structural components of a well-landscaped yard. They are long-lived perennials with stems and branches that increase in girth and height each growing season. Unlike herbaceous plants that die back to the ground in winter, woody ornamentals remain aboveground year-round. In the landscape, woody ornamentals serve many essential functions. Individual specimens provide a focal point, while groups establish a framework. Woody plants create vertical layering from the ground up, affording a host of ornamental and environmental benefits. Shrubs help define areas of the landscape. Flowering woody plants add color and fragrance to a yard, especially in the spring (Figure 11–1). Many deciduous woody plants offer fall color from foliage, berries, or twigs to brighten autumn landscapes, while evergreens provide winter interest (Figure 11–2). Environmental benefits include wildlife habitat, wind screens, shade (Figure 11–3), and erosion control. This large group of plants is divided into three basic categories: vines, shrubs, and trees. Each of these categories can be subdivided into evergreen and deciduous plant varieties, and evergreens can be further divided into broad-leaved (broadleaf) and narrow-leaved (narrowleaf) plants.
Vines are climbing or crawling woody plants without self-supporting stems. When allowed to crawl along the ground, woody vines can be used as ground covers. However, providing vertical support for vines makes them versatile, interesting aspects of the landscape and reduces their footprint, making them very useful in small spaces. When trained over an arbor, vines create shade; when encouraged to grow up a trellis or fence, vines screen unwanted views or define garden spaces. Deciduous or evergreen vines add interest when trained against the wall of a building or when used to frame a doorway. Vines relieve the monotony of a large expanse of fencing and can hide a chain-link fence with a mass of green foliage. Many woody vines offer seasonal color with blooms, foliage, or berries.
Types of Vines
Vines are generally divided into four groups based on their method of climbing.
Clinging vines produce short rootlike growths that serve as adhesive pads (Figure 11–4). They easily climb trees, walls, and wood fences with little assistance. These vines should not be allowed to grow on houses or eaves. As such a vine matures, its canopy becomes dense and traps moisture against the home leaving it susceptible to rot. The vine can work its way into cracks and crevices, destroying masonry or pulling down window frames or gutters. Vines with rootlets growing on tree trunks do not harm the tree unless they grow to cover the tree’s foliage. Examples of this type of vine are Japanese hydrangea vine (Hydrangea hydrangeoides) and climbing fig (Ficus pumila).
Twining vines make up the largest group of vines. They climb by wrapping their stems around and through their support structure (Figure 11–5). They grow well on lattice, chain-link fencing, or any structure they can weave through, but usually need help becoming established. Avoid planting twining vines near small trees and shrubs because these vines may become difficult to control. Examples of this type of vine are American wisteria (Wisteria frutescens) and Carolina jessamine (Gelsemium sempervirens).
Scrambler vines produce long, supple stems that can be woven through the same type of support structures as twining vines (Figure 11–6). They generally need to be trained to climb up and through their support structures. Examples of this type of vine are climbing aster (Ampleaster carolinianus) and greenbriar (Smilax laurifolia).
Tendrils are short curly stems that wrap around narrow structures like wire or bamboo (Figure 11–7). These vines need a support structure with small diameter elements and do very well on chain-link fences or wires. Examples of this type of vine are grape (Vitis rotundifolia), evergreen clematis (Clematis armandii), Virginia creeper (Parthenocis quinquefolia), and crossvine (Bignonia capreolata)
Shrubs are woody plants that grow up to 12 feet tall with foliage extending to the ground. They often have multiple trunks. Deciduous and evergreen (both broadleaf and narrowleaf or coniferous) shrubs are versatile in the landscape, creating structure as ground covers, hedges, screens, and borders. Woody shrubs offer focal points as specimen plantings and provide a wide variety of seasonal interest via blooms, fruit, foliage, or twigs that offer color, texture, or scent.
Trees are woody plants that typically grow more than 12 feet tall and usually have only one main trunk. Deciduous and evergreen (both broadleaf and narrowleaf or coniferous) trees are key components in a well-planned landscape, creating vertical shape and architecture. Working as specimen plants or in groups, trees contribute a strong vertical element to the landscape. Trees also offer a wide spectrum of foliage, both evergreen and deciduous, and provide interest via blooms, fruit, and twigs. Trees are environmental workhorses that create cooling shade, detain stormwater runoff, remove air pollutants, sequester carbon, and host many species of wildlife.
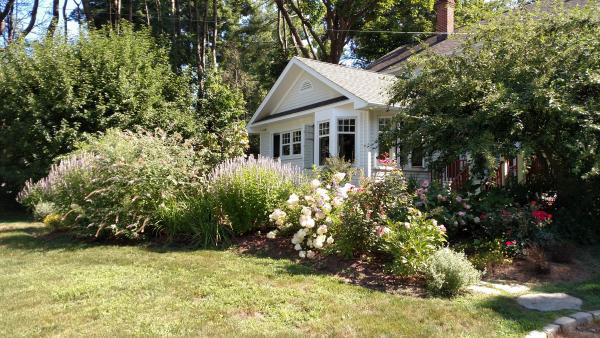
Figure 11–1. Flowering woody ornamentals add color to the landscape, especially in the spring.
emetzner130, Pixabay CC BY0

Figure 11–2. Many deciduous woody plants offer fall color from foliage, berries, or twigs to brighten up an autumn landscape, while evergreens provide winter interest.
Robert Lyle Bolton, Flickr CC BY 2.0
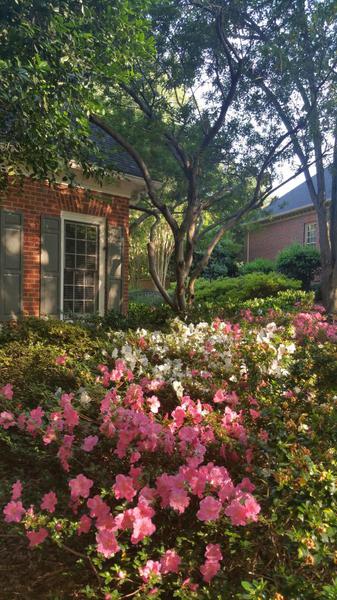
Figure 11–3. Shade trees like this evergreen wax myrtle (Morella cerifera), cool houses with their shade.
Margaret Genkins
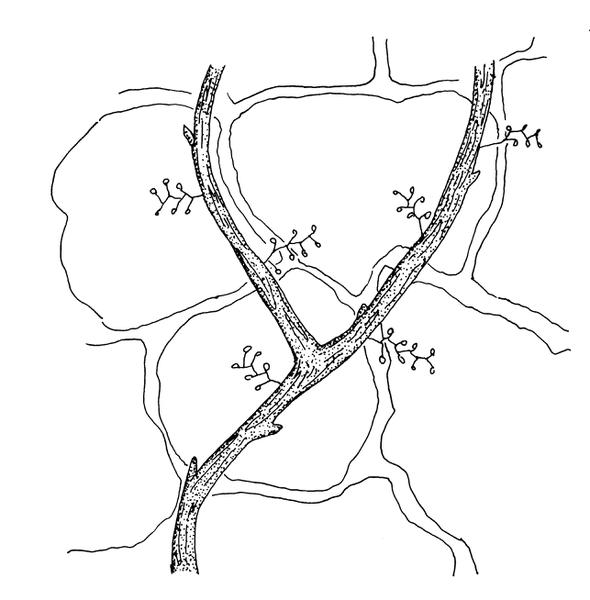
Figure 11–4. Boston ivy (Parthenocissus tricuspidata) climbs using disc-like adhesive tips for support.
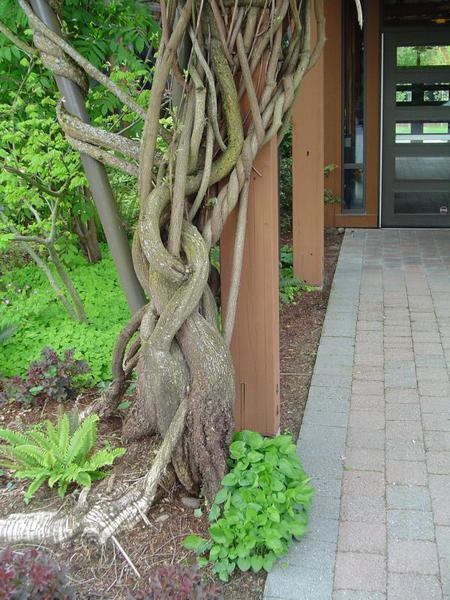
Figure 11–5. Twining vines like American wisteria (Wisteria frutescens) wrap their stems around a support structure.
born1945, Flickr CC BY 2.0
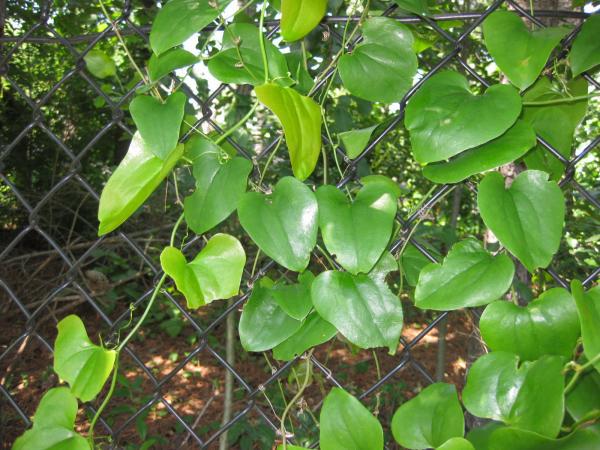
Figure 11–6. Scrambler vines like greenbriar (Smilax laurifolia) need to be wound around a support like this chain-link fence.
Fepup,Wikimedia, CC BY0
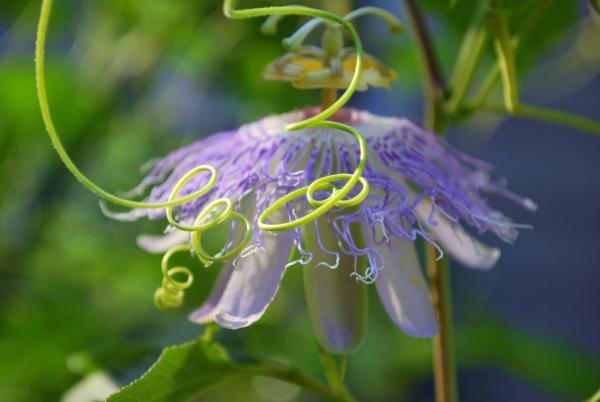
Figure 11–7. Tendril vines like Passion flower (Passiflora spp.) climb by twining stems and tendrils.
/\ \/\/ /\, Flickr CC BY-SA 2.0
Selecting Woody Ornamental Plants
Selecting the “right plant for the right place” is the most important step in creating a healthy, vibrant landscape. Thousands of different kinds of plants are grown in North Carolina, and the number of options at a nursery can be overwhelming. Begin by identifying the site characteristics (sun, soil, available space), and limit your search to plants that thrive in those conditions. Next, consider the role you want the plant to play in the landscape design, and narrow your search further to plants that can fulfill those requirements. See “Landscape Design,” chapter 19, for more information about the site, and see the NC State Extension Gardener Plant Toolbox for detailed information about specific plants or to search for plants with specific characteristics.
Consider the following factors as you choose woody ornamentals to become the architectural framework for a healthy, beautiful landscape:
Plant Functions
Plants serve many functions in the landscape—from increasing comfort and beauty, to creating physical barriers, to providing wildlife habitat, to protecting the soil. Select plants that can fulfill the desired functions.
- Climate. Provide shade, modify humidity and air temperature, and divert breezes or block wind. Providing shade usually requires tall, sturdy, long-living tree species. Place deciduous trees to shade south-facing windows of a home in the summer, and allow the sun to help heat the home in winter. Windbreaks must be able to survive rigorous climatic conditions.
- Visual. Provide screening or privacy and reduce glare. For screening, select an evergreen tree or shrub with dense foliage that grows quickly to the desired height.
- Physical. Direct or limit movement of people or animals. Barrier plantings may require sturdy plants with dense growth and possibly thorns or spines.
- Environmental. Control erosion, prevent stormwater runoff, and filter air and water.
- Ecological. Contribute multiple ecosystem services, such as attract and host pollinators (including birds, bats, butterflies, bees, beetles, and moths) and provide habitat for songbirds and other native wildlife. Native woody trees and shrubs can be particularly effective. For example, some oak trees host more than 500 moth and butterfly species.
- Aesthetic. Fulfill landscape design criteria through colorful fruits and flowers, interesting foliage, fall colors, attractive bark, winter appeal, fragrances, textures, and pleasing forms.
Plant Characteristics
There are many plant characteristics to consider when selecting a plant for the landscape: mature size, mature form, foliage, bloom, fruit, seeds, cones, bark, growth rate, hardiness, water needs, insect and disease resistance, air pollution tolerance, and weediness.
- Mature size. Consider size at maturity, and carefully survey the landscape to consider both the horizontal and vertical space available. Evaluate the plant’s impact on buildings, rooflines, fences, patios, sidewalks, and power lines. Consider how shading from the mature tree canopy and the extensive feeder roots might affect plants or hardscape beneath the canopy.
- Mature form. Forms include low-spreading, round or oval, vase, pyramidal, columnar or fastigiate, upright, and pendulous or weeping (Figure 11–8). Choose plants that provide the desired functions and visual appeal in their mature size and form.
- Foliage. Consider all aspects of foliage, including color in all seasons, texture, size, and whether deciduous or evergreen. Plan for leaf drop as all plants shed leaves. Deciduous plants drop all their leaves in a short period of time, whereas evergreen plants shed throughout the year.
- Bloom. Consider color, fragrance, duration, season, and bloom time within season (early, mid, or later).
- Fruit, seeds, and cones. Consider beauty and color as well as potential messiness and weediness of each plant’s fruiting and seed dispersal habits.
- Twigs and bark. Consider beauty, color, and texture, as well as potential messiness. Exfoliating bark, while visually interesting on the trunk, may become undesirable once it falls to the ground.
- Growth rate. Plants grow at varying rates. Although it may be appealing to purchase a “fast-growing” tree in hopes of instant shade, sometimes that speed comes at a cost to strength. Many fast-growing trees have weak wood that breaks easily. Evaluate both your immediate landscape goals and the plant’s long-term impact on the mature landscape.
- Hardiness. Consider cold and heat tolerance of plant selections.
- Water needs. Consider drought and wet tolerance. Plants vary widely in their adaptation to soil moisture. Most plants need to dry out slightly between watering and can tolerate neither drought nor standing water for extended periods. The lack of oxygen in saturated soil causes the roots of many plants to die. Some plants, however, like bald cypress (Taxodium distichum), grow in the middle of a river. Other species, like eastern red cedar (Juniperus virginiana), survive months without rain. Select and group plants that have similar water needs to increase survival and improve watering efficiency.
- Native. See “Native Plants,” chapter 12, for guidance in selecting native plants adapted to the site conditions and supportive of native wildlife for an environmentally friendly landscape.
- Insect and disease resistance or susceptibility. Check with your local N.C. Cooperative Extension Center for plants to avoid because of poor adaptability to pests in your region.
- Air pollution tolerance. If air pollution is a problem in your area, conduct some research before selecting plants for your yard. Plants like arborvitaes (Thuja spp.), gingkos (Ginkgo biloba), sugar maples (Acer saccharum), and red oak have a higher tolerance for air pollution.
- Weediness. Some plants produce seeds that germinate quickly and prolifically or have root systems that invade planting beds and send up new plants. Research the potential weediness of plants such as Algerian ivy (Hedera canariensis), bamboo, cottonwood (Populus spp.), English ivy (Hedera helix), periwinkle (Vinca major), privet (Ligustrum spp.), tree of heaven (Ailanthus altissima), trumpet creeper (Campsis spp.), and willow (Salix spp.). Some research is being done to produce seedless versions of weedy woody ornamental plants.
Site Characteristics
Consider the following site characteristics to select a plant that will thrive in a particular setting: size of available space, sunlight, soil characteristics, climate, microclimate, moisture, slope, hardscapes, water, and existing vegetation.
- Size of available space. Width and height aboveground and available root space belowground.
- Sunlight. Duration, timing, intensity, and direction of exposure. Some plants require shade or filtered light, while others require full sun for best growth. Before choosing plants for the landscape, observe how many hours of sun and shade various parts of the landscape receive. Plants requiring full sun need at least 6 hours of direct sun each day. Many shade-loving plants tolerate exposure to early morning sun but may suffer if exposed to 2 hours of direct sunlight at midday or afternoon.
Not all shade is the same. There is filtered shade, partial shade, open shade, and dense shade.
- Filtered shade (dappled sunlight) occurs under trees with smaller leaves or leaflets (Figure 11–9) and is suitable for growing many plants—even plants that prefer full sunlight, such as service berry (Amelanchier alnifolia) or staghorn sumac (Rhus typhina).
- Partial shade indicates that the area may be in shade a portion of the day and then receive full sun at another time.
- Open shade occurs where there is an obstacle, such as a building, blocking the plant so that it does not receive direct sunlight but does receive indirect light.
- Deep shade is the most restrictive and is found in heavily wooded areas and in landscapes under large evergreens or broadleaf deciduous trees (maple, oak, hickory, beech). Deep shade also occurs in a narrow side yard when another building is close or in a recessed entryway on the north side of the house.
Shade and light intensity changes with the time of day, the season, the slope, and over time as trees grow. Sites that might be in full sun in winter may become heavily shaded as the season changes and trees leaf out. Light is also influenced by topography. For example, a south-facing slope receives more light than a north-facing slope. As trees grow taller and wider, they cast larger shadows and less light penetrates the increasingly dense shade. It is possible to admit more light under the canopy of trees or large shrubs by removing lower limbs. Removal of too many limbs, however, stresses the plant. Selecting plants that thrive in dense shade is a better option than attempting to alter the environment by thinning the canopy of otherwise healthy plants.
- Soil characteristics. Moisture, drainage, pH, texture, and structure. Identify the soil moisture and drainage characteristics of your site by digging a hole 12-inches to 15-inches deep where you intend to place the plant. Fill the hole with water. If the water remains in the hole after 24 hours, the soil is poorly drained. For poorly drained sites, select plants that tolerate wet conditions. Winter daphne (Daphne odora) prefers uniform moisture but not wet soil. Bald cypress (Taxodium distichum) grows in a range of moisture situations from very wet sites to moderately dry sites. If the site is dry, select plants that thrive in dry conditions like santolina (Santolina virens) or plan to irrigate. Most woody plants grown in NC landscapes thrive in a pH range from 6.0 to 7.0, but there are exceptions. So before selecting a plant, review its soil pH requirements to ensure it will thrive in the intended site. Read more about pH in “Soils and Plant Nutrients,” chapter 1, and have a soil sample tested to determine pH for different planting areas in the landscape. Plants such as Japanese pieris (Pieris japonica), azaleas, blueberries, camellias, mountain laurel, and rhododendrons grow best in soil with a pH of 5.0 to 5.5. In soils with a pH of 6.0 or higher, these acid-loving plants may become yellow and grow poorly. Soil texture or the amount of sand, silt, and clay in any given soil is extremely difficult to change on a large scale. Work with your soil’s given texture to choose plants that thrive in that soil type. Plants that are native to your region are already well-adapted to a given soil texture. Read more in chapter 12, “Native Plants.” Changing the structure of the soil or how well it holds and releases nutrients and water can be managed over several seasons by the repeated addition of organic matter.
- Climate. Temperature highs and lows, air movement, rainfall, and length of growing season. The climate varies significantly within North Carolina, and plants that flourish in the mountains may do poorly or fail in the coastal plain. This is due, in part, to the variation in temperature. Use the USDA Plant Hardiness zone map to determine which plants are hardy in your location. The map is based on the average annual minimum winter temperature and is divided into 13 zones, each covering a range of 10°F. Each zone is subdivided into five degree bands indicated by “a” and “b”. In North Carolina, the zones tend to be aligned with elevation and transition—from 6a in the mountains to 8a on the coast. A plant is said to be hardy if it tolerates the average annual minimum winter temperatures that occur in a zone. Cold tolerance is an important limiting factor, but one of the biggest challenges for plants in the South is warm nights. High night temperatures increase respiration and deplete food reserves, leading to a greater incidence of plant stress. The American Horticultural Society has developed a national Plant Heat Zone Map that includes 12 zones based on the number of days the temperature rises above 86°F. North Carolina has four zones represented. The zoning map provides guidelines, but it is important to evaluate your own specific site. Characteristics of a specific location can cause it to be warmer or colder than other locations within the same zone. Here are some examples of microclimates:
- Radiated heat. The south side of a building and hardscapes (rocks, paved surfaces, and brick walls) absorb heat during the day and radiate heat at night.
- Enclosure. Evergreen trees keep the area beneath their canopy warmer by holding the heat from the ground.
- Shade. The north side of a house and beneath the canopy of a tree are protected from the sun and so are cooler during the day.
- Slope. Gravity takes rainfall away from plants on hills before it has time to soak in. Plants at the bottom of hills or near gutter downspouts, however, may get much more than the reported rainfall. Like water, cold air also flows down. So in winter, low spaces at the bottom of hills are colder.
- Vegetation. A high concentration of plants leads to increased humidity and increased competition for water, nutrients, and sunlight. In forests, cooler temperatures and less wind exposure decrease water loss. Competition from tree roots, however, causes some shady areas to be quite dry.
- Overhangs. Plants under eaves, awnings, or branches may receive no rain.
- Moisture. Humidity, the amount and timing of rainfall, and the soil texture and structure affect the amount of moisture available to plants.
- Water. Proximity to a large body of water can moderate temperature and humidity.
Purchasing
Plants can be purchased as container-grown, bare root, or balled-and-burlapped (B&B). Always purchase plants from a reputable source (such as a nursery, garden center, botanical garden, or Extension Master Gardener Volunteer plant sale). Select healthy, vigorous plants that are uniformly shaped with no thin areas or broken or damaged limbs. Compact, full foliage is more important than height. Examine the trunk for cankers and split bark, especially after a severe winter (Figure 11–10). Examine both the tops and the bottoms of leaves, and reject plants that show signs or symptoms of insect or disease problems.
Small trees (less than 2-inch caliper trunks, measurement taken 6 inches from the ground) do not have to look like a miniature of a mature tree. Select trees with foliage evenly distributed in the entire upper two-thirds of the tree (Figure 11–11). This distribution of limbs and foliage supports the development of trunk taper and strength as the tree matures.
The root system is just as important, if not more important, than the top of the plant. Check the bottom of the container for roots growing out of drainage holes. It is fine if a few small roots are sticking out of the holes. But if large roots have to be cut off to remove the plant from the container, choose a different plant. Severe root pruning stresses the plant and reduces growth. If you suspect a plant may be root bound, gently slide the root ball out of the container. The root ball should stay together but be somewhat pliable. If the root ball is very hard or many roots are circling the root ball, purchase a different plant. A mass of circling roots acts as a physical barrier to root growth into the soil after transplanting. The circled or girdled roots also choke and kill the plant as it grows (Figure 11–12). Examine the root system for small white roots along the exterior of the root ball indicating a healthy plant and root structure (Figure 11–13).
Small plants are easier to transplant, more economical, and adjust to transplant shock more quickly than large plants.
Large plants are more expensive and take longer to become established.
Cover plants placed in the back of a truck to prevent wind exposure from desiccating and damaging foliage during transport home. Ideally, transplant plants soon after they are purchased. If there is a delay, keep the plants in a protected, shaded area and check for moisture frequently to prevent the root ball from drying out. Avoid placing plants on paved surfaces that absorb and radiate heat. Keep the plants out of the sun because the dark-colored root balls and containers also absorb heat, causing the temperature inside the root ball to be higher than the air temperature. Do not lay a tree down on its side for extended periods of time unless the trunk is wrapped or covered to prevent sunscald. Low temperatures are also dangerous to plants that have not been hardened off. Expect root injury if temperatures drop below 23°F unless soil or mulch is used to insulate the outside of the root ball or container.
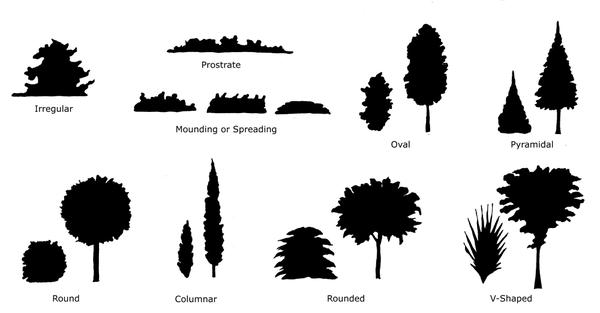
Figure 11–8. Woody plants grow in many different forms.
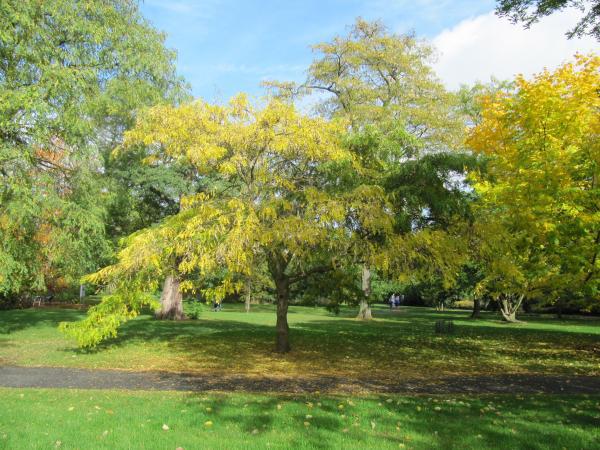
Figure 11–9. This honeylocust (Gleditsia triacanthos) has small leaflets that provide filtered shade.
Leonora Enking, Flickr CC BY-SA 2.0
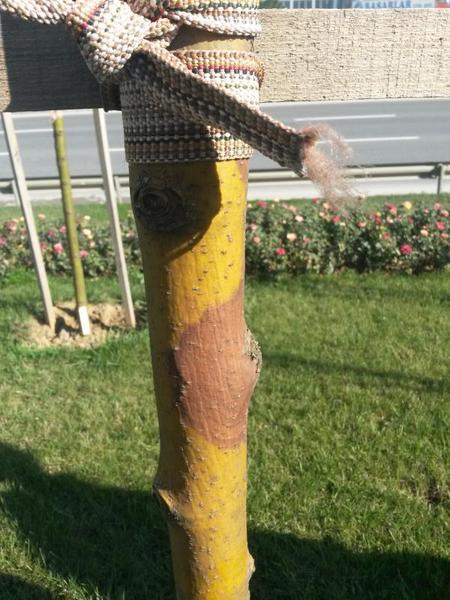
Figure 11–10. This newly installed tree has a stem canker. Do not purchase plants that have split bark or cankers.
Scot Nelson, Flickr, CC BY0
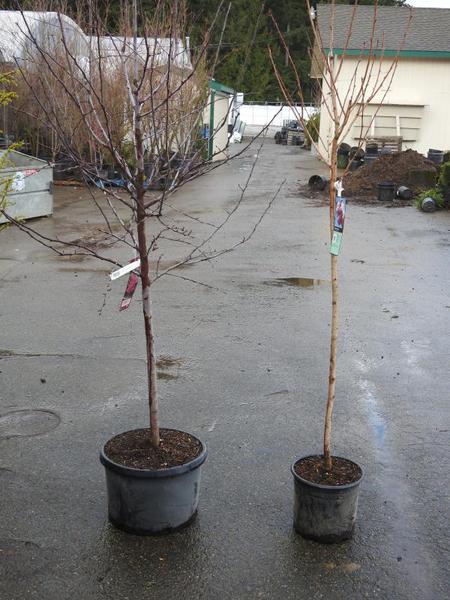
Figure 11–11. Branches lower on the trunk help develop trunk taper. The tree on the left would be a better option; the tree on the right has been pruned up too high.
Kathleen Moore CC BY 2.0
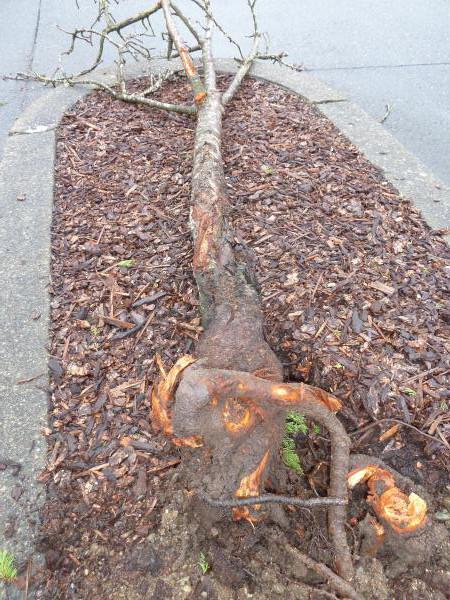
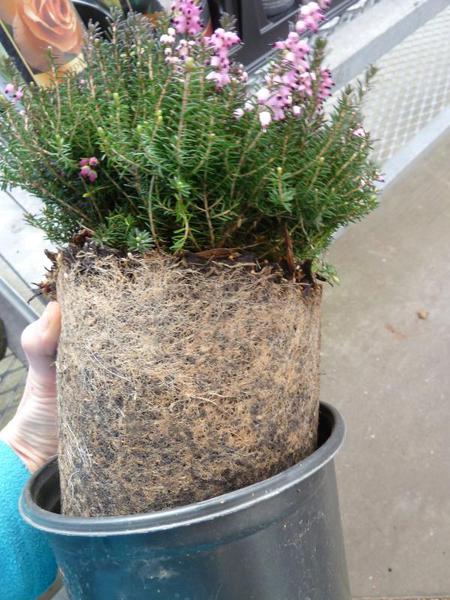
Figure 11–13. This Scotch heather (Calluna vulgaris) has many feeder roots at the edge of the pot but no woody roots wrapping around. Slice and loosen the roots in several places before planting.
Kathleen Moore CC BY 2.0
Site Preparation
Proper site preparation is a good investment in the long-term health of woody ornamental plants. The work put into preparing the site can significantly improve root growth, leading to a healthy plant, resistant to stresses that might otherwise create problems. Based on recommendations from soil test results, add amendments and address fertility issues to improve soil prior to planting.
If the existing soil is compacted and poorly drained, tilling or digging to improve aeration and drainage is essential for satisfactory plant growth. If deep tilling or ripping is necessary to eliminate a hardpan that was formed below the soil surface during construction, consider hiring a professional with appropriate equipment. If drainage is a problem, consider installing a drain tile system to evacuate excess water or creating raised beds.
Rather than creating individual planting holes, prepare the entire bed when possible. When preparing the bed, incorporate 1 inch to 3 inches of organic matter, such as compost, into the top 12 inches of soil. Ensure that organic matter is well composted or aged.
Planting Woody Ornamentals
Careful attention to proper planting techniques prevents future problems. Although planting procedures vary depending on whether the plant is container-grown, bare-root, or balled-and-burlapped (B&B), there are some best practices that apply to all three.
Best Practices for Planting Woody Ornamentals
Consider Timing. Most container plants can be transplanted at any time of year but do best, and require the least attention to watering, if transplanted in late fall or early spring. This planting time also provides plants with time to begin to become established before low or high temperatures occur.
Prepare. Move plant to the planting location and remove trunk wrap if present. Remove twine from crown and any labels. At time of planting, prune only broken or dead branches, or those that are rubbing. For trees if there is more than one central leader, select the healthiest one and remove the other, making a proper pruning cut. Determine how big the hole should be by measuring the root ball. You can use a measuring tape, yardstick or the shovel handle for a good approximation.
Dig the hole. An ideal planting hole is only as deep as the root ball and at least two to three times wider, with roughened sides sloping in toward the bottom (Figure 11–14). Reserve the soil removed to refill the hole. The sides of a hole dug in heavy soil can become slick, especially if the soil is somewhat wet. Slick sides can act as physical barriers to root growth and moisture movement. Use a shovel to make the sides of the hole rough and irregular (Figure 11–15). Loosened soil below the root ball can settle, resulting in the plant being too deep. If the hole is dug too deep, firm the bottom of the hole to reduce settling. Because most new roots grow horizontally from the side of the root ball, soil firmed at the bottom of the hole does not substantially affect root growth. In many urban soils, root growth from the bottom of the root ball is limited by inadequate aeration and excessive moisture.
Position the plant. Carefully place the plant in the hole. For B&B trees gently roll them into the hole. Position the tree so it is straight, and the “best side” faces out. Make sure to plant at or slightly above grade. If your soil is very poorly drained, create a small mound (about 6” in height) in the middle of the hole and set the root ball on this mound. This allows water to collect beneath the roots.
Attend to the roots. For B&B trees, remove any twine wrapped around the base of the trunk. Remove the top 1/3 to 1/2 of the wire basket using wire cutters. Pull the burlap down away from the top of the ball and cut off. For container-grown trees, use a shovel to shave off roots around the edge and bottom of the root ball. Slice down into the root ball in a radial manner.
Refill the hole. Loosen and break up any clods in the excavated soil before backfilling because clods can create air pockets around the root ball. Do not amend the backfill. Fill the planting hole about halfway and then water-in. Finish adding soil to the hole so it is level with the surrounding grade. Chop the soil in the hole with the end of a shovel to minimize air pockets taking care not to chop the roots. Do not tamp the soil too firmly, as this will compact the soil making it harder for growing roots to penetrate.
Water. After planting, construct a ring of soil 2 inches to 3 inches high to form a water basin just beyond the outside edge of the hole (plants in beds probably do not require a water basin). This permits water to soak into the root zone rather than running off the surface. Water the plant to eliminate air pockets around the roots. The water basin can be expanded as the plant grows or removed after the plants become established.
Mulch. Apply 2 inches to 3 inches of organic mulch in an area that extends to several inches beyond the plant canopy. Keep mulch at least 6 inches away from the trunk or crown of the plant to improve air circulation and discourage insect and mammal activity (Figure 11–16). The root zone of trees and shrubs grows to extend beyond the drip line—two to three times the distance between the trunk and the edge of the canopy. Increase the mulch zone outward as plants mature to continue to protect the roots. The mulch helps to maintain moisture and reduce fluctuations in soil temperature. Mulch inhibits weeds and breaks down over time, improving the soil.
Container-grown Plants
Container-grown plants have become the most popular method of growing plants for sale by the nursery industry. Water plants thoroughly before transplanting. For smaller plants, remove each plant from its container by turning the plant upside down and giving the top edge of the container a sharp rap. Catch the root ball as it slips from the container. For larger plants, turn each plant on its side and gently press on the container; then holding on to the base of the plant, gently slip the root ball out of the container. Always pick the plant up by the root ball, never by the trunk or stem as it could split or break.
Bare-root Plants
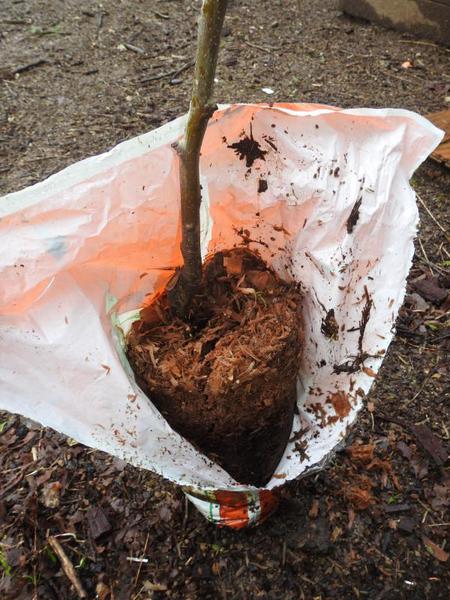
Mail-order companies often sell bare-root plants because it is more economical to ship plants without soil. Bare-root plants are usually the least expensive but require more care during and after planting. These plants were grown in a field nursery and dug during the dormant season. Soil was removed from their roots before they were put into cold, moist storage. At shipping, the roots are covered with damp peat moss or sawdust and wrapped with plastic or cardboard (Figure 11–17). Most bare-root plants are deciduous trees or shrubs. Evergreen plants are rarely sold bare-root. Plants with a long tap root, such as nut trees and some fruit and shade trees, are often sold bare-root because they are not well-suited to B&B or container production.
Install bare-root plants while they are dormant. When plants arrive, check them for moisture and do not let the roots dry out. Keep roots wrapped in wet paper or sphagnum moss and covered with plastic until it is time to install. Keep plants in a cool (not freezing) location; roots can be easily damaged by freezing temperatures.
Before planting, soak the roots in water for at least an hour but not more than 24 hours. Longer soaking can drown the roots from lack of oxygen. Remove any broken or damaged roots before planting. Never leave the roots exposed to wind or sun even during the planting process; keep the roots protected by wrapping in moist burlap or place them in a bucket of water.
Build a mound of soil in the center of the planting hole and spread the roots around it. Gently work the soil in and around the roots while the plant is being supported to ensure good soil-root contact.
Balled-and-burlapped Plants
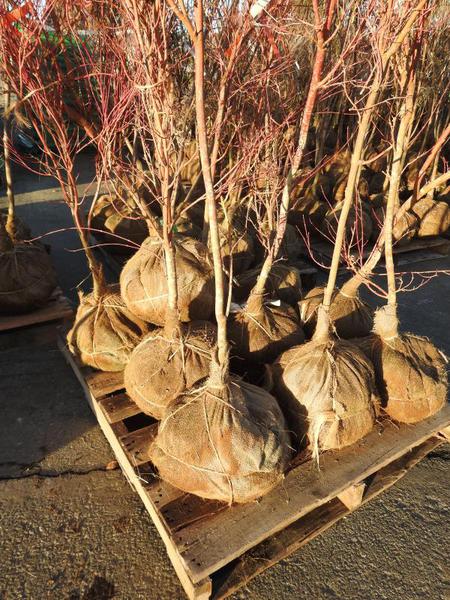
Most of the trees and shrubs sold B&B have been grown in field nursery rows, dug with soil intact, wrapped with burlap, and tied with twine (Figure 11–18). The size of the root ball varies with plant size. Select a plant with a sound, firm root ball, 10 to 12 times the diameter of the tree trunk measured 6 inches off the ground.
Most B&B plants are rootpruned for several years to create a compact and fibrous root system. But even with the best nursery efforts, up to 95% of the roots are lost in the digging process. The remaining small portion of the plant's former root system has difficulty absorbing enough water to meet the plant's needs. Take extra care to ensure the roots never dry out and are not exposed to hot summer or freezing winter temperatures for an extended period of time before planting.
Handle B&B material carefully; on most species if the soil ball is broken, many of the small roots are severed and the plant will die. Always pick the plant up by the soil ball, never by the trunk or stem.
Natural burlap that has not been treated or dyed can be buried with the plant because it is biodegradable, but remove all synthetic material from a root ball. To determine the difference between a natural and a synthetic material, hold a lit match to a small portion of the material. Natural materials burn while synthetics melt.
After positioning the plant in the hole, remove any straps, ties, strings, or wires secured around the root ball. Wire baskets are often used to reinforce the root ball during shipping. Experts disagree on possible harm that the wires might cause if left in the planting hole. If possible, cut and remove the top portion of the basket. Removing the entire wire basket can cause the root ball to be damaged. Remove natural burlap from the top one-half to one-third of the root ball. Cut the burlap on top of the root ball, roll it back, and cover with soil. If part of the burlap is exposed above the soil line, it acts as a wick, removing moisture from the root ball. B&B plants usually need little pruning at planting but may need careful watering during the summer.
Special Planting Circumstances
When planting under a shade tree, do not till within the drip line. Tilling would damage tree roots, possibly resulting in slow decline and eventual death. Instead, dig individual holes for a few spreading plants. Install young plants (quart-sized containers versus gallon-sized) so only small holes are needed. Smaller holes are easier to dig and are less disruptive to the tree. Choose long-lived plants to minimize disturbance to the roots.

Figure 11–14. Diagram of a properly planted tree. Note that the width of the hole is more than two times the diameter of the root ball with gently sloping sides The rootball sits on undisturbed soil, and the trunk flare is just above grade.
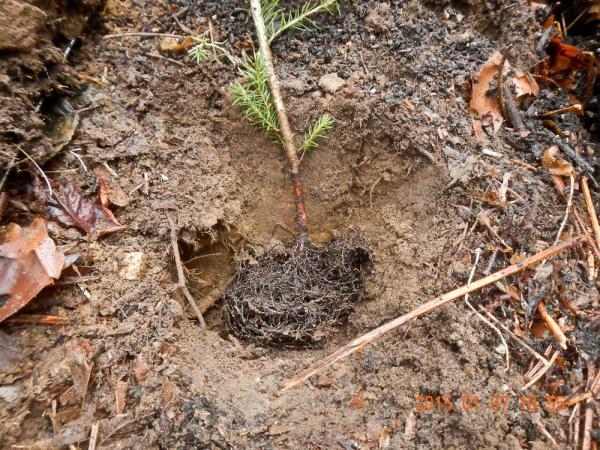
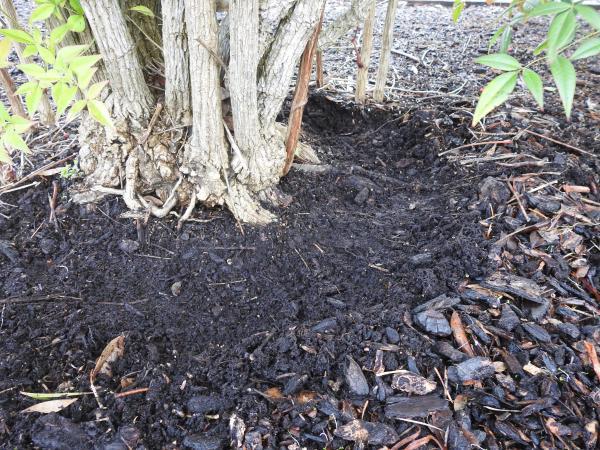
Figure 11–16. Mulch is placed 6 inches from the crown of this heavenly bamboo (Nandina domestica) shrub.
Kathleen Moore CC BY 2.0
Care of Newly Installed Woody Ornamentals
Staking Newly Installed Plants
Staking Vines
Newly transplanted vines often need guidance to reach the intended support. Use a short piece of string, netting, or stake to guide growth to the lower portions of the trellis or fence. To prevent vines from growing upright with a mass of foliage at the top and little at the base, train the vine horizontally at first, forcing the upward growth to develop from lateral shoots. Moderate pruning in the first few years also encourages low branching.
Staking Trees and Shrubs
In some situations, staking can provide stability to the roots and trunk of a tree while allowing it to develop a healthy root system, strong trunk, and strong branches. Avoid staking trees and shrubs if possible as it is a labor-intensive, costly procedure that can easily do more harm than good. Most plants less than 6 feet tall with less than a 1-inch trunk do not need to be staked. As nursery stock gets larger, the root ball may not be large enough to keep the stem from tipping once planted. Environmental factors at the planting site—such as wind exposure, topography, surrounding plantings, and soil conditions—also play a role in the decision to stake. Plant and observe the tree or shrub for a day; if it leans, it may need staking.
Drive the first stake at least 2 feet down into native soil, outside the root ball on the side of the prevailing winds. Set the other stake in on the opposite side. Use broad, smooth strapping material to avoid abrasion, and place the strapping at the highest point on the trunk where the crown stands upright. Place straps using a “figure 8” crossing pattern wrapped around the trunk and securely fastened to the stake. Never use wire, even if it is placed in old garden hose, as this can girdle the plant. Tighten straps so they are firm enough not to contact the stakes but loose enough to allow slight (two to three times the trunk diameter) movement, which increases trunk taper and strength (Figure 11–19). Check the strapping regularly to ensure it is not causing trunk injury. It may be possible to remove stakes for fall-planted trees by midspring. Remove all staking within one year after planting or growth may be reduced.
Bare-Root Plants
Drive a single stake about three-fourths the height of the tree at a distance of 2 inches to 4 inches from the center of the planting hole on the southwest side of the tree trunk (Figure 11–20). Fasten the tree to the stake with nylon tape or strapping formed in a loose loop just above the lowest scaffold branches, or 6 inches above the lowest point at which you can hold the tree upright.
Container and B&B Plants
Use as few stakes as possible to keep the plant upright. Start with a stake placed outside the root ball and upwind from the prevailing winds. Drive the stake into the ground 2 feet. Create a loop, and wrap one end of a nylon tape or strapping two-thirds of the way up the trunk. Securely fasten the other end to the stake without putting a strain on the trunk. If one stake is not sufficient to keep the plant upright, run another stake into the ground parallel to the prevailing winds (Figure 11–21). In some cases, three stakes may be needed to keep the plant upright. Drive three stakes an equal distance from the planting hole and from each other 2 feet into the ground.
Watering
Depending on the season and current weather conditions, recently installed plants may be subject to drought stress until roots grow into the surrounding soil. The well-drained planting mix of container-grown plants dries out more quickly than the surrounding soil. Even though moisture is often adequate in the surrounding soil, the moisture may not move into the transplanted root ball or backfill rapidly enough to replace the water removed by plants. Trees and shrubs, 1-gallon to 3-gallon size, require 3 gallons to 5 gallons of water twice a week during the establishment period, if it does not rain. Follow this watering routine until the root system penetrates the surrounding soil (approximately three to four weeks). Plants installed during the cooler part of the year may need less watering.
Check the root ball for moisture by putting a finger in the soil. If the root ball is dry, increase the amount or the frequency of watering, or both. Care must be taken to prevent the transplanted root ball from drying out because the organic mix is very difficult to rewet once it becomes dry. Water applied after a root ball has become very dry may run off rather than soaking in. If this happens, apply water two or three times each day until the root ball is wet.
Pruning
Newly installed plants typically need only light pruning to remove damaged or broken branches. To prevent future structural problems, however, also remove at planting, or within the first year or two, any serious branch problems, such as a tight v-crotch (Figure 11–22). Maintain the natural growth habit of shrubs, and do not remove the central leader of shade trees. Do not remove the lower branches of trees following transplanting. The foliage is needed to shade the trunk and for food production, and these laterals help produce trunk taper. Because the signal that initiates new root growth originates in shoot tips, removing the ends of branches reduces root development. Pruning reduces the leaf area; while this reduces transpiration, it also reduces photosynthates for root growth.
Fertilizing
Before using fertilizer, conduct a soil test to determine which nutrients are needed. Always follow fertilizer package instructions. Applying more than the recommended amounts can damage plants. Remember that natural fertilizers, like slowly decomposing compost, do not have the same issues with salt buildup that some commercial fertilizers have. Wait until spring to fertilize trees and shrubs that were planted in the fall. Wait six weeks to eight weeks to fertilize plants installed in the spring. Roots are actively growing two to three times the diameter of the canopy. Fertilizer placed too far away from actively growing roots is wasted (Figure 11–23).
Tree Wraps
Research regarding the use of tree wraps is inconclusive, but most experts agree tree wrapping is not necessary. However, landscape professionals often wrap the trunks of newly transplanted trees that have thin bark. The intent is to prevent trunks from cracking when direct sunlight shines on the lower trunk in cold weather. In winter, the sun is at a lower angle, so more light hits the trunk on the south and southwest sides than it does during the summer. Newly planted trees that have thin bark, such as red maple and ornamental cherry, planted in high-heat sites (near hard-surface materials such as brick, concrete, or asphalt that reflect or absorb heat) are often wrapped. To wrap a tree, begin at the soil line and spiral the wrapping material around the trunk up to the first major branches. Overlap each layer by half a width. Tree wraps are applied in the fall and removed the following spring. If left on too long, wraps encourage insect and disease problems.
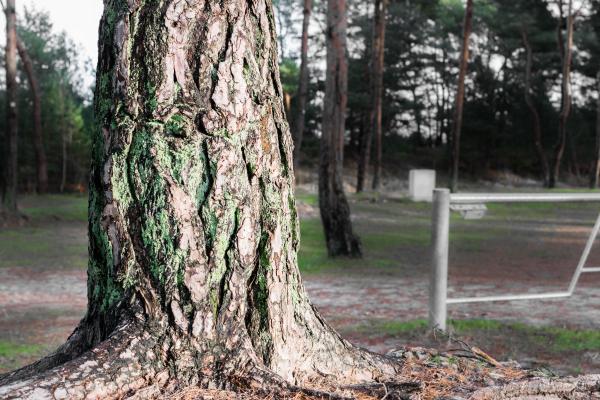
Figure 11–19. This mature pine tree has developed good trunk taper, flaring out at the soil line.
J. Triepke, Flickr CC BY 2.0
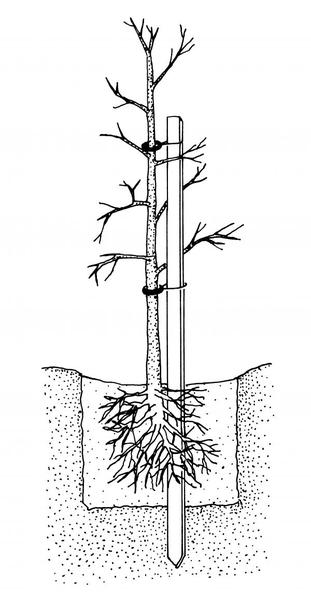
Figure 11–20. Staking a bare-root tree.

Figure 11–21. Staking a small tree using two parallel stakes.

Figure 11–22. A tight v-crotch. The smaller branch should be removed to prevent structural problems later on.
Kathleen Moore CC BY 2.0
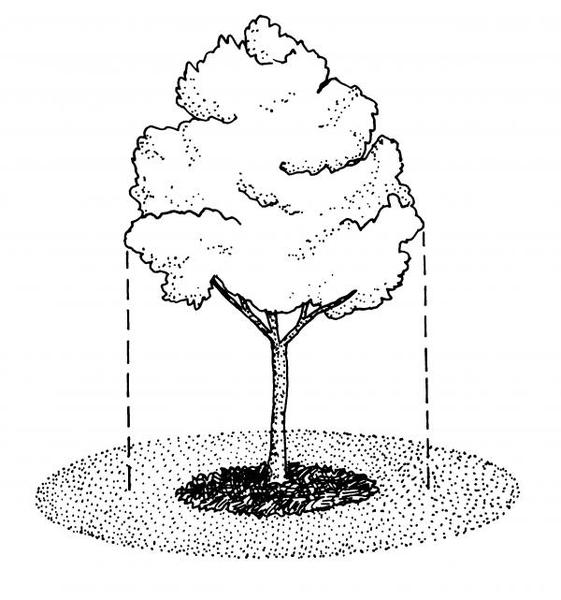
Figure 11–23. Place fertilizer where roots are growing, or two to three times the canopy's diameter.
Care of Established Woody Ornamentals
There is no such thing as a “no maintenance” landscape. Good maintenance practices include mulching, irrigation, fertilizing, weeding, and pruning. These practices lead to higher vigor and resistance to insects and diseases. Different types of woody ornamentals require different levels of maintenance.
Mulches
Mulch is a material applied to the soil surface for protection or improvement of the area covered. Mulch is not worked into the soil. Mulching conserves soil moisture and prevents weed seed germination. Mulch also reduces runoff, helps maintain uniform soil temperatures, prevents soil and fungi from splashing onto the foliage (thus reducing the potential of soilborne diseases), and adds to the aesthetic appearance of landscape plantings.
Mulch can be applied at any time of the year, but the best time to apply mulch to established plantings is in spring after soil has started warming and plants are beginning to grow but before weed seeds start to germinate. Apply mulch to the entire bed, or for individual trees, from 6 inches away from the trunk to at least 6 inches to 12 inches beyond the drip line of the tree. Renew as needed to maintain a 2-inch to 3-inch depth.
Organic Mulches
As organic mulches break down, they provide organic matter and nutrients to the soil. For maximum benefit, extend the mulched area to include as much of the root zone as possible. Pull mulch 6 inches away from the base of plants to prevent bark decay and vole damage.
Select organic mulching material that is readily available, easy to apply, and weed-free. Fine-textured mulches have more surface area and less airspace and therefore retain more moisture than coarse-textured materials. See Table 11–1 for pros and cons of some organic mulch materials.
Potential Problems from Mulch
- Too much of a good thing. Excessive application of mulch can result in roots growing in the mulch rather than the soil. In addition, overmulched plants are easily damaged when herbicides and fertilizers are applied and during periods of drought stress or extreme cold.
- Mulching an area that is poorly drained can aggravate the condition.
- Thick piles of unshredded leaves or uncomposted grass clippings form a thick mat that inhibits water penetration. Run the lawn mower over dry leaves to shred before using them as mulch. Leave grass clippings on the lawn.
- If mulch is too deep and too close to the trunk, mice and voles may tunnel in undetected and cause damage by chewing the bark. Moisture trapped by the mulch may also cause decay and can eventually lead to death of the plant (Figure 11–24). Keep the mulch back 6 inches from the stems. A circle of crushed stone about 6 inches wide around the stems may also be helpful.
Inorganic Mulches
Gravel, rock, plastic, and landscape fabric can be used as mulches, but applying these materials requires extra time and expense. Replanting is also difficult once these materials are in place, and they are difficult to remove. Rock materials absorb and re-radiate heat from the sun and thus increase water loss from plants and soil. Black plastic mulch interferes with the normal oxygen and water supplies to the root system, restricting gas and water exchange to only the places where holes were cut for planting. A very shallow root system develops, leaving the plant susceptible to drought stress. Landscape fabrics allow normal water and oxygen exchange while preventing the growth of most weeds that germinate beneath the fabric, excluding sedges and some grasses, which grow right through landscape fabric. Weed seeds germinate and grow on soil that accumulates on top of the fabric and plastic. Black plastic and landscape fabric also degrade over time, becoming unsightly, and small pieces are difficult and time-consuming to remove from garden beds (Figure 11–25).
If landscape fabric is used, apply it on bare soil before or immediately after planting. Fasten the material to the soil to prevent weeds from pushing the material up. Cut an “x” in the material, lay the flaps back, and plant a shrub in the opening. Once the plant is installed, lay the flaps back to cover the opening. Avoid getting soil on top of the material. Be sure to expand the hole as the plant grows so the landscape fabric does not girdle the trunk.
Some attractive results have been obtained by using a combination of landscape fabric covered with an organic material. As the mulch decomposes, however, it produces a layer of "soil" in which weeds can grow. Coarse-textured mulch materials, such as pine-bark nuggets, decompose more slowly.
Watering Established Plants
Most plants can withstand short periods of drought without significant damage, but excessive water, even for relatively short periods, causes oxygen depletion, root decay, and root-rot diseases. Overwatering is much more common than underwatering. The key to irrigation success is to water the entire root zone deeply and infrequently.
The amount of water needed is influenced by several factors, including soil texture, slope, drainage, mulch, weather, shade, plant type, plant size, location, time since transplant, fertilization, pruning, and competition.
Soil texture. Soils differ in how much water they absorb and how quickly they dry out after a rain or watering. Water percolates rapidly into and through sandy soil, so plants can be watered quickly and must be watered frequently. Because water applied to a clay soil runs off the surface and is slow to percolate, clay soils must be watered slowly, allowing the water to be absorbed into the soil. Because clay soils may also drain slowly, they may not need to be watered as frequently.
Slope. Water plants on slopes more slowly and more frequently as gravity pulls the water down the slope away from the root zone.
Drainage. The faster the drainage, the more frequently plants need irrigation.
Mulch. Mulches help keep the soil cool and reduce water loss through evaporation, thus extending the time between watering.
Weather. The more sunlight, the longer the day length, the higher the temperature, the higher and drier the wind, and the lower the humidity, the more watering is needed.
Shade. The denser the shade, the less radiant heat from the sun, the cooler the temperature, the less watering is needed. In addition, the object that is creating the shade may also be creating a microclimate. For example, the canopy of a tree over the top of a plant may block wind and prevent evaporation of soil moisture in a way that shade produced by an adjacent building would not.
Plant type. Some plants have specific adaptations of their structure and physiology that allow them to use less, or tolerate more water. For example, desert plants tend to have smaller leaves with a waxy cuticle or trichomes. Many desert plants can store water in their leaves, trunks, or roots. On the other hand, plants with large leaves (hydrangea) or with shallow root systems (dogwood) are usually the first to suffer during drought periods.
Plant size. Large plants need more water over a wider area than small plants. Apply water from the trunk outward, two to three times the distance to the drip line.
Location. Shrubs under large trees are especially susceptible to drought because of the large volumes of water taken up by tree roots.
Time since transplant. Late spring or summer transplants are the most susceptible to drought because their roots have had a shorter time to become established prior to summer stress.
Fertilization. Recently or heavily fertilized plants easily suffer root damage if water becomes depleted. In addition, new growth stimulated by fertilizing is vulnerable to drought stress.
Pruning. Severe pruning results in vigorous, tender growth that is more dependent on uniform moisture.
Competition. Weeds and landscape plants compete for water. The denser the planting, the more watering is needed.
Table 11–1. Pros and cons of some organic mulch materials.
| Organic Mulch Materials | Pros | Cons |
|---|---|---|
| Pine-bark nuggets | attractive, long lasting | expensive; floats and washes away in rain storms; thick layers can provide habitat for voles and other pests |
| Shredded or chipped wood/bark/fines | readily available, attractive | splintery to work with; decomposes rather quickly and needs to be reapplied |
| Pine straw | readily available, remains in place even on slopes | stunts the growth of some annuals like pansies, highly flammable |
| Leaves and twigs | readily available | can mat and prevent water penetration unless shredded |
| Grass clippings | readily available, free | herbicides sprayed on the lawn could affect broadleaf woody ornamentals; if applied too thickly, can mat and prevent water penetration, or can mold or heat up as it breaks down; best left on the lawn where clippings are a huge asset |
| Straw | readily available | frequently contains seeds that germinate in landscape; needs to be reapplied frequently; not as attractive as other mulches |
It is important to water thoroughly and then allow the soil to dry between waterings. Frequent light watering wastes water, does little to satisfy the water requirements of most plants, and leads to development of a shallow root system, increasing susceptibility to drought. Allowing the soil surface to dry out somewhat between watering encourages root development at greater depths where soil moisture is higher. During prolonged dry spells, water well-established woody plants every 10 days. During cool seasons, less watering is necessary because evaporation from the leaves and soil is slower.
When watering woody ornamentals, especially trees, the goal is to wet the soil 1 foot to 3 feet deep. The best way to determine if adequate water has been applied is to dig in the soil and check how far the water has moved. Wetting the soil to a depth of 12 inches requires about 3 inches of surface water (varies with soil type, compaction, and slope). This may seem like a lot, but when applied slowly the water has time to move down through the soil profile. This takes time, particularly in a clay-type soil. The most efficient time to water trees and shrubs is between 9 p.m. and 9 a.m. During this time, there is generally less wind, lower temperatures, and higher humidity, so less water is lost through evaporation. If water is being applied directly to the soil through an irrigation system, there is no increased risk of disease. However, if water is applied via a sprinkler that wets the leaves, water early in the morning to promote quicker leaf drying to reduce the spread of disease.
Hand-watering is ineffective for watering woody ornamentals because water is applied at a rate that exceeds the soil’s ability to absorb the water. Hand-watering also may not supply enough water. To reduce runoff, use a water-breaker nozzle that divides the spray into rain-size droplets (Figure 11–26). Apply a minimum of 5 gallons of water per 10 square feet, which is approximately the amount delivered by a 5/8-inch hose operating for 1 minute at medium pressure (water pressure from municipalities range from 30 to over 100 pounds of pressure per square inch). To determine how much water comes out of a hose, use a 5-gallon bucket and time how long it takes to fill to the top. Apply 5 gallons (which usually takes about a minute) to small shrubs (under 4 feet tall). Larger shrubs need more water; add 15 seconds of watering for each foot of height exceeding 4 feet. For large trees, apply 6 to 7 gallons (usually takes 1½ minutes to 1¾ minutes) for each 10 square feet of canopy area. If runoff occurs before the correct amount has been applied, move to another spot and come back after the water has soaked in.
Sprinklers come in a variety of sizes and spray patterns. Hose-end sprinklers are easy to move and come in many sizes and shapes. But because of their limited range, hose-end sprinklers are not convenient for watering large areas. In addition, much of the water sprayed into the air is lost to evaporation. Hose-end sprinklers increase disease pressure by splashing disease propagules from the soil onto leaves. Wetting leaves also increases the opportunity for those disease propagules to infect leaf tissue. Pop-up rotary sprinkler heads are for turf—not ornamental plantings.
Drip irrigation systems have several key components: a controller that regulates when, where, and for how long water is distributed; a pressure regulator to control the water pressure going into the system; a filter to prevent debris from clogging the emitters; tubing to distribute the water; and emitters to regulate the flow of water onto the soil (Figure 11–27). Some emitters are embedded into the tubing. Others are attached. Sensors are available to shut the system off when it rains. Modular aboveground systems that attach to a hose or water spigot are also available. Be sure to distribute enough emitters to irrigate the soil under the canopy of the plant and to add emitters as the plant and its root zone grow. Emitters come in a variety of flow rates. The most common flow rates are ½ gallon/hour, 1 gallon/hour, and 2 gallons/hour. To wet the soil 12 inches deep, you must apply approximately 3 inches of surface water. So if you use 1-gallon-per-hour emitters, you need to run your system for 3 hours when you irrigate. A drip irrigation system is expensive to install, and in many cases it may be best to hire a professional. But a drip system may save money in time by using water more efficiently. Rabbits, squirrels, and chipmunks sometimes chew on the tubing.
Soaker hoses emit water directly to the soil, slowly and economically (Figure 11–28). They do not wet the foliage or disturb the soil structure because water does not hit the ground with any force. Many gardeners leave the hoses in one location for an entire season or longer.
Most plants wilt when they experience inadequate moisture. If they wilt in the middle of the day and then recover at night, they probably have plenty of water in the soil but their roots are not able to take it up quickly enough to keep up with transpiration in the middle of the day. In this case, irrigating the soil does not help. If the plant is wilted in the morning, check the soil moisture. If the soil is dry 3 inches down, apply water. Wilt can be caused by various factors. So if the soil is moist, look for other causes. Drought stress is also expressed by a change in leaf color or leaf drop. Leaves on river birch and poplar trees turn yellow and drop. Sycamore leaves turn brown and fall, while other trees develop premature fall color or shed small branches.
Leaf scorch develops when a plant’s root system cannot replenish moisture as fast as it is lost from foliage. This disorder is caused by a limited or damaged root system, drought, soil compaction, or hot, windy conditions. The leaf tissue on the edges and between the main veins dies and turns brown. Eventually the entire leaf dies except for a narrow band along the veins. Plants can be affected uniformly or only on one side. Plants growing near reflective surfaces such as hardscapes, as well as recent transplants, are more likely to be affected. Desiccation also occurs in the winter, so be sure to water evergreen plants prior to high winds or a severe freeze.
Fertilizing Established Plants
Applying too much fertilizer contributes to polluting our rivers, streams, lakes, and estuaries and kills plants and animals that rely on these water resources. In addition, excess fertilizer increases the likelihood of some plant diseases. Further, overapplying fertilizer creates more work and wastes money. Applying fertilizer in the wrong place and at the wrong time—including just before a rainstorm—also contributes to pollution and wastes resources.
A moderate rate of growth and healthy green color are desired for most woody plants. Excessive vigor, which is evident by lush, abnormally deep green leaves and long shoot growth, is weak and undesirable. Fertilizing plants that have outgrown their allotted landscape space leads to more pruning, which is work for you and creates wounds on the plant. All too often, gardeners assume fertilizing is the answer for any plant problem. Lack of fertilizer, however, is rarely the cause of poor growth. Fertilizer may be helpful, but only after the problem causing poor growth has been identified and corrected. Symptoms of poor plant growth include the following:
- Abnormally light-green or yellow leaves
- Leaves smaller than normal
- Fewer leaves and/or flowers than normal
- Shorter-than-normal annual twig growth
- Dieback of branches at tips
- Foliage wilt
Lack of nutrition is only one of many causes for poor plant growth. Other causes include inadequate soil aeration or moisture, adverse climatic conditions, pH not matched to a plant’s need, pests, and diseases. In addition, transplanting woody ornamentals initially results in slow growth, but the normal growth rate resumes after the root system is reestablished. Another cause of shock and limited new growth is construction disturbance within the past five to 10 years. Determine the specific cause of poor growth in each situation; then identify appropriate corrective measures, if needed. Fertilizer is not the remedy for all plant problems. In many cases, fertilizer makes existing problems worse.
Conduct a soil test and follow the resulting fertilizer recommendations. Consider current and desired growth rate, any visible symptoms of deficiency, and the plant’s age, type, and location. The fertilization rate is also influenced by rainfall, irrigation, and soil type. A wet season often increases the need to fertilize, especially in sandy soils. During periods of dry weather, reduce the amount of fertilizer. Both natural (organic) or synthetic fertilizers are appropriate for use on woody ornamentals; chapter 1, “Soils and Plant Nutrients,” provides detailed information on different types of fertilizers. Fertilizer encourages water-demanding new growth and can injure roots of ornamentals under drought stress. Here are points to consider when deciding when, where, how, and how much to fertilize.
When to Fertilize
- Foliage. Growth can be used as a guide to determine fertilizer needs. When plants exhibit off-colored leaves, smaller-than-normal leaf size, or premature fall color or leaf drop, the plants may need fertilizer. These signs, however, may also indicate a root problem or the need for water. Deficiency symptoms do not indicate how much fertilizer is needed, only that fertilizer may be needed.
- Plant age. Give newly installed plants time to reestablish their root systems before applying a highnitrogen fertilizer to push new growth. To accelerate the growth of a young plant, several light applications of fertilizer per year (March, May, and July) may be made. As woody plants mature, the need for nitrogen decreases; rapid growth is no longer needed or desired. Most established woody plants perform well with just one application every two to three years.
- Temperature. Woody plants can absorb nutrients as long as the soil temperature is above 40°F, but absorption slows during hot summer weather. Root growth is most active during cool weather in fall and late winter to early spring and can occur even when the foliage appears dormant. Fertilize trees and shrubs in the fall after the first frost and in early spring before new growth begins.
Where to Apply Fertilizer
- Dumping fertilizer in one spot causes the roots below the fertilizer to burn and die.
- Spread the fertilizer on top of the soil or mulch, and water well. Because the fertilizer quickly moves through the mulch, there is no need to remove it or to place the fertilizer below it.
- Keep fertilizer off the stems of shrubs and at least a foot away from tree trunks.
- Do not get dry fertilizer on the leaves of plants. If this happens, use a broom to brush the fertilizer off or rinse it off with water.
- Because feeder roots are within the top foot of soil and lateral fertilizer movement in the soil is very limited, a broadcast surface application of fertilizer is preferable to the use of fertilizer spikes, stakes, or to placing fertilizer in holes spaced around the tree.
- Feeder roots normally grow two to three times the size of the canopy (Figure 11–29). Ornamentals located near a lawn or planting bed that is fertilized regularly do not need additional fertilizer because many of their roots extend into those areas and absorb nutrients.
- Weed-and-feed fertilizers should not be used under trees or shrubs unless the label says doing so is safe.
How to Apply
- Liquid foliar fertilizer sprays can temporarily correct deficiencies of minor elements such as iron or manganese. Do not use this method to provide all of a plant's fertilizer needs because the benefits of foliar sprays are short-lived. Nutrient deficiencies are often caused by a disease or improper soil condition (pH, drainage, soil compaction) affecting the roots. Foliar sprays give only temporary relief and do not correct the main problem.
- Tree injection of micronutrients is a last resort. Trees can be permanently injured by drilling holes, and the decay that could develop may outweigh any benefit the fertilizer might provide. Any benefit from the fertilizer is temporary at best.
How Much Fertilizer to Apply
- Soil test. The results include specific fertilizer recommendations. Have the soil tested before planting and every two to three years thereafter. Information on taking a soil test and interpreting the results can be found in “Soils and Plant Nutrients,” chapter 1.
- Plant type. Plants with a fibrous root system, such as azaleas, rhododendrons, and blueberries, can be easily damaged by fertilizer. It is important to fertilize only when needed and never to overfertilize.
Managing Weeds
A 2-inch to 3-inch layer of mulch suppresses most annual weed seeds and makes it easy to hand-pull any that do germinate. However, perennial weeds that propagate from roots in addition to seeds, such as bermudagrass, sedges, and nut grass, are more difficult to control.
If needed, herbicides are available to aid in weed control.
Preemergence herbicides work by interrupting seed germination; they do not work after the seedling has emerged. If summer or winter annual weeds are identified as a problem, apply a preemergent as directed on the product label. Apply in spring before summer annual weed seeds germinate or in late summer to early fall prior to winter weed germination.
Postemergence herbicides kill growing weeds, but may also damage trees or shrubs if not applied with extreme care. The younger and smaller the weeds are, the more effective the control is. Treat weeds before they flower or fruit. As most woody ornamentals are dicots, use a postemergence herbicide that kills only monocots. These chemicals do not control dicot weeds but do kill monocot ornamental plants such as ornamental grasses, irises, and lilies. Furthermore, although intended for monocot eradication, any herbicide contact with the green bark or foliage could result in plant injury or death. For more information on weeds and weed management, refer to “Weeds,” chapter 6.
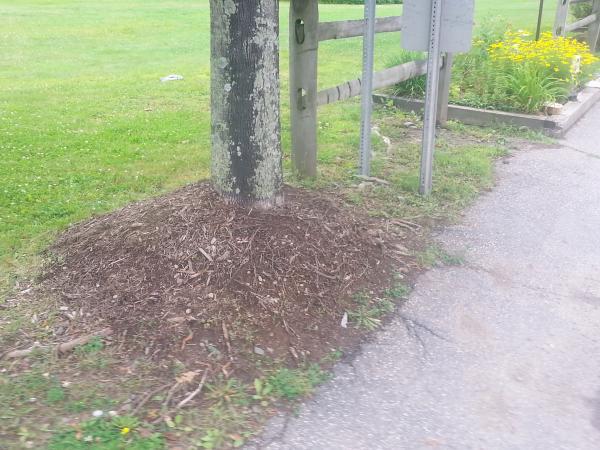
Figure 11–24. The mulch is mounded up like a volcano against the trunk of the tree, which can cause pest and disease problems.
NY State IPM Program at Cornell University CC BY 2.0
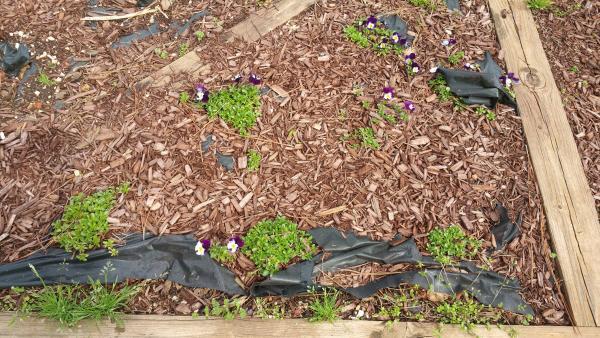
Figure 11–25. Landscape fabric degrades over time and becomes visible and unsightly in the landscape.
Lucy Bradley CC BY 2.0
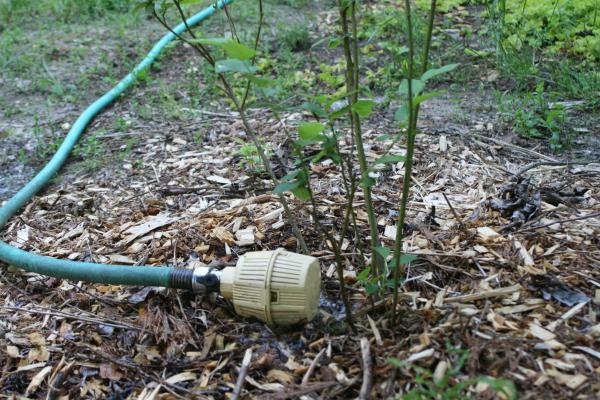
Figure 11–26. Use a water-breaker nozzle instead of a trigger-type nozzle when watering plants by hand.
Chris Alberti CC BY 2.0
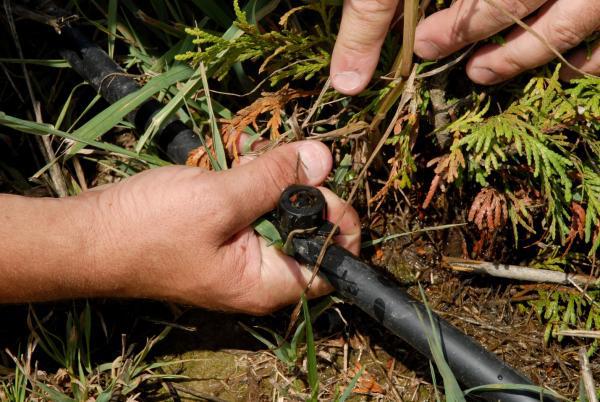
Figure 11–27. A drip irrigation system has emitters that place water at each plant’s root zone.
Alice Welch, USDA, Flickr CC0
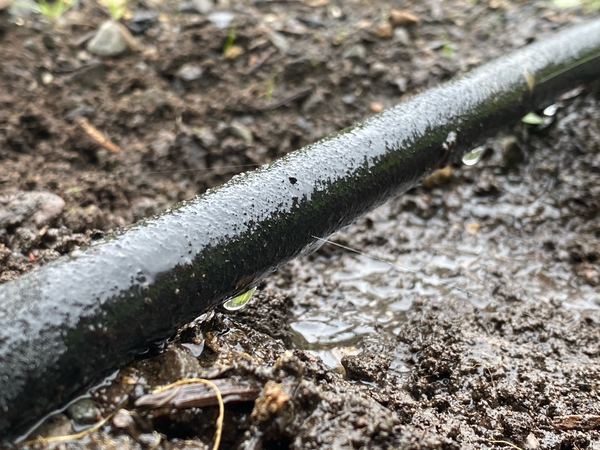
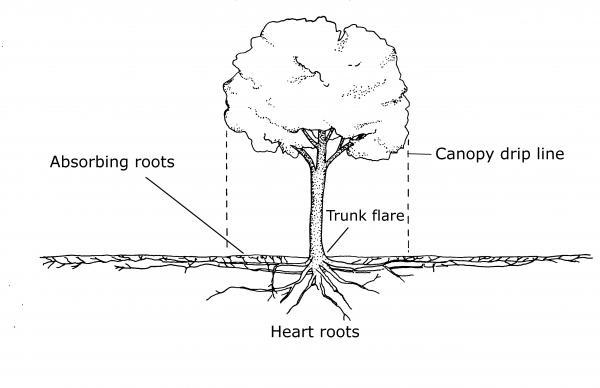
Figure 11–29. Roots normally grow twice the diameter of the canopy.
Pruning
Reasons to Prune
Pruning involves the selective removal of specific plant parts. There are several reasons to prune:
- To train young trees. Select strong scaffolding branches, and eliminate competing branches, double leaders, crossing, or broken branches.
- To maintain plant health. Remove damaged, diseased, dying, or dead branches, as well as crossing branches that may rub together and injure bark.
- To improve ornamental aesthetics. Selective pruning that thins crowded branches opens up the canopy for better light penetration. This increases flowering and fruiting and may make attractive bark more visible. Remove water sprouts (Figure 11–30) and suckers (Figure 11–31). Selective pruning includes training to a specific shape, for example espaliered along fences or walls.
- To manage growth and size. Minimize the need to control size by installing plants where they can grow to their mature size unimpeded by buildings or other plants (right plant for the right place).
- To increase light under the tree canopy. Raise the tree’s canopy by removing lower branches to allow better light penetration to turfgrass or ornamentals under a canopy. Selecting plants that can survive dense shade, however, is a better option than attempting to alter the environment by thinning the canopy of otherwise healthy plants.
- To improve safety. Remove branches that block driveways, impede traffic on sidewalks or neighbors’ yards, or interfere with important site lines. Pay special attention to any plants that have damaged branches that may fall on people or property. Trees that grow near power lines need to be pruned but only by a certified arborist from a utility company. Never attempt to prune a tree that touches a power line.
Pruning is frequently misunderstood and incorrectly practiced. Some mistakenly view pruning as an annual spring ritual and prune whether it is needed or not. Others resort to severe pruning to manage the problems created by overplanting or installing a plant that grows too large for the site.
Pruning Strategies
Five basic techniques are used for pruning woody ornamental trees and shrubs: pinching, heading back, thinning, renewal pruning, and shearing. Some plants require more of one method than another, but good pruning is usually a combination of several methods.
- Pinching is the removal of the terminal portion of a succulent, green shoot before it becomes woody and firm (Figure 11–32). Pinching greatly reduces the need for more dramatic pruning later. Whenever a shoot becomes excessively long (except late summer), simply pinch or cut the shoot to reduce its length and to promote side branching. Cut back long, vigorous shoots into the canopy.
- Heading back involves removing the terminal portion of a woody branch by cutting it back to an arbitrary location on the branch without regard for buds or lateral branches (Figure 11–33). Heading back stimulates shoot growth below the cut, thus making the plant denser. Repeated heading back with no thinning cuts results in a top-heavy plant. Dense top growth reduces sunlight and results in the loss of foliage inside the plant canopy.
- Thinning is the least conspicuous method of pruning and results in a more open plant without stimulating excessive new growth. Considerable growth can be removed without changing the plant's natural appearance or growth habit. With thinning cuts (Figure 11–34), a branch is cut off at its point of origin from the parent stem (branch collar), to a lateral side branch, or to the "Y" of a branch junction. Prune to a lateral that is one-third the diameter of the branch being removed. Thin out the oldest and tallest stems first, allowing vigorous side branch development. This method of pruning is best done with a handsaw, pruning shears, or loppers, not hedge shears. Almost all plant species can be thinned. Repeated thinning with no heading back results in plants with long, spindly branches.
- Renewal pruning (rejuvenation) involves removing the oldest branches of a shrub by pruning them near the ground, leaving only the younger, more vigorous branches, which also may be cut back (Figure 11–35). Remove small stems (less than pencil size). Plants pruned by renewal include azalea (Rhododendron spp.), deutzia (Deutzia spp.), forsythia (Forsythia spp.), mock orange (Pittosporum tobira), spirea (Spirea spp.), and weigela (Weigela florida). On some species, the entire top portion of the plant can be removed close to the ground. A variation of renewal pruning involves cutting branches back to a predetermined height each year. Butterfly bush (Buddleja davidii) is often pruned back to a woody framework (Figure 11–36). With time the framework becomes congested and requires some slight thinning. Yellow (Cornus sericea ‘Flaviramea’) and red twig dogwood (Cornus sericia 'Cardinal') and beautyberry (Callicarpa americana) are severely pruned almost to the ground each year to promote the growth of more colorful twigs or berries.
- Shearing involves cutting the terminal of most shoots with shearing or hedge clippers. Only use this method to create formal hedges. Shearing is a form of heading back. If done correctly, shearing does lead to the development of a “veneer” of foliage on the outside edges of the plant (Figure 11–37). This results in a reduction of leaves in the interior. Every three years to five years perform a thinning to open the plant up and allow light to enter the interior. In many cases, a plant that has been sheared for many years may benefit from a late winter rejuvenation pruning to allow new growth.
For heading, thinning and rejuvenation pruning, cut back to a bud making the cut at a slight angle 1/4 inch above the bud (Figure 11–38). The angle will allow moisture to flow off the cut. Avoid making the cut at a sharp angle because it produces a larger wound. When making cuts back to buds, lateral branches, or the trunk of the plant, the wounds seal quickly. Pruning the middle of a branch will leave a stub which cannot seal over. While pruning is done to reduce the overall size of the plant, remember that the growth of shoots near the pruning cuts are invigorated. Severely pruning back strong shoots produces vigorous growth.
Timing of Pruning
Pruning at the wrong time of year rarely kills a plant immediately. Doing so, however, may remove flower buds or make the plant more susceptible to frost damage, sunscald, insects, or disease. Light corrective pruning can be done at any time of year and reduces the need for severe pruning, which can weaken the plant and reduce its natural beauty. Base the selection of when to prune on the pruning objectives, when the plant flowers, and how extensive the pruning should be. Start pruning and training when trees are quite young. This prevents many serious problems before they develop. Older, neglected trees are more difficult, dangerous, and expensive to prune.
Consider the life cycle of insects and disease when choosing the time to prune. Do not prune plants in the genus Prunus in fall or early winter when bacterial cankers are reproducing. Do not prune dogwoods in May, June, and July when borers are most active.
Late winter or early spring. Before new growth begins in spring, prune summer-flowering and fall-flowering shrubs that bloom after May, including abelia (Abelia spp.), beautyberry (Callicarpa americana), butterfly bush (Buddleja davidii), rose of Sharon hibiscus (Hybiscus syricsus), crape myrtle (Lagerstroemia indica), and summersweet (Clethra alnifolia). These plants flower on new growth produced in the current growing season. If necessary, do any extensive pruning in late winter to early spring when bare branches are lighter and the tree structure is visible. Pruning wounds created in late winter or early spring seal off quickly, and insect and disease organisms are not as prevalent. Callus cells that gradually grow over each wound occur rapidly just prior to the onset of new growth in the spring. New growth is greatest after late-winter or early-spring pruning because all the stored energy from the full-size plant is channeled into the smaller pruned plant.
Spring. Spring-flowering shrubs flower before May, including forsythia (Forsythia spp.), deutzia (Deutzia spp.), lilac (Syringa spp.), viburnum (Viburnum spp.), mock orange (Pittosporum tobira), and spiraea (Spiraea spp.). These shrubs flower on buds formed the previous summer or fall. If these shrubs are pruned during late summer, fall, winter, or early spring, many of the flower buds are removed. To ensure maximum flowering, prune these shrubs as soon as possible after flowers fade in the spring.
Summer. Do little or no pruning after July 4th because new growth may not have time to mature before cold weather. Callus cells also grow rapidly just after maximum leaf expansion in early summer.
Fall. Prune hydrangeas (Hydrangea spp.) after flowering. They are an exception to the customary practice for shrubs that bloom in summer.
Winter. Prune older deciduous trees in late winter when they are dormant so limbs are not obscured by leaves. Wood around winter-pruned cuts is more susceptible to desiccation. Some trees—such as birch, honey locust, maple, dogwood, elm, and walnut—exude excessive sap from the wound when pruned in late winter or early spring. Although this bleeding does not hurt the tree, it can be alarming to many gardeners. These trees do not ooze sap if pruned in late spring, summer, or fall.
Sometimes pruning is necessary regardless of the time of year.
- Damaged or dead wood. If there are only a few damaged or dead branches, remove them as soon as they are noticed. If the damage is extensive, however, pruning may need to be done in stages, with follow-up work distributed over several months or years.
- Diseased or insect-infected wood. Properly identify the insect or disease before branches are pruned. Remove small insect infestations (like scales or webworms) by pruning the areas of the plants where the insects are attached. Cut back to healthy wood to remove all diseased tissue. When working with diseased wood, use sterilized pruning tools. A bleach solution (9 parts water to 1 part bleach) is often used, but it can corrode pruning tools. Household disinfectant sprays are easier on tools and clothing, as is rubbing alcohol.
Pruning Tools
Efficient pruning requires quality, sharp tools that are designed for the specific task. Useful tools include hand clippers, lopping shears, and pruning saws . Optional equipment includes hedge shears, pole pruners, and chainsaws. Neither wound sealant (Figure 11–39) nor anvil clippers (Figure 11–40) are recommended. Clean and oil tools regularly. After use, wipe blades with an oily cloth to prevent rusting. Keep cutting edges sharp with several passes with a good oilstone. Pruning cuts made with a sharp blade close more quickly than cuts made with a dull blade. Paint, varnish, or regularly treat wooden handles with linseed oil. Use tools properly; don't twist or strain pruners or loppers. Don't cut wire with pruning tools.
Hand clippers, sometimes called hand shears or pruners, are effective on branches less than ½-inch in diameter. Attempting to cut larger branches risks damaging the plant and the clippers. The two types of hand clippers are anvil and bypass (scissor). Anvil clippers have one sharp top blade that cuts against an anvil of softer metal. The branch is cut on one side and crushed and torn on the other side. Although anvil clippers are lighter and less expensive than bypass clippers, they are not recommended for pruning woody ornamentals. Bypass clippers have one sharp blade that “by-passes” a softer metal anvil in making a cut (Figure 11–41). They usually cost more, but make cleaner, closer cuts.
Hedge shears have long blades that are flat, or wavy and relatively short handles—one for each hand (Figure 11–42). Gas or electric-powered hedge shears are also available (Figure 11–43). Shears are designed for clipping small-leaved plants to create a formal appearance, such as a topiary. Hedge shears are sometimes misused to prune shrubs with large leaves into round balls and squares that do not enhance shrub growth or appearance.
Lopping shears have long handles to provide the leverage needed to cut through branches up to 1¾-inch in diameter. Handles vary in length from 20 inches to 36 inches (Figure 11–44). Lopping shears are useful for pruning overgrown shrubs and small tree branches. Ratchet and gear-type loppers exert more leverage for cutting thicker branches, but are more expensive.
Pole pruners are used to cut overhead branches that might otherwise be difficult to reach. They have a cutter with a hooked blade above and a cutting blade below, and some include a saw (Figure 11–45). The pole is either in sections that fit together or that telescope. Wooden poles are heavy; aluminum poles are lighter but conduct electricity if they touch an overhead wire. Fiberglass or plastic is probably the best material. Wear head and eye protection when using pole pruners, as branches cut overhead might fall.
Pruning saws are used on branches ½-inch in diameter and above (Figure 11–46). They make a cleaner and often more accurate cut than hand pruners or loppers. There are many makes and models of pruning saws. Most are “tri-cut” types that cut only on the pull, which allows greater strength and control. A narrow, curved pruning saw fits well into most branch crotches, ensuring a better angle of the cut. Pruning saws allow access to areas that might otherwise be too dense or crowded to prune. They have narrower blades and coarser teeth than carpenter saws. Fineness of the cutting edge is measured in points (teeth per inch). An 8-point saw is for delicate, close work on small shrubs and trees. Average saws are about 6 points, while 4½-point saws are for fairly heavy limbs.
Chainsaws are most appropriate for cutting trees down or for firewood (Figure 11–47). Some arborists use chainsaws to prune large branches, but it is not advised for homeowners to use chainsaws on live wood. It is too difficult to make accurate pruning cuts. Chainsaws come in a variety of sizes and can be electric or gas powered. Generally, the longer the blade, the stronger the motor and the heavier the saw. Protective clothing along with eye and ear protection are recommended. Chainsaws should be used only with the operator standing on the ground. The chainsaw should never be lifted over the head.
The Biology of Pruning
Examine plant structure to identify optimal locations for pruning cuts.
- Branch bark ridge: the location where the bark from the trunk joins the bark from the branch forming a dark line, sometimes resembling a tiny mountain range that extends from the branch union (crotch) a short way down both sides of the trunk, parallel to the side branch.
- Branch collar: the slightly swollen area just outside the connection between the branch and the trunk (Figure 11–48). It is more noticeable on some types of plants than others.
- Branch defense zone: a cone of cells inside the branch collar that activates a reaction zone that inhibits the spread of decay organisms into the trunk and also initiates the growth of woundwood, the callus tissue that grows to seal off wounds.
When the cut is properly placed, between the branch bark ridge and just outside the branch collar, the woundwood grows inward from all edges in a doughnut shape, ultimately sealing off the entire wound (Figure 11–49). However, no woundwood grows from areas where the branch collar was damaged. If the branch collar is injured during pruning, neither the branch defense zone nor woundwood will be activated to protect the tree, so it is essential to leave the branch collar intact.
Do NOT apply wound dressing to a pruning cut. In most cases, sealing wounds promotes decay by creating an environment favorable to disease. Some wound dressings kill cambial cells and cause the wound to remain open for years longer than if no treatment had been applied.
Tree Wound Response
Trees have a natural defense response to wounding They form two types of walls- chemical (fungi-toxic compounds) and physical (gums or plugs) that close off or “compartmentalize” four sides of a wounded area, thus preventing the potential spread of decay organisms (Figure 11–50). The decay or injury remains but is sealed off and does not increase in size if the walls remain intact. . The storage capacity and function of the injured part is lost forever, however.
- The first wall is formed by plugging the vertical vascular (xylem) cells. This is the weakest wall but slows the vertical spread of decay.
- The second wall is formed at the outer edge (late wood initiation) of a growth ring. It is a weak barrier but does offer resistance to inward spread of decay by producing fungi-toxic chemicals.
- Each growth ring is subdivided into compartments with a radial, or third wall. It is a very strong wall and provides resistance to lateral spread. It presents a chemical barrier.
- The fourth wall is a barrier wall. While it is the strongest of all the walls, it can be broken by outside forces, such as woodpeckers or mechanical injury. Internally, it separates the wood present at the time of injury from new wood formed as the tree grows.
The ability of a tree to compartmentalize depends on its species, age, vigor, and the size and location of the wound.
Separate from the four internal walls, is wound closure. Callus tissue develops around the external injury or pruning cut and can eventually cover the wound by growing over the dead wood (Figure 11–49).
Tree anatomy
Properly pruning a tree requires a basic understanding of tree structure. A cross section of a tree trunk reveals it is composed of many layers (Figure 11–51). Each year a tree essentially grows a new "layer of wood" or sapwood over the older wood, or heartwood. The outside layer of the tree is dead bark that provides protection from the environment. Between the bark and wood is the cambium layer, which is responsible for increases in tree diameter (by creating annual rings) and responds to injury by producing callus tissue.
Branches are attached to the tree trunk by interlocking branch and trunk tissue. A new layer of interlocking tissue is produced each year. Branches with a 45-degree to 60-degree angle of attachment are considered the strongest. When branches on the main trunk have a narrow angle of attachment, as they increase in diameter, they eventually run out of room to grow. The branch bark becomes surrounded by woody trunk and branch tissue. The bark that becomes overgrown is referred to as included bark (Figure 11–52). The union is weak and likely to split.
Prune to Promote “Sealing” of Wounds
When humans are injured, like a skinned knee, a scab forms over the wound. Skin cells are regenerated, and eventually the scab falls off—revealing a knee that looks the same as it did before it was injured. While humans are able to produce new cells and heal over wounds on any part of our bodies, plants are only capable of “sealing” or encapsulating wounds. This sealing process is possible only in certain areas of the plant, which is why it is important to identify these areas when making pruning cuts. The areas capable of growth or sealing are called meristematic tissue. Meristematic tissue occurs in the tips of roots and shoots, in buds, or at the outer edge of trunk and stem tissue just below the bark. Branches that are less than 2 inches in diameter seal over well if cut off at a point of attachment or just beyond a bud because they are made up of mostly decay-resistant sapwood (active xylem). Large branches are made up of more heartwood (dead xylem tissue) that is slow to seal over and more susceptible to decay and disease.
To create the smallest wound for a plant to seal over, use the three-cut method for branches larger than 2 inches in diameter (Figure 11–53).
- The first cut is an undercut, made 4 to 6 inches from the branch collar, which prevents bark from ripping down the trunk when the limb is removed.
- The second cut, made further out on the branch from the first cut, removes the weight of the branch.
- The third cut, the precision cut, is made at the branch collar. Care must be taken to leave the collar intact so callus tissue can form. If the third cut is made too close to the trunk, it is known as a flush cut (Figure 11–54). This removes the tissue that would have formed the callus, thus preventing the wound from sealing.
For very large branches, it is best to contact a certified arborist. An arborist has the equipment and expertise to remove large branches safely with the least amount of damage to the tree.
Topping and Flush Cuts
Tree topping is not a recommended practice. Topping, also called shearing, heading back, or dehorning, involves cutting back main branches and the central leader to a specific height without regard to the location of lateral branches (Figure 11–55). This practice is mistakenly thought to reduce the risk of property damage during a storm. Topping, however, actually makes trees more dangerous by creating wounds that do not close, thus allowing decay organisms to enter the tree. In addition, the new growth that sprouts in response to topping is attached weakly and is easily damaged during storms. Thinning is an alternate way to reduce wind resistance without damaging the tree.
Flush cuts or cuts that go beyond the branch bark collar are also not recommended. Flush cuts open up larger wounds than are necessary that are also difficult for trees to close over. Large wounds make the tree susceptible to entry by decay organisms.
Considerations for Evergreen Woody Ornamentals
Pruning Broadleaf Evergreens
The term “broadleaf evergreen” is somewhat misleading because it is used to describe evergreens with large leaves such as Japanese aucuba (Aucuba japonica). It is also used to describe evergreens with small leaves, such as boxwood (Buxus sempervirens), Japanese hollies (Ilex crenata cultivars), and scarlet pyracantha (Pyracantha coccinea). The term “broadleaf” is used here to include all evergreens except conifers, which have needlelike or scalelike leaves.
General maintenance. The minimal pruning needed by broadleaf evergreens is best done in early spring, but can be done any time of year. Selectively cut back branches that are damaged, diseased, dying, or dead. Also cut back branches that are headed into the center of the canopy, and branches that extend far beyond the canopy of the rest of the plant. A compact plant results when branches are pruned back to an outward-facing lateral within the plant canopy.
Some plants, such as azalea (Rhododendron spp.) and abelia (Abelia spp.), produce long, vigorous shoots that extend well beyond the natural canopy and well above a lateral branch. Cut these back severely within the canopy; try to leave a few leaves on the stem. When needed, moderate to heavy pruning should be done in late winter or early spring before new growth begins. Rejuvenate both species after flowering in the spring.
Evergreens that flower in early spring should not be pruned in late summer, fall, or winter because doing so reduces the number of flowers. Wait to prune until immediately after they finish flowering. The best time to prune is after berries drop in the spring. Cut back a few of the tallest and oldest branches to achieve a layered look. For multistemmed plants, such as leucothoe (Leucothoe spp.), completely remove a few of the oldest branches to the ground each year for two to three years. Because boxwood is grown for its foliage rather than flowers, it should be rejuvenated in late winter. It is best pruned by cutting only the tips of stems. The center of older plants often has little or no green foliage. Avoid severe pruning if possible as the plants are slow to recover. If heavy pruning becomes necessary, do so over a period of several years.
Experts differ on the importance of deadheading broadleaf evergreens such as rhododendron and mountain laurel. Some find that allowing the seed capsules to develop reduces flower and shoot development the following year. To deadhead as soon as the flowers fade, hold the branch with one hand and snap the faded flower truss with the other (Figure 11–56). Use care to prevent damaging the new shoots that form directly below the flower cluster.
Severe pruning. If broadleaf evergreens become too large for their location, severe pruning is an option. To successfully rejuvenate healthy evergreens, prune in late winter or early spring just before new growth begins. Cut back overgrown shrubs, such as hollies (Ilex spp.), camellia (Camellia spp.), and mountain laurel (Kalmia latifolia), to bare branches 2 feet to 4 feet (or even lower) from the ground (Figure 11–57). Plants recover in two to three years depending on plant health and cultural practices such as fertilization, mulching, watering, and insect and disease control. After severe pruning, new growth is slow because dormant buds must become active. In midsummer, thin and head back excessively vigorous new shoots when they reach 6-inches to 12-inches long.
Hedges
Begin pruning hedge plants soon after they are transplanted to ensure they do not become leggy and that branches go all the way to the ground. A dense hedge must be developed slowly, and severe pruning may be required the first two years. Never try to make a hedge reach the desired height in a single season or it will be thin and open at the base.
Subsequent pruning depends on the formality of the hedge. Formal hedges are often sheared in the spring after the main flush of growth has fully elongated. Because any new growth that occurs appears out of place, numerous shearings are required throughout the growing season. An informal hedge is usually pruned only one or two times per year. Any significant pruning is done in late winter to early spring before new growth begins. A follow-up pruning is usually done in midsummer. Allow informal hedges to grow following the natural shape of the plant but conforming to the size and shape of the desired hedge. It is important that the top of the hedge be narrower than its base to prevent the upper branches from shading out the lower branches (Figure 11–58).
Pruning Narrowleaf Evergreens
Narrowleaf evergreens are plants that have needles, awls, or scales, such as juniper, pine, cedar, spruce, and yew. Although some dwarf forms are available, most cultivars require some pruning to control size, shape, and density. Enhance the natural shape of the plant through maintenance pruning. The timing of selective pruning is less critical for narrowleaf evergreens because they are normally grown for their foliage and not for their flowers. Prune in the winter and use the cuttings for holiday decorations, or prune in early spring before new growth starts. A second light pruning (thinning and heading) is often done in late June to early July after new growth is completed. Remove long, out-of-scale branches by cutting back to a lateral or just above a vigorous side shoot on two- or three-year-old wood. Start at the top of the plant and work down, removing branches that extend out and over lower shorter branches. Do not cut all branches back to the same length, or the natural shape of the plant is lost. Hide pruning cuts under an overlapping branch.
Many conifers, such as arborvitae, develop an area on the inside of the plant canopy that has little or no foliage. Avoid cutting back to bare branches; they seldom develop new growth. Yews on the other hand sprout new growth wherever cuts are made.
Pines are unique because buds for new growth occur only on branch terminals. Prune back to a branch or to the main trunk. An exception to this rule is in the spring when new shoots called candles develop. When the candle has extended to its full length and the needles are still soft, remove about half the length of the candle to reduce growth (Figure 11–59).
Severe pruning. Heavy pruning kills most narrowleaf evergreens because most narrowleaf evergreens do not have dormant buds on old wood. If narrowleaf plants become too large for their location, it's best to remove them and replant with a smaller variety.
Considerations for Deciduous Woody Ornamentals
Deciduous Vines
Prune vines to limit vigorous growth, clear around windows and doors, enhance flower production, thin branches, and remove dead or damaged wood. The best time to prune depends on when the vine flowers. Spring-flowering vines are usually pruned after they finish flowering, while most other vines are pruned during the dormant season. Twining vines initiate most of their growth from the upper buds; if the lower portions of the vine become leafless, promote new, low-growing foliage by pruning severely and then removing all but the strongest new shoots. Keep vines that produce long, vigorous shoots, such as Carolina jessamine (Gelsemium sempervirens), in bounds by shearing and training several times a year. Specific pruning practices for commonly planted vines are provided below.
Wisteria (Wisteria spp.) easily becomes stem heavy, producing few flowers. To promote profuse flowering never prune heavily during the dormant season. Instead prune in late summer and early fall before flower bud development. Reduce the spur-bearing shoot length by onehalf or greater, leaving about six short nodes with spurs that will bear next year's flowers. Remove excessively vigorous shoots entirely or train to fill voids.
Clematis (Clematis spp.) vines are thicker and more vigorous if pruned to the lowest pair of strong buds when newly planted. There are three types of Clematis; those that bloom on new wood, those that bloom on one-year-old wood, and those that bloom on both. Those that flower on the current season's wood (Clematis × jackmanii, C. tangutica, and C. viticella) should be severely pruned in late winter to early spring to promote new growth. Prune clematis that flower on one-year-old wood (C. armandii, C. montana) by cutting away all flowering wood to within a few inches of the main framework immediately after flowering. Most of the popular, large-flowering cultivars—such as ‘Nelly Moser’, ‘Henry’, ‘Duchess of Edinburgh’, and ‘William Kennett’—flower both in the spring on one-year-old wood, and also produce side shoots that provide further displays of medium-size flowers during late summer. Only lightly prune these. Regardless of the species flowering habit, after five or more years some clematis vines may become too tall or leggy. Prune severely in late winter to early spring to rejuvenate. Spring flowers are eliminated that year, but late summer flowers develop. An alternative is to severely prune a fourth to a third of the oldest shoots back to within a foot of the ground each year for several years.
Climbing and rambling roses are pruned differently, but both flower more heavily when new canes are trained in a somewhat horizontal position rather than allowed to grow in a vertical position.
Climbing roses flower on the current season's growth. This group of roses is not particularly vigorous and little pruning is required. Examples of climbing roses include ‘Iceberg’, ‘Meg’, ‘Handel’, and ‘Marigold’, as well as roses derived from hybrid tea cultivars, such as climbing ‘Peace’ or climbing ‘Crimson Glory’. Cut dead or weak wood flower stems back to a vigorous bud. In the winter, shorten flowering laterals to three or four buds. After several years, some of the old canes may be removed at the base to produce new vigorous canes. Lady Banks rose (Rosa banksiae) and Mermaid rose (Rosa 'Mermaid' ) are pruned like climbing roses, but do not prune the flowering laterals in winter.
Rambling roses are vigorous growers that flower only once in the spring. Ramblers derived from Rosa lucieae flower on one-year-old wood. After flowering, cut the old canes to the ground and leave the new vigorous shoots to flower the following year. Another group of ramblers flowers on new canes but not those that primarily arise from the base; new flowers develop on new growth midway up on old canes. Remove some of the old flowering canes where new vigorous shoots have started growing.
Deciduous Shrubs
General maintenance. Remove small branches that do not conform to the natural shape. Use thinning and heading cuts when removing larger branches. Plants vary in how often older branches should be removed. Prune forsythia (Forsythia spp.) annually, while viburnum (Viburnum spp.) and witch hazel (Hamamelis spp.) may not need this type of pruning more than once every three to five years.
Severe pruning. Older shrubs that have outgrown their location may need more severe pruning to reduce plant size. If they are healthy and receive adequate sunlight, they respond well to renewal pruning. Prune all the branches near the ground and then remove some of the excessive number of new upright shoots that develop from the base by midsummer. Head back the shoots you leave when they reach their full length. To prevent the inner portion of a plant from becoming overly dense, prune to the outward-growing buds.
An alternative is to selectively remove up to half of the branches at the base. This would include the removal of older, unproductive wood, inward growing branches, and any other growth that detracts from the natural form of the plant. Also remove any extremely vigorous, unbranched suckers. Examine the remaining branches and head back those that detract from the intended size or appearance. In midsummer, new shoots develop quickly. Remove some of the new basal shoots. A less dramatic method is to annually remove a fourth to a third of the oldest branches for several years until all of the old branches are removed. This method also requires the removal of excessive basal shoots in midsummer.
Roses. Prune hybrid tea, floribunda, grandiflora, hybrid perpetual, and polyantha roses in early spring as the buds are swelling, but before growth has started. Remove all dead wood by cutting at least an inch below the dead area. Select three to five of the strong canes; the rest are completely removed. Cut the remaining canes back to a height of 18 inches to 24 inches (Figure 11–60). Cut just above a large, strong, outward-facing bud. Prune shrub roses that bloom only in spring after they have flowered by removing old canes, dead wood, and dead flowers. Prune shrub or landscape roses back to 6 inches to 10 inches above ground either in fall or spring.
Deciduous Trees
Young Trees
Begin training young trees the first year after transplanting. Train gradually over a period of several years. Limit pruning to enhancing the natural shape or structural strength of the tree. The objective in the first few years is to identify and correct problems with the main framework of the tree. Lower branches are left on the trunk to manufacture food and to shade the lower bark (which is often quite thin) and to promote trunk taper.
The height of a branch does not increase as the tree grows but remains at the same height for life. With time, some of the lower branches need to be removed as they increase in length, create unwanted shade, or interfere with gardening activities or traffic.
Most ornamental trees are grown with one central leader (the topmost vertical branch). A single-trunk tree with evenly spaced branches is structurally stronger than one that has multiple trunks or branches clustered together (Figure 11–61). Exceptions are trees such as crape myrtles and river birches that are grown for their interesting bark color and have been pruned to develop multiple trunks. A tree that grows to more than 40 feet should have a single trunk well up into the canopy, but the trunk does not have to be perfectly straight. When a young tree has two competing leaders, remove the weaker of the two. If they are essentially equal, either can be removed. Trees with several trunks often develop included bark in the crotch that eventually causes one of the trunks to split from the rest of the tree during a storm.
Ideally, select scaffold branches (primary branches that make up the tree's framework) emerging from the trunk with a 45-degree to 70-degree angle of attachment (Figure 11–62). Generally, branches with angles less than 45 degrees become weaker as they grow longer and increase in diameter. Branch angles of less than 30 degrees result in a very high percentage of limb breakage, while those between 60 degrees and 70 degrees have a very small breakage rate.
Choose scaffold branches that form ascending spokes around a central axle (Figure 11–63). This provides a structurally strong tree that is attractive, balanced, and allows sunlight to penetrate and wind to pass through the canopy. Space major scaffold branches at least 8 inches and preferably 20 inches apart vertically. Closely spaced scaffolds have fewer lateral branches. The result is long, thin branches with poor structural strength. Good radial spacing prevents one limb from overshadowing another. Branch arrangement and spacing is more critical for large shade trees than for small flowering trees.
Established Trees
For pruning older trees that are typically large, it is best to call a certified arborist. If you must do it yourself, first remove damaged, diseased, dying, or dead branches. Selectively remove limbs from the perimeter of the canopy, especially those growing close together or beyond the desired size. Also, remove branches with narrow angles of attachment. Remove branches at their point of origin, or cut back to laterals that are at least one-third the diameter of the limb being removed. To locate the appropriate angle to make a pruning cut, identify the branch bark ridge on the limb in question. The angle created by the branch bark ridge and an imaginary line flush with the tree trunk is the approximate angle at which to make the pruning cut (Figure 11–64). Never remove more than 25% of the total foliage at one time.
Thinning techniques are used to improve the appearance or function of a tree in a landscape. Thinning does not significantly reduce the overall size of a tree but opens up its canopy to allow more sunlight to penetrate the interior of the tree (Figure 11–65). Prune laterals that have grown taller than the terminal leader or beyond the canopy of the tree. Remove laterals that have grown inward toward the center of the tree at their point of attachment (Figure 11–66). Remove water sprouts; they are structurally weak and lead to overly dense growth in the interior of the tree. Branches that are less than half the diameter of the trunk are stronger than those that grow larger than half the trunk diameter. Thinning is sometimes used to open the canopy to allow the wind to blow through (rather than blowing the tree over) and to reduce stress during drought periods or following construction damage, but thinning is rarely necessary and if done improperly harms the tree. Trees vary in the amount of thinning they tolerate without suffering ill effects. An overthinned tree responds by producing numerous water sprouts and suckers. Sunscald occurs on trees with thin bark.
Heading reduces the overall size of a tree. Cut back to good lateral branches and possibly head the tips of the laterals (Figure 11–67). It is better to cut back over a period of several years than to attempt dramatic pruning in one year. When cutting back to an intersecting lateral branch, choose a branch that forms an angle of no more than 45 degrees with the branch to be removed and that has a diameter at least half that of the branch to be removed.
When cutting branches over 1 inch in diameter, use the three-cut method (Figure 11–53) to avoid tearing the bark of the trunk. Make slanting cuts when removing limbs that grow upward; this prevents water from collecting in the cut and speeds sealing.
Arboriculture
Arboriculture is the art and science of planting and caring for trees. If a tree is too large to prune from the ground or has experienced extensive damage, it is best to hire a certified arborist (someone who is trained to work on trees). While many people advertise that they prune trees, not all of them are trained in proper tree care. A certified arborist has passed a tree knowledge exam from the International Society of Arboriculture (ISA) and is required to earn continuing education credits to maintain certification. Obtain several bids for tree work, ask for, and check out references.
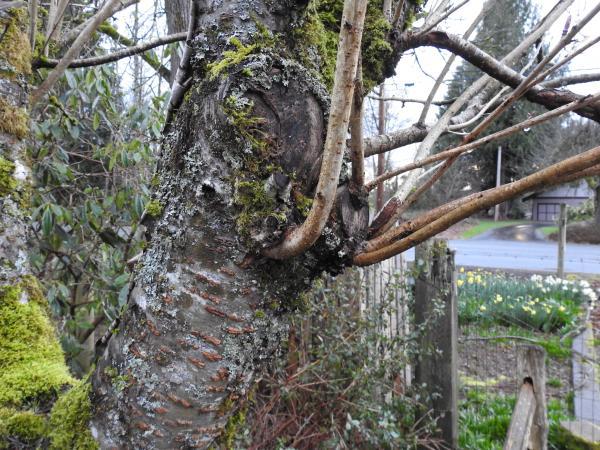
Figure 11–30. Water sprouts are shoots that arise from latent buds on the trunk or stems of a plant and are often the result of heavy pruning.
Kathleen Moore CC BY 2.0
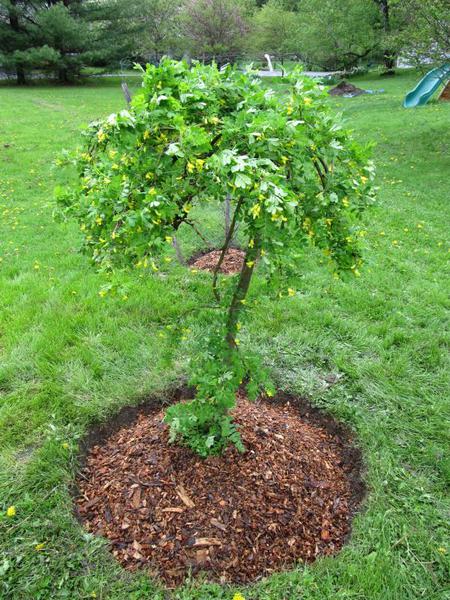
Figure 11–31. Suckers on a weeping Siberian pea tree (Caragana arborescens 'Pendulua').
Jonathan Teller-Elsberg, Wikimedia CC BY-SA 3.0
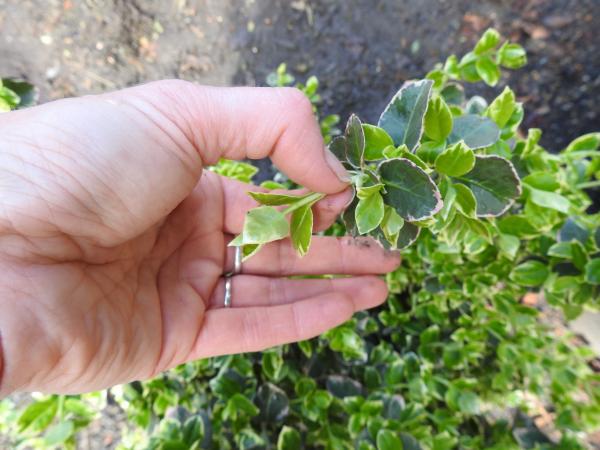
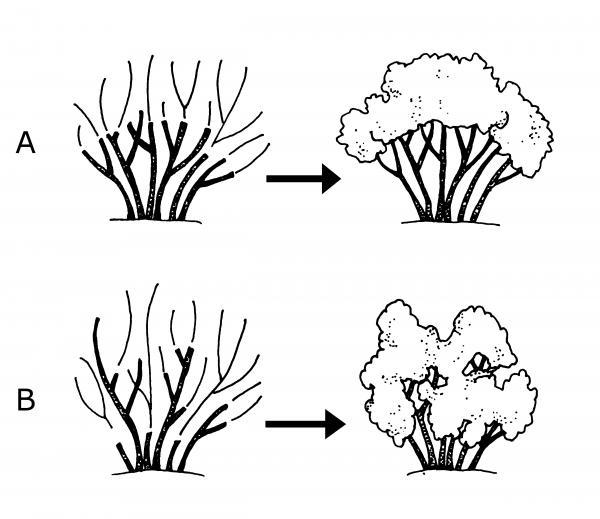
Figure 11–33. Heading back involves removing the terminal portion of woody branches without regard to buds or lateral branches. A) A shrub with shoots headed back to the same height. B) A shrub with shoots headed back to different heights.
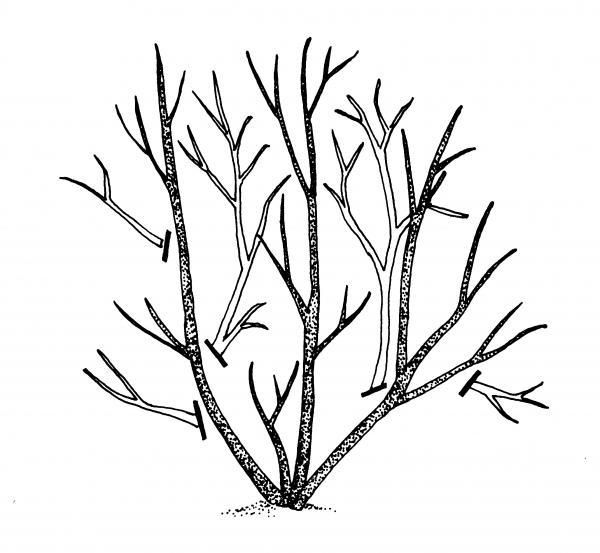
Figure 11–34. With thinning cuts, branches are removed at their point of origin.
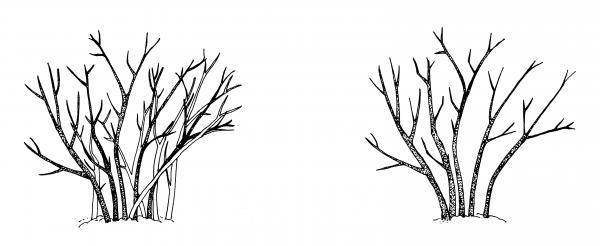
Figure 11–35. Renewal pruning involves cutting the oldest branches back to the ground leaving the younger, more vigorous branches.
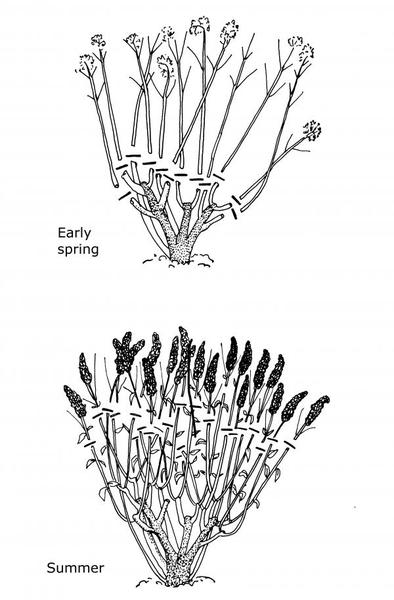
Figure 11–36. Each year in early spring, prune back plants such as butterfly bush to a framework. In late summer, remove the faded blooms to promote further flowering.
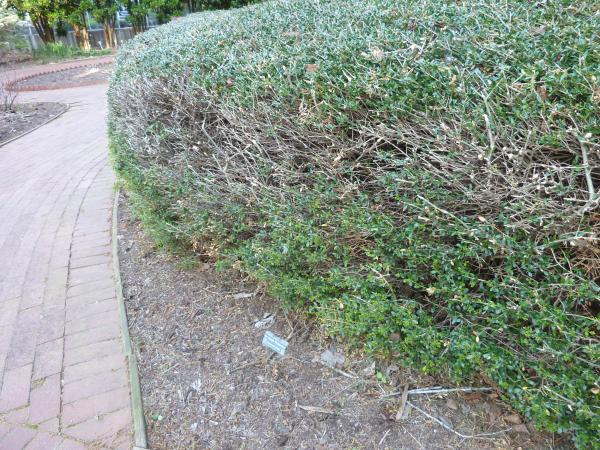
Figure 11–37. A hedge trimmer got a little too close and removed the veneer of foliage.
Kathleen Moore CC BY 2.0
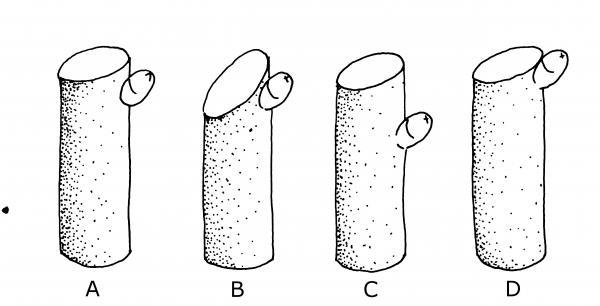
Figure 11–38. A) Proper location and angle of a pruning cut; B) Too slanted; C) Too far from the bud; D) Too Close to the bud.

Figure 11–39. Wound sealants over pruning cuts are not recommended. They only serve to "seal in" pathogens and interfere with a plant's natural ability to seal over a wound..
Kathleen Moore CC BY 2.0
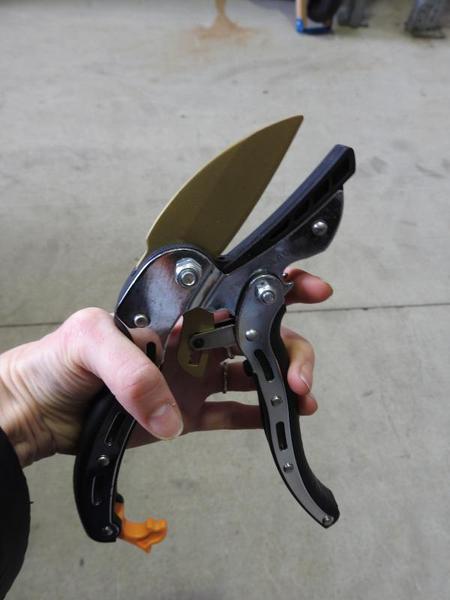
Figure 11–40. Anvil pruners have a blade that meets a flat surface. These types of pruners can crush stems as they cut.
Kathleen Moore CC BY 2.0
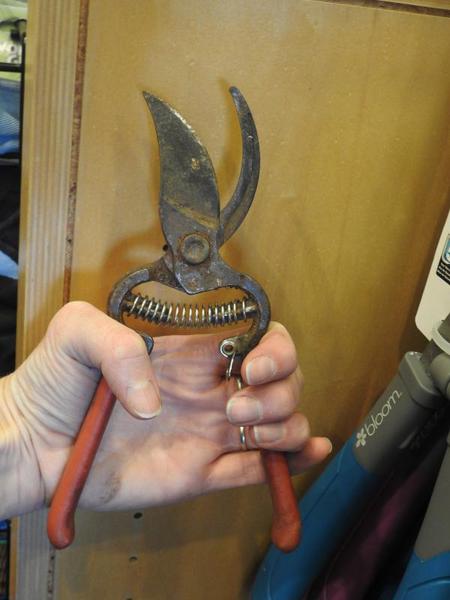
.jpg)
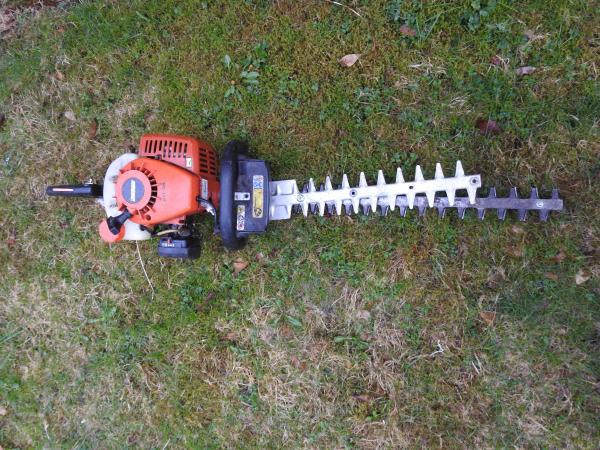
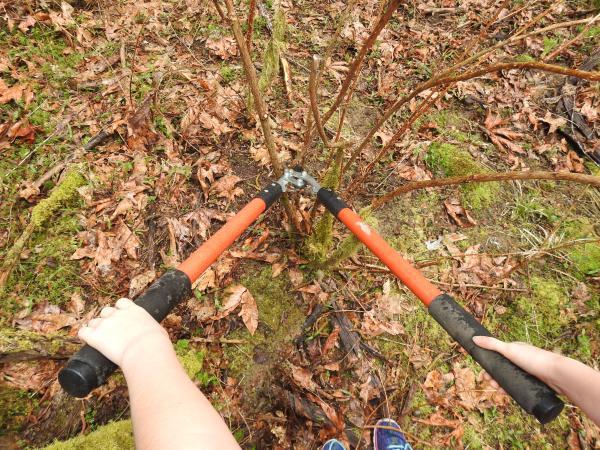

Figure 11–45.A pole pruner with a cutter on one side and a pruning saw on the other allows for cutting high branches from the ground.
Kathleen Moore CC BY 2.0
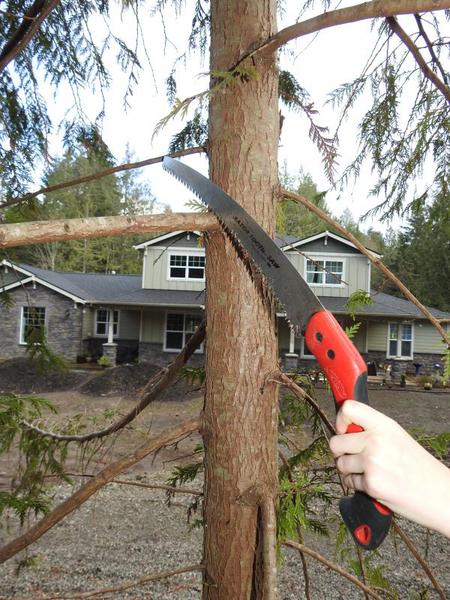
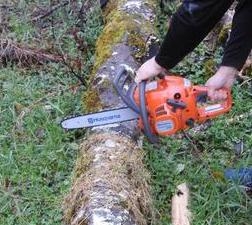
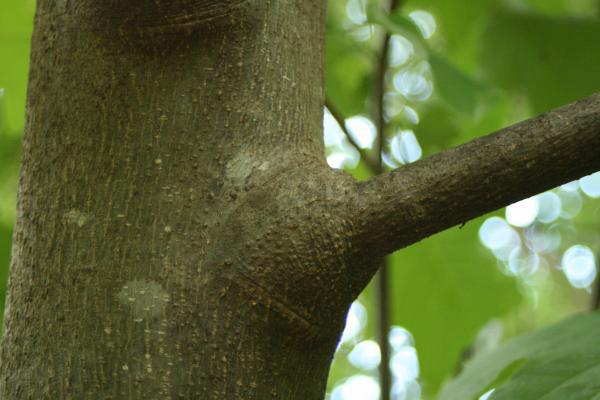
Figure 11–48. Branch collar is the slightly swollen area just outside the connection between the branch and trunk.
Chris Alberti CC BY 2.0

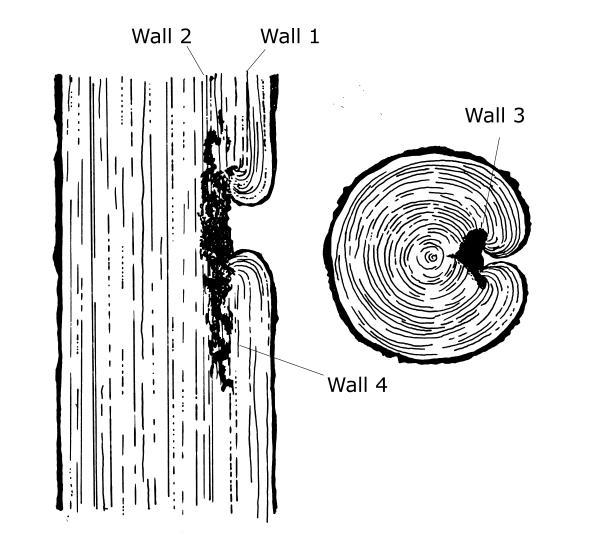
Figure 11–50. Compartmentalization of decay in trees: Wall 1 resists vertical spread, wall 2 resists inward spread, wall 3 resists lateral spread, and wall 4 controls spread to wood formed after wounding.
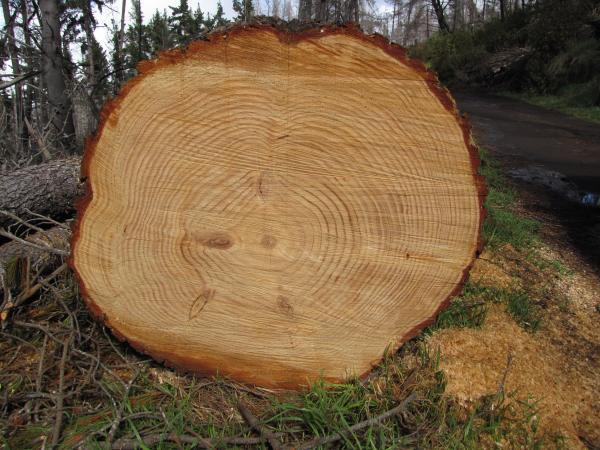
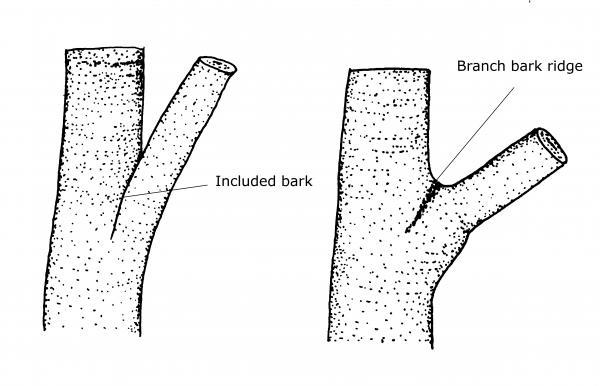
Figure 11–52. V-shaped crotches lead to included bark.
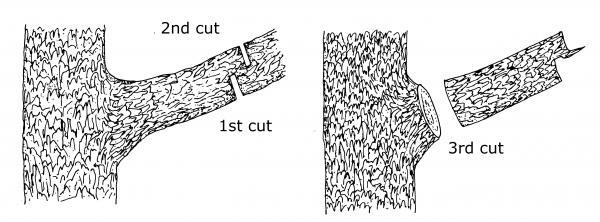
Figure 11–53. A three-point cut. The first cut is an undercut to prevent bark ripping. The second cut, further out on the branch removes the weight. The third cut is made outside the branch collar to remove the limb protecting the meristematatic tissue.
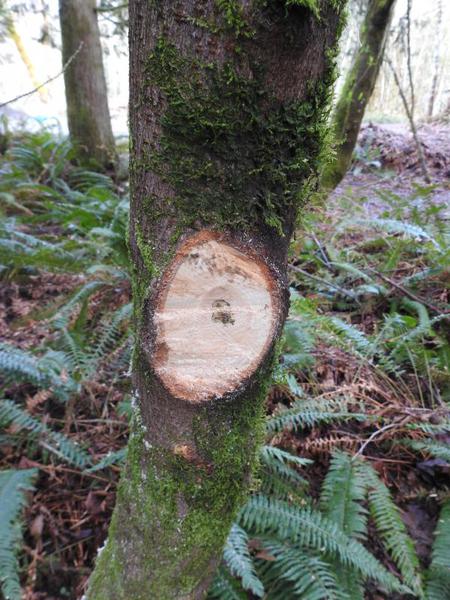
Figure 11–54. A flush cut made too close to the trunk, removing the branch collar and leaving an oval-shaped wound.
Kathleen Moore CC BY 2.0
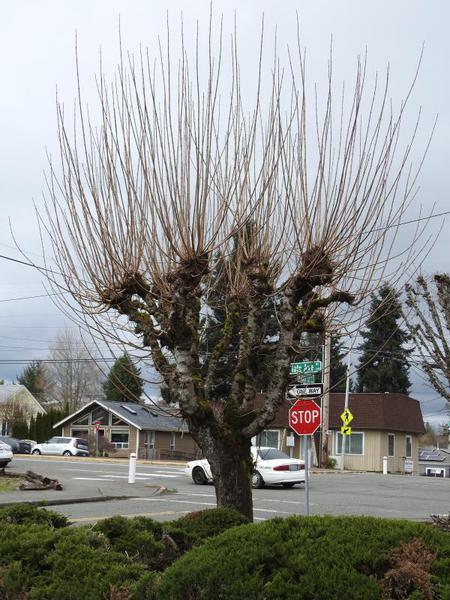
Figure 11–55. Topped trees where major branches have been removed. The large wounds are subject to decay. Water sprouts have grown from the cuts but are poorly attached. As they get larger, the sprouts become a hazard.
Kathleen Moore CC BY 2.0
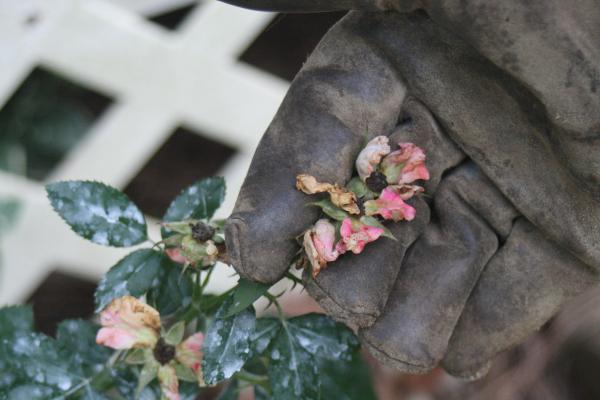
Figure 11–56. This rose bush is being deadheaded by snapping off the faded flower truss.
Chris Alberti CC BY 2.0

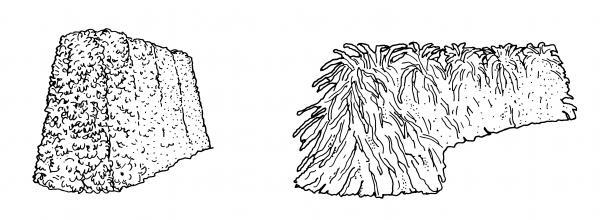
Figure 11–58. Pruning of a formal (left) and naturally shaped (right) hedge to allow sunlight to reach the lower foliage. The top of the hedge must be narrower than its base to prevent the upper branches from shading the lower branches.
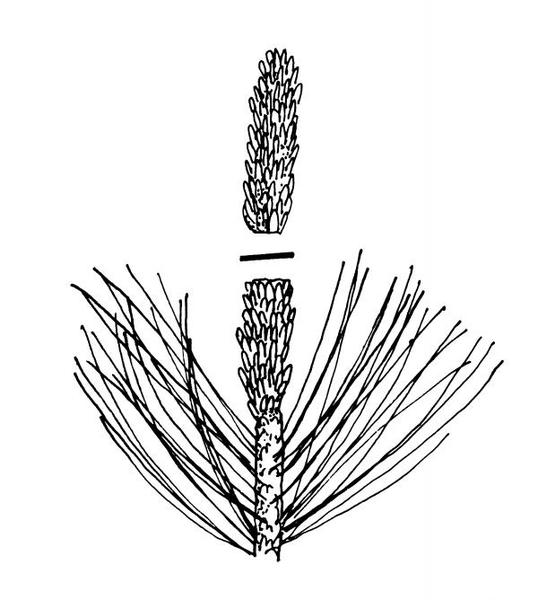
Figure 11–59. Prune pines by cutting back half of the new growth.
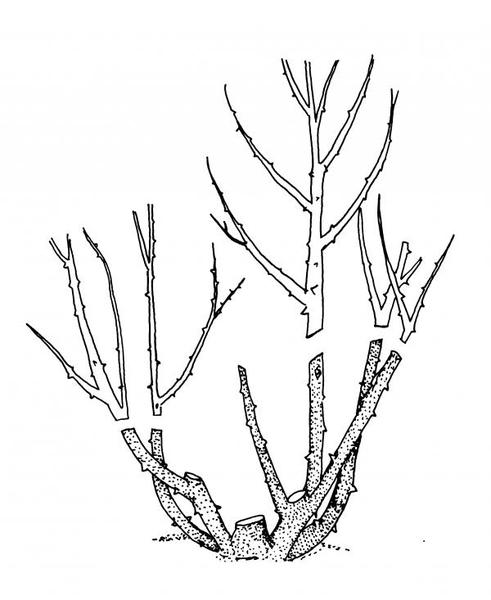
Figure 11–60. Prune rose shrubs back to three to five of the strongest canes in early spring.
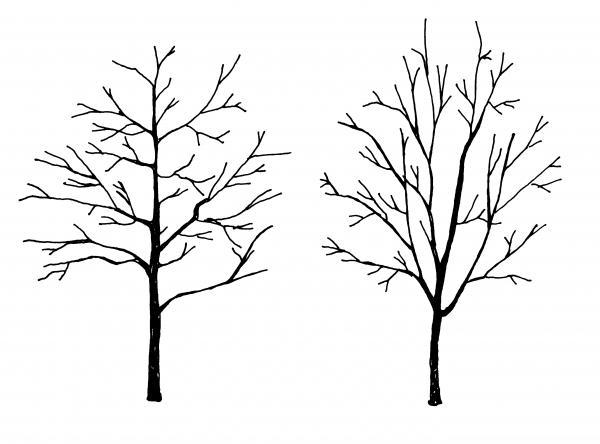
Figure 11–61. A single-trunk tree with evenly spaced branches (left) is structurally stronger than one that has multiple trunks or has branches clustered together (right).
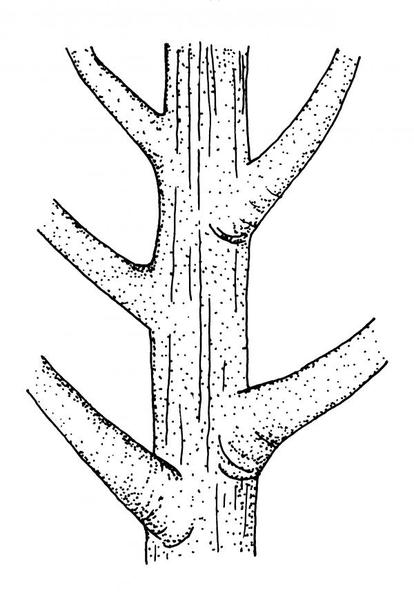
Figure 11–62. Optimum angle of attachment of scaffold branches (45 degrees).
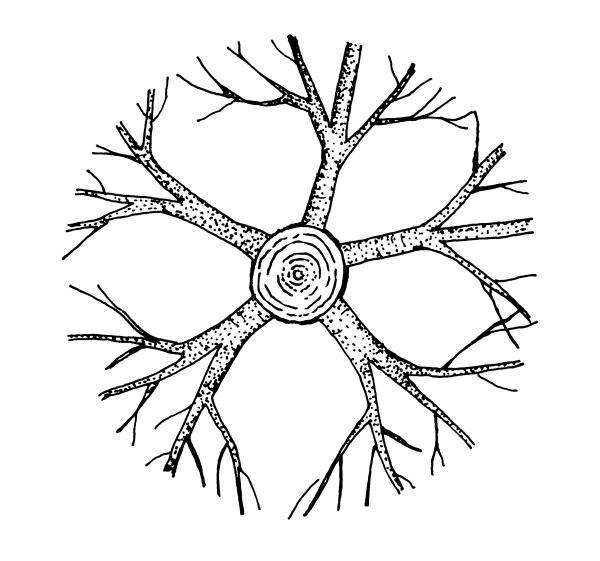
Figure 11–63. Radial arrangement of scaffold branches.
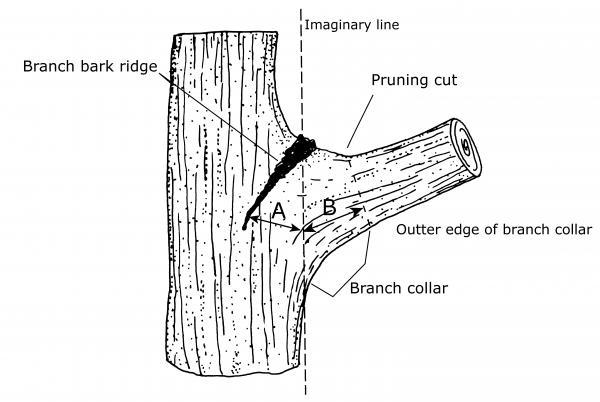
Figure 11–64. The angle (A) created by the branch bark ridge and an imaginary line flush with the tree trunk is the approximate angle (B) at which to make the pruning cut.
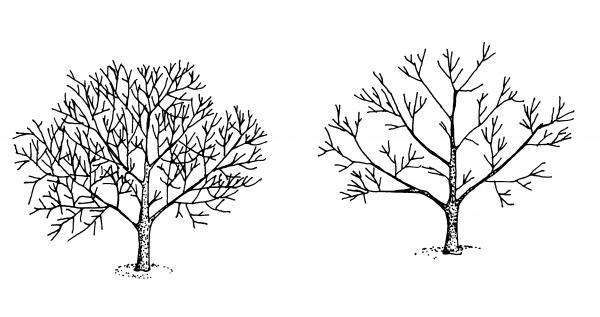
Figure 11–65. Thinning opens up a tree canopy.
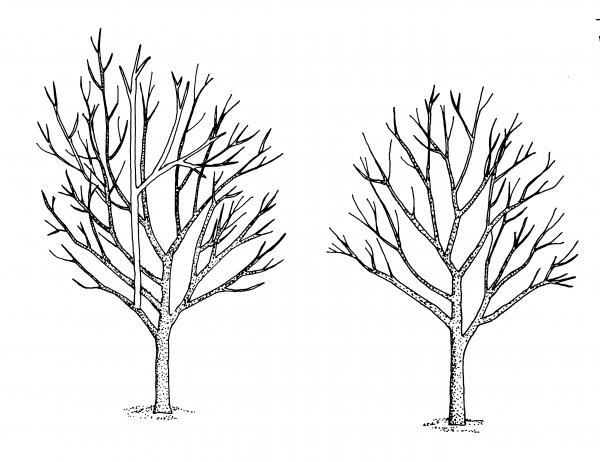
Figure 11–66. Remove laterals that have grown inward toward the center of a tree back to their point of origin.
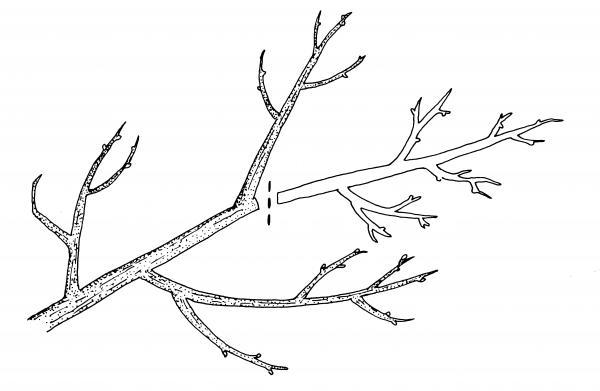
Figure 11–67. Heading cuts made by pruning to a lateral at least half the the diameter of the branch being removed.
Managing Problems of Woody Ornamentals
Woody ornamentals make up the vast majority of landscape plants. They suffer from environmental stresses such as drought, low temperatures, too much or too little sunlight, or cultural problems such as improper plant selection and poor location or maintenance techniques. Insects and diseases affect woody ornamentals but are usually secondary problems that appear after an environmental or cultural stress. Properly identifying the plant is the first step in solving a plant problem. Knowledge of the plant type helps rule out some insect or disease problems.
One of the challenges when diagnosing problems with woody plants is their longevity. Problems that manifested years ago may only now be showing symptoms. A pot-bound plant might not show the effects of girdled roots until the roots grow larger and start restricting water and nutrients. A particularly dry summer might not affect a mature tree immediately, but symptoms may appear in the following seasons. Problems caused by tree root damage during construction may not manifest themselves in the canopy for several years. A plant that was improperly pruned may not cause a problem until a wind or icestorm causes it to shed branches. Evergreens are particularly challenging. A cut Christmas tree tossed out into the yard can remain green for several months, giving us an idea of how long it can take for stresses to appear on the leaves of a living tree.
The sheer size of a mature tree or shrub makes it difficult to diagnose a problem. Often problems are seen on the newest growth. On a large tree this would be at the tips of branches that may be high in the air. Management may be delayed simply because a homeowner is unaware of the problem.
Gather information through observation and asking questions before diagnosing a plant problem. What type of plant is it? Has a soil test been completed? What is the soil pH? Is the soil compacted or poorly drained? How much sunlight does the plant receive? Has soil drainage been tested? Has the plant suffered from hot, dry, or freezing weather? Was the plant recently transplanted? How and when was it watered and fertilized? Has an herbicide been used in the area recently? Has the plant been pruned recently? Has there been any tilling, construction, or disturbance of the soil around the plant?
This section examines plant problems, starting with roots, trunk, branches, and leaves. In all cases, proper selection, planting, and care of a plant are the most important factors for plant health. It is much easier and less expensive to properly care for a plant than remediate a problem.
What are the signs that woody ornamentals are under duress?
- Change in leaf color from green to yellow, orange, or brown. This often starts as blotches or on the margins.
- Leaf drop, especially on lower branches.
- New leaves are smaller than normal.
- Branch or twig dieback.
- Poor yearly growth increment. Has it been growing well for a number of years, but the last year or two the amount of growth has greatly decreased?
- The presence of lichens on the branches. Something may be happening that is weakening the plant.
Damage to Roots
Plant roots develop and survive where there is adequate oxygen and moisture. Most active roots are in the top 3 feet of soil, with the majority in the top 12 inches. The more compacted or poorly drained the soil is, the closer the roots are to the soil surface. Roots grow most of the year, stopping only when soil temperatures are around 40°F to 45°F. Roots occur as perennial woody roots and as annual absorbing roots. Woody roots become thicker each year; absorbing roots die but are replaced by new absorbing roots. Annual absorbing roots form shallow, horizontal fans that take up water and nutrients. A few woody support roots grow downward and outward to anchor the plant in place. Most plants do not have a deep tap root. Although a tap root may develop on trees growing in the woods in well-drained soils, tap roots generally do not develop on plants transplanted into the landscape or grown in compacted or poorly drained soil.
- Exposed surface roots. These roots become unsightly or in the way. Roots do not suddenly grow on the soil surface. Roots increase in diameter over a period of years. Soil erosion speeds their exposure. Exposed roots need protection from pedestrian and vehicle traffic, including lawn mowers. Mulching exposed roots physically protects them as well as conserving soil moisture and preventing direct sunlight from heating the roots. Cutting off or covering roots with top soil are temporary solutions that cause long-term damage to tree roots.
- Septic system. Root problems occur around septic fields and sewer lines. Do not plant trees such as willow, maple, and elm species near a septic field. Tree roots are often incorrectly blamed for plugged and broken pipes actually caused by natural settling, age, and wear. Leaking pipes encourage roots to grow into the area and to move into and through the cracks. As roots increase in size, cracks widen and more breaks occur.
- Cracked sidewalks and pavement. As roots increase in diameter, they crack or lift sidewalks, asphalt driveways, and other paved surfaces. Severe pruning of tree roots leads to major decline or tree death. The best solution is to select trees that are less likely to become a problem or to plant further away from paved surfaces.
- Tree stumps. Consider leaving stumps as wonderful wildlife habitat for birds and beneficial insects. If it is not possible to leave a stump, remove it by digging (difficult at best), burning (not recommended), or by hiring a tree company to grind out the stump. Another method is to encourage or speed up the natural decay process. The length of time varies with tree species, moisture, temperature, and size of the stump. To expedite the decay process, cut the stump as close as possible to the ground and cover it with soil, or drill holes in the stump about an inch in diameter, 6 inches to 12 inches deep, and spaced about a foot apart.
- Trenching. Digging trenches for installation of water, sewer, telephone, cable, or gas lines, or for building foundations, damages the root systems of nearby trees and shrubs. To minimize potential damage, attempt to locate trenching in areas that cause the fewest roots to be damaged or near areas that have already been trenched.
- Roots covered by pavement. Roots that are covered by pavement may be deprived of air and moisture, which are essential for growth. If the covered area involves only a small portion along one side of the plant, satisfactory growth will continue. If the entire area around the plant is to be paved, use a porous material to allow water and air to penetrate. If brick or flagstone is used, do not mortar the joints. When pavement is nonporous, leave a 6-foot-diameter opening around the trunk of small trees and a larger opening for large trees. It the roots extend beyond the pavement into uncovered soil, the opening does not need to be as large.
- Changes in soil grade. Even a few inches of fill added or soil removed causes extensive root damage. If possible, never remove soil from or add large amounts of soil within the drip line. Symptoms may appear within months or years after filling has occurred. The extent of injury from fills varies with the species, age, and condition of the plant; the depth and type of fill; and drainage. The base of an established tree flares at the soil line (wider than the tree’s trunk a foot above the soil line). If the tree does not have a flare but enters the ground in a straight line, fill dirt has been added. Gently remove soil at the base of the tree to reveal the depth of the fill (Figure 11–68). Other visible symptoms include small leaves, many dead twigs, and the presence of numerous suckers along the main trunk and branches.
Damage to Trunks
Woody plants have a thin layer of living tissue just beneath the bark. Damage to this growing cambium causes serious problems for a tree. Avoid injury by preventing grass and weeds from growing at the base of the plant or by hand-trimming or hand-clipping them. Wounds are serious enough by themselves, but a wounded plant must also protect itself from pathogens that invade the wound.
These microorganisms often attack the injured bark and invade adjacent healthy tissue, greatly enlarging the affected area. Woody plants can be completely girdled from microbial attack following injury. Decay fungi also become active on the wound surface, and structural deterioration of the woody tissues beneath the wound often occurs.
Hollow trees result from a tree injury when walls 1, 2, and 3 fail to stop the spread of decay. Wall 4 remains intact so new growth continues to occur on the outer part of the trunk. When there is evidence of decay in a tree, contact a certified arborist for a consultation (Figure 11–69).
Construction
Protect trees and large shrubs on a construction site from the devastating effect of grade changes, fill, soil compaction, and building construction. Damage to plants during construction usually involves impairment of the water and nutrient supply system. Plan protective measures before construction begins. Simply placing a barrier around the trunk of a plant does not protect the root system. Place tall, conspicuous stakes and fencing at the ends of the branches on the sides where trucks or bulldozers are operating. Groups of trees or shrubs usually stand a better chance of survival than individual specimens (Figure 11–70).
Many roots are destroyed when the soil is compacted by construction equipment driving over the root zone. Minimize construction traffic to a few paths that are covered with 6 inches to 10 inches of mulch, and do not allow parking under desirable trees. Do not spread soil beneath the canopy of plants that are to be saved. In addition, be sure that grading changes do not cause water to be channeled toward plants.
Trees may respond quite differently to various types of construction damage. Under some circumstances, death may occur soon after the tree is damaged. In most cases, the tree appears to stabilize but grows little for years. Often insects and disease invade the weakened tree and lead to gradual deterioration. During periods of stress (high temperatures and drought) the trees may go through a rapid decline and die. Young trees are normally able to recover more quickly than old or middle-aged trees.
Lightning
Lightning strikes vary in their severity (Figure 11–71). A lightning bolt passing through a trunk may cause internal damage, but the tree may not develop visible symptoms until years later. Severe strikes cause loosened bark that hangs in strips, or the tree may even catch fire. If only a small amount of damage occurred, remove loose bark and damaged branches and provide excellent care (mulch, water, and fertilize) to minimize stress. Have an arborist assess the tree.
Freeze Damage
- Leaves and stems. Injuries can occur from desiccation and ice crystals.
- Desiccation: During the winter, evergreen plants continue to lose water through transpiration—particularly during periods of strong winds and on bright, sunny days. However, root absorption is reduced or prevented when the soil is cold or frozen. Desiccation occurs when water leaves the plant foliage faster than the roots can replenish it. The foliage of plants such as camellia (Camellia var.) and boxwood (Buxus spp.) may turn yellow or orange due to mild desiccation or excessive sunlight. In severe cases, the branches also become dehydrated and die. Damage is normally worse on the side of the plant facing the wind or sun or near a reflective surface (white house, concrete paving, and snow cover).
- Ice crystals: Ice crystals rupture cell walls. This damage shows up as discolored leaves and dead branch tips.
- Flowers and leaf buds. Alternating or unseasonably warm temperatures in late winter prematurely stimulate the opening of flowers or leaf buds, which might then be killed by a late freeze. Many spring flowering shrubs, including quince (Chaenomeles speciosa), forsythia (Forsythia spp.), and camellia (Camellia var.), flower over an extended period of time with only a small portion of their flowers open at one time. The open flowers may be killed, but the unopened buds normally go unharmed. If the leaf buds are killed, the plant is often delayed in resuming spring growth but eventually puts out new growth from dormant buds.
Preventing Freeze Damage
- Plant selection. Choose plants known to be winter hardy.
- Plant placement. Use hardscaping and exposure to prevent freeze damage.
- Frost-sensitive plants in sheltered locations with western or southern exposures; near block walls, rocks, and patios that collect and reflect the heat of the sun; or in full sun, which is warmer than shaded locations during the day. It is, however, night temperatures that usually cause frost damage. The worst place to plant a frost-tender plant is the south side of the landscape with no shade or protection from wind. Avoid planting tender plants in locations that are likely to experience rapid fluctuations in temperature.
- Place frost-tolerant plants that bloom early, such as some cultivars of gardenia (Gardenia spp.), azalea (Rhododendron spp.), camellia (Camellia var.), and daphne (Daphne spp.), in cold spots protected from wind and sun on the north, northeast, or east side of a building or near some other barrier to prevent a premature break of dormancy and risk flower and fruit damage.
- Fertilization. Avoid late-summer fertilization because it stimulates new growth in early fall that may not have time to harden off prior to sudden temperature drops in late fall and early winter.
- Weather. Know the average first and last frost dates for your area. Keep an eye on the weather forecast. Cool, clear nights with low humidity, often following a cold front, are signs of an impending frost.
- Water the soil prior to a freeze. Compared to dry soil, moist soil absorbs and holds four times more heat, conducts that heat to the surface faster, and radiates 5°F warmer throughout the entire night. In addition, watering reduces desiccation. Avoid antidesiccant products as they reduce transpiration for only a short period, and research has shown them to be ineffective for use over the winter.
- Protect. Shade plants from direct winter sun and wind because plants that freeze and thaw slowly suffer less damage. Protect small evergreens by both reducing the force of the wind and providing shade with windbreaks created by attaching burlap or canvas to a frame on two sides of the plant. Plants under trees are protected by the canopy, which both provides shade that delays vulnerable spring growth and traps heat radiated from the soil. Cover plants with burlap, sheets, plastic, or frost cloth. Do not allow the covering to touch the foliage. Extend the covering to the ground to trap heat radiating off the soil at night. A light bulb placed near the ground, well away from the trunk, offers additional protection, as does placing 5 gallon buckets full of water inside the covering. Remove the covering every morning to prevent overheating, which can cause premature bud break, increasing susceptibility to a late frost or even killing the plant.
- Mulch. Provide a 3-inch layer of mulch to reduce water loss and maintain uniform soil moisture and temperature around roots.
Managing Freeze Damage
Wait until new growth starts in the spring to prune winter-damaged plants. Plants and branches that look dead may still be alive. In addition, dead branches create a protected air space around the living tissue, preventing future frost damage. Also, pruning may stimulate new growth that is vulnerable to freeze damage. Spring growth may be delayed in damaged plants, and only when new growth starts will the extent of winter damage become apparent.
- Split bark. A rapid nighttime drop in temperature can freeze water within branches or the trunk of a tree, causing it to explode or split open along frost cracks (Figure 11–72). If not severe, these cracks appear to close when warm weather arrives. The wood fibers within, however, may not actually grow back together. This is commonly found on the southwest side of young shade trees where warm afternoon sun creates greater extremes in the day and night temperatures. Protect the trunk by planting evergreens on the south and southwest side of the tree, or wrap the trunk in white tree wrap for the winter.
- Snow and ice damage. The weight of accumulated snow and ice on branches can cause them to bend or break, and high winds compound the damage, resulting in misshapen plants with broken, split branches (Figure 11–73). Snow can be removed with a broom. But when branches are frozen, they are quite brittle. So always sweep upward, lifting snow off. Plants bent out of shape by snow or ice often straighten up on their own in a few days, but prune broken branches as soon as possible. Minimize damage from ice and snow by preventive pruning, including the removal of weak, narrow-angled, v-shaped crotches.
Storm Damage
Care for damaged large trees is best left to professionals. Wise decisions and prompt action are required to minimize the impact of storm damage. First decide if the tree is worth saving. Consider replacing plants that do not serve a needed function or do not have any sentimental or historical value. Also consider replacement when a plant has already been stressed or is old or had low vigor prior to the storm. A tree with severe damage to the trunk or more than 30% of the main branches should be replaced. Also consider replacing a damaged shrub or tree if other, more desirable species or varieties are available.
Repairs to damaged trees come in two stages: (1) first aid for immediate attention and (2) follow-up work to be distributed over several months or years.
Uprooted small trees. Remove any damaged roots or branches. Straighten and stake immediately because exposure to sun and wind severely damages any upturned roots and trunks.
Prune broken and split branches and eliminate breeding grounds for insects and diseases by promptly removing all debris, including broken branches and pruned limbs. Delay pruning to reshape the tree because removal of more than a fourth of the canopy in one year may result in sunscald, weak branching habits, and sucker growth.
Minimize stress by keeping the tree mulched and watered, removing suckers, and managing insect and disease problems. Gradually prune and reshape trees for balance and general appearance over a period of three to five years. When they begin to grow again, a light application of fertilizer may be helpful. But too much fertilizer applied too early can cause further damage.
Natural characteristics or plant problems?
Some characteristics of plants are often incorrectly diagnosed as a disease or plant problem. Some of the most common are listed below:
Yellow leaves or leaf drop in fall. Many narrowleaf evergreens and some broadleaf evergreens, including azaleas (Rhododendron spp.), develop yellow leaves in the fall (Figure 11–74). This is the normal shedding of the oldest leaves. The yellowing is uniform from the top to the bottom of the plant. The newest leaves or needles on the tips of branches remain green.
Bark shedding. Tree bark sheds as the tree grows. Bark shedding of some trees, including sycamore (Platanus occidentalis), maple (Acer spp.), and crape myrtle (Lagerstroemia indica), tends to be very noticeable (Figure 11–75). If the bark sheds off and exposes more bark, there is no need to be concerned. If bare wood is exposed, sunscald, lightning, or winter damage could be a serious problem.
Spring leaf drop. Some broadleaf evergreens, including holly (Ilex spp.), camellia (Camellia var.), and magnolia (Magnolia spp.), shed their oldest leaves in the spring as new growth begins. The yellowing is uniform from top to bottom of the plant, and new growth is not affected.
Gummosis. Plum and cherry trees may exude a clear to yellowish gum to seal off injuries (Figure 11–76). It may be related to pruning or mechanical injury.
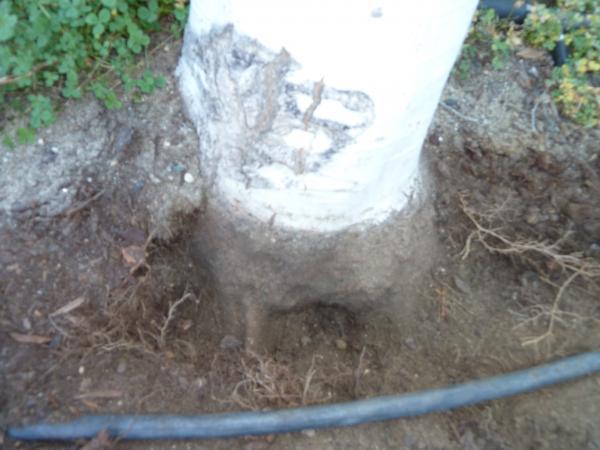
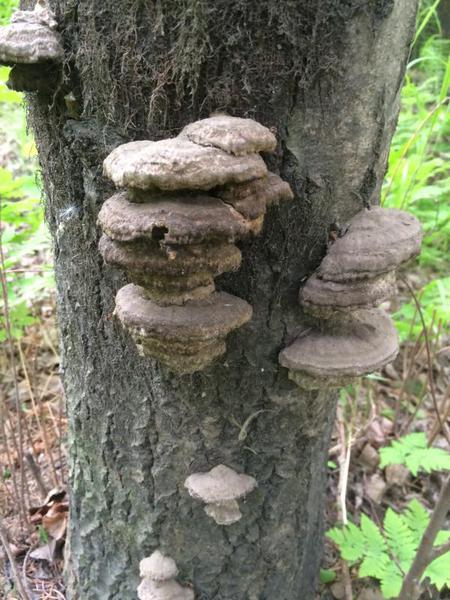
Figure 11–69. Conks are a sign that a tree has internal decay—even if the outside appears healthy.
Scot Nelson, Flickr CC0

Figure 11–70. Protect trees and large shrubs during construction. A simple barrier is not enough.
Chris Alberti CC BY 2.0

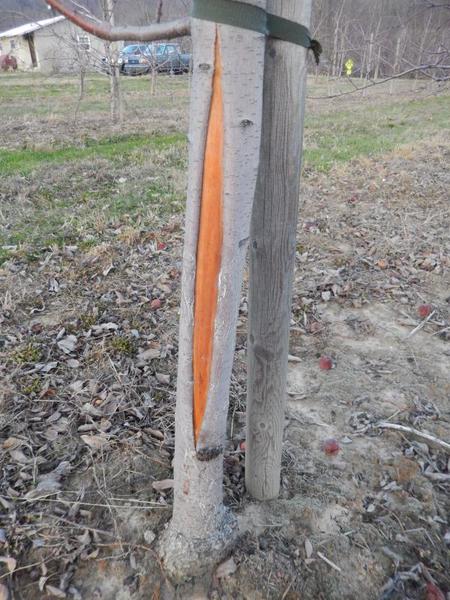
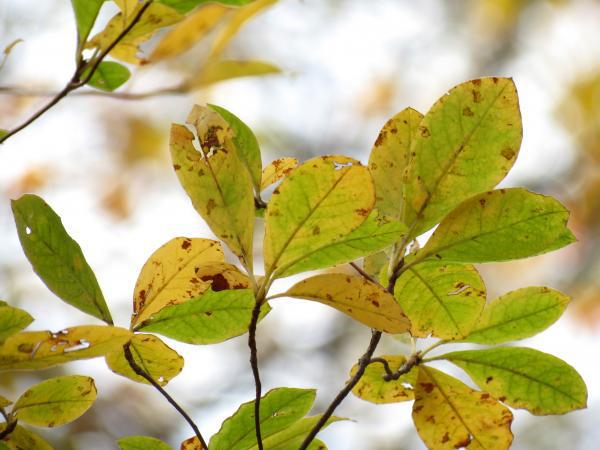
Figure 11–74. Normal yellowing of azalea (Rhododendron spp.) leaves in the fall.
Katja Schultz, Flickr CC BY 2.0
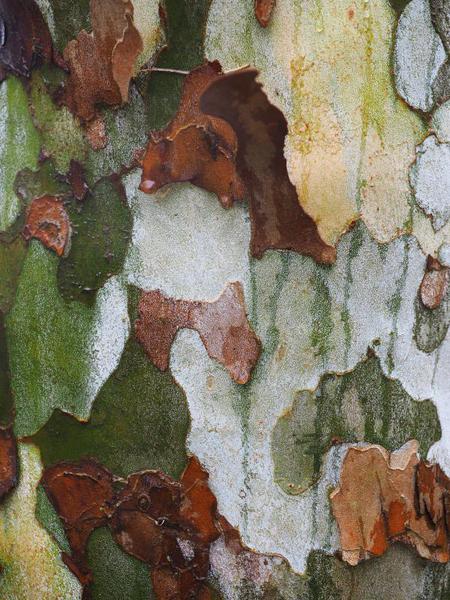
Figure 11–75. Natural shedding of sycamore (Platanus occidentalis) bark.
Judy Gallagher, Flickr CC BY 2.0
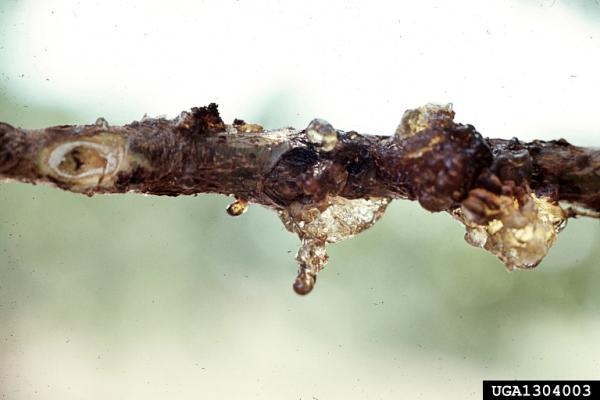
Figure 11–76. Gummosis on a peach tree is the result of injury.
Carroll E. Younce, USDA Agriculture Research Service, Bugwood, CC BY - 3.0
Case Study—Think about IPM: An Azalea Issue
Something is wrong with your azalea shrub. The branches seem to be dying back.
You review the diagnostic procedures from chapter 7, “Diagnostics,” and think about the five steps for IPM:
- Monitor and scout to determine pest type and population levels.
- Accurately identify host and pest.
- Consider economic or aesthetic injury thresholds. A threshold is the point at which action will be taken.
- Implement a treatment strategy using physical, cultural, biological, or chemical management, or a combination of these strategies.
- Evaluate success of treatments.
1. Monitor and scout to determine pest type and population levels.
You have an azalea that was planted seven years ago and has been blooming beautifully for the past three years. But this spring there were fewer blossoms, and now the leaves on half the shrub are wilted. Before sending a sample to the Plant Disease and Insect Clinic at NC State, you decide to do some sleuthing on your own (answers to questions are in italics).
2. Accurately identify the host and pest.
Step 1. Identify the plant: The shrub is a ‘Pink Ruffles’ Southern Indica azalea with large pink blossoms.
Step 2. Describe the problem: The shrub had fewer blooms this spring, and in the summer it began to look unhealthy. A few of the branches are dying back, and the leaves on those branches are dry and brown (Figure 11–77).
Step 3. Identify what is normal:
What does the healthy part of the plant look like? The unaffected branches have glossy, deep-green leaves.
What does the unhealthy part of the plant look like? The affected branches have wilted or dead leaves some of which are still attached to the stem (Figure 11–78).
Have you had a soil test? No. (For information on how to submit a soil test, see chapter 1, “Soils and Plant Nutrients.”)
Step 4. Identify cultural practices:
Age and history of plants: This shrub was purchased seven years ago from a local nursery. The first few years it did not bloom much, but then it became a beautiful shrub. This spring there were few blossoms.
Irrigation: It is watered with a hose every other week in the winter and once a week during the warmer months depending on the rain.
Fertilizer: This shrub has not been fertilized.
Maintenance: In the early summer it was pruned because the branches were getting tall. The surrounding area was weeded, and a layer of pine needle mulch was added. No pesticides or herbicides have been added.
Step 5. Identify environmental conditions:
Are there any significant water issues? There is no standing water in this area. It has been a hot, dry summer. The shrub did appear drought stressed a few times but seemed to perk up after being watered.
What is the soil like? The soil is red and seems claylike. It holds water well.
Describe the light. How many hours of sunlight does this shrub get? The shrub gets filtered shade most of the day from a large tulip tree.
What happened over the winter? Did frost damage occur? Were any melting salts used? It was a mild winter, so there was no frost damage. Salts were used on the walk and driveway twice, but that is 25 feet from this plant.
Describe any recent changes or events: Nothing has changed near this shrub recently.
Step 6. Identify signs of pathogens and pests:
On the leaves: There are no missing pieces of leaf, no spots, insect eggs, frass, or webbing. There was a small black beetle on one of the leaves, and there were a few small flies.
On the stems: There are no insects, eggs, frass, webbing, or missing chunks.
On the crown, roots and in the soil: The crown of the plant shows some dead and dying branches (Figure 11–79). There is no smell coming from the roots. There were no visible signs of any fungus, eggs, or frass. There were some ants crawling around in the soil around the plant.
Step 7. Identify symptoms:
On the leaves: The leaves on the affected branches are brown and wilted, and many are falling off.
On the stems: The healthy branches do not have splitting or peeling bark. They are white inside with green when I scratch the outer surface of a twig. The dead branches are only dead on the tips. Toward the base they have healthy foliage . At the tips of the damaged branches, when I scratch the bark, I see reddish-brown streaking in the wood (Figure 11–80). There are no holes on the stems.
On the roots: The roots appear somewhat yellow and well-hydrated, but it is difficult to tell if they are healthy.
Step 8. Identify distribution of damage in the landscape:
Are other plants in the landscape affected? This is the only azalea shrub and the other shrubs—boxwoods and hollies—do not appear to be affected. No other plants in the landscape appear to be affected.
Step 9. Identify distribution of damage on the plant and specific plant parts:
Where is the damage seen on the plant? Scattered branches on the shrub.
Step 10. Identify timing:
When did you notice this problem? The branches started dying back this July. Now in August, dieback occurs on almost half the shrub.
You hypothesize this is a disease because there were signs of disease and no signs of insects or insect damage. Because the symptoms appear on the stems affecting the leaves, you suspect this is a vascular problem. The branches die back but not to the base, and there is still live tissue on the branches. Doing the scratch test and seeing the transition zone between the dead and healthy green tissue (Figure 11–80) leads you to believe this is not a root problem. Based on the other facts gathered, the cultural practices of infrequent watering—especially in dry conditions—could have caused stress to the shrub, making it susceptible to disease. You look at a cross section of an unhealthy branch (Figure 11–81) and see a triangular dark area of dead tissue surrounded by lighter living tissue. This sharp distinction between dead and live tissue is a clue this may be a canker disease.
You search extension.org or type in “azalea+canker+edu” into a search engine to find university-based resources on the Internet. Several resources discuss a twig blight called Phomopsis sp. that causes the same reddish-brown streaking you saw on the stems. It is a common fungal problem among mature azaleas, particularly ‘Indica’ cultivars. It would be impossible to confirm this fungus without laboratory diagnosis, but you feel confident enough in your diagnosis to research the ways to manage this pathogen.
Phomopsis sp. is worse following heat or drought stress and follows a poor pruning job.
3. Consider economic or aesthetic injury thresholds.
This mature shrub is just to the left of your front door. It is a beautiful addition to the landscape, and it is important to save it.
4. Implement a treatment strategy using physical, cultural, biological, or chemical management, or combine these strategies.
Physical: Promptly prune out branches at least 6 inches below any discoloration. Be sure to use good pruning practices by always pruning back to a bud, not leaving any stubs. Practice hygienic pruning by spraying the shears with isopropyl alcohol between cuts to prevent spreading the disease. Dispose of all affected material; do not compost.
Cultural: Keep the shrub well-watered in warmer months but do not overwater. Mulch around the plants with an acidic mulch like pine needles, wood chips, or bark.
Biological: There are no recommended biological treatments at this time.
Chemical: Fungicides are not affective in treatment of Phomopsis sp.
5. Evaluate success of treatments.
Keeping records in a garden journal, or notes about the appearance of wilting branches helps to identify if your management strategies are affective. Documenting the strategies implemented and their success or failure helps you make better management decisions in the future.
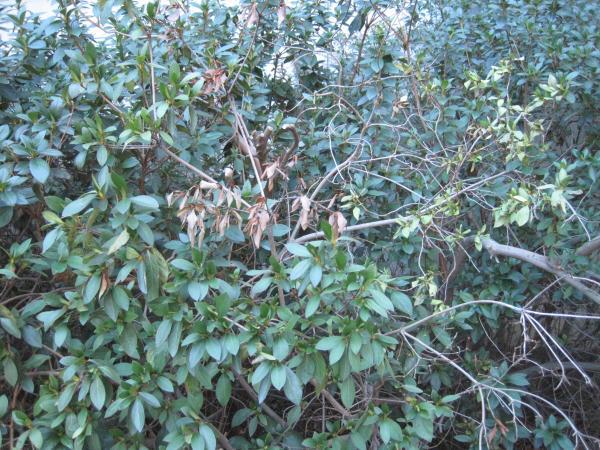
Figure 11–77. An overall view of the azalea shrub.
Plant Disease and Insect Clinic (PDIC)

Figure 11–78. A branch with dead and missing leaves.
PDIC

Figure 11–79. The crown of the plant shows some dead and dying branches.
PDIC
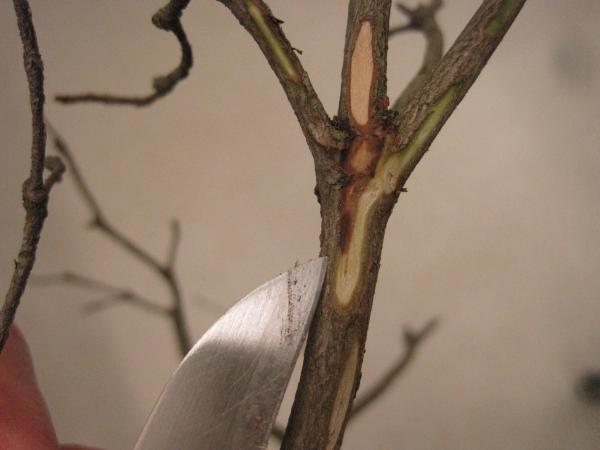
Figure 11–80. Scraping the bark of damaged branches reveals dark spots in the wood.
PDIC
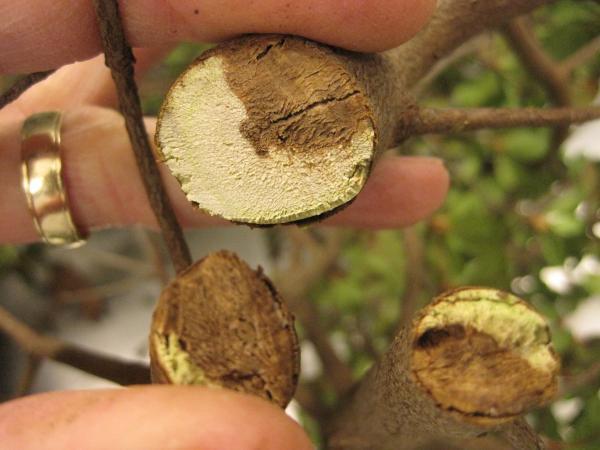
Figure 11–81. A cross-section of branches also reveals dark spots in the wood.
PDIC
Frequently Asked Questions
1. Do I need to prune my woody ornamentals, and if so, how do I do it?
Pruning is the removal of plant parts to accomplish any or all of the following goals: to train the growth habit of the plant; to maintain plant health; to improve the quality of flowers, fruits, foliage, and stems; to control growth. Pruning can also enhance the natural beauty of a plant and accentuate its features. Based on the needs of the specific plant, use the proper tools effectively at the optimal time of year to achieve the desired effect. Some plants only require pruning to remove damaged, diseased, dying, or dead branches or other plant parts, and heavy pruning may actually kill some plants. Refer to the following publications, all of which are available online.
Pruning Trees and Shrubs Series
- AG-780-01, Before the Cut
- AG-780-02, Tools to Make the Cut
- AG-780-03, General Pruning Techniques
- AG-780-04, How to Prune Specific Plants
2. Why didn’t my big leaf hydrangea bloom this year?
There are many factors that affect flowering in shrubs. Big leaf hydrangea (Hydrangea macrophylla) flower buds are particularly notorious for not forming in weather that is too cold and for dying off if there is a sudden cold snap after bud development. These hydrangeas bloom on old wood, so pruning in the fall or spring could remove all the flower buds and prevent blooming.
3. Should I use wound paint after pruning a tree or shrub?
Wound paint is not recommended and may even hinder the plant’s ability to seal off (compartmentalize) the pruning injury. A better strategy, especially on trees, is to make proper pruning cuts, either at the point of attachment or just beyond a bud, early in the life of a plant. This results in small wounds (less than 4 inches in diameter) near tissue that is capable of growing to seal off the wound naturally. This pruning, done in the first few years of a plant’s life to direct future growth, is called “training.”
4. My variegated dogwood has a branch with all green leaves. What should I do?
The branch with all green leaves has reverted back to its original form. These nonvariegated branches grow more quickly than variegated ones. Remove them immediately by cutting back to a branch union.
To learn more about common woody ornamental problems see Appendix C, "Diagnostic Tables."
Further Reading
Armitage, Allan M. Armitage's Vines and Climbers: A Gardener's Guide to the Best Vertical Plants. Portland, Oregon: Timber Press, Inc., 2010. Print.
Batdorf, Lynn R. Boxwood Handbook: A Practical Guide to Knowing and Growing Boxwood. 3rd ed. Boyce, Virginia: American Boxwood Society, 2005. Print.
Bitner, Richard L. Conifers for Gardens: An Illustrated Encyclopedia. Portland, Oregon: Timber Press, Inc., 2007. Print.
Brickell, Christopher, and David Joyce. American Horticultural Society Pruning and Training. New York: DK Publishing, 2011. Print.
Callaway, Dorothy J. The World of Magnolias. 1994. Portland, Oregon: Timber Press, Inc., 1999. Print.
Church, Glyn. Complete Hydrangeas. Cheektowaga, New York: Firefly Books Ltd., 2007. Print.
Dirr, Michael A. Dirr's Encyclopedia of Trees and Shrubs. Portland: Timber Press, Inc., 2011. Print.
Dirr, Michael A. Manual of Woody Landscape Plants: Their Identification, Ornamental Characteristics, Culture, Propagation and Uses. 6th ed. Champaign, Illinois: Stipes Publishing L.L.C., 2009. Print.
Gardiner, Jim. The Timber Press Encyclopedia of Flowering Shrubs. Portland, Oregon: Timber Press, Inc., 2011. Print.
Gregory, Peter, and J. D. Vertrees. Japanese Maples: The Complete Guide to Selection and Cultivation. 4th ed. Portland, Oregon: Timber Press, Inc., 2009. Print.
Jaynes, Richard A. Kalmia: Mountain Laurel and Related Species (Third Edition). Portland, Oregon: Timber Press, Inc., 2009. Print.
Ortho All about Roses. 2nd ed. Hoboken, New Jersey: John Wiley & Sons Inc., 2007. Print.
O'Sullivan, Penelope. The Homeowner's Complete Tree & Shrub Handbook: The Essential Guide to Choosing, Planting, and Maintaining Perfect Landscape Plants. North Adams, Massachusetts: Storey Publishing, 2007. Print.
Simeone, Vincent A. Great Flowering Landscape Shrubs. Chicago: Chicago Review Press, 2005. Print.
Simeone, Vincent A. Great Flowering Landscape Trees. Chicago: Chicago Review Press, 2007. Print.
Simeone, Vincent A. Great Landscape Evergreens. Chicago: Chicago Review Press, 2008. Print.
Toomey, Mary K., and Everett Leeds. An Illustrated Encyclopedia of Clematis. Portland, Oregon: Timber Press, Inc., 2001. Print.
Towe, L. Clarence. American Azaleas. Portland, Oregon: Timber Press, Inc., 2004. Print.
Trehane, Jennifer. Camellias: The Gardener's Encyclopedia. Portland, Oregon: Timber Press, Inc., 2007. Print.
Chapter Text Hyperlinks
NC State Extension Gardener Plant Toolbox
Air Pollution, Publication 430-022, Virginia Cooperative Extension
Qualifiers for Quagmires: Landscape Plants for Wet Sites, HIL-646
Plant Hardiness Zone Map, by USDA Agricultural Research Service
NC Irrigation Contractors’ Licensing Board
A Gardener’s Guide to Fertilizing Trees and Shrubs, AG-613
International Society of Arboriculture (ISA)
How to Hire a Tree Care Professional, AG-691
NC State University Plant Disease and Insect Clinic
Azalea Diseases in the Landscape, ODIN-16
Pruning Trees & Shrubs, Before the Cut, AG-780-01
Pruning Trees & Shrubs, Tools to Make the Cut, AG-780-02
Pruning Trees & Shrubs, General Pruning Techniques, AG-780-03
Pruning Trees & Shrubs, How to Prune Specific Plants, AG-780-04
For More Information
NC State Resources
- Fertilizing Trees and Shrubs, AG-613
- How to Hire a Tree Care Professional, AG-691
- Insects and Related Pests of Shrubs, AG-189
- Pruning Trees & Shrubs, Before the Cut, AG-780-01
- Pruning Trees & Shrubs, Tools to Make the Cut, AG-780-02
- Pruning Trees & Shrubs, General Pruning Techniques, AG-780-03
- Pruning Trees & Shrubs, How to Prune Specific Plants, AG-780-04
- Qualifiers for Quagmires: Landscape Plants for Wet Sites, HIL-646
- Tree Fertilizing 6 video series
- Tree Planting 7 video Series
- Tree Pruning 8 video series
- Tree Species Plant Profiles
- Who is Responsible for the Trees? A Citizen Guide to Trees in the Community, AG-696
- Woody Ornamentals Diagnostic Tables
More NC State Resources
Other Resources
- Arbor Day Foundation
- International Society of Arboriculture (ISA)
- Trees resistant to Air Pollution, 430-022, Virginia Cooperative Extension
- Woody Ornamentals for Cut Flower Growers, by ATTRA
Videos
- Pruning Woody Ornamentals, by Oklahoma Gardening (6:17 minutes)
Contributors
Authors:
Lucy Bradley, Associate Professor and Extension Specialist, Urban Horticulture, NC State University; Director, NC State Extension Master Gardener program
Barbara Fair, Assistant Professor, Department of Horticultural Science
Contributions by Extension Agents: Tim Mathews, Matt Jones, Danelle Cutting, Katy Shook, Paul McKenzie, Allison Arnold, Deborah Dillion
Contributions by Extension Master Gardener Volunteers: Barbara Goodman, Margaret Genkins, Kristen Monahan, Chris Alberti, Linda Alford, Jackie Weedon, Karen Damari, Connie Schultz, Bethany Sinott, Kim Curlee, Edna Burger, Caro Dosé
Content Editor: Kathleen Moore, Urban Horticulturalist
Copy Editor: Barbara Scott
Based in part on text from the 1998 Extension Master Gardener manual prepared by:
Erv Evans, Extension Associate, Department of Horticultural Science
How to cite this chapter:
Bradley, L., and B. Fair. 2022. Woody Ornamentals, Chapter 11. In: K.A. Moore, and. L.K. Bradley (eds). North Carolina Extension Gardener Handbook, 2nd ed. NC State Extension, Raleigh, NC. <http://content.ces.ncsu.edu/11-woody-ornamentals>
Publication date: Feb. 1, 2022
AG-831
Other Publications in North Carolina Extension Gardener Handbook
- 1. Soils & Plant Nutrients
- 2. Composting
- 3. Botany
- 4. Insects
- 5. Diseases and Disorders
- 6. Weeds
- 7. Diagnostics
- 8. Integrated Pest Management (IPM)
- 9. Lawns
- 10. Herbaceous Ornamentals
- 11. Woody Ornamentals
- 12. Native Plants
- 13. Propagation
- 14. Small Fruits
- 15. Tree Fruit and Nuts
- 16. Vegetable Gardening
- 17. Organic Gardening
- 18. Plants Grown in Containers
- 19. Landscape Design
- 20. Wildlife
- 21. Youth, Community, and Therapeutic Gardening
- Appendix A. Garden Journaling
- Appendix B. Pesticides and Pesticide Safety
- Appendix C. Diagnostic Tables
- Appendix D. Garden Tools
- Appendix E. Season Extenders and Greenhouses
- Appendix F. History of Landscape Design
- Appendix G. Permaculture Design
- Appendix H. Community Gardening Resources
- Appendix I. More NC State Resources
- Glossary
N.C. Cooperative Extension prohibits discrimination and harassment regardless of age, color, disability, family and marital status, gender identity, national origin, political beliefs, race, religion, sex (including pregnancy), sexual orientation and veteran status.