
Outline
Garden Design and Implementation
Maintenance of Annuals and Perennials
Summer-flowering and fall-flowering bulbs
Insects and Diseases of Herbaceous Ornamentals
Objectives
This chapter teaches people how to:
- Identify why annuals are a better choice in some situations than perennials and vice versa.
- Select appropriate herbaceous plants from garden centers.
- Perform seasonal maintenance requirements for herbaceous plants.
- Incorporate herbaceous plants into a landscape design.
- Recognize and manage the most common problems with herbaceous plants.
Introduction
Herbaceous ornamentals are plants that have flexible stems and die back to the ground each year. Unlike woody ornamentals, they do not develop persistent woody tissue that lasts through the winter and develop new buds in the spring. Herbaceous ornamentals are divided into annuals, biennials, or perennials based on their life cycles. Annuals die after a growing season. They are sensitive to temperatures that are either too hot or too cold. With biennial and perennial plants, the stems die back, but the crown of each plant survives to produce new growth the following season (Figure 10–1). These life cycles can be influenced by geography. In the cooler mountain region of the state, a plant may grow as an annual. But in the coastal region, it may grow as a perennial.
Herbaceous ornamentals provide interest and contrast that make a landscape lively and interesting (Figure 10–2). These plants also add depth, dimension, form, and texture to the landscape. Their flowers are often the stars of the garden, providing enchanting colors and fragrances. This chapter provides information on how to select, install, and maintain herbaceous ornamentals, and how to address common problems associated with these plants.
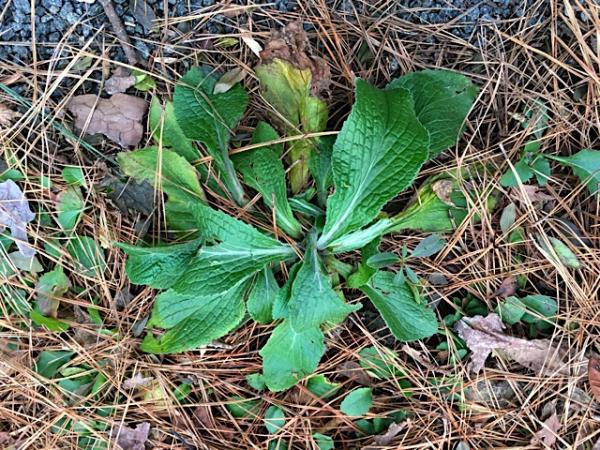
Figure 10–1. This biennial foxglove dies back to a rosette of leaves at the crown. The crown is the transition between the leaves and the root and can be found at or just below ground level.
Barbara Goodman CC BY 2.0
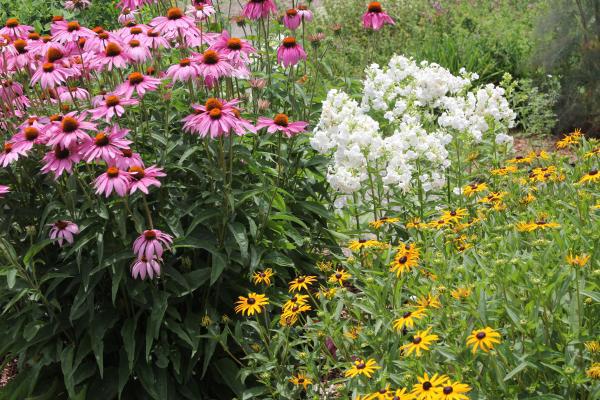
Figure 10–2. A perennial bed.
NC. Hort, Flickr
Annuals
Annuals are plants that are transplanted or direct-seeded each year because once they bloom and set seed, they die. Annuals bloom more quickly and for a longer period than any other group of plants. They are versatile, easy to grow, and relatively inexpensive. They offer the gardener a chance to experiment with color, height, texture, and form. Annuals provide a massive display of color when used in beds, planters, window boxes, and hanging baskets, or they can be used to fill in spaces where a perennial has died or where spring-flowering bulbs have died back (Figure 10–3). Plant breeders have produced many new and improved cultivars that have a more compact form, produce more flowers, tolerate more sun or shade, or are resistant to insect and disease damage.
As with all plants, it is important to place annuals where there is adequate sun or shade and space for growth. Small plants purchased in 4-inch pots may grow to fill a space 2-feet-square by the end of the growing season.
Annuals that perform well can be found online in the North Carolina Extension Gardener Plant Toolbox.
Some plants like alyssum (Lobularia maritima), ageratum (Ageratum houstonianum), cleome (Cleome houtteana), impatiens (Impatiens walleriana), melampodium (Melampodium divaricatum), nasturtium (Tropaeolum majus), petunia (Petunia × hybrida), and vinca (Catharanthus roseus) naturally reseed themselves. The ability to reseed varies with the cultivar and the severity of the winter. Reseeding is not always desirable. Volunteer plants are often scattered or located in a clump instead of growing in their designated spot. Some hybrid varieties are developed to be sterile and do not reseed, or their seedlings do not have the same flower quality as their parents.
Types of Annuals
Annuals are sometimes categorized as cool-season or warm-season. Cool-season annuals, such as geraniums (Pelargonium × hybridum), petunias (Petunia × hybrida), and snapdragons (Antirrhinum majus), grow best when the temperatures are in the 70s°F and 80s°F during the day. The best flower production is in the spring and fall, while flower production declines in the middle of a hot summer. Warm-season annuals, such as cosmos (Cosmos spp.,) four-o'clocks (Mirabilis jalapa), and pentas (Pentas lanceolata), perform well when the daytime temperatures are in the 80s°F and 90s°F and the nighttime temperatures are in the 60s°F and 70s°F.
Annual flowers differ in their tolerance to cold weather and frost. Hardy annuals are the most cold-tolerant. They tolerate light frost and some freezing weather without being killed. In most cases, hardy annuals are planted in the fall or in the spring before the last frost date. Hardy annuals include calendula (Calendula officinalis), cornflower (Centaurea cyanus), foxglove (Digitalis purpurea), larkspur (Delphinium spp.), pansy (Viola × wittrockiana), sweet alyssum (Lobularia maritima), stock (Matthiola incana), viola (Viola cornuta, V. tricolor), and many Dianthus cultivars. Most hardy annuals are not heat-tolerant and usually decline and die with the onset of hot summer temperatures.
Half-hardy annuals tolerate periods of cold damp weather but are damaged by frost. Most half-hardy annuals are seeded outdoors in early spring because they do not require warm soil temperatures to germinate. Seeds or plants are normally planted after the last spring frost. Examples of half-hardy annuals include baby's breath (Gypsophila elegans), bells of Ireland (Moluccella laevis), blue sage (Salvia uliginosa), candytuft (Iberis amara, I. umbellata), cleome (Cleome houtteana), forget-me-nots (Myosotis sylvatica), love-in-a-mist (Nigella damascena), snow-on-the-mountain (Euphorbia marginata), strawflower (Xerochrysum bracteatum), and torenia (Torenia fournieri). Many half-hardy annuals decline in the midsummer heat but may re-bloom in late summer or fall.
Tender annuals are native to warm tropical regions of the world. They are sensitive to fall temperature drops and cold soil temperatures and are easily damaged by frost. Plant tender annuals after the threat of frost is past. Tender annuals include ageratum (Ageratum houstonianum), balsam (Impatiens balsamina), begonia (Begonia semperflorens), celosia (Celosia argentea var. plumosa), coleus (Coleus ×hybridus), colocasia (Colocasia spp.), globe amaranth (Gomphrena globosa), impatiens (Impatiens walleriana), marigold (Calendula officinalis), morning glory (Ipomoea purpurea), nasturtium (Tropaeolum majus), nicotiana (Nicotiana alata), petunia (Petunia × hybrida), purple heart (Tradescantia pallida 'Purple Heart'), Persian shield (Strobilanthes auriculata var. dyeriana), scarlet sage (Salvia splendens), moss verbena (Verbena aristigera), vinca (periwinkle) (Catharanthus roseus), and zinnia (Zinnia angustifolia, Z. elegans).
Winter-flowering annuals, such as pansies (Viola × wittrockiana), violas (Viola cornuta), and flowering cabbage, are planted in the fall, flower in the winter and early spring, and die during the summer.
Some flowers that might otherwise be classified as perennial, such as begonias (Begonia spp.) and snapdragons (Antirrhinum majus), are classified with annuals because they do not consistently survive the winter in a specific location.
Biennials
The life cycle of biennial plants is completed over two growing seasons. During the first season they produce only leaves, usually in a rosette. Following a winter cold period, they flower in the second growing season, produce seeds, and then die. Popular biennials include foxglove (Digitalis purpurea), hollyhock (Alcea rosa), stock (Matthiola incana), and sweet William (Dianthus barbatus). Cultural practices are basically the same as for annuals, except that the plants are alive for two growing seasons and produce no flowers the first season.
If biennial seeds are sown in midsummer, however, the plants develop during the summer and fall. After exposure to the winter cold, they develop flowers in the spring.
New cultivars of plants traditionally referred to as biennials are being developed that produce flowers the first season. ‘Foxy’ is a cultivar of foxglove (Digitalis purpurea) that blooms the first year. Annual cultivars of sweet William (Dianthus barbatus) and hollyhock (Alcea rosea) are also available.
Perennials
Many perennials flower for only a few weeks each year. But with careful planning, a gardener can grow perennials that produce a succession of flowers for most of the season. As one type of perennial finishes, another begins to bloom.
Although trees, shrubs, vines, and many ground covers are perennials, gardeners usually use the term to refer to herbaceous perennial flowering plants. Most herbaceous perennials grow and flower for several years, although some perennials survive for only three or four years. In the fall, the tops of herbaceous perennials (leaves, stems, and flowers) die down to the ground, while the root system persists through the winter. In the spring the plant grows a new top from its crown or roots. Plants that grow from bulbs and bulblike structures (corms, tubers, rhizomes) are also herbaceous perennials, but are often classified separately as flowering bulbs.
Perennial classifications are based on hardiness. Hardy perennials normally survive the winter with little or no protection. Tender or half-hardy perennials can survive a mild winter, but may not survive a severe winter without protection. In colder climates, tender perennials are often grown as annuals, including snapdragons (Antirrhinum majus) and four-o'clocks (Mirabilis jalapa). Microclimates and soil drainage are factors in determining how hardy and long-lived a perennial is at any particular site.
Perennials have some advantages over annuals:
- There is a wider diversity of perennials to choose from, which allows for more colors, textures, and fragrances.
- It is easier to find a perennial that thrives under differing sun exposures, soil types, and moisture levels. If annuals cannot grow in a particular location, a perennial is often a good option.
- Perennials survive for several years without replanting.
- They grow quickly, reaching their mature size in just a few years.
- They often divide easily for spreading around the landscape or to share with friends, thereby reducing a garden’s overall cost.
Is It an Annual, a Biennial, or a Perennial?
Local climatic conditions, development of new cultivars, and new uses for specific garden flowers have blurred the distinctions among annuals, biennials, and perennials. Annuals have traditionally been referred to as plants that complete their life cycle in one growing season. Some perennials that bloom quickly, such as moss verbena (Verbena tenuisecta) and Jerusalem cherry (Solanum pseudocapsicum), are grown as annuals and discarded at the end of one season. Some of our so-called annuals, including begonias (Begonia spp.), impatiens (Impatiens spp.), and snapdragons (Antirrhinum majus), are actually perennials in warmer climates or mild winters as found in the NC coastal plain.
Garden Design and Implementation
Site Selection
A successful and beautiful herbaceous ornamental garden takes planning by the gardener before the first seed or plant hits the soil. Finding an appropriate site and finding the types of plants that thrive in that site are the first steps. Consider the amount of sunlight, microclimate temperature, competition from tree roots, soil drainage, and aeration.
Herbaceous ornamentals are showy, so place them where they can be seen and enjoyed. Will you look out from inside the home at these plants, or do you wish them to welcome visitors to your home? If the plants are fragrant, consider a location where you linger, such as near a patio or front porch. Herbaceous ornamentals are very flexible and can be planted in the ground, in raised beds, and in containers, including hanging baskets.
Will this garden area be brand new, or is this an older planting bed that needs some renovation? Are there woody plants in the area to consider?
These factors affect site selection:
- Sunlight. Examine the type of light available, from full sun to partial sun, and heavy shade. How many hours a day is the site in full sun? When evaluating light exposure, note the duration and intensity of sunlight the site receives. Four hours of full sun during the morning is very different from 4 hours of stronger, more intense afternoon sun. There are also many types of shade, and the amount of light in a shaded location varies with the type, number, and size of trees in the area. If the site receives more than 3 hours of unfiltered midday sun, treat it as a "full sun" site. "Partial shade" is defined as receiving unfiltered morning sun but shade during the afternoon hours, or moderate shading throughout the entire day. A "heavily shaded" site would receive very little direct midday light and less than 60% of the sun's intensity during the remainder of the day. Few flowering plants do well in deep shade. Introducing more light to a shaded location can greatly increase flower production. Removing some tree limbs can allow more light to reach the ground below. Plants preferring partial shade may tolerate more sunlight if temperatures are moderate and adequate water is provided.
- Water. Annuals and perennials need about an inch of water per week during the growing season. If summers are particularly hot, plants may need more water. Deep infrequent irrigations are better than light, frequent watering. Locating the plantings near a water source makes it easier to water the beds. A soaker hose, drip irrigation system, or careful hose watering at the base of the plants helps to keep the foliage dry and to avoid disease problems. If overhead watering is unavoidable, water in the morning so the foliage has time to dry before nightfall.
- Slope angle and exposure. The steeper the angle of the slope is, the greater the runoff and potential for erosion. Plants on slopes need to be watered more frequently. North- and east-facing slopes are cooler than south- or west-facing slopes.
- Temperature. Very few plants look attractive and flower profusely from early spring through late fall. Cool-season flowers such as dianthus (Dianthus sp.), pansies (Viola ×wittrockiana), and snapdragons (Antirrhinum majus) grow best when the temperatures are mild; they slow or stop flowering when exposed to high summer temperatures. It is possible to extend the flowering season of cool-season annuals by placing them in a protected location, shaded from direct sunlight from about noon to 4 p.m. Plants adjacent to a paved surface or brick wall experience warmer temperatures, and their flowering period is shortened. Choose heat-loving plants such as gaillardia (Gaillardia pulchella), portulaca (Portulaca grandiflora), and ,moss verbena (Verbena tenuisecta), for locations next to walls, driveways, or other locations with reflected heat. On the contrary, planting these heat-loving plants on the north side of the house in light shade delays and reduces their flower production.
- Weeds. Select a site without a severe weed problem. Avoid sites with hard-to-control weeds such as bermudagrass and nutsedge. A site that has been cultivated for several years probably has fewer weeds. Manage weeds prior to planting. Read more about weed management in chapter 6, “Weeds.”
- Soil type. The soil type, whether sand, silt, or clay, affects moisture and drainage of the planting site. Soil pH requirements vary among annuals and perennials, but most prefer a pH between 5.5 and 6.5. Conduct a soil test and review chapter 1, “Soils and Plant Nutrients.” Apply lime to the soil prior to installing plants that need a higher pH. Soil improvement for perennial beds is similar to that for annuals. Fall is the best time to incorporate organic matter, but any time is better than not using organic matter at all. Add a 3-inch to 4-inch layer of pine bark mulch on top of the soil before planting. If the soil is not suitable, consider creating raised beds and importing soil.
- Soil moisture. Many perennials need well-drained soil. Although many plants tolerate a wet site for a short period of time, most are killed by extended periods of wet feet. So do not locate a perennial border in a low-lying area that is subject to standing water. Examine the site’s interrelated factors of drainage, moisture retention, and soil aeration. Frequent heavy rains in combination with poorly drained soils cause excessive soil moisture and limited air space in the soil, thus reducing plant growth and increasing the chances of root-rot problems. One way to check for adequate drainage is to dig a hole 10 inches deep and fill it with water. After it drains, refill it with water. If the water drains in 8 to 10 hours, the site has adequate drainage for most herbaceous plants. If the water drains in an hour or less, add organic matter to slow percolation. If the water takes longer than ten hours subsoil compaction or the presence of a hardpan beneath the bed may be to blame. Deep tillage of the beds is sometimes needed to break up the subsoil and increase the drainage rate.
Garden Design
Select plants for a specific purpose—such as edging, accents for evergreens, masses of color, or rock garden specimens—so that each plant’s characteristics match the site and your objectives. Observe flowering times to find plants that flower together and plants that are showy when little else is in bloom. To obtain details on particular plants or groups of plants, consult plant societies, specialty books, nurseries that specialize in herbaceous perennials, and local botanical gardens. Information about recommended perennials is also on the North Carolina Extension Gardener Plant Toolbox website.
Identify the roles the plants will play in the garden. This is especially important with perennials because they grow in the same location for several years. Add plants that provide contrast in height, form, and texture. Keep color combinations in mind when designing a bed or border. In general, it is best to plant in groups or drifts rather than using single plants. Groups or drifts are normally repeated several times throughout the landscape to provide unity. Read more about designing planting beds in chapter 19, “Landscape Design.”
Designing a garden with plants that exhibit many different colors requires some coordination. Consider the color of the house and any other fixed structures, such as fences or utility buildings. Using pink flowers against a brick house with orange tones would not produce a pleasant combination. Try to use masses of a single color instead of mixing colors in a flower bed (Figure 10–4). A mass planting of a single color or planting in bands of colors produces a stronger impact.
Consider location and how the flowers will be viewed. Bright colors stand out and appear closer, while dark colors appear farther away and tend to fade into the background. For example, a bed of red flowers is easily seen from a distance, but blue and purple flowers are best enjoyed up close (Figure 10–5). Bright colors draw attention to an area, so do not use red and yellow flowers near an eyesore or unattractive area. White is the last color to fade from sight as darkness falls and thus is good for areas used at night.
Colors that look good together are said to be in harmony. There are four basic color schemes to choose from: complementary, monochromatic, analogous, and triadic. Colors opposite on the color wheel (Figure 10–6) are complementary and look good when used together. Examples include red and green, yellow and violet, orange and blue. Monochromatic color schemes use lighter and darker shades of a single color. For an analogous harmony, use any three colors next to each other on the color wheel; for example, orange, yellow-orange, and yellow. A triadic harmony is achieved by combining three colors that are equal distances apart—for example, yellow, red, and blue. Read more about harmony in chapter 19, “Landscape Design.”
Colors also affect how people feel. Colors on the right-hand side of the color wheel are considered warm colors (yellow to red); colors on the left side are considered cool colors (green to violet). Planting warm-colored flowers around a deck or patio make it seem warmer. Red tends to excite people. Research has also shown that food tastes better around red colors. Pink is perceived as being sweet and fragrant. Yellow is associated with liveliness and exuberance. White gives the feeling of neatness, cleanliness, and orderliness. Green helps eyes to recover quickly from strain. Blue is perceived as cool and calming. Gray is said to promote creativity.
Preparing the Soil
Good soil is the foundation of healthy plants. Study “Soils and Plant Nutrients,” chapter 1, in this manual to learn how to test soil for deficiencies and how to properly amend it for greatest success.
Plant Selection
Herbaceous ornamental plants and seeds are available from a wide variety of sources. If possible, buy named cultivars selected for their known characteristics of disease resistance, heat and cold tolerance, growth habit, and color. Garden centers provide plants in a variety of container sizes. These plants are often in flower when they are offered for sale, which allows selection of the desired colors and often gives an instant color effect in the garden. Although it is possible to transplant perennials in flower, it is much better to transplant prior to flowering.
Landscaping with Perennials
Traditionally, perennials were planted in formal gardens in large beds or borders 6-feet to 12-feet wide. Perennials are used in a wide variety of ways—in island beds, rock gardens, woodland plantings, or even in bog gardens.
Ideally a perennial border includes a background, such as a wall or hedge, against which perennials stand out while in flower (Figure 10–7). In island beds, perennials can provide their own background if the tallest plants are planted in the center and low-growing plants are located toward the edges. In designing long borders or beds, group plants according to their height. Verify bloom times to have plants blooming at different times of the year. Do not forget that perennials with colorful or interesting foliage provide interest even when the plants are not in flower (Figure 10–8). Combine annuals with perennials to fill in bloom-time gaps and produce a continuous colorful show. Figure 10–9 shows an example of how to design a bed using height and bloom time to provide year-round interest. Figures 10–10 and 10–11 illustrate designs for sun and shade respectively. Learn more about “Landscape Design” in chapter 19.
Plants sold in cell packs are less expensive than plants grown in larger containers, and their roots usually grow into the surrounding soil more quickly. Select plants that are compact and have normal color. Plants in cell packs dry out quickly, so keep them moist until they are planted.
Discount chain stores and grocery stores often sell plants in cardboard boxes, tubes, or plastic bags. These plants were dormant when shipped but may have started growth while on display. If purchased soon after the plants arrive at the merchant, such plants often grow satisfactorily. But they seldom do well if they have dried out or have produced new stems and leaves that are thin, yellow, or pale-green. If only a small amount of new growth has occurred, these plants may grow satisfactorily but should be hardened off before planting outdoors (Figure 10–12).
Mail-order companies offer a wider selection of plants than most local nurseries. While most mail-order companies are reputable, a few are misleading in their claims and specialize in offering small, lower-grade plants. Most mail-order companies guarantee their plants and offer to replace those that arrive in poor condition or fail to grow properly. Most companies ship plants bare root or in small containers. Shipping dates vary with each company’s location. Northern nurseries often ship only in the spring. When the plants arrive, check to see that they are moist.
Importing Soil
Sometimes it is necessary to import soil to fill a raised bed, but there are several potential problems. Consider using imported soil only as a last resort. Imported soil is often harvested from subsoil sources rather than top soil. Subsoil is not ideal for plant growth as it does not contain adequate supplies of organic matter or nutrients. Imported soils may contain insect pests, soilborne diseases, organisms such as nematodes, or weed seeds. Pollutants, including toxic metals such as lead, are other potential contaminants. It is challenging to obtain accurate historical information on imported soils, making it difficult to evaluate potential problems. Often, improving the existing soil through composting, mulching, and fertilizers is a better option.
Figure 10–10 shows an example of a perennial bed designed for full sun and contains the following plants:
| Number | Common Name | Latin Name |
|---|---|---|
| 1. | Elderberry | Sambucus canadensis |
| 2. | Weigela | Weigela florida |
| 3. | Milkweed | Asclepias tuberosa |
| 4. | Coral bells | Heuchera ‘Palace Purple’ |
| 5. | Black-eyed Susan | Rudbeckia fulgida |
| 6. | Ox eye | Heliopsis helianthoides |
| 7. | Sneezeweed | Helenium autumnale |
| 8. | Calico aster | Symphyotrichum lateriflorum |
| 9. | Cranesbill | Geranium maculatum |
| 10. | Mealy cup sage | Salvia farinacea |
| 11. | Tulips 40 bulbs | Tulipa hybrids |
| 12. | Monkshood | Aconitum spp. |
| 13. | Delphinium | Delphinium spp. |
Figure 10–11 is a bed designed for shade from existing evergreen trees and contains the following plants:
| Number | Common Name | Latin Name |
|---|---|---|
| 1. | Existing long-leaf pines | |
| 2. | Dwarf rhododendron | Rhododendron minus |
| 3. | Wild columbine | Aquilegia canadensis |
| 4. | Lenten rose | Helleborus orientalis |
| 5. | Hosta | Hosta 'Blue Mammoth' |
| 6. | Hosta | Hosta 'Francee' |
| 7. | Lady's mantle | Alchemilla mollis |
| 8. | Bugle weed | Ajuga reptans |
Starting From Seeds
Start herbaceous ornamentals indoors from seeds or sow them directly in the garden.
Indoor Sowing
Start seeds eight to 10 weeks before the last spring frost. Harden off seedlings by exposing them to outside conditions before planting in their intended site. Read more about starting plants from seeds in chapter 13, “Propagation.”
Direct Sowing
Wait two to three weeks after the last spring frost before sowing. If sowed directly in the garden when soil temperatures are below 60°F, most seeds do not germinate well or can rot.
Annuals seeded in the garden sometimes fail to germinate properly because the soil surface crusts and prevents water entry. One way to overcome this is to make a furrow in the soil about ½-inch deep and fill it with vermiculite (if the soil is dry, water the furrow before filling with vermiculite). Then sow the seed at the rate recommended on the package. Cover the seeds with vermiculite, and use a nozzle adjusted to a fine mist to water the seeded area thoroughly. Keep the seedbed well-watered, or cover with mulch such as newspaper to prevent excessive evaporation. Remove the mulch promptly after germination begins so young seedlings receive adequate sunlight.
All-America Selections
Plant breeders are constantly developing new and improved cultivars of bedding plants. Some of the outstanding new cultivars are designated as All-America Selections Winners. The All-America Selections is an industry-sponsored organization composed of a council of judges and over 50 official test gardens across the country.
NC State University has a test garden at the J. C. Raulston Arboretum (JCRA) in Raleigh. April is the best time to see winter annuals; July and August are the best months for summer annuals. Trial reports summarizing the results of bedding plant and perennial research conducted are posted on the JCRA website.
Seeds that are particularly susceptible to damping-off fungal disease, such as sweet alyssum (Lobularia maritima), should be sown in hills. Zinnias (Zinnia elegans) are another exception to the traditional planting recommendations. In many cultivars of zinnias, some flowers may appear with a large, nearly naked corolla and few colorful petals. This phenomenon is sometimes referred to as "Mexican hats." To eliminate undesirable plants without leaving holes in the garden bed, sow two or three seeds at each location, wait until the plants start flowering, and then remove plants with undesirable characteristics. Thin the remaining plants to the recommended 8-inch to 12-inch spacing.
When most outdoor-seeded annuals develop their first pair of true leaves, it is time to thin seedlings to the recommended spacing. Transplant the excess seedlings to another spot. Many perennials are hybrids that do not grow true to type when propagated from saved seed; off-types of color, flower form, and plant habit are common. Although some perennial seeds can be sown directly in the beds where they are to flower, it is usually best to start plants indoors or in a cold frame and set them out in beds after the weather warms. An alternative to spring seeding is to sow seeds in flats or seedling beds during the summer for fall transplanting.
Working With Transplants
Transplants produce a display of flowers several weeks earlier than direct-seeded plants. This is especially true for annuals such as scarlet sage (Salvia splendens) and common lantana (Lantana camara), which germinate slowly or need several months to bloom from seeds.
Annual flowers are available at a variety of retail businesses in the spring. Buy only healthy plants, free of insects and diseases. Retailers often purchase flowering plants or bedding plants from a wholesale grower instead of growing the plants themselves. While the quality of these plants is often excellent when they first arrive, some retailers are not plant experts, nor are they equipped to properly care for plants. Do not purchase plants that have not been watered properly or that have been stored under stressful conditions (as on hot, paved surfaces) for extended periods. Ask when the plants arrived or if a new shipment is expected soon. Freshly stocked plants are preferable to plants held for several weeks. Choose plants with compact foliage, side branches, and good color. It is tempting to select the plants that are in bloom, but younger, nonflowering plants are often better choices because they establish in the landscape more quickly.
Bare root plants are normally transplanted in early spring. In theory, container-grown plants can be transplanted any time of the year. But in reality, plants set out during hot, dry weather, or the cold of winter, require more pampering to survive. Container-grown perennials that flower in late summer or fall are normally planted in the spring, while spring-flowering perennials are planted in late summer or early fall. Regardless of the time of planting, allow perennials sufficient time to establish before flowering or before the onset of cold or hot, dry weather. Many gardeners prefer fall planting because the plants develop an extensive root system before new foliage growth occurs. The ideal weather for transplanting is cool and overcast. Wait until the proper planting time to purchase plants even though transplants are often available sooner. Do not plant tender annuals before the danger of frost has passed. Do not plant hardy annuals, such as pansies, until the soil has cooled because planting too early can result in heat damage and disease in the fall. Likewise, setting out transplants too early in spring, before the soil has warmed, results in cold damage. Do not set out new plants immediately after purchase. Give them time to acclimate by keeping plants outdoors for a few days in a partially shaded location. Check them daily and water as needed. Because the soil volume is limited in small containers, roots dry out quickly. Although plants may appear to recover fully, wilting stunts their potential growth.
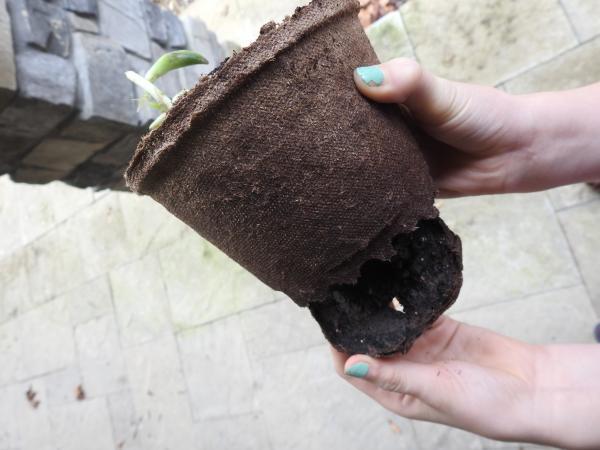
Soak bare root plants in water for about a half hour before planting. Water container-grown plants before removing them from their pots. A damp root ball is less likely to fall apart. Do not pull plants from their containers. Remove plants from individual containers by tipping each container and tapping the bottom. To remove plants from cell packs, turn the pack upside down and squeeze the bottom of each cell to force the root ball out of the pack (Figure 10–13). If the plants are in fiber pots, remove the fiber from the outside of the root mass. When setting out plants in peat pots, remove the upper edges of the pot so that the lip of the peat pot is not exposed above the soil level—where it acts as a wick and pulls water away from the plant (Figure 10–14). Remove the bottom of the peat pot to encourage better rooting and drainage (Figure 10–15).
Review the information provided when plants are purchased, or check references such as the North Carolina Extension Gardener Plant Toolbox to determine optimum spacing between plants. Crowding plants increases the likelihood of disease and insect problems. Plant tall, upright plants such as snapdragons about one-fourth as far apart as their mature height. Space tall, bushy plants about one-half as far apart as their mature height and rounded, bushy annuals about as far apart as their mature height. To make beds look more uniform, use staggered spacing instead of setting plants in straight rows.
Once the soil in a planting bed is amended, water it until it is slightly damp. Dig a hole for each plant as deep as the root ball and at least twice as wide. Prior to planting, drench the soil around the planting hole with a liquid fertilizer (16-12-10 or 20-20-20 mixed 1 tablespoon per gallon of water) to stimulate root growth.
Turn the pot upside down and slide the root ball out. Roots may have difficulty growing into the surrounding soil unless the roots and soil mixture are cut or loosened. Loosen the roots around the bottom and sides of the root ball and spread them out. Fill the hole and firm the soil lightly around the plant, making sure the crown is at the soil line. This is sometimes difficult to determine for dormant bare root plants. Set the plants at the same depth or just slightly higher than they were growing in the container. When filling the hole, firm the soil lightly. If plants must be transplanted during hot or windy periods, provide some shading after planting.
After planting, apply a 2-inch to 3-inch layer of mulch, such as pine bark nuggets or pine straw. Because most perennials grow from the crown, do not cover the crown. Mulches help keep the soil surface from crusting, reduce soil temperature, conserve moisture, and prevent weed seed germination. When organic mulches break down, they add humus to the soil. Avoid using pine straw around pansies (Viola × wittrockiana) and violas (Viola cornuta) as it can reduce their growth and flowering. Pine straw has also caused problems with other bedding plants.
Monitor transplants frequently, and prevent moisture stress until new roots have had time to grow into the surrounding soil. Remember that the root mass is initially only as large as the original container, so apply irrigation water toward the base of the plant until it becomes established.
Figure 10–4. A mass planting of milkweed (Asclepias tuberosa) makes a visual impact and also supports wildlife. Blanket flower (Gaillardia pulchella) is seen in the foreground.
Mark Levisay, Flickr CC BY 2.0
Figure 10–5. Blue or purple flowers like this stock (Centaurea cyanus) are best viewed up close.
Kathleen Moore CC BY 2.0
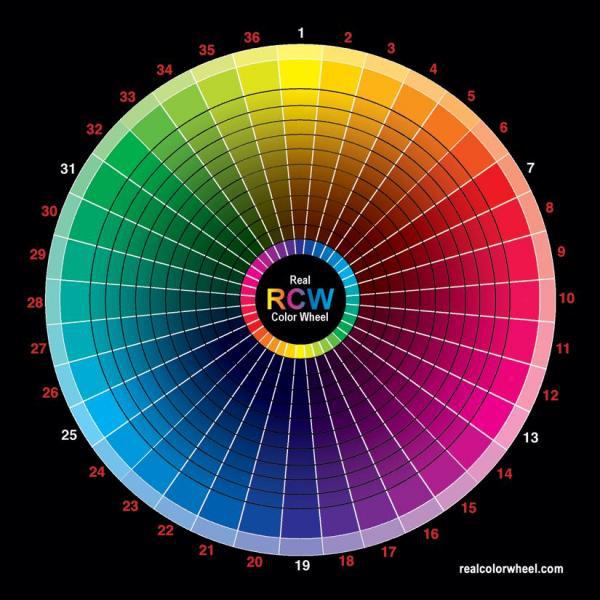

Figure 10–7. Flowers from this perennial border stand out because of the fence background element.
Patrick Standish, Flickr CC BY 2.0
Figure 10–8. When you design a bed, group plants together, placing the tallest plants toward the back, and remember to use plants that are interesting even when not in bloom like grasses and evergreen shrubs.
Kathleen Moore CC BY 2.0
Figure 10–9. A perennial bed designed by height of the plants and to provide for year-round bloom. Pink=spring blooming, Green=summer blooming, and Yellow=fall blooming.
Renee Lampila
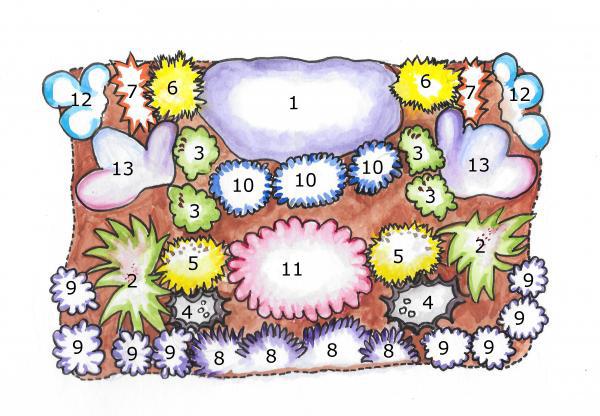
Figure 10–10. A perennial bed designed for full sun.
Renee Lampila
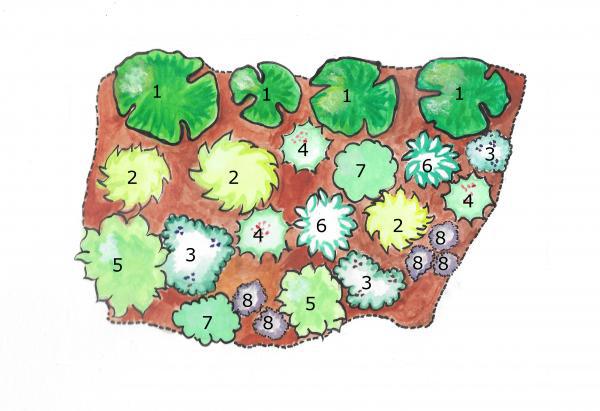
Figure 10–11. A perennial bed design for shade.
Renee Lampila
Figure 10–12. Harden off plants by placing them in a protected area outdoors.
Lucy Bradley CC BY 2.0

Figure 10–13. Remove plants from individual plastic pots by tipping the pot and tapping the plant until it falls into your hand; do not pull a plant out by the stem. Turn plants in cell packs over, and push out from the bottom.
Chris Alberti CC BY 2.0
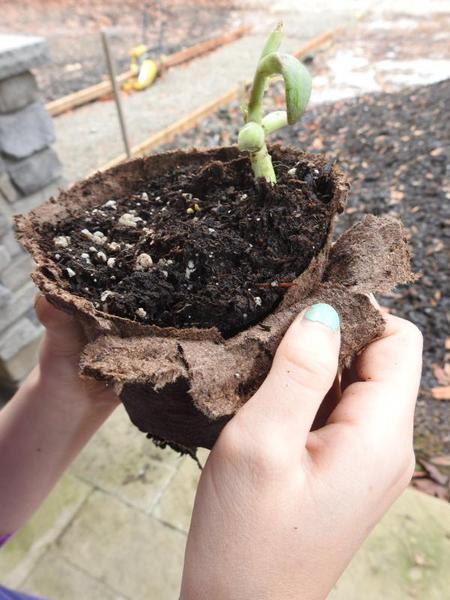
Figure 10–14. Remove the top lip of the peat pot so there is no wicking of water.
Kathleen Moore CC BY 2.0
Maintenance of Annuals and Perennials
Watering
Although some herbaceous plants tolerate moderate periods of dry weather, others must have a continuous supply of water. Flowering of most annuals slows or stops during extended hot, dry summer weather. To minimize the need for watering, select drought-tolerant annuals such as globe amaranth (Gomphrena globosa), blue blazes hyssop (Agastache ‘Blue Blazes’), Dahlberg daisy (Thymophylla tenuiloba), gazania (Gazania rigens), portulaca (Portulaca grandiflora), and creeping zinnia (Zinnia angustifolia).
Supplemental irrigation probably will be necessary at some point during the growing season. Soil type, as well as growth stage and temperature, influence watering frequency. Bedding plants grown in a properly watered clay soil may need watering only once a week. Bedding plants grown in a sandy soil may need watering several times a week. This varies with the time of year, amount of sunlight or shade, plant growth, and other environmental factors. Most plants need 1 inch of water per week but may require more when flowering or when exposed to high temperatures or windy conditions. Moisten the entire bed thoroughly, but do not water so heavily that the soil becomes soggy. After watering, allow the soil to dry moderately before watering again.
A soaker hose is excellent for watering flower beds. Water seeps directly into the soil without waste and without wetting leaves and flowers. The slow-moving water does not disturb the soil or reduce its capacity to absorb water. Sprinklers wet the flowers and foliage and make them more susceptible to diseases. The impact of water drops falling on the surface may change soil structure and cause it to puddle or crust, preventing free entry of water and air.
The least effective method for watering is with a hand-held nozzle. Watering with a nozzle has all the disadvantages of watering with a sprinkler. Additionally, gardeners seldom are patient enough to do a thorough job of watering with a nozzle so they do not apply enough water and do not distribute it evenly over the bed.
Fertilizing
Nitrogen is the nutrient that most frequently limits plant growth. Unfortunately, nitrogen is the most difficult nutrient to manage. Soil tests for nitrogen are not dependable, and nitrogen is easily leached from the soil. The challenge is to maintain adequate nitrogen levels to meet the plants’ requirements without damaging the plants or the environment.
Follow the fertilizer recommendations provided with the soil test results. In addition, growth rate and foliage color are the primary guides for determining whether additional fertilizer should be applied during the growing season. A plant growing well may not need fertilizer, and too much fertilizer promotes excessive foliage growth without necessarily promoting flower production. Too much fertilizer may also stimulate disease and pest problems. Always follow the recommendations on your soil test results. It is not necessary to remove the mulch before fertilizing. Watering after applying fertilizer washes fertilizer off the foliage, prevents foliage burn, and makes the fertilizer available to the plants more quickly.
Care of Cut flowers (Figure 10–16)
Extend the longevity of cut flowers by cutting them in the morning when their water content is high. Select flowers that are not yet in full bloom. Use a clean sharp knife or clippers, and place the cut stems immediately into a bucket of warm water. Moving the stems quickly into water prevents bubbles from blocking the vascular system in the stem. Leave them in the warm water for 2 hours to soak up as much water as possible before arranging. To hold the flowers longer, place them in fresh warm water, cover them with plastic to prevent water loss, and set them in a refrigerator.
When flowers are arranged, remove any foliage that will be below the water line in the vase. Cut the stem again, but make the cut at an angle to maximize the area available to take up water and cut the stem underwater to prevent air bubbles. Arrange flowers in a clean container that has been washed with one part household bleach to nine parts water and allowed to dry. This should kill bacteria that could clog the stems and reduce water uptake.
A commercial flower preservative added to the water lengthens the flowers’ vase life by providing nutrients and killing bacteria. Do not reuse florist foam as it is sometimes contaminated with bacteria. Place the arrangement in a cool, draft-free location out of direct sunlight. Recut the stems every third day, change the water, and add fresh preservative.
Note that daffodils and other jonquils have a sap that is toxic to other cut flowers. If you want to use daffodils in a mixed arrangement, place them in a vase of cool water overnight so most of the sap is released before mixing them with other flowers.
Mulching
A mulched garden has an orderly look, requires less weeding, and better maintains uniform soil moisture. In addition, mulches help insulate roots during cold periods and keep roots cool during warm periods. Furthermore, mulches reduce the spread of soilborne diseases by preventing soil from splashing onto leaves There are two types of mulches: organic and inorganic. Organic mulches include bark, grass clippings, leaves, pine needles, shredded hardwood, straw, and wood chips. Inorganic mulches include landscape fabrics, plastic, rocks, and rubber. Organic mulches have the advantage of adding nutrients and humus to the soil as they decompose, improving soil tilth and moisture-holding capacity. In addition, using yard waste, like compost, leaves, or grass clippings, as a mulch reduces waste disposal costs. Apply mulch containing small pieces of matter sparingly to avoid forming a layer that water cannot penetrate. Be aware that mulch with large pieces of matter, placed in thick layers, may provide habitat for voles and cause crown rot.
Organic mulches are almost always the better choice for herbaceous ornamental beds. Apply most organic mulches after plants are well-established and when there is reasonably good soil moisture. Replenish mulch in early spring to maintain the desired mulch depth. Mulch the entire bed except for the crowns and stems of the plants.
Do mulches affect soil pH?
While oak leaves and pine needles are acidic when fresh, as they break down they become neutral or even slightly alkaline. In addition, except in sand, soil pH is strongly buffered and difficult to change. In fact, mulches have very little impact on soil pH and almost none below 2 inches deep.
Organic Mulches
- Bark (pine bark nuggets). Use 2 inches to 3 inches of this dark-brown mulch. Various sizes are available, from shredded to large chunks. Be aware that a thick layer of shredded bark becomes impermeable to water, and larger bark pieces may float away during heavy rains.
- Grass clippings. Grass is best left on the lawn to naturally decompose and supply nutrients. Only use dry grass for mulching planting beds, and slowly build up to a layer of 2 inches. A thick layer of grass clippings is impenetrable to water. Be wary of weed seeds and herbicides that may have been used on the lawn as they can have a negative effect on sensitive plants.
- Leaf mold. Leaf mold consists of fallen leaves that are starting to decompose. Use a 2-inch to 3-inch layer of leaves under plants for a natural look. Leaf mold mulch needs to be replaced each year. If the leaves are already well decomposed, they may be better used as a soil amendment than a mulch.
- Pine needles. Use a 2-inch to 3-inch layer of this red-brown mulch (Figure 10–17). It allows water and air to penetrate into the soil easily. And because it has an interlocking habit, it is effective for use on slopes. There are many grades available, with longleaf pine (Pinus palustris) being the most expensive and “cleanest” in appearance. Loblolly pine (Pinus tinea) needles are the most common and least expensive pine straw. Pine needles can lower soil pH, but only very gradually over many years. Inspect needles for mold or heavy dirt or other particulate contamination before purchasing. Do not use pine straw mulch around pansies as it can reduce the number of flowers in the spring. In addition, to minimize risk of fire, some cities have banned the use of pine straw as a ground cover within 10 feet of multifamily dwellings.
- Shredded hardwood. This mulch usually comes in a ground or double-ground form and should be spread thinly, in a 1-inch to 2-inch layer, to avoid creating an impermeable layer. Hardwood mulches decompose slowly and do not need to be replaced as often as some other mulches.
- Straw. Straw is not the most attractive mulch, so it may be a better option for vegetable beds or new lawns than for ornamental beds. It decomposes quickly, so replenish a 2-inch to 3-inch layer regularly. Never use hay as it contains too many weed seeds.
- Wood chips. Use a 2-inch to 3-inch layer of this mulch, which consists of bark and various sizes of ground-up or chipped wood. Wood mulches are generally less expensive than pine needle or hardwood mulches. Wood mulch may need to be replaced every two years, depending on the particle size.
Colored Wood Mulch
There is no evidence that dyes used in coloring wood mulch are toxic. The wood chips themselves, however, may contain toxic substances. Much of the wood in colored mulch came from chipped scraps, pallets, and construction waste. Some of this wood is contaminated with creosote or chromated copper arsenate (CCA)—both chemicals used in pressure-treating lumber. Although the sale of CCA lumber has been banned, some older decks and fences still contain CCA-treated lumber, which can make its way into the recycling stream. In addition, pallets used to transport chemicals can become contaminated by spills. CCA and other toxic chemicals have been found in soil where colored wood chip mulch had been applied. Not all colored wood mulch is contaminated. Recycled construction and demolition wood have the highest rate of CCA contamination. Check the source of the wood used in the mulch prior to purchase.
Weeding
Using mulch and spacing plants so they produce a solid canopy are the best ways to minimize weed problems. Some weeds can be managed by cultivation or use of an herbicide, but some still need to be pulled by hand. Weeds are easier to pull after a rain or irrigation.
Cultivation is most effective as a weed management strategy early in the season. As annual plants grow, the feeder roots that spread between plants are likely to be injured by cultivation. In addition, cultivation stirs the soil and uncovers weed seeds that then germinate.
Any herbicide used in flower beds must be chosen carefully. Read the label: No one herbicide is safe for use on all herbaceous ornamentals. Time and rate of application varies with the herbicide selected. A preemergence herbicide is used to disrupt the germination process. Some preemergence herbicides are applied before planting; others are applied after planting but before weeds emerge. Make sure the planting bed is weed-free when the preemergence herbicide is applied. Only a few postemergence herbicides are labeled for use on grassy weeds after herbaceous plants have become established. For additional information on weed management, refer to chapter 6, “Weeds.”
Staking
Many tall annuals and perennials—such as cosmos (Cosmos spp.) and cleome (Cleome houtteana),—may need support to protect them from strong winds and rain (Figure 10–18). Begin staking when plants are about one-third their mature size. Many materials can be used for staking: wire cages, bamboo stakes, tomato stakes, twiggy brushwood, or wire rings.
Make the staking material 6 inches to 12 inches shorter than the height of the mature plant. Place stakes close to the plant, but take care not to damage the root system. Sink stakes into the ground far enough to be firm. Loosely tie plants to the stakes.
Tie the plant by making a double loop with one loop around the plant and the other around the stake to form a figure-eight (Figure 10–19). Never loop the tie around both the stake and plant. The plant hangs to one side, and the stem may become girdled. Support plants with delicate stems (like cosmos) with a framework of stakes and strings in crisscrossing patterns.
Deadheading and Pruning
Deadheading is the removal of dead or faded flowers and seed pods. When annuals and perennials expend energy to produce seeds after the flower fades, flower production often decreases. To maintain vigorous growth and assure neatness, remove spent flowers and seed pods (Figure 10–20a and Figure 10–20b).
Although this step is not necessary for all flowers, it is a good practice with ageratum (Ageratum houstonianum), calendula (Calendula officinalis), celosia (Celosia argentea), coleus (Coleus scutellarioides), cosmos (Cosmos bipinnatus), geraniums (Pelargonium ×hybridum), marigolds (Tagetes erecta, T. patula), scabiosa (Scabiosa atropurpurea), salvia (Salvia argentea), black-eyed Susan (Rudbeckia fulgida), and zinnias (Zinnia elegans). Check plants weekly. Many modern cultivars are self-cleaning; their spent flowers drop off quickly. Some cultivars are sterile and do not produce seeds.
Some bedding plants, such as polka dot plant (Hypoestes phyllostachya) and impatiens (Impatiens spp.), may benefit from pruning back for size control and rejuvenation. Pruning can stimulate greater flowering of some cultivars of petunias. Cut back plants as needed, leaving approximately one-half of the shoot
Heavy rains and wind may cause herbaceous plants to split or drop over. Remove any damaged stems by cutting them back to a foot aboveground. Water carefully, and be watchful for signs of disease as the plant regrows.
Fall Cleanup
Remove and compost annuals after they die, but do not simply mow perennials to the ground after the first frost. Not only does this create a barren spot in the landscape; it also robs wildlife of valuable winter food, nest supplies, and shelter (Figure 10–21). Many beneficial insects hibernate in dead plant material or leaf litter. Some perennials—such as lavender (Lavandula spp.), Russian sage (Salvia yangii), and candytuft (Irberis simpervirens)—have woody bases and are severely set back or can even die if heavily pruned in the fall. Wait until spring, and scratch some of the twigs at the plant’s base to find white or green living tissue to prune back to. Some perennials are semi-evergreen or evergreen, and their foliage should be maintained to bring some welcome green to the barren winter landscape. However, if the bed contains nonwoody perennials and is in a highly visible area—or if it has become clear that birds and other wildlife have used the winter bounty you provided—prune stems to just above ground level and remove and compost any dead plant tissue. If any plants were prone to disease the previous growing season, remove and dispose of them immediately instead of composting the material. Fall is a great time to re-apply a layer of mulch to help protect the root zone through the winter.
Specifics for Perennials
Division
Many perennials left in the same place for more than three years are likely to become overcrowded and need to be divided. Some perennials, however, are best left in place and not divided; this is true of baby's breath (Gypsophylla elegans), blue wild indigo (Baptisia australis), gas plant (Dictamnus albus), goat's beard (Aruncus dioicus), globe thistle (Echinops ritro), and sea holly sea holly (Eryngium planum).
The best time to divide most perennials is in the spring when new shoots are 2 inches to 3 inches tall, or in the fall when the foliage starts to die back. Most plants that are divided during an active growth period in the summer are slower to reestablish. Daylily (Hemerocallis spp.) and bearded iris (Iris germanica) are among those perennials that can be divided after their flowering period, even during the summer. Division is usually done by digging the plant up and dividing it into several smaller sections. An alternative for vigorous clumps is to slice off a section with a sharp spade while leaving the main clump in the ground.
Some plants like chrysanthemums (Chrysanthemum spp.) or iris (Iris spp.) exhibit a decline in vigor as a clump grows. Transplants from the center often grow poorly and flower sparsely. To divide mature clumps, select only the vigorous side shoots from the outer edges of the clump and discard plants from the center. Divide the plant into clumps of three to five shoots each. Be careful not to overdivide; a clump that is too small does not give much color the first year after replanting. Do not put all the divisions back into the space that contained the original plant; that would place too many plants in a given area. Exchange extra plants with a friend, plant them elsewhere in the yard, or discard them.
Pinching
Some plants produce thicker and fuller growth if the shoot tips are pinched back to promote growth of side (axillary) shoots. Plants that respond to pinching include chrysanthemums (Chrysanthemum spp.), asters (Aster spp.), and phlox (Phlox spp.). Start pinching in early spring when the shoots are several inches long, and discontinue by early July. This reduces the height and decreases the likelihood of blow-over by wind and rain or from the weight of large, heavy flowers. The result is a more compact plant with more, but sometimes smaller, flowers. Pinching off buds also delays flowering.
Winter protection
In colder parts of the country, perennial beds are often mulched with an extra 2-inch to 4-inch layer of organic material to provide winter protection. For most perennials and most areas of North Carolina, this practice is not necessary. Dead foliage can provide winter protection for the plant and cover for wildlife, but old foliage can also harbor disease-causing organisms and insects. If dead foliage is left over the winter, it should be removed quite early in the spring.
Alternate freezing and thawing can cause plants to be heaved out of the soil, which causes root damage. Apply mulch to plants that are growing at the upper limits of their normal range to help keep them dormant. Apply mulch only after the soil temperature has cooled following several frosts. If winter mulch is applied too early, the warmth from the protected soil could cause growth to continue and increase winter injury. Do not pile mulch heavily over the crowns, as this would encourage rotting. Reduce the mulch depth to 2 inches to 3 inches as soon as growth starts in the spring.
Figure 10–16. Properly cared for cut flowers last a long time in a vase.
Erin Downey, Flickr CC BY-SA 2.0
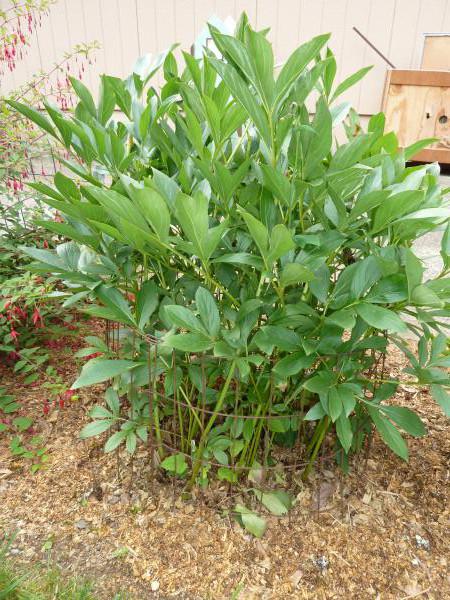
Figure 10–18. Many tall perennials, such as peonies (Paeonia hybrids), need support like this wire cage.
Kathleen Moore CC BY 2.0
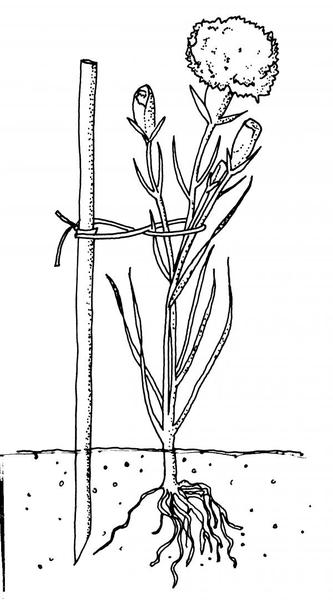
Figure 10–19. A stake used to support tall perennials. Use soft twine or strips of cloth for ties. Loop the tie around the stem in a figure-eight pattern.
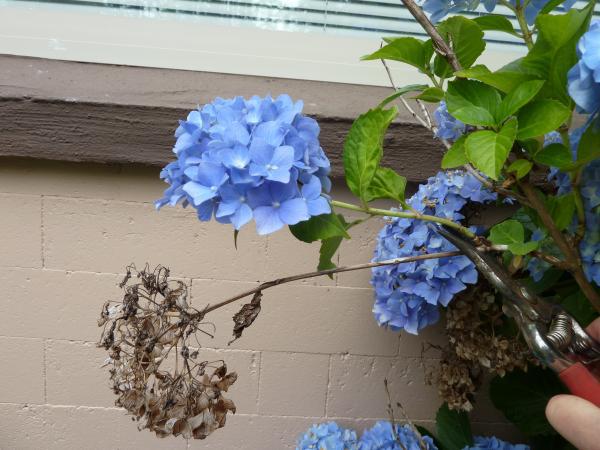
Figure 10–20a. Deadheading, or removing dead flowers from this big-leaf hydrangea (Hydrangea macrophylla).
Kathleen Moore CC BY 2.0
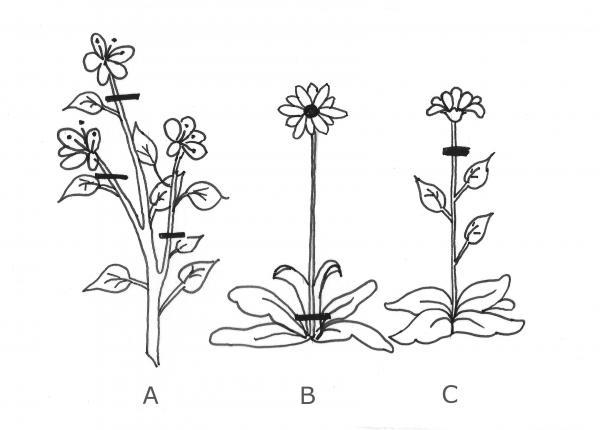
Figure 10–20b. How to deadhead different plant growth forms. A) Cut just above the leaves, B) Cut at base of flower stalk, C) Cut above a leaf.
Renee Lampila
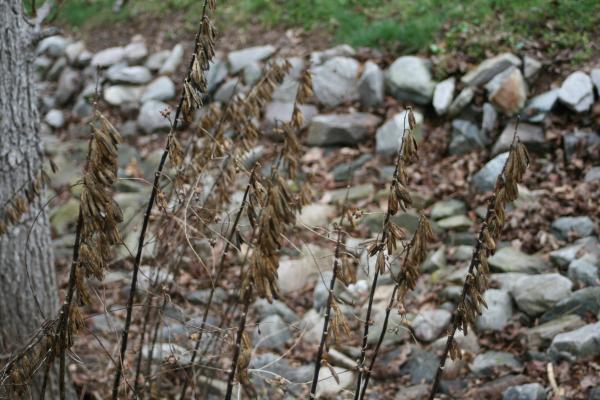
Figure 10–21. Leaving perennial plant skeletons, like these Hosta spp., through the winter provides valuable wildlife food and habitat.
Chris Alberti CC BY 2.0
Flowering Bulbs
A wide variety of bulbs is grown in North Carolina (Figure 10–22). Most are grown for their flowers, but some are grown for their foliage. Most flowering bulbs are perennial plants and require little maintenance. Some bulbs provide weeks or months of color; others flower for only a few weeks each year. Bulbs are broadly grouped into spring-flowering (January through May) and summer-flowering or fall-flowering (June through October) plants.
Bulb types used for gardens and landscapes include true bulbs, corms, tubers, tuberous roots, enlarged hypocotyls, and rhizomes. All are commonly called "flower bulbs." A true bulb, however, is a modified stem surrounded by scalelike, modified leaves that contain stored food for the shoots. Tulips (Tulipa hybrids), daffodils (Narcissus spp.), hyacinths (Hyacinths orientalis), and lilies (Lilium Asiatic hybrids) are examples of true bulbs. There are two types of true bulbs: tunicate and imbricate. The outermost scales of a tunicate bulb are dry and papery. Tulips (Tulipa hybrids), daffodils (Narcissus spp.), hyacinths (Hyacinthus orientalis), grape hyacinths (Muscari armeniacum), and alliums (Allium aflatunense) grow from tunicated bulbs. An imbricate bulb has thick, loosely arranged scales that lack a protective covering. Lilies (Lilium spp.) produce imbricate bulbs.
A corm is the swollen base of a stem that contains stored nutrients; it does not have fleshy scales. Corms are tunicated or imbricate. On top of the corm are one or more "eyes" from which new shoots develop. The corms of crocuses and gladioli disintegrate as the stored food within is used to produce roots and shoots. A new corm forms on top of the remains of each original corm. In addition, stolonlike structures bearing miniature corms (called cormels) develop on the tip.
A tuber is a thickened underground stem swollen with food reserves. It differs from a true bulb or corm in that it has no covering of dry leaves and no basal plate from which roots grow. Usually short, fat, and rounded, tubers have a knobby surface with growth buds, or eyes, from which the shoots of the new plant emerge. Caladiums (Caladium spp.) grow from tubers.
Tuberous roots are true roots. Their food supply is stored in root tissue, not in stem or leaf tissue as with other "bulbs." Buds are produced only on the crown or stem end of the tuberous root. Fibrous roots develop on the opposite end. Tuberous roots are biennial; they are produced in one growing season and go dormant when the herbaceous shoot dies. In the spring, buds from the crown produce new shoot growth using energy from the old root. Dahlia (Dahlia), anemone (Anemone spp.), and ranunculus (Ranunculus spp.) produce tuberous roots.
In some plants, the hypocotyl (the portion of the stem below the cotyledon and above the roots) enlarges to become a fleshy storage site. This enlarged hypocotyl is perennial and continues to enlarge laterally each year. Cyclamen (Cyclamen spp.), gloxinia (Incarvillea spp.), and "tuberous" begonia (Begonia spp.) have enlarged hypocotyls.
A rhizome is a modified stem that grows horizontally just above or below the soil surface. Roots grow from the lower surface, while shoots develop from buds on the upper surface or sides, usually at the tips. Canna (Canna spp.), bearded iris (Iris germanica), calla lily (Zantedeschia spp.), and oxalis (Oxalis spp.) produce rhizomes.
Spring-flowering Bulbs
Spring-flowering bulbs provide color before most annuals and perennials (Figure 10–23). Some crocuses (Crocus spp.) begin flowering in January; some daffodils (Narcissia spp.) begin flowering in February. Spring-flowering bulbs are planted in the fall, produce foliage and flowers in the spring, then die back and remain dormant during the summer months. It is usually best to plant spring-flowering bulbs in groups of 12 to 25 instead of planting in rows. Note that some bulbs in the eastern regions of North Carolina are grown as annuals because chilling hour requirements are too high for mild winters.
Types of Spring-flowering Bulbs
Tulips (Tulipa hybrids), daffodils (Narcissus spp.), and hyacinths (Hyacinthus orientalis) are referred to as the major spring-flowering bulbs. Minor spring-flowering bulbs include aconite (Aconitum spp.), anemone (Anemone spp.), crocus (Crocus spp.), cyclamen (Cyclamen spp.), fritillaria (Fritillaria meleagris), glory-of-the-snow (Chionodoxa luciliae), grape hyacinth (Muscari armeniacum), Dutch iris (Iris hollandica), lily-of-the-valley (Convallaria majalis), and snowdrops (Galanthus nivalis). Species in this group of bulbs are often quite easy to grow and produce massive flower displays.
Tulips (Tulipa hybrids) are one of the most popular spring-flowering bulbs. They are sold by type and cultivar. Some of the most common types are single, cottage (late-blooming), Darwin (tallest), parrot (twisted, ruffled petals), and double (two or more rows of petals). Species tulips are the wild forerunners of today’s hybrid tulips. Species tulips are generally smaller than hybrid tulips, and they sometimes naturalize where growing conditions are favorable. Popular species tulips include Tulipa fosteriana, T. greigii, and T. kaufmanniana.
Traditionally, tulips were treated primarily as annuals in the South because few—if any—flowered the second year. The lack of flowering is often due to poor site selection and preparation. Many of the tulip cultivars available in garden centers and mail-order catalogs are unsuitable for our heat. Tulips are a short-lived perennial at best. Here in the southern states, tulip cultivars are generally considered successful perennials if they survive for three years. To increase the likelihood of perennialization, plant the bulbs in well-drained soil. Amending heavy clay soils with organic matter, planting on a slope, adding drainage tiles, and constructing raised beds are all methods that will improve drainage. If the bed is not prepared properly, no cultivar will perennialize. Fertilize the bulbs twice a year or use a slow-release fertilizer once a year. For a list of recommended tulip cultivars for North Carolina refer to Table 10–1.
Daffodils (Narcissus species—Hardy II) are more hardy than tulips in North Carolina and usually come back year after year with minimum care. Narcissus, daffodils, and jonquils are classified into twelve divisions based on the length of corolla in relation to perianth segments. They come in a variety of colors, including white, yellow, peach, and bicolor. They are sold as single-, double-, or triple-nose bulbs (from smallest to largest bulb size). As a group they are easy to grow, multiply rapidly, and do well in naturalized settings. The terms “daffodils” and “narcissus” are often used interchangeably. Narcissus is the genus name for all daffodils. Daffodil is the common name for all members of the genus Narcissus. In some parts of the country, any yellow-flowering daffodil is called a jonquil. Technically, however, jonquils are characterized by having several yellow flowers with a strong scent and rounded foliage.
Hyacinths (Hyacinths orientalis) produce a large, single spike of many small, fragrant flowers that come in a wide range of colors. Traditionally, hyacinths flower for only one year in North Carolina, but repeat blooming can be encouraged by paying special attention to site preparation and fertilization after blooming.
Table 10–1. Tulip cultivars for North Carolina.
| Season | Color | Cultivar | Hardiness Zone |
|---|---|---|---|
| Very Early | Purple | Demeter | 6 – 8 |
| Red | Showwinner | 8 | |
| Red/Yellow | Stresa | 8 | |
| Yellow | Bellona | 8 | |
| Candela | 6 – 8 | ||
| Golden Apeldoorn | 6 – 7 | ||
| Early | Orange | Dillenberg | 6 |
| Orange Emperor | 6 | ||
| Pink (Rose) | Christmas Marvel | 8 | |
| Red | Toronto | 6 – 8 | |
| Red/Yellow | Queen of Sheba | 8 | |
| White | Purissima (White Emperor) | 7 – 8 | |
| Yellow | Yokohama | 6 – 8 | |
| Golden Parade | 6 – 7 | ||
| Hoangho | 6 | ||
| Monte Carlo | 7 | ||
| Yellow Dover | 6 –8 | ||
| Golden Oxford | 6 –8 | ||
| Yellow/Red | Gudoshnik | 6 – 7 | |
| Jewel of Spring | 6 – 7 | ||
| Mid | Orange | Juan | 6 |
| Orange Emperor | 8 | ||
| Pink (Rose) | Blenda | 6 | |
| Preludium | 6 | ||
| Red | Apeldoorn | 8 | |
| Frankfurt | 6 | ||
| Ile de france | 6 | ||
| Oscar | 6 | ||
| Parade | 7 – 8 | ||
| Lucky Strike | 7 | ||
| Princess Victoria | 6 | ||
| Red/Yellow | Beauty ofApeldoorn | 6 – 8 | |
| Los Angeles | 6 | ||
| White | Kansas | 6 | |
| Striped Apeldoorn | 6 – 8 | ||
| Oranjezon | 6 – 8 | ||
| Don Quichotte | 8 | ||
| Purple | Negrita | 6 | |
| Diplomat | 6 – 8 | ||
| Holland's Glorie | 6 – 7 | ||
| Margaret Herbst | 8 | ||
| Oxford | 6 – 8 | ||
| Red/White | Leen van der Mark | 6 | |
| Merry Widow | 6 – 7 | ||
| Spring Song | 6 – 8 | ||
| Kiezerskroon | 6 | ||
| Thule | 6 | ||
| Late | Orange | Jimmy | 6 – 7 |
| Pink (Rose) | Angelique | 8 | |
| Purple | Prince Charles | 6 | |
| Dreaming Maid | 6 | ||
| Bing Crosby | 6 | ||
| Oriental Beauty | 6 | ||
| Renown | 8 | ||
| Red/Yellow | Ad Rem | 6 | |
| Red/White | Ballade | 6 | |
| White | Maureen | 7 | |
| Make Up | 6 | ||
| Orange Bouquet | 7 | ||
| Gordon Cooper | 6 – 7 | ||
| Purple/White | Arabian Mystery | 6 | |
| Red | Balalaika | 8 | |
| Dyanito | 6 | ||
| Red Matador | 7 | ||
| Rosy Wings | 7 | ||
| Kees Nelis | 6 – 7 | ||
| Karel Doorman | 6 | ||
| White/Pink | Douglas Baader | 6 | |
| Yellow | West Point | 6 – 7 | |
| Very Late | Orange | Orange Favourite | 7 – 8 |
| Orange | Orange Favourite | 7 – 8 | |
| Orange | Orange Favourite | 7 – 8 |
Planting Dates
Plant spring-flowering bulbs in the fall to promote good root development and to satisfy the cold requirement. The cold requirement ranges from six weeks to 20 weeks depending on the species or cultivar. The exact time to plant depends on the prevailing soil temperature. In general, it is advisable to wait until the soil temperature is below 60°F (at the optimal planting depth). The optimal planting time in Zone 6 is October. In Zones 7 and 8, it is better to wait until November or early December. Root growth starts in the fall and continues through the winter.
Bulb Selection and Preplanting Care
Selecting high-quality spring-flowering bulbs is important because the flower bud has already developed before the bulb is sold. Size is important. Generally, larger bulbs produce better flowers. Select bulbs that are plump and firm. Small nicks and loose skins do not affect the quality. Beware of bargain bulbs that are often too small to flower the first year.
If you buy bulbs well before planting time, keep them in a cool, dry place. A temperature of 60°F to 65°F is cool enough to prevent bulbs from drying out before planting. Temperatures higher than 70°F can damage the flower inside spring-flowering bulbs. Rhizomes, tubers, and tuberous roots dry out faster than bulbs and corms and survive best if stored in peat, perlite, or vermiculite.
Do not store spring-flowering bulbs near fruits that produce ethylene (such as apples or pears). Ethylene is a gas that can cause "flower abortion" and other problems with flowering. Store the bulbs in open trays, and if they are stored in a refrigerator, ventilate frequently. Unless specified, do not store bulbs in paper or plastic bags.
Summer-flowering and Fall-flowering Bulbs
Summer-flowering and fall-flowering bulbs come in a wide range of flower colors, shapes, and heights, and many do well in North Carolina.
Purchase bulbs that are healthy and disease-free. Diseased bulbs look moldy or discolored, or feel soft and rotted. Site preparation is essentially the same as for other herbaceous plants and spring-flowering bulbs (see section on soil preparation).
Good drainage is essential for most bulbs. Most summer-flowering and fall-flowering bulbs require a soil pH between 6.0 and 7.0. Apply fertilizer and lime according to a soil test report. Planting times and depths vary greatly for different species. Plant bulbs upright and rhizomes and tuberous roots on their sides. Firm the soil around them, and water thoroughly after planting to settle the soil.
During the growing season, most bulbs benefit from a light application of fertilizer, but not heavy applications of nitrogen. Apply a light application in the spring before growth begins. Some plants, such as cannas, are heavy feeders and require additional fertilizer during the growing season. Use soil test results, foliage color, and growth rates to determine the need to make subsequent fertilizer applications.
Most bulbs prefer to be moist, but not wet, during the growing season, especially if temperatures exceed 80˚F. A 2-inch to 3-inch layer of mulch reduces water needs and helps manage weeds. Plants that grow over 2 feet tall and have large blooms require staking. When flowers fade, cut them off to prevent seed formation. Seed production diverts food that would otherwise be stored in the bulb for next year’s growth. Cannas produce flowers up until frost if they are deadheaded. When the foliage dies back in the fall, cut and destroy the old foliage, which can harbor disease and insect problems.
If summer-flowering bulbs need dividing, do so in the spring just prior to planting or before new growth begins on established plants. Use a sharp knife to cut roots and tubers, and make sure that each division contains at least one growing shoot or eye.
True bulbs and corms produce offsets called bulblets or cormels (Figure 10–24), which can be pulled from the parent and planted separately. Bulblets or cormels are usually too small to flower the first year.
Site Selection for Bulbs
In selecting a site for planting, consider light, temperature, soil texture, and function. Most bulbs prefer full sun. Select a planting site that provides at least 5 to 6 hours of direct sunlight a day. Bulbs left in the ground year after year should have 8 hours to 10 hours of daily sunlight for good flowering. This requirement should not restrict planting to areas that receive full sun year-round. Many bulbs flower and produce foliage before deciduous trees leaf out in the spring. A few bulbs, such as daffodils (Narcissus—Hardy I and II), crocus (Crocus spp.), squill (Puschkinia libanotica), and wood hyacinths (Hyacinthoides hispanica ), tolerate partial shade.
Consider microclimate conditions when selecting spring-flowering bulbs for specific locations. A microclimate is a local modification of the general climate. It is influenced by topography, the ground surface, plant cover, and man-made conditions. The microclimate produced by screening with tall evergreens provides a windbreak and possibly shade. Bulbs planted in a southern exposure near a building or wall bloom earlier than bulbs planted in a northern exposure. Because daffodil flowers always face the source of strongest light, they are best planted with shrubs, a wall, or fence as a background.
Most bulbs and bulblike plants do not tolerate poor drainage; they grow best in deep, well drained loam or sandy soils. This is especially true for tulips and hyacinths. The easiest method to determine if the site drains well is to observe the proposed planting area the day after a heavy rainfall. If water remains in the site, then the soil does not drain adequately. A better method is to dig a hole about a foot deep and fill it with water. The next day fill the hole with water again. If the water drains away in 8 hours to 10 hours, the soil is sufficiently well-drained to grow most bulbs. If the water does not drain adequately, select another site, improve the drainage, or create a raised bed using landscape timbers, stacked stone, brick, or other suitable materials.
Planting in Poorly Drained Soil
Till the site 4-inches deep and space the bulbs properly on the soil surface. Cover with 5 inches to 8 inches of ½-inch, screened pine bark mulch (amended with lime at the rate of 5 pounds per cubic yard). Roots will grow and position the bulbs at the optimal depth for subsequent growth and development. The mulch also provides winter protection.Planting Bulbs
The simplest method for planting bulbs is to dig individual planting holes. Loosen the soil below the depth of the planted bulbs (Figure 10–25). Add fertilizer according to the soil test report, then cover with a layer of soil (bulbs should not come into direct contact with fertilizers). Set bulbs upright in the planting hole with the roots facing down and cover with amended soil.
A better method for planting bulbs is to dig and remove the soil to a depth of 8 inches to 12 inches over the entire bed (Figure 10–26). Dig bulb beds when the soil is fairly dry because wet soil packs tightly. Remove large stones and building trash, but turn under all leaves, grass, stems, roots, and anything else that decays. Incorporate into the soil fertilizer, amendments, and organic matter as recommended by a soil test report. A soil pH between 6.0 to 7.0 is ideal for most bulbs. If the pH level needs to be raised, apply lime at the prescribed rate. Never apply more than 40 pounds of lime per 1,000 square feet per application. Because both lime and phosphorus move slowly when applied on the soil surface, thoroughly incorporate them into the soil when preparing the bed prior to planting. In many situations, incorporating 30% to 50%, by volume of composted pine bark or composted yard waste greatly improves soil drainage. Refill the planting site with several inches of the prepared soil.
Arrange the bulbs at the recommended depth and spacing. Bulb catalog and reference recommendations for planting may be either too shallow or too deep depending on soil conditions. As a general rule, plant bulbs at a depth 2½ to 3 times as deep as the diameter of the bulb. To provide winter protection and to reduce mechanical damage to the flower bulbs, plant most small bulbs 5 inches deep and large bulbs 8 inches deep. Because a surface mulch of 2 inches to 3 inches is advised, calculate this amount in the planting depth. Bulbs planted at shallower depths experience wide temperature shifts in the winter and earlier warming in the spring. Early spring warming leads to smaller bulbs and poorer flowering the following year. Cover the bulbs with amended soil, water to remove air pockets and to settle the soil, and apply a 2-inch to 3-inch layer of mulch. Mulch keeps the soil temperature more uniform and delays warming of the soil in the spring. To root properly and grow well, most flower bulbs require a soil that is moist, but not wet.
Animals such as voles, mice, rabbits, squirrels, and deer eat spring-flowering bulbs such as crocuses and tulips. Daffodils and hyacinths are usually not bothered. Although no system can totally exclude animals, in some cases, covering the bulbs with heavy ½-inch wire mesh screening at planting affords some protection and still allows the shoots to grow through.
Care After Planting Bulbs
Shoot elongation occurs during mid to late winter, and shoots appear above the ground by late winter (Figure 10–27). The foliage is quite cold hardy and normally does not need to be protected.
Mulching
After soil has cooled in winter, mulch bulbs with 2 inches to 3 inches of an organic material such as straw, pine bark, hay, or shredded leaves in order to manage weeds and to prevent premature warming of the soil. Do not use large leaves because they may mat too tightly on the ground and keep shoots from pushing aboveground.
Fertilization
Do not fertilize bulbs after they flower as this can cause disease problems. Fertilize according to soil test recommendations when foliage is 1 inch to 2 inches tall (about six to eight weeks before flowering). Keep fertilizer off the leaves and away from roots so that it does not burn the plants. An alternative is to use a single fall application of a slow-release fertilizer at planting and each fall thereafter at the normal planting time. Many references suggest using bone meal as a bulb fertilizer; however, research at NC State University has found that the phosphorus from bone meal is released very slowly and does not move through the soil very well. It often stays within a few inches of where it is applied. Use foliage color and growth rates to determine the need to make subsequent applications of fertilizer.
Pruning
After spring-flowering bulbs finish flowering, remove faded blooms to prevent seed development, which reduces food storage in the bulb for next year’s growth (Figure 10–28). The foliage should be allowed to dry naturally. Green leaves produce food for plant growth the following year. During this period the mother bulbs enlarge or produce offsets, or they are replaced by daughter bulbs. Removal, braiding, or bending of the fading and dying foliage markedly reduces future bulb size. The undesirable appearance of dying foliage should be considered when selecting a site for bulb plantings. When bulbs are used around a mailbox or walkway, the dying foliage is more visible than when bulbs are used on the sides of the yard or in natural areas. After the foliage turns yellow, falls over, and comes loose when slightly tugged, it can be removed and destroyed. Remove dead foliage so that any diseases present do not infect new growth the following year.
Replanting
If the bulbs flower satisfactorily, leave them in the ground. If tulips and hyacinths fail to flower, remove them and replant with new bulbs in the fall. The flowering of daffodils decreases over time if they become crowded. If this happens, dig them up, divide, and replant. Often the flowering of recently divided daffodils is poor the first year. The bulbs are small and must go through a season of good growing conditions before they produce enough stored food to flower satisfactorily. If bulbs need to be moved from one place to another, wait until after the foliage has faded before digging and replanting.
Why Bulbs Fail to Perennialize:
Failure of spring-flowering bulbs to perennialize may be related to several factors.
- Plant selection
- Bulb species or cultivar may not be hardy in the climate zone.
- Site conditions and physical damage
- Poor drainage
- Attack by voles or squirrels
- Exposure to air from tunneling moles
- Drought
- Competition from roots of other plants
- Sunlight too limited for adequate photosynthesis
- Disease
- Management errors
- Planted too deep or too shallow
- Inadequate or excess water
- Produced bulbs below minimum size required for flowering
- pH too low or too high
- Bulbs not properly fertilized
- Foliage not left to dry naturally after flowering
Pest Problems
Several insects and related pests can attack flowering bulbs. The most common are aphids, thrips, and mites. Use “Diagnostics” and “Integrated Pest Management” strategies from chapters 7 and 8 to correctly identify the problem and implement management techniques.
Although it is possible for flowering bulbs to become infected by a wide range of diseases, most flowering bulbs are selected for some tolerance or resistance to most of the serious soil-borne diseases. The most prevalent foliar disease of bulbs is caused by a species of Botrytis, also known as "tulip fire." Symptoms of this fungal disease, which spreads quickly in warm, wet weather, include yellowing and shriveling of the leaf tips, followed by development of spots near the leaf margins that increase in size and merge (Figure 10–25). Spots appear on petals followed by rotting and a mushy, gray mold. A preventive measure includes planting on a well-ventilated site in full sun. Remove and destroy any heavily infested bulbs.
In the spring rabbits, voles, and deer may feed on the new foliage of tulips and lilies. Refer to “Wildlife,” chapter 20, for management strategies.
Winter Hardiness and Storage
Traditionally, bulbs are classified as "hardy," "semi-hardy," or "tender." The degree of hardiness varies with soil drainage, winter severity, hardiness zone, depth of planting, and the presence or absence of mulch. Hardy bulbs are left in the ground year round. Semi-hardy bulbs are left in the ground in mild climates but are not reliably hardy in colder climates without applying a 2-inch to 3-inch layer of mulch. In the eastern part of North Carolina, dahlias (Dahlia) survive in the ground through the winter, but they must be dug and stored in the state’s piedmont and mountain regions. Tender bulbs do not tolerate severe freezing and can be left in the ground only in warm climates. Normally they are dug in the fall after frost, stored, and replanted in the spring. Caladiums are very sensitive to cold weather and must be dug in all parts of the state. Refer to Table 10-2 for recommended storage conditions for selected bulbs.
Digging is done in the fall when the foliage turns yellow after a frost. Use a spading fork to gently lift the bulbs from the ground. Do not wash off soil that clings to the bulbs. Spread the bulbs in a shaded place to dry. When dry, store them away from sunlight in a cool, dry basement, closet, or garage. Be sure that air circulates around stored bulbs.
Never store bulbs more than two or three layers deep, as they generate heat and may decay. Leave the soil on achimenes (Achimenes spp.), begonia (Begonia grandis), canna (Canna americanallis), caladium (Caladium bicolor), dahlia (Dahlia), and ismene (Hymenocallis spp.) bulbs. Store these bulbs in clumps on a layer of peat moss or sawdust in a cool place. Clean and separate them just before planting.
Table 10–2. Storage conditions for selected bulbs.
| Bulbs | Harvest and Storage | Temperature |
|---|---|---|
| Achimenes (Achimenses spp.) | Store rhizomes in pots | 50°F to 70°F |
| Amaryllis (Hippeastrum spp.) | Bring container plants indoors in early fall. Keep them growing at 55°F for 8 weeks to 10 weeks to force reflowering. | It is not necessary to let the plants go dormant. |
| Begonia (Tuberosa Group) | Harvest in fall; dry, and store in dry peat | 35°F to 45°F |
| Caladium (Caladium bicolor) | Harvest in fall; dry, and store in mesh bag or in dry sphagnum moss | 70°F to 75°F |
| Calla lily (Zantedeschia spp.) | Store dry | 50°F to 55°F |
| Canna (Canna spp.) | Harvest in fall; dry, and store in dry peat or vermiculite | 41°F to 50°F |
| Crinum (Crinum spp.) | Not commonly stored, but if so in slightly moist sand | 35°F to 45°F |
| Crocosmia (Crocosmia hybrids) | Store so corms do not dry out | 35°F to 41°F |
| Dahlia (Dahlia spp.) | Harvest in fall; dry (do not wash), and store in dry vermiculite or sand | 35°F to 45°F |
| Elephant's ear (Colocasia spp.) | Store dry | 70°F to 75°F |
| Gladiolus (Gladiolus byzantinus) | Harvest after the foliage dies back; store in mesh bags with good air circulation | 41°F |
| Gladiolus (Gladiolus spp.) | Store in dry peat moss | 60°F to 70°F |
| Tritonia (Tritonia sp.) | Harvest rhizomes and store | 35°F to 41°F |
| Tuberose (Agave amica) | Store in plastic bag containing sand or vermiculite | 55°F to 65°F |
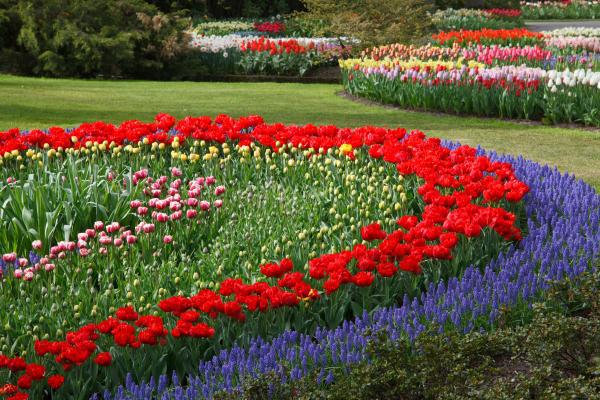
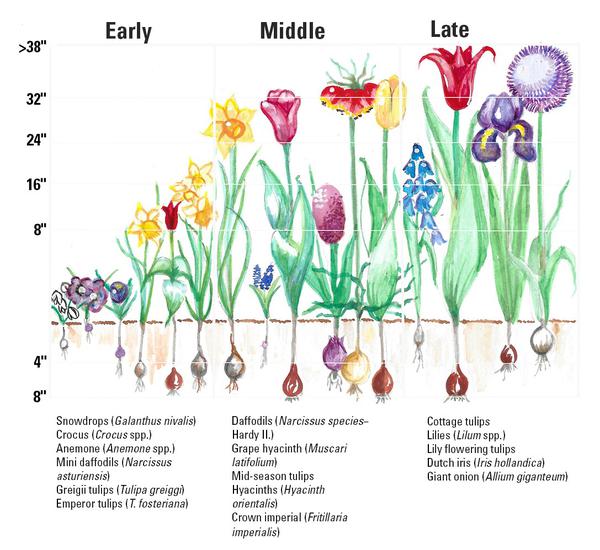
Figure 10–23. Examples of early, mid, and late-season spring-flowering bulbs. Their mature height and planting depth are indicated on the left side.
Renee Lampila
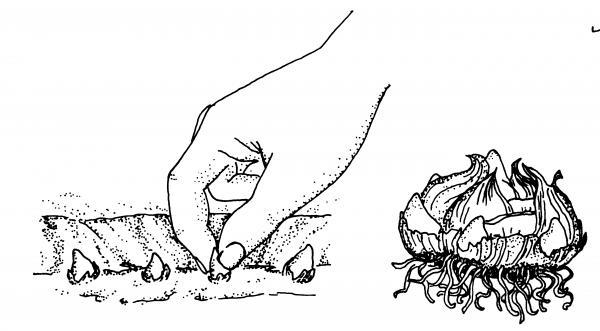
Figure 10–24. Tiny cormels are offsets formed along the edge of a larger corm.
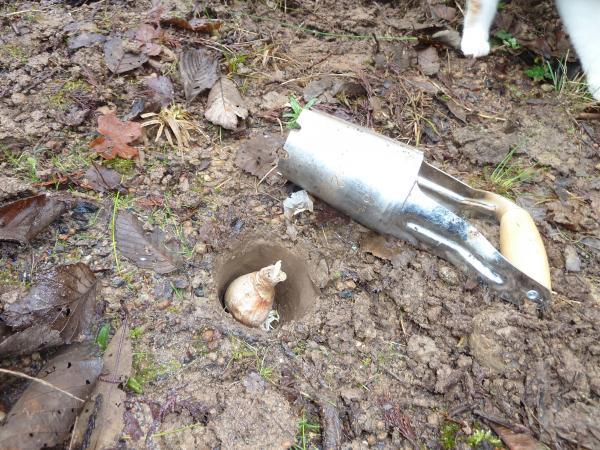
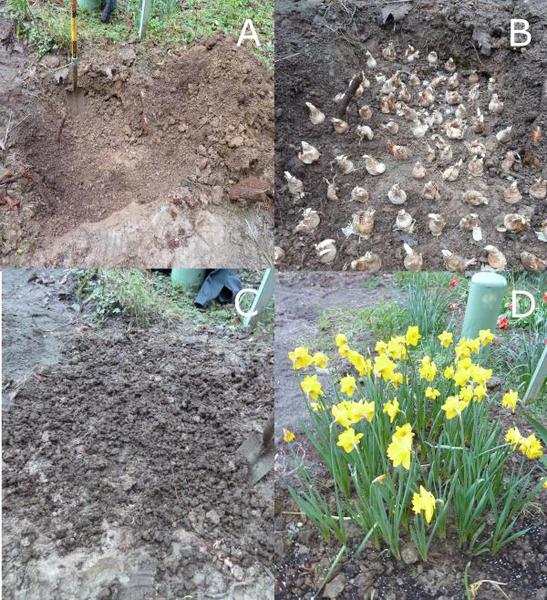
Figure 10–26. A) Remove soil from the entire bed first, B) Lay out bulbs, C) Cover bulbs, D) Enjoy the flowers.
Kathleen Moore CC BY 2.0
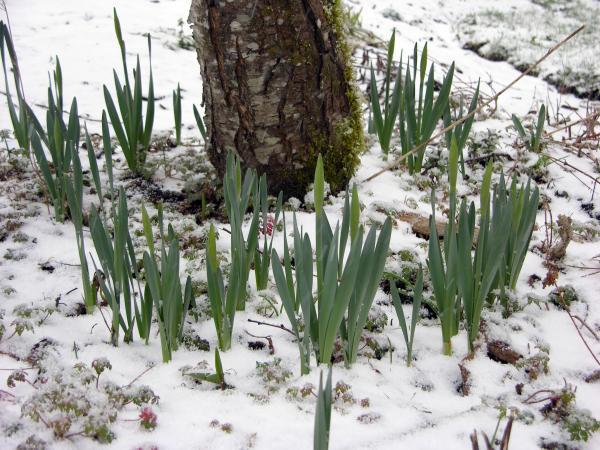
Figure 10–27. Daffodil foliage emerging from the soil in early spring.
Alex O'Neal, Flickr CC BY-SA 2.0
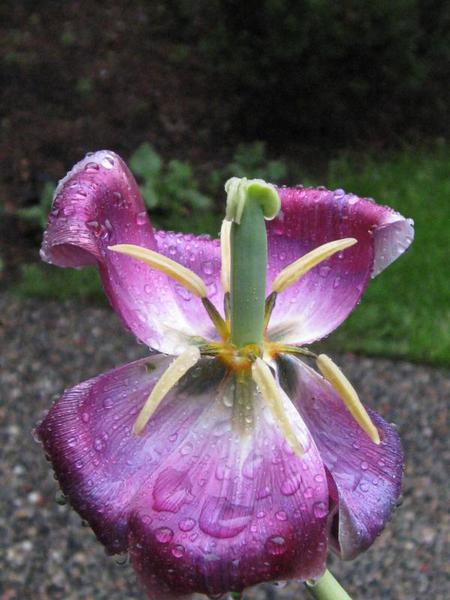
Figure 10–28. Remove faded blooms after flowering so energy goes into the bulb for next year, rather than into making seeds. If this tulip is left alone, the green ovary will grow, diverting energy from root storage into seed development.
Ruth Hartnup, Flickr CC BY 2.0
Wildflowers
North Carolina has an abundance of wildflowers and native plants. Wildflowers can be found in pastures, woodlands, wetlands, along beaches and roadways, and on rocky slopes (Figure 10–29). While many wildflowers can be found growing throughout the state, others naturally occur in only a few isolated locations.
"Wildflower" refers to a plant native to the region that has not undergone any major change or improvement by humans. Many wildflowers are not true natives, but plants that have naturalized after being introduced (accidentally or on purpose) from other parts of the country or world. Cultivars of native wildflowers have also been developed for use in gardens.
While some wildflowers are hardy and easy to grow, others need very specific growing conditions or they decline and die. Some wildflowers are quite weedy and should be avoided except in meadow gardens. Success depends on matching the needs of each type of wildflower to specific site conditions. The North Carolina Extension Gardener Plant Toolbox has more information about specific wildflower plants and their preferred conditions. Select a location that closely resembles the growing conditions in nature; examine sunlight, moisture, and drainage conditions.
Wildflowers can be used in combination with other perennials and annuals in flower beds and borders. Plants that prefer wet conditions can be used in a bog garden, rain garden, or on the edge of a pond or stream. A woodland or informal shade garden is probably the best option for a wooded site. If a site is sunny and dry, a meadow garden may be the best choice. The placement of plants in a design can be very formal, or plants can be grown in a naturalistic setting. Clusters or drifts of wildflowers are quite effective.
Obtaining Plants
Wildflowers can be started from seeds, stem cuttings, division, or root cuttings, or purchased from a nursery as bare root or container-grown plants. An often overlooked strategy is to identify and preserve any native plants that occur naturally in your landscape.
Collecting plants from the wild may seem like an inexpensive method of obtaining plants, but may be illegal and the result is often less than satisfactory. Some wildflowers are endangered or threatened and should never be collected from the wild. The USDA Forest Service does offer limited collection permits for wildflowers. Costs and stipulations vary by region and time of year. For more information, see chapter 12, "Native Plants."
Woodland and Shade Gardens
Native woodland wildflowers have evolved a life cycle that coincides with available sunlight. Rapid growth and flowering occurs from late March through May, then tree leaves develop and significantly reduce sunlight available to plants on the forest floor. As tree leaves develop, wildflower growth and flowering are greatly reduced. Some early spring woodland wildflowers such as mayapple (Podophyllum peltatum) become dormant by midsummer and do not reappear until the following spring.
Shade-loving, summer-blooming, and fall-blooming wildflowers occur along forest edges in filtered or dappled shade; they do not grow in dense shade. To increase the amount of available sunlight for a shade garden, remove some undergrowth and undesirable trees. It is easier to grow wildflowers under some trees than others. Oaks, maples, beeches, and sweetgums have shallow roots and produce heavy shade; only early spring flowers do well near these trees. Wildflowers growing under pine trees are often quite different from those growing under deciduous trees. While the shade from pine is year-round, it is a filtered or dappled shade.
Shade-loving wildflowers have several basic needs: light shade, adequate moisture, soils high in organic matter, and leaf mulch that persists throughout the year. Most woodland wildflowers prefer an acidic soil that is rich in humus. In general, the soil should have adequate moisture but be well-drained. However, wildflowers differ in their moisture needs and tolerance of adverse moisture conditions. Some wildflowers like cardinal flower (Lobelia cardinalis), jewelweed (Impatiens capensis), and forget-me-not (Myosotis sylvatica) actually need boglike conditions. Mayapple (Podophyllum peltatum) and foam flower (Tiarella cordifolia) prefer uniform moisture.
Woodland wildflowers naturally grow in areas where leaves and other plant debris accumulate and become part of the soil environment. Organic matter as mulch is critical for their growth; it helps hold moisture, keeps the soil cool, and helps the soil stay loose and well- aerated. Adding a 3-inch to 5-inch layer of organic matter or leaf compost is ideal. It is usually not necessary to apply lime to raise the soil pH because most North Carolina wildflowers tolerate acidic soils. In woodland settings, it is best to plant container-grown plants. Dig individual holes instead of preparing an entire bed; this minimizes damage to established trees. Fertilizing wildflowers is rarely necessary and can be harmful. Mulching and adding compost is usually adequate.
Each year, the deciduous forests of North Carolina put on a generous display of wildflowers (Figure 10–30). To preserve these woodland wildflower displays for everyone to enjoy, it is important not to harvest plants illegally.
Meadow Gardens
Meadow gardens have increased in popularity, but claims that they need no maintenance and that masses of color appear after simply broadcasting seeds from a mixture are very misleading. Unfortunately, most such attempts at meadow gardening have produced a weed garden because of inadequate site preparation or sowing seeds of wildflowers that were not suitable for local growing conditions. Many of the prepackaged seed mixtures contain mostly annual wildflowers. Read the label closely.
A field or meadow garden is very different from a woodland garden. Meadow wildflowers need full sun for at least 6 to 8 hours a day, adequate moisture early in the year, and a well-drained soil. Soils are generally less fertile and lower in organic matter than the soils in woodland gardens.
Weeds can be a major concern. Select a site that has been cultivated as a lawn or garden. Eliminate weed problems a year before planting. Frequent mowing and hand-pulling will eliminate many problem weeds.
Ideally, prepare the site in midsummer for a fall planting. Spray with a nonselective, nonresidual herbicide in August, and allow the weeds to die before cultivating.
Soil preparation includes cultivation, incorporation of a 2-inch to 4-inch layer of organic matter (such as pine bark or composted yard waste), and a soil test. Amend according to the soil test results. Do not incorporate fertilizer unless the soil is low in nutrients because excessive nitrogen stimulates weeds more than wildflowers. Tilling the soil brings more weed seeds to the soil surface where they can germinate. A few weeks after tilling, lightly till the soil again (1 inch to 2 inches deep) or use a nonselective herbicide to kill newly sprouted weeds. This process may need to be repeated several times to reduce the weed population. The use of a preemergence herbicide is not recommended because it also prevents wildflower seeds from germinating.
Because some seeds require chilling conditions before they germinate, October and November are the best months for seeding a wildflower meadow in North Carolina. Lightly rake the soil surface after seeding to cover the seeds. A light layer of weed-free straw is a good mulch to reduce erosion, improve soil moisture retention, and shade the soil from hot, drying sunlight. Germination of some species occurs within a few weeks after seeding, so water to keep the soil surface moist.
Meadow wildflowers are of two basic types: perennials and annuals that reseed themselves. Allow those that reseed to finish flowering, and the seeds need to become fully mature before the foliage is mowed. Without management, a "natural" planting of wildflowers eventually reverts to a succession of weeds, vines, and volunteer trees. Weed management consists of hand-weeding, fall mowing, and possibly spot treating of weeds with a nonselective, nonresidual herbicide.
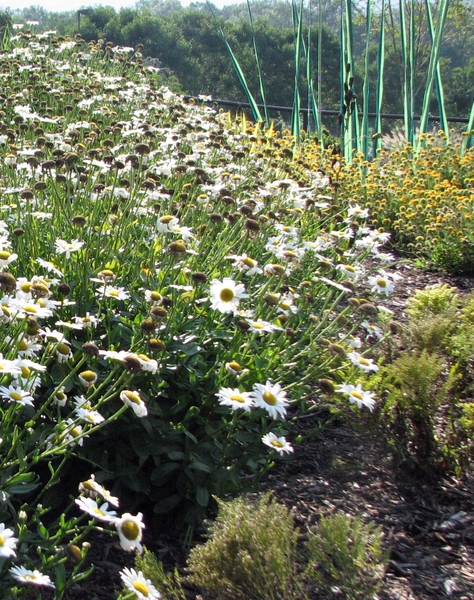
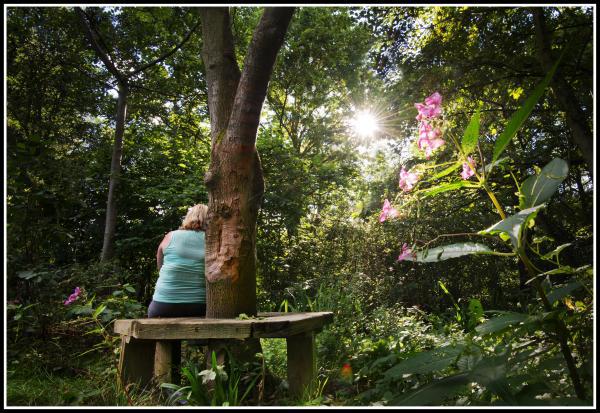
Insects and Diseases of Herbaceous Ornamentals
Although in general herbaceous plants are not insect or disease prone, they do experience occasional problems, and some plants are likely to develop problems every year. To reduce potential problems, select disease-resistant cultivars when possible. Choose a site that is optimal for plant growth, and prepare the soil according to soil test results. Allow adequate spacing between plants, and install a 1-inch to 3-inch layer of organic mulch.
Keeping plants healthy through good cultural practices avoids many pest and disease problems. Most insect pests in the garden do not cause appreciable damage, especially if they are caught early or if natural predators and parasites are allowed to keep a balance. Practice integrated pest management (IPM) strategies to minimize problems. See chapter 8, “IPM,” for specific strategies. Use of a pesticide should be a last resort after all other options have been exhausted. Before using any pesticide, be certain that the pest and the plant species are indicated on the label. Read and follow all directions, including precautions, shown on the label. Read more about pesticide safety in appendix B, “Pesticides and Pesticide Safety.”
Familiarize yourself with the major insect and disease pests of your plants as many insect and disease problems are limited to specific plant species. Soilborne diseases are not as serious a problem for annuals as they are for perennials because annuals grow in the garden for only one season.
Insects and related pests
Spider mites become abundant during dry weather. Their piercing-sucking mouthparts cause stippled spots on the leaf surface as they remove plant fluids from the underside of the leaf. Aphids are found during periods of warm temperatures when rapid, tender growth occurs. The green peach aphid is the most widespread of the many types of aphids. Leaves, stems, and flowers become distorted because the piercing-sucking mouthparts of aphids damage leaf cells when they are young. As the leaf cells expand, leaves appear deformed. Aphids also spread virus diseases and produce honeydew that leads to sooty mold development. Spraying the foliage with a strong stream of water helps to manage spider mites and aphids.
Various plant bugs attack herbaceous plants. Some of the most common ones are four-lined and tarnished plant bugs. Borers tunnel within the stems of some herbaceous plants and cause the stems to be stunted or to fall over. Among the borers that occur most frequently are the burdock borer, European corn borer, iris borer, and stalk borer. Other insects that occur on herbaceous ornamentals include beetles, leaf miners, mealy bugs, thrips, various caterpillars, and whiteflies. Some plants have unique insect problems that do not occur on other plants—for example, the snapdragon lace bug or phlox plant bug. Monitor for insects and related pests during the season when pests normally occur. Remove insects by hand if they are adversely affecting a plant’s appearance. Most insects are not present in sufficient numbers to cause significant damage.
Do not treat for soil insects unless large numbers of cutworms, white grubs, or wireworms are observed when the soil is prepared for planting. Read more about managing insect problems in “IPM,” chapter 8.
Foliage diseases
Although leaf spot diseases caused by fungi are not normally fatal to herbaceous plants, specific cultivars or species can be greatly disfigured. Crowded plants are more likely to develop foliar diseases. Cultural practices are the best preventive measures for disease management. Select resistant plants when possible, remove severely damaged plants, and destroy plant residue in the fall. Improve air circulation and sunlight, and keep water off foliage when irrigating.
Rust is a fungal disease that appears as pale spots on a plant’s upper leaf surfaces and as orange, yellow, or brown pustules on leaf lower surfaces. Many rusts must have an alternate host for survival. Elimination of infected foliage is the best management strategy.
Botrytis blight is a fungal disease caused by Botrytis cinera. It attacks leaves, stems, and flowers, covering them with fuzzy, grayish-black tissue.
Some leaf spots are caused by bacteria; the management is the same as for fungal leaf spots except chemical options are less effective. To help manage bacterial diseases, improve air circulation, reduce overcrowding, and remove and destroy infected foliage.
Powdery mildew appears as a powdery, gray, or almost white growth on the leaves that is easily rubbed off. Some relief is achieved with fungicidal sprays. Downy mildew occurs on the lower sides of leaves, causing pale-green or yellow spots to appear on the upper leaf surfaces. Remove affected foliage, remove weeds, and keep the foliage dry by watering the soil with a soaker hose instead of an overhead sprinkler. Read more about “Diseases” in chapter 5.
Soil diseases
Herbaceous ornamentals commonly develop several soil or root diseases. Damping-off disease causes young seedlings to collapse when a fungus attacks the stem near the soil line. Sanitation and well-drained soils help to prevent the disease. Crown gall is caused by bacteria that enter through a wound and is characterized by galls forming on the roots or at the base of the stems. Chemical management is not effective; remove and destroy infected plants.
A number of soilborne fungi can cause stem and root rots. Feeder roots attacked by Pythium species become gray or brown. Rhizoctonia species cause the stem at the soil line to turn brown and shrivel. Avoid planting too deeply and improve soil aeration and drainage. A species of the fungus Sclerotinia causes brown stem cankers. Stems develop round black knots of fungal tissue on the stem surface and in the pith, and a white cottony fungus is often visible at the soil line. Remove and dispose of plants exhibiting root diseases to reduce the spread of infection to nearby plants. Also remove soil adjacent to the roots.
Some herbaceous plants are susceptible to wilts caused by species of two other soilborne fungi: Fusarium and Verticillium. An infected plant often appears healthy until subjected to drought or hot temperatures. While the roots remain viable, the vascular system becomes clogged, and the plant may be stunted, develop yellow foliage, or wilt and die. Select resistant cultivars if possible, keep foliage dry, and remove infected plants and debris.
Case Study—Think about IPM: Bee Balm in Distress
Some of your bee balm plants (Monarda didyma) look sick. You wonder what is wrong with them and what you can do to improve their appearance. You review the diagnostic procedures from chapter 7, “Diagnostics,” and think about the five steps for IPM:
- Monitor and scout to determine pest type and population levels.
- Accurately identify host and pest.
- Consider economic or aesthetic injury thresholds. A threshold is the point at which action should be taken.
- Implement a treatment strategy using physical, cultural, biological, or chemical management, or combine these strategies.
- Evaluate success of treatments.
1. Monitor and scout to determine pest type and population levels.
You have several bee balm plants in your landscape. It is early fall, and you have noticed that two of your bee balm plants are declining. There is a white powdery substance on the leaves (Figure 10–31). A sample could be sent to the Plant Insect and Disease Clinic at NC State, but a cost-effective approach involves digging into some diagnostic questions.
2. Accurately identify the host and pest.
- Step 1. Identify the plant: You look through your garden journal and verify on your landscape design that the affected plants are bee balm (Monarda didyma).
- Step 2. Describe the problem: Two of the 10 bee balm plants have a white powder on the leaves and stems. Some of the leaves look disfigured.
- Step 3. Identify what is normal:
- What does the healthy part of the plant look like? The healthy bee balm in the same bed has bright-green leaves. The parts of the affected plant that still look healthy are the older growth.
- What does the unhealthy part of the plant look like? The new growth has smaller leaves that are distorted. A white powdery substance is visible, mostly concentrated on the younger leaves and on some stems.
- Have you had a soil test? Yes, and it showed I needed to add lime, which I did add to the bed along with compost at the time of planting. (For information on how to submit a soil test see chapter 1, “Soils and Plant Nutrients.”)
- Step 4. Cultural practices:
- Describe the age and history of plant: The bee balm plants are three years old and have been growing well since they were planted.
- Irrigation: Now that the weather has cooled off, they are watered once a week with a soaker hose for 2 hours after the sun rises.
- Fertilizer: I have added a 2-inch layer of compost every fall plus fertilizer recommended on my soil test results.
- Maintenance: I have been diligent about keeping weeds out of the bed, pruning, deadheading, and removing any fallen material.
- Step 5. Environmental conditions:
- Are there any significant water issues? It was a very hot, dry summer. We did go on vacation, and the bee balm looked a little wilted when we returned. The soil absorbs water readily; there is no standing water when irrigating or after rain.
- Describe the light near this garden bed. How many hours of sunlight? This bed gets about 6½ hours of full sun a day. There is a maple tree nearby that does shade the bee balm in the afternoon. The plants that are affected are the ones that receive the most shade.
- Describe any recent changes or events: We put in a new paver patio that is adjacent to this bed.
- Step 6. Signs of pathogens:
- On the buds/flowers: There is some of the powdery white substance on some of the buds.
- On the leaves: No insects are visible, white powdery substance is visible on the leaves and some stems.
- On the stems: There is some of the powdery white substance on some of the stems.
- On the roots: Nothing visible.
- On the soil: No insects are visible. No pathogens are visible on the soil.
- Step 7. Symptoms:
- On the leaves: The new leaves are disfigured.
- On the roots: No foul odor is detected coming from the soil. (Looking for a root pathogen at this point would require digging up the plants. Because this is a destructive procedure, it was not attempted.)
- Step 8. Distribution of damage in the landscape:
- Are other plants in the landscape affected? The zucchini plants in the garden have the same white powdery substance on the leaves.
- Step 9. Distribution of damage on the plant and specific plant parts:
- Where is the damage visible on the plant? On the aboveground portions of the plant on new leaves and buds.
- Step 10. Timing:
- When did you notice this problem? Yesterday when I went out to water. The bee balm plants looked good last week when I checked on them.
You hypothesize that this is a disease rather than an insect and that it is a foliar problem and not a root problem. You look up the disease section in a resource guidebook and discover a photo that looks like your powdery leaves (Figure 10–32). Now that you have a likely identification, you do more research on this disease. You search extension.org or type in “powdery mildew + edu” into your Internet search engine to find university-based resources. The first few links that come up name powdery mildew as a common fungal disease.
Steps 6 and 7 lead us to believe we are dealing with a pathogen. Steps 2, 4, 5, 9, and 10 support our theory that this is powdery mildew.
3. Consider economic or aesthetic injury thresholds.
Powdery mildew is not fatal, and with some management strategies, the bee balm can move into spring with a fresh start.
4. Implement a treatment strategy using physical, cultural, biological, or chemical management, or combine these strategies.
You research strategies to manage powdery mildew.
- Physical. You discover powdery mildew thrives in warm, humid, shady locations with poor air circulation. Planting in sunny locations with plenty of room around the plants for air to move is less favorable for disease. The current location of the bee balm is not ideal with the close proximity of other shrubs and shade from the maple tree. The planting bed cannot be moved, but the maple tree can be pruned up to increase sunlight and the bee balm can be pruned to help airflow. You read that powdery mildew on deciduous plants can come on late in the growing season and that it is generally not fatal. Powdery mildew is dormant in the winter. In the dormant season, all infected branches, buds, and plant material can be removed and disposed of so as to not spread spores. You will carefully remove all infected material later this fall. In the spring, close monitoring of plants that have been infected previously can help identify any re-infections early. If it is early in the growing season, affected leaves can be removed and disposed of.
- Cultural. You find that fertilizers high in nitrogen can cause a flush of new growth, making plants more susceptible, so careful monitoring of fertilizer application is important. You recall not exactly following the soluble fertilizer label directions and just adding a “scoop” to their watering can a few months ago. You plan to avoid doing that in the future. You discover there are many powdery-mildew-resistant varieties of bee balm, such as ‘Purple Mildew Resistant’ and ‘Marshalls Delight’, which can be planted if this plant does not survive or if you are interested in planting any new bee balm plants.
- Chemical. For recommended fungicides and rates, consult the current North Carolina Agricultural Chemicals Manual. Given that it is late in the season, that powdery mildew is not usually serious, and that other measures are being taken, fungicide applications are not justified, saving you time and money.
5. Evaluate success of treatments.
Keeping a garden journal or notes about the management strategies tried and their results provides valuable data for making garden decisions in the future. Some of the management strategies you researched may take more time to see results, and having a written record helps to jog your memory. If the problem continues in the spring or the plant is declining further, you can reevaluate your management strategies and even consider additional diagnostic work.
.jpg)
Frequently Asked Questions
- How do I fertilize my bulbs so they return every year? To encourage spring-flowering bulbs to bloom subsequent years, apply a complete nitrogen fertilizer in the fall and again in the spring when shoots appear. Fertilize summer-flowering bulbs when shoots appear in the spring. A second application may be needed in mid to late summer. Be sure to follow the recommendations on the soil test report and manufacturer’s directions. Water in the fertilizer so that it becomes available to the plant. For additional reference, refer to NC State Extension publication HIL-551, Bed Preparation and Fertilization Recommendations for Bedding Plants in the Landscape.
- Can you suggest some annuals that tolerate hot, dry sites? No site is without stress, but a few things can be done to minimize stress. Begin with evaluating the soil texture. If it is sandy, then the addition of pine bark humus, composted leaf mold, or peat moss improves water retention. Adding lime and nutrients to the bed based on a soil test also improves plant nutrition. Bedding plants grown in sandy soils may require watering as frequently as two to three times per week. Use heat-loving, drought-tolerant annuals—such as Mexican heather (Cuphea hyssopifolia), blanket flower (Gaillardia pulchella), lantana (Lantana camara), red fountain grass (Cenchrus setaceus), mealycup sage (Salvia farinacea), moss rose or purslane (Portulaca grandiflora), creeping zinnia (Zinnia angustifolia), globe amaranth (Gomphrena globosa), celosia (Celosia argentea var. plumosa), cosmos (Cosmos sulphureus), verbena (Verbena × hybrida), and Madagascar periwinkle (Catharanthus roseus). For additional reference, refer to NC State Extension publication HIL 552, Selection and Use of Stress-Tolerant Bedding Plants for the Landscape.
- When is the best time to plant annuals? Annuals, as their classification implies, complete their entire life cycle in one year and are classified by horticulturists as hardy, half-hardy, or tender. Plant hardy plants in late fall to early spring. Plant half-hardy plants after the last frost date in spring. Wait to plant tender annuals until soil is warm. To expand your selection of annuals, consider starting plants from seed. Study seed packets for recommended planting dates. Zones recommended for planting apply to heat as well as frost dates.
- My petunias are wilting and dying, and the roots have rotted off. What should I do? Petunias are susceptible to several root and crown rot diseases if planted in poorly drained soils or watered too often. Two common crown rots are caused by species of Phytophthora and Rhizoctonia. To confirm the pathogen, submit a plant sample along with soil and roots to the NC State Plant Disease and Insect Clinic. Chemical management of these diseases is generally not practical or economical in the home landscape. It is best to correct the wet soil condition. Ensure the site has good drainage by amending the soil, and avoid overwatering and overfertilizing. Rotate petunias with other annuals to prevent disease build-up. Furthermore, many diseases are introduced into our gardens on the plants we purchase. Therefore, be sure to inspect plants before purchase, and avoid buying plants that appear unhealthy.
Further Reading
Adams, Denise Wiles. Restoring American Gardens: An Encyclopedia of Heirloom Ornamental Plants, 1640-1940. Portland, Oregon: Timber Press, Inc., 2004. Print.
Armitage, Allan M. Armitage's Garden Perennials. 2nd ed. Portland, Oregon: Timber Press, Inc., 2011. Print.
Armitage, Allan M. Herbaceous Perennial Plants: A Treatise on Their Identification, Culture and Garden Attributes. 3rd ed. Champaign, Illinois: Stipes Publishing L.L.C., 2008. Print.
Ball, Jeff, and Liz Ball. Rodale's Flower Garden Problem Solver. Emmaus, Pennsylvania: Rodale Press, Inc., 1990. Print.
Bryan, John E. Timber Press Pocket Guide to Bulbs. Portland, Oregon: Timber Press, Inc., 2005. Print.
Chaplin, Lois Trigg. The Southern Gardener's Book of Lists: The Best Plants for All Your Needs, Wants, and Whims. Lanham, Maryland: Taylor Trade Publishing, 1994. Print.
Cox, Jeff. Perennial All-Stars: The 150 Best Perennials for Great-Looking, Trouble-Free Gardens. Emmaus, Pennsylvania: Rodale Press, Inc., 1998. Print.
Darke, Rick. The Encyclopedia of Grasses for Livable Landscapes. Portland, Oregon: Timber Press, Inc., 2007. Print.
DeWolf, Jr., Gordon P, ed. Taylor's Guide to Ground Covers, Vines, and Grasses. New York: Houghton Mifflin Company, 1987. Print.
DiSabato-Aust, Tracy. The Well-Tended Perennial Garden: Planting and Pruning Techniques. Expanded Edition. Portland, Oregon: Timber Press, Inc., 2006. Print.
Dole, John M., and Harold F. Wilkins. Floriculture: Principles and Species. 2nd ed. Upper Saddle River, New Jersey: Prentice Hall, Inc., 2004. Print.
Ellis, Barbara. Taylor's Guide to Annuals: How to Select and Grow More than 400 Annuals, Biennials, and Tender Perennials. New York: Houghton Mifflin Company, 1999. Print.
Ellis, Barbara. Taylor's Guide to Perennials: More than 600 Flowering and Foliage Plants, Including Ferns and Ornamental Grasses. New York: Houghton Mifflin Company, 2000. Print.
Hanson, Beth, ed. Spring-Blooming Bulbs: An A to Z Guide to Classic and Unusual Bulbs for Your Spring Garden. Brooklyn, New York: Brooklyn Botanic Garden, 2002. Print.
Hanson, Beth, ed. Summer-Blooming Bulbs: Scores of Spectacular Bloomers for Your Summer Garden. Brooklyn, New York: Brooklyn Botanic Garden, 2001. Print.
Hessayon, D. G. The Bulb Expert. London: Expert Books, 1995. Print.
Hodgson, Larry. Making the Most of Shade: How to Plan, Plant, and Grow a Fabulous Garden That Lightens up the Shadows. Emmaus, Pennsylvania: Rodale Press, Inc.., 2005. Print.
Hudak, Joseph. Gardening with Perennials Month by Month. 2nd ed. 1993. Portland, Oregon: Timber Press, Inc., 2000. Print.
Johnson, Eric A., and Scott Millard. The Low-Water Flower Gardener. Littleton, Colorado: Ironwood Press, 1996. Print.
MacKenzie, David S. Perennial Ground Covers. 1997. Portland, Oregon: Timber Press, Inc., 2003. Print.
McGary, Jane, ed. Bulbs of North America. Portland, Oregon: Timber Press, Inc., 2001. Print.
McKinley, Michael, ed. Ortho's All about the Easiest Flowers to Grow. Des Moines, Iowa: Meredith Books, 2001. Print.
Mickel, John T. Ferns for American Gardens. 1994. Portland, Oregon: Timber Press, Inc., 2003. Print.
Ogden, Scott. Garden Bulbs for the South. 2nd ed. Portland, Oregon: Timber Press, Inc., 2007. Print.
Peace, Tom. Sunbelt Gardening: Success in Hot-Weather Climates. Golden, Colorado: Fulcrum Publishing, 2000. Print.
Phillips, Ellen, and C. Colston Burrell. Rodale's Illustrated Encyclopedia of Perennials: 10th Anniversary Revised and Expanded Edition. Emmaus, Pennsylvania: Rodale Press, Inc., 2004. Print.
Rogers, Ray. The Encyclopedia of Container Plants: More than 500 Outstanding Choices for Gardeners. Portland, Oregon: Timber Press, Inc., 2010. Print.
Schmid, W. George. An Encyclopedia of Shade Perennials. 2002. Portland, Oregon: Timber Press, Inc., 2003. Print.
Schrock, Denny, ed. Ortho All about Perennials. Hoboken, New Jersey: John Wiley & Sons Inc., 2007. Print.
Still, Steven M. Manual of Herbaceous Ornamental Plants. 4th ed. Champaign, Illinois: Stipes Publishing L.L.C., 1994. Print.
Sullivan, Barbara J. Garden Perennials for the Coastal South. Chapel Hill, North Carolina: The University Of North Carolina Press, 2002. Print.
Sunset Annuals and Perennials. Menlo Park, California: Sunset Publishing Corporation, 2002. Print.
Welch, William C. Perennial Garden Color. 1989. College Station, Texas: Texas A&M University Press, 2012. Print.
Chapter Text Hyperlinks
North Carolina Extension Gardener Plant Toolbox
JC Raulston Arboretum at NC State University
Changing pH in Soil, by Paul Vossen, University of California Cooperative Extension
Weed Control in Pansy Beds, by Joseph C. Neal, North Carolina State University
City of Raleigh Pine Straw Ordinance
Colored Bark Mulch, by Ron Kujawski, University of Massachusetts, Amherst
USDA Forest Service Wildflower Collection Permits
NCDA Agronomic Services – Soil Test Forms & Information
USDA “Understanding the Soil Test Report”
How to Submit a Sample, North Carolina Plant Disease and Insect Clinic
North Carolina Agricultural Chemicals Manual
Bed Preparation and Fertilization Recommendations for Bedding Plants in the Landscape, HIL-551
Selection and Use of Stress-Tolerant Bedding Plants for the Landscape, HIL-552
Annuals Recommended for Pender County Landscapes
For More Information
-
NC State Resources
- Annual Flowers
- Bed Preparation and Fertilization for Bedding Plants, HIL-551
- Diseases of Ornamentals
- Entomology Insect Notes
- Insect and Related Pests of Flowers and Foliage Plants, AG-136
- Landscape Publications
- Plant Identification, The Herbarium
- Stress-Tolerant Bedding Plants, HIL-552
- Weed Control in Pansy Beds, by Joseph C. Neal, North Carolina State University
More NC State Resource
Other Resources
- Changing pH in Soil, University of California
- Colored Bark Mulch, University of Massachusetts, Amherst
- Cut flowers, Royal Horticultural Society
- Floriculture InfoSearch website
- Flower Growing Guides, Cornell University
- Gardening for Honey Bees, Indiana Department of Natural Resources
- Map & Plant List, Chanticleer Garden, Wayne, PA
- Pine Straw Ordinance, City of Raleigh
- Trial Gardens at UGA
- Wildflower Collection Permits, USDA Forest Service
- Woody Ornamentals for Cut Flower Growers, by ATTRA
Videos
- Cutting Garden Flowers, Virginia Farm Bureau (4:01 minutes)
- Gardening Tips, Smithsonian Butterfly Habitat Garden (2:02 minutes)
Contributors
Author: Toby Bost, Horticulturist, Author
Contributions by Extension Agents: Cyndi Lauderdale, Debbie Dillion, Sam Marshall, Susan Brown, Pam Jones, Ben Grandon, Paige Patterson
Contributions by Extension Master Gardener℠ Volunteers: Renee Lampila, Barbara Goodman, Sue Davis, Jackie Weedon, Karen Damari, Connie Schultz, Bethany Sinnott, Gloria Polakof, Cynthia Wagoner, Linda Mahoney, Kim Curlee, Caro Dosé
Content Edits: Lucy Bradley, Associate Professor and Extension Specialist, Urban Horticulture, NC State University; Director, NC State Extension Master Gardener℠ program; Kathleen Moore, Urban Horticulturist
Copy Editor: Barbara Scott
Based on text from the 1998 Extension Master Gardener℠ manual prepared by:
Erv Evans, Extension Associate, Department of Horticultural Science
Contributions from:
Doug Bailey, Extension Specialist, Department of Horticultural Science
Gus De Hertogh, Professor, Department of Horticultural Science
How to cite this chapter:
Bost, T. 2022. Herbaceous Ornamentals, Chapter 10. In: K.A. Moore, and. L.K. Bradley (eds). North Carolina Extension Gardener Handbook, 2nd ed. NC State Extension, Raleigh, NC. <http://content.ces.ncsu.edu/10-herbaceous-ornamentals>
Publication date: Feb. 1, 2022
AG-831
Other Publications in North Carolina Extension Gardener Handbook
- 1. Soils & Plant Nutrients
- 2. Composting
- 3. Botany
- 4. Insects
- 5. Diseases and Disorders
- 6. Weeds
- 7. Diagnostics
- 8. Integrated Pest Management (IPM)
- 9. Lawns
- 10. Herbaceous Ornamentals
- 11. Woody Ornamentals
- 12. Native Plants
- 13. Propagation
- 14. Small Fruits
- 15. Tree Fruit and Nuts
- 16. Vegetable Gardening
- 17. Organic Gardening
- 18. Plants Grown in Containers
- 19. Landscape Design
- 20. Wildlife
- 21. Youth, Community, and Therapeutic Gardening
- Appendix A. Garden Journaling
- Appendix B. Pesticides and Pesticide Safety
- Appendix C. Diagnostic Tables
- Appendix D. Garden Tools
- Appendix E. Season Extenders and Greenhouses
- Appendix F. History of Landscape Design
- Appendix G. Permaculture Design
- Appendix H. Community Gardening Resources
- Appendix I. More NC State Resources
- Glossary
N.C. Cooperative Extension prohibits discrimination and harassment regardless of age, color, disability, family and marital status, gender identity, national origin, political beliefs, race, religion, sex (including pregnancy), sexual orientation and veteran status.